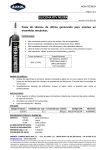
1
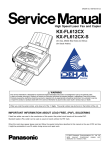
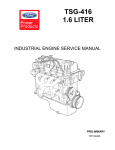
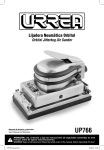
1997 Aerostar/Ranger
Page 1 of 1
Section 06-02: Brakes, Rear Drum
REMOVAL AND INSTALLATION
1997 Aerostar, Ranger Workshop Manual
Lugnut Torque Requirement
NOTE: Torque specification is for nut and bolt threads free of dirt and rust. Do NOT use oil or grease
on threads. Use only Ford recommended replacement fasteners.
Tighten lugnuts to 135 Nm (100 lb-ft).
[email protected]
file://C:\TSO\tsocache\VDTOM_5368\SVK~us~en~file=SVK62007.HTM~gen~ref.HTM
2011-04-28
1997 Aerostar/Ranger
Page 1 of 4
Section 06-02: Brakes, Rear Drum
REMOVAL AND INSTALLATION
1997 Aerostar, Ranger Workshop Manual
Brake Drum
WARNING: DO NOT INHALE DUST FROM BRAKES OR ASSOCIATED COMPONENTS.
INHALATION OF DUST CAN BE INJURIOUS TO YOUR HEALTH. COMPRESSED AIR OR BRUSHES
MUST NOT BE USED TO CLEAN BRAKES, BRAKE DRUMS (1126) AND ASSOCIATED
COMPONENTS. A VACUUM CLEANER, SUCH AS ROTUNDA BRAKE/CLUTCH/SERVICE VACUUM
091-R0001 OR EQUIVALENT, EQUIPPED FOR THIS PURPOSE SHOULD BE CAREFULLY USED TO
REMOVE ANY DUST. ADHERENT DUST SHOULD BE REMOVED WITH A DAMP RAG. ANY DUST
SHOULD BE CONTAINED IN A SEALED AND LABELED BAG FOR DISPOSAL. WEAR AN APPROVED
HIGH EFFICIENCY CARTRIDGE OR AIR LINE RESPIRATOR AND USE EXTRA CAUTION TO AVOID
BREATHING THIS DUST. ALWAYS USE NON-ASBESTOS REPLACEMENT PARTS.
Removal
1. Raise and support the vehicle so the wheel (1007) is clear of the floor.
2.
CAUTION: Use of a drum puller or a torch is not recommended. Drum distortion may
result.
Remove the hub cap, if equipped, and wheel.
3. Remove the retaining nut and remove the brake drum.
4.
CAUTION: Loosen the adjusting screw only if the brake drum cannot be removed. Do not
burr, chip or damage the notches in the adjusting screw assembly or the self adjusting
mechanism will not function properly.
If the brake drum is rusted to the axle shaft pilot, use coarse sandpaper or file to remove the rust
buildup, then work the brake drum off.
If the brake drum will not come off, insert a narrow screwdriver through the brake adjusting
hole in the brake backing plate (2211), and disengage the adjusting lever from the brake
adjusting screw assembly. While holding the adjusting lever away from the brake adjusting
[email protected]
file://C:\TSO\tsocache\VDTOM_5368\SVK~us~en~file=SVK62008.HTM~gen~ref.HTM
2011-04-28
1997 Aerostar/Ranger
Page 2 of 4
screw assembly, loosen the brake adjusting screw assembly with Brake Adjustment Tool
D81L-1103-C or equivalent.
Ranger
Aerostar
[email protected]
file://C:\TSO\tsocache\VDTOM_5368\SVK~us~en~file=SVK62008.HTM~gen~ref.HTM
2011-04-28
1997 Aerostar/Ranger
Page 3 of 4
Installation
1. If a new brake drum is to be installed, remove the protective coating from the new brake drum with
carburetor degreaser or equivalent.
2. Adjust the rear brake shoe and lining (2200) as described in this section using Brake Adjustment
Gauge D81L-1103A or equivalent. Brake drum turning may be performed as long as the maximum
inside diameter is not exceeded. The maximum inside diameter is cast into the drum face.
3. Install the brake drum.
4. Install the wheel on the wheel hub bolts against the brake drum, and tighten the lug nuts (1012) to
135 Nm (100 lb-ft).
[email protected]
file://C:\TSO\tsocache\VDTOM_5368\SVK~us~en~file=SVK62008.HTM~gen~ref.HTM
2011-04-28
1997 Aerostar/Ranger
Page 4 of 4
[email protected]
file://C:\TSO\tsocache\VDTOM_5368\SVK~us~en~file=SVK62008.HTM~gen~ref.HTM
2011-04-28
1997 Aerostar/Ranger
Page 1 of 16
Section 06-02: Brakes, Rear Drum
REMOVAL AND INSTALLATION
1997 Aerostar, Ranger Workshop Manual
Brake Shoes and Lining
SPECIAL SERVICE TOOL(S)
REQUIRED
Description
Tool Number
Hold-Down Spring Tool T73T-2300-A
CAUTION: To ensure correct assembly, note the position of each part removed.
Removal
1. Remove the wheel (1007) and brake drum (1126).
2. NOTE: If the boots are not removed, brake fluid leakage past the cups may go undetected
because the boots may seal the fluid in the rear wheel cylinder. If leaks are found, the rear
wheel cylinder must be repaired or replaced.
Inspect rear wheel cylinder for signs of leaks or presence of rust by removing the boots and
inspecting interior surfaces. Water leaking into the rear wheel cylinder past the boots will cause rust
to form and may cause the rear wheel cylinder to seize.
3. If no leaks are found, install brake cylinder clamp over the ends of the rear wheel cylinder as shown.
4. Remove the brake shoe retracting springs.
[email protected]
file://C:\TSO\tsocache\VDTOM_5368\SVK~us~en~file=SVK62009.HTM~gen~ref.HTM
2011-04-28
1997 Aerostar/Ranger
Page 2 of 16
5. Remove the brake shoe adjusting lever cable from the anchor pin, cable guide and adjusting lever.
6. Remove the cable guide from the secondary brake shoe and lining web.
7. Remove the adjusting lever and adjusting lever return spring.
8. Remove the brake shoe adjusting screw spring.
9. Using Hold-Down Spring Tool T73T-2300-A, remove the brake shoe hold-down spring and pin from
each rear brake shoe and lining (2200).
10. Remove the brake shoe adjuster assembly.
11. Remove the primary brake shoe parking brake lever link and parking brake link spring.
12. Remove the parking brake rear cable and conduit (2A635) from the parking brake lever.
13. Remove the rear brake shoe and lining from the vehicle.
14. Remove the parking brake lever from the secondary rear brake shoe and lining.
[email protected]
file://C:\TSO\tsocache\VDTOM_5368\SVK~us~en~file=SVK62009.HTM~gen~ref.HTM
2011-04-28
1997 Aerostar/Ranger
Page 3 of 16
Rear Brake, Ranger
Item
Part Number
Description
1
2069
Brake Shoe Hold-Down Spring Pin
2
—
Anchor Pin (Part of 2211)
3
2028
Brake Shoe Anchor Pin Guide Plate
4
2A637
Parking Brake Lever
5
2296
Brake Shoe Retracting Spring (Short)
6
2296
Brake Shoe Retracting Spring (Long)
7
2200
Rear Brake Shoe and Lining (Secondary)
8
351467-S
Washer
9
2106
Parking Brake Lever Pin Retainer
[email protected]
file://C:\TSO\tsocache\VDTOM_5368\SVK~us~en~file=SVK62009.HTM~gen~ref.HTM
2011-04-28
1997 Aerostar/Ranger
Page 4 of 16
10
2A179
Cable Guide
11
2068
Brake Shoe Hold-Down Spring
12
2A642
Primary Brake Shoe Parking Brake Lever Link
13
2A601
Parking Brake Link Spring
14
2A176
Brake Shoe Adjusting Lever
15
2048
Brake Shoe Adjusting Screw Stud
16
372583-S
Thrust Washer
17
2047
Brake Shoe Adjusting Screw Nut
18
2041
Brake Adjuster Screw
19
2049
Brake Shoe Adjusting Screw Spring
20
2200
Rear Brake Shoe and Lining (Primary)
21
2A178
Brake Shoe Adjusting Lever Cable
22
2211
Brake Backing Plate
Rear Brake, Aerostar
Item
Part Number
Description
1
2069
Brake Shoe Hold-Down Spring Pin
2
—
Anchor Pin (Part of 2211)
3
2028
Brake Shoe Anchor Pin Guide Plate
4
2A637
Parking Brake Lever
5
2296
Brake Shoe Retracting Spring (Short)
6
2296
Brake Shoe Retracting Spring (Long)
7
2200
Rear Brake Shoe and Lining (Secondary)
8
351467-S
Washer
9
2106
Parking Brake Lever Pin Retainer
[email protected]
file://C:\TSO\tsocache\VDTOM_5368\SVK~us~en~file=SVK62009.HTM~gen~ref.HTM
2011-04-28
1997 Aerostar/Ranger
Page 5 of 16
10
2A179
Cable Guide
11
2068
Brake Shoe Hold-Down Spring
12
2A642
Primary Brake Shoe Parking Brake Lever Link
13
2A601
Parking Brake Link Spring
14
2A787
Parking Brake Spring Retainer
15
2A176
Brake Shoe Adjusting Lever
16
2048
Brake Shoe Adjusting Screw Socket
17
372583-S
Thrust Washer
18
2041
Brake Adjuster Screw
19
2047
Brake Shoe Adjusting Screw Nut
20
2049
Brake Shoe Adjusting Screw Spring
21
2200
Rear Brake Shoe and Lining (Primary)
22
2A178
Brake Shoe Adjusting Lever Cable
23
2211
Brake Backing Plate
Installation
1. Clean the ledge pads on the brake backing plate.
2. Apply a light coating of Disc Brake Caliper Slide Grease D7AZ-19590-A or equivalent meeting Ford
specification ESA-M1C172-A at the points where the brake shoes touch the brake backing plate.
3. Before installing the rear brake shoes and linings, assemble the parking brake lever on the secondary
shoe and, on ten-inch brakes, secure with the spring washer and parking brake lever pin retainer.
4. Position the rear brake shoe and lining on the brake backing plate (2211), and install the brake shoe
hold-down spring pins, brake shoe hold-down springs, and brake shoe hold-down spring cups using
Hold-Down Spring Tool T73T-2300-A. Install the primary brake shoe parking brake lever link, parking
brake link spring, and washer. Connect the parking brake rear cable and conduit to the parking brake
lever.
[email protected]
file://C:\TSO\tsocache\VDTOM_5368\SVK~us~en~file=SVK62009.HTM~gen~ref.HTM
2011-04-28
1997 Aerostar/Ranger
Page 6 of 16
5. Install the brake shoe anchor pin guide plate. Place the brake shoe adjusting lever cable anchor over
the anchor pin with the crimped side away from the brake backing plate.
Aerostar
[email protected]
file://C:\TSO\tsocache\VDTOM_5368\SVK~us~en~file=SVK62009.HTM~gen~ref.HTM
2011-04-28
1997 Aerostar/Ranger
Page 7 of 16
Ranger
6. Install the primary shoe-to-anchor (short) spring using a brake spring removal/installation tool.
[email protected]
file://C:\TSO\tsocache\VDTOM_5368\SVK~us~en~file=SVK62009.HTM~gen~ref.HTM
2011-04-28
1997 Aerostar/Ranger
Page 8 of 16
7. NOTE: Make sure the brake shoe adjusting lever cable is positioned in the groove, and not
between the cable guide and the shoe web.
Install the cable guide on the secondary shoe web with the flanged holes fitted into the hole in the
secondary shoe web. Thread the brake shoe adjusting lever cable around the cable guide groove.
8. NOTE: Make sure the cable end is not cocked or binding on the anchor pin when installed. All
parts should be flat on the anchor pin.
Install the secondary shoe-to-anchor (long) spring.
9. Remove the wheel cylinder clamp.
10.
CAUTION: Install the brake adjuster screw in the same location from which it was
removed. Interchanging the brake adjuster screws from one side of the vehicle to the other
will cause the rear brake shoe and lining to retract rather than expand each time the automatic
adjusting mechanism is operated.
NOTE: For Aerostar, to prevent incorrect installation, the socket end of each brake shoe
adjusting screw is stamped with R or L to indicate their installation on the right or left side of
the vehicle. The brake shoe adjusting screw nuts can be distinguished by the number of lines
machined around the body of the nut. Two lines indicate a right-hand nut; one line indicates a
left-hand nut. Another way to identify adjusters is to check thread pitch. The right side
adjuster has right-hand threads while the left side adjuster has left-hand threads. The adjuster
will also increase in length when the adjusting lever is operated if properly installed.
Apply Premium Long-Life Grease XG-1-C or -K or equivalent meeting Ford specification ESA-M1C75B to the threads of the brake adjuster screw, the thrust washer and the brake shoe adjusting screw
stud or socket. Turn the adjusting screw into the brake shoe adjusting screw nut to the end of the
threads and then loosen it one-half turn. Refer to illustrations.
[email protected]
file://C:\TSO\tsocache\VDTOM_5368\SVK~us~en~file=SVK62009.HTM~gen~ref.HTM
2011-04-28
1997 Aerostar/Ranger
Page 9 of 16
Aerostar
Item
Part Number
Description
1
2A176
Adjusting Lever
2
2048
Brake Shoe Adjusting Screw Socket
3
—
Adjustment Notches
(Part of 2041)
4
372583-S
Thrust Washer
5
2041
Brake Shoe Adjusting Screw
6
—
Identification Lines, RH
(Part of 2047)
7
2047
Brake Adjuster Screw Nut
Ranger
[email protected]
file://C:\TSO\tsocache\VDTOM_5368\SVK~us~en~file=SVK62009.HTM~gen~ref.HTM
2011-04-28
1997 Aerostar/Ranger
Item
Page 10 of 16
Part Number
Description
1
2A176
Adjusting Lever
2
2048
Brake Shoe Adjusting Screw Stud
3
372583-S
Thrust Washer
4
—
Adjustment Notches
(Part of 2047)
5
2047
Brake Adjuster Screw Nut
6
2041
Brake Shoe Adjusting Screw
A
—
Left-Hand Identifier Ring
B
—
"L" at Base of Socket
11. Assemble the adjuster and install the assembly between the shoe ends. Refer to illustrations.
Aerostar
[email protected]
file://C:\TSO\tsocache\VDTOM_5368\SVK~us~en~file=SVK62009.HTM~gen~ref.HTM
2011-04-28
1997 Aerostar/Ranger
Page 11 of 16
12. On the Aerostar, hook the cable hook into the hole in the brake shoe adjusting lever from the
outboard plate side. The brake shoe adjusting levers are also stamped with an R or L to indicate their
installation on the right- or left-hand brake assembly.
13. On the Ranger, after installation, the brake shoe adjusting lever should engage the brake adjuster
screw nut just below the centerline. Hook the brake shoe adjusting lever cable into the notch in the
brake shoe adjusting lever from the inboard side and install the brake shoe adjusting lever and
adjusting lever return spring on the pin on the web of the secondary rear brake shoe and lining
Ranger
[email protected]
file://C:\TSO\tsocache\VDTOM_5368\SVK~us~en~file=SVK62009.HTM~gen~ref.HTM
2011-04-28
1997 Aerostar/Ranger
Page 12 of 16
14. On the Aerostar, install the hooked end of the brake shoe adjusting screw spring in the large hole in
the primary shoe web. Connect the loop end of the brake shoe adjusting screw spring to the adjuster
lever hole.
15. On the Ranger, install the brake shoe adjusting screw spring in the rear brake shoe and lining.
16. On the Aerostar, pull the brake shoe adjusting lever, brake shoe adjusting lever cable and brake shoe
adjusting screw spring down toward the rear to engage the pivot hook in the large hole in the
secondary shoe web.
17. On the Aerostar, check the action of the adjuster by pulling brake shoe adjusting lever cable toward
secondary shoe, activating brake shoe adjusting lever. Brake shoe adjusting lever should snap in
above the next tooth of adjuster. Release brake shoe adjusting lever cable to return brake shoe
adjusting lever to original position and the adjuster should turn one notch.
Aerostar
[email protected]
file://C:\TSO\tsocache\VDTOM_5368\SVK~us~en~file=SVK62009.HTM~gen~ref.HTM
2011-04-28
1997 Aerostar/Ranger
Page 13 of 16
If pulling the brake shoe adjusting lever cable does not produce the action described, or if brake
shoe adjusting lever kit action is sluggish instead of positive and sharp, check the position of the
brake shoe adjusting lever on the adjusting screw toothed wheel. The brake shoe adjusting lever
should contact the adjusting wheel one tooth above the centerline of the brake adjuster screw. If the
contact point is below this centerline, the brake shoe adjusting lever will not lock on the teeth in the
adjusting screw wheel, and the brake adjuster screw will not be turned as the brake shoe adjusting
lever is actuated by the brake shoe adjusting lever cable. Refer to Diagnosis and Testing in Section
06-00 for adjuster diagnosis.
18. Check the action of the Ranger adjuster mechanism:
Pull the brake shoe adjusting lever cable toward the secondary rear brake shoe and lining.
The brake shoe adjusting lever should turn the adjuster screw nut one tooth.
Release the brake shoe adjusting lever cable and the brake shoe adjusting lever should drop
below the next tooth on the adjuster screw nut.
If the action is not sharp and definite, check for binding or lack of lubrication.
Adjuster Test, Ranger
[email protected]
file://C:\TSO\tsocache\VDTOM_5368\SVK~us~en~file=SVK62009.HTM~gen~ref.HTM
2011-04-28
1997 Aerostar/Ranger
Page 14 of 16
19. Using Brake Adjustment Gauge D81L-1103-A or equivalent, measure the inside diameter of the brake
drum.
Measuring Brake Drum
[email protected]
file://C:\TSO\tsocache\VDTOM_5368\SVK~us~en~file=SVK62009.HTM~gen~ref.HTM
2011-04-28
1997 Aerostar/Ranger
Page 15 of 16
20. Using the brake adjuster screw, adjust the rear brake shoe and lining to the brake drum inside
diameter.
Measuring Rear Brake Shoe and Lining
21. Install the brake drum.
[email protected]
file://C:\TSO\tsocache\VDTOM_5368\SVK~us~en~file=SVK62009.HTM~gen~ref.HTM
2011-04-28
1997 Aerostar/Ranger
Page 16 of 16
22. Install the wheel and tire assembly. Tighten the lug nuts (1012) to 135 Nm (100 lb-ft).
[email protected]
file://C:\TSO\tsocache\VDTOM_5368\SVK~us~en~file=SVK62009.HTM~gen~ref.HTM
2011-04-28
1997 Aerostar/Ranger
Page 1 of 3
Section 06-02: Brakes, Rear Drum
REMOVAL AND INSTALLATION
1997 Aerostar, Ranger Workshop Manual
Wheel Cylinder
Removal
1. Raise and support vehicle. Remove wheel (1007).
Item
Part Number
Description
1
2028
Brake Shoe Anchor Pin Guide Plate
2
2042
Wheel Cylinder Brake Shoe Link
3
2261
Rear Wheel Cylinder
4
2211
Brake Backing Plate
5
20310-S
Bolt, Wheel Cylinder-to-Backing Plate
6
34941-S
Washer
A
—
Tighten to 12-18 Nm
(106-159 Lb-In)
2. Remove the brake drum (1126), and rear brake shoes and linings (2201) as described in this section.
[email protected]
file://C:\TSO\tsocache\VDTOM_5368\SVK~us~en~file=SVK62010.HTM~gen~ref.HTM
2011-04-28
1997 Aerostar/Ranger
Page 2 of 3
3. Disconnect the brake line from the rear wheel cylinder. Connect a length of hose to the line and
submerge end of hose in a can containing a small amount of brake fluid to prevent air from entering
the system.
4. Remove the rear wheel cylinder retaining bolts and lockwashers, and then remove the rear wheel
cylinder from the brake backing plate.
Installation
1. Apply Silicone Rubber D6AZ-19562-AA or -BA or equivalent meeting Ford specification ESB-M4G92A or ESE-M4G195-A to wheel cylinder mounting area to seal backing plate mounting area.
2. Place the rear wheel cylinder on the brake backing plate and install the retaining bolts and
lockwashers. Tighten the wheel cylinder-to-backing plate bolts to 12-18 Nm (106-159 lb-in).
3. Connect the brake line to the rear wheel cylinder.
4. Install the rear brake shoe and lining (2200) as described in this section. Install the brake drum and
adjust the brakes as described in this section.
5. Install the wheel and tire assembly.
6. Bleed the system as described in Section 06-06 . Check brake operation before moving the vehicle.
[email protected]
file://C:\TSO\tsocache\VDTOM_5368\SVK~us~en~file=SVK62010.HTM~gen~ref.HTM
2011-04-28
1997 Aerostar/Ranger
Page 3 of 3
[email protected]
file://C:\TSO\tsocache\VDTOM_5368\SVK~us~en~file=SVK62010.HTM~gen~ref.HTM
2011-04-28
1997 Aerostar/Ranger
Page 1 of 6
Section 06-02: Brakes, Rear Drum
REMOVAL AND INSTALLATION
1997 Aerostar, Ranger Workshop Manual
Brake Backing Plate
Removal
1. Raise and support the vehicle.
2. Remove the rear brake shoe and lining (2200) and the rear wheel cylinder. Refer to the procedures in
this section.
3. Disconnect parking brake rear cable and conduit (2A635) from brake backing plate by squeezing
locking fingers together using a 9/16-inch flare nut wrench and pulling parking brake rear cable and
conduit through brake backing plate.
Aerostar
[email protected]
file://C:\TSO\tsocache\VDTOM_5368\SVK~us~en~file=SVK62011.HTM~gen~ref.HTM
2011-04-28
1997 Aerostar/Ranger
Page 2 of 6
Part
Number
Item
Description
1
2028
Brake Shoe Anchor Pin Guide Plate
2
2027
Anchor Pin
3
2261
Rear Wheel Cylinder
4
351467-S
Washer
5
2296 or
2035
Retracting Spring
6
2200
Rear Brake Shoe and Lining
7
2A179
Cable Guide
8
2A178
Brake Shoe Adjusting Lever Cable
9
2A637
Parking Brake Lever
10
2049
Brake Shoe Adjusting Screw Spring
11
—
Pivot Hook (Part of 2A176)
12
2A635
Parking Brake Rear Cable and Conduit
13
2A176
Brake Shoe Adjusting Lever
14
2041
Adjuster Assembly
15
—
Parking Brake Cable Housing Retainer (Part of 2A809
and 2A635 Cables)
16
2200
Rear Brake Shoe and Lining
17
2A642
Parking Brake Link
18
2A094
Brake Shoe Hold-Down Retainer Repair Kit
19
2A601
Parking Brake Link Spring
Ranger
[email protected]
file://C:\TSO\tsocache\VDTOM_5368\SVK~us~en~file=SVK62011.HTM~gen~ref.HTM
2011-04-28
1997 Aerostar/Ranger
Item
Page 3 of 6
Part Number
Description
1
2028
Brake Shoe Anchor Pin Guide Plate
2
2027
Anchor Pin (Part of 2211)
3
2261
Rear Wheel Cylinder
4
2200
Rear Brake Shoe and Lining (Secondary)
5
2296
Brake Shoe Retracting Spring (Long)
6
2A179
Cable Guide
7
2A178
Brake Shoe Adjusting Lever Cable
8
2A637
Parking Brake Lever
9
—
Adjusting Lever Pin
(Part of 2200)
10
2A176
Brake Shoe Adjusting Lever
11
2A180
Adjusting Lever Return Spring
12
2047
Brake Shoe Adjusting Screw Nut
[email protected]
file://C:\TSO\tsocache\VDTOM_5368\SVK~us~en~file=SVK62011.HTM~gen~ref.HTM
2011-04-28
1997 Aerostar/Ranger
Page 4 of 6
13
2041
Brake Adjuster Screw
14
2A635
Parking Brake Rear Cable and Conduit
15
2049
Brake Shoe Adjusting Screw Spring
16
2200
Rear Brake Shoe and Lining (Primary)
17
2068
Brake Shoe Hold-Down Spring
18
2A601
Parking Brake Link Spring
19
2A642
Primary Brake Shoe Parking Brake Lever Link
20
2296
Brake Shoe Retracting Spring (Short)
4. Remove the axle shaft (4234). Refer to Section 05-02A or Section 05-02B . Use care not to damage
the oil seal.
5. Remove the nuts retaining the brake backing plate to the rear axle housing and remove the brake
backing plate and the rear wheel gasket from the rear axle housing.
Installation
1. Apply Silicone Rubber D6AZ-19562-AA or -BA or equivalent meeting Ford specification ESB-M4G92A or ESE-M4G195-A to braking plate mounting hole to seal axle shaft flange mounting area.
2. Position the brake backing plate and rear wheel gasket on the rear axle housing.
3. Install the backing plate retaining nuts. Alternately and evenly tighten the nuts to 34-47 Nm (25-35 lbft).
4. Apply a light coating of Disc Brake Caliper Slide Grease D7AZ-19590-A or equivalent meeting Ford
specification ESA-M1C172-A to the ledge pads at the points where the rear brake shoe and lining
contact the brake backing plate.
[email protected]
file://C:\TSO\tsocache\VDTOM_5368\SVK~us~en~file=SVK62011.HTM~gen~ref.HTM
2011-04-28
1997 Aerostar/Ranger
Page 5 of 6
5. Feed the parking brake rear cable and conduit through its hole in the brake backing plate and engage
locking fingers.
6. Install the axle shaft. Refer to Section 05-02A or Section 05-02B as required in the Powertrain,
Drivetrain Service Manual. Use care not to damage the oil seal.
7. Install the rear wheel cylinder and rear brake shoe and lining and adjust using Brake Adjustment Tool
D81L-1103-C or equivalent. Connect the parking brake rear cable and conduit to the parking brake
lever.
8. Install the rear brake shoe and lining. Refer to the procedure in this section.
9. Connect the brake line to the rear wheel cylinder. Tighten the brake line fitting to 15-20 Nm (11-14 lbft).
10. Install the brake drum (1126) and wheel and tire assembly. Tighten the lugnuts to 135 Nm (100 lb-ft).
11. Bleed air from the system as described in Section 06-06 .
[email protected]
file://C:\TSO\tsocache\VDTOM_5368\SVK~us~en~file=SVK62011.HTM~gen~ref.HTM
2011-04-28
1997 Aerostar/Ranger
Page 6 of 6
[email protected]
file://C:\TSO\tsocache\VDTOM_5368\SVK~us~en~file=SVK62011.HTM~gen~ref.HTM
2011-04-28
1997 Aerostar/Ranger
Page 1 of 3
Section 06-02: Brakes, Rear Drum
DISASSEMBLY AND ASSEMBLY
1997 Aerostar, Ranger Workshop Manual
Wheel Cylinder
Rear wheel cylinders should be rebuilt in full axle sets only. If one side of the vehicle is done, the other side
should also be rebuilt.
Rear wheel cylinders should not be disassembled unless they are leaking. Carefully pull lower edges of
wheel cylinder boots away from rear wheel cylinder, and note whether interior is wet with brake fluid.
Excessive brake fluid at this point indicates leakage past piston cups and a need for rear wheel cylinder
overhaul.
NOTE: A slight amount of brake fluid is nearly always present and acts as a lubricant for the wheel
cylinder piston. It is not necessary to remove the rear wheel cylinder from the backing plate to
disassemble, inspect, hone, and overhaul the rear wheel cylinder. Removal is necessary only if the
rear wheel cylinder is damaged or scored beyond service.
Disassembly
1. Remove the rear brake shoe and lining (2200). Refer to the procedure in this section.
2. On ten-inch brakes, remove the wheel cylinder brake shoe links.
3. Disengage rear wheel cylinder boots from retaining grooves in rear wheel cylinder casting. Remove
each wheel cylinder boot and wheel cylinder piston from rear wheel cylinder as an assembly.
4. Remove rear wheel cylinder piston cups and wheel cylinder piston cup spring from wheel cylinder
bore.
5. Discard all rubber parts.
6. Remove wheel cylinder bleeder screw from rear wheel cylinder.
7. Wash all parts in clean, denatured alcohol.
8. Inspect pistons for scratches, scoring, or other visible damage. Replace if necessary. Always replace
rubber parts.
9. Inspect the rear wheel cylinder bore for score marks or rust. If either condition is present, the rear
wheel cylinder bore must be honed. However, the rear wheel cylinder should not be honed more
than 0.08mm (0.003 inch) beyond its original diameter.
10. Wash rear wheel cylinder with clean, denatured alcohol after honing, dry it with compressed air.
11. Inspect the bleeder hole to ensure it is free of obstructions.
Assembly
Use all parts in the wheel cylinder service kit.
1. Apply a light coating of High Performance DOT 3 Brake Fluid C6AZ-19542-AA or equivalent DOT 3
fluid meeting Ford specification ESA-M6C25-A, DOT 3 to all internal parts.
[email protected]
file://C:\TSO\tsocache\VDTOM_5368\SVK~us~en~file=SVK62013.HTM~gen~ref.HTM
2011-04-28
1997 Aerostar/Ranger
Page 2 of 3
2. Thread bleeder screw into rear wheel cylinder. Tighten to 7-9 Nm (61-79 lb-in).
3. Insert the wheel cylinder piston cup spring, wheel cylinder piston cups and wheel cylinder pistons into
their respective positions in the wheel cylinder bore. Place a wheel cylinder boot over each end of the
wheel cylinder.
4. Install the bleeder screw.
5. Install the wheel cylinder brake shoe links, if required.
6. Install rear brake shoe and lining. Refer to the procedure in this section.
7. Install brake drum (1126) and wheel (1007).
8. Bleed brake system. Refer to Section 06-06 .
Brake Wheel Cylinder, Disassembled
Item
Part Number
Description
1
—
Wheel Cylinder Boot
(Part of 2261)
2
2196
Wheel Cylinder Piston
3
2201
Wheel Cylinder Piston Cup
4
2261
Rear Wheel Cylinder
5
2208
Wheel Cylinder Bleeder Screw
6
2204
Wheel Cylinder Piston Cup Spring
[email protected]
file://C:\TSO\tsocache\VDTOM_5368\SVK~us~en~file=SVK62013.HTM~gen~ref.HTM
2011-04-28
1997 Aerostar/Ranger
Page 3 of 3
[email protected]
file://C:\TSO\tsocache\VDTOM_5368\SVK~us~en~file=SVK62013.HTM~gen~ref.HTM
2011-04-28
1997 Aerostar/Ranger
Page 1 of 2
Section 06-02: Brakes, Rear Drum
CLEANING AND INSPECTION
1997 Aerostar, Ranger Workshop Manual
Cleaning
WARNING: BRAKES CONTAIN ASBESTOS FIBERS. AVOID BREATHING DUST. BREATHING
ASBESTOS DUST MAY CAUSE ASBESTOSIS AND CANCER.
BREATHING ASBESTOS DUST IS HAZARDOUS TO YOUR HEALTH.
DUST AND DIRT PRESENT ON WHEEL BRAKE AND CLUTCH ASSEMBLIES MAY CONTAIN
ASBESTOS FIBERS THAT ARE HAZARDOUS TO HEALTH WHEN MADE AIRBORNE BY CLEANING
WITH COMPRESSED AIR OR BY DRY BRUSHING.
WHEEL BRAKE ASSEMBLIES AND CLUTCH FACINGS SHOULD BE CLEANED USING A VACUUM
CLEANER RECOMMENDED FOR USE WITH ASBESTOS FIBERS SUCH AS ROTUNDA
BRAKE/CLUTCH/SERVICE VACUUM 091-R0001 OR EQUIVALENT. DUST AND DIRT FROM VACUUM
SHOULD BE DISPOSED OF IN SUCH A MANNER THAT PREVENTS DUST EXPOSURE, SUCH AS
SEALED BAGS. THE BAG MUST BE LABELED AS PER OSHA INSTRUCTIONS AND THE TRASH
HAULER NOTIFIED AS TO THE BAG'S CONTENTS.
IF A VACUUM SUITABLE FOR ASBESTOS IS NOT AVAILABLE, CLEANING SHOULD BE DONE WET.
IF DUST GENERATION IS STILL POSSIBLE, TECHNICIANS SHOULD WEAR GOVERNMENTAPPROVED TOXIC DUST PURIFYING RESPIRATORS.
GRINDING OR SANDING ON BRAKE LININGS, PADS, ROTORS, DRUMS OR CLUTCH FACINGS
SHOULD BE DONE ONLY WHILE USING PROPERLY EXHAUST-VENTILATED EQUIPMENT.
OSHA REQUIRES AREAS WHERE ASBESTOS DUST GENERATION IS POSSIBLE TO BE ISOLATED
AND POSTED WITH WARNING SIGNS. ONLY TECHNICIANS CONCERNED WITH PERFORMING
BRAKE OR CLUTCH SERVICE SHOULD BE PRESENT IN THE AREA.
CAUTION: Do not use denatured alcohol for flushing the system or cleaning assemblies where
alcohol could be trapped and cause eventual failure of rubber components in the system.
1. Denatured alcohol is acceptable for cleaning parts, provided the parts are completely air-dried and
coated with brake fluid before installation.
2. To remove brake fluid contamination, clean all parts with denatured alcohol. Do not attempt to clean
contaminated lining. Contaminated brake lining must be replaced.
[email protected]
file://C:\TSO\tsocache\VDTOM_5368\SVK~us~en~file=SVK62014.HTM~gen~ref.HTM
2011-04-28
1997 Aerostar/Ranger
Page 2 of 2
[email protected]
file://C:\TSO\tsocache\VDTOM_5368\SVK~us~en~file=SVK62014.HTM~gen~ref.HTM
2011-04-28
1997 Aerostar/Ranger
Page 1 of 3
Section 06-02: Brakes, Rear Drum
CLEANING AND INSPECTION
1997 Aerostar, Ranger Workshop Manual
Inspection
Use Rotunda Brake/Clutch/Service Vacuum 091-R0001 or equivalent to remove all dust from backing plates
and interior of brake drums (1126).
Wheel Cylinders
1. Rear wheel cylinders should not be disassembled unless they are leaking. Pull back each rear wheel
cylinder dust boot and inspect for leakage.
2. Excessive brake fluid at this point indicates leakage past the piston cups and a need for rear wheel
cylinder (2261) overhaul. A slight amount of fluid is nearly always present and acts as a lubricant for
the pistons. If evidence of leakage is noted, the rear wheel cylinder should be disassembled,
inspected and overhauled.
3. Inspect the rear wheel cylinder bore for scratches and pitting. If the rear wheel cylinder is pitted or has
deep scratches, the rear wheel cylinder must be replaced.
Brake Drums
1. A brake drum should be visually inspected and measured with Rotunda Brake Drum Micrometer 10400046 or equivalent. Before making an inspection or measurement, remove grease, brake fluid, or
other contaminants from the brake drum using denatured alcohol.
2. Best shop practice requires measuring every brake drum with a brake drum micrometer regardless of
visual inspection. The brake drum micrometer is set to the drum diameter and measures the amount
and type of wear. Measure the diameter at various points 45-degrees apart around the brake shoe
and lining contact area, and at the bottom of the deepest groove to determine if the brake drum
requires replacement.
Brake Lining
1. Inspect rear brake shoes and linings (2200) for excessive lining wear or shoe damage. If lining is
damaged or worn within 0.79mm (1/32 inch) of the rivet heads on riveted linings, it must be replaced.
Replace any rear brake shoe and lining that has been contaminated with oil, grease or brake fluid.
Replace rear brake shoe and lining in axle sets only. Never replace just one rear brake shoe and
lining of a brake assembly. Replace both primary and secondary shoes. Prior to replacement of lining,
brake drum diameter should be checked to determine that brake drum diameter is within
specification. If braking surface diameter exceeds specification, the brake drum must be replaced.
2. Check condition of rear brake shoes and linings, retracting spring, hold-down springs, and brake
drum for signs of overheating. If rear brake shoe and lining metal parts have a slight blue coloring,
indicating overheating, retracting and hold-down springs should be replaced. Overheated springs lose
their tension and could allow new rear brake shoe and lining to drag and wear prematurely, if not
replaced.
Springs
Check springs for:
[email protected]
file://C:\TSO\tsocache\VDTOM_5368\SVK~us~en~file=SVK62015.HTM~gen~ref.HTM
2011-04-28
1997 Aerostar/Ranger
Page 2 of 3
Spread or collapsed coils
Twisted, bent or damaged shanks
Discoloration — This is a sign of brake overheating. Overheated springs lose some of their tension
and should be replaced.
Brake Backing Plate
1. Inspect the brake backing plate for correct mounting and securely tightened mounting nuts.
2. Inspect the brake shoe and lining contact pads (where the rear brake shoe and lining rest).
Deep grooves in the brake shoe and lining contact pads could restrict brake shoe and lining
movement.
If grooves exist, hand sand the brake shoe and lining contact pads.
If the grooves are still present after hand sanding, the rear brake backing plate must be
replaced. Any attempt to remove the grooves by grinding may result in improper brake shoe
and lining-to-brake drum contact.
3. Inspect all other brake parts and replace any that are worn or damaged.
[email protected]
file://C:\TSO\tsocache\VDTOM_5368\SVK~us~en~file=SVK62015.HTM~gen~ref.HTM
2011-04-28
1997 Aerostar/Ranger
Page 3 of 3
[email protected]
file://C:\TSO\tsocache\VDTOM_5368\SVK~us~en~file=SVK62015.HTM~gen~ref.HTM
2011-04-28
1997 Aerostar/Ranger
Page 1 of 2
Section 06-02: Brakes, Rear Drum
ADJUSTMENTS
1997 Aerostar, Ranger Workshop Manual
Brake Drum
Refinishing
Minor scores on brake drums (1126) can be removed with sandpaper. Do not refinish brake drums to
remove score marks. A drum surface which is highly polished can cause brake lockup or noise. This
polished condition should be removed with sandpaper. A brake drum that is out of round sufficient to cause
vehicle vibration or roughness when braking should be refinished. Remove only enough stock to true-up the
brake drum. When brake drum maximum inside diameter shown on the brake drum is exceeded either
through wear or refinishing, the brake drum must be replaced.
Check inside diameter of brake drum with Brake Adjustment Gauge D81L-1103-A or Rotunda Brake Drum
Micrometer 104-00046 or equivalent.
After a brake drum is refinished, wipe refinished surface with a cloth soaked in clean, denatured alcohol.
Maximum Diameter
Brake drum maximum diameter is cast into the rim of the brake drum. The brake drum may be machined
enough to correct scoring but only up to the MAX. DIA. dimension. If, after machining, the brake drum inside
braking surface diameter exceeds the specification, it must be discarded.
[email protected]
file://C:\TSO\tsocache\VDTOM_5368\SVK~us~en~file=SVK62016.HTM~gen~ref.HTM
2011-04-28
1997 Aerostar/Ranger
Page 2 of 2
[email protected]
file://C:\TSO\tsocache\VDTOM_5368\SVK~us~en~file=SVK62016.HTM~gen~ref.HTM
2011-04-28
1997 Aerostar/Ranger
Page 1 of 7
Section 06-02: Brakes, Rear Drum
ADJUSTMENTS
1997 Aerostar, Ranger Workshop Manual
Brake Shoe and Lining
Drums Removed
WARNING: DO NOT INHALE DUST FROM BRAKES OR ASSOCIATED COMPONENTS.
INHALATION OF DUST CAN BE INJURIOUS TO YOUR HEALTH. COMPRESSED AIR OR BRUSHES
MUST NOT BE USED TO CLEAN BRAKES, BRAKE DRUMS AND ASSOCIATED COMPONENTS. A
VACUUM CLEANER SUCH AS ROTUNDA BRAKE/CLUTCH/SERVICE VACUUM 091-R0001 OR
EQUIVALENT EQUIPPED FOR THIS PURPOSE SHOULD BE CAREFULLY USED TO REMOVE ANY
DUST. ADHERENT DUST SHOULD BE REMOVED WITH A DAMP RAG. ANY DUST SHOULD BE
CONTAINED IN A SEALED AND LABELED BAG FOR DISPOSAL. WEAR AN APPROVED HIGH
EFFICIENCY CARTRIDGE OR AIR LINE RESPIRATOR AND USE EXTRA CAUTION TO AVOID
BREATHING THIS DUST. ALWAYS USE NON-ASBESTOS REPLACEMENT PARTS.
The rear brakes are automatically adjusted while driving the vehicle in reverse and sharply applying the
brakes, and then driving forward. It may be necessary to do this several times to obtain the proper rear
brake adjustment. Manual brake adjustment is required only after the brake shoes have been replaced, or if
brake shoe adjusting lever has malfunctioned and has been repaired or replaced. Perform the manual
adjustment with the brake drums (1126) removed, using Brake Adjustment Gauge D81L-1103-A or
equivalent and the procedure described below.
When adjusting the rear brake shoes, check the parking brake rear cable and conduit (2A635) for
proper operation. Make sure the equalizer operates freely. For parking brake service, refer to Section
06-05 .
1. Raise vehicle on hoist. Position suitable safety stands under vehicle. Remove wheel (1007). Remove
brake drum as described in this section.
2. Use Rotunda Brake/Clutch/Service Vacuum 091-R0001 or equivalent to remove any dust present on
the brake assembly.
3. Carefully remove the brake shoe hold-down spring. Using sandpaper, clean the shoe-to-backing plate
contact points while holding the shoe away from the brake backing plate.
4. Check brake backing plate for damage. If any damage is found, it must be replaced. Refer to
procedure in this section. If no damage is found, apply a small amount of Disc Brake Caliper Slide
Grease D7AZ-19590-A or equivalent meeting Ford specification ESA-M1C172-A to the points where
the shoes touch the brake backing plate. Be careful not to get the lubricant on the linings.
The following illustration is simplified to show contact point location.
[email protected]
file://C:\TSO\tsocache\VDTOM_5368\SVK~us~en~file=SVK62017.HTM~gen~ref.HTM
2011-04-28
1997 Aerostar/Ranger
Page 2 of 7
5. Reinstall brake shoe hold-down spring.
6. Set the Brake Adjustment Gauge D81L-1103-A or equivalent to the inside diameter of the drum
braking surface.
[email protected]
file://C:\TSO\tsocache\VDTOM_5368\SVK~us~en~file=SVK62017.HTM~gen~ref.HTM
2011-04-28
1997 Aerostar/Ranger
Page 3 of 7
7. Reverse the tool as shown and adjust the rear brake shoe and lining (2200) until they match the
gauge setting. The gauge contact points on the rear brake shoe and lining must be parallel to the
vehicle with the center line through the center of the axle.
8. Hold the brake shoe adjusting lever out of engagement while rotating the notched part of the adjuster
screw assembly, to prevent burring the notches. Make sure the adjuster rotates freely.
9. If necessary, remove the adjuster for disassembly and cleaning, then lubricate the adjusting screw
threads and pilot end with a thin, uniform coating of Disc Brake Caliper Slide Grease D7AZ-19590-A
or equivalent meeting Ford specification ESA-M1C172-A.
Checking Adjustment, Typical
[email protected]
file://C:\TSO\tsocache\VDTOM_5368\SVK~us~en~file=SVK62017.HTM~gen~ref.HTM
2011-04-28
1997 Aerostar/Ranger
Page 4 of 7
10. Install the brake drums.
11. Install the wheel on the brake drum and tighten the lug nuts (1012) to 135 Nm (100 lb-ft). Remove the
safety stands and lower the vehicle.
12. After adjusting the brake shoes, check brake operation before moving the vehicle.
13. Complete the adjustment by sharply applying the brakes several times while driving the vehicle
alternately in forward and reverse.
Drums Installed
Adjust the single anchor brake by turning the adjusting screw located between the lower ends of the shoes.
1. Place transmission (7003) in neutral. Raise the vehicle until the tires clear the floor. Install safety
stands.
2. Remove the cover from the adjusting hole at the bottom of the brake backing plate, and turn the
brake shoe adjuster assembly using Brake Adjustment Tool D81L-1103-C or equivalent inside the
hole to expand the brake shoes until they lock the brake drum. Refer to illustration.
Ranger
[email protected]
file://C:\TSO\tsocache\VDTOM_5368\SVK~us~en~file=SVK62017.HTM~gen~ref.HTM
2011-04-28
1997 Aerostar/Ranger
Page 5 of 7
Aerostar
[email protected]
file://C:\TSO\tsocache\VDTOM_5368\SVK~us~en~file=SVK62017.HTM~gen~ref.HTM
2011-04-28
1997 Aerostar/Ranger
Page 6 of 7
3. When the rear brake shoes and linings are against the brake drum, loosen the brake shoe adjusting
screw nut 10 to 12 notches so that the brake drum rotates freely without drag.
4. If the brake drum does not rotate freely, remove the wheel and brake drum, and vacuum out any dust
and dirt from the linings using Rotunda Brake/Clutch/Service Vacuum 091-R0001 or equivalent.
5. Using sandpaper, remove any rust from the points where the shoes touch the brake backing plate.
6. Check brake backing plate for damage. If none is found, apply a light coating of Disc Brake Caliper
Slide Grease D7AZ-19590-A or equivalent meeting Ford specification ESA-M1C172-A . Do not get
the lubricant on the rear brake shoe and lining.
7. Install the wheel and brake drum and adjust the rear brake shoe and lining.
8. Install the adjusting hole cover in the brake backing plate.
9. Check and adjust the other rear brake assembly.
10. Apply the brakes. If the pedal travels more than halfway to the floor, there is too much clearance
between the brake shoes and the brake drums. Repeat Steps 2 and 3 of this procedure.
11.
WARNING: PERFORM THE ROAD TEST ONLY WHEN THE BRAKES WILL APPLY AND
THE VEHICLE CAN BE SAFELY STOPPED.
When the rear brake shoes and linings have been properly adjusted, lower the vehicle and road test
[email protected]
file://C:\TSO\tsocache\VDTOM_5368\SVK~us~en~file=SVK62017.HTM~gen~ref.HTM
2011-04-28
1997 Aerostar/Ranger
Page 7 of 7
to check brake operation.
[email protected]
file://C:\TSO\tsocache\VDTOM_5368\SVK~us~en~file=SVK62017.HTM~gen~ref.HTM
2011-04-28
1997 Aerostar/Ranger
Page 1 of 2
Section 06-02: Brakes, Rear Drum
SPECIFICATIONS
1997 Aerostar, Ranger Workshop Manual
SPECIFICATIONS
Fluid Specifications
Part Number
Description
Specification
C6AZ-19542-AA
Ford High Performance DOT 3 Brake Fluid ESA-M6C25-A
D7AZ-19590-A
Disc Brake Caliper Slide Grease
ESA-M1C172-A
XG-1-C or K
Premium Long-Life Grease
ESA-M1C75-B
D6AZ-19562-AA or BB Silicone Rubber Sealant
ESB-M4G92-A or ESE-M4G195-A
Brake Specifications
Ranger Reg. and SuperCab Under
4580 GVWR
Ranger Reg. SuperCab Over
4580 GVWR
All
Aerostar
Axle Usage,
Front
2540/
2580/2650
2750
2800
2650
Axle Usage,
Rear
2750/2950
2750/3200
2950
DSSA
DSSA
DSSA
Truck Series
Type
Size (Inches)
9x1.75 a
10x2.5
b
10x2.5
a Ranger
b 9x1.75
SuperCab with limited slip axles have 10x2.5 inch rear brake regardless of GVWR.
standard with 2.3L engine.
Bore Diameters — Rear Wheel Cylinders
Ranger Reg. and SuperCab
Under 4580 GVWR
Ranger Reg. SuperCab Over
4580 GVWR
All
Aerostar
0.75
0.75
0.9375
Ranger Reg. and SuperCab
Under 4580 GVWR
Ranger Reg. SuperCab Over
4580 GVWR
All
Aerostar
Lining Thickness Primary
(Inches)
.19
.189
.189
Lining Thickness
Secondary (Inches)
.28
.245
.245
Lining Length Primary
(Inches)
6.10
8.46
8.46
Lining Length Secondary
(Inches)
8.80
10.88
9.59
Truck Series
Rear Wheel Cylinder
Bore (Inches)
Rear Drum Brake Lining Dimensions
Truck Series
[email protected]
file://C:\TSO\tsocache\VDTOM_5368\SVK~us~en~file=SVK62019.HTM~gen~ref.HTM
2011-04-28
1997 Aerostar/Ranger
Page 2 of 2
NOTE: The following torque specifications are for clean, dirt-free and paint-free dry bolt and nut
threads.
Torque Specifications
Description
Nm
Lb-Ft Lb-In
Backing Plate-to-Rear Axle Housing Nuts 34-47 25-35
—
Lugnuts
135
100
—
Wheel Cylinder-to-Backing Plate Bolts
12-18
—
106159
Brake Line-to-Wheel Cylinder Fitting
15-20 11-14
Wheel Cylinder Bleeder Screw
7-9
—
—
61-79
[email protected]
file://C:\TSO\tsocache\VDTOM_5368\SVK~us~en~file=SVK62019.HTM~gen~ref.HTM
2011-04-28