1
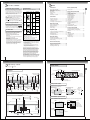
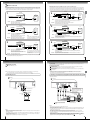
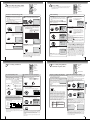
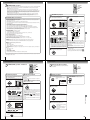
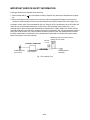
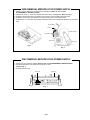
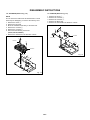
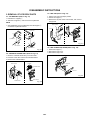
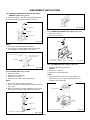
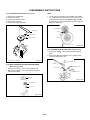
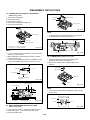
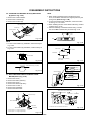
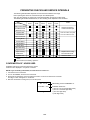
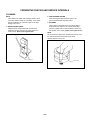
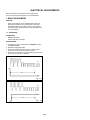
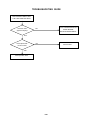
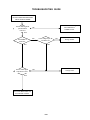
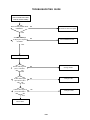
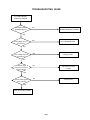
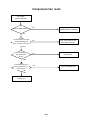
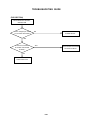
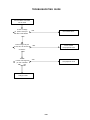
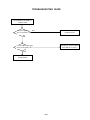
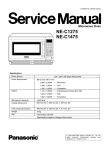
Connections
Cable TV connections
Many cable companies offer services permitting reception of extra channels including pay or subscription channels. This
DVD/VCR has an extended tuning range and can be tuned to most cable channels without using a cable company
supplied converter box, except for those premium channels which are intentionally scrambled. If you subscribe to a
premium channel which is scrambled, you must have a descrambler box for proper reception.
This DVD/VCR cannot receive scrambled programs since it does not contain a descrambler. In order to receive scrambled programs, your existing descrambler must be used. Descrambler boxes are available from cable companies. Consult your local cable company for more information concerning connection to their descrambler equipment. There are
many ways to connect your DVD/VCR to a cable system. Below are six common methods of connection.
4
DVD/VCR
DVD/VCR
TV
Splitter
TV
A/B Switch
VHF/UHF
IN (ANT)
IN
(ANT)
IN
(ANT)
VHF/UHF
IN (ANT)
Incoming Cable
Connections
1
IMPORTANT: Make sure the TV/CABLE menu option is set to the “CABLE” mode.
A
Incoming Cable
Converter/Descrambler
OUT
(TV)
B
OUT
(TV)
Allows: *
*
*
Prevents: *
Allows: * Recording of nonscrambled channels.
* Use of the programmable timer.
* Recording of one channel while watching another.
Watching scrambled channels while recording another channel.
* Using the DVD/VCR tuner to select channels.
DVD/VCR
2
Converter/
Descrambler
TV
IN
(ANT)
Incoming
Cable
Recording of one channel while watching another.
Using the programmable timer to record only the channel selected at the converter box.
Recording of all channels through the converter box.
5
DVD/VCR
TV
Splitter
IN
(ANT)
VHF/UHF
IN (ANT)
Converter/Descrambler
OUT
(TV)
VHF/UHF
IN (ANT)
A/B Switch
OUT
(TV)
Incoming Cable
A
B
Allows: * Recording of channels through the converter box
(scrambled and unscrambled).
* Using the programmable timer to record only the
channel selected at the converter box.
Note:
To record from converter/descrambler, DVD/
VCR tuner must be tuned to the converter
output channel, usually channel 3 or 4.
Prevents: * Recording one channel while watching another.
* Using the DVD/VCR tuner to select channels.
Allows: *
*
*
*
Prevents:
Recording of nonscrambled channels.
Recording of one channel while watching another.
Watching premium channels through the converter while recording nonscrambled channels.
Using the programmable timer.
Recording scrambled channels.
DVD/VCR
3
DVD/VCR
TV
6
TV
Converter/Descrambler
Splitter
IN
(ANT)
IN
(ANT)
Converter/Descrambler
Incoming Cable
VHF/UHF
IN (ANT)
Incoming Cable
OUT
(TV)
Converter/Descrambler
VHF/UHF
IN (ANT)
OUT
(TV)
A/B Switch
A
B
Allows: * Recording of nonscrambled channels.
* Use of the programmable timer.
* Recording an unscrambled channel while watching
any channel selected at the converter box.
Prevents:
Recording scrambled channels.
Note:
If you are playing a tape or using the tuner
built into the DVD/VCR, the converter must
be set to the video channel output of the DVD/
VCR (either 3 or 4).
Allows: * Recording of all channels through the converter box.
* Recording a scrambled or unscrambled channel while watching another (scrambled or
unscrambled) channel.
* Using the programmable timer to record only the channel selected at the converter box.
Prevents: Using the DVD/VCR tuner to select channels.
Note: Whenever a Converter/Descrambler box is placed before the DVD/VCR, you must tune the DVD/VCR to the output of
the Converter/Descrambler box, usually channel 3 or 4.
16
17
Connections
S-video output
An S-Video connection is superior to Video (Yellow) output. Use this method for DVD playback when the connected television has SVideo input, and does not have component video inputs.
Connecting to a TV
Component video outputs
Connect the DVD/VCR to your TV.
Note: This method transports VHS and DVD-video signals. For enhanced DVD-video performance, we recommend you
also connect the S-video or ColorStream® component video outputs to your TV/monitor. 19
PROGRESSIVE outputs
Some TVs or monitors are equipped with component video inputs that are capable of reproducing a progressively scanned video
signal. Connecting to these inputs allows you to view the highest quality pictures with less flicker.
INTERLACED outputs
Some TVs or monitors are equipped with component video inputs. Connecting to these inputs allows you to enjoy the highest quality
DVD picture playback.
Notes:
• Actual labels for component video inputs may vary depending on the TV manufacturer. (ex. Y, R-Y, B-Y or Y, CB, CR)
• In some TVs or monitors, the color levels of the playback picture may be reduced slightly or the tint may change. In such a
case, adjust the TV or monitor for optimum performance.
The S-video output and component video output transports the DVD-video signal exclusively and will deliver enhanced DVD
video picture performance.
Signal flow
Connections
Connecting to an audio system and TV equipped with S-video input/component video inputs
Connecting to a TV
Signal flow
To ANALOG
AUDIO OUT
(white)
(yellow) (red)
(red)
(white)
To wall outlet
To wall outlet
To ANALOG AUDIO OUT
To VIDEO
OUT
Audio/video cable (supplied)
To SVIDEO
OUT
To PR/CR
VIDEO
OUT
To PB/CB
VIDEO
OUT
Component
video cable
(not supplied)
To audio inputs
To video input
(yellow)
(red)
To Y
VIDEO
OUT
If you connect the DVD/VCR to
your TV with the DVD OUT jacks,
select the corresponding video
input on your television to watch
DVD video discs.
Audio cable (not supplied)
To audio inputs of
the amplifier
(white)
To Y video input
(red)
(white)
To PB/CB video input
To PR/CR video input
TV or monitor with
audio/video inputs
To S-video input
S-video cable (not supplied)
To switch the scan mode between the
interlace and progressive modes, see
page 59.
Notes:
• Refer to the owner’s manual of the connected TV as well.
• When you connect the DVD/VCR to your TV, be sure to turn off the power and unplug both units from the wall outlet before
making any connections.
• If your television set has one audio input, connect the left and right audio outputs of the DVD/VCR to a Y cable adapter (not
supplied) and then connect to your TV.
• Connect the DVD/VCR directly to your TV. If you connect the DVD/VCR to a VCR, TV/VCR combination or video selector,
the playback picture may be distorted as DVD video discs are copy protected.
18
TV or monitor with
ColorStream®
component video inputs
Audio system
Notes:
• Refer to the owner’s manual of the connected equipment as well.
• When you connect the DVD/VCR to other equipment, be sure to turn off the power and unplug all of the equipment from the
wall outlet before making any connections.
• If you place the DVD/VCR near a tuner or radio, the radio broadcast sound might be distorted. In this case, place the DVD/
VCR away from the tuner and radio.
• The output sound of the DVD/VCR has a wide dynamic range. Be sure to adjust the receiver’s volume to a moderate
listening level. Otherwise, the speakers may be damaged by a sudden high volume sound.
• Turn off the amplifier before you connect or disconnect the DVD/VCR’s power cord. If you leave the amplifier power on, the
speakers may be damaged.
• When connecting to a TV using the Video or S-video jack, make sure that the Progressive indicator “ ” on the
display window is not lit. If it is lit, the Video and S-video outputs do not feed the correct signals and you cannot see
any picture. To turn off the Progressive indicator, select PROGRESSIVE scan Off 59 .
19