1
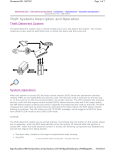
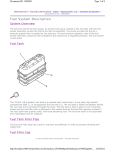
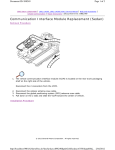
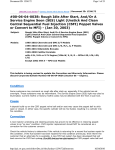
Document ID: 2187407
2009 Pontiac G8
Page 1 of 11
| G8 Service Manual | Transmission | Automatic Transmission - 6L50/6L80/6L90 |
Repair Instructions - Off Vehicle | Document ID: 2187407
1-2-3-4 and 3-5 Reverse Clutch Overhaul
Table 1:
1-2-3-4 and 3-5 Reverse Clutch Plates Removal
Table 2:
1-2-3-4 Clutch Piston Removal
Table 3:
3-5 Reverse Clutch Piston Removal
Table 4:
1-2-3-4 and 3-5 Reverse Clutch Piston Seals Replacement
Table 5:
3-5 Reverse Clutch Piston Installation
Table 6:
1-2-3-4 Clutch Piston Installation
Table 7:
1-2-3-4 Clutch Plate Installation
Table 8:
3-5 and Reverse Clutch Plate Installation
Table 9:
1-2-3-4 and 3-5 Reverse Clutch Bearing Assembly Replacement
1-2-3-4 and 3-5 Reverse Clutch Plates Removal
1-2-3-4 and 3-5 Reverse Clutch Plates Removal
Callout
Component Name
1
3-5 Reverse Clutch Backing Plate Retaining Ring
2
3-5 Reverse Clutch Backing Plate
3
3-5 Reverse Clutch Plate Assembly (Qty: 4)
4
3-5 Reverse Clutch Plate (Qty: 4)
© 2013 General Motors Corporation. All rights reserved.
http://localhost:9001/si/showDoc.do?docSyskey=2187407&pubCellSyskey=145731&pubO... 5/6/2013
Document ID: 2187407
Page 2 of 11
5
3-5 Reverse Clutch (Waved) Plate
6
3-5 Reverse Clutch Apply Ring
7
1-2-3-4 Clutch Backing Plate Retaining Ring
8
1-2-3-4 Clutch Backing Plate
9
1-2-3-4 Clutch Plate Assembly (Qty: 5)
10
1-2-3-4 Clutch Plate (Qty: 5)
11
1-2-3-4 Clutch (Waved) Plate
1-2-3-4 Clutch Piston Removal
1-2-3-4 Clutch Piston Removal
Callout
Component Name
1-2-3-4 Clutch Piston Dam Retaining Ring.
Caution: Use care when compressing the 1-2-3-4 clutch spring and dam assembly.
Compressing the dam assembly too much may damage it.
1
Caution: Refer to Retaining Ring Reuse Caution in the Preface section.
Special Tool
J 38734 Intermediate Spring Compressor Adapter
http://localhost:9001/si/showDoc.do?docSyskey=2187407&pubCellSyskey=145731&pubO... 5/6/2013
Document ID: 2187407
Page 3 of 11
2
1-2-3-4 Clutch Piston Dam Assembly
3
1-2-3-4 Clutch Spring
1-2-3-4 Clutch Piston
4
Tip
• It may be necessary to apply air to the apply passage in order to remove the
piston. Install the 1-2-3-4 clutch housing onto the torque converter (with fluid
pump) housing assembly in order to apply air.
• After air is applied, it may be necessary to turn the housing assembly upside
down and carefully tap the housing against a flat surface in order to release
the piston.
3-5 Reverse Clutch Piston Removal
3-5 Reverse Clutch Piston Removal
Callout
Component Name
Preliminary Procedure
1. Install the 1-2-3-4 and 3-5 reverse clutch housing assembly onto the torque converter
(with fluid pump) housing assembly.
2. Apply hand pressure on the 1-2-3-4 clutch piston housing while applying compressed
air to the apply passage in order to unseat the 3-5 reverse clutch piston.
1-2-3-4 Clutch Piston Housing Retaining Ring
http://localhost:9001/si/showDoc.do?docSyskey=2187407&pubCellSyskey=145731&pubO... 5/6/2013
Document ID: 2187407
Page 4 of 11
Caution: Refer to Retaining Ring Reuse Caution in the Preface section.
1
Special Tool
DT 47867 Adjustable Clutch Spring Compressor
2
1-2-3-4 Clutch Piston Housing
3
3-5 Reverse Clutch Spring
3-5 Reverse Clutch Piston
4
Tip
It may be necessary to turn the housing assembly upside down and carefully tap
the housing against a flat surface in order to release the piston.
1-2-3-4 and 3-5 Reverse Clutch Piston Seals Replacement
1-2-3-4 and 3-5 Reverse Clutch Piston Seals Replacement
Callout
Component Name
Caution: Refer to Seal Reuse Caution in the Preface section.
Preliminary Procedure
Lubricate all seals with automatic transmission fluid (ATF) prior to installation.
1
1-2-3-4 Clutch Piston Seal
http://localhost:9001/si/showDoc.do?docSyskey=2187407&pubCellSyskey=145731&pubO... 5/6/2013
Document ID: 2187407
Page 5 of 11
2
3-5 Reverse Clutch Piston Dam (O-Ring) Seal
3
3-5 Reverse Clutch Piston Inner Seal
4
1-2-3-4 Clutch Piston Housing
5
3-5 Reverse Clutch Piston Outer Seal
6
3-5 Reverse Clutch Piston
1-2-3-4 Clutch Piston Inner Seal
7
Caution: Do not install a NEW 1-2-3-4 clutch piston inner seal yet. A special tool
used to install the 1-2-3-4 clutch piston housing retaining ring may damage the seal
if the seal is installed prior to installing the retaining ring. Refer to 3-5 Reverse
Clutch Piston Installation.
8
1-2-3-4 Clutch Piston Housing Seal
9
1-2-3-4 Clutch Piston Housing Seal
3-5 Reverse Clutch Piston Installation
3-5 Reverse Clutch Piston Installation
Callout
1
Component Name
3-5 Reverse Clutch Piston
3-5 Reverse Clutch Spring
2
Caution: Ensure the clutch spring is centered on the piston with the tabs facing up.
Failure to do so may cause damage to the clutch assembly.
http://localhost:9001/si/showDoc.do?docSyskey=2187407&pubCellSyskey=145731&pubO... 5/6/2013
Document ID: 2187407
3
Page 6 of 11
1-2-3-4 Clutch Piston Housing
1-2-3-4 Clutch Piston Housing Retaining Ring
Caution: Before using the DT 47782-2, push the retaining ring over the DT 477821 by hand so that the ring is positioned below the tapered area of the DT 47782-1.
If the ring is positioned above the tapered area when it is being installed, the ring
will become lodged between both tools and damage to the tools, retaining ring, and
piston housing will result.
Caution: Refer to Retaining Ring Reuse Caution in the Preface section.
4
Caution: Push the retaining ring down over the cone until the ring seats firmly in
the retaining ring groove. The retaining ring will make a distinctive click sound when
it seats. Failure to properly seat the retaining ring may cause damage to the 35 reverse clutch assembly.
Tip
Use a screwdriver in order to verify the retaining ring is fully seated into the groove.
It may appear as though the retaining ring is not fully seated, since the groove is
shallow by design. However, this shallow interface is normal.
Special Tools
• DT 47782-1 Retaining Ring Cone
• DT 47782-2 Retaining Ring Installer
1-2-3-4 Clutch Piston Inner Seal
5
Caution: Install a NEW seal and orientate as shown. Failure to do so may cause
internal transmission leaks and damage to the transmission.
1-2-3-4 Clutch Piston Installation
http://localhost:9001/si/showDoc.do?docSyskey=2187407&pubCellSyskey=145731&pubO... 5/6/2013
Document ID: 2187407
Page 7 of 11
1-2-3-4 Clutch Piston Installation
Callout
1
Component Name
1-2-3-4 Clutch Piston
1-2-3-4 Clutch Spring
2
Caution: Ensure the clutch spring is centered on the piston with the tabs facing up.
Failure to do so may cause damage to the clutch assembly.
1-2-3-4 Clutch Piston Dam Assembly
3
Tip
Lubricate the inner and outer surfaces of the dam assembly with ATF in order to
ease installation into the piston. Install the tabs facing up.
1-2-3-4 Clutch Piston Dam Retaining Ring
Caution: Use care when compressing the 1-2-3-4 clutch spring and dam assembly.
Compressing the dam assembly too much may damage it.
4
Caution: Refer to Retaining Ring Reuse Caution in the Preface section.
Special Tool
J 38734 Intermediate Spring Compressor Adapter
1-2-3-4 Clutch Plate Installation
http://localhost:9001/si/showDoc.do?docSyskey=2187407&pubCellSyskey=145731&pubO... 5/6/2013
Document ID: 2187407
Page 8 of 11
1-2-3-4 Clutch Plate Installation
Callout
Component Name
1-2-3-4 Clutch (Waved) Plate
1
Caution: To avoid damaging the seal, first place J 46624-1 with the small chamfer
end facing up and leave in place for at least 60 seconds.
1-2-3-4 Clutch Plate (Qty: 5)
2
3
Caution: Ensure all clutch plates are centered in the housing. When installing the
first steel clutch plate, ensure an opening between the external splines is centered
over the missing snap ring groove punch in the housing. Align the external splines
of each remaining steel clutch plate with the first steel clutch plate. Failure to do so
may cause damage to the clutch assembly.
1-2-3-4 Clutch Plate Assembly (Qty: 5)
1-2-3-4 Clutch Backing Plate
4
Caution: Align the external splines of the backing plate with the external splines of
the steel clutch plates. Failure to do so may cause damage to the clutch assembly.
1-2-3-4 Clutch Backing Plate Retaining Ring
5
Caution: Depending on the housing configuration, align the retaining ring gap with
the missing snap ring groove punch in the housing or the offset punch in the
housing. Failure to do so may cause damage to the clutch assembly.
Tip
http://localhost:9001/si/showDoc.do?docSyskey=2187407&pubCellSyskey=145731&pubO... 5/6/2013
Document ID: 2187407
Page 9 of 11
After the retaining ring is installed, determine clutch piston travel in order to verify
if the correct selective retaining ring is being used. Refer to 1-2-3-4 Clutch Backing
Plate Retaining Ring Measurement.
3-5 and Reverse Clutch Plate Installation
3-5 and Reverse Clutch Plate Installation
Callout
Component Name
3-5 Reverse Clutch Apply Ring
1
Caution: Ensure apply ring legs are positioned into the 3-5 reverse clutch piston.
Failure to do so may cause damage to the 3-5 reverse clutch assembly.
2
3-5 Reverse Clutch (Waved) Plate
3
3-5 Reverse Clutch Plate (Qty: 4)
4
3-5 Reverse Clutch Plate Assembly (Qty: 4)
5
3-5 Reverse Clutch Backing Plate
3-5 Reverse Clutch Backing Plate Retaining Ring
6
Caution: Depending on the housing configuration, align the retaining ring gap with
the missing snap ring groove punch in the housing or the offset punch in the
housing. Failure to do so may cause damage to the clutch assembly.
Tip
After the retaining ring is installed, determine clutch piston travel in order to verify
http://localhost:9001/si/showDoc.do?docSyskey=2187407&pubCellSyskey=145731&pubO... 5/6/2013
Document ID: 2187407
Page 10 of 11
if the correct selective retaining ring is being used. Refer to 3-5 Reverse Clutch
Backing Plate Retaining Ring Measurement.
1-2-3-4 and 3-5 Reverse Clutch Bearing Assembly Replacement
1-2-3-4 and 3-5 Reverse Clutch Bearing Assembly Replacement
Callout
Component Name
3-5 Reverse Clutch Bearing
Caution: Install the NEW bearing assembly with the seal side up. Improper
installation of the bearing may cause damage to the transmission.
Caution: Do not reuse the bearing. Install a NEW bearing. Reusing an old bearing
may cause damage to the transmission.
1
Specification
Install the bearing flush to 0.3 mm below the thrust surface.
Special Tools
• DT 47865 Bearing Remover
• DT 47866 Bearing Installer
• J 8092 Driver Handle
http://localhost:9001/si/showDoc.do?docSyskey=2187407&pubCellSyskey=145731&pubO... 5/6/2013
Document ID: 2187407
Page 11 of 11
• J 45124 Removal Bridge
http://localhost:9001/si/showDoc.do?docSyskey=2187407&pubCellSyskey=145731&pubO... 5/6/2013