1
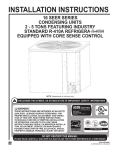
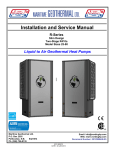
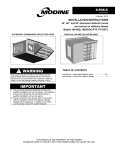
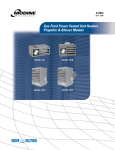
GEO16-501.3 5H0839240000 August, 2015 INSTALLATION AND SERVICE MANUAL ground source heat pump split unit model GS/ES NOTE: Energy Star only applies to certain configurations. NOTE: GS Split Units are Energy Star Rated only when matched with the appropriate Modine GA Air Hander. Model ES Split Units are not Energy Star Rated. WArNING This unit contains R-410A high pressure refrigerant. Hazards exist that could result in personal injury or death. Installation, maintenance, and service must only be performed by an HVAC technician qualified in R-410A refrigerant and using proper tools and equipment. Due to much higher pressure of R-410A refrigerant, DO NOT USE service equipment or tools designed for refrigerants other than R-410A. ImpOrTANT WArNING Improper installation, adjustment, alteration, service or maintenance can cause property damage, injury or death, and could cause exposure to substances which have been determined by various state agencies to cause cancer, birth defects or other reproductive harm. Read the installation, operating and maintenance instructions thoroughly before installing or servicing this equipment. 1. The use of this manual is specifically intended for a qualified installation and service agency. A qualified installation and service agency must perform all installation and service of these appliances. 2. GS/ES Split Units contain the refrigerant R-410A. Review the R-410A Material Safety Data Sheet (MSDS) for hazards and first aid measures. 3. Refrigerant charging should only be carried out by an EPA-certified air conditioning contractor. Inspection On Arrival 1. Inspect unit upon arrival. In case of damage, report it immediately to transportation company and your local factory sales representative. 2. Check rating plate on unit to verify that power supply meets available electric power at point of installation. 3. Inspect unit received for conformance with description of product ordered (including specifications where applicable). THIS MANUAL IS THE PROPERTY OF THE OWNER. PLEASE BE SURE TO LEAVE IT WITH THE OWNER WHEN YOU LEAVE THE JOB. SPECIAL PRECAUTIONS SPECIAL PRECAUTIONS THE INSTALLATION AND MAINTENANCE INSTRUCTIONS IN THIS MANUAL MUST BE FOLLOWED TO PROVIDE SAFE, EFFICIENT, AND TROUBLE-FREE OPERATION. IN ADDITION, PARTICULAR CARE MUST BE EXERCISED REGARDING THE SPECIAL PRECAUTIONS LISTED BELOW. FAILURE TO PROPERLY ADDRESS THESE CRITICAL AREAS COULD RESULT IN PROPERTY DAMAGE OR LOSS, PERSONAL INJURY, OR DEATH. THESE INSTRUCTIONS ARE SUBJECT TO ANY MORE RESTRICTIVE LOCAL OR NATIONAL CODES. HAZARD INTENSITY LEVELS 1. DANGER: Indicates an imminently hazardous situation which, if not avoided, WILL result in death or serious injury. 2. WARNING: Indicates a potentially hazardous situation which, if not avoided, COULD result in death or serious injury. 3. CAUTION: Indicates a potentially hazardous situation which, if not avoided, MAY result in minor or moderate injury. 4. IMPORTANT: Indicates a situation which, if not avoided, MAY result in a potential safety concern. DANGER 1. Appliances must not be installed where they may be exposed to potentially explosive or flammable atmosphere. 2. W ater temperatures over 125°F can cause severe burns instantly resulting in severe injury or death. Feel water before showering or bathing. Ensure that the primary water heating source setpoints are higher than the heat pump water discharge temperature of 120°F. WARNING 1. Disconnect power supply before making wiring connections to prevent electrical shock and equipment damage. 2. All appliances must be wired strictly in accordance with the wiring diagram furnished with the appliance. Any wiring different from the wiring diagram could result in a hazard to persons and property. 3. Any original factory wiring that requires replacement must be replaced with wiring material having a temperature rating of at least 105°C. 4. Ensure that the supply voltage to the appliance, as indicated on the serial plate, is not 5% greater than rated voltage. 5. This unit contains R-410A high pressure refrigerant. Hazards exist that could result in personal injury or death. Installation, maintenance, and service must only be performed by an HVAC technician qualified in R-410A refrigerant and using proper tools and equipment. Due to much higher pressure of R-410A refrigerant, DO NOT USE service equipment or tools designed for refrigerants other than R-410A. 6. When servicing or repairing this equipment, use only factory-approved service replacement parts. A complete replacement parts list may be obtained by contacting Modine Manufacturing Company. Refer to the rating plate on the appliance for complete appliance model number, serial number, and company address. Any substitution of parts or controls not approved by the factory will be at the owner’s risk. 2 CAUTION 1. Ensure that the supply voltage to the appliance, as indicated on the serial plate, is not 5% less than the rated voltage. 2. D o not use these units to heat or cool the building during construction. Mechanical components can quickly become clogged with debris. System damage may result. 3. D o not overcharge the refrigeration system. This can lead to elevated compressor discharge pressure and possibly flooding the compressor with liquid. 4. D o not attempt to reuse any mechanical or electrical component which has been wet. Such component must be replaced. important 1. S tart-up and adjustment procedures must be performed by a qualified service agency. 2. All refrigeration checks must be made by a qualified R-410A refrigeration technician. 3. D o not release refrigerant to the atmosphere. When adding or removing refrigerant, all national, state/ province, and local laws must be followed. 4. The ground heat exchanger (open or closed loop or water source to be connected to the unit must be designed, constructed, and prepared in accordance with industry guidelines (IGSHPA, ASHRAE, NGWA, etc.) and best practices, and any more restrictive local codes and regulations by a qualified service agency. Failure to properly, size, install, or prepare the source could result in reduced performance, a reduction in the normal life of the units, and a hazard to persons and property. 5. U nits selected for open loop ground source applications should have a cupronickel source coaxial heat exchanger to reduce mineral buildup and scaling. Open loop systems should have the source coaxial coil flushed periodically to maintain peak performance. 6. All piping and connections must be made in accordance with local plumbing codes. 7. To check most of the Possible Remedies in the troubleshooting guide listed in Tables 22.1-24.1, refer to the applicable sections of the manual. Table of Contents General Information . . . . . . . . . . . . . . . . . . . . . . . . . . . . . . . . . . 1 Inspection on Arrival . . . . . . . . . . . . . . . . . . . . . . . . . . . . . . . . . 1 Special Precautions . . . . . . . . . . . . . . . . . . . . . . . . . . . . . . . . . . 2 Model/Serial Number Designations . . . . . . . . . . . . . . . . . . . . . . 3 Unit Dimensions . . . . . . . . . . . . . . . . . . . . . . . . . . . . . . . . . . . . 4 Unit Location . . . . . . . . . . . . . . . . . . . . . . . . . . . . . . . . . . . . . . . 5 Installation . . . . . . . . . . . . . . . . . . . . . . . . . . . . . . . . . . . . . . . . . 5 SI (Metric) Conversion Factors . . . . . . . . . . . . . . . . . . . . . . . 5 Water Connections . . . . . . . . . . . . . . . . . . . . . . . . . . . . . . . . 6 Wiring . . . . . . . . . . . . . . . . . . . . . . . . . . . . . . . . . . . . . . . . . 10 Electrical Specifications . . . . . . . . . . . . . . . . . . . . . . . . . . . . . . 13 Start-Up Procedure . . . . . . . . . . . . . . . . . . . . . . . . . . . . . . . . . 14 Physical Data . . . . . . . . . . . . . . . . . . . . . . . . . . . . . . . . . . . . . .18 Maintenance . . . . . . . . . . . . . . . . . . . . . . . . . . . . . . . . . . . . . . 19 Replacement Parts . . . . . . . . . . . . . . . . . . . . . . . . . . . . . . . 20 Serial Plate – Example . . . . . . . . . . . . . . . . . . . . . . . . . . . . 20 Troubleshooting . . . . . . . . . . . . . . . . . . . . . . . . . . . . . . . . . . . . 21 Start Up/Troubleshooting Form . . . . . . . . . . . . . . . . . . . . . . . . 25 Warranty . . . . . . . . . . . . . . . . . . . . . . . . . . . . . . . . . . Back Page GEO16-501.3 model nomenclature Figure 3.1 - Model Number Designations 1,2 3 4,5,6 7 8 9,10 11 12 13 14 15 16 17 18 MT UC MBH DS CC SV CT AC GM HM HWG MT SA RA 1,2 - Model Type (MT) GS - Residential Split Unit ES - Commercial Split Unit 3 - Unit Configuration (UC) I - Indoor 4,5,6 - Nominal Cooling Capacity (MBH) 024 - 24,000 Btu/hr 036 - 36,000 Btu/hr 048 - 48,000 Btu/hr 060 - 60,000 Btu/hr 066 - 66,000 Btu/hr 7 - Development Sequence Designation (DS) C - Current 8 - Compressor Configuration (CC) 2 - Two Stage 4 - Two Stage w/Soft Start 9,10 - Supply Voltage (SV) 03 - 208-230/60/1 11 - Controls Type (CT) 4 - Modine Controls System 12 - Air Coil (AC) N - None 13 - Geo (Source) Coaxial Coil Material (GM) C - Copper N - Cupro-Nickel 14 - Hydronic (Load) Coaxial Coil Material (HM) X - None 15 - Hot Water Generator or Desuperheater (HWG) 0 - None 1 - Hot Water Generator - Factory Installed Pump 16 - Motor Type (MT) N - None 17 - Supply Air Configuration (SA) N - None 18 - Return Air Configuration (RA) N - None Figure 3.2 - Serial Number Designations WARRANTY TERM 1 - 1 Years Parts Commercial 2 - 10 Years Parts/ 5 Years Labor Residential 3 - 10 Years Parts/ 10 Years Labor Extended Residential Serial Number S 0 40 SPO MODEL STACKED UNIT 0 - Standard 1 - Stacked MOTOR SUPPLIER 40 - AO Smith 51 - Genteq 00 - None 20 1 YEAR OF MANUFACTURE 2 11 14 12345 SEQUENTIAL NUMBER Number varies from 0000 to 9999. Each unit within the same week of manufacture is to have unique number COMPRESSOR 1 - Copeland BLOWER SUPPLIER 20 - Morrison 00 - None 1234 SPO NUMBER WEEK OF MANUFACTURE GEO16-501.3 3 unit dimensions Figure 4.1 - Unit Dimensions Table 4.1 - Dimensions (inches) Models Overall Cabinet Electrical Geo & DHW 036 048 060 066 A 23.13 23.13 23.13 23.13 23.13 B 25.65 25.65 25.65 25.65 25.65 C 25.65 25.65 25.65 25.65 25.65 D 17.07 15.44 17.31 17.07 17.07 E 14.26 12.82 14.68 14.26 14.26 F 11.76 10.32 12.18 11.76 11.76 H 2.00 2.00 2.00 2.00 2.00 J 7.14 7.14 7.14 7.14 7.14 K 14.24 14.24 14.24 14.24 14.24 L 21.25 18.62 17.36 21.25 21.25 M 11.57 11.57 11.57 11.57 11.57 N 8.28 7.54 8.32 8.28 8.28 O 5.35 4.85 5.38 5.35 5.35 Liquid Line Connection - Sweat 3/8 3/8 3/8 1/2 1/2 Suction Line Connection - Sweat 5/8 3/4 3/4 7/8 7/8 Coil Connection Size (Female Swivel) 1" NPT 1" NPT 1" NPT 1" NPT 1" NPT Approx. Shipping Weight (lbs.) 218 218 268 306 308 Control Refrigerant 4 024 GEO16-501.3 unit location / installation Preparation Table 5.1 - SI (Metric) Conversion Factors To Convert Multiply By To Obtain "W.C. 0.24 kPa psig 6.893 kPa °F (°F-32) x 0.555°C inches 25.4 mm feet 0.305 meters CFM 0.028 m3/min To Convert Multiply By To Obtain CFH 1.699 m3/min Btu/ft3 0.0374mJ/m3 pound 0.453 kg Btu/hr 0.000293 kW/hr gallons 3.785 liters psig 27.7 "W.C. unit location DANGER Appliances must not be installed where they may be exposed to potentially explosive or flammable atmosphere. Electrical Handling Each unit will be shipped to the site on a wood skid. Whenever possible, all lifting and handling of the unit should be done with the packing and skid in position. When slinging or using a forklift to lift the unit, the support points should be sufficiently apart to give stability when lifting. Unless otherwise noted, the lifting points should be equidistant from the centerline. Extreme care should be taken not to drop the unit Considerable damage can occur to the unit during positioning, in particular, to the paneling and exterior paint. Use an adequate number of personnel and the correct tools when moving the unit. The unit is designed to remain upright so care should be taken when lifting the unit up steps. The use of torque screwdrivers on panel, cover or component mounting screws is not recommended. Hand-start all screws. If electric drills are used – set at the lowest possible torque. Storage Equipment should be stored in clean, dry area and in its original packaging. CAUTION Do store or install units in corrosive environments or in locations subject to temperature or humidity extremes (e.g., attics, garages, rooftops, etc.). Performance, reliability, and service life can be significantly reduced. Transport and store units in an upright position. Tilting units greater than 60° beyond horizontal may result in damage to the compressor. If the unit is tilted past 60°, do not energize the compressor until the unit has been upright for a minimum of 6 hours to prevent compressor damage. Unit Protection 1. B efore installation, ensure that the correct electrical power supplies are available for the unit. 2. E ach unit requires an independently fused and isolated power supply. 3. C heck to make sure that the units will have adequate installation clearance for easy access to remove all panels and access all internal components. Provide ample area to access external components in and around the unit and system including water valves, fittings, and all electrical connections. 4. R emove any Accessory Kits and shipping support material from the mechanical compartment. 5. C heck Refrigerant Piping for dents or kinks. 6. Inspect all electrical connections. Connections must be clean and tight at the terminal. To prevent damage, keep the unit in its original packaging or cover with an equivalent protective covering while on the job site. Cover open water connections to prevent debris from entering the system. Take extra precautions to protect the unit from damage or contamination when in an area where spraying, plastering and / or painting has not been completed. Physical damage or contamination from foreign debris may prevent proper start-up and costly equipment clean-up. Examine all fittings, valves, or pipes and remove all dirt or debris before installing unit. Electrical wiring should be done in accordance with all applicable national and local codes. It is the responsibility of the electrical contractor to adhere to such codes. The warranty will be voided if wiring is not in accordance with the specifications of the unit. Modine recommends using copper conductors only. All power supply wiring must be capable of carrying the maximum current load under no fault conditions at the stipulated voltages. Care should be taken to avoid significant voltage drops. A knockout for power connection is provided on the access side of the unit. See unit dimensions in Figure 4.1. INSTALLATION important 1. The ground heat exchanger (open or closed loop) or water source to be connected to the unit must be designed, constructed, and prepared in accordance with industry guidelines (IGSHPA, ASHRAE, NGWA, etc.) and best practices, and any more restrictive local codes and regulations by a qualified service agency. Failure to properly, size, install, or prepare the source could result in reduced performance, a reduction in the normal life of the units, and a hazard to persons and property. 2. U nits selected for open loop ground source applications should have a cupronickel source coaxial heat exchanger to reduce mineral buildup and scaling. Open loop systems should have the source coaxial coil flushed periodically to maintain peak performance. Installation of these units is to be INDOORS only. The instructions detailed below are for the Installation of a “Standard” unit. Accommodations and adjustments will be required for the usage of additional unit accessories. Should assistance be required for the installation of these additional items, consult Modine at the phone number listed on the back cover of this manual. The unit must be located in a conditioned space that will remain above freezing and where humidity levels could cause cabinet condensation. GEO16-501.3 5 installation Unit Installation 1. Units should be mounted on a vibration-absorbing pad slightly larger than the base of the unit. See Table 6.1 below for Modine vibration pad part numbers. If the unit isn’t mounted on a vibration-absorbing pad, it must be raised off the floor to prevent damage due to accidental flooding. It is not necessary to anchor the unit to the floor. Table 6.1 - Vibration Absorbing Pads High Density Plastic Pad Size Part Number Models 32" X 32" 5H0835220000 024-036 36" X 36" 5H0835230000 048-066 2. Check to ensure that the unit is level in both directions and also plumb. If adjustment is necessary, Modine recommends the placement of metal shims in the outermost corners of the base. 3. Provide adequate clearance for all access panels. 4. Provide easy access for servicing water valves, fittings and compressor. 5. Provide access to the controller and all electrical connections. 6. Provide a clear physical path to the unit. Adequate space should be provided to allow removal of the unit, if necessary. Water Connections 1. All units utilize swivel pipe fittings for water connections that are rated for 150 psi. 2. The connections have a rubber gasket seal similar to a garden hose gasket, which, when mated to the flush end of most 1" Figure 6.1 - Water Connection Breakdown threaded male pipe fittings (MPT), provides a leak-free seal without the need for thread sealing tape or joint compound. 3. The water piping system should include pressure/temperature taps for serviceability. 4. Refer to Figure 6.1. Install the brass spacer and rubber gasket in swivel connector prior to attempting any connection (rubber gasket and brass spacer kits are shipped with unit). To make the connection, mate the field supplied male pipe thread fitting against the rubber gasket in the swivel connector and thread the female locking ring onto the pipe threads, while maintaining the brass elbow in the desired direction. Tighten the connectors by hand, and then gently snug the fitting with pliers to provide a leak-proof joint. 5. D O NOT OVERTIGHTEN, as leaks may occur. 6. NOTE: Never use flexible hose smaller than 1" inside diameter on the unit. Limit the length to 10' per connection in one direction. Check carefully for leaks. Installation with Existing Air Handler or Refrigerant Coil Modine recommends installing Split units with a new matching Modine Air Handling or A-coil unit, but the Split unit may be matched with an existing air handler or coil if the following conditions are met: 1. C oil must be R-410A rated and use a heat pump thermal expansion valve with internal check valve. 2. The air coil and line set have been flushed with a compound that vaporizes in accordance with the instructions provided with the flushing agent. Follow the air handler manufacturer’s installation instructions to install the air handler. Note that such installations do not qualify for Energy Star. Factory installed Snap ring in this groove Swivel adaptor hand tighten Brass snap ring Brass spacer Rubber gasket Swivel adaptor hand tighten P/T Port - access for temperature and pressure 6 GEO16-501.3 installation Dual Fuel Setup A conventional fossil fuel forced air furnace may also be used for an air handler, as well as a supplemental heat source. The furnace must provide at least 400 CFM/Ton of nominal unit cooling capacity. Refer to the Cased / Uncased Coil I&S manual for exact airflow requirement for the rated matched systems. The furnace should be disabled until auxiliary heating is called for, then the heat pump should be disabled when the furnace takes over the heat load. Refer to the furnace manufacturer’s installation instructions for directions on installation of the furnace, coil, and wiring. A Dual Fuel Thermostat is required to prevent damage to the split unit (see Figure 12.1). Refrigerant Line Sets Only ACR grade copper tubing should be used. Recommended line sets are shown in Table 9.2. Refer to the table for proper line sizing, as well as maximum allowable lengths of the line set. The table is based on equivalent line length. Equivalent Line Length is the combination of the actual lengths of all straight runs and the equivalent length of all bends valves and fittings in a particular line. Refer to the ASHRAE Fundamentals Handbook for determining the equivalent lengths of bends, valves and fittings. If calculated equivalent line length is between two lengths in Table 9.2, use the size for the next longer length. Line sets over 60 feet are not recommended and can lead to oil return problems, which can dramatically reduce the life of the compressor, and excessive pressure drop, which can reduce capacity and efficiency of the system. Vertical lines should be kept to a minimum. Large vertical lifts will increase pressure drop in the liquid line. Whenever possible, the air handler should be installed above the unit to aid in oil return. Horizontal suction lines should be pitched slightly toward the unit to aid in oil return. Do not exceed the largest suction line size in the table for each given unit size. Bends and turns should be avoided if possible and all wall penetrations should be sealed. Line sets must be suspended properly and should not contact anything except the hangers and insulation. Ends of copper lines should be kept sealed until joints are brazed. All lines should be insulated with 3/8" thick insulation at minimum. The filter drier should be replaced whenever the lines are broken into for service. All brazing should be done with nitrogen flowing through the inside of the tubing at 2-3 psi to prevent oxidation. A low silver phos-copper braze alloy is recommended. When brazing to the Split Unit service valves, wrap the valves in a wet rag to prevent damage to the valves. NOTE: The Split Unit is shipped with a factory refrigerant charge. The service valves should not be opened until the entire line set has been leak tested, purged and evacuated. Existing Line Sets New line sets are recommended, but required if the following conditions exist: • A compressor burnout occurred in the previous system • Oil traps were installed in the existing line sets • The existing line set sizes are not equal the recommended line sets • The existing line set shows signs of damage, corrosion, abrasion or fatigue Thermal Expansion Valve The Split Ground Source Unit is equipped with a thermal expansion valve (TXV) that is pre-set from the factory for performance. No adjustment is necessary unless service has been done on the TXV. Table 9.1 shows the Split Unit TXV initial factory settings. Note that the matched Split System has two TXV’s, each with independent factory settings. One TXV is included with the A-coil or Air Handler, and one is installed in the Split unit. Refer to the Cased / Uncased or Air Handler I&S manual for the initial factory TXV settings at the A-coil. WARNING R-22 RETROFITS It is highly recommended that a new line set be installed for any R-22 system retrofit. If it is impossible to replace the line set, the line set must be flushed prior to the installation of the R-410A split system. It is also critical that the installer clear traps of all residual mineral oils. GEO16-501.3 7 installation DANGER Water temperatures over 125°F can cause severe burns instantly resulting in severe injury or death. Feel water before showering or bathing. Ensure that the primary water heating source setpoints are higher than the heat pump water discharge temperature of 120°F. 8.Reinstall the drain valve on one side of the tee. 9.Open all valves, except the system drain valve, and fill the system with water. Bleed all air and check for leaks. 10.Insulate all piping with 3/8” closed cell insulation. 11. R efer to Start Up Procedure for DHW setup and start up. Figure 8.1 - Typical DHW Piping Diagram COLD WATER IN important HOT WATER OUT AIR VENT All piping and connections must be made in accordance with local plumbing codes. All components should be located in a conditioned space that is maintained above 50°F at all times. Hot Water Generator (Desuperheater) Installation (If Equipped) A minimum 50 gallon water heater is recommended with the Desuperheater (DHW) option. Higher demand applications may use either one 80 gallon water heater or two 50 gallon water heaters piped in series. The hot water tank should be allowed to stratify by lowering the bottom element setpoint to 100°F and setting the top element setpoint to 125°F. Control of the DHW pump is via electro-mechanical temperature switches. The pump is energized whenever the unit is running a conditioning cycle, the DWH supply temperature (water leaving the desuperheater coil) is < = 120°F and the compressor discharge temperature is > = 100°F. The desuperheater pump is disabled on delivery from the factory. It must be enabled by wiring the pump in the unit control panel after the DHW piping has been completed and purged. This is to prevent the domestic hot water pump from running before the DHW tank is piped to the heat pump. DHW option must not be enabled until all piping is complete and the DHW loop has been purged and bled or damage can occur. DHW IN DHW OUT DRAIN CONNECTION DRAIN VALVE Figure 8.2 - Typical DHW Piping Diagram with Two Tanks COLD WATER IN Poor domestic water quality may result in debris buildup in the system. A water softener is recommended with hard water (greater than 10 grains or 170 total hardness). Extreme hard water will require additional maintenance and should be considered with the DHW option, as maintenance costs may outweigh potential savings. AIR VENT Make sure all local electrical and plumbing codes are met for installing a hot water generator. The installing contractor is responsible for performing the installation accordingly. Water piping lengths must be kept at a minimum. DO NOT use a one way length greater than 50 feet. HOT WATER OUT HOT WATER OUT COLD WATER IN TANK 1 HEATING SOURCE DISABLED DHW IN Coaxial drain tees that provide an inlet and outlet to the heat DHW OUT pump from the drain connection are not recommended. The decreased diameter of the inlet and outlet pipes to the heat pump make it possible for debris build up and completely stop the flow of water to and from the desuperheater. 1. Turn off power or fuel supply to the water heater. DRAIN CONNECTION 2. Close cold water supply valve to heater. DRAIN VALVE 3. Drain and flush the tank, then remove the drain valve. 4.Inspect the water heater cold water inlet pipe for a check Table 8.1 - DHW Pipe Sizes valve and remove if present. Failure to do so will result in Maximum pipe length (one way) to achieve optimum flow damage to the unit. 5.Use a tee to connect the cold water supply pipe to the DHW DHW Flow 1/2" In connection on the unit. Be sure to install a shutoff valve Models 3/4" Copper (gpm) Copper on the Cold Water Inlet pipe. Also install a shutoff valve on the supply line to the unit, as well as an air vent at the 024 0.8 50 highest point of the system. 036 1.2 50 6.Run DHW piping using a minimum of 1/2" OD copper 048 1.6 45 50 tubing. See Table 8.1 for recommended line sizes. 060 2.0 25 50 7.Use a tee to connect the unit DHW Out Connection to the water heater drain connection. Be sure to install a shutoff 066 2.4 10 50 valve on the pipe as near to the water heater as possible. GEO16-501.3 8 installation Leak Testing and Evacuating the Refrigeration System Pressurize the line set and air coil with 150 psi dry nitrogen and thoroughly check for leaks. Once a leak free system is verified, purge the system and evacuate the line set and air coil to at least 500 microns. Use both service ports to prevent false readings. A quality vacuum pump capable of accurately measuring vacuum depth is required to ensure system is ready for charging. System must hold vacuum for a minimum for 30 minutes. Charging the System Do not overcharge the system. Charge all systems by weight as determined from Table 9.2 and the supplied factory charge. Factory charge includes, split unit charge, air handler charge and a 25' line set. If the line set varies from 25', then a charge adjustment must be calculated. Table 9.1 - Initial Split Unit TXV Superheat Settings Models TXV Turns Closed 024 036 048 060 066 3-1/4 3-1/4 1-1/4 3-1/4 4-1/4 Verify final settings after initial adjustments. Table 9.2 - Line Sizing and Initial Refrigerant Charges Equivalent Line Length Liquid Split Unit Factory Charge (oz) - No HWG Split Unit Factory Charge (oz) - w/HWG 3/4" 3/8" 88 91 3/8" 3/4" 1/2" 105 108 7/8" 3/8" 7/8" 1/2" 120 123 1/2" 7/8" 1/2" 1-1/8" 1/2" 160 163 1/2" 7/8" 1/2" 1-1/8" 1/2" 160 163 Air Handler/ A-Coil Size Split Unit Size Suction Liquid Suction Liquid Suction 024 024 5/8" 3/8" 5/8" 3/8" 036 036 3/4" 3/8" 3/4" 048 048 3/4" 3/8" 060 060 7/8" 066 066 7/8" 20 Feet 40 Feet 60 Feet Initial system charge includes Split unit charge, 25' line charge, and Air Coil charge. Adjust charge via actual system subcooling and superheat measurements. Additional charge for R-410A is 1.0 oz/ft for 1/2" line and 0.5 oz/ft for 3/8" line GEO16-501.3 9 installation Wiring Figure 10.1 - Terminal Strip WARNING 1. Disconnect power supply before making wiring connections to prevent electrical shock and equipment damage. 2. All appliances must be wired strictly in accordance with the wiring diagram furnished with the appliance. Any wiring different from the wiring diagram could result in a hazard to persons and property. 3. Any original factory wiring that requires replacement must be replaced with wiring material having a temperature rating of at least 105°C. 4. Ensure that the supply voltage to the appliance, as indicated on the serial plate, is not 5% greater than rated voltage. CAUTION Ensure that the supply voltage to the appliance, as indicated on the serial plate, is not 5% less than the rated voltage. Installation of wiring must conform with local building codes, or in the absence of local codes, with the National Electric Code ANSI/NFPA 70 - Latest Edition. Unit must be electrically grounded in conformance to this code. In Canada, wiring must comply with CSA C22.1, Part 1, Electrical Code. Electric wiring must be sized to carry the full load amp draw of the motor, starter and any controls that are used with the unit. See Table 13.1 for electrical data. Any damage to or failure of units caused by incorrect wiring of the units is not covered by warranty. Terminal Strip Connections The terminal strip connections are designed to clamp down on the wires. To properly connect the wires to the terminal strip: 1. Push a small flat-head screwdriver into the square hole on the terminal. Press firmly until the screwdriver hits the back stop and opens the terminal (see Figure 10.1). 2. Remove approximately 3/8" of insulation from the end of the wire and push the stripped wire into the oval hole in the terminal. 3. Remove the screwdriver. Pull on the wire to make sure that it is securely clamped in the terminal. 4. Make sure that the terminal clamp is in contact with bare wire (insulation removed). 10 Unit Power Connection Refer to the unit serial plate for unit voltage and phase. Available power must be the same as indicated on serial plate Remove access panel and electrical box cover. Using Unit Power knockout, route power lines through unit and into main electrical panel. Connect line voltage wires to the L1 and L2 lugs of the contactor. Consult the unit electrical data on the serial plate for correct overcurrent protection sizing. Connect ground wire to ground lug in electrical panel. Replace electrical box cover and access panel prior to unit startup. Hot Water Generator Pump Wiring The domestic hot water pump is not wired in the factory to prevent pump burnout in case the unit is powered before the domestic hot water tank is plumbed or full of water. Refer to the control manual and wiring diagram for instructions on enabling the pump. Transformer Wiring The system supplies the power to the controller via a 24V transformer. On 208-230V systems, the transformer comes factory wired for 230V operation. If the unit is to be powered with 208V, the transformer must be wired for 208V. A terminal strip with a jumper is provided for easy field configuration (see Figure 11.1). Refer to the wiring diagram provided with the unit for for details. GEO16-501.3 installation Figure 11.1 - 208-230V Transformer Wiring Flow Center Wiring The flow center must be connected to the terminal blocks in the electrical box. The pumps will automatically be cycled as required by the unit. Be sure to wire the flow center prior to turning the system on. Thermostat Wiring The thermostat wires are connected directly to the appropriate terminal blocks in the electrical box. Refer to the unit wiring diagram or control manual for details. Thermostat Installation and Wiring The thermostat should be located on an interior wall in a larger room approximately 54" off the floor and away from supply duct drafts. DO NOT locate the thermostat in areas subject to sunlight, drafts or on external walls. GEO16-501.3 11 installation Open Loop Control Valve Wiring Dual Fuel Setup / Thermostat Wiring Always maintain water pressure in the heat exchanger by placing water control valves at the outlet of the unit to prevent mineral precipitation during the off cycle. Pilot operated slow closing valves are recommended to reduce water hammer. If water hammer persists, an expansion tank can be mounted on the piping to help absorb the excess hammer shock. Slow closing valve must have an end switch that enables/disables the compressor. See Figure 12.3 for proper wiring. When matched with a separate coil and a furnace for the air handler, a dual fuel thermostat is required to prevent furnace from engaging when heat pump is operating. The heat pump is the first and second stage of heating and the furnace is the auxiliary heat. Figure 12.1 - Field Wiring to Fossil Fuel Furnace 502 520 521 522 591 592 〈 〈 〈 〈 〈 〈 〈 〈 〈 〈 〈 〈 〈 〈 C 24VAC Common R 24VAC Hot G Fan Y1 Compressor Stage 1 Y2 Compressor Stage 2 W1 Aux Ht Stg 1 W2 Aux Ht Stg 2 Figure 12.3 - Optional Open Loop Valve Wiring Furnace Terminals Control Panel Terminals 500 Condensate Overflow Alarm Modine Air Handlers are supplied with a condensate pan overflow switch which should be wired back to the Split System with two wires. Terminals are provided in control panel for field wiring of condensate overflow switch. Remove the blue jumper wire and wire COS to terminals 533 & 534. Refer to wiring diagram and Figure 12.2. If the Modine Split unit is matched with an existing air handler or air coil, it is highly recommended a normally closed, condensate overflow switch is installed in the air coil drain pan and wired to the unit control board. When installed, the controller will shut down the unit in the event of a plugged condensate drain line. Failure to wire the switch to unit may result in damage to the furnace or property. The condensate switch accessory assembly, 3H0387860001, is available for field installation. It is supplied with 75’ of lead wire. The condensate alarm is a 24V, normally closed, dry contact. The installer may route the leads back to the unit or run two wires. Figure 12.2 - Condensate Overflow Switch Wiring 12 GEO16-501.3 electrical DATA electrical DATA Table 13.1 - Electrical Data Models 024 036 048 Supply Voltage 208-230/60/1 Min / Max Voltage 197 / 253 060 066 FLA 15.7 19.7 28.1 34.7 37.6 MCA 18.5 23.5 33.5 41.8 45.4 MOP 30.0 40.0 50.0 70.0 70.0 GEO16-501.3 13 START-UP PROCEDURE start-uP procedure CAUTION important Start-up and adjustment procedures must be performed by a qualified service agency. The unit has been factory tested and set for proper operation, but a full unit start-up is recommended. NOTE: If any abnormal operation occurs during the startup procedure, refer to the Troubleshooting section. To avoid equipment damage, DO NOT leave system filled in a building without heat during the winter unless antifreeze is added to the water loop. Heat exchangers never fully drain by themselves and will freeze unless winterized with antifreeze. Controller Setup GS/ES systems are pre-programed from the factory for easy installation, no installer setup is required for the unit to function. The DHW pump is not wired from the factory on all units. This is done to protect the pump during installation and startup. If a DHW pump is in the system, it must be wired. NOTE: Always start the system in heating mode. Pre-Start Checks Before applying power to heat pump, use the following checklist to ensure a complete and proper installation. important • Check that the supply voltage matches the unit supply voltage listed on the Unit Serial Plate. • Verify that all wiring is secure and properly protected. • All high voltage wiring is correct including, fuses, breakers and wire sizes. • Trace circuits to insure that the unit has been wired according to the wiring diagram. • Check that the unit has no visible damage and that all the components are secure. • Check that all field electrical and mechanical work has been performed according to all applicable Federal, State, and Local codes. • Check the supply voltage to the unit is within +/- 5% of the voltage on the unit serial plate. • Low voltage wiring for thermostat, control wiring and the freeze protection setpoint completed. • Transformer wiring is correct. • Water supply to heat pump is completed. • Piping completed, water system cleaned and flushed of debris. • Air and debris are purged from the ground loop. • Antifreeze added to ground loop, as required • Isolation valves are open, water control valves or loop pumps wired. • DHW piping is complete, all air purged from system and charged with water. • IMPORTANT: Ensure all valves in the DHW circuit are fully open. • Condensate line is open, condensate drain line is correctly pitched. • Blower rotates freely. • Check air coil for cleanliness. • Filter is clean and in position. • Clean all debris from the ducting system. • Service/access panels are in place. • Entering air and water temperatures are within operating limits in Table 16.2. Ensure that the freeze protection setpoint is properly set (approximately 10°F above the fluid freeze point) for the type and percentage of fluid used in the ground loop. CAUTION Verify that ALL water control valves are open and allow water flow prior to engaging the compressor. Freezing of the coax or water lines can permanently damage the heat pump. 14 Table 14.1 - Freeze Point of Pure Antifreeze Solutions, °F ➀ % Vol. Methanol Ethanol Propylene Glycol 5.0 26.2 29.5 29.3 7.5 23.0 28.1 27.7 10.0 19.7 26.4 26.1 12.5 16.2 24.6 24.4 15.0 12.6 22.6 22.5 17.5 8.8 20.4 20.5 20.0 4.9 18.1 18.4 22.5 — 15.6 16.1 25.0 — 12.9 13.8 27.5 — 10.0 11.3 30.0 — 7.0 8.8 ➀A ll values are typical, refer to antifreeze manufacturer data sheets for actual values. Unit Startup Procedure The Startup/Troubleshooting form found on page 25 of this manual may be used to assist during unit startup. 1. P ut thermostat in standby or off mode. 2. Turn on line power to heat pump. 3. Turn thermostat fan position to “ON” and verify blower operation. 4. Put thermostat in heating mode. 5. S lowly raise the thermostat set-point until a heating call is generated and the compressor energizes. 6. After a few minutes, check the supply air and verify warm air delivery. 7. V erify water flow by comparing pressure drop across the coaxial coil to values in Table 15.1. 8. M onitor ground water supply (GWI) and return (GWO) temperatures. If temperature drop is within expected operating range as shown in Table 16.1, continue with testing. GEO16-501.3 START-UP PROCEDURE 9. If temperature drop is outside of expected operating range, check refrigerant pressures and compare to those shown in Table 16.1. 10. Check air temperature rise across the coil. Air temperature rise should be between 20°F and 30°F. 11. Check for vibration, noise and leaks. 12. Lower thermostat set point below room temperature and verify that compressor and flow center deactivate. 13. Initiate a control signal to place the unit in the cooling mode. Cooling set point must be set below room temperature. 14. Cooling will energize after a time delay. 15. Be sure that the compressor and flow center are activated. 16. Monitor ground water supply (GWI) and return (GWO) temperatures. If temperature rise is within expected operating range as shown in Table 16.1, continue with testing. 17. If temperature drop is outside of expected operating range, check refrigerant pressures and compare to those shown in Table 16.1. 18. Check for an air temperature drop of 15°F to 25°F across the air coil. 19. Check for vibration, noise and leaks. 20. Adjust the cooling set point above the room temperature and verify that the compressor and flow center deactivate. 21. If unit fails to operate as described, see troubleshooting section. If the unit still does not operate properly, contact Modine at the number listed on the back of this manual. 22. When testing is complete, set system to normal operating mode. Table 15.1 - Water Pressure Drop, psi (Based on Entering Water Temperature) Models 024 Sequence of Operation 30°F 40°F 60°F 90°F 110°F 4.0 0.8 0.8 0.7 0.6 0.6 5.0 1.1 1.1 0.9 0.8 1.8 1.5 1.4 1.8 1.6 6.0 7.0 8.0 036 10.0 8.0 10.0 Heat: Upon receiving a G and Y1 and signal from the thermostat, the blower and compressor will be energized. On two stage units with ECM, the first stage of the compressor will be energized and the blower will provide the first stage airflow. The compressor will be limited by a timer that will provide anticycle protection. When a subsequent Y2 signal is received, the second stage of the compressor will be energized and the blower will provide second stage airflow (two stage units with ECM only). Open Loop Systems: An optional valve can be fitted to stop water flow when the compressor is not energized. This allows the pumping system to work more efficiently. Supplemental Electric Heat (Field Installed Accessory): Upon receiving a W1 signal from the thermostat, heat is energized. Upon receiving a W2/E signal from the thermostat, electric heat is energized. 2.8 18.0 21.0 0.7 1.7 1.5 2.2 3.5 3.0 0.5 1.1 2.5 2.2 4.5 4.1 3.7 4.9 6.2 0.9 1.5 3.4 5.8 2.8 3.7 1.0 2.7 3.8 2.0 2.4 1.0 1.8 1.7 1.3 0.4 1.4 2.0 1.3 0.5 1.0 1.9 5.0 2.6 1.2 1.8 6.3 2.1 0.8 2.2 2.7 12.0 2.5 0.9 1.3 15.0 1.6 1.4 4.1 1.3 1.1 1.7 4.7 0.6 9.0 1.0 5.4 0.6 1.7 1.9 0.8 1.1 3.0 4.0 0.9 1.2 3.4 4.1 5.5 12.0 24.0 0.7 1.3 1.7 1.0 1.6 2.3 3.1 3.0 5.3 4.9 3.9 Table 15.2 - Antifreeze Pressure Drop Corrections Antifreeze Type Ethylene Glycol Blower: The blower will cycle with a call for cooling or heating. Cool: Upon receiving a a G, Y1, and O signal from the thermostat, the blower, compressor and reversing valve will be energized. On two stage units with ECM, the first stage of the compressor will be energized and the blower will provide the first stage airflow. The compressor will be limited by a timer that will provide anti-cycle protection. When a subsequent Y2 signal is received, the second stage of the compressor will be energized and the blower will provide second stage airflow (two stage units with ECM only). 2.9 3.5 Propylene Glycol The unit’s controller will monitor calls for heat or cooling by thermostat(s). 2.1 9.0 8.0 14.0 060 & 066 1.8 1.4 2.2 1.9 6.0 048 1.4 6.0 12.0 DHW Startup Procedure 1. If the DHW was wired, the DHW pump will run whenever the heat pump is running and the DHW Supply temperature is below 120°F and the discharge temperature is above 100°F. 2. To verify operation of the DHW pump, ensure that the heat pump is running and the DHW temperature is below 120°F and the discharge temperature is above 100°F. 3. The temperature rise across the desuperheater should be 5-10°F. GPM Ethanol Methanol Antifreeze Solution Percent by Weight Correction Factor 15% 20% 30% 15% 20% 30% 38% 14% 20% 29% 10% 15% 20% 25% 1.12 1.16 1.22 1.20 1.27 1.43 1.55 1.29 1.34 1.43 1.12 1.16 1.19 1.21 Equation 15.1 - Coaxial Coil Pressure Drop Antifreeze Correction To find actual pressure drop through either coaxial coil when the unit is operated with an antifreeze solution, rather than water: Where: WPDA = WPDS x ACF WPDA = Water Pressure Drop at Actual Conditions WPDS = Water Pressure Drop at Standard Conditions (water) from Table 18.1 ACF = Antifreeze Correction Factor from Table 18.2 GEO16-501.3 15 start-up procedure Table 16.1 - Typical Operating Conditions Heating - No Desuperheater Entering Water Temperature (°F) Water Flow (gpm/ton) Suction Pressure (psig) Discharge Pressure (psig) Superheat (°F) Subcool (°F) Water Temperature Drop (°F) Air Temperature Rise (°F) 1.5 3.0 1.5 3.0 1.5 3.0 68-76 72-80 100-110 104-114 134-144 138-148 285-310 290-315 315-345 320-350 355-395 360-390 8-12 8-12 9-13 9-13 10-14 10-14 3-9 3-9 5-11 5-11 6-12 6-12 5-7 3-5 7-9 5-7 9-11 7-9 15-21 17-23 22-28 24-30 30-36 32-38 Water Flow (gpm/ton) Suction Pressure (psig) Discharge Pressure (psig) Superheat (°F) Subcool (°F) Water Temperature Rise (°F) Air Temperature Drop (°F) 1.5 3.0 1.5 3.0 1.5 3.0 122-130 120-128 127-136 125-134 132-144 130-142 220-235 190-210 210-280 250-270 360-380 330-350 13-19 13-19 11-15 11-15 10-14 10-14 10-16 10-16 8-14 8-14 8-14 8-14 19-23 9-12 19-23 9-12 18-22 9-12 21-25 21-25 20-24 20-24 18-22 18-22 30 50 70 Entering Water Temperature (°F) 50 70 90 Cooling - No Desuperheater Table 16.2 - Operating Limits 16 Operating Limits Cooling, °F Heating, °F Min. Ambient 45 45 Rated Ambient 80.6 68 Max Ambient 100 85 Min. Entering Air 50 40 Rated Entering Air, db/wb 80.6/66.2 68/59 Max. Entering Air, db/wb 110/83 80 Min. Entering Water 30 20 Normal Entering Water 50-90 30-60 Max. Entering Water 120 90 NOTE: Limits are acceptable for start-up conditions only. Min / max limits are intended for bringing the space up/down to normal temperatures. Units are not designed to operate at the min/max conditions on a continual or regular basis. The operating limits are dependant upon three primary factors: 1) water temperature, 2) return air temperature, and 3) ambient temperature. When any of the factors are at the minimum or maximum levels, the other two factors must be at the normal level for proper and reliable unit operation. GEO16-501.3 start-up procedure Table 17.1 - Compressor Winding Resistance (Ohms) Compressor C to S C to R S to R ZPS20K5E-PFV 1.64 1.30 2.94 ZPS26K5E -PFV 1.91 1.02 2.93 ZPS30K5E -PFV 1.52 0.89 2.40 ZPS35K5E -PFV 1.55 0.62 2.17 ZPS40K5E-PFV 1.87 0.52 2.38 ZPS49K5E-PFV 1.67 0.42 2.09 ZPS51K5E-PFV 1.67 0.42 2.09 ZPS60K5E-PFV 1.91 0.36 2.27 Table 17.2 - Refrigerant Circuit Malfunctions and Probable Causes ➀ The following chart will assist in troubleshooting and diagnosing causes of a problematic unit. The chart provides general guidance for system measurements relative to typical operating conditions. Cause Symptom Air Temp Water (Source) Diff. Temp Diff Head Press. Suct. Press. Comp Amp Draw Superheat Subcool Undercharged System Low Low Low High Low Low Low Overcharged System High High High Normal High Normal Normal Low Air Flow / Load Water Flow - Heating High High High High Low High Low / Normal Low Air Flow / Load Water Flow - Cooling Low Low Low Low / Normal High High Low / Normal Low Source Water Flow - Heating Low Low Low Low High Low High Low Source Water Flow - Cooling High High High High Low Low High High Air Flow / Load Water Flow - Heating Low Low Low Low High Low Normal / High High Air Flow / Load Water Flow - Cooling Normal / High High Normal / High High Low Low Normal / High High Source Water Flow - Heating Normal / High High Normal / High High Low / Normal High Low High Source Water Flow - Cooling Low Low Low Low High High Low Low Indoor Air / Load Water Temp - Heating Low Low Low Low / Normal High High Normal / High High Low Low Low Low Low Indoor Air /Load Water Temp - Cooling Low Low Low Low / Normal High Indoor Air / Load Water Temp - Heating High High High Normal / High Low / Normal High Indoor Air / Load Water Temp - Cooling High High High High Low Low High Restricted TXV High Low Low / Normal High High Low Low TXV Bulb Failure (Loss of Charge) Normal Low Normal High High Low Low Restricted Filter/Drier 1 High Low Low / Normal High High Low Low Inefficient Compressor Low High Low High High Low Low Scaled / Fouled Load Heat Exchanger - Heating High High High High Low Low Low Scaled / Fouled Load Heat Exchanger - Cooling Low Low Low Low / Normal High Low Low Scaled / Fouled Source Heat Exchanger - Heating Low Low Low Low / Normal High Low Low Scaled / Fouled Source Heat Exchanger - Cooling High High High High Low Low Low ➀ Restricted filter / drier will have symptoms similar to restricted TXV. Check temperature drop across filter drier to verify a restriction. GEO16-501.3 17 TECHNICAL data Table 18.1 - Technical Data Model Size 024 036 Compressor 048 060 066 Two Stage Copeland Ultratech Coaxial Coil Internal Water Volume, gal. 1.1 1.8 2.1 2.5 2.5 Nominal Coaxial Water Flow Rate, GPM 6.0 9.0 12.0 15.0 18.0 Nominal Cooling Capacity, Tons 2.0 3.0 4.0 5.0 6.0 MATCHING GA/EA AIR HANDLER 024 036 048 060 066 ➀ Cooling capacity based on 350 CFM , 75/63°F Dry Bulb/Wet Bulb Return Air 18 GEO16-501.3 maintenance MAINTENANCE Coaxial Coil Maintenance – Ground Loop Applications WARNING When servicing or repairing this equipment, use only factoryapproved service replacement parts. A complete replacement parts list may be obtained by contacting Modine Manufacturing Company. Refer to the rating plate on the appliance for complete appliance model number, serial number, and company address. Any substitution of parts or controls not approved by the factory will be at the owner’s risk. CAUTION Do not attempt to reuse any mechanical or electrical component which has been wet. Such component must be replaced. important Generally water coil maintenance is not needed for closed loop systems. However, if the piping is known to have high dirt or debris content, best practice is to establish a periodic maintenance schedule with the owner so the coil can be checked on a regular basis. Dirty installations are typically the result of deterioration of iron or galvanized piping or components in the system. Open cooling towers requiring heavy chemical treatment and mineral buildup through water use can also contribute to higher maintenance. Should periodic coil cleaning be necessary, use standard coil cleaning procedures that are compatible with the heat exchanger material and copper water lines. Generally, with greater water flow rates, the likelihood of scaling reduces. However, flow rates over 3 gpm per ton can produce water (or debris) velocities that can erode the heat exchanger wall and ultimately produce leaks. Desuperheater Coils To check most of the Possible Remedies in the troubleshooting guide listed in Tables 22.1 - 24.1, refer to the applicable sections of the manual. The routine care and maintenance of this unit will increase longevity, provide for the proper operational performance, and reduce the probability of failure. Once the unit is operational, it will be necessary to perform certain routine maintenance/service checks. Following is a Maintenance Schedule with the recommended checks. If your unit is equipped with special features, there may be additional checks that are required. Consult Modine for assistance. The use of torque screwdrivers on panel, cover or component mounting screws is not recommended. Hand-start all screws. If electric drills are used – set at the lowest possible torque. Coaxial Coil Maintenance – Ground Water Applications If the system is installed in an area with a known high mineral content (125 P.P.M. or greater), best practice is to establish a periodic maintenance schedule with the owner so the coil can be checked on a regular basis. Should periodic coil cleaning be necessary, use coil cleaning procedures that are compatible with the heat exchanger material and copper water lines. Generally, with greater water flow rates, the likelihood of scaling reduces. Therefore, the recommended minimum water flow is 1.5 gpm per ton. Recommended minimum flow rate for entering water temperatures below 50°F is 2.0 gpm per ton. Keep all air out of the water. An open loop system should be checked to ensure that the well head is not allowing air to infiltrate the water line. Lines should always be airtight. Keep the system under pressure at all times. It is recommended in open loop systems that the water control valve be placed in the discharge line to prevent loss of pressure during off cycles. Closed loop systems must have positive static pressure. If potable water is hard or not chemically softened, the high temperature of the desuperheater can lead to scaling. This results in more scheduled maintenance. A buffer tank may be installed to help prevent scaling. Extreme hard water conditions should not use the desuperheater option. Should periodic coil cleaning be necessary, use coil cleaning procedures that are compatible with the heat exchanger material and copper water lines. Air Filters Filters must be clean to obtain maximum performance. They should be inspected monthly under normal operating conditions and be replaced when necessary. Units should never be operated without a filter. Condensate Drain In areas where airborne bacteria produce slime in the drain pan, it may be necessary to treat chemically with an algaecide approximately every three months to minimize the problem. It may be necessary to clean the condensate pan periodically to insure indoor air quality. The condensate drain can pick up lint and dirt, especially with dirty filters. Inspect twice a year to avoid the possibility of overflow. Compressor Conduct annual amperage checks to insure that amp draw is no more than 10% greater than indicated on the operating data. Blower Motors All units have lubricated fan motors. Do not lubricate unless obvious, dry operation is inspected. Periodic oiling is not required (may lead to excessive dirt buildup & motor failure). Check the operation amperage annually to ensure the amp draw is not greater than 10% of data indicated on the name plate. ECM fan motors need NO oiling. GEO16-501.3 19 maintenance / REPLACEMENT PARTS Cabinet If a flood occurs, try to expel water as soon as possible. Water contact for any duration will cause corrosion on the cabinet finish. All units mounted on the ground should be installed on an absorption pad. This also helps prevent water from entering the cabinet. If the cabinet is dirty, do not spray with water, use a damp rag with mild detergent, and wipe the system clean. Figure 20.1 - Serial Plate EXAMPLE Refrigerant System The refrigerant circuit is sealed, service gauges should not be used unless the system is not operating correctly. The operational charts show correct pressures, flow and temperature. Before servicing the refrigerant circuit, ensure that the water and air flow are correct. REPLACEMENT PARTS For ease of identification when ordering replacement parts or contacting the factory about this unit, please provide the complete model number and unit serial number. This information can be found on the serial plate attached to the unit (see Figure 20.1). When a component part fails, a replacement part should be obtained by contacting the local distributor or Modine Sales Representative. The sales representative can assist with Return Material Authorizations (RMAs) and potential warranty claims. The following details are required to process parts orders and warranty claims: 1. Full description of part required, including unit’s model number. 2. The complete unit’s serial number. 3. Completed Return Material Authorization (RMA) 4. An appropriate purchase order number. For further information email modinegeothermal@ccsportal. com or call 1-877-679-4436 (4GEO). Table 20.1 - Common Replacement Parts Models 024 Compressor Contactor Reversing Valve 5H1038032021 5H083431001 5H102830-4 Desuperheater Pump 5H083423001 036 5H1038033021 5H083431001 5H102830-1 5H083423001 048 5H1038034021 5H083431001 5H102830-1 5H083423001 060 5H1038035121 5H083431001 5H102830-3 5H083423001 066 5H1038036021 5H083431001 5H102830-3 5H083423001 Models High Pressure Switch Low Pressure Switch Filter - Drier 024 5H083561 5H083562 5H083405-1 036 5H083561 5H083562 5H083405-1 048 5H083561 5H083562 5H083405-2 060 5H083561 5H083562 5H083405-3 066 5H083561 5H083562 5H083405-3 20 GEO16-501.3 TROUBLESHOOTING General When encountering a unit with operational faults, complete these preliminary system checks before utilizing the troubleshooting charts. In order to maintain system integrity, performance and efficiency, do not install service gauges unless unit operation appears abnormal and all other diagnostic checks are normal.. Verify water and air side temperatures changes against Typical Operating Data. If the performance is within the ranges in the table and the air and water flows have been verified, then gauges may be installed in order to check subcooling and superheat. 1. Verify that the unit and flow center power supplies are on 2. Verify that all fuses or disconnects switches are intact 3. Inspect unit for obvious defects (e.g., leaking connections, loose or damaged wiring, etc.) 4. Verify field inputs and outputs (refer to wiring diagram) a. Thermostat inputs – Thermostat inputs are 24VAC signals and can be verified using a volt meter between C and Y, G, O, W. b. Outputs – Compressor and reversing valve output relays are 24VAC and can be verified using a voltmeter. The fan, flow center and DHW pump are powered through 240V relays. Operation can be verified using a voltmeter or clamp-on ammeter. 5.After completing these checks, refer to the troubleshooting tables on the next pages. GEO16-501.3 21 troubleshooting Table 22.1 - Troubleshooting Fault No power to unit Compressor not operating Blower does not run 22 Mode Htg Clg Possible Cause Verify Action Power Failure No voltage at line side of compressor contactor. Check disconnect switch and power distribution panel. Open disconnect switch At heat pump disconnect, voltmeter shows voltage on the line side but not on the load side. Determine why the disconnect switch was opened. Close disconnect if safe to do so. X Blown fuse / circuit breaker tripped Check fuses and circuit breaker. Reset circuit breaker or replace fuses with proper size and type. Verify total load on system and proper fuse / circuit breaker sizing. X X Low supply voltage Voltmeter shows abnormally low voltage at heat pump disconnect switch (below 95% of serial plate voltage). Call power company. X X Thermostat position Verify that thermostat is in heating or cooling position. Test operation of thermostat. X X Defective thermostat Verify operation of thermostat; verify thermostat signals at unit. Replace, if defective. X X Thermostat wiring Verify thermostat wiring at unit and signals at unit. Repair wiring, if needed. Transformer Check primary and secondary transformer voltages. If no primary, verify wiring If no, or low secondary, check transformer wiring If wiring ok, replace transformer. Check transformer secondary voltage circuit breaker. Reset breaker, if tripped. Power wiring defect Check for loose or broken wires at compressor, contactor and capacitor. Repair wiring, if needed. Check controller display for fault. Address lockout and reset controller. X X X X X X X X X X X Locked out on safety controls X X Defective Ensure that compressor is cool and overload has compressor overload had sufficient time to reset. Ohmmeter shows a resistance across R & S terminals and OPEN or infinite resistance between C & R or C & S terminals. If windings are open or overload is faulty, replace compressor. X X Compressor motor burn out or open windings Ohmmeter shows no resistance or OPEN between common and run terminals. *NOTE: Make sure the compressor is rested. Troubleshoot cause and replace motor Defective compressor contactor Voltage on line side and contactor pulled in, but no voltage on one or both terminals on the load side. Points damaged. Replace contactor. Voltage on line side, 24VAC across contactor coil and no voltage on load side. Bad coil, replace contactor. Loss of compressor run signal Voltage on line side of contactor verified and contactor won’t pull in. No 24VAC on compressor contactor coil when 24VAC is present at controller and controller fuse is intact. Replace controller. Defective run capacitor Measure resistance across capacitor terminals. If shorts exist, capacitor is defective. Replace, if faulty. X X X X X X X X Defective thermostat Verify operation of thermostat. Replace if defective. X X Thermostat wiring Verify thermostat wiring at unit. Repair wiring, if needed. X X Loss of power to motor (208/240V units) Verify voltage across 240VAC L1 IN & L2 IN. If no voltage, on L1 and L2, check wiring on board and top of contactor; repair wiring as needed. X X X X Defective ECM motor Verify line voltage at motor. X X Unit is oversized Verify load calculations and unit selection. Defective PSC motor Check line voltage at motor with G call. GEO16-501.3 If power at motor, check capacitor. Replace motor or capacitor, if defective. If power at motor, verify control signals. troubleshooting Table 23.1 - Troubleshooting Fault Mode Htg Clg X Unit “short cycles” X X X X X X X Possible Cause Check air filter Replace, if necessary. Thermostat location Check to see if thermostat is installed near a supply air grill. Relocate, if necessary. Defective compressor overloads Ensure that compressor is cool and overload has had sufficient time to reset. Ohmmeter shows a resistance across R & S terminals and OPEN or infinite resistance between C & R or C & S terminals. If windings are open or overload is faulty, replace compressor. Wiring and controls Examine all wiring points. Tighten all wiring points. Check flow center operation Troubleshoot flow center Manually open water valve and measure water flow. Adjust to proper flow rate. Reduced water flow Plugged water strainer or filter. Replace or clean, if dirty. Scaled or plugged coaxial coil Check temperature drop across coaxial coil. Clean, if necessary. Water supply too cold Verify GEO IN with temperature probe. Verify loop sizing; verify that all air has been purged from ground heat exchanger; bring water temperature within design parameters. Entering air too cold Measure return air, should be above 60ºF. Bring return air temperature within design parameters. Reduced air flow Verify blower operation. Troubleshoot blower operation. Check air filter. Replace or clean, if dirty. Check for airflow restrictions in ducting system. Address any ductwork airflow restrictions. Check external static. Check external static against blower table. Low refrigerant charge Check for refrigerant leaks. If leaks found, evacuate, repair and recharge to factory recommended charge. Plugged bi-flow filter / drier Verify that low pressure cut-out occurs in heating mode and not in cooling mode. Replace filter, if necessary. X Restricted TXV Verify superheat and subcooling values. Replace, if necessary. X Defective low pressure switch Monitor suction pressure while operating, verify low pressure cut-out pressure (25 +/- 5 psig). If defective, replace. Reduced water flow Check flow center operation. Troubleshoot flow center. Manually open water valve and measure water flow. Adjust to proper flow rate. Plugged water strainer or filter. Replace or clean, if dirty. X Water supply too hot Verify GEO IN with temperature probe. Verify loop sizing; bring water temperature within design parameters. X Scaled or plugged coaxial coil Check temperature drop across coaxial coil. Clean, if necessary. Reduced or no air flow in heating Verify blower operation. Troubleshoot blower operation. Check air filter. Replace or clean, if dirty. Check for airflow restrictions in ducting system. Address any ductwork airflow restrictions. Check external static. Check external static against blower table. Air temperature out of range Measure return air, should be below 95ºF. Bring return air temperature within design parameters. X X X X X X X X X Action Dirty Air Filter X Low pressure cutout Verify X X High pressure cutout X X X Defective high pressure switch Monitor discharge pressure while operating, verify high pressure cut-out pressure (600 +/- 25 psig). Replace, if defective. X X Overcharged with refrigerant Verify superheat and subcooling values. Evacuate and recharge to factory recommended charge. X X Restricted TXV Verify superheat and subcooling values. Replace, if necessary. X X Non-condensables in system Verify superheat and subcooling values. Evacuate and recharge to factory recommended charge. X Loss of control signal In cooling mode, verify 24VAC at RV coil and at REV terminals. If 24VAC exists, troubleshoot RV and coil. If no control signal, troubleshoot thermostat signals. GEO16-501.3 23 troubleshooting Table 24.1 - Troubleshooting Fault Mode Htg Clg Thermostat setup / wiring Verify thermostat setup and wiring. X Thermostat operation Verify proper thermostat signals to unit. Replace, if necessary. X No water flow, high pressure cutout Check flow with flow meter. Check pump operation. Dirty Air Filter Check air filter. Replace or clean, if dirty. Unit undersized Verify load calculations and unit selection. Thermostat location Check to see if thermostat is installed near a supply air grill. If excessive, it may possible to rectify with shading and insulation. X X X X X X X X X X X X X X X X X Auxiliary heater is always “ON” Noisy unit 24 Duct losses Ambient losses Low refrigerant charge Scaled or plugged coaxial coil Reduced water flow Water supply too hot X X X X X Troubleshoot blower operation. Check for airflow restrictions in ducting system. Address any ductwork airflow restrictions. Check air filter. Check external static. Verify blower operation. Check air filter. Check external static. Check supply and return air temperatures at heat pump and at furthest registers. If difference is significant, duct losses are occurring. Clean or replace. Verify GEO IN with temperature probe.. Check flow center operation. Manually open water valve and measure water flow. Plugged water strainer or filter. Verify GEO IN with temperature probe. Verify superheat and subcooling values. Non-condensables in Verify superheat and subcooling values. system Poor drainage Check piping slope, away from unit and toward outlet. Check venting. X X X X X X Cycle power to system, using an amp meter verify amperage draw. Check 24VAC voltage signals to the auxiliary heater printed circuit board. Make sure the compressor is not in direct contact with the base or sides of the cabinet. Cold surroundings can cause liquid slugging, increase ambient temperature. Remove compressor mounting bolts. Air flow is noisy Pump cavitation Repair duct losses. Plugged water strainer or filter. Troubleshoot compressor operation. Rattles and vibrates Check external static against blower table. Troubleshoot flow center. Manually open water valve and measure water flow. Check trap dimensions and location. X Address any ductwork airflow restrictions. Check flow center operation. X X Replace or clean, if dirty. Replace or clean, if dirty. Restricted TXV Compressor Troubleshoot blower operation. Check temperature drop across coaxial coil. Check superheat and subcooling values. Check for refrigerant leaks. Check for blockage and clean drain. X Check external static against blower table. Address issue. Improper trap X Replace or clean, if dirty. Check for losses / gains due to ambient air infiltration through doors and windows. Compressor Defective auxiliary heater PCB Relocate, if necessary. Verify blower operation. Blocked drain X Repair wiring, if needed. Replace, if defective. When it is necessary to replace the reversing valve, wrap it with a wet cloth and direct the heat away. Excessive heat can damage the valve. X X If defective, replace. When it is necessary to replace the reversing valve, wrap it with a wet cloth and direct the heat away. Excessive heat can damage the valve. Verify operation of reversing valve and solenoid coil. Defective reversing valve creating bypass of refrigerant from discharge to suction side of compressor. Check for airflow restrictions in ducting system. Water supply too cold X Condensate overflow Reduced air flow in cooling Reduced water flow X X Defective reversing valve Reduced or no air flow in heating X Insufficient cooling or heating Action Verify operation of reversing valve and solenoid coil. X X Verify Defective reversing valve X Unit will not operate in cooling mode Possible Cause Check for loose screws, panels, or internal components. Tighten and secure. Piping could be hitting the metal surfaces. Add insulation between the contact. Undersized duct work will cause high airflow velocities and noisy operation. Purge air from closed loop system. GEO16-501.3 If leaks found, evacuate, repair and recharge to factory recommended charge. Adjust to proper flow rate. Verify loop sizing; bring water temperature within design parameters. Troubleshoot flow center. Adjust to proper flow rate. Replace or clean, if dirty. Verify loop sizing; bring water temperature within design parameters. Replace, if necessary. If discharge pressure is too low and suction pressure too high, compressor is not pumping properly. Replace compressor. Evacuate and recharge to factory recommended charge. Replace printed circuit board. Replace printed circuit board. SPLIT UNIT START UP / TROUBLESHOOTING FORM Customer Name ___________________________________________________ Date _________________________ Address _______________________________________________________________ Loop Type _________________ Model # ________________________________ Serial # ______________________________ Antifreeze ____________ ___Startup ___Troubleshooting, Complaint __________________________________________________________ COOLING CYCLE ANALYSIS HEATING CYCLE ANALYSIS Note: In order to maintain optimal performance, DO NOT hook up pressure gauges during start up procedures. When troubleshooting, conduct water side analysis first. If water-side performance is poor, use of pressure gauge and refrigerant side analysis may be required. Technician Notes GEO16-501.3 25 this page intentionally left blank 26 GEO16-501.3 this page intentionally left blank GEO16-501.3 27 commercial Warranty (For Residential Warranty, see GEO16-510) Seller warrants its products to be free from defects in material and workmanship, EXCLUSIVE, HOWEVER, of failures attributable to the use of materials substituted under emergency conditions for materials normally employed. This warranty covers replacement of any parts furnished from the factory of Seller, but does not cover labor of any kind and materials not furnished by Seller, or any charges for any such labor or materials, whether such labor, materials or charges thereon are due to replacement of parts, adjustments, repairs, or any other work done. This warranty does not apply to any equipment which shall have been repaired or altered outside the factory of Seller in any way so as, in the judgment of Seller, to affect its stability, nor which has been subjected to misuse, negligence, or operating conditions in excess of those for which such equipment was designed. This warranty does not cover the effects of physical or chemical properties of water or steam or other liquids or gases used in the equipment. BUYER AGREES THAT SELLER’S WARRANTY OF ITS PRODUCTS TO BE FREE FROM DEFECT IN MATERIAL AND WORKMANSHIP, AS LIMITED HEREIN, SHALL BE IN LIEU OF AND EXCLUSIVE OF ALL OTHER WARRANTIES, EITHER EXPRESS OR IMPLIED, WHETHER ARISING FROM LAW, COURSE OF DEALING, USAGE OF TRADE, OR OTHERWISE, THERE ARE NO OTHER WARRANTIES, INCLUDING WARRANTY OF MERCHANTABILITY OR FITNESS FOR PURPOSE, WHICH EXTEND BEYOND THE PRODUCT DESCRIPTION CONFIRMED BY BUYER AND SELLER AS OF THE DATE OF FINAL AGREEMENT. This warranty is void if the input to the product exceeds the rated input as indicated on the product serial plate by more than 5% on gas-fired and oil-fired units, or if the product in the judgment of SELLER has been installed in a corrosive atmosphere, or subjected to corrosive fluids or gases, been subjected to misuse, negligence, accident, excessive thermal shock, excessive humidity, physical damage, impact, abrasion, unauthorized alterations, or operation contrary to SELLER’S printed instructions, or if the serial number has been altered, defaced or removed. BUYER AGREES THAT IN NO EVENT WILL SELLER BE LIABLE FOR COSTS OF PROCESSING, LOST PROFITS, INJURY TO GOODWILL, OR ANY OTHER CONSEQUENTIAL OR INCIDENTAL DAMAGES OF ANY KIND RESULTING FROM THE ORDER OR USE OF ITS PRODUCT, WHETHER ARISING FROM BREACH OF WARRANTY, NONCONFORMITY TO ORDERED SPECIFICATIONS, DELAY IN DELIVERY, OR ANY LOSS SUSTAINED BY THE BUYER. Component Applicable Models Heat Exchangers Gas-Fired Units Heat Exchangers Low Intensity Infrared Units Compressors Condensing Units for Cassettes Burners Low Intensity Infrared Units Other Components excluding Heat Exchangers, Coils, Condensers, Burners, Sheet Metal BUYER’S REMEDY FOR BREACH OF WARRANTY, EXCLUSIVE OF ALL OTHER REMEDIES PROVIDED BY LAW, IS LIMITED TO REPAIR OR REPLACEMENT AT THE FACTORY OF SELLER, ANY COMPONENT WHICH SHALL, WITHIN THE APPLICABLE WARRANTY PERIOD DEFINED HEREIN AND UPON PRIOR WRITTEN APPROVAL, BE RETURNED TO SELLER WITH TRANSPORTATION CHARGES PREPAID AND WHICH THE EXAMINATION OF SELLER SHALL DISCLOSE TO HAVE BEEN DEFECTIVE; EXCEPT THAT WHEN THE PRODUCT IS TO BE USED BY BUYER AS A COMPONENT PART OF EQUIPMENT MANUFACTURED BY BUYER, BUYER’S REMEDY FOR BREACH, AS LIMITED HEREIN, SHALL BE LIMITED TO ONE YEAR FROM DATE OF SHIPMENT FROM SELLER. FOR GAS-FIRED PRODUCTS INSTALLED IN HIGH HUMIDITY APPLICATIONS AND UTILIZING STAINLESS STEEL HEAT EXCHANGERS, BUYER’S REMEDY FOR BREACH, AS LIMITED HEREIN, SHALL BE LIMITED TO TEN YEARS FROM DATE OF SHIPMENT FROM SELLER. These warranties are issued only to the original owner-user and cannot be transferred or assigned. No provision is made in these warranties for any labor allowance or field labor participation. Seller will not honor any expenses incurred in its behalf with regard to repairs to any of Seller’s products. No credit shall be issued for any defective part returned without proper written authorization (including, but not limited to, model number, serial number, date of failure, etc.) and freight prepaid. OPTIONAL SUPPLEMENTAL WARRANTY Provided a supplemental warranty has been purchased, Seller extends the warranty herein for an additional four (4) years on certain compressors. Provided a supplemental warranty has been purchased, Seller extends the warranty herein for an additional four (4) years or nine (9) years on certain heat exchangers. EXCLUSION OF CONSUMABLES & CONDITIONS BEYOND SELLER’S CONTROL This warranty shall not be applicable to any of the following items: refrigerant gas, belts, filters, fuses and other items consumed or worn out by normal wear and tear or conditions beyond Seller’s control, including (without limitation as to generality) polluted or contaminated or foreign matter contained in the air or water utilized for heat exchanger (condenser) cooling or if the failure of the part is caused by improper air or water supply, or improper or incorrect sizing of power supply. “APPLICABLE WARRANTY PERIOD” TEN YEARS FROM DATE OF FIRST BENEFICIAL USE BY BUYER OR ANY OTHER USER, WITHIN TEN YEARS FROM DATE OF RESALE BY BUYER OR ANY OTHER USER, WITHIN TEN YEARS FROM DATE OF RESALE BY BUYER IN ANY UNCHANGED CONDITION, OR WITHIN ONE HUNDRED TWENTY-SIX MONTHS FROM DATE OF SHIPMENT FROM SELLER, WHICHEVER OCCURS FIRST FIVE YEARS FROM DATE OF FIRST BENEFICIAL USE BY BUYER OR ANY OTHER USER, WITHIN FIVE YEARS FROM DATE OF RESALE BY BUYER OR ANY OTHER USER, WITHIN FIVE YEARS FROM DATE OF RESALE BY BUYER IN ANY UNCHANGED CONDITION, OR WITHIN SIXTY-SIX MONTHS FROM DATE OF SHIPMENT FROM SELLER, WHICHEVER OCCURS FIRST TWO YEARS FROM DATE OF FIRST BENEFICIAL USE BY BUYER OR ANY OTHER USER, WITHIN TWO YEARS FROM DATE OF RESALE BY BUYER IN ANY UNCHANGED CONDITION, OR WITHIN THIRTY MONTHS FROM DATE OF SHIPMENT FROM SELLER, WHICHEVER OCCURS FIRST Heat Exchangers/Coils Indoor and Outdoor Duct Furnaces and System Units, Steam/Hot Water Units, Oil-Fired Units, Electric Units, Cassettes, Vertical Unit Ventilators, Geothermal Units Compressors Vertical Unit Ventilators, Geothermal Units Burners High Intensity Infrared Units ONE YEAR FROM DATE OF FIRST BENEFICIAL USE BY BUYER OR ANY OTHER USER, WITHIN ONE YEAR FROM DATE OF RESALE BY BUYER IN ANY UNCHANGED CONDITION, OR WITHIN EIGHTEEN MONTHS FROM DATE OF SHIPMENT FROM SELLER, WHICHEVER OCCURS FIRST Sheet Metal Parts All Products As Modine Manufacturing Company has a continuous product improvement program, it reserves the right to change design and specifications without notice. © Modine Manufacturing Company 2015 Modine Manufacturing Company 1500 DeKoven Avenue Racine, WI 53403 Phone: 1.877.679.4436 (4GEO) www.modinehvac.com