1
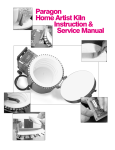
56747B
Revised
1.8.15
Illustration 26
Frame
Rear Control Arm Install
Control Arm Drop
Bracket (91-5462 drvr
and 91-5468 pass)
5/8” X 4
1/2” Bolt
Rear Upper
Control Arm
Rear Axle
Rear Lower
Control Arm
moved OE control arm bolts. Secure the
front of the bracket to the frame using the
supplied nut plate (90-5472) and 1/2” X 1
1/2” bolt and hardware. See ILLUSTRATION 25.
coil spacer bracket (91-5474 drvr and 915479 pass) single rear retaining 7/16” X 1”
bolt and washer into the bump stop axle pad.
See ILLUSTRATION 27.
NOTE: Due to limited access, it may be
helpful to wedge a screwdriver under the
bolt to hold it in place while installing the
bracket.
NOTE: Before installing the coil spacer
brackets (91-5474 drvr and 91-5479 pass)
scrape off any excess weld splatter from the
bump stop pad using a flat blade screw
driver or chisel. This will ensure a proper fit
of the brackets.
11. Torque the OE control arm drop bracket bolts
to 175 ft./lbs. Torque the 1/2” bolt and hardware according to the torque chart on page
24.
12. Reinstall the upper and lower control arms
into the control arm drop bracket using the
supplied 5/8” X 4 1/2” bolts and hardware.
See ILLUSTRATION 26. Do not torque at
this time.
15. Install the rear coil spacer bracket (91-5474
drvr and 91-5479 pass) onto the rear axle
bump stop pad. Secure the rear coil spacer
bracket (91-5474 drvr and 91-5479 pass) to
13. Repeat the previous steps 3 through 12 on the
passenger side of the vehicle.
14. ON DRIVER SIDE ONLY, Install the rear
22