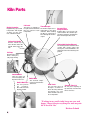
1
Paragon
Home Artist Kiln
Instruction &
Service Manual
Introduction
Thank you for choosing the Paragon Home Artist kiln! We have designed it to give you many years of reliable service.
The kiln changes clay into ceramics, one of the hardest materials known. Ceramic ware is so durable that it
is among the few surviving artifacts from ancient civilizations. With your new kiln, you can make art pieces
that will last for many generations.
Please read this manual before firing the kiln. The manual will help you gain the most enjoyment
from your Home Artist kiln and is bound to answer many questions. The manual could also save you money;
failure to follow instructions can easily cause expensive damage to the kiln. This manual gives basic firing
instructions for greenware clay, glaze, overglaze, china paint, and glass. Please consult your supplier for specific instructions on firing their products.
Inspect the kiln. When you receive your kiln, check
the carton for damage (crushed, holes, etc.). Check
the kiln for both interior and exterior damage. If the
kiln is damaged, you can refuse the shipment and have
it returned, or accept the shipment after having the
driver note the damage on the Bill of Lading. Then
call Paragon at 800-876-4328 or 972-288-7557 (open
Monday to Thursday, 7 a.m. to 5:30 p.m. Central).
“What is it about that meditative quiet when
kids are working with clay? I teach 3rd, 4th
and 5th graders in a very poor neighborhood, and even the toughest 5th grader will
let down his ‘cool and tough’ act for clay.”
—Grace Sheese
Check the Bill of Lading to insure that you received the correct number of packages. Note any shortages on
the Bill of Lading, and have the driver sign the copy.
If there were no signs of visible kiln damage and you discover damage after the driver has left, notify the
shipper immediately.
Save the shipping carton. It was carefully designed to provide maximum protection during shipping.
Use the carton to take the kiln to seminars or on vacation, or to return the kiln to the factory for repairs.
Cracks, clicking, discoloration. Tremendous stresses are generated
within the kiln. The ceramic fiber firing chamber actually expands and contracts with each firing. Do not be concerned if small cracks appear in the
fiber. This is normal. These are surface cracks that close tightly when
heated.
The paint and stainless steel wrap will eventually discolor from heat. This,
again, will not affect the kiln’s performance.
Cracks in the firing chamber are normal.
Please do not be alarmed by them.
During firing, you will hear an intermittent,
distinct clicking. This is the sound of the
relay sending power to the heating element.
Do not be concerned with this sound.
The Electrical data plate. Important information about your kiln is etched on its
electrical data plate. Please record this information below and include it
when ordering parts or calling your dealer or the factory about your kiln.
P/N________________ SN___________ Model___________Volts____
©2002, by Paragon Industries, Inc. IM-214/9-02
2/
Contents
Setting Up the Kiln . . . . . . . . . . . . . . . . 5
Electrical Installation . . . . . . . . . . . . . . . . . . . . . . . . . . . . . . . . . . . . 5
Where to Locate Your Kiln . . . . . . . . . . . . . . . . . . . . . . . . . . . . . . . 5
Transporting the Kiln. . . . . . . . . . . . . . . . . . . . . . . . . . . . . . . . . . . . 5
Kiln Parts . . . . . . . . . . . . . . . . . . . . . . . . 6
Firing Preparation & Loading . . . . . . . . 7
Shelves, Posts, Tile Setters & Stilts . . . . . . . . . . . . . . . . . . . . . . . . 7
Kiln Wash and Glass Separator . . . . . . . . . . . . . . . . . . . . . . . . . . . 8
Vacuum the Kiln Regularly . . . . . . . . . . . . . . . . . . . . . . . . . . . . . . . 9
Check the Thermocouple . . . . . . . . . . . . . . . . . . . . . . . . . . . . . . . . 9
The Basics of Kiln Loading . . . . . . . . . . . . . . . . . . . . . . . . . . . . . . . 9
The Basics of Firing the Kiln . . . . . . . . 10
Venting the Lid . . . . . . . . . . . . . . . . . . . . . . . . . . . . . . . . . . . . . . . 10
Protecting the Heating Element . . . . . . . . . . . . . . . . . . . . . . . . . . 10
The Basics of Firing Clay . . . . . . . . . . . . . . . . . . . . . . . . . . . . . . . 10
Removing the Ware from the Kiln . . . . . . . . . . . . . . . . . . . . . . . . . 11
Firing Log Book. . . . . . . . . . . . . . . . . . . . . . . . . . . . . . . . . . . . . . . 11
Preventing Overfires . . . . . . . . . . . . . . . . . . . . . . . . . . . . . . . . . . . 11
Color Temperature Chart . . . . . . . . . . . . . . . . . . . . . . . . . . . . . . . 11
Power Failures . . . . . . . . . . . . . . . . . . . . . . . . . . . . . . . . . . . . . . . 12
Your First Firing. . . . . . . . . . . . . . . . . . . . . . . . . . . . . . . . . . . . . . . 12
Firing Clay . . . . . . . . . . . . . . . . . . . . . . 12
Pyrometric Cones . . . . . . . . . . . . . . . . . . . . . . . 12
Low-Fire Greenware. . . . . . . . . . . . . . . . . . . . . . 13
Drying the Clay . . . . . . . . . . . . . . . . . . . . . . . . . . . . . . . . . . . . . . . 13
Loading and Firing Low-Fire Greenware . . . . . . . . . . . . . . . . . . . 14
Greenware and Glazed Ware in the Same Firing. . . . . . . . . . . . . 14
Low-Fire Glaze . . . . . . . . . . . . . . . . . . . . . . . . . . 15
Overglaze . . . . . . . . . . . . . . . . . . . . . . . . . . . . . . 16
Decals . . . . . . . . . . . . . . . . . . . . . . . . . . . . . . . . . . . . . . . . . . . . . . 16
Glass Fusing & Slumping . . . . . . . . . . 17
How to Cut Glass . . . . . . . . . . . . . . . . . . . . . . . . . . . . . . . . . . . . . 17
Fusing Compatibility of Glass . . . . . . . . . . . . . . . . . . . . . . . . . . . . 17
The Annealing Range . . . . . . . . . . . . . . . . . . . . . . . . . . . . . . . . . . 17
Cleaning and Gluing the Glass. . . . . . . . . . . . . . . . . . . . . . . . . . . 18
Loading the Kiln . . . . . . . . . . . . . . . . . . . . . . . . . . . . . . . . . . . . . . 18
Firing the Glass . . . . . . . . . . . . . . . . . . . . . . . . . . . . . . . . . . . . . . . 18
Imperfection . . . . . . . . . . . . . . . . . . . . 19
Bisque . . . . . . . . . . . . . . . . . . . . . . . . . . . . . . . . . . . . . . . . . . . . . . 19
Glaze . . . . . . . . . . . . . . . . . . . . . . . . . . . . . . . . . . . . . . . . . . . . . . . 19
Underglaze . . . . . . . . . . . . . . . . . . . . . . . . . . . . . . . . . . . . . . . . . . 19
Overglaze . . . . . . . . . . . . . . . . . . . . . . . . . . . . . . . . . . . . . . . . . . . 19
Glass . . . . . . . . . . . . . . . . . . . . . . . . . . . . . . . . . . . . . . . . . . . . . . . 20
Safety
Overfiring
The warranty on your Paragon kiln does
not cover damage from overfiring,
regardless of the circumstances. It is the
operator’s responsibility to make sure the
kiln turns off at the proper time.
The Ceramic Fiber
Avoid touching the firing chamber surface
with sharp or pointed objects. They can
damage the fiber surface. Touching the
embedded heating element with sharp or
pointed objects is a shock hazard.
Read the Manual!
Read each page of this manual in detail
before operating your kiln. Warranty does
not cover damage caused by failure to
follow instructions.
Food or Drink Surfaces
Some decorative materials may be unsafe
and toxic when used for surfaces that will
be in contact with food or drink. When you
make food or drink containers, select a
glaze or glass that has been formulated,
tested and labeled as approved for
surfaces that will be in contact with food or
drink. Follow the glaze or glass
manufacturer’s instructions exactly,
without any variations.
The Orton Firing Institute We encourage
you to become a member of the Orton Firing Institute, where you will receive expert advice on
making and firing clay. Call 614-895-2663 to
join. Gain access to a wealth of experience for
only a nominal annual membership fee.
Maintenance . . . . . . . . . . . . . . . . . . . . 20
Trouble-Shooter . . . . . . . . . . . . . . . . . . . . . . . . . . . . . . . . . . . . . . 20
Replacing the Thermocouple . . . . . . . . . . . . . . . . . . . . . . . . . . . . 21
Replacing a Relay or Transformer . . . . . . . . . . . . . . . . . . . . . . . . 22
Replacing the Temperature Controller . . . . . . . . . . . . . . . . . . . . . 22
Replacing the Firing Chamber . . . . . . . . . . . . . . . . . . . . . . . . . . . 22
Ceramic Fiber Repair . . . . . . . . . . . . . . . . . . . . . . . . . . . . . . . . . . 23
Replacing the Lid . . . . . . . . . . . . . . . . . . . . . . . . . . . . . . . . . . . . . 23
Glossary . . . . . . . . . . . . . . . . . . . . . . . . 23
Paragon Kiln Limited Warranty. . . . . . 24
/3
Important Safety Rules
An electric kiln is extremely safe to operate provided you
follow these basic safety rules and pointers:
G
Unplug kiln when not in use.
G
Do not touch hot sides.
G
Keep unsupervised children away.
G
Place kiln on a non-combustible surface.
G
Do not install closer than 12” from any wall or
combustible surface.
G
Fire only in a well ventilated, covered and protected area.
G
Keep cordset away from hot sides of kiln.
G
Do not open lid until kiln has cooled to room
temperature and the switch is off.
G
Keep the lid closed when kiln is not in use.
G
DANGEROUS VOLTAGE: Do not touch
heating elements with anything.
G
Disconnect kiln before servicing.
G
Do not leave kiln unattended while firing.
G
Wear safety glasses when cutting glass.
G
Wear firing safety glasses when looking into a
hot kiln.
G
Keep food away from your work area.
G
Never fire tempered glass inside a kiln. It
could explode.
G
Avoid firing toxic materials inside the kiln.
Additional Safety Pointers
Never leave the kiln unattended during firing. Check the
kiln from time to time. Observe the normal sounds that it
makes, and length of firing time. Observe the color of light
around the edge of the lid.
Once you are familiar with the normal operation of your
kiln, you will know when something goes wrong. If the kiln
fails to shut off and becomes too hot, you will know by the
length of firing time and by the color of light around the lid.
Observing your kiln’s normal
operation is one of the most “My grandmother, who
important safety precautions.
Keep the lid closed when
the kiln is not in use. This
keeps dust out of the kiln.
Also, should someone turn on
4/
the kiln while you are away, the closed lid will keep the heat
safely inside the firing chamber.
Never place anything on the kiln’s lid, even when the kiln
is idle. If people become accustomed to placing papers and
other objects on the kiln, they may forget and do that while
the kiln is firing. During operation, the lid may get hot
enough to burn combustible materials placed on top of it.
Remove all tripping hazards from around the kiln. Keep
the kiln’s supply
cord out of traffic
areas. Do not let
the cord touch the
side of the kiln,
which may damage
the cord. Avoid extension cords if
possible.
Do not remove
the ware from the Place the kiln no closer than 12”or more from
kiln until the kiln the nearest wall. Do not let the power cord
has cooled to room touch the hot sides of the kiln.
temperature. It is
possible for thermal shock to break hot ceramic pieces. The
sharp edges of broken ware can injure hands.
After firing glazed ware in your kiln, examine the shelves
for glaze particles. Sharp slivers of glaze stuck to the shelf
can cut hands. Before rubbing a hand over a shelf, be sure
the shelf is free of glaze shards.
Fire only approved materials purchased from a knowledgeable supplier. Do not fire marbles, pieces of concrete,
rocks, and other objects. Rapid heating to high temperature
can cause violent reactions in many materials.
Greenware, which is unfired clay, must be bone-dry before firing. Moist greenware can explode inside the kiln,
damaging the ware and the kiln. Place a piece of greenware
against the inside of your wrist. If
it feels cool, it is too wet to fire.
Do not fire cracked shelves.
They can break during firing,
damaging the ware inside the
kiln. Store kiln shelves in a dry
area. Moist shelves can explode
inside a kiln.
If you smell burning plastic,
turn the kiln off. Examine the wall
outlet and supply cord for signs of
burning.
Do not fire the kiln if the wall
outlet is damaged by heat.
Never place extra insulation around the kiln in an attempt
to conserve energy. The
extra insulation can cause
has taught china paint- the wiring and the steel
coached me during my first fir- case to over-heat.
ing for 60 years,
ing. I treasure the memory of that moment of my
life with her.”
Darcy Giesseman
Ke e p loo s e-fi t t i n g
clothing away from the hot
kiln.
Setting Up the Kiln
Electrical Installation
You must plug your kiln into a
circuit that no other appliance uses
while the kiln is firing. Turn off the
circuit breaker or unscrew the fuse
for the circuit that your kiln will be
plugged into. Check to see if other
appliances shut off too. If that circuit powers appliances that must
remain on while the kiln is firing,
plug your kiln into a different circuit.
Caution: 120 volt kilns: avoid extension cords if
possible. If you must use one, never use one smaller
than 12 gauge and longer than 20 feet. Never plug it
into a ceiling outlet!
Voltage fluctuation can vary firing time from as little as
half to more than twice the average time. If the voltage is too
low, the kiln may never reach full temperature.
The receptacle must have a separate safety grounding
wire. This protects you from serious electrical shock.
5 Keep the kiln away from curtains and other combustible materials.
6 Keep the space above the kiln clear of hanging planters and overhead shelves.
7 Position kiln on a level, fire-proof surface, such as a
concrete floor. If you place the kiln on a concrete floor
finished with linoleum tile, place a fireproof material
over the tile to protect it from discoloration.
8 Keep unsupervised children away.
9 Keep the power supply cord away from the kiln case.
There is little danger of serious burn from accidental
contact if you exercise the same caution you would use with
an electric iron.
Transporting the Kiln
Some people take their kilns to seminars or on vacation.
The easiest way to transport the kiln is to use the original
packing materials.
If you no longer have the packing materials, transport the
kiln in an upright position with the lid closed. Place a thin
sheet of foam cushioning between the lid and the firing
chamber to prevent rubbing. Avoid subjecting the kiln to excessive vibration during travel.
Where to Locate Your Kiln
1 Place your kiln in a well ventilated, covered and protected area, such as a garage or basement. If the
fumes can reach a living area, install a vent hood over
the kiln that ducts to the outside, or find a different
location.
2 Remove the lawn mower, gasoline, paint, and other
flammable materials from the kiln room. If you fire
the kiln in a garage, park your car outside.
3 Provide a minimum of 12 inches’ clearance between
kiln and the closest wall.
4 Never allow the temperature of your firing room to
exceed 100 - 110° F. Measure the temperature about
3 feet from the kiln. If necessary, use fans to lower
room temperature. Do not fire the kiln in a small, enclosed space such as a closet.
A thin sheet of foam packing will prevent abrasion between the lid and firing chamber during travel.
“Before I ever took the first ceramics class, I
knew in my heart that I needed to be working with clay. It’s something that reaches
back into my childhood.”
Sheron Roberts
Do not allow room temperature to exceed 100 110°F.
“Centering clay has a way of putting me into
that altered state where time doesn’t happen.”
Millie Carpenter
/5
Kiln Parts
Digital Controller
Regulate firing speed and
temperature with digital
accuracy. See the separate controller manual.
Lid Latch
The latch is a reminder to
keep the lid closed until the
kiln has cooled to room
temperature.
Thermocouple
The thermocouple senses
temperature in the firing
chamber. When loading
the kiln, be careful not to
hit or dislodge the thermocouple.
Ceramic Fiber
Firing Chamber
Ceramic fiber is a space-age, efficient insulation. Be careful to prevent glaze and other contaminants
from contacting the fiber shell.
Collapsible Handle
Pull the handle up to
move the kiln. Lower the
handle before firing the
kiln.
Embedded Heating Element
The heating element can burn out on
contact with ceramic glaze, kiln
wash, glass, and contaminants containing silica and silica bearing compounds.
Lid Prop
Prop the lid to vent
fumes during the
early stage of firing.
On/Off Switch
Turn the switch off
and and unplug the
kiln when not in use.
Switch Box Fuse
The fuse protects
the
co n t r o l l e r .
Check the fuse if the
display is blank.
Switch Box
The electrical components are housed in the
switch box.
Case Vents
The vent slots move air
through a channel between the firing chamber
and outside case. This
lowers the kiln’s outer surface temperature.
Ceramic Fiber Lid
Do not place anything on
top of the lid, even when the
kiln is not in use.
“Working in my small studio keeps me sane and
happy. I forget about everything else and am grateful to do what I do.”
Heidrun Schmid
6/
Firing Preparation
& Loading
Shelves, Posts, Tile Setters & Stilts
These accessories can be purchased from Paragon
through an authorized dealer.
Kiln Shelves
Shelves are flat slabs of fireclay that can withstand high
temperatures. Place a shelf on the kiln bottom for all firings
to protect the fiber bottom. By using multiple shelves, you
can stack more ware
in your kiln than you
could ever place on
the bottom of the
kiln alone. Like any
other pottery, they
will break if dropped.
Kiln Posts
Posts are made
from the same material as shelves. Posts
support and separate
the layers of shelves You can stack posts, but a single post is
in a kiln. The shorter more stable.
the post, the greater the stability. Posts can be stacked upon
one another to achieve a greater height, but a single long post
is more stable. Use 3 posts to separate shelves. Three posts
are more stable than 4.
Removing stilt marks with a stilt
stone.
Cleaning stilt wire with a stilt stone.
arate the piece from the kiln
shelf. Stilts also allow air to
circulate around large, flat
pieces.
Stilts can be used in firings up to 2000°F. They cannot be used to fire porcelain
and stoneware, which fire to
cone 6 - 10. At those temperatures, the wire points
would embed into the clay.
Stilts, however, can be used
to fire overglaze onto porcelain at china painting temperatures.
Load ornaments onto a stilt post.
Stilts
Triangular stilts are general purpose for cups,
bowls and saucers.
The stilt helps circulate air under this plate.
At high temperatures, glaze becomes molten and sticks
permanently to
any thing
it
touches, such as
t he kiln s helf .
Stilts prevent this.
A stilt is a ceramic
base embedded
with high temperature wire. The
sti l t s us pe nds
glazed ware on the
wire points to sep- Straightening a stilt point.
Stilt points are made of a high temperature metal alloy.
You can straighten metal points by bending gently with pliers. Remove glaze buildup on the points with a stilt stone or
emery cloth. The oxidation of the wire can discolor the glaze
at the stilt mark. Cleaning the wire points with a stilt stone
solves that problem.
Stilts come in a wide variety of shapes and sizes. The
3- poin t t r i a n g u l a r
stilts support bowls,
plates, and cups. Bar
stilts support longer
pieces. Load ornaments and eggs on stilt
posts.
Bar stilts support longer pieces and
pieces with a large hollow base.
Be careful when you
remove the stilt after
firing. The stilt points
leave a sharp edge in
/7
the glaze. Handle the ware carefully to avoid injury. Remove
the sharp stilt marks with a stilt stone.
Tile and Plate Setters
These are holders used to stack plates and tiles inside the
kiln. Firing plates and tiles is more efficient with a tile or
The tile setter saves space inside
the kiln.
plate setter than placing these items flat on the shelf. The
setters not only save space in the kiln but also allow air circulation around the ware, preventing warping and breakage.
The ware heats more uniformly in a setter than when placed
directly onto a kiln shelf.
Bead Rods
Bead rods are used to fire glazed ceramic beads. The rods
are made from nichrome wire, which can withstand high
temperatures. The beads must not be glazed inside the hole
and around the edge of the hole. String the beads onto the
bead rods. The beads must not touch. Suspend the bead
rods between two posts.
a f r e sh c oat . W h e n
recoating a shelf, remove
most of the old coating
with grit cloth (available
from Paragon). This is
an abrasive-coated mesh
that allows residue to
pass through. You could
also use coarse sand paper. Removing the old
grit cloth to remove most of the old
c oat in g giv e s y ou a Use
separator. Then apply a fresh coat.
smooth surface to start
with. Wear a respirator
when removing separator. Then recoat the shelf using the
following directions.
Caution: Do not apply separator to the ceramic fiber firing chamber walls, lid, or bottom. Contact
with separator will destroy the heating element,
which is embedded in the walls.
1 Mix the separator
with water following the directions
on the bag. Stir.
2 Use a haik brush or
a soft paint brush
to apply the separator to the shelf.
(The haik brush is
easier to use because it lays down a Applying separator to the shelf.
more even coating.) Each time you dip your brush into the separator mixture, swirl the brush around the bottom of
the container. This is because the separator settles
quickly. Start the brush stroke near the center of the
shelf and work toward the edges. This is to avoid a
buildup of separator on the edges.
3 Use two or three thin coats changing the direction
of the brush stroke 90° with each coat. Let the separator dry for a few minutes between coats. Do not
apply thick coats; they tend to flake off.
4 Dry the shelf completely before firing.
Fire glazed beads on a bead rod suspended between two posts.
Kiln Wash and Glass Separator
Kiln wash and glass separator are mixtures of finely
ground minerals that do not fuse at high temperatures. They
act as a barrier against glaze and glass. The kiln shelf must
be coated with kiln wash or glass separator to keep ceramic
glaze and glass from sticking to it. Without a barrier, the
glaze or glass would embed permanently into the shelf.
(Both glass separator and kiln wash will be referred to as
“separator.”) A coat of separator will usually last for many
firings. When the shelf coating begins to crack or chip, apply
8/
Note: Remove any buildup of separator from the
edges of the shelf by tracing around it with a finger.
Excess separator may break off the edges and fall
onto ware positioned below the shelf.
Note: Place pyrometric cones (pages 12 - 13) only on
separator-coated shelves. But do not apply separator
onto pyrometric cones. It changes the maturing
temperature of the cone.
If glaze or glass sticks to the shelf, scrape it off with a putty
knife at a sharp angle. Wear safety glasses—sometimes
chipped glaze becomes airborne. Then recoat the bare spot
with more separator.
Vacuum the
Kiln Regularly
Ke ep the f irin g
chamber clean. Dust
falling on molten glaze
leaves pinholes and
other imperfections.
Vacuum the kiln with
the soft brush nozzle of
Vacuum the kiln with the brush attachment
a v ac uum c lean er. of a vacuum cleaner.
Clean the inside lid
surface, walls, bottom,
and the underside of shelves, especially before a glaze firing.
Vacuuming is one of the most important steps in firing a kiln.
Check the Thermocouple
You will find a rod, called the thermocouple, extending
into the firing chamber. The digital controller senses temperature by reading a
small voltage from
the thermocouple. If
the tip of this rod is
pushed out of the firing chamber, the
kiln will assume that
the firing chamber is
cold. This will result
in an overfire, which
can damage your
thermocouple measures temperature inkiln. When loading The
side the kiln. Keep shelves and ware at least
the kiln, check that 1” away from the thermocouple.
the rod extends into
the firing chamber
by the correct amount.
2 To make full use of
your kiln’s firing capacity, group similar
sizes of ware together inside the
kiln.
3 Place taller pieces on
the top shelf.
4 Keep ware at least 1”
away from the heating element. If the tip
Group similar sizes of ware together.
of a large piece of Place taller pieces on the top shelf. Line
ware comes closer up posts vertically.
than 1” to the kiln
wall, position that section of ware between rows of element.
5 For stability, stack posts so that they are directly in
line with each other vertically.
6 Minimum spacing between shelves is 2 ½”.
Posts in each layer should be at least 1” taller than
the ware. Minimum spacing between shelves is 2
½” as shown above.
I
A 1/8” diameter thermocouple should extend into the firing chamber ½” - 5/8”.
7 Stack shelves so there is at least one row of element
between any two shelves.
I
A ¼” diameter thermocouple should extend into the firing chamber 1” or more.
8 Posts used with each shelf layer should be at least 1”
taller than the ware.
I
Keep shelves, posts and ware at least 1” - 1 ½” away from
the thermocouple.
9 Ke e p war e an d k iln
shelves 1” - 1 ½” away
from the thermocouple.
The Basics of Kiln Loading
1 Always place a shelf in the bottom of the kiln for every
firing. This protects
the ceramic fiber
bottom. The shelf
should be coated with
kiln wash.
Caution: Never fire
glass or glazed ware
directly on the kiln’s
ceramic fiber bottom. Alway s fire
these items on a
shelf.
10 If possible, load the top
shelf to a height where
one element row is between the top shelf and
the top of the kiln.
11 When loading ware and
shelves, do not dislodge
the thermocouple.
Have at least one row of element
showing above the top shelf, if
possible.
12 Do not move the kiln or bump into it after you have
loaded it. This could topple the ware inside.
/9
The Basics of
Firing the Kiln
kiln. Allow to cool to
room temperature.
Gently scrape off
the contaminant
with a knife, being
careful not to damage the heating element. Vacuum the
kiln.
Venting the Lid
Your Home Artist kiln is equipped with a lid prop. During
the first stage of firing, raising the lid with the prop allows
gases and water vapor produced by the ware to escape.
Note: If you do not prop the lid when firing items
that release moisture, the vapor will be pushed out of
the firing chamber wherever it can escape, resulting
in rust to the steel case and switch box.
F or luste rs a n d
overglazes, you may
need additional venting. In this case, you
can raise the lid an extra inch with a short
ceramic post.
Do not prop the lid
to rush the cooling of
the ware. This can
da ma ge the ware.
Never open the lid until the kiln has cooled
to room temperature.
Protecting the Heating Element
Contact with silica or silica bearing compounds, such as
kiln wash, glass separator, alumina hydrate, glass, enameling
powder, and ceramic glaze, will ruin the heating element.
Never fire glazed ceramic ware or glass directly on the firing
chamber bottom. Use a ceramic shelf to protect the bottom from
glaze drips, glass and enameling powder.
Caution: Your kiln’s heating element is embedded
in the walls of the firing chamber. Materials such as
glass and glaze, if absorbed into the fiber walls, can
ruin the element. This type of damage is not covered by warranty. Prevent glass separator, kiln wash,
and alumina hydrate from falling from a shelf onto
the firing chamber. These materials can destroy the
element.
Note: If a contaminant such as dripping glass or
glaze embeds into the firing chamber, unplug the
10 /
I
B e su r e t o v e n t
glaz e d war e b y Removing spattered glaze from the cepropping the lid ramic fiber wall with a knife. Caution: unplug kiln. Avoid disturbing the element.
d u r in g t h e f ir st
st age of f ir in g.
Glaze fumes can eventually crystallize on the firing
chamber and element if the kiln is not vented.
I
If you pour slip to make greenware, keep the kiln away
from the pouring area. Do not allow anyone with a glaze
brush near the kiln. It is easy for glaze to end up on the element.
I
Keep glazed ware at least ½” away from the kiln walls. It is
possible for glaze to bubble and splash onto the kiln during firing.
I
If you smooth out glaze imperfections before loading the
ware into the kiln, do it away from the kiln. The airborne
glaze powder can contaminate the element.
The Basics of Firing Clay
Do not fire plaster, plaster of paris, or polymer clay in the
kiln. Do not fire anything that requires a temperature higher
than 2000°F, such as stoneware and porcelain. You will probably fire mostly slip-cast earthenware clay and porcelain
china blanks.
Clay is fired twice. The first firing is the greenware, or
bisque, firing. The second is the glaze firing. The greenware
firing hardens the raw clay so that it can accept glaze. If
greenware were glazed, the moisture in the glaze would
weaken the unfired clay.
Note: Greenware is unfired clay. Bisque is fired clay
that has not yet been glazed.
Burning Off the Carbons
Slip-cast clay is made by
pouring clay into a mold, then
after a short period, pouring
most of the clay back out of the
mold. Slip-cast ware, as a result, is hollow inside. Most
slip-cast clay can be fired rapidly.
The larger and thicker the
ware is hollow. If the
ware, the slower it must be Slip-cast
clay is solid and very thick, it will
fired. If you are in doubt about break in the kiln.
how fast to fire, then use your
digital controller’s slow rate. Clay contains carbon and gases
that must be released during firing. Venting the lid and firing
at the correct speed give gases sufficient time to escape.
Firing too fast or without venting can result in these defects:
I
Breaking The ware can explode if water escapes too
quickly.
I
Black coring When you break the piece, a black line appears down the center of the clay’s
cross section. The
carbon burned out
of the clay surfaces
but not all the way
through the cross
section of the clay.
I
I
I
Bloating
Th e
gases escaped too
rapidly, causing the
c lay to be c ome
bloated.
Glaze bubbles
a nd pinholes
Carbon that did not
burn out during the
greenware firing is
released during the
glaze firing. Escaping gases rupture the glazed surf ac e ,
c ausin g
bubbles and pinholes.
Porosity The fired
ware will be weaker.
A cross-section of the fired clay shows a
black line. This is carbon that did not burn
out completely.
help you schedule firings, because you will know how long it
takes to fire each type of ware. The log book will help you determine, for instance, if the kiln will shut off in time for an
appointment you have to keep, or whether you should begin
the firing when you return home.
Preventing Overfires
Caution: The warranty on your Paragon kiln does
not cover damage from overfiring, regardless of the
circumstances. It is the operator’s responsibility to
make sure the kiln turns off at the proper time.
Your Home Artist kiln is equipped with a digital controller, which accurately adjusts the firing rate and shut-off temperature for the cone you program. However, it is still possible to overfire the kiln. An overfire can damage not only the
ware and kiln furniture; a severe overfire can destroy the firing chamber, requiring a complete replacement.
The following guidelines will help to prevent overfirings.
Please make them a habit:
I
When loading the kiln, check that the thermocouple extends into the firing chamber by the correct amount. See
page 9, left column.
I
Ceramics: It is important to program the correct cone
(pg. 12 - 13). Firing the ware too hot can melt the clay, ruining the kiln shelf. If the clay runs off the shelf, it can
ruin the kiln bottom. Before firing, use Program Review
to check that you have programmed the correct cone.
I
Use Program Review to be sure you have not inadvertently programmed an extended hold time. This can
overfire the ware.
I
As a safety precaution, learn to judge temperature by the
color of the firing chamber. (The color of the interior appears as a line of light at the seam between the lid and the
kiln wall.) With experience, you can tell, by the color
around the lid, how hot the interior is. If the controller
malfunctions and the kiln becomes too hot, turn off the
kiln. Indications of an overfire: the firing time is longer
than usual, and the interior color is too bright.
Pinholes from underfired bisque.
Removing the Ware from the Kiln
Wait until the kiln cools to room temperature before removing the ware. In some cases, opening the lid too soon can
cause crazing (tiny cracks in the glaze).
Firing Log Book
Record the following information in a firing log book:
I
Date
I
Firing cone, speed and hold; or Ramp/Hold program
Color
I
Starting time
I
When the lid was lowered from vented position
I
Total firing time
I
Type of pieces
I
Firing results
Orange to yellow
09 to 03
1650 to 2000
I
Ceramic firings: a sketch of the bent cone (pages 12-13)
Yellow to light yellow
02 to 10
2000 to 2400
Keeping a record of
firings takes just moments. As you gain experience, you will find a
wealth of information in
your record book. It will
Color Temperature Chart
Cone
Degrees F
Lowest visible red to dark red
022 to 019
885 to 1200
Dark red to cherry red
018 to 016
1200 to 1380
Cherry red to bright cherry red
015 to 014
1380 to 1500
Bright cherry red to orange
013 to 010
1500 to 1650
“When you concentrate on making a pot, you have no time to dwell on
your problems. I know a therapist who used clay in working with suicidal
teens. She has worked wonders with these kids.”
Mike Gordon
/ 11
Power Failures
If a firing that has
reached red heat is interrupted by a power failure,
it is best to resume firing before the kiln cools below red
heat. Press the START key to resume firing.
Your First Firing
For your first firing, position only the kiln-washed shelves
and an 06 cone in the kiln. Fire the kiln without ware. Fumes
from clay or glaze may interfere with the formation of an oxide coating on the element during the first firing.
1 Clean the kiln with the brush attachment on a vacuum cleaner.
2 Apply kiln wash to the tops of the shelves.
During the first firing, do not fire ware. Fire only empty
shelves and posts.
3 Load the shelves into the kiln, separating them with
posts. Place an 06 cone on one or more shelves. Air
must circulate around the empty shelves; they may
crack if you stack them in the bottom of the kiln
without posts.
4 Prop the lid with the lid prop.
5 Program the firing for an 06 cone. See the separate
instructions for your digital controller. Press
START.
6 Close the lid from the vented position after one
hour.
7 After the kiln shuts off, allow the kiln to cool to room
temperature before opening the lid.
Note: Do not be concerned about the clicking noise
your kiln makes during firing. Your kiln contains a
relay, which sends power to the element. The relay
clicks as it cycles on and off to maintain the correct
temperature.
12 /
Firing Clay
Pyrometric Cones
Ceramists of the past judged when the firing was completed by the color of the heat and length of firing. In 1886, a
German ceramist named Seger made clay cones that bent
when the ware received the proper heat work. He positioned
the cones on a shelf inside the kiln. By looking through a view
port in the kiln, he could see the cones bend and knew when
to turn off the kiln. His cones took the guesswork out of firing.
Today we still use Seger’s cones.
They are small pyramids of clay and
mineral oxide that soften and bend
when exposed to heat. When consulting your dealer with a glaze problem, you should have a bent cone
from that firing. The cone will help
trouble shoot the problem. The cone
lets you compare one firing to the
next. If the cone bends less and less
with each firing, it indicates that the
thermocouple is wearing and will
soon need replacement. Without
cones it would be difficult to know
that.
Self-supporting cones
must be broken apart before use. Note that the
cone number is stamped
on the base.
Cones are manufactured by the Orton Ceramic Foundation and available from your distributor.
Cone Numbers
The most confusing thing about cones is the way they are
numbered. But once you understand the reason behind
the numbers, the system becomes clear. Pyrometric
cones are numbered from
022 through 01 and 1 through
10. Cone 022 matures at the
lowest temperature, and 10
matures at the highest. Seger
numbered his original cones
from 1 to 20, with 1 being the
lowest temperature. Later,
cones of even lower temperatures were needed, so new
numbers were added. The
new numbers started with
“0” and went from 01 to 022,
with higher numbers getting
progressively cooler.
To avoid confusion, think of the “0” as minus. Numbers
without the “0” are positive. The higher the positive number, the higher the temperature. “0” numbers are negative.
The higher the negative number, the lower the temperature.
With this understanding, you can quickly see that cone 5 is
hotter than 05. The number is stamped on the base of the
cone. The cone number for each material is usually stated on
the label by the clay or glaze manufacturer. Your supplier can
also give you the cone number.
Heat Work
Cones are rated by temperature. But it is more accurate to
think of them as measuring heat work, not temperature
alone. Heat work is the combined effect of time, temperature, and the atmosphere inside the kiln. All these factors affect the maturity of your ware and not just temperature. For
instance, firing to a lower temperature for a longer time will
produce the same maturity as firing to a higher temperature
for a shorter time.
Consult your supplier for recommended firing rate.
(Rapid firing is like cooking: the turkey may be done on the
outside but not on the inside.)
Using Cones
Place the cone on a kiln shelf
with the ware or on a blank tile.
Kiln wash shelves or tile before
placing cones on them. (See page
8.) You do not need to place a cone
in every firing, though it is a good
idea to do so. The cone slants 8
degrees from vertical and bends
in the direction of the slant. Place
the cone so that it will not touch
nearby ware as it bends. Cones
come in either standard or
self-supporting. Standard large
cones must be mounted in a clay
or wire plaque with 2" of the cone
exposed above the cone holder.
Self-supporting cones stand upright without holders. We recommend self-supporting cones;
they are easier to use than standard large cones.
Clay is fired in two separate firings: the greenware firing
and glaze firing. You can buy ware that has already been
through the first firing. It is called bisque ware. Simply glaze
the bisque and fire again. If you are firing greenware, read
this section. If you are doing only glaze firings, skip to the
next section, page 15.
Drying the Clay
Greenware should be completely dry before you place it in
the kiln. Moist greenware can rust the kiln and can explode if
fired too fast. Some people use an infrared light bulb to dry
the clay. It may be necessary to use a dehumidifier. Dry the
ware evenly. A raised surface, such as a rack, will help air to
circulate freely around the clay. Do not dry the clay too rapidly, especially thick pieces, or the clay will crack.
1 Give the greenware enough time to dry. Drying time
depends on humidity.
2 Touch the greenware to the inside of the wrist or to
the cheek. If it feels warm, it is usually dry. Dry longer
if it feels cool. (Note that in humid areas, even damp
greenware can feel warm. The humidity causes the
moisture in the greenware to stop evaporating.)
Position the cone so that it will
not touch nearby ware when it
bends.
3 If you live in a humid area and the greenware is still
moist after an extended drying time, load it into the
kiln. Prop the lid with the lid prop. Fire to 200°F/93°C
at a rate of 100°F/55°C in Ramp-Hold mode. Maintain 200°F/93°C hold until the greenware dries completely—usually 2 hours of hold time. (See the separate controller instruction manual.)
Caution: Do not fire the greenware higher than
200°F/93°C until it has completely dried.
Handle cones carefully. If
Standard large cones require
dropped, they may develop cracks a clay or wire plaque to hold
that could affect their perfor- them upright.
mance. Age and normal humidity
do not affect the accuracy of cones. However, do not use
them if they become wet. For more information on pyrometric cones, see your kiln’s digital controller manual.
Bending results
1
Low-Fire Greenware
1) Under-fired cone;
2) Correctly fired cone;
3) Over-fired “puddled” cone.
2
3
Testing for Dryness with a Mirror
Hold a mirror above the propped lid for a few seconds
where hot air from the kiln will move across the mirror’s surface. If the mirror fogs, the greenware is still releasing moisture. Keep the lid propped and hold 200°F/93°C until the
mirror no longer fogs.
The mirror must be at room temperature for this test.
The mirror fogs when moisture in the hot air condenses on
the cooler mirror. If you hold
the mirror too
long near the
kiln, the mirror
will heat up and
will no longer
fog when moisture hits it. So
hold it at the lid
for only several
se c on d s at a
time.
/ 13
Loading and Firing
Low-Fire Greenware
Low-fire greenware has a firing range from cone 06 to 02.
The greenware must be bone dry before firing. Otherwise, it
will crack or even explode during firing. Check for dryness by
touching to cheek or the inside of a wrist. Ware will be cold if
not dry. Another indicator of moisture is patches of darker
color in the clay.
Handle greenware carefully. Cradle the pieces from the
bottom. Do not lift by a rim. Low-fire greenware pieces do
not stick together during firing. Therefore, greenware may
be stacked so that it touches each other. Place small items
around larger ones. You can also place light greenware
pieces inside larger ones. This is called nesting. Be sure that
Lids and bowls are fired together in the greenware firing.
Low-fire greenware firing is simple. Just be certain the
greenware is fired to the pyrometric cone recommended by
the clay supplier. If the greenware is not fired hot enough,
the piece will absorb moisture after it has been glaze-fired,
causing the glazed surface to crack. This is called “crazing”
and is most often due to underfired greenware. To help
eliminate crazing, fire greenware at least one cone hotter
than glaze, and even hotter if glaze can still be applied easily
to the hard bisque. While glaze may be applied to greenware
and fired once, separate firings produce better quality, so we
do not recommend single firing of greenware and glaze.
Allow the kiln to cool to room temperature before opening
the lid.
“Nested” greenware must not be loaded too tightly.
there is plenty of room for expansion inside the larger pieces.
Pack nested pieces lightly so that heat can still circulate
freely around each piece. Black rings in the fired ware indicate that the nested pieces were packed too tightly to burn off
all the carbon.
Greenware does not need stilts. Fire ware in the position
in which it will be used when finished, except for large pieces
with flat, vertical surfaces such as wall plaques and clocks.
These should be fired flat to prevent warping. Pieces to be
used together, such as a box with its lid, should be fired in
place to ensure a good fit. You can also stack mugs and bowls
rim to rim.
Greenware and Glazed Ware
In the Same Firing
The clay is fired in two separate firings: the greenware, or
bisque, firing, and the glaze firing. Greenware should not be
fired in the same load as glazed ware. Not only do the two
types of ware mature at different temperatures, but gases
from the greenware can discolor the glaze and also cause
glaze bubbles.
If you must fire greenware and glaze pieces in the same
load, place the glazed pieces in the bottom of the kiln and the
greenware pieces on a shelf above.
“The profound experience of working with
clay is to have a three dimensional image in
your head, and then have it come out
through your hands.”
Marie Gibbons
Fire greenware box and lid together to ensure a good fit.
14 /
Low-Fire Glaze
Your hands must be clean when touching glazed ware. Oil
and hand lotion will leave finger prints. If you scrape off or
damage the color during handling, you can usually repair it
by applying more glaze over the damaged spot before firing.
The difference between loading greenware and glazed
ware is that glazed pieces must not touch each other, the
floor, or a shelf in your kiln during firing. If this happens,
they will be permanently bonded together and ruined by the
melted glaze.
The natural expansion and contraction of the ceramic fiber during each firing generates tremendous stresses within
the firing chamber. As a result, fine grains of dust may form
on the firing chamber and should be removed before each
firing. Vacuum the walls, bottom and inside surface of the lid
with the soft brush nozzle attachment of a vacuum cleaner.
Glaze and clay must expand and contract at the same rate.
If the glaze shrinks more than the clay, the glaze will “craze,”
forming small cracks. If
it expands more than the
clay, it will “shiver,”
breaking off in sections.
Test each clay and glaze
combination using clay
scraps such as broken
bisque pieces.
Use stilts to support
low-fire glazed ware during firing. The shelf tops Use stilts to separate the ware from the
and floor MUST be kiln kiln shelf.
washed with all purpose,
high fire kiln wash for protection from glaze drops.
Note: Kiln wash only the top side of the shelf. Kiln
wash on the underside of the shelf will flake off onto
glazed ware placed below the shelf.
ing.” This is an alternative to stilting. To “dry
foot” a piece, remove all
glaze from the portion of
the piece that will rest on
the shelf. Using a wet
sponge or a piece of grit
cloth, clean off the glaze
from the bottom of the
ware and slightly above “Dry footing” means removing the glaze
the base so that it will not from the base of the piece. This elimirun down and touch the nates the need for stilts.
base. Do not use dry footing for low-fire glazed pieces that will be placed in water
while used or cleaned. The unglazed areas will absorb water,
which can cause glaze crazing.
Vent the lid with the lid prop for about an hour. Red glazes
should be placed in the top of the kiln for extra venting. Separate clear glazes from colors. Load clear glazes in the bottom
of the kiln and colors above them. Pieces that go together,
such as a cup and saucer or bowl and lid, should be placed
next to each other. This helps assure uniformity in color.
Keep pieces ¼ to ½” apart. The bubbles and gases emitted
from glazes can contaminate other nearby pieces. If you are
firing ware draped with lace, vent the lid until all smoke disappears.
To keep holes in glazed salt and pepper shakers from
closing in with glaze, insert tooth picks in the holes. They
will burn away during the firing.
Allow the kiln to cool to room temperature before opening
the lid.
Feel free to experiment with firing speed using
throw-away samples of bisque. Some glazes look better
when fired at a particular speed.
Caution: Never apply kiln wash to the ceramic fiber
floor of the Home Artist Kiln.
Glazed pieces must be thoroughly dry before firing and
should not be fired with greenware unless both mature at the
same cone. Even then, separate the glaze from the
greenware by loading glazed pieces in the bottom of the kiln
and greenware on shelves above. Low-fire glaze usually fires
to a lower cone than greenware, so firing time will be shorter
if glazed pieces are loaded separately.
In the greenware firing, a bowl and lid are fired together. In the low-fire
glaze firing, they are kept separate as shown above.
Remove the stilts from the ware after firing by breaking
Check to make sure that first, no two pieces of glazed
the thin film of glaze holding them. Handle with caution. Reware are touching each other, the kiln walls, the floor or the
move the sharp stilt edges by rubbing with a stilt stone, elecshelves; and second, that the underside of the kiln shelf is
tric grinder or hand grinder. (See photo, page 7.)
clean before you place it over
glazed pieces. Any dust falling on
“Many of our customers, in very stressful jobs, find release
your ware will cause pinholes.
To eliminate stilt marks, you
can prevent glazed pieces from
sticking to the shelf by “dry foot-
through clay. One, a doctor, found clay to be the road back from a
mental breakdown.”
Stephen Mills
/ 15
Overglaze
Overglaze is decoration applied over fired glaze or polished porcelain bisque. Overglazes include china paints,
gold, and luster, which fire from 022 to 014.
Use stilts to increase the flow of heat under the pieces,
and make sure ware is not touching other ware. Hard-bodied
porcelain can be stilted. But do not stilt soft-bodied ware
such as bone china. The stilt would embed into the glaze.
Ware must be completely dry before firing. Remove
smudges and fingerprints from the bottom of pieces. Wipe
dust off the pieces with a soft silk cloth.
Note: Use stilts to increase the air flow under pieces
with large, flat surfaces, or sections that vary in
thickness. You can place small pieces directly on the
kiln shelf.
Test fire all china paints on the glazes you are using.
China paints will crack or peel if applied heavily. Apply several light coats instead, firing between each, until you get the
shade you want. Not all china paint colors reach maximum
color saturation at the same temperature even when fired on
the same ware. So you must know which colors you should
fire first at higher temperatures to prevent burning out the
original colors in later firings. For example, reds mature at a
lower temperature than other colors and are fired after the
other colors have been fired. Do not fire reds and yellows
side by side. Colors also mature at a lower temperature on
ceramic pieces than on porcelain or hard china. Check the
overglaze manufacturer’s literature for information on
which cone to use with each color and type of ware.
Tiles and other large, flat pieces sometimes crack when
placed flat against a shelf. Use tile setters to distribute heat
Separate horizontally stacked china painted plates with stilts. Do not stilt
soft-bodied ware such as bone china.
holder, or place a triangular stilt under the bottom plate, and
a stilt between each plate stacked on top. Stacking plates
with stilts should be limited to 3 or 4 plates. Line the stilts
vertically.
Note: When separating horizontal plates with triangular stilts, load the plates gently. Otherwise the
china painted plates will scratch.
When firing overglaze, vent the lid with the lid prop until
all smoke and odor from china paint oil and other organic
materials has vanished. How long this takes depends on how
much decoration is on the ware. Gold and lusters will look
dull if not vented. Some colors, such as red, need especially
thorough venting. To be on the safe side, you can leave the lid
in vented position throughout the entire overglaze firing.
The kiln can be fired at the kiln’s Fast speed for most
overglazes. Larger pieces should be fired slower. Some materials, such as bone china, also need a slower firing. China
paints fired at a slow speed absorb more thoroughly into the
glaze. If you are in doubt about speed, fire slower. It is not
worth risking pieces you spent time on to fire the kiln fast.
Use the kiln’s hold feature to soak china paint at the firing
temperature. A 15 - 20 minute hold gives china paints time to
absorb more deeply into the glaze. Before firing valuable
pieces, do a test with hold time. Too much hold time can
burn out china colors.
Slow cooling is important for some materials, such as
gold. Glass paste on porcelain should also cool slowly. Be
sure the kiln room is well ventilated. Allow the kiln to cool to
room temperature before opening the lid.
Decals
Firing plates vertically minimizes the chance of
debris falling on them during firing.
evenly around the pieces, or place them on top of a stilt for air
circulation. The vertical plate holders minimize the chance
of debris inside the kiln from falling on the plates. But firing
plates horizontally is necessary when using certain decorations. In this case, you can use either a horizontal plate
16 /
Squeeze bubbles out of the decal when applying. Vent by
leaving the lid open all the way until the fumes burn off.
Then prop the lid throughout the rest of the firing.
Glass Fusing &
Slumping
You will probably fire mostly stained glass, but you can
also fire standard float (window) glass. Some types of float
glass devitrify (form a dull, frosty surface) when fired.
Caution: Never fire tempered glass. It could explode if heated inside a kiln.
Basic Glass Tools
Reservoir Glass Cutter uses a reservoir of oil to lubricate the cutter wheel.
Running Pliers are for cutting large pieces of glass.
Breaking Pliers are for cutting small strips.
Grozing Pliers shape the glass by chipping away the
edges. They are often used when the score line doesn’t break
cleanly. Note that rough edges will become smooth when
fired to fusing temperature.
How to Cut Glass
Note: IMPORTANT! Wear safety glasses when cutting or chipping glass.
1 Lay the glass on a clean surface. Mark off the cut with
a grease pencil or felt-tip pen. A small mark on each
end of the glass will do. Lay a wooden straight edge
over the glass and line it up with the marks you just
made.
2 Hold the straight edge firmly and score the glass with
the glass cutter. Press just hard enough so that the
scoring noise sounds steady and unbroken.
3 Place the straight edge under the glass so that an edge
is lined up with the score line you just made. Press
down on the glass. It will break cleanly.
Fusing Compatibility of Glass
When glass changes temperature, it expands and contracts. The rate at which glass changes size is called the coefficient of thermal expansion. If you fuse two glass pieces together and one changes size faster or slower than the other,
the fused piece may crack—even several months after removing from the kiln.
When different glasses have a close enough coefficient of
expansion to fuse successfully, they’re called fusing compatible. Buy glass labeled fusing compatible. Or fuse glass that
has been cut from the same sheet, which guarantees compatibility.
Fusing Compatibility Test
1 To test glass for compatibility, fuse small ½” square
sample pieces of different glasses onto a larger base
piece of clear transparent. It should extend beyond
the small sample pieces by half an inch on each side.
One of the sample pieces should be cut from the base
piece.
2 Heat the glass to a temperature that completely
rounds the edges of the small sample pieces.
3 After the glass cools, place a polarizing filter under
the glass and another filter over the glass. Look at the
glass with light shining through it (hold it over a
lamp). Turn one of the filters until the filters are at
their darkest.
Results of the Test
If you see a halo around the edges of the small glass samples, this usually means the glass is not compatible. If you
see no halo, the glass is fusing compatible.
Why did we include a sample square cut from the base
transparent glass? It tests for annealing. A halo around that
piece means the glass was not annealed properly. Perform
the test again, this time cooling more slowly through the annealing range.
The Annealing Range
Each type of glass has a temperature range that it must
pass through slowly when it cools. This is called the annealing range. This slow cooling gives hot glass time to release
the stress of cooling. If you cool the glass too fast through the
annealing range, it will break.
The larger and thicker the glass, the slower it must pass
through its annealing range. You cannot over-anneal, so err
on the side of caution if you aren’t sure how long to anneal.
Small projects such as earrings rarely need annealing time as
they cool.
/ 17
Cleaning and Gluing the Glass
Grease, dirt, and fingerprints etch permanently into the
glass during firing. Clean the glass with glass cleaner (the
type without silicones), rubbing alcohol, or even plain water
just before assembling the pieces on the kiln shelf.
Use white glue, such as Elmer’s diluted 1:1 with water, to
hold the glass pieces
together after you
place them on the kiln
shelf. Use the glue
sparingly. Glue is especially important
when fusing wire into
the glass. The glue
prevents the glass or
wire from moving out
of place before they
fuse. The glue disappears during firing.
Avoid using glue on
the coated side of
dichroic glass. If you
l a y dic hroic glass
carefully onto the
piece, glue is unnecessary, so avoid it altogether if you do not
know which side of
the dichroic is coated.
Loading the Kiln
Air should circulate between the shelf and the bottom of
the kiln, so place three or four 1/2” posts in the kiln. Lay the
shelf over the posts.
Firing the Glass
1 Vent the kiln by propping the lid with the lid prop.
Venting allows the gases released to escape. When
the kiln reaches 500 - 800° F / 260 - 426°C, lower the
lid from the vented position.
Looking at the glass during firing. Open the lid about 1”. Always wear firing
safety glasses when looking at the hot glass.
2 The first time you fire a particular brand or type of
glass, program the controller for a higher temperature than the estimated fusing temperature. Watch
the glass by opening the lid 1” for several seconds at
a time. Shut the kiln off when the glass fuses the way
you want. Make a note of the shut-off temperature.
For future firings, program the kiln for that temperature and rate.
Note: With every firing, be sure you are near the kiln
before the expected shut-off time.
3 After you shut the kiln off, vent the lid for 10 minutes by using the lid prop. Then close the lid.
4 The annealing range for most glasses is between
950°/510°C and 700°F/371°C. Cool slowly through
this annealing range. Leaving the door closed will
slow the cooling enough for most projects. If you
need even slower cooling, program a separate segment for cooling. See the kiln’s digital controller
manual.
Note: For safest cooling, leave the ware inside the
kiln until the kiln reaches room temperature. If you
remove the ware too soon, the sudden temperature
change can crack the piece.
“I used to have this wonderful haiku pinned
up above my kiln when I had my studio:
“‘Now that my house has burned down, I
have a better view of the rising moon.’
“During firing, I would lose stuff that I had
made. Things I thought would be beautiful
turned out ugly. The haiku helped me realize that I had to live with loss and ‘failure’
and learn from it.”
Sandra Dwiggins
18 /
Imperfection
Poor firing results are naturally disappointing, especially
after you have spent hours on a piece. Mistakes are an inevitable part of the learning process. They are bound to happen.
The time spent making a faulty piece is never time wasted if
you learn from the mistake. Use this section to find out how
to make the ware better the next time.
Bisque
Warped ware can be caused by distorting upon removal
of the piece from the mold, firing too close to the elements,
or firing a piece in an unnatural position.
Sagging ware is usually the result of overfiring.
Glaze
Crazing is usually
caused by underfired
bisque. Bisque should be
fired to the highest temperature at which it will
still take glaze. Crazed
ware may be refired to
the proper cone. CAUTION: China paints and
other overglazes will
burn off when fired to 06.
Crazing appears as tiny cracks.
Glaze too thin in spots can be caused by uneven glazing
or a “hard spot” on the bisque. Ceramic glaze should be applied in flowing coats; first in one direction and the next coat
in an opposite direction (horizontal, then vertical or
vice-versa). Allow to dry between each coat. Some glazes may
require twice the recommended coats because of thin application. “Hard spots” are sometimes the first spot where the
poured slip touches the mold. Heating bisque in an oven to
approximately 120 degrees F. will help in applying glaze to
hard bisque.
Crazing immediately on removing from the kiln can
be caused by not firing the ware hot enough or opening the
lid while the kiln is still hot. Refire to the proper cone.
Crazing in spots can be caused by not having mixed the glaze
thoroughly before using.
Black specks in the ware are usually caused by organic
materials not completely burned out in the bisque firing.
This works its way to the surface during the glaze firing.
Pinholes and bubbles in glazed ware can be caused by
too heavy a glaze application, by severe underfiring or by dust
on the bisque. Underfired bisque still contains carbons that
did not burn off completely. During the glaze firing, these
gases rupture the glazed surface, causing pinholes and bubbles. Damp bisque can reduce the number of air pockets and
pinholes that may form when glaze dries too quickly. Clean
bisque with tap water or use a base coat of glaze thinned 3
parts glaze to 1 part water immediately before applying glaze
in the usual manner to the bisque.
Poor color in colored glazes can be caused by too thin an
application, placing ware too close to an element or to other
glazed ware which may be incompatible, insufficient venting
during the early stages of firing, or overfiring glazes in the
red family.
Light edges on dark glass glaze pieces may be caused by
the flow of the glaze away from the edges in two directions.
Try an extra coat of glaze on the edges, or apply a thin coat of
underglaze in the following manner: Mix 1 part water with 2
parts of suitable dark or black underglaze and brush a thin
wash coat of the underglaze over the bisque ware. Then, immediately apply the first regular coat of full strength glaze.
Allow to dry thoroughly between coats. Continue with number of coats recommended by the manufacturer.
Sagging glaze is usually caused by applying too much
glaze on a vertical surface causing the glaze to actually sag
when fired.
Crawling or bare spots on a fired piece can be caused
by applying the glaze too heavily. Oil from your skin that gets
on the greenware before it is
fired can also cause this. Another cause may be hard
spots from too much polishing of your greenware when
sponging. A few drops of
vinegar in your sponging
water will help alleviate this
problem. Crawling may be
corrected by applying more
glaze to these spots and Crawling, or bare spots.
refiring.
Underglaze
Streaks in underglaze are usually caused by not applying
enough coats to the greenware. After a piece has been decorated with underglaze and fired, you may check it for streaks
by submerging it in water and immediately removing it. The
piece will appear glossy, just as if it had been glazed, and
streaks and thin spots will show up. The weak spots can be
touched up and refired. Be sure the underglaze has been
fired before putting it under water. For interesting designs,
underglaze colors may be applied over unfired matte or texture glazes that do not flow.
Overglaze
Breaking in overglaze firing can be caused by poorly
fired bisque. A slow bisque fire is always better for ware that
is to be china painted. The greenware should be completely
dry before being placed in the kiln. Standing plates on edge
or using a plate holder gives good heat circulation and will
help prevent plate breakage.
Purple spots in gold are usually due to a thin application
of gold or too much thinner. If gold is applied accidentally to
an area it will show purple after being fired unless cleaned
with a good gold remover.
/ 19
Broken lines in gold can be caused by overfiring or too
heavy an application. However, this is can be very attractive
when gold is crackled over a dark color of fired glaze.
One way to eliminate bubbles is to hold the temperature at
100°F below fusing temperature for 20 minutes. This gives the
shelf time to heat up to match the temperature of the glass.
Peeling china paint can be caused by the paint being
applied too heavily.
Glass Separator Sticks To Glass when fired too hot. Instead of firing to a full fuse temperature, try firing 50°F cooler
and holding at that temperature for twenty minutes.
Loss of color in china painting is usually a result of
overfiring or thinning your paint with too much medium
when applying.
Faded colors in overglaze decals are a result of either
underfiring or overfiring. If pinks and reds are drab, refire to
a hotter cone. When used with a china paint background, apply and fire the decals first, then china paint and fire again.
Check the recommendations of decal supplier. If decal was
underfired, refire to proper firing cone. If decal was
overfired, the design may be repainted in china paints and
refired.
Weakening of luster colors can be caused by
overfiring.
Maintenance
Trouble-Shooter
Kiln Does Not Turn
On, Display is Blank
I
Make sure the circuit
breaker is in the “on”
position.
I
If the breaker is on,
check the kiln’s fuse. It
is located on the kiln’s
switch box. Remove the
fuse by pressing on the
fuse holder and turning
counter-clockwise half a
turn. Check the fuse by
placing the probes of an
ohmmeter on the ends of
the fuse. If the ohmeter
reads less than one ohm (digital meter) or reads 0 ohms
(analog meter), the fuse is bad. Replacement fuse:
White spots in lusters or metals can be caused by moisture on the ware before it was placed in the kiln or from having been fired at the same time as other overglazes. Apply
lusters only on a dry day.
Powdering of luster colors can be caused by too heavy
an application.
Glass
Glass Cracking is caused by heating or cooling too fast or
fusing incompatible glass. Not enough glass separator on the
shelf can also cause glass cracking.
Most problems in fusing are caused by rushing the firing.
The glass must change temperature slowly during the critical
temperature range of 100° - 500° F. This critical range applies
to both heating and cooling.
The second critical temperature range is annealing, which
is the cooling range of 950° - 750°F average. Cool the glass
slowly during this range so the stress in the glass will have time
to dissipate.
If you become impatient after the glass has fused and you
open the kiln for a few seconds to peek inside, you may hear a
“ping,” which is the sound of glass cracking. Avoid the temptation to open the kiln. Wait until the kiln has cooled to room
temperature. Some artists schedule their fusing so that it is
completed before they go to bed. That way they will be asleep
while the glass cools and they won’t be tempted to open the
kiln while it is still hot.
AGC ½ A 250V AC
Note: If you do not have an ohmmeter, visually inspect the fuse. You will see a thin strand of unbroken
wire in a good fuse. The wire usually appears broken
in a burned fuse, like the filament in a light bulb.
Circuit Breaker Trips
I
If the circuit breaker trips after the kiln has fired for
awhile, make sure no other appliances are operating on the
same circuit as the kiln. The
breaker may need replacing.
The breaker may have tripped
due to loose connections in the
breaker box. If the fuse or circuit
breaker panel feels unusually
warm, have your electrician
check for loose connections,
particularly at the center screw
of the fuse socket, even in a new fuse box.
I
If the circuit breaker trips immediately after the kiln is
turned on, the kiln may have a short circuit. Unplug the
kiln. Open the kiln switch box and look for a loose wire
touching the case.
After each firing, examine the shelf. Recoat if the kiln wash
is chipped. When glass sticks to a bare section of shelf, the
glass will crack.
Glass Bubbles are often caused by heating the kiln too fast.
Air, grease or dirt trapped between layers of glass can cause
bubbles. Other causes are uneven glass volume, and moisture
or air trapped between the glass and shelf.
Make sure the shelf is completely dry before firing. If you
have applied fresh glass separator, leave the shelf in the kiln at
300°F for 30 minutes before placing glass on it.
20 /
Temperature is Inaccurate
I
Make sure the thermocouple extends into the firing
chamber by the correct amount:
A 1/8” diameter thermocouple should extend into the firing
chamber ½” - 5/8”.
ceramic block. Then securely tighten the 4 screws in
the ceramic block.
5 Fasten the ceramic block to the heat shield with the
two screws removed in step 3.
A ¼” diameter thermocouple should extend into the firing
chamber 1” or more.
I
If the temperature is inaccurate even though the thermocouple extends into the firing chamber correctly, replace
the thermocouple.
Replacing the Thermocouple
6 Remove the 4 screws holding the controller faceplate
to the top of the switch box. Lift out the faceplate.
1 UNPLUG the kiln.
2 Remove the screws on the sides of the switch box that
hold it to the kiln. Gently lift the box away from the
kiln.
3 Remove the two screws securing the thermocouple
ceramic block to the kiln. Remove the thermocouple
assembly from the kiln.
4 Slide the new thermocouple assembly into the hole in
the kiln wall. The thermocouple should protrude
into the firing chamber ½” - 5/8” for a 1/8” diameter
thermocouple, and 1” or more for a ¼” diameter
thermocouple. To adjust the thermocouple length,
change the gap between the thermocouple and the
7 Remove the 2 thermocouple wires attached to the
back of the controller. They are held in place by button or lever type connectors. To remove the wires, lift
the levers (or press down on the connector buttons)
and pull the wires out.
8 Strip ½” of insulation from the ends of the new thermocouple wires. Be sure the wire ends are separated
where the insulation has been stripped. If bare ends
touch, the thermocouple will not work properly.
9 Attach the wires to
the back of the
controller. One
wire is yellow, the
other red. Make
su r e t h e wir e s
connect to the corr e c t t e r min als,
which are color
coded. Reinstall
the controller to
the switch box.
10 Position the ther- Press the buttons on the back of the board
remove the thermocouple wires shown
mocouple wires so to
here. Observe color coding.
they are away from
the hot sides of the kiln case and other electrical
wires. (Placing thermocouple wires next to or looped
around other wires could cause erratic controller
readings.)
Insert the new thermocouple into the kiln wall. Adjust to the proper length.
Then tighten the ceramic block screws holding the thermocouple.
11 Check that no wires touch the kiln case or element
connectors. Wires touching element connectors
or kiln case will burn. Reinstall switch box.
/ 21
Replacing a Relay or Transformer
1 UNPLUG kiln.
2
Remove th e
screws on the
s ides of th e
switch box that
hold it to the
kiln. Gently lift
the box a way
from the kiln.
3 The transformer
a nd re lay are
bolted to the ins ide of th e
switch box. Hold
the ne w part
next to the one
you are replacing, aligned in
the same direction. Remove
and transfer one
wire at a time
from the old part
to the new one.
Make sure each
c onne c tion is
tight.
4 Replace push-on
connectors and
wires damaged
by heat. If wire
connectors do
not fit snugly on
terminals, gently
squeeze the end of the terminal with pliers.
5 Remove the old part from
switch box. Install the replacement.
Note: If you are replacing the
transformer, examine the new
one to make sure the primary is properly wired for
your kiln’s voltage. (See the kiln’s wiring diagram.)
6 Check to see that wires are not touching kiln case or
the element connectors. Wires touching element
connectors or the kiln case will burn out. Move
switch box into place and reinstall switch box
screws.
22 /
Replacing the
Temperature Controller
1 UNPLUG the kiln.
2 Remove the 4 corner screws holding the controller
faceplate to the switch box. Carefully lift out faceplate.
3 Disconnect all the
wires from the
back of the board.
You will find two
plugs and two single wires.
4 Connect the wires
to the new board.
Reinstall faceplate to the switch
box.
Replacing the Firing Chamber
When the element burns out, the ceramic fiber firing
chamber must be replaced.
To test for a burned out
element, you will need an
ohmmeter.
1 UNPLUG the kiln.
2 Remove the screws
on the sides of the
switch box that hold
it to the kiln. Gently
lift the box away from the
kiln.
3 Place ohmmeter leads
against the element conn e c t or s. A n o- n e edle-movement reading
on an analog meter, or
OPEN on a digital meter,
indicates a burned out element.
Replacing the firing chamber is a factory repair. Please
call 800-876-4328 or 972-288-7557 for instructions, or see
the dealer who sold you the kiln.
Ceramic Fiber Repair
I f gla ss, c eramic
glaze, or other materials
drip onto the firing
chamber, repair before
the next firing. Otherw i se the gla z e will
re me lt a nd e mbed
deeper into the fiber.
1 Unplug the kiln.
2 Cut or scrape the
ceramic fiber to remove the contaminant. Remove as little fiber as possible. If a heating element is located where you are
scraping, avoid touching the element.
3 Drill new holes in
the lid band for the
hinge.
4 Install screws.
Replacing the Lid
1 Remove the hinge screws from the lid band.
2 Lift off the lid. Place the new lid in position.
Glossary
hold time See “heat soak.”
bisque Fired, unglazed clay.
kiln wash A powder mixed with water and
brushed on top of shelves as protection from
drops of fired glaze.
cone, pyrometric A small pyramid of ceramic materials that will react to the effect of
time, temperature and atmospheric condition inside the kiln in the same way as ceramic ware.
crazing Hairline cracks in glazed ware. Most
common cause is underfired bisque.
decal A design or picture printed in overglaze or underglaze colors on a protective
coating. The decal is slipped from the paper
backing onto the appropriate ware and fired
for permanency.
dry footing Removing glaze from the bottom
of ware before firing to eliminate the need to
stilt.
earthenware A natural clay, porous compared to stoneware and porcelain. Fires to
around cone 04. It will not hold liquids unless
it is glazed.
element A coil of wire that heats when electricity passes through it.
enamel Liquid or powder containing finely
ground glass. Usually applied to metal, such
as copper, and fired in a kiln.
glaze A liquid composed of glass particles
and applied to ceramic ware.
greenware Unfired clay objects.
grog Fired, crushed clay.
heat soak Maintaining the same temperature inside a kiln.
kiln furniture The shelves and posts used
to position ware inside a kiln.
luster An iridescent overglaze, sometimes
metallic.
maturing point The stage where clay or
glaze has received the correct amount of
“heat work.” This is usually measured by the
6 o’clock bend of a large pyrometric cone
placed on a kiln shelf beside the ware being
fired.
overglazes China paints, lusters, gold, etc.,
usually used over a fired glaze but may also be
applied on polished porcelain bisque and
fired for permanency.
plaster A white powder used for making ceramic molds.
porcelain A vitrified, translucent ceramic
ware. Fires to a higher temperature than any
other ceramic ware.
pyrometer An instrument for measuring
temperature.
ramp Changing the temperature with a controller. If the temperature change is drawn in
graph form, the resulting line looks like a
ramp.
changes firing speed, temperature, and can
add hold time.
sgraffito Decorating ware by scratching the
surface layer of clay. This reveals a clay of a
different color underneath.
silica A mineral that will not harden at a very
high firing temperature, used for separating
porcelain greenware during firing.
slip A liquid clay used in making ceramic objects by casting.
stilts Small clay or metal-tipped supports
used to prevent glazed objects from sticking
to the kiln shelf.
stoneware A vitreous ceramic body usually
made from native clays. Fired to much higher
temperatures than earthenware.
thermal shock Stress caused by sudden
changes in the temperature of ceramic ware.
Can cause cracks or breaks.
thermocouple The measuring unit of a pyrometer that is inserted into the kiln’s firing
chamber.
transformer An electrical device in the
kiln’s switch box that changes the higher
voltage from the wall outlet to 24 volts. The
lower voltage powers the kiln’s controller.
underglaze A decoration applied to
greenware or bisque, usually applied under
the glaze.
relay An electromagnet that, when triggered
by current from the controller, turns on the
heating elements.
venting Allowing air to come into the kiln
and vapor and gases to escape. This is one of
the most important steps in firing.
segment A set of instructions for the controller in the Ramp-Hold mode. A segment
vitrify To change into a glassy or a non-porous state by heat and fusion.
/ 23
Paragon Kiln
Limited Warranty
Paragon kilns are warranted to the original purchaser by
Paragon Industries, Inc. (herein “Paragon”), subject to the
listed exclusions below, to be free of defects in workmanship
for the period specified below. The warranty period begins
from date of shipment from the Paragon factory unless date
of original purchase from an authorized Paragon distributor
or dealer can be established.
Warranty Period:
Home Artist series kilns rated to 2000°F: 1 year
This warranty period applies unless otherwise agreed to
in writing.
This warranty excludes: 1) Kilns damaged by overfiring
(exceeding the melting temperature of the material being
fired) regardless of cause of overfiring; 2) Ware, tools, kiln
furniture, or anything inside damaged by overfire; 3) Kilns
allowed to exceed the maximum temperature shown on
kiln’s nameplate, regardless of cause; 4) Kilns subjected to
abuse, neglect, freight damage or improper storage; 5) Kilns
used for either reduction or salt firing, 6) Kilns damaged by
improper electrical installation; 7) Kilns used for purposes
other than firing ceramics, glass, heat treating, or the purpose for which it was intended; 8) Element burnout caused
by contact with foreign materials; 9) The patented Dawson
Kiln Sitter and/or Limit Timer manufactured by W.P.
Dawson, Inc., 399 Thor Place, Brea, California 92621.
WARRANTY COVERAGE EXTENDS ONLY TO THE
ORIGINAL PURCHASER AND DOES NOT COVER REPLACEMENT OF PARTS THAT ARE, BY THEIR NATURE, EXPENDABLE. THIS WARRANTY IS VOIDED IF
THE PRODUCT IS ADVERSELY AFFECTED BY
ATTACHING ANY FEATURE OR DEVICE TO IT, OR IS
IN ANY WAY TAMPERED WITH OR MODIFIED WITH-
“Clay becomes part of us. We
long to be with it when away from
the studio. We spend hours in its
company, and we fight with it.
When we need the peace and
calm of clay, it is there waiting.
When we need excitement, it is
ready to come out of the kiln.
Clay entices us, because working
with it works out so much of our
everyday life.”
Carol Jackaway
OUT EXPRESS WRITTEN PERMISSION FROM PARAGON INDUSTRIES, INC.
Paragon Industries, Inc., will repair or replace any parts
that become defective under normal and proper use during
the specified period for the kiln purchased, providing the
kiln has not been subjected to misuse or the listed exclusions. Paragon will furnish and install replacement parts at
the factory with transportation costs to and from the factory
paid by the owner; or upon receipt of defective parts at the
factory, and after factory examination of the defect, Paragon
will furnish replacement parts, complete with installation
instructions, shipped postpaid to owner. The warranty on
the repaired and/or replaced parts will be limited to the unexpired term of the original warranty.
Any claim for adjustment under this warranty must include name and address of dealer from whom kiln was originally purchased. Repair or replacement of any defective parts
shall fulfill all obligations of Paragon. No other obligations or
liabilities are assumed in connection with Paragon kilns nor
does Paragon Industries, Inc. authorize its distributors or
dealers to assume any other obligations or liabilities on its
behalf.
THERE ARE NO OTHER WARRANTIES EXPRESSED
OR IMPLIED, INCLUDING BUT NOT LIMITED TO
ANY IMPLIED WARRANTIES OF MERCHANTABILITY
OR FITNESS FOR A PARTICULAR PURPOSE. IN NO
EVENT SHALL PARAGON INDUSTRIES, INC. BE LIABLE FOR ANY LOSS OF PROFITS OR ANY INDIRECT
OR CONSEQUENTIAL DAMAGES ARISING OUT OF
ANY SUCH DEFECT IN MATERIAL OR WORKMANSHIP. NOTE: SOME STATES DO NOT ALLOW THE
EXCLUSION OR LIMITATION OF INCIDENTAL OR
CONSEQUENTIAL DAMAGES SO THE ABOVE LIMITATION OR EXCLUSION MAY NOT APPLY TO YOU.
This agreement is made in the State of Texas and its validity, construction, and all rights under it will be governed
by the laws of the State of Texas. This warranty gives you
specific legal rights, and you may also have other rights,
which vary from state to state.
2011 South Town East Blvd.
Mesquite,Texas 75149-1122
972/288-7557 / Toll Free: 800-876-4328
Fax: 972-222-0646 / Toll Free Fax: 888-222-6450
[email protected] / www.paragonweb.com