1
Read the following instructions
carefully before replacing any
parts. Reasonable care and safe
methods should be practiced.
Check
local
codes
and
requirements before installation.
Only competent electrician
should make the installations.
Servicing should be performed
only by knowledgeable pump
service contractors or authorized
service stations.
WARNING: Always disconnect
the pump from power source
before handling or making any
adjustments. Always wear
rubber boots when there
is water on the floor and you
must unplug the pump or make
any adjustments.
1. Removing pump from sump.
Before removing pump from
sump for repair, check to see if
the trouble could simply be a
blown fuse, tripped circuit
breaker, or a power cord not
completely inserted into the
receptacle.
NOTE: Automatic thermal
overload
protects
the
sealed-in oil motor. Running
dry may overheat the motor
and activate the overload
protector. This will close the
circuit when the motor cools
and allow pump to restart. If
condition continues to exist,
it may cause premature
pump failure.
Unplug the power cord and
pull the pump, by the handle,
from the sump. Sandblast, if
4
possible, any dirt or trash from
the outside of the pump before
dismantling.
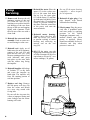
2. Check diaphragm switch. If
the unit is being operated by
the automatic diaphragm
switch, unplug the pump from
the “piggyback” receptacle and
plug the pump directly into the
power source. If the pump
starts each time it is plugged
directly into the receptacle and
does not start each time when
plugged into the piggyback
switch with the diaphragm
switch
pressed
into
a
start position, replace the
complete piggyback switch
assembly and retest with the
new assembly.
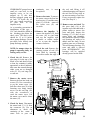
3. Check for impeller blockage.
Check for an obstruction in the
impeller cavity by laying the
pump on its side and inserting
a screwdriver through the hole
in the foot and baffle plate (28)
and the bottom plate (26) and
turning the rotor and shaft
(16). It should turn freely. If
the impeller hangs up or there
is an indication of impeller
blockage, the foot and baffle
plate must be removed by
removing the three hex head
cap screws (29) and the
bottom plate removed by
removing the five hex head
cap screws (27). Clear
the impeller of its obstruction
and clean the impeller,
and reassemble.
4. Check power cord. Check the
power cord (5) for brittleness
or for any cuts or nicks in
the insulation. Using an
ohmmeter,
check
the
continuity of the power cord.
If any of these tests fail, the
power cord should be
replaced. To replace power
cord unscrew the nut on the
cord, pull cord up and discard
damaged power cord. Add
pipe sealant to threads and
reinstall by pushing cord onto
pins and tighten nut.
5. Check for air lock. A sump
pump is said to be air locked if
water traps in the pump and it
cannot get out, thus preventing
pump from operating.
32
TOTAL DYNAMIC HEAD-FEET
Pump
Servicing
24
1/3 HP
16
8
0
0
10
20
30
40
CAPACITY-U.S. G.P.M.
50
60