1
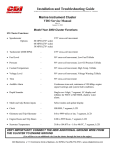
Installation and Troubleshooting Guide
All rights reserved. Reproduction or use of content, in any manner, without express written permission by CDI Electronics, Inc., is prohibited.
CDI P/N: 113-4489
This kit will replace the following P/N's: 583656, 583664, 583665, 583896, 583984, 584329, 584331, 584347, 584486,
584487 and 584489.
WARNING! This product is designed for installation by a professional marine mechanic. CDI Electronics cannot be held
liable for injury or damage resulting from improper installation, abuse, neglect or misuse of this product.
Installation
1.
2.
3.
4.
5.
6.
7.
8.
9.
10.
11.
12.
13.
Disconnect the negative battery cable.
Clean all battery cable connections and engine grounds.
Remove the flywheel.
Disconnect the orange and orange/blue ignition coil wires.
Remove the base assembly with the old CD module mounted on it.
Remove the old power pack from the timer base plate and save the mounting bolts.
Cut the Black/Yellow kill wire close to the old power pack and save the wire.
Disconnect the Charge coil wires from the old CD module.
Replace the old charge coil with the new one (Remember to install the shunt plate on the outside of the charge coil ONLY IF THE
OLD CHARGE COIL HAD A SHUNT PLATE INSTALLED). Bend the top lamination up and the bottom lamination down to wedge
the coil in place.
Route the charge coil wires and the new sensor wires through the top of the timer base plate.
Slide the charge coil and sensor wires through the new sleeving.
Install the clamp on top of the armature plate to position and secure the charge coil and sensor coil leads.
Slide the sleeving up to the armature plate to protect the wiring and install the cover on the bottom of the plate (align the notch in
the cover with the notch in the plate).
14. Install the new sensor and plate assembly (Plate side up). Set the air gap according to the service manual, using PN: 553-4994
Locator Ring.
A) Place the 553-4994 Locator Ring over the outside of the sensor and stator assemblies, seating it over the mounting bosses
in the armature plate.
B) Loosen the mounting screws holding the sensor and stator assemblies in place.
C) Slide the sensor and stator assemblies out against the Locator Ring and hold them in place.
D) Tighten the screws to 15-22 inch pounds and slide the Locator Ring off of the sensor and stator assemblies.
15. Install the timer base assembly and connect the linkage.
16. Re-install the flywheel according to the service manual.
17. Mount the new power pack to the engine (or to the adapter plate if there are no mounting bosses for the power pack,
keeping the wires to the inside edge of the plate). If needed, mount the adapter plate on the port side of the engine at
the top of the water jacket.
18. Route the trigger and charge coil wires around and over to the new CD module,
19. Insert the charge wires and sensor wires into the 5 pin connector, matching the wire color pin locations to the power
pack connector.
20. Check for DC voltage on the kill (stop) wire (usually Black/Yellow) with the key-switch in the on and off position. At no time should
you see over 2 volts DC on this wire as severe damage to the power pack can occur.
21. Cut and strip approximately 3/16” of insulation from the Black/Yellow wire and crimp the terminal furnished. Insert the
Black/Yellow wire into the 5 pin connector.
22. Connect the tan temperature wire to the temperature sensor.
23. Connect the orange and orange/blue wires to the ignition coils.
24. Re-connect the battery cable,
25. Reset ignition timing according to the service manual.
Troubleshooting
No Fire Any Cylinder
1. Check the cranking speed, the engine should be turning 250 RPM or more. (Check the battery and starter).
2. Check the stator resistance (450-850 ohms) and DVA output voltage while the stator is connected to the power pack.
You should read 150V or more from the brown wire to the brown/yellow wire while they are connected to the pack. If
low, disconnect the brown and brown/yellow wires from the pack and retest. If the voltage jumps to over 225V – the
pack is likely bad. A reading that remains below 175V usually indicates a bad stator.
3. Check the trigger resistance and output. From the black/white to the white/black should read 38-43. DVA output
should read 0.5V or more from the black/white to the white/black trigger wire, (Connected to the pack) while cranking
the engine.
CDI Electronics • 111 Commerce Circle • Madison, AL 35758 • Fax 256-772-5701 • www.cdielectronics.com • Rev A • 11/24/2010
Page 1 of 3
Installation and Troubleshooting Guide
All rights reserved. Reproduction or use of content, in any manner, without express written permission by CDI Electronics, Inc., is prohibited.
Still no fire:
1. Check the stator for signs of leakage out of the charge coil, check stator resistance (450-850 ohms) and DVA output
voltage while the stator is connected to the power pack. You should read 150V or more from the brown wire to the
brown/yellow wire while they are connected to the pack. If low, disconnect the brown and brown/yellow wires from the
pack and retest. If the voltage jumps to over 225V – the pack is likely bad. A reading that remains below 175V usually
indicates a bad stator.
2. Check the trigger resistance and output. From the black/white to the white/black should read 38-43. DVA output
should read 0.5V or more from the black/white to the white/black trigger wire, (Connected to the pack) while cranking
the engine.
No Fire on One Cylinder
1. Swap the orange coil wire of the cylinder not firing with the one that does on the pack and see if the fire moves from
one coil to the other one. If it does, the pack is likely bad. If the fire stays on the same cylinder, the ignition coil is
probably bad.
2. Swap the Blue trigger wire with the Green trigger wire and retest. If the fire moves from one cylinder to the other,
replace the trigger. If it does not move, the pack is likely bad.
3. Swap the Brown stator wire with the Brown/Yellow stator wire and retest. If the fire moves from one cylinder to the
other, replace the stator.
Will not accelerate beyond 2500 RPM and shakes violently
SLOW circuit is activating:
1. Check the engine temperature and verify that the engine is not overheating.
2. Check the location of the tan temperature sensor wire. It should not be located too close to a spark plug wire.
3. Disconnect the tan temperature sensor wire at the pack and retest. If the engine now operates normally, replace the
temperature sensor.
4. If the engines still acts up, replace the power pack.
SLOW circuit will not activate
Disconnect the tan temperature wire and short it to engine ground.
If the SLOW circuit now operates, replace the temperature sensor.
If the SLOW circuit still does not work, replace the power pack.
CDI Electronics • 111 Commerce Circle • Madison, AL 35758 • Fax 256-772-5701 • www.cdielectronics.com • Rev A • 11/24/2010
Page 2 of 3
Installation and Troubleshooting Guide
All rights reserved. Reproduction or use of content, in any manner, without express written permission by CDI Electronics, Inc., is prohibited.
Thank you for using CDI Electronics.
CDI Electronics • 111 Commerce Circle • Madison, AL 35758 • Fax 256-772-5701 • www.cdielectronics.com • Rev A • 11/24/2010
Page 3 of 3