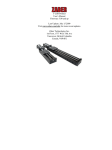
1
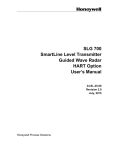
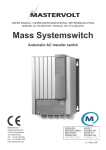
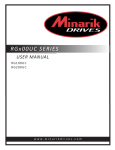
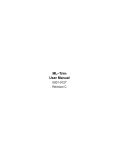
DI Driver Module Kit User’s Manual D000020 Rev F July 2012 Drivven, Inc. • 12001 Network Blvd • Bldg E, Ste 110 • San Antonio, Texas 78249 • USA Phone : 210.248.9308 Web : www.drivven.com , E-mail : [email protected] Drivven, Inc. DI Driver Module Kit HIGH VOLTAGE: This device normally operates at voltages up to 175 volts. Extreme care should be taken to protect against shock. Even when the device is completely powered down, allow approximately three minutes for the internal high voltage to dissipate. Do not touch any of the module screw terminals or injector terminals while the device is powered. © Drivven, Inc. 2011 • DI Driver Module Kit User’s Manual • D000020 • Rev F 2 Drivven, Inc. DI Driver Module Kit Contents Introduction ......................................................................................................................... 4 Module Specifications ........................................................................................................ 5 Pinout .................................................................................................................................. 6 Hardware ............................................................................................................................. 6 Powering the Module .......................................................................................................... 7 Platform Compatibility ....................................................................................................... 9 Internal Boost Power Supply ............................................................................................ 11 Direct Injector Drivers ...................................................................................................... 16 Connecting Injectors to the Module .................................................................................. 36 Compliance and Certifications .......................................................................................... 38 Physical Specifications and Characteristics ...................................................................... 39 © Drivven, Inc. 2011 • DI Driver Module Kit User’s Manual • D000020 • Rev F 3 Drivven, Inc. DI Driver Module Kit Introduction The Direct Injector Driver Module Kit provides a CompactRIO (cRIO) module for driving a wide variety of diesel and gasoline direct injectors, including many piezo actuated injectors. The kit includes LabVIEW FPGA and RT VIs for controlling the driver channels. Each DI driver channel is individually controlled for timing and duration, but channel operation may not overlap. The module cannot control piezo and solenoid actuator types simultaneously. When configured for piezo mode, channel 3 is not available and must have its terminals shorted together. Features: 3-channel solenoid injector drivers 2-channel piezo injector drivers (in piezo mode) Up to 175V internal boost power supply Up to 40A peak current drive Operates from 6V to 32V battery Optional external input for high voltage supply (up to 175V) o Internal boost supply automatically shuts down when external high voltage is applied > 24V Circuit protection and diagnostics o Protected against INJ+/- short to battery / high voltage o Protected against INJ+/- short to GND o Internal power supply overload protection o Internal power supply over-charge protection o Module temperature protection o Open circuit detection o Fault flags reported for all above conditions LabVIEW FPGA and RT VIs for engine-synchronous, multi-pulse injection control strategies o Up to 16 pulses per injection cycle (Engine Speed Limited) o Configurable for any combination of angle and time triggering o Current control profile Up to 8 phases Each phase provides settings for upper and lower current dithering setpoints Duration and drive voltage (battery or boost) specified for each phase First phase can be configured to end after first peak Drivven’s DI Calibrator application assists with firing injectors on a test bench for configuring the injector current/voltage profile Piezo injector operation for unipolar drive o Inverted piezo drive supported (Discharge=ON, Charge=OFF) © Drivven, Inc. 2011 • DI Driver Module Kit User’s Manual • D000020 • Rev F 4 Drivven, Inc. DI Driver Module Kit Module Specifications Table 1. Module Specifications Parameter Description Value Units Number of Channels for Solenoid Injectors Number of Channels for Standard Piezo Injectors Number of Channels for Inverted Piezo Injectors Main Battery (BATT) Input Range Recommended Main Battery Input Power Capacity External Power (EXT PWR) for Boost Power Supply (1) Replacement Maximum Module Internal Power Dissipation (2) Maximum Current Drive to Injectors (3) Maximum Recommended Injection Command Duration (4) Maximum Injection Events Per Engine Cycle (5) Minimum Time Between Injection Events Maximum Single IPhase Element Duration Maximum BackBoostTime Maximum OneShot Time Maximum HVTarget Setpoint (7) Maximum Internal Module Temperature Before Critical Fault (7) Short Circuit Fault Threshold (During Injection Events) (7) Short Circuit Fault Threshold (Outside Injection Events) (6) Open Circuit Fault Threshold (7) High Voltage Fault Threshold 3 2 1 7-32 >=100 VDC W 7-175 VDC 10 40 5 16 0 1.6 1.6 5 175 85 44 20 1.5 195 Watts A msec msec msec msec msec V C A A A V Notes: (1) When using an external high voltage power supply connected to the EXT PWR terminal, do not connect this high voltage supply to the BATT terminal. The BATT terminal should still be connected to a separate supply of 7-32V. The ground of the external high voltage supply should be connected to the GND terminal 8. (2) The recommended maximum time at 40A is 100usec (3) Longer injection durations are possible, but the duty cycle of the driver should be taken into consideration. For example a single one-shot pulse on an injector test stand could safely be 200msec. Therefore injection duty cycle, current levels, and module temperature should be considered. (4) This is a software limit. However, overall injection duty cycle, current levels and module temperature should be considered. Sixteen injection events per engine cycle may overload the module depending on engine speed and current levels. (5) The software can be configured to have multiple injection commands which merge. However, the injector will need a certain amount of time to close the valve at the end of an injection command. This is a property of the injector. (6) If the current during an injection command does not exceed this level, then an Open Circuit Fault will be reported. However, this does not effect the operation of the driver. The Open Circuit Fault is for information only. (7) These conditions will cause a critical fault and shutdown operation of the module. A manual fault clearing via software must take place to resume operation. © Drivven, Inc. 2011 • DI Driver Module Kit User’s Manual • D000020 • Rev F 5 Drivven, Inc. DI Driver Module Kit Pinout Hardware The DI Driver Module Kit provides three channels for driving unipolar solenoid and piezo injectors in a National Instruments CompactRIO module. An internal boost power supply is included for providing up to 175V for driving peak solenoid currents up to 40A. © Drivven, Inc. 2011 • DI Driver Module Kit User’s Manual • D000020 • Rev F 6 Drivven, Inc. DI Driver Module Kit Powering the Module The DI Driver module requires power from two different sources. One source is from the CompactRIO backplane male high density D-Sub 15-pin (HD15) connector which mates with the module’s female HD15 connector. This power source provides a regulated 5 volts and ground to various digital logic functions within the module. The CompactRIO 5V source is active whenever the CompactRIO or R-Series Expansion Chassis is properly powered. The module should be powered at the HD15 connector by plugging it into a CompactRIO or R-Series Expansion Chassis. The module’s HD15 connector should not be connected to any other device. Another required power connection is at the external screw terminal connector block provided with the module. The main power terminals are labeled BATT (0) and GND (9). Typical power sources will be from automotive 12VDC or 24VDC battery systems. However, the module can accept power from a range of 7VDC to 32VDC. Caution – You must use a UL Listed power supply with the Drivven DI Driver Module. With the internal boost power supply and injector outputs disabled, the module requires up to 100mA from the external supply. The total power required to operate the module and drive injectors is according to the following formula: Where: Ip (A) = Peak current Ih (A) = Hold current HVTarget (V) = High Voltage Target from internal boost supply BattV (V) = Battery voltage supplied to BATT(0) Tip (sec) = Time of peak current phase DurAve (sec) = Average duration of all injection pulses within an engine cycle RPMmax (RPM) = Maximum engine speed in RPM Nchan = Number of channels used Npulse = Number of injection pulses per engine cycle The above formula assumes a 4-stroke engine cycle. For 2-stroke engines, multiply the result by 2. Table 2. Example power calculation. Parameter Ip (A) Ih (A) HVTarget (V) BattV (V) Tip (sec) DurAve (sec) RPMmax (RPM) Nchan Npulse Power (W) Continuous Current (A) Value 25 15 75 13.8 0.000100 0.000800 4500 3 2 65 4.5 © Drivven, Inc. 2011 • DI Driver Module Kit User’s Manual • D000020 • Rev F 7 Drivven, Inc. DI Driver Module Kit A 100W power supply is sufficient for most applications. Power requirements may peak up to 150W for more demanding applications. The external battery ground is isolated, within the module, from the CompactRIO 5V supply ground. However, the external battery ground and the CompactRIO ground may be connected externally. The module will not be recognized by software without both power supplies active at the HD15 connector and the external screw terminal block. Warning: The external battery supply input terminals are not reverse voltage polarity protected. Connecting power to the module in reverse polarity will damage the module. This event is not covered by warranty. Please refer to the DrivvenReverseBatteryNotice.pdf document (available on the website) for a recommended solution for protecting a system from reverse battery polarity. There is an optional power input to the external screw terminal connector block. The terminal is labeled EXT PWR (7). The ground reference for EXT PWR (7) must be the same ground as GND (9). This power input can range from 6V to 175V and is optionally used to provide the boost voltage in place of the internal boost supply. Since the internal boost power supply is a significant contributor to the internal module heat generation, this external power input may be necessary if the injector drive requirements, in combination with maximum engine speeds, cause the internal module temperature to exceed the limit. This topic is discussed in detail later in this manual. When a voltage above 24V is applied to the EXT PWR (7) terminal, then the internal boost power supply will automatically shut off, even if it is enabled via software. Even when EXT PWR (7) is connected to an external high voltage power source, BATT (0) must still be connected to 6V to 32V in order for the module to be properly powered for general functions. In most applications the EXT PWR (7) terminal is not necessary and should be left unconnected. © Drivven, Inc. 2011 • DI Driver Module Kit User’s Manual • D000020 • Rev F 8 Drivven, Inc. DI Driver Module Kit Platform Compatibility CompactRIO modules from Drivven are compatible within two different platforms from National Instruments. One platform is CompactRIO (cRIO), typically consisting of a CompactRIO controller and CompactRIO chassis as shown in Figure 1a below. Integrated cRIO chassis and some sbRIO boards are also included in this compatible platform. Please contact Drivven for the latest cRIO family compatibility information. Figure 1a. CompactRIO platform compatible with Drivven CompactRIO modules. The other platform is National Instruments PXI which consists of any National Instruments PXI chassis along with a PXI RT controller and PXI-78xxR R-Series FPGA card. An R-Series expansion chassis must be connected to the PXI FPGA card via a SHC68-68-RDIO cable. The CompactRIO modules insert into the R-Series expansion chassis. This platform is shown in Figure 1b below. Figure 1b. PXI platform compatible with Drivven CompactRIO modules. Drivven CompactRIO modules are not compatible with the National Instruments CompactDAQ chassis. Drivven CompactRIO modules REQUIRE one of the hardware support systems described above in order to function. The modules may not be used by themselves and/or interfaced to third party devices at the backplane HD15 connector. These efforts will not be supported by Drivven or National Instruments. © Drivven, Inc. 2011 • DI Driver Module Kit User’s Manual • D000020 • Rev F 9 Drivven, Inc. DI Driver Module Kit You can use Drivven C Series modules with NI cRIO-911x, NI cRIO-907x, and NI R Series Expansion systems under the following conditions. –Leave one empty chassis slot between Drivven and NI modules. –Maintain an ambient system operating temperature of 0 to 45 °C. –Typical specifications of NI modules may not apply when used in a system with Drivven modules. –Warranted specifications are guaranteed for all NI modules except thermocouple modules when used in a system with Drivven modules. –The NI 9214 is recommended for thermocouple measurements in cRIO systems using Drivven modules. -Scan Interface mode, auto-detection, and ID mode are not supported for Drivven modules. © Drivven, Inc. 2011 • DI Driver Module Kit User’s Manual • D000020 • Rev F 10 Drivven, Inc. DI Driver Module Kit Internal Boost Power Supply The DI Driver Module contains an internal boost power supply which can be commanded to maintain a voltage level from battery voltage up to 175V. The boost power supply can be enabled or disabled at any time via software. It is disabled automatically whenever critical faults occur and can only be enabled thereafter by clearing the faults. The high voltage is stored within internal capacitors and used to drive the high-voltage, phases of the injector current profile. HIGH VOLTAGE: This device normally operates at voltages up to 175 volts. Extreme care should be taken to protect against shock. Even when the device is completely powered down, allow approximately three minutes for the internal high voltage to dissipate. Do not touch any of the module screw terminals or injector terminals while the device is powered. © Drivven, Inc. 2011 • DI Driver Module Kit User’s Manual • D000020 • Rev F 11 Drivven, Inc. DI Driver Module Kit Internal Boost Power Supply Performance There are six critical factors which determine how well the internal boost power supply will perform for a particular injector solenoid application. Those factors are: Injector solenoid resistance Injector solenoid inductance Peak current required to open the injector valve Working voltage requirement (HVTarget) Frequency of injection events Injector solenoid back-boost time (BackBoostTime) We will discuss each of these factors one at a time. Injector Solenoid Resistance Typical common rail diesel injector solenoids will have a resistance of 1 ohm or less. This resistance will waste, as heat, a portion of the energy supplied to the solenoid. It also affects the maximum current achieved in the coil, which depends on the drive voltage applied. In general, lower solenoid resistances are better for common rail solenoid injector applications. Injector Solenoid Inductance Typical common rail injector solenoids will have an inductance of 1mH or less. Inductance acts to resist current change through the coil. The higher the inductance, the longer it will take to achieve the required peak current level, given a constant drive voltage. When the internal high voltage is used as a current drive, there is a transfer of energy from the internal high voltage capacitance to the injector solenoid. Longer drive times mean more energy will be depleted from the internal high voltage capacitance. This causes the internal boost supply to work harder to maintain the high voltage target. However, inductance is not a bad thing because it is proportional to the magnetic force generated for opening the injector valve. Peak Current Requirement Higher peak-currents require more energy from the internal boost power supply because the internally stored high voltage will be depleted at a higher rate. Working Voltage Requirement A higher working voltage maintained by the internal boost power supply will be able to drive the peak current level in a shorter amount of time, thereby providing quicker valve opening times and more predictable fuel injection quantities over a given injection duration. However, the boost power supplies operate less efficient at higher voltages. Therefore the power supply must work harder to maintain a higher working voltage. Typical times to reach 20 amps in common-rail diesel injectors are on the order of 30 to 100 microseconds, with a working voltage of 100V. Frequency of Injection Events The frequency of injection events is directly proportional to the work required by the power supply to maintain the working voltage. Injector Back-Boost In many scenarios, it is possible to get a significant and useful back-boost charge from the injector solenoid at the end of each injection event. This back-boost from the solenoid mostly depends on the hold-current level during the injection event, and the working voltage of the boost power supply. In most cases, if the current profile is correctly configured, there will be a small back-boost on the order of 5V to the power supply which will reduce the work required to maintain the working voltage. It is possible to incorrectly configure the module to use very little of the high voltage supply for driving the peak-current while also setting a high hold-current level. This configuration can lead to back-boosting the power supply over the required working voltage. The usage of the internal high voltage supply should be used to prevent this from happening. If the working voltage © Drivven, Inc. 2011 • DI Driver Module Kit User’s Manual • D000020 • Rev F 12 Drivven, Inc. DI Driver Module Kit exceeds 175V, then it will generate a fault and shut down automatically. Power Supply Faults and Protections There are a few critical faults related to the operation of the internal power supply which will cause all operations of the module to shutdown automatically. The internal boost power supply and injection control can be re-enabled by manually clearing the faults via software. Power Supply Charge Fault (PSCharge) If the power supply is actively attempting to recharge and detects that the voltage is not rising, then the charge fault will be set. This fault would most likely occur if there was an internal problem with the module, such as a capacitor failure. Power Supply Overload Fault (PSOverLoad) The DI driver module maintains an integrator of power supply usage. An internal counter increments with each power supply voltage boost and decrements according to a fixed time interval. If the integrator winds up to 3,800 counts, then an overload fault will be set. This is an indication that the module temperature would soon rise beyond its maximum operating temperature if not stopped. The module temperature fault may be tripped before the overload fault, depending on the actual conditions. Module Temperature Fault (ModuleTemperature) Due to the standard CompactRIO module enclosure design, there is limited ability for heat to escape the module. The power supply circuitry was designed with components carefully selected for efficiency and compactness. Still, the primary source of heat within the DI Driver Module is the internal boost power supply. If the internal module temperature rises above approximately 80C, then the module temperature fault will be set. High Voltage Limit Fault (HighVoltageLimit) If the charge on the internal power supply exceeds 175V, then the high voltage limit fault will be set. This fault could occur due to internal problems with the module or due to excessive injector solenoid back-boosting. Excessive solenoid back-boosting can be caused by a combination of solenoids with very high inductance and using the internal boost supply very little. The above faults are loosely tied together, in that certain conditions can lead to two or more of the above faults. For example, the power supply may be loaded such that the board temperature will reach its limit before the overload integrator limit is reached. © Drivven, Inc. 2011 • DI Driver Module Kit User’s Manual • D000020 • Rev F 13 Drivven, Inc. DI Driver Module Kit Internal Boost Power Supply Benchmarks For a better understanding of what the power supply is capable of, in terms of driving typical common rail diesel injectors, below are some bench test results. Table 3. Bench Test Results Test Condition External Battery Voltage (V) HVTarget (V) PeakCurrent (A) PeakTime (msec) HoldCurrent (A) BackBoostTime (msec) Number of injectors operated Number of fuel pulses per cycle Simulated engine speed (RPM) Length of test (min) Ambient temperature (C) Final module temperature (C) Temperature stabilized? Injector under test Test 1 Test 2 13.8 13.8 75 75 27 27 0.18 0.18 15 15 0.20 0.20 3 3 1 5 5000 2000 10 10 25 25 50 75 Y N Bosch P/N 0445 110 072 Mercedes Benz P/N 611 070 09 87 With air flow over the module, the duration of operation at heavy loads can be extended. The internal power supply requires approximately 10 milliseconds to charge from 12V to 100V, and approximately 20 milliseconds to charge from 12V to 150V. This charge-up process will occur immediately when enabling the power supply. As long as the power supply is enabled, the requested working voltage will be maintained while injection events are not commanded. Depending on the working voltage, the user may hear a slow frequency of faint clicks from the module. This is normal noise from the power supply. The above table is a guide to the capability of the internal boost power supply. There are many different possible solenoid current profiles that are required by as many different injector solenoids. The DI Calibrator application can assist in determining whether the internal power supply will meet those requirements. Drivven will determine calibration parameters for customer’s injectors at no cost if the calibration data can be re-used. This does not include fuel flow measurements. Drivven must be provided with current profile information and a test solenoid or injector. When the internal supply is disabled, the high voltage will bleed down to battery voltage from 175V in approximately 2 minutes. While it is not ideal, for packaging considerations, to use an external high voltage power supply, there is a screw terminal to the module for this purpose, in case the internal power supply cannot meet the demands of the application. However, before deciding to use an external power supply, consider using only two of the three available channels instead of all three. For example, consider using three DI driver modules for a six cylinder engine. This will lighten the load on each internal power supply. Connecting an External Power Supply to EXT PWR (7) An optional high voltage external power supply may be connected to EXT PWR (7) if the internal boost power supply is overheating or not able to keep up with the injection requirements. Inside the module, the external high voltage supply connects to the same internal capacitance as the © Drivven, Inc. 2011 • DI Driver Module Kit User’s Manual • D000020 • Rev F 14 Drivven, Inc. DI Driver Module Kit internal boost supply. Expect an electrical spark when connecting a live high voltage power supply to the EXT PWR (7) terminal. It is strongly recommended that a good permanent connection be made before powering the external power supply. When an external high voltage supply greater than 24V is detected, it will cause the internal boost supply to automatically shutdown. The BATT (0) terminal must still be connected and powered by 6-32V even when using an external high voltage supply connected to EXT PWR (7). A high voltage external power supply is not necessary for most applications. Suggested External High Voltage Supplies TDK Lambda Genesys 100-15 © Drivven, Inc. 2011 • DI Driver Module Kit User’s Manual • D000020 • Rev F 15 Drivven, Inc. DI Driver Module Kit Direct Injector Drivers Injector Driver Circuit Description The DI Driver Module contains three solenoid direct injector drivers. Two Piezo injectors can also be driven by this module and the details of that are discussed later in this section. The driver channels share some circuitry, making it impossible for injection events to overlap among channels within the same module. If injection events with different injectors must overlap, then multiple modules should be employed. There is a high voltage circuit and a battery voltage circuit which drive current to the injector load. The high voltage and battery voltage drive circuits are shown below in the simplified schematics for operating various types of injectors. Solenoid Injector Operation A representative simplified schematic driving three solenoid injectors is shown in figure 2, below. Figure 2. DI driver simplified schematic for solenoid injectors. The user can programmatically specify up to eight sequential drive phases within each solenoid injection command pulse via an 8-element IPhaseArray. Each phase is implemented sequentially © Drivven, Inc. 2011 • DI Driver Module Kit User’s Manual • D000020 • Rev F 16 Drivven, Inc. DI Driver Module Kit and can specify upper and lower current dithering setpoints, phase duration, and drive circuit – high voltage or battery voltage. The high voltage drive circuit should be used only as much as necessary so that the internal boost power supply energy is conserved and not overloaded. The solenoid current is controlled using a dual comparator feedback circuit for upper and lower dithering thresholds. Other current and voltage sensing circuits are used for fault detection. Figures 3-6, below, are oscilloscope images showing examples of current waveforms for four different IPhaseArray configurations. Three of the examples show waveforms that are common in the direct injection industry. The fourth waveform is for the purpose of showing the flexibility of the IPhaseArray interface. The software interface to the DI Driver, including the IPhaseArray, is described in the software section of this manual, however, some things are worth noting here. The total duration of the injection command is not determined by the total durations of the IPhaseArray elements. The total duration is determined by the Boolean command delivered to the DI Driver FPGA express VI. Generating command pulses to the express VI is described in the software section of this manual. If the Duration parameter of an IPhaseArray element is set to 0, then the current levels for that element will be carried out for the remainder of the injection command. © Drivven, Inc. 2011 • DI Driver Module Kit User’s Manual • D000020 • Rev F 17 Drivven, Inc. DI Driver Module Kit Figure 3a. Solenoid IPhaseArray configuration example 1. Figure 3b. Current and voltage traces from solenoid IPhaseArray configuration example 1. © Drivven, Inc. 2011 • DI Driver Module Kit User’s Manual • D000020 • Rev F 18 Drivven, Inc. DI Driver Module Kit Figure 4a. Solenoid IPhaseArray configuration example 2. Figure 4b. Current and voltage traces from solenoid IPhaseArray configuration example 2. © Drivven, Inc. 2011 • DI Driver Module Kit User’s Manual • D000020 • Rev F 19 Drivven, Inc. DI Driver Module Kit Figure 5a. Solenoid IPhaseArray configuration example 3. Figure 5b. Current and voltage traces from solenoid IPhaseArray configuration example 3. © Drivven, Inc. 2011 • DI Driver Module Kit User’s Manual • D000020 • Rev F 20 Drivven, Inc. DI Driver Module Kit Figure 6a. Solenoid IPhaseArray configuration example 4. Figure 6b. Current and voltage traces from solenoid IPhaseArray configuration example 4. Phase1FirstPeakEnable The DI Driver module provides a software option, in the form of a Boolean control called Phase1FirstPeakEnable, to transfer operation from the first phase to the second phase upon reaching the first current peak corresponding to the first phase IUpper threshold. Figure 7, below, shows an example of this mode of operation. © Drivven, Inc. 2011 • DI Driver Module Kit User’s Manual • D000020 • Rev F 21 Drivven, Inc. DI Driver Module Kit Figure 7. Current and voltage traces from Phase1FirstPeakEnable=TRUE operating mode. BackBoostTime A global parameter which is critical for proper solenoid injector control is the BackBoostTime. This time period directly follows the end of the injection command duration and allows the backemf of the injector solenoid to be directed to the internal power supply for back-boosting the internal high voltage power supply. It also brings the injector solenoid current quickly to zero. If BackBoostTime is set to zero, then injector current would be allowed to recirculate through the injector until the energy dissipates. which would lead to unpredictable injector valve closing. Therefore BackBoostTime should be calibrated long enough for the energy within the injector solenoid to be fully discharged to the internal boost power supply. If BackBoostTime is greater than zero, but too short, you will see the injector current bump up and recirculate until the energy is fully dissipated. BackBoostTime should be extended until the current recirculation cannot be seen on the scope solenoid current trace. A typical BackBoostTime is approximately 0.2 milliseconds. Injectors with higher inductance will have more energy to dissipate at the end of injection and require a longer BackBoostTime. Figures 8-12, below, show five different values for BackBoostTime applied to the same solenoid injector. © Drivven, Inc. 2011 • DI Driver Module Kit User’s Manual • D000020 • Rev F 22 Drivven, Inc. DI Driver Module Kit Figure 8. BackBoostTime = 0.0 msec. Figure 9. BackBoostTime = 0.025 msec. © Drivven, Inc. 2011 • DI Driver Module Kit User’s Manual • D000020 • Rev F 23 Drivven, Inc. DI Driver Module Kit Figure 10. BackBoostTime = 0.050 msec. Figure 11. BackBoostTime = 0.100 msec. © Drivven, Inc. 2011 • DI Driver Module Kit User’s Manual • D000020 • Rev F 24 Drivven, Inc. DI Driver Module Kit Figure 12. BackBoostTime = 0.150 msec. Piezo Injector Operation The DI Driver module is capable of driving unipolar piezo injectors. Unipolar means that the piezo injector is charged to a positive voltage and discharged to ground. Bipolar drive means that the piezo injector can be charged to a positive or negative voltage. When driving piezo injectors, only channels 1 and 2 are available for this mode. Channel 3 must be connected with a shorting jumper between the Inj+ and Inj– terminals. Electrically, piezo injectors are a capacitive load, as opposed to an inductive load from solenoid injectors. Solenoid injectors require current to be driven through the solenoid in order to create the proper magnetic field within the injector body to mechanically open a valve. Piezo injectors have a “stack” of piezo crystal elements which respond mechanically to a voltage applied across the stack. The two pins of the piezo injector are connected internally across the stack. As the voltage across the stack increases, the stack expands, and exerts a force to open a fluid valve. The benefit of piezo injectors is the ability of the piezo stack to respond mechanically quicker than a solenoid operated injector. It is difficult to estimate the fuel quantity injected while the injector valve is in the process of opening. Therefore, achieving a shorter time from the beginning of energizing the injector to fully opening the valve is an advantage because the fuel injection quantity can be metered more precisely over the entire injection command. Since a piezo stack is electrically like a capacitor, it requires current in one direction, to charge up to a specified voltage, and current out in the opposite direction to discharge. The typical charge voltage required for piezo injectors ranges from 100V to 200V. Most piezo injectors in production today require up to 165V and will vary based on desired fuel rail pressure. A piezo stack must be charged up to the specified voltage at a rate which will not damage the stack. If the charge and discharge rate is too fast, the stack will not last very long. Therefore the charge and discharge current must be controlled. This can be done practically with an inductive element in series with the piezo stack and treated similar to an inductive load, as far as current control is concerned. However, the DI Driver module has a special piezo mode of operation which utilizes the same IPhaseArray interface to control current to the piezo stack for charge and discharge rates. When © Drivven, Inc. 2011 • DI Driver Module Kit User’s Manual • D000020 • Rev F 25 Drivven, Inc. DI Driver Module Kit charging the piezo stack, the final charge will be a few volts less than the HVTarget setpoint. When discharging the piezo stack the final discharge state will be 0 Volts. The IPhaseArray is used differently during piezo mode. The eight elements of the IPhaseArray are divided into two groups. The first four elements are used for charge, and the last four elements are used for discharge. The BackBoostTime parameter is not used for piezo injector operation. The DriveSrc Boolean for each IPhaseArray element is not applicable for piezo injector operation because the high voltage driver circuit is always used. A representative simplified schematic driving two piezo injectors is shown in figure 13, below. Figure 13. DI driver simplified schematic for two piezo injectors. The DI Driver module can also operate piezo injectors requiring an inverted charge scheme. The inverted piezo mode is determined by the PiezoInvert Boolean discussed in the software section of this manual. This means that the injector valve is closed when the stack is charged, and the valve is opened when the stack is discharged. Only a single piezo injector may be operated by channel 1 when operated in inverted mode. Channel 2 must be left disconnected, while channel 3 must be connected with a shorting jumper between the Inj+ and Inj– terminals. When © Drivven, Inc. 2011 • DI Driver Module Kit User’s Manual • D000020 • Rev F 26 Drivven, Inc. DI Driver Module Kit PiezoInvert mode is enabled, the first four IPhaseArray elements are used for discharge and the last four elements are used for charge. A representative simplified schematic driving a single piezo injector in inverted mode is shown in figure 14, below. Figure 14. DI driver simplified schematic for a single inverted piezo injector. Figures 15-21, below, are oscilloscope images showing examples of current and voltage waveforms for seven different IPhaseArray configurations for piezo injectors. © Drivven, Inc. 2011 • DI Driver Module Kit User’s Manual • D000020 • Rev F 27 Drivven, Inc. DI Driver Module Kit Figure 15a. Piezo IPhaseArray configuration example 1. Figure 15b. Current and voltage traces from Piezo IPhaseArray configuration example 1. HVTarget = 150V. Charge time = 148 usec. © Drivven, Inc. 2011 • DI Driver Module Kit User’s Manual • D000020 • Rev F 28 Drivven, Inc. DI Driver Module Kit Figure 16a. Piezo IPhaseArray configuration example 2. Figure 16b. Current and voltage traces from Piezo IPhaseArray configuration example 2. HVTarget = 150V. Charge time = 124 usec © Drivven, Inc. 2011 • DI Driver Module Kit User’s Manual • D000020 • Rev F 29 Drivven, Inc. DI Driver Module Kit Figure 17a. Piezo IPhaseArray configuration example 3. Figure 17b. Current and voltage traces from Piezo IPhaseArray configuration example 3. HVTarget = 150V. Charge time = 188 usec © Drivven, Inc. 2011 • DI Driver Module Kit User’s Manual • D000020 • Rev F 30 Drivven, Inc. DI Driver Module Kit Figure 18a. Piezo IPhaseArray configuration example 4. Figure 18b. Current and voltage traces from Piezo IPhaseArray configuration example 4. HVTarget = 150V. Charge voltage = 100V. © Drivven, Inc. 2011 • DI Driver Module Kit User’s Manual • D000020 • Rev F 31 Drivven, Inc. DI Driver Module Kit Figure 19a. Piezo IPhaseArray configuration example 5. Figure 19b. Current and voltage traces from Piezo IPhaseArray configuration example 5. HVTarget = 150V. Charge voltage = 100V step, then 150V. © Drivven, Inc. 2011 • DI Driver Module Kit User’s Manual • D000020 • Rev F 32 Drivven, Inc. DI Driver Module Kit Figure 20a. Piezo IPhaseArray configuration example 6. Figure 20b. Current and voltage traces from Piezo IPhaseArray configuration example 6. HVTarget = 150V. Inverted piezo operation. © Drivven, Inc. 2011 • DI Driver Module Kit User’s Manual • D000020 • Rev F 33 Drivven, Inc. DI Driver Module Kit Figure 21a. Piezo IPhaseArray configuration example 7. Figure 21b. Current and voltage traces from Piezo IPhaseArray configuration example 7. HVTarget = 175V. © Drivven, Inc. 2011 • DI Driver Module Kit User’s Manual • D000020 • Rev F 34 Drivven, Inc. DI Driver Module Kit Injector Types Supported Many different types of solenoid and piezo injectors can be driven with this module, including gasoline direct injectors. Drivven will help customers determine the appropriate settings and operating limitations for any type of injector at no cost if the setup parameters can be re-used for other customer projects. Drivven does not verify injector operation on a fuel flow bench. Instead, Drivven will determine the optimum software settings to achieve a specified current/voltage profile. Injector Driver Circuit Faults and Protections There are several scenarios which can lead to short circuits with the DI driver module. Each possible short condition is detected by the module and a critical fault is reported. Each short circuit fault will cause all power supply and injection control operations to shutdown automatically. The power supply and injection control can be re-enabled by manually clearing the faults via software. Short Circuit Fault Conditions INJ+ shorted to battery: This condition will immediately cause a ShortCircuit critical fault. Since current is flowing through the injector solenoid, current rise times are limited by the load inductance and the short will typically be detected at about 20A if the channel is off, and 45A if the channel is on. INJ- shorted to battery: This condition will immediately cause a ShortCircuit critical fault. Since current is bypassing the injector solenoid, current rise times are extremely fast and could peak as high as 200A before detection. However, the module can handle this current spike and shutdown appropriately. INJ+ shorted to ground: This condition will cause a HighVoltageDriver critical fault or LowVoltageDriver critical fault during an injection event. The fault reported depends on when exactly the short condition occurs – during the high-voltage or low-voltage portion of the current profile. INJ- shorted to ground: This condition will cause a HighVoltageDriver critical fault or LowVoltageDriver critical fault during an injection event. The fault reported depends on when exactly the short condition occurs – during the high-voltage or low-voltage portion of the current profile. INJ+ shorted to INJ-: This condition will cause a HighVoltageDriver critical fault or LowVoltageDriver critical fault during an injection event. The fault reported depends on when exactly the short condition occurs – during the high-voltage or low-voltage portion of the current profile. INJ+ / INJ- Open Circuit: This condition is detected when the current during the injection event does not exceed 1.5A. The OpenCircuit non critical fault is reported for the appropriate channel and is automatically cleared upon the next pulse if the condition is removed. © Drivven, Inc. 2011 • DI Driver Module Kit User’s Manual • D000020 • Rev F 35 Drivven, Inc. DI Driver Module Kit Connecting Injectors to the Module Figure 22. Connecting solenoid injectors to the driver module. © Drivven, Inc. 2011 • DI Driver Module Kit User’s Manual • D000020 • Rev F 36 Drivven, Inc. DI Driver Module Kit Figure 23. Connecting piezoelectric injectors to the driver module. © Drivven, Inc. 2011 • DI Driver Module Kit User’s Manual • D000020 • Rev F 37 Drivven, Inc. DI Driver Module Kit Compliance and Certifications Safety This product meets the requirements of the following standards of safety for electrical equipment for measurement, control, and laboratory use: IEC 61010-1, EN 61010-1 UL 61010-1, CSA 61010-1 Electromagnetic Compatibility This product meets the requirements of the following EMC standards for electrical equipment for measurement, control, and laboratory use: EN 61326-1 (IEC 61326-1): Class A emissions; Industrial immunity EN 55011 (CISPR 11): Group 1, Class A emissions AS/NZS CISPR 11: Group 1, Class A emissions FCC 47 CFR Part 15B: Class A emissions ICES-001: Class A emissions Caution: When operating this product, use shielded cables and accessories. CE Compliance This product meets the essential requirements of applicable European Directives as follows: 2006/95/EC; Low-Voltage Directive (safety) 2004/108/EC; Electromagnetic Compatibility Directive (EMC) Environmental Management NI is committed to designing and manufacturing products in an environmentally responsible manner. NI recognizes that eliminating certain hazardous substances from our products is beneficial to the environment and to NI customers. For additional environmental information, refer to the NI and the Environment Web page at ni.com/environment. This page contains the environmental regulations and directives with which NI complies, as well as other environmental information not included in this document. Waste Electrical and Electronic Equipment (WEEE) EU Customers At the end of the product life cycle, all products must be sent to a WEEE recycling center. For more information about WEEE recycling centers, National Instruments WEEE initiatives, and compliance with WEEE Directive 2002/96/EC on Waste Electrical and Electronic Equipment, visit ni.com/environment/weee. Battery Replacement and Disposal Battery Directive This device contains a long-life coin cell battery. If you need to replace it, use the Return Material Authorization (RMA) process or contact an authorized National Instruments service representative. For more information about compliance with the EU Battery Directive 2006/66/EC about Batteries and Accumulators and Waste Batteries and Accumulators, visit ni.com/environment/batterydirective. © Drivven, Inc. 2011 • DI Driver Module Kit User’s Manual • D000020 • Rev F 38 Drivven, Inc. DI Driver Module Kit Management Methods for Controlling Pollution Caused by Electronic Information Products Regulation (China RoHS) Chinese Customers National Instruments is in compliance with the Chinese policy on the Restriction of Hazardous Substances (RoHS) used in Electronic Information Products. For more information about the National Instruments China RoHS compliance, visit ni.com/environment/rohs_china. 电子信息产品污染控制管理办法( 中国RoHS) 中国客户 National Instruments符合中国电子信息产品中限制使用某些有害物质指令 (RoHS)。 关于National Instruments中国RoHS合规性信息,请登录 ni.com/environment/rohs_china。(For information about China RoHS compliance, go to ni.com/environment/rohs_china.) Physical Specifications and Characteristics Weight: 170 grams Maximum Altitude: 2000 m Maximum Ambient Temperature: 45º C Operating Humidity: 10% to 90% RH, noncondensing Pollution Degree: 2 Ingress Protection: IP30 For Indoor Use Only If you need to clean the module, wipe it with a dry towel Safety Guidelines Caution: Do not operate this module in a manner not specified in these operating instructions. Product misuse can result in a hazard. You can compromise the safety protection built into the product if the product is damaged in any way. If the product is damaged, return it to National Instruments for repair. D000020-UM © Drivven, Inc. 2011 • DI Driver Module Kit User’s Manual • D000020 • Rev F 39