1
PROGRAMMING
MANUAL
GVC1 CONTROLLER
SOFTWARE
SUPERCEDES
PROGRAMMING INSTRUCTIONS
IN SERVICE MANUAL
.
.
December 2008
P/N 4216961 Rev F
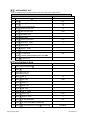
TABLE OF CONTENTS
SERVICE MODE ......................................................................................................................................................... 2
TUBE FILL/ DISPENSE COINS ................................................................................................................................ 3
MOTOR COUNT ....................................................................................................................................................... 3
OPTIONS .................................................................................................................................................................. 3
FORCE VEND ........................................................................................................................................................... 3
BILL ESCROW ....................................................................................................................................................... 4
MULTI VEND .......................................................................................................................................................... 4
FREE VEND ........................................................................................................................................................... 4
FAST CHANGE ...................................................................................................................................................... 4
OPTICAL VEND ..................................................................................................................................................... 5
IVEND™ CYCLE .................................................................................................................................................... 5
POINT OF SALE MESSAGE (POS) ....................................................................................................................... 6
SETPOINT .............................................................................................................................................................. 6
DROP SENSOR SENSITIVITY .............................................................................................................................. 7
CONFIGURATION .................................................................................................................................................... 7
SPACE TO SALES (STS)....................................................................................................................................... 8
TIME/DATE ............................................................................................................................................................. 9
HEALTH SAFETY (HS) ........................................................................................................................................ 10
ADVANCED CONFIGURATION........................................................................................................................... 11
PRICING .................................................................................................................................................................. 13
ACCOUNTING ........................................................................................................................................................ 15
ADVANCED OPTIONS ........................................................................................................................................... 17
DISCOUNT ........................................................................................................................................................... 17
TEST VEND ............................................................................................................................................................ 28
TEST ALL MOTORS ............................................................................................................................................... 29
DIAGNOSTIC .......................................................................................................................................................... 29
Record the Model Number and Serial Number of your machine below.
The Model and Serial numbers are needed to obtain quick service and parts information for your machine.
The numbers are available on the identification plate located on the backside of the cabinet of the machine.
MODEL NUMBER:
SERIAL NUMBER:
ii
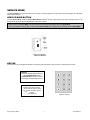
SERVICE MODE
Use Service Mode to program and service the machine. Use the keypad as an input device. Watch the display for information
while in Service Mode.
SERVICE MODE BUTTON
To enter Service Mode, press the Service Mode Button located on the top or upper right corner of the controller cover. To exit
Service Mode, press the Service Mode Button or push the * button.
NOTES:
If credit exists when Service Mode is entered, it will be restored when the machine returns to Sales Mode.
If no key is pressed for approximately 1 minute while in Service Mode, the controller will automatically return to Sales Mode.
Figure 2.A Controller—
Inside Door Mounted
KEYPAD
Use the buttons on the keypad as directed in the step-by-step instructions in this manual in programming the vendor.
DISPLAY
Check the display after pressing the
Service Mode Button and/or
Keypad Buttons to make sure that
the program is responding correctly.
Buttons 0-9 are used to move
between the various modes,
menus and sub-menus; while
the button is used to save a
setting.
(See Figure 3)
GVC1 Programming Manual
Figure 3: Keypad
2
P/N 4216961 Rev F
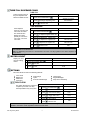
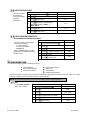
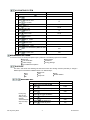
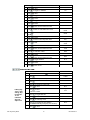
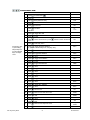
TUBE FILL/ DISPENSE COINS
TUBE FILL
Tube Fill counts coins as
they are deposited and
Shows the dollar amount.
STEP
DISPLAY
Motor Count or Error Code **
1.
Press Service Mode Button
2.
Press
and begin depositing coins
Press
2 times to exit
3.
At least 15 of each
denomination
0.00
TUBE DISPENSE
Tube Dispense
Pays out coins from the
coin mech coin tubes.
This mode will also
display the current
quantity of coins in the
coin mech. coin mech
coin tubes.
STEP
DISPLAY
Motor Count or Error Code **
1.
Press Service Mode Button
2.
Press
to dispense highest value coin
3.
Press
to dispense 2
highest coin
Value of Coin
4.
Press
to dispense 3 highest coin
Value of Coin
5.
Press
6.
Press
nd
Value of Coin
rd
Value of Coin
th
to dispense 4 highest coin
0.00
2 times to exit
**NOTE: Whenever the Service Mode button is pressed, the resulting display will be either the Motor
Count Number or an Error Code.
Note: For dispensing more than a 4 denomination coin mech. use keys greater in the same sequence as
shown above.
MOTOR COUNT
Displays the total
count of working
motors.
STEP
DISPLAY
1.
Press Service Mode Button
--
2.
Press
then wait.
--
Press
to exit.
3.
0.00
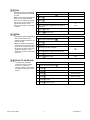
OPTIONS
This menu allows access to the following features:
Force Vend
Bill Escrow
Multi Vend
Free Vend
.
Fast Change
Optics
Point Of Sale Message
Temperature
Keypad Backlight
Drop Sensor Sensitivity
FORCE VEND
This option will force the customer to
complete a purchase once they
have deposited money of any form.
STEP
1. Press Service Mode Button
2. Press
DISPLAY
-OPtn
3. Press
to view current setting
Frcn
4. Press
to toggle ON or OFF
FrcY
5. Press
to save setting
FrcY
6.
Press
3 times to exit
0.00
Note: If a vend is attempted on a configured selection and the motor fails during this vend, the customer will be
allowed to escrow the credit, regardless of the force vend status.
GVC1 Programming Manual
3
P/N 4216961 Rev F
.
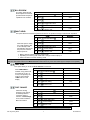
BILL ESCROW
This option allows the last
bill accepted to be returned,
provided the bill acceptor is
capable of such a feature.
STEP
1.
Press Service Mode Button
2.
Press
OPtn
3.
Press
ESCY
4.
Press
to toggle ON or OFF
ESCn
5.
Press
to save setting
ESCn
Press
3 times to exit.
6.
.
DISPLAY
--
0.00
MULTI VEND
This option allows the customer to purchase more than one product if enough credit has been deposited.
STEP
When this option is active,
any credit remaining after
a vend attempt is not
automatically returned. At
this point, the customer
has the option of:
DISPLAY
1.
Press Service Mode Button
2.
Press
OPtn
3.
Press
NULn
4.
Press
to toggle ON or OFF
NULY
5.
Press
to save setting.
NULY
Press
3 times to exit.
6.
--
0.00
Making another selection if there's enough credit.
Depositing more money (cash credit from a changer or bill acceptor); or
Press coin return to receive remaining credit.
Note: After 5 minutes any credit that is left on the display will disappear.
Note: For card reader sessions, the Multi-vend feature will function only if the card reader supports multiple vend capability.
.
FREE VEND
This option allows you to set the whole machine to Free vend.
When FREE VEND is
enabled, every product will
be vended at no cost, no
money is accepted by the
machine, the message
"FREE" will be on the
display.
STEP
Press Service Mode Button
2.
Press
OPtn
3.
Press
FrEn
4.
Press
to toggle ON or OFF
FrEY
5.
Press
to save setting.
FrEy
Press
3 times to exit
6.
.
DISPLAY
1.
--
FREE
FAST CHANGE
STEP
Allows the vending
machine to give change
immediately after the
customers makes a
selection. If Fast Change
is ON, it will override the
Multi Vend feature.
DISPLAY
Motors ( - - )
1.
Press Service Mode Button
2.
Press
OPtn
3.
Press
FChn
4.
Press
5.
Press
to save setting.
Press
3 times to exit
6.
to toggle ON or OFF
FChY
FChY
0.00
NOTE: If “OPTICS” is turned ON the amount of the product will display until a product drops.
GVC1 Programming Manual
4
P/N 4216961 Rev F
.
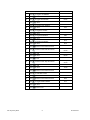
OPTICAL VEND
Optical Sensor Control Options - This submenu provides the operator with options for designating product items or rows
that will be monitored for product delivery by an optical sensor. Default is ALL selections “ON” unless changed.
.
.
Optics All
STEP
Press Service Mode Button
2.
Press
OPtn
3.
Press
oPt
4.
Press
to toggle ALL ON/OFF
ALLY
5.
Press
to save
ALLn
Press
3 times to exit
6.
.
.
--
0.00
Optics by Row
STEP
DISPLAY
1.
Press Service Mode Button
2.
Press
OPtn
3.
Press
oPt
4.
Press
to enter Row
5.
Press
to toggle ON/OFF
ro1Y
6.
Press
to save
ro1Y
Press
to enter another Row or 3 times to exit
7.
.
DISPLAY
1.
.
--
ro-
0.00
Optics by Item
STEP
DISPLAY
1.
Press Service Mode Button
2.
Press
OPtn
3.
Press
oPt
4.
Press
to enter Item
5.
Press
to toggle ON/OFF
12 n
6.
Press
to save
12 n
Press
to enter another item or 3 times to exit
7.
--
--
0.00
If the accumulated credit is equal to or larger than the selection price when a selection is entered, the motor corresponding
to that selection will be turned on. Selections that are designated as Optical will have an associated vend operation that
differs from the normal vend operation.
IVEND™ CYCLE
For 5 milliseconds at the start of a vend, the iVend™ optical sensor will be checked to make sure it is not blocked,
damaged, or disconnected.
If blocked, damaged or disconnected - the normal home-switch-vend cycle will be used and the optical sensors will be
ignored. Both the vend motor and a vend timeout timer are started.
The selection motor rotates to the home-switch position.
If there is a home-switch signal, the vend is considered successful.
If after 10 seconds there is no home-switch signal, the vend failed. The vend motor is shut down and the MAKE
ALTERNATE SELECTION light will turn on. The customer can then press selection buttons to activate another motor,
or press the Coin Return button.
GVC1 Programming Manual
5
P/N 4216961 Rev F
NOTE: Force Vend is overridden under this vend cycle.
If not blocked, damaged or disconnected - the iVend™ Sensor System is used. The vend motor and a vend timeout
timer are started.
The selection motor rotates to the home-switch position.
If a product is detected during this time period, the vend is considered successful.
If after reaching the home-switch position, a product has not been detected, the vend motor will pause for 1 second
while the controller continues to monitor the optical sensor for product delivery.
o If a product is detected during this pause, the vend is considered successful.
o If a product is not detected, the controller initiates a second vend cycle and another vend time out timer while
continuing to monitor the optical sensor.
If a product is detected during this second cycle, the motor will be stopped immediately. The vend is
considered successful. The 2nd Vend accounting counter is increased by 1.
If a product is not detected before the motor reaches the home-switch position, the vend motor is stopped and
for 2 seconds the controller continues to monitor the optical sensor for product delivery. If a product is
nd
detected, the vend is considered successful. The 2 Vend accounting counter is increased by 1.
if no product is detected, the selection is sold out. Such as state will trigger the MAKE ALTERNATE
SELECTION light. The amount of credit is displayed. The customer can press selection buttons to activate
this or another motor or press the Coin Return button
o If after 10 seconds there is no home-switch signal and no product is detected, the vend failed. The vend motor is
shut down and MAKE ALTERNATE SELECTION
is displayed. The customer can press selection buttons to
activate another motor or press the Coin Return button.
.
POINT OF SALE MESSAGE (POS)
Turn OFF (or ON)
the default display
message.
NOTE: The display
message for a drink
machine is “ICE
COLD”. All others
the message is
0.00
STEP
Press Service Mode Button
2.
Press
OPtn
3.
Press
POSY
4.
Press
to toggle ON or OFF.
5.
Press
to save setting.
Press
3 times to exit.
6.
.
DISPLAY
1.
--
POSn
POSn
0.00
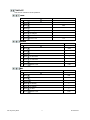
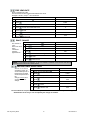
SETPOINT
The following are the factory default SET POINT temperature settings for each refrigeration type:
Snack N/A
Cold 36°F(2.2°C)
Slackened 5°F (-9°C)
Frozen -10°F (-23.3C)
MNF {Upper 36°F (2.2°C)},
{Lower -10°F (-23.3°C)}
SF 5 -15°F (-26.1°C)
NF 2 {Upper 36°F (2.2°C)},
{Lower -12°F (-24.4°C)}
CF 1 35°F (1.7°C)
Chilled 62°F (16.7°C)
NF 5 {Upper 36°F (2.2°C)},
{Lower -15°F (-26.1°C)}
Dual Zone {Upper 63°F (17.2°C)},
{Lower 36°F (2.2°C)}
SFF -10°F (-23.3°C)
CF 36°F (2.2°C)
Dual Zone 6 {Upper 57°F (13.9°C)},
{Lower 36°F (2.2°C)}
SF 2 -12°F (-24.4°C)
These temperatures may be adjusted, however it is not recommended. The temperatures have been set according to
NAMA specifications for optimal operation and/or product safety. Before making any adjustment see Health Safety
section.
STEP
DISPLAY
--
1.
Press Service Mode Button
2.
Press
3.
Press
to view/change machine temperature
36
4.
Press
to save
36
Press
2 times to exit
5.
GVC1 Programming Manual
OPtn
0.00
6
P/N 4216961 Rev F
.
KEYPAD BACKLIGHT
STEP
This menu controls
the brightness
level of the keypad
backlight.
(Default is 3)
Press Service Mode Button
2.
Press
3.
Press
4.
Press
repeatedly to change setting.
Note:0=Off, 1=Low, 2=Med, 3
=High, 4=Max
bL 0
5.
Press
to save
bL 0
Press
3 times to exit.
6.
.
DISPLAY
--
1.
OPtn
bL 3
to view setting.
0.00
DROP SENSOR SENSITIVITY
FOR CAN/BOTTLE SELECTIONS ONLY.
STEP
This menu allows you to adjust the
Drop Sensor sensitivity.
1 is most sensitive;
9 is the least sensitive.
Default is 3.
When Can/Bottle Mode is ON, the
Drop Sensor is enabled for vending
bottles or cans.
DISPLAY
1.
Press Service Mode Button
2.
Press
OPtn
3.
Press
drP3
4.
Press
to toggle for settings 1-10.
drP6
5.
Press
to save.
drP6
Press
3 times to exit.
6.
--
0.00
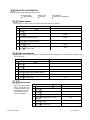
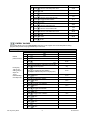
CONFIGURATION
This menu allows access to the following features:
Space to Sales (STS)
Date/ Time
Health Safety
Advanced Configuration
Item (can/bottle)
Row (snack/can/bottle)
All (snack/can/bottle)
This menu provides access to sub-menus that set Can, Bottle or Snack type of product to each item, entire row or entire
machine. Consult the machine service manual for specific settings.
NOTE: the can and bottle settings are for machines utilizing column loaded product only.
.
ALL
To set ENTIRE MACHINE to
Snack, Can, or Bottle
STEP
Press Service Mode Button
2.
Press
CBS
3.
Press
ALL…SnAc
4.
Press
to toggle Snack, Can, Bottle.
CAn
5.
Press
to save
CAn
Press
3 times to exit.
6.
GVC1 Programming Manual
DISPLAY
1.
7
--
0.00
P/N 4216961 Rev F
.
ROW
Provides the option of designating
rows that will contain cans, bottles
or snack.
Note: For selections designated as
either cans or bottles the vend
motor will run continuously during
the vend cycle until a drop sensor
signals the controller, or the
maximum vend time of 10 seconds
concludes.
STEP
1.
Press Service Mode Button
2.
Press
CBS
3.
Press
Enter row number on keypad.
RO-
4.
Press
Snack
again to toggle from Can, Bottle or
8
bott
6.
Press
to save.
bott
Press
3 times to exit.
0.00
ITEM
Provides the option of designating
items that will contain cans,
bottles. The entire machine or row
must be set first.
Note: For selections designated
as either cans or bottles the vend
motor will run continuously during
the vend cycle until a drop sensor
signals the controller, or the
maximum vend time of 9 seconds
concludes.
STEP
DISPLAY
1.
Press Service Mode Button
2.
Press
CBS
3.
Press
--
4.
Enter item number on keypad.
5.
Press
again to toggle from Can, Bottle
6.
Press
to save.
Press
3 times to exit.
7.
.
--
5.
7.
.
DISPLAY
--
81
CAn
CAn
0.00
SPACE TO SALES (StS)
This allows can and bottle
machines to use two column
motors to run under one
selection number. It also allows
the setting of selections to run a
Combi.
STEP
Press Service Mode Button
2.
Press
CBS
3.
Press
StSn
4.
Press
StS7 for CB 700
5.
Press
StSC for Combi
6.
Press
to save.
Press
3 times to exit.
7.
GVC1 Programming Manual
DISPLAY
1.
8
--
StS?
0.00
P/N 4216961 Rev F
.
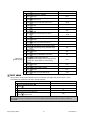
TIME/DATE
Sets the time and date for timed operations.
.
.
YEAR
STEP
1.
Press Service Mode Button
2.
Press
CBS
3.
Press
dAtE
4.
Press
YEAr
5.
Press
to see year
****
6.
Press
to edit year
****
7.
Press
to save.
****
8.
.
.
DISPLAY
Press
--
0.00
4 times to exit
MONTH
STEP
Press Service Mode Button
2.
Press
CBS
3.
Press
dAtE
4.
Press
nth
5.
Press
to see month
**
6.
Press
to edit month
**
7.
Press
to save.
**
Press
4 times to exit
8.
.
.
--
0.00
DAY
STEP
DISPLAY
1.
Press Service Mode Button
2.
Press
CBS
3.
Press
dAtE
4.
Press
dAY
5.
Press
to see day
**
6.
Press
to edit day
**
7.
Press
to save.
**
Press
4 times to exit
8.
GVC1 Programming Manual
DISPLAY
1.
--
0.00
9
P/N 4216961 Rev F
.
.
TIME
This menu controls and displays the current time of day. The display will show a 24 hour format.
Examples:
8:05 a.m. = TIME08:05, 1:15p.m. = TIME 13:15
STEP
DISPLAY
1.
Press Service Mode Button
2.
Press
CBS
3.
Press
dAtE
4.
Press
00:00
5.
Press
to edit
6.
Press
to save.
Press
4 times to exit
7.
.
.
- -
14:30
14:30
0.00
DAYLIGHT SAVINGS TIME
This menu controls and displays the currently active daylight savings rule.
STEP
DISPLAY
1.
Press Service Mode Button
- -
2.
Press
CBS
3.
Press
dAtE
4.
Press
for Daylight Savings Menu
Press
to toggle between settings
6.
Press
to save.
dsUS
7.
Press
4 times to exit
0.00
dSno
dsAU
dsEU
dsUS
5.
.
HEALTH SAFETY (HS)
Health Safety - This menu allows the user to specify the operating region to meet health safety requirements. The health
safety requirements are applied to ALL (whole machine). If the requirements are violated then the whole machine will be
shut down.
.
.
HS “All”
STEP
DISPLAY
1.
Press Service Mode Button
2.
Press
CBS
3.
Press
HS n
4.
Press
to toggle HS ON/OFF (default is ON)
HS Y
5.
Press
to save
HS Y
Press
4 times to exit
6.
GVC1 Programming Manual
--
0.00
10
P/N 4216961 Rev F
.
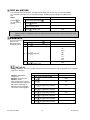
ADVANCED CONFIGURATION
The following menus are available under this option:
Beep Enable
Optics Disables
Motor Type
Password
Set Defaults
Machine type refrigeration
.
.
BEEP ENABLE
Use this option to choose whether a sound is heard when buttons are pressed.
STEP
DISPLAY
1.
Press Service Mode Button
2.
Press
CBS
3.
Press
PASS
4.
Enter Password (default 2314)
ACFG
5.
Press
to toggle Beep ON/OFF
bEPY
6.
Press
to save
bEPn
Press
4 times to exit
7.
--
0.00
.
.
OPTICS DISABLES
When set up , if the I-vend is not aligned, or sensors are blocked or unplugged, the “NO SALE” POS will display until
the I-vend is fixed.
STEP
Press Service Mode Button
2.
Press
CBS
3.
Press
PASS
4.
Enter Password (default 2314)
ACFG
5.
Press
OPdn
6.
Press
to save
Press
4 times to exit
7.
.
DISPLAY
1.
.
--
to toggle Optics Disables ON/OFF
OPdY
0.00
MOTOR TYPE
STEP
Motor Type is preset at the
factory. The only time this
should be checked is after
the installation of a new
board to assure that the
board is compatible.
1.
Press Service Mode Button
2.
Press
3.
Press
Enter Password (default 2314)
4.
-CBS
PASS
ACFG
5.
Press
motors
to toggle from 2 or 3 wire
tYP2
6.
Press
to save
tYP2
Press
4 times to exit
7.
GVC1 Programming Manual
DISPLAY
11
0.00
P/N 4216961 Rev F
.
.
TALKER (NOT AVAILABLE)
.
.
PASSWORD
Allows the operator to change the password
STEP
NOTE: if you forget your
personal password after
changing it from the
default, contact VendNet
Technical Service at 1800-833-4411for help.
Press Service Mode Button
2.
Press
3.
4.
Press
Enter Password (default 2314)
ACFG
5.
Press
for Password menu
2314
6.
Press
to edit
2314
7.
Press
to save
****
Press
4 times to exit
8.
.
.
DISPLAY
1.
-CBS
PASS
0.00
SET DEFAULTS
Use these steps to reset the defaults for the following:
NOTE: If you have previously changed your password, this will reset it back to the factory default of 2314.
STEP
DISPLAY
1.
Press Service Mode Button
2.
Press
3.
4.
Press
Enter Password (default 2314)
5.
Press
Init
6.
Press
rSt?
7.
Press
RESE
8.
GVC1 Programming Manual
Press
-CBS
PASS
ACFG
0.00
4 times to exit
12
P/N 4216961 Rev F
.
.
TEMP
This menu allows the board to electronically control the refrigeration system.
STEP
1.
Press Service Mode Button
2.
Press
3.
Press
Enter Password (default 2314)
4.
.
.
-CBS
5.
Press
to edit Refrigeration Type.
Default is Snack
6.
Press
to save
Press
4 times to exit
7.
DISPLAY
PASS
ACFG
SnAc
CoLd
SLAC
FrZn
duaL
chLL
nnF
nF 2
nF 5
SF
SF 2
SF 5
SC
SC 1
dU 6
(Choice)
0.00
. SELECTION STYLE
STEP
DISPLAY
- -
1.
Press Service Mode Button
2.
Press
CBS
3.
Press
PASS
4.
Enter Password (default 2314)
5.
Press
----
6.
Press
to toggle through selections
7.
Press
to save
Press
4 times to exit
8.
*/# (default)
2de
2 d 40
3 dig
0.00
Note:
*Or # is pushed to select from a USD FROZEN or COLD FOOD
2 d E is used for the USD Combi
3 dig (3 Digit) requires 3 digit input for all selections
PRICING
This menu allows these methods for assigning prices to selections:
__
ITEM — by individual selections
ROW— by shelf or tray
ALL ITEMS — by entire machine.
The maximum price that can be set is $99.99
GVC1 Programming Manual
COUPONS by Item, Row, or All
__
TOKENS by Item, Row, or All
13
P/N 4216961 Rev F
.
ALL
This menu allows you to set the selection price of
every item all at once.
Time Saving Tip:
Instead of setting the price of each item one at a
time, it is much faster to set the common price of
the entire machine; then go back and set the price
of each item or row.
STEP
DISPLAY
1.
Press Service Mode Button
--
2.
Press
Prc
3.
ALL
4.
Press
to enter price
Enter new price
0.50
5.
Press
0.50
6.
.
to save
Press
0.00
3 times to exit.
ROW
STEP
Use this menu to set the price
of a row (shelf) all at the same
time.
Time Saving Tip:
Instead of setting the price of
one item at a time, set the
common price of a Row, then
go back and set the price of
each item.
Press Service Mode Button
--
2.
Press
Prc
3.
Press
Enter row number and price
Example: Top row=1,
row below top row=2, etc.
Program will automatically go to the next Row.
ro -
4.
5.
6.
.
DISPLAY
1.
Press
to save.
Press
3 times to exit
0.50
0.50
0.00
ITEM
This menu allows price
setting by each
selection item.
STEP
Press Service Mode Button
--
2.
Press
Prc
3.
Press
Enter Item and price
--
4.
5.
6.
GVC1 Programming Manual
DISPLAY
1.
$0.50
Press
to save. The program will
automatically go to the next selection
number.
Press
3 times to exit.
14
$0.50
0.00
P/N 4216961 Rev F
.
VALUE COUPON
Allows the operator to designate the values of "free vend" coupons that the validator has been
programmed to accept. The GVC control board can have 5 different coupons each having a different
value.
After one coupon is accepted, further coupons will not be accepted until a successful vend has taken place.
NOTE: This option requires a coupon programmed validator [MDB version].
NOTE: If no value is set, coupons will be shown as free vends.
STEP
.
DISPLAY
1.
Press Service Mode Button
--
2.
Press
Prc
3.
Press
CPn
4.
Press
5.
Enter the amount you want coupon to be or leave at 0.00
1.50
6.
Press
1.50
7.
Press
2 times to edit coupon 2-5 or press
to exit menu
CPn1
0.00
for Coupon1
to save
5 times
0.00
VALUE TOKEN
This option allows the operator to designate the values of "free vend" tokens accepted by pre-programmed coin
mechanism /changer. The GVC control board can set five different tokens with a different value each.
NOTE: This option requires an MDB version coin mechanism/changer.
STEP
DISPLAY
1.
Press Service Mode Button
--
2.
Press
Prc
3.
Press
Thn
4.
Press
for Token 1
The set value will be shown
Enter the value for Token 1
Thn1
0.00
Press
to save
Thn1
Press
2 times to edit token 2-5 or press
5.
6.
7.
1.00
4 times to exit
0.00
ACCOUNTING
Use this menu to gain access to menus that display or reset data for various types of cash and vend totals. Counts
can be viewed by individual items, rows or as the whole machine.
Historical totals: These are the counts since the initialization of the machine. They cannot be reset.
Resettable totals: These are totals since the last reset. These can be reset at any time. You have the option to
reset just an item, row or the whole machine.
Clearing by item and row will only clear the item or row entered.
GVC1 Programming Manual
15
P/N 4216961 Rev F
.
ACCOUNTING “ALL”
This menu displays the total sales value and total vend count for the entire machine.
NOTE: This will include satellite machines.
STEP
DISPLAY
1.
Press Service Mode Button
2.
Press
3.
Press
The Historical count will be shown
All
10
4.
Press
Historical vend count
10
5.
Press
Historical cash value
10.00
6.
Press
Resettable count
7.
Press
Reset Cash
10.00
8.
Press
Historical Card Value
0.00
9.
Press
Historical 2
10.
Press
Reset. Card
11.
Press
Reset 2
12.
Press
to clear all selections
13.
Press
to confirm clear
Confirming clear will clear the resettable counts for ALL ITEMS.
14.
.
Press
-Acct
nd
nd
10
0
Vends
0.00
0
Vends
Clr?
Clrd
0.00
4 times to exit
ACCOUNTING BY ROW
STEP
DISPLAY
1.
Press Service Mode Button
2.
Press
3.
Press
to enter row
Enter the row number
ro-
4.
Press
Hist. Ct.
10
5.
Press
Hist. Cash
10.00
6.
Press
Reset. Ct.
10
7.
Press
Reset Cash
10.00
8.
Press
Hist. Card
0.00
9.
Press
Hist. 2
10.
Press
Reset Card
11.
Press
Reset 2
12.
Press
to clear Resettables
Clr?
13.
Press
to confirm clear (ONLY For that row)
Clrd
Press
to enter another row or press
14.
GVC1 Programming Manual
-Acct
nd
0
Vends
nd
0.00
0
vends
4 times to exit
16
Sales Mode
P/N 4216961 Rev F
.
ACCOUNTING BY ITEM
STEP
DISPLAY
1.
Press Service Mode Button
--
2.
Press
3.
Press
to enter an item
Enter the item number
-14
4.
Press
Hist. ct.
10
5.
Press
Hist. cash
10.00
6.
Press
Reset. Ct..
10
7.
Press
Reset. Cash
10.00
8.
Press
Hist. Card
0.00
9.
Press
Hist 2
10.
Press
Reset. Card
11.
Press
Reset 2
12.
Press
item)
to clear Resettables (ONLY for that
Clr?
13.
Press
to confirm clear
Clrd
0.00
Acct
nd
0
vends
nd
0.00
0
vends
ADVANCED OPTIONS
To enter this menu you will be prompted to input a password. The following options are available:
Discount
Max Change
Free Vend Rate
Shutdown
Exact Change
Energy Savings
Unconditional Acceptance
.
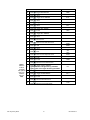
DISCOUNT
This menu will access the following sub-menus that allow the vending machine (controller) to charge a
different price for selections at different times or on different days:
Start Time
Item
Value
Day
Row
Enable ON/OFF
Stop Time
All
.
.
DISCOUNT “ALL”
STEP
If Every Day
“ON” is your
setting, skip to
step #27
To set individual
days use steps
12-27
GVC1 Programming Manual
DISPLAY
1.
Press Service Mode Button
2.
PASS
3.
Press
Enter Password (default 2314)
4.
Press
dISC
5.
Press
to toggle All ON/OFF
ALLY
6.
Press
to save
ALLY
Press
to exit to Discount
Press
to enter day menu
7.
8.
17
--
AdV
dISC
day
P/N 4216961 Rev F
DISCOUNT “ALL” cont.
9.
Press
to toggle Every Day ON/OFF
(To set individual days turn Every Day OFF)
ALLn
10.
Press
to save
ALLY
11.
Press
to toggle Mon. ON/OFF
nonY
12.
Press
to save
nonY
13.
Press
to toggle Tues ON/OFF
tuEY
14.
Press
to save
tuEn
15.
Press
to toggle Wed ON/OFF
UEdY
16.
Press
to save
UEdY
17.
Press
to toggle Thurs. ON/OFF
thuY
18.
Press
to save
thuY
19.
Press
to toggle Fri On/OFF
FrIY
20.
Press
to save
FrIn
21.
Press
to toggle Sat On/OFF
SAtY
22.
Press
to save
SAtY
23.
Press
to toggle Sun ON/OFF
SunY
24.
Press
to save
Sunn
Press
2 times to exit to Discount menu
26.
Press
2 times to enter Start Time menu
Strt
00:00
27.
Press
to edit
08:00
28.
Press
to save
08:00
Press
to exit to Start Time
30.
Press
2 times to enter Stop Time menu
Stop
23:59
31.
Press
to edit
10:00
32.
Press
to save
10:00
33.
Press
2 times to exit to Discount menu
dISC
34.
Press
to enter Disc. Value
0.50
35.
Press
to save
0.50
Press
2 times to exit to discount menu
37.
Press
to toggle enable ON/OFF
En n
38.
Press
to save
En Y
Press
4 times to exit to Sales Mode
25.
29.
36.
39.
GVC1 Programming Manual
DISPLAY
18
dISC
Strt
dISC
0.00
P/N 4216961 Rev F
.
.
DISCOUNT BY ROW
STEP
1. Press Service Mode Button
Press
2. Enter Password (default 2314)
AdV
3. Press
to toggle and turn off All
ALLn
4. Press
to save
ALLn
5.
Press
to exit to Discount menu
for Row
6. Press
Enter row
7. Press
GVC1 Programming Manual
Password
dISC
Press
If Everyday
“ON” is
your
setting,
skip to step
# 27
To set
individual
days use
steps 1327
DISPLAY
Motors ( - - )
8. Press
dISC
ro-
to toggle OFF/ON
ro1Y
ro1Y
to save
once to enter another row or 2 times to go
9. Press
to Discount menu
dISC
10. Press
to enter Day menu
DAY
to toggle All days ON/OFF
11. Press
(To set individual days turn Every Day off)
ALLY
12. Press
ALLY
to save
13. Press
to toggle Mon. ON/OFF
nonY
14. Press
to save
nonY
15. Press
to toggle Tues ON/ OFF
tuEY
16. Press
to save
tuEn
17. Press
to toggle Wed ON/OFF
UEdY
18. Press
to save
UEdY
19. Press
to toggle Thurs. ON/OFF
thuY
19
P/N 4216961 Rev F
DISCOUNT BY ROW Cont.
20. Press
to save
21. Press
to toggle Fri. ON/OFF
FriI
22. Press
to save
FrIn
23. Press
to toggle Sat. ON/ OFF
SAtY
24. Press
to save
SAtY
25. Press
to toggle Sun. ON/OFF
SunY
26. Press
to save
Sunn
27.
Press
2 times to exit to Discount menu
to edit start time enter in 24hr time
29. Press
(HH:MM)
08:00
30. Press
to save
08:00
31. Press
2 times to enter stop time menu
32. Press
to edit
Stop
23:59
33. Press
to save
10:00
Press
2 times to exit to Discount menu
Strt
10:00
35. Press
to enter disc. Value
dISC
36. Press
to save
0.50
37.
Press
2 times to exit to Discount menu
dISC
38. Press
to toggle ON/OFF
En Y
39. Press
to save
En Y
40.
Press
0.00
4 times to exit
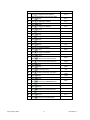
DISCOUNT BY ITEM
STEP
If Every Day
“ON” is your
setting, skip
to step #27
To set
individual
days use
steps 13-27
GVC1 Programming Manual
dISC
Strt
00:00
34.
.
thuY
2 times to enter Start Time menu
28. Press
.
DISPLAY
DISPLAY
1.
Press Service Mode Button
2.
Press
Enter Password (default 2314)
PASS
3.
4.
Press
dISC
5.
Press
to toggle ALL items OFF
ALLn
6.
Press
to save
ALLn
7.
Press
for Item
Enter item number
-24 n
8.
Press
to toggle Item ON
24 Y
9.
Press
to save
24 Y
10.
Press
11.
Press
to toggle Everyday ON/OFF
(To set individual days Everyday must be OFF)
ALLY
12.
Press
ALLY
to enter Day menu
to save
20
--
AdV
dAY
P/N 4216961 Rev F
DISCOUNT BY ITEM cont.
13.
Press
to toggle Tues ON/OFF
tuEn
14.
Press
to save
tuEn
15.
Press
16.
Press
to save
UEdY
17.
Press
to toggle Thurs. ON/OFF
thuY
18.
Press
to save
thuY
19.
Press
to toggle Fri On/OFF
FrIn
20.
Press
to save
FrIn
21.
Press
to toggle Sat On/OFF
SAtY
22.
Press
to save
SAtY
23.
Press
to toggle Sun ON/OFF
Sunn
24.
Press
to save
Sunn
Press
2 times to exit to Discount menu
26.
Press
2 times to enter Start Time menu
Strt
00:00
27.
Press
to edit
08:00
28.
Press
to save
08:00
Press
to exit
25.
29.
to toggle Wed ON/OFF
UEdY
dISC
Strt
30.
Press
2 times to enter Stop Time menu
Stop
23:59
31.
Press
to edit
10:00
32.
Press
to save
10:00
Press
2 times to exit to Discount menu
34.
Press
to enter Disc. Value
0.50
35.
Press
to save
0.50
Press
2 times to exit to Discount menu
37.
Press
to toggle Enable ON/OFF
En n
38.
Press
to save
En Y
Press
4 times to exit
33.
36.
39.
GVC1 Programming Manual
DISPLAY
21
dISC
dISC
0.00
P/N 4216961 Rev F
.
FREE VEND RATE
Enter a number from 0-255.
This will set the number of paid vends between free vends.
th
Example: If set at 5; every 5 vend will be free.
STEP
1.
Press Service Mode Button
2.
Press
Enter Password (default 2314)
3.
DISPLAY
-PASS
****
rate
0
4.
Press
to enter Free Vend Rate menu
5.
Press
to edit
10
6.
Press
to save
10
Press
3 times to exit
7.
.
0.00
EXACT CHANGE
The amount of
coins
left in coin mech
when
"Use Exact
Change"
light comes on
STEP
1. Press Service Mode Button
DISPLAY
--
2. Press
Enter Password (default 2314)
3. Press
4. Enter the amount for exact change
5. Press
6.
Press
PASS
AdV
EChG
0.00
0.00
1.00
to save
0.00
3 times to exit.
NOTE: If “Unconditional Acceptance” is set, for example, at $20.00, exact change will also be
$20.00 and cannot be set for a lower amount.
.
UNCONDITIONAL ACCEPTANCE
Sets the unconditional
acceptance value. All
coins or bills equal to or
less than this set value
will be accepted even if
the
changer cannot return
an equal amount of
change.
STEP
DISPLAY
1.
Press Service Mode Button
2.
3.
Press
Enter Password (default-2314)
4.
Press
5.
Enter the amount
UnAc
0.00
5.00
6.
Press
to save
5.00
Press
3 times to exit.
7.
-PASS
AdV
0.00
The Unconditional Acceptance set value is adjustable but the maximum value is equal to the largest
denomination of currency or coin accepted by the changer or validator.
GVC1 Programming Manual
22
P/N 4216961 Rev F
.
MAX CHANGE
STEP
Maximum Change
Option - This option
will prevent change
from being returned to
the customer until the
amount of credit has
been reduced to a
value less than or
equal to the
programmed maximum
change limit.
1. Press Service Mode Button
DISPLAY
--
2. Press
Enter Password (default is 2314)
PASS
3. Press
ChG
AdV
4. Press
to toggle ON/OFF
ChGY
5. Press
to save
ChGY
6. Press
7. Press
8.
Press
to enter dollar amt.
50.00
ChG
to save
3 times to exit.
0.00
NOTE: The highest value that can be set for the maximum price is $99.95.
.
SHUTDOWN
This option allows the controller to shut down a range of selections or the entire machine based on four (4)
time-of-day intervals. If the time falls within one of these intervals and the entire machine has been selected
for shutdown then the message "no SaLE… tIL..hh:mm" is displayed.
If a range of selections has been chosen for shutdown that does not encompass the entire machine, the
same message will display once every time the customer makes a selection that falls within the range.
NOTE: The correct time and date must be set so that the SHUTDOWN intervals work correctly. Also, for any
given day these 4 time intervals may overlap one another. For each interval, the machine (controller)
can be programmed from no days up to every day of the week on which the specified shutdown time
intervals will be active.
.
.
SHUTDOWN ALL
STEP
1.
Press Service Mode Button
2.
PASS
3.
Press
Enter Password (default is 2314)
4.
Press
Shdn
5.
Press
for Interval1
Int1
6.
Press
to toggle All ON
AllY
7.
Press
to save
AllY
Press
to exit
9.
Press
to enter day menu
10.
Press
to toggle Everyday ON/OFF
(To program individual days turn Everyday OFF)
ALLY
11.
Press
ALLY
12.
Press
to toggle Mon ON/OFF
nonY
13.
Press
to save
nonY
14.
Press
to toggle Tues ON/OFF
tuEn
15.
Press
to save
tuEn
8.
If Everyday
“ON” is your
setting, skip
to step # 27
To set
individual
days use
steps 13-27
GVC1 Programming Manual
DISPLAY
--
AdV
Int1
to save
23
day
P/N 4216961 Rev F
SHUTDOWN ALL cont.
16.
Press
to toggle Wed ON/OFF
UEdn
17.
Press
to save
UEdn
18.
Press
to toggle Thurs. ON/OFF
thuY
19.
Press
to save
thuY
20.
Press
to toggle Fri. ON/OFF
FrIY
21.
Press
to save
FrIY
22.
Press
to toggle Sat. ON/OFF
SAtn
23.
Press
to save
SAtn
24.
Press
to toggle Sun. ON/OFF
SunY
25.
Press
to save
SunY
Press
2 times to exit
27.
Press
2 times to enter start time menu
Strt
00:00
28.
Press
to edit
08:00
29.
Press
to save
08:00
Press
to exit
26.
30.
Strt
31.
Press
2 times to enter stop time menu
32.
Press
to edit
10:00
33.
Press
to save
10:00
Press
2 times to exit to Interval menu
Int1
35.
Press
to toggle Lighting ON/OFF
Lighting ON-turns off lights during shutdown
Lighting OFF- leaves lights On during shutdown
Litn
36.
Press
to save
LitY
35.
Press
to toggle enable ON/OFF
En n
36.
Press
to save
En Y
Press
2 times to edit Interval 2-4
Press
3 times to exit to sales mode
37.
38.
GVC1 Programming Manual
Int1
Stop
23:59
34.
NOTE:
Machine
must be
equipped
with optional
light relay.
Default
setting is
OFF
DISPLAY
24
Shdn
0.00
P/N 4216961 Rev F
.
.
SHUTDOWN BY ROW
STEP
1.
Press Service Mode Button
2.
Press
Enter Password (default is 2314)
PASS
4.
Press
Shdn
5.
Press
6.
Press
to set Row
Enter Row
ro ro1n
7.
Press
to toggle Row ON
ro1Y
8.
Press
to save
Ro1Y
9.
Press
menu
to enter another Row or press
10.
Press
to enter Day menu
11.
Press
to toggle Everyday ON/OFF
(To program individual days turn everyday OFF)
ALLY
12.
Press
to save
ALLY
13.
Press
to toggle Mon ON/OFF
nonY
14.
Press
to save
nonY
15.
Press
to toggle Tues ON/OFF
tuEn
16.
Press
to save
tuEn
17.
Press
to toggle Wed ON/OFF
UEdn
18.
Press
to save
UEdn
19.
Press
to toggle Thurs. ON/OFF
thuY
20.
Press
to save
thuY
21.
Press
to toggle Fri. ON/OFF
FrIY
22.
Press
to save
FrIY
23.
Press
to toggle Sat. ON/OFF
SAtn
24.
Press
to save
SAtn
25.
Press
to toggle Sun. ON/OFF
SunY
26.
Press
to save
SunY
Press
2 times to exit
28.
Press
2 times to enter start time menu
Strt
00:00
29.
Press
to edit
08:00
30.
Press
to save
08:00
Press
to exit
32.
Press
2 times to enter stop time menu
Stop
23:59
33.
Press
to edit
10:00
3.
If Everyday “ON”
is your setting,
skip to step # 27
To set individual
days use steps
13-27
27.
31.
GVC1 Programming Manual
DISPLAY
--
AdV
Int1
for Interval1
2 times to return to Interval
Int1
Day
Int1
Strt
25
P/N 4216961 Rev F
SHUTDOWN BY ROW cont.
34.
to save
Press
2 times to exit to Interval menu
36.
Press
to toggle enable ON/OFF
En n
37.
Press
to save
En Y
Press
2 times to edit Interval 2-4
Press
3 times to exit to sales mode
38.
39.
.
10:00
Press
35.
.
DISPLAY
Shdn
0.00
SHUTDOWN BY ITEM
STEP
If Everyday “ON” is your
setting, skip to step # 27
To set individual days
use steps 12-27
1.
Press Service Mode Button
2.
Press
3.
DISPLAY
-PASS
Enter Password (default is 2314)
AdV
4.
Press
Shdn
5.
Press
for Interval1
Int1
6.
Press
to enter item
10 n
7.
Press
to toggle ON/OFF
10 Y
8.
Press
to save
10 Y
9.
Press
to enter another item or press
2 times for Interval1 menu
10. Press
to enter day menu
Int1
day
to toggle Everyday ON/OFF
11. Press
(To program individual days turn Everyday OFF)
ALLn
12. Press
to save
ALLn
13. Press
to toggle Mon ON/OFF
nonY
14. Press
to save
nonY
15. Press
to toggle Tues ON/OFF
tuEn
16. Press
to save
tuEn
17. Press
to toggle Wed ON/OFF
UEdn
18. Press
to save
UEdn
19. Press
to toggle Thurs. ON/OFF
thuY
20. Press
to save
thuY
21. Press
to toggle Fri. ON/OFF
FrIY
22. Press
to save
FrIY
23. Press
to toggle Sat. ON/OFF
SAtn
24. Press
to save
SAtn
25. Press
to toggle Sun. ON/OFF
SunY
26. Press
to save
SunY
27.
GVC1 Programming Manual
Int1
Press
2 times to exit
26
Int1
P/N 4216961 Rev F
SHUTDOWN BY ITEM cont.
32. Press
2 times to enter Stop Time menu
33. Press
to edit
10:00
34. Press
to save
10:00
35.
Press
Int1
2 times to exit to Interval menu
36. Press
to toggle enable ON/OFF
En Y
37. Press
to save
En Y
38.
39.
Shdnt
Press
2 times to edit Interval 2-4
Press
3 times to exit to Sales mode
28. Press
2 times to enter Start Time menu
29. Press
to edit
30. Press
to save
31.
.
DISPLAY
Stop
23:59
Press
0.00
Strt
00:00
08:00
08:00
Strt
to exit
ENERGY SAVINGS
This function allows you to set a refrigerated machine to run at a higher than normal temperature during
programmable periods and programmable days of the week.
NOTE: Energy Savings runs OUTSIDE of the HS Standards. There are two programmable intervals.
STEP
Default
password 2314
If Everyday
“ON” is your
setting, skip to
step # 23
To set
individual days
use steps 8-22
GVC1 Programming Manual
DISPLAY
--
1.
Press Service Mode Button
2.
Press
3.
Enter Password
AdV
4.
Press
EnrG
5.
Press
for Interval1(to edit Interval 2, Press
6.
Press
to enter Day menu
7.
Press
to toggle Everyday ON/OFF
(To program individual days turn everyday OFF)
ALLn
8.
Press
to save
ALLn
9.
Press
to toggle Mon ON/OFF
nonY
10.
Press
to save
nonY
11.
Press
to toggle Tues ON/OFF
tuEn
12.
Press
to save
tuEn
13.
Press
to toggle Wed ON/OFF
UEdn
14.
Press
to save
UEdn
15.
Press
to toggle Thurs. ON/OFF
thuY
16.
Press
to save
thuY
17.
Press
to toggle Fri. ON/OFF
FrIY
18.
Press
to save
FrIY
19.
Press
to toggle Sat. ON/OFF
SAtn
20.
Press
to save
SAtn
PASS
27
)
Int1/ or Int2
day
P/N 4216961 Rev F
ENERGY SAVINGS CONT.
DISPLAY
21.
Press
to toggle Sun. ON/OFF
SunY
22.
Press
to save
SunY
Press
2 times to exit
24.
Press
2 times to enter Start Time menu
Strt
00:00
25.
Press
to edit
08:00
26.
Press
to save
08:00
Press
to exit
23.
27.
Int1
Strt
28.
Press
2 times to enter Stop Time menu
Stop
23:59
29.
Press
to edit
10:00
30.
Press
to save
10:00
Press
2 times to exit to Interval menu
31.
Int1
32.
Press
33.
Press
to reset Storage Temp (available range:
36ºF to 62ºF)
40F
34.
Press
to save
40F
Press
2 times for INTERVAL main menu
35.
62F
to enter Storage Temp (default is 62ºF)
Int1
Press
to toggle Lighting ON/OFF
Lighting ON-turns off lights during Energy Savings.
Lighting OFF- leaves lights On during Energy
Savings
LiTn
37.
Press
to save
LiTY
38.
Press
to toggle enable ON/OFF
En n
39.
Press
to save
En Y
Press
3 times to exit to Sales mode
Optional -
(Default is OFF) 36.
41.
0.00
TEST VEND
Use this menu to test vend individual motors. The selection will display with the test vend. If a test
vend attempt on a particular motor fails, controller will beep.
STEP
DISPLAY
1.
Press Service Mode Button
--
2.
--
3.
Press
Press selection number on keypad and wait
4.
Repeat step 3 for other selections.
5.
Press
10
0.00
3 times to exit.
NOTE: If Space to Sales is enabled, motors are run by selection number in Space to Sales arrangement. If
the machine is iVend™ equipped the test cycle will match the description found in the iVend™ section of
the manual.
GVC1 Programming Manual
28
P/N 4216961 Rev F
TEST ALL MOTORS
This menu will test vend all motors. The selection will display with the test vend. If a test vend attempt
on a particular motor fails, then the controller will beep. Satellite machines will also be included in the
test.
NOTE:
STEP
DISPLAY
Pressing
at
any time will stop
the test.
1.
Press Service Mode Button
2.
Press
and wait.
The motor selection number will display
while it is being tested.
3.
Press
--
**
0.00
3 times to exit.
NOTE: If Space to Sales is enabled, motors are run by selection number in Space to Sales arrangement. If the
machine is iVend™ equipped the test cycle will match the description found in the iVend™ section of the
manual.
DIAGNOSTIC
This menu is used to
perform a selfdiagnostics check
and display results.
STEP
Press Service Mode Button
2.
Press
dIAG
Press
to start test
tESt
CtL
ChSu
oPt
drP
Cn
ChG
biLL
Press
3 times to exit.
3.
4.
.
DISPLAY
--
1.
0.00
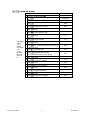
TEST RELAY
Testing of Relays - This menu provides functions that allow the operator to test the operation of the individual
relay lines 1 through 6.
STEP
RELAY1 - Refrigeration
Compressor.
RELAY2 - Evaporator Fan
RELAY3 - Heater
Upon exit from the function the
corresponding relay control line
will revert to a state that is
dependent on the controller's
normal relay control algorithm.
GVC1 Programming Manual
DISPLAY
--
1.
Press Service Mode Button
2.
Press
Diag
3.
Press
rlY
4.
Press
to toggle Relay 1 ON/OFF
rL1n
5.
Press
to toggle Relay 2 ON/OFF
rL2n
6.
Press
to toggle Relay 3 ON/OFF
rL3n
7.
Press
to toggle Relay 4 ON/OFF
rL4n
8.
Press
to toggle Relay 5 ON/OFF
rL5n
9.
Press
to toggle Relay 6 ON/OFF
rL6n
29
P/N 4216961 Rev F
.
LOG
Engineering download for service technician ONLY!
STEP
1.
Press Service Mode Button
2.
Press
Diag
3.
Press
Log
4.
.
DISPLAY
Press
--
0.00
3 times to exit
COIN REJECT RATE
This feature tracks the percentage of coins that have been rejected by the coin mech. This will be reset when in
accounting “ALL” has been cleared.
STEP
DISPLAY
1.
Press Service Mode Button
2.
Press
3.
Press
to view percentage
Press
3 times to exit
4.
.
Diag
10
0.00
BILL REJECT RATE
This feature tracks
1.
percentage of bills
rejected by the validator, 2.
and resets when “All” has
been cleared
3.
4.
.
--
STEP
DISPLAY
--
Press Service Mode Button
Diag
Press
Press
to view percentage
Press
3 times to exit
20
0.00
IVEND ALIGNED
Indicates when iVend™ vend delivery sensors are in alignment
STEP
.
1.
Press Service Mode Button
2.
Press
3.
Press
DISPLAY
-Diag
“Good” or “No”
to check I-vend alignment
LOG
.
.
REFRIGERATION LOG
This setting allows logging of the refrigeration temperatures through a laptop (w/appropriate
software) and the DEX port in real time.
STEP
DISPLAY
1.
Press Service Mode Button
2.
Press
3.
4.
Press
Enter 2314
5.
Press
rFon
6.
Press
rFoY
7.
Press
to save
Press
4 times to exit
8.
GVC1 Programming Manual
-Diag
PASS
Log
rFoY
0.00
30
P/N 4216961 Rev F
.
.
HEALTH SAFETY TEST
This allows the testing of the HEALTH SAFETY without having to wait longer than 15 minute or taping down
door switches.
STEP
DISPLAY
1.
Press Service Mode Button
Motor Count or Error Code
2.
Press
3.
Press
Enter 2314
4.
PASS
Log
5.
Press
hStn
6.
Press
hStY
7.
Press
to save
Press
4 times to exit
8.
.
Diag
hStY
0.00
DOOR ALERT
This allows for an alert when the door is left opened on refrigerated units
STEP
DISPLAY
1.
Press Service Mode Button
2.
Press
Diag
3.
Press
dorn
4.
Press
to toggle
dorY
5.
Press
to save
dorY
6.
Press
Motors ( - - )
Sales Mode
3 times to exit
©
NOTE: If further assistance is needed, you may call VendNet at 1(800) 833-4411, and ask for a service
representative.
.
MANUAL DEFROST
This allows a manual defrost cycle
STEP
DISPLAY
1.
Press Service Mode Button
2.
Press
Diag
3.
Press
dEFn
4.
Press
dEFY
5.
Press
6.
GVC1 Programming Manual
Press
Motors ( - - )
dEFY
to save
0.00
3 times to exit
31
P/N 4216961 Rev F
NOTES:
The contents of this publication are presented for informational purposes only, and while every effort has been made to ensure their accuracy, they are not to be construed
as warranties or guarantees, express or implied, regarding the products or services described herein or their use or applicability. We reserve the right to modify or improve
the designs or specifications of such products at any time without notice.
VendNet™
165 North 10th Street
Waukee, Iowa 50263
United States of America
USA & Canada
Service
(800) 833-4411
Parts
(888) 259-9965
Email
Web Site
International
(515) 274-3641
[email protected]
www.vendnetusa.com
4213674A.DOC
GVC1 Programming Manual
32
P/N 4216961 Rev F


![Un exemple d`utilisation du Code_Aster : calcul d`[...]](http://vs1.manualzilla.com/store/data/006378765_1-78c84f9e3de587cd857dc1c0e3a3a2a6-150x150.png)