1
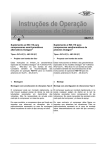
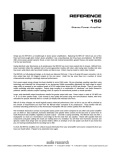
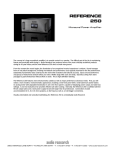
icon Audio Instruction Manual for: MB 30m Amplifiers Shown with upgraded driver valves Contents 1 Introduction & final inspection 6 Bias adjustment 2 Quick set up guide 7 Valve replacement 3 Connecting inputs & outputs 8 Specifications 4 Getting the best performance 9 Guarantee 5 Trouble shooting 10 Packing instructions 1 Introduction Thank you for purchasing the MB30m. Designed by David Shaw in Leicester. These pure valve mono block amplifiers are the result of years of careful design and listening tests with a wide range of speakers. The amplifiers are hand built using carefully selected audiophile components. The transformers are our own unique LDT Tertiary hand wound design hand wound using low oxygen copper and special Japanese long grain iron. Each amplifier is completed in Leicester, then valved, carefully commissioned and tweaked for best performance. In order to get the best out of your amplifier, please read the “SET UP” notes. These contain important information about the correct operation and safety. Should you be uncertain about anything please contact your dealer or one of our team. Valve amplifiers do need a little more attention than their solid-state counterparts, but the sonic results are well worth it. In this manual we have tried to include everything that you need to know. Please let us know if you find any errors or feel that we have missed anything out. The MB30m is a Single Ended (one output valve) triode/UL power amplifier designed for the excellent new KT120 power output valves. Many SE amplifiers are of low power which limits the choice of speaker. The new KT120 valve has enabled us to develop an amplifier which has three times the power of a single 300B, The MB30 will give ample volume with most popular loudspeakers in most situations, with a smoothness and richness that is often lacking with push-pull designs. MB30s operate in “fixed-bias” mode which gives maximum power, cooler running and low distortion. The MB30s are sensitive enough to be used with any pre-amplifier or passive in most situations. Their simplicity coupled with point to point hand wiring without the use of printed circuit boards results in an open euphoric sound that is wonderfully detailed and warm. You MUST occasionally check the bias this is easy with the built in meter. Final Inspection - Your Guarantee of Quality To assure you of optimum performance and reliability, this amplifier has passed our rigorous final inspection and listening test by the Icon Audio team in Leicester. Date …./…./…. Model ………. Amp Serial Number ………. Customer …………………………… Check amplifier finish ………. Internal wiring check ………. Bias meter calibration .…..ma Run min 10 hour test ………. Check input ………. Output Valve Bias level ……...v Sound Quality ………. Channel Balance ………. Valve Microphony ………. Valve Seating ………. Hum level L…...R.…..mv RF Test ………. LED brightness ………. Serial No sticker and recorded ………. Mains voltage 110-120 / 230-240V IEC Mains Fuse ………A Soft Start Fitted N/A.…. Sales invoice ………. Signed off by Bottom label ………. Credit card receipt .……… Customer survey form .……… Bias meter ………. Transformer Protection N/A.…. Upgrades: Output valves ……....………. 1st Stage valve ………………. Capacitor grade (Audio) ………. Mains lead ………. Other ……………………………… …………………………………… …………………………………… …………………………………… …………………………………… …………………………………… …………………………………… ………………………. Notes: Please note we do not test the standard mains lead or plug fuse. *See engineers notes at rear Page 2 MB30 SE Layout and Features The MB30s are not particularly sensitive to noise so therefore may be placed close to each other similar to a conventional power amplifier. Or alternatively place adjacent to each loudspeaker in order to keep the loudspeaker cable to a minimum. They should be placed on a flat surface to allow a gap underneath to aid ventilation. *See engineers notes at rear Page 3 IMPORTANT READ THESE NOTES THROUGH FIRST! 2 QUICK SET UP GUIDE Your safety is paramount to us. Valve amplifiers like the MB30m operate using high voltages. Please take care when setting up and adjusting. DO NOT OPERATE WITHOUT VALVES FITTED. If you are uncertain how to proceed at any point ask your dealer or Icon Audio. 1 Unpack each unit carefully. Make sure that it is in good condition. If not report to Icon Audio or your dealer. It is important that you keep the packaging for warranty/service return/shipping. NOTE THE “LEFT” and “RIGHT” orientation on each amplifier. Also keep the left and right amplifier valves separate. 2 If Necessary fit the valves, or check that they are firmly in place. Fit the valves according to the numbers written on the base of the valve, and on the socket. Observe “Left” and “Right”. The valves should be pushed gently but firmly all the way down. Be careful to note the correct orientation of the valves central “spigot” between the pins otherwise damage could occur. To avoid damage to the valves, do not twist the glass envelopes excessively as they may become loose/detached from their base. Hold the valves by the base if possible. Damage to valves is not covered by the warranty. These valves have already been fitted and tested for quality. 3 Connect to source unit, e.g. Pre amp, Passive pre amp etc via sockets on the rear. 4 Connect speaker terminals use “0” &“8 ohm” terminals unless you have 4 ohm speakers (see P5) Make sure that the polarity is correct. (See speaker connections chapter 3). If ‘bi-wiring’ both ‘common’ should go to the black terminal and both ‘positive’ (or red) should go to the red terminals. 5 Connect to mains supply using supplied IEC mains lead to 230/240v supply (or 120v)*. If for some reason the welded plug must be removed, please remove plug fuse and dispose of immediately. (As they can be a danger to children if plugged in). The replacement plug should be wired in the following way Brown to Live terminal, Blue to Neutral terminal and Green/Yellow to Earth terminal. 6 SWITCH ON! The meter should light up and a visible glow may be seen inside the valves when viewed from certain angles. After about one minute the amplifier should now be working. With the pre amp volume control set to minimum there *See engineers notes at rear should be no sound coming from the speakers except a barely discernible hum. If there are any unpleasant sounds coming from the speakers, switch off and refer to the ‘Trouble Shooting’ section or contact Icon Audio. 6a Sensitivity Switch Located on the rear, this switch is “UP” (H) for (high sensitivity) operation. If use with a preamplifier is required, the switch should be “DOWN” in the low sensitivity position. 7 Your unit should now be functioning. If not check wiring again. Do not operate at a high volume for the first five minutes to allow the valves to warm up properly. Please note all these things are normal for valve amplifiers: A, Valves can get very hot, BEWARE! B, The transformer covers will get quite warm C, The amplifier may smell slightly for a few weeks. D, Occasional Mobile phone ‘breakthrough’ is normal. E, Valves may make a ‘tinkling’ sound when warming up and cooling down. F, One channel may come on before the other at switch on. G, There may be a ‘click’ when switching off. H, The occasional “click” or “pop” is normal. 8 Health and Safety. The valves when operating have high surface temperatures. Keep out of reach of children and pets. Always unplug when making adjustments. Like all amplifiers there are potentially lethal high voltages inside, which when switched off can take twenty minutes to discharge! Do not remove bottom panel unless you are a competent engineer. There are no user serviceable parts inside. Like other household electrical appliances do not leave unattended whilst switched on. Do not adjust the bias pre sets without reference to the manual. Incorrect adjustment could cause the valves to overheat, with resulting in damage to valves and amplifier. Bias Adjustment: The bias adjustment is factory set. No initial adjustment is normally needed. However you should initially check the bias of the KT120 valves to make sure it is correct for your mains voltage. Full details are in section 6. Page 4 3 Connecting inputs & outputs Many problems associated with electronic equipment involves connecting leads, which are usually either ‘BAD CONNECTION’ or a ‘WRONG CONNECTION’. So it’s worth making sure that you have good connections and that your leads are the right way round. Inputs MB30m power amplifiers require some kind of pre amplifier to accomplish volume control and switching of source. This can be achieved by either a “passive” or powered unit. Icon Audio makes ideal pre amps. You may wish to consult your dealer. If you wish to use a turntable you will need a suitable phono pre-amp. Your dealer or Icon Audio can advise you. Any of our highly rated PS1 MM/MC, PS2 MM or PS3 MM/MC all valve phono stages would be an ideal partner. Note: If you are only using one source that has a volume control fitted, e.g. our PS1 or PS3 phono stage, or a CD player with volume control then no preamplifier is necessary. Connecting loudspeakers It is important to use good quality loudspeaker cable. This should be relatively thick and multistranded. i.e. QED 79 “stand” or better. Take care to connect the correct polarity. You can either ‘hard wire’ your cable to the amplifier by baring enough cable to fit in the connector and twist together to avoid any spare strands touching anywhere else (soldering the stands together helps). Be warned this amplifier does not have an output protection device, which would degrade the sound. So a prolonged short due to strands of wire touching could cause damage. Alternatively use good quality ‘banana’ plugs or spade connections, once fitted they are trouble free. In our experience Icon valve amplifiers are more tolerant of cables; therefore the benefits of some very ‘exotic’ cables may be less apparent. But this is also personal taste. The losses in speaker cables is less than in interconnects. Speaker polarity. It is essential that you observe the polarity of the terminals; they must be the same for the left/right connections at each amplifier end and at the loudspeaker end. Otherwise the sound will be ‘out of phase’ with the sound stage ‘inside out’ with reduced bass. If you are unable to check this or confirm the polarity (e.g. if you have ‘built in’ wiring), a test disc will be helpful. If you are ‘bi-wiring’ you can independently use either 4 or 8 ohms for the bass and treble. Many modern smaller speakers use a 4 ohm unit. If in doubt the “heaviest” base is the best match (depending upon preference). and again 4 or 8 ohms for treble, 8 ohms will give a “brighter” balance. There is no right or wrong so choose the sound balance that suits you best. The MB30m is designed to work with full range, low to medium efficiency speakers having impedance between 4 ohms to 8 ohms. Speakers having efficiency of lower than 85db will have greater difficulty in providing a high sound level. But this will also depend upon individual speakers, room size, type of music and positioning etc. 4 Getting the best performance from your amplifier UNDER NO CIRCUMSTANCES OPERATE WITHOUT VALVES FITTED! NEVER REMOVE THE BOTTOM COVER! Switch on your pre-amp first. This will limit “switch on thump” in your speakers. Do not leave the amplifier switched on all the time. This is not necessary Do not switch off and on without a short rest of 60 seconds (to reset the ‘soft start’) Do not adjust the output valve grid bias without reading the manual Do not operate the amplifier without loudspeakers connected Do not use valves other than listed as there could be danger of shock or damage Do check the bias regularly or if you have cause to suspect a problem Do Make sure the speakers are in phase What is safe maximum power? The MB30m will run happily all day long at any undistorted power; the valves hardly stressed any more than at zero volume. Running into distortion will however stress the whole amplifier. Generally speaking if the sound is not distorted then the amplifier is not stressed. But beware of heavy musical transients at high volume which could also damage your speakers and blow fuses. MB30 only needs one minute to warm up and 15 minutes to sound at its best. Valve life is approx 5000 hours, that is approx 7 months continuous use or 5 years at 20 hours a week. Leaving the amp switched on Do not leave the amplifier on 24/7. There is no benefit, it is wasting electricity and valve life. The *See engineers notes at rear Page 5 ‘Burning in’ Although the amplifier should sound good within about 15 mins it can take up to an hour to sound at its best when new and will take several months of regular use before it is fully ‘run in’. Like the ageing of wine, the biggest change occurs in the first month but continues at a slower and slower rate for 2-3 years. The sound will become more mellow and musical over time. Upgrading Valves! Quality valves should sound better and have a better service. The valves supplied with selected models are the result of careful comparison with other makes. But beware of paying a premium for “New Old Stock” valves where you may be paying for rarity value and not performance. Icon Audio can recommend and supply a range of standard and upgrade valves. Importantly valves supplied will be tested and listened to before despatch so you can be sure of the best sound quality. Cabinet Care To remove dust we suggest gentle brushing of the paintwork with a soft paintbrush. Other marks can usually be removed with a damp cloth. Never use anything wet on the amplifier, and always clean with the power disconnected. 5 Trouble Shooting 1. Amplifier Dead Check the 2 amp mains fuse in the IEC socket at the back of the amplifier. To gain access, remove the mains lead. The fuse is in a small plastic drawer, which forms part of the socket assembly. To open insert a flat blade screwdriver or similar and prise open. The fuse in use is the innermost the outer is a spare. Should the replacement fuse also blow there is a fault you should disconnect from the mains and seek qualified help or Icon Audio. Replacements should be 2 Amp ‘anti-surge’. The fuse in the wall plug should be a 5 amp fuse, although unlikely to fail, this should be checked if the amplifier fuse is OK. 2. No sound Have you selected the right input? Is the “Tape Monitor” switch on? Are all the connections OK? Is everything switched on? Are the speakers connected? Distorted sound. Could be your source, the speakers or the amplifier, check all wiring, and try swapping things around to eliminate or prove which component if the problem. Left or right amplifier? If both probably the source unit. Try another source. If one amplifier is distorted check the bias. No bias reading means either a fuse blown or a faulty valve. Distorted sound at higher volumes may be because one of the KT120 valves failing. A symptom of this could be unable to bias properly. Refer to an engineer or to Icon Audio. 3. Hum Problems If you experience hum, try disconnecting the input, if it clears it is NOT the amplifier, but some cause external to the MB30m and further advice should be sought from your dealer or Icon Audio. By elimination find out which unit is causing this. Interconnects MUST be well screened (some exotic ones are not!). If hum persists with no input this is may be a fault. 5. Strange noises coming from speakers Disconnect the pre-amplifier. If the noise disappears the fault is elsewhere. Turn volume to minimum on unused pre-amplifier input, if the noise disappears, the fault is with the source or the connection. If noise persists, the problem is with the pre-amplifier. If a whole output valve glows red (other than the heater), often accompanied by a hum through the speakers, switch off immediately, and refer to Icon Audio or a service engineer, as this could be valve failure. 6. Service: Should you suspect a problem, you could return the unit to your dealer or Icon Audio for a periodic service or return the valves for testing free of charge. You should carefully remove the valves (by pulling the base, not the glass). Numbering them with a marker from left to right as you do so in order that that may be replaced in the same position. They should be well packed in cardboard & foam or similar, and returned to Icon Audio for testing. (Valves are very rugged if packed properly). *Mains Supply This amplifier is hard wired to work on 230/240v ac. The transformer may be re-configured for 110/120v ac by a qualified engineer. See engineers notes or contact Icon Audio for more information. This manual is provided for guidance only, and is not intended as a comprehensive service manual. In case of problems you should refer to your dealer or directly to Icon Audio. 4. External hum causes; Identify which input is causing hum. Connect one input at a time. A common cause is a ‘hum loop’ caused by having too many earths, and may be identified by unplugging each input source from the mains. One remedy for this is to use an interconnect which only has the screen connected at one end. Other causes of lowlevel hum can be from adjacent equipment, so experiment with moving equipment around to see if this makes the hum better or worse. “Unscreened” interconnects WILL cause hum with this amplifier. Only use screened interconnects. Never disconnect a mains earth. It is there for your protection! *See engineers notes at rear Page 6 6 Bias Adjustment Why is bias so important? With pure Class A single valve operation the valve must be at 50% of its current. This enables it to increase to 100% and down to 0% at full power as the music waveform demands. Too low and the full power will not be achieved without distortion, too high and the valve will be operating at a higher power, at a higher temperature and shortening its life. Why isn’t it done automatically? Although possible it would require a transistor circuit to continuously monitor the KT120. Apart from the complexity and reduced reliability (transistors don’t like heat and high voltage spikes), the circuit may misinterpret “music” as a need to adjust the bias, which will have consequences for the listening quality. Overall we feel the “fixed bias” method sounds better. Our simple Bias check method will help you keep the MB30 at its optimum performance: How to check and adjust Bias: 1. Run the amplifier for at least 10 minutes. If changing valves check initially, and again after ten minutes. 2. You will need a small flat blade screwdriver to fit the adjustment pots. 3. Switch off the pre-amp or source unit to prevent false readings. 4. Push the bias switch up. The pointer should be in the black section of the dial. Maximum reading of 75. Minimum reading of 50. See Notes below. 5. If adjustment is necessary turn the adjacent “pot” slightly until the pointer reaches the desired position. Notes If the BOTH amplifier readings are slightly low or high, this could be due to local power supply fluctuations. In which case leave and check at another time. Indeed you may even notice small variations whilst you are checking, this is normal. If you find significant variations at different times, the best compromise is to set a little on the low side in order that a reading of 75 is not exceeded. If the reading cannot be controlled or is erratic, this is normally the sign of a faulty valve. No reading at all usually means the valve is faulty. Swapping valves with the other MB30 may enable you to eliminate whether a valve is faulty or not. Valve Testing: If you suspect any of the valves are not working correctly or you are concerned about their condition, Icon Audio will test the valves free of charge. Return them to us well packed in a rigid box with a note detailing the problem, which valves you suspect and your contact details. We will then contact you with the test results. *See engineers notes at rear Possible visible valve faults Not all valve faults are visible but KT120s 6SN7s and GZ34s valves should not be used if: 1. The “silver” getter material has turned white or is disappearing (air leak). 2. The valve rattles excessively (a slight rattle is normal). 3. There are any cracks in the glass. 4. The base is loose. (sometimes repairable) 5. Any pins are damaged or loose. 6. The heater does not light up (this is harder to see with the 6SN7). If a valve stays “cold” the heater has probably failed. Generally speaking valve failure may be one of these: 7. The valve continues to work but the emission gets low. In the case of KT120 output valves this will result in not being able to set the bias properly. 8. The valve gets noisy/microphonic. Usually happens to the small valves, can be confirmed by tapping gently with a plastic pen. 9. Heater fails. No glow in centre of valve. Valve is cold. 10. A valve that is lit up is not a guarantee that it is working properly; conversely a valve that is not lit up will not be working at all. 11. Dramatic Failure. Occasionally the demise of a power valve may be obvious with internal sparks and noise through the speakers. In that case, switch off and do not use until a replacement is available. Before re-commencing use see chapter 6 “Bias Adjustment”. If there was any associated burning smell etc, we would recommend a qualified person examines the inside of the amplifier first. 12. The whole internal metal structure glows red. This is usually an internal short, and may be checked by replacement valve. 7 Valve Replacement Important! Before attempting any valve change ISOLATE each amplifier by removing the IEC cable from the socket on the rear, for 10 minutes to allow high voltages to discharge. High voltages are present inside the amplifier and on exposed valve sockets when valves are removed, so take suitable care. It is not necessary to remove the bottom cover. Beware valves get hot in operation! Valve replacement procedure: 1. Read the notes on “Bias adjustment” first. 2. Remove valves by holding the base and gently but firmly with a slight rocking motion. (be careful too much movement will break the central spigot). 4. Replace the valve with the same or equivalent type. 5. Prepare to adjust the bias of the KT120 according to section “6” so have a small screwdriver ready. 6. Switch and adjust bias as necessary. Check again after 30 minutes. Page 7 How long do valves last? And how do I know when to replace valves? 8 Specification & Features Valve life will depend upon such things as hours of use and number of on/off cycles. Valve life is impossible to predict as they can suffer from many different faults. As a very rough guide we would suggest valves are routinely replaced according to this usage: Up to 3 hours a day Every 5 years 3 hours a day or more Every 3 years 8 hours a day or more Every year. Based upon using 5 out of 7 days a week. All the valves in the MB30 wear at similar rate so replacement in sets is recommended unless one fails prematurely. If you are uncertain about the condition of your valves you may return them to Icon Audio for testing free of charge. But like a LP stylus or car tyres valves have a finite life and may not sound at their best when they have several thousand hours of use. It is our policy to offer service for any of our products regardless of age. We are always happy to check the valves and working of the amplifier for personal callers or by post for a small charge. Please contact us first. 100% Pure Class A output power Class A, all Triode front end KT120 60w beam pentode output valve 6SN7 (CV181) double triodes 1st stage valve Valve rectifier, GZ34/5AR4 Output power Triode 16w (11.35v @8 Ohms) Ultralinear 27w (14.7v @8 Ohm) Oversized choke regulated power supply for both driver and output stage Our own unique designed tertiary wound output transformer for low distortion and feedback All hand wired point to point without printed circuit Signal to noise level 98db (low gain) Signal to noise level 88db (high gain) Freq resp 18 - 26kHz +0 –1db (8w) Freq resp 13 - 42kHz +0 –3db (8w) THD 0.1% @1w. 0.4% @8w. 1.4% @27w 4 & 8 ohm loudspeaker taps (suitable for 2-16Ω) Low feedback design (no feedback on high gain) Solen/SCR hi fi audio capacitors (recommended Jensen upgrade Copper foil upgrade available) Audiophile 2 watt metal film resistors for performance, stability and reliability Silver plated copper PTFE audio cable Audiophile long grain, high flux steel transformer laminations for high performance. Gold plated Input & speaker terminals 330mv (high) & 925mv (low) input sensitivity. 220/240volts 85w approx (each) C E, ROHS Size in mm W160, D380, H210, 12kg ea Packed 44cm x 25cm x 32cm 13kg 2 boxes Typical values @ 235v AC (Specifications subject to change *See engineers notes at rear Page 8 9 Guarantee Thank you for purchasing one of our amplifiers. We trust you will be pleased with it. This amplifier is guaranteed by the dealer you purchased from for 12 months from the date of purchase for parts and labour, excluding shipping. Valves are consumables and therefore on a 12 months pro-rata wear basis. Please keep your receipt as proof of purchase, this will be needed. All units are individually tested for performance for at least ten hours before despatch to you. In the unlikely event that you believe the unit is not functioning correctly, it may be helpful to contact us first as we may be able to assist you. Then we would request that you return the item to your dealer. You are advised to inform us of any change of address or change of ownership in order that we may keep you up to date of any upgrades or improvements. Check our website. Exclusions Claims for any damage to either amplifiers or valves must be reported within 24 hours of receipt. This amplifier is designed for normal domestic hi fi use. It is not guaranteed for commercial, Public Address use, or use in other situations. The icon guarantee becomes void if the unit has been modified in any way not approved by Icon Audio. 10 Packing Instructions It is essential that the original box and packing be kept in good condition, as this provides vital protection from damage during transit. Please do not write on box, but use removable labels. Should the original box and packaging be lost or become unusable a repacking charge of one hundred pounds will be made. Re-use the supplied plastic bag to keep the amp clean and free from damp. The mains lead fits in a foam cut-out underneath the amplifier. Send the valve covers and valves in the separate supplied box. See above for valve removal. Valves should be removed, numbered and packed in “Bubblewrap” or similar for protection inside the valve cover. If the amplifier is stored in the box, keep upright. Do not store in damp conditions as the transformer windings will corrode. If the amplifiers are shipped insurance is desirable due to the high unit value. Audio UK LTD 351 Aylestone Road Leicester LE2 8TA www.iconaudio.co.uk Phone +44 (0) 116 244 0593 Cell +44 (0) 778 715 8791 Email: [email protected] 2014-08-28 G version *See engineers notes at rear Page 9 Engineers Notes These notes are only intended for use by an engineer qualified to work with high voltages found in valve amplifiers. Owners should refer any problems to a dealer or service agent. The amplifier may be inverted by supporting the transformers on non abrasive surface (e.g. dense foam, books etc) which allows space between the KT120 and the work surface. Safety Before removing base disconnect the power cord. Always allow 10 minutes for the HT to discharge, or measure before proceeding. If possible use a bleed resistor of around 5-10KΩ will speed this up, and check that the HT voltage has discharged. Amplifier dead. Check the 20mm mains fuse in the IEC socket at rear of the amplifier, if dead there is a spare included. Or the fuse in the plug (if applicable). If not either check in-line power switch fuse adjacent to IEC socket. 230v to 115v Conversion. Take the precautions as above. It is necessary to change the primary power windings from series to parallel. This can be achieved by unsoldering the “live” input from the IEC socket and replacing it with the two “centre tap” connections normally found insulated with “heat shrink”. The single removed wire should be connected together with the “neutral” connection on the IEC socket. A The IEC socket AC fuse should be doubled in value. *See engineers notes at rear Page 10