1
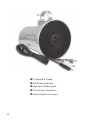
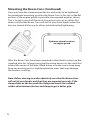
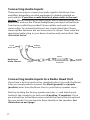
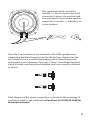
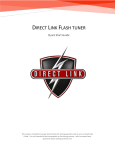
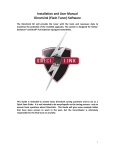
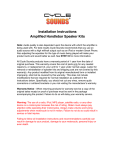
All-in-One Amplified Lower Speakers For use with: Boom Cans™ Amplified Lower Speakers (p/n: 4405-0240) Installation & User Guide Specifications: Amperage Draw Idle 60mA Full Power 1.5 Amps RMS Output 45 watts Peak Output 95 watts Impedance 2.8 Ohm Material: Billet Aluminum Diameter: 5.625" Depth: 5.625" Weight: 2.25 lbs ea. * Physical specifications are for a single lower speaker * Compatible with all 2 and 4 Ohm Radio Systems. Parts List: (2) Boom Cans™ All-in-One Amplified Lower Speakers (2) Boom Cans (Button Head) Mounting Screws (2) Heavy Duty P-Clamps for 1-1/4" Engine Guards (2) Rubber Shims for P-Clamps (1) 2-Pin Quick Connection Power Adapter (1) 3.5mm Splitter Mono-to-Stereo (1) 3.5mm Stereo Cable 3ft (6) Red T-Tap Lock Connectors (4) 8" Wire Ties (1) Installation & User Guide Thank you for your purchase of the Boom Cans™ Allin-One Amplified Lower Speakers. Please read ALL instructions and precautions before attempting to operate or install the Boom Cans. General Care and Maintenance 1. Always secure the Boom Cans to the engine guard or alternate secure location before riding. After mounting the Boom Cans make sure they are far enough away from all moving parts and cables. Turn the bars to each side to check clearances on fenders and cables. 2. Do not overtighten mounting screws or rear cap screws. Excess pressure such as overtightening can cause the housings to crack or break. Always make sure the Boom Cans are securely mounted before riding. WARNING Operation of an audio device while driving a motor vehicle is strongly discouraged. Drivers should always stop completely before attempting to adjust volume or any other settings on an audio device. Failure to follow this warning may lead to serious injury or even death. Warranty Information All Cycle Sounds® products are covered under a one year manufactures warranty against defects in craftsmanship and materials. Always keep a copy of your original receipt for warranty purposes as it will be needed to obtain warranty service. If you have a warranty question or issue please contact Cycle Sounds using the information below. Cycle Sounds Warranty Department: [email protected] 1(866)427-2346 j k l m uP-Clamp Bar Clamp vLED Power Indicator wHigh Level Audio Input x2-Pin Power Connector y3.5mm Audio Line Input 3 Mounting the Boom Cans Start by opening the included p-clamps and fitting them around the engine. If using on a 1" bar you will need to put the shims around the bar with the p-clamps. After the clamps are around the bar insert the mounting screws through the clamps, from the top, and into the Boom Cans housings threaded mounting hole. See illustration below. If needed you can use the included rubber shims to make a tighter grip against the bar if the clamps seem to slip once the speaker housings are mounted. Do not overtighten these bolts or you may break the speaker housing. b a c 4 Mounting the Boom Cans (Continued) Once you have the clamp around the bar and ready to be tightened for permanent mounting, position the Boom Cans as far out on the flat portion of the engine guard as possible at an upward angle as shown. This is to get as much of the music toward your ears as possible. Also make sure that the Boom Cans will not hit your front fender when the bars are turned all the way to either side before final tightening. Optimum clamp locations on engine guard After the Boom Cans have been mounted in their final location use the supplied wire ties to begin securing the wiring harness to the crash bar toward the center of the bike. When doing so make sure to keep away from any moving parts or high temperature areas that may damage the harness or wiring. Note: Before moving on make absolutely sure that the Boom Cans will not hit your fender and that they are mounted securely. If the clamp slides on the bar undo the clamp and insert the included rubber shim between the bar and clamp to get a better grip. 5 Connect Power and Ground First, find an accessory power location on your bike. Do this by using a volt meter or consulting the factory service manual for your make/ model. Route the wiring harnesses toward the center of the bike and toward your chosen power location. Once both harnesses are at the power connection location attach the Red Locking T-Tap Connector to the vehicles power and ground locations as shown below. Once the T-Tap Connectors are attached to the bike's power and ground attach the provided 2-Pin Quick Connector to each Boom Can connector as shown. To Left Boom Can To complete the power and ground connections simply plug the other ends of the 2-Pin Quick Connector to the attached Red T-Tap Connectors as shown. Make sure the red wires go to your 12v accessory power wire and the black wires to your ground wire. 6 Connecting Audio Inputs There are two ways to connect an audio signal to the Boom Cans amplifiers depending on what equipment is already installed on your vehicle. If you have a radio head unit please refer to the next section. When connecting an mp3 player, music enabled phone, Rock Box or GPS unit use the 3.5mm (headphone) jack input on the Boom Cans harness with the provided 3.5mm splitter and male-to-male stereo cable. To connect the Boom Cans simply attach the 3.5mm stereo splitter between the two boom cans as shown. Then route the remaining (male) plug to your device Mono location and you're all set. See illustration below. Female-to-Male Extension To Left Boom Can To Right Boom Can Stereo Mp3 Player Audio Connect Splitter Male-to-Male Extension To Audio Source Connecting Audio Inputs to a Radio Head Unit If you have a factory head unit or standard radio to use with the Boom Cans you simply need to connect the black (ground) and purple (positive) wires from the Boom Cans to your factory speaker wires. Start by locating the factory speaker wires for +/- and attach a red locking t-tap connector to each wire (2 positive / 2 negative). If you are unsure how to find these wires consult the factory service manual for your model. You can tap into these directly at the speakers. See illustration on next page. 7 The speaker terminals should be marked +/-, but on Harleys the small connector is always the positive lead. You may need to remove the speaker connector to see the +/- indicators on some speakers. Once the 2 red connectors are attached to the OEM speaker wires, simply plug the blue connectors on the Boom Cans Harness into the red connectors you just attached making sure to keep the positive and negative wires separate. If you get a "tinny" sound when finished check to make sure the positive/negative wires are correctly attached as shown. A full diagram of the stereo connections is shown on the next page. If you have trouble or get confused, call us direct at 1(816)525-2628 for technical assistance. 8 Connecting Audio Inputs to a Radio Head Unit (Wiring Diagram) - + + OEM Speaker Wires OEM Speaker Wires - Left Speaker Right Speaker To Radio To Left Boom Can To Right Boom Can Radio Head Unit Integration Only! 9 Amplifier Adjustment Information (IMPORTANT!) The Boom Cans amplifiers are setup and optimized for maximum volume and clarity from the factory so no adjustments should be necessary on most bikes. If you find that adjustment is necessary for your audio system call our technical support at 1(816)525-2628 for instruction on correct adjustment for your specific model and audio system. Failure to call and verify the needed settings before making any adjustments may damage your Boom Cans and/or void the warranty on your product. 10 WARNING: Please read and complete all instructions before turning on or doing any adjustment to your audio system. When the radio and amplifiers are set up correctly there should be no distortion of the sound at 3/4 volume. If there is please review all instructions and make sure you have completed everything correctly. Failure to follow all instructions correctly may result in damage to your sound system or Boom Cans and amplifiers and/or void your factory warranty. Boom Cans™ Installation & User Guide Cycle Sounds LLC 275 NW Victoria Drive Lee's Summit, MO 64086 (866) 427-2346 / Toll Free (816) 525-2628 / Office (816) 525-3647 / Fax www.cyclesounds.com