1
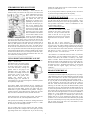
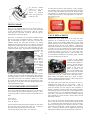
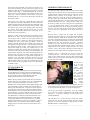
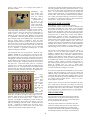
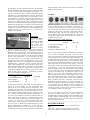
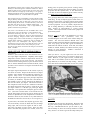
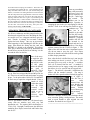
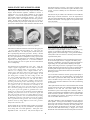
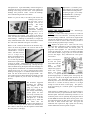
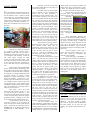
in-law Ben started untying the tiedowns. The trailer was
on a modest slope toward the rear. I was installing the left
ramp when Ben called "look out". (the forward strap had
broken.) The truck was coming back and I tried to block it
with the ramp which was perpendicular to the truck. Didn't
work, the truck rolled over one end of the ramp with my
right leg under the other end. I got a very bruised leg and
was probably lucky it wasn't broken. Other than my leg
the only casualty was a broken tail light. We usually leave
the steel cable to the winch for the last thing to release but
not this time. The moral of the story, take your time
loading and unloading and Be Careful.
I am not a machinist,
but a drill press and a
drill press vise is all
that is required to do
the job – and a large
tap wrench.
The
hardest part in the
whole operation is
clamping the part in the vise and aligning it with the
drill bit! There is no real large flat surface to grip a
carburetor top. The
part has to be
parallel to the table
and the drill exactly
perpendicular to the
inlet hole. A slightly
smaller drill bit can
be inverted in the
chuck and used as a
guide to line things
up then removed for the 33/64 as in figure 1. The
depth of the drill into the in let is important because
you do not want to score the seat. Pres. Pieper
advised me that the end of the drill bit can be ground
to allow deeper penetration.
-------------------------------------------------------------------------------
REPAIRING THREADS ON CAST PARTS
Editor
We all have carburetors and fuel pumps that have the
inlet threads stripped from cross threading the lines.
As careful as we are, it happens and there goes the
part! Threads in castings do not stand a chance
against the brass fittings. One way to prevent this
from happening is after attaching the fuel line to the
pump, then thread the fitting into the carb inlet
BEFORE it is bolted to the manifold! This allows
more play to insure the parts line up. Remember the
threads do no prevent the fuel from leaking, it is the
seat and the ferrel on the line.
One of the ways
to repair the part
is to find another
top half of a carb
or fuel pump
where the threads
are
good
to
replace it. This is
becoming harder to do now days as the “junk parts”
dry up, most have stripped threads and the prices are
up. The prices of restored carbs and pumps are going
up too – to the point where I believe it is worthwhile
to find a way to repair the stripped threads. I have a
bunch of 91-99
carbs that would
sell for $100
restored – this
seemed worthwhile to me to
invest
in
a
Helicoil repair
kit for $40.
Now, after the hole is drilled the tap is run into the
hole making sure that it is vertical – figure 2. The
pot metal gives way easily to the tap. A stainless
steel coil in inserted into the tool. A mandrel is
rotated into the tool to engage a tang in the helicoil
that allows it to be screwed into the tapped hole –
figure 3. The helicoil is threaded ¼ inch below the
surface and the mandrel removed. The tang is
broken off with a punch and the finished job appears
as in figure 4.
The fuel line is
now
easily
inserted into the
new threads and
can be tightened
down
without
fear of destroying
the pot metal.
The
helicoil:
Provides a stronger assembly and eliminates thread
wear, corrosion, galling, seizing and rust. The can be
used to repair threads to their original size and
condition. It worked for me! (Figure 5)
----------------------------------------------------------------
Helicoil part number 5528-8 for ½-20 thread repair
comes with ten stainless steel coils, tap, and
installation tool. The required drill size/diameter is
33/64 (.516). I thought I could borrow the drill from
machinist Steve Pieper, but no luck and I had to buy
one for $17.
15