1
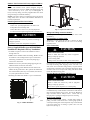
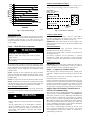
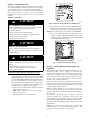
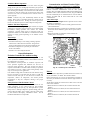
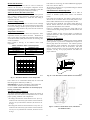
INSTALLATION Specifications for this unit in residential new construction market require the outdoor unit, indoor unit (including metering device), refrigerant tubing sets, and filter drier, and muffler listed in pre--sale literature. There can be no deviation. Consult the Service Manual – Air Conditioners and Heat Pumps Using Puron Refrigerant to obtain required unit changes for specific applications and for R--22 retrofit. Step 1 — Check Equipment and Job Site Unpack Unit Move to final location. Remove carton taking care not to damage unit. Step 3 — Clearance Requirements When installing, allow sufficient space for airflow clearance, wiring, refrigerant piping, and service. Allow 24 in. (609.6 mm) clearance to service end of unit and 48 in. (1219.2 mm) (above unit. For proper airflow, a 6--in. (152.4 mm) clearance on 1 side of unit and 12--in. (304.8 mm) on all remaining sides must be maintained. Maintain a distance of 24 in. (609.6 mm) between units. Position so water, snow, or ice from roof or eaves cannot fall directly on unit. On rooftop applications, locate unit at least 6 in. (152.4 mm) above roof surface. 3/8--- in. (9.53 mm) Dia. Tiedown Knockouts in Basepan(2) Places Inspect Equipment File claim with shipping company prior to installation if shipment is damaged or incomplete. Locate unit rating plate on unit corner panel. It contains information needed to properly install unit. Check rating plate to be sure unit matches job specifications. Step 2 — Install on a Solid, Level Mounting Pad If conditions or local codes require the unit be attached to pad, tie down bolts should be used and fastened through knockouts provided in unit base pan. Refer to unit mounting pattern in Fig. 2 to determine base pan size and knockout hole location. For hurricane tie downs, contact distributor for details and PE (Professional Engineer) Certification, if required. On rooftop applications, mount on level platform or frame. Place unit above a load--bearing wall and isolate unit and tubing set from structure. Arrange supporting members to adequately support unit and minimize transmission of vibration to building. Consult local codes governing rooftop applications. Roof mounted units exposed to winds above 5 mph may require wind baffles. Consult the Service Manual -- Residential Split System Air Conditioners and Heat Pumps Using Puron Refrigerant for wind baffle construction. NOTE: Unit must be level to within 2 (3/8 in./ft,9.5 mm/m.) per compressor manufacturer specifications. View From Top A05177 UNIT BASE PAN Dimension in. (mm) 35 X 35 (889 X 889) TIEDOWN KNOCKOUT LOCATIONS in. (mm) A B C 9–1/8 (231.8) 6–9/16 (166.7) 28–7/16 (722.3) Fig. 2 -- Tiedown Knockout Locations Step 4 — Operating Ambient The minimum outdoor operating ambient in cooling mode is 55_F (12.78_C) without low ambient cooling enabled, and the maximum outdoor operating ambient in cooling mode is 125_F (51.67_C). The maximum heating operation ambient is 66_F (18.9_C). Compressor protections prevent operation below --10 to --20_F. Step 5 — Elevate Unit Elevate unit per local climate and code requirements to provide clearance above estimated snowfall level and ensure adequate drainage of unit. ! CAUTION UNIT OPERATION HAZARD Failure to follow this caution may result in equipment damage or improper operation. Do not allow water and/or ice to build up in base pan. ! CAUTION UNIT OPERATION HAZARD Failure to follow this caution may result in equipment damage or improper operation. Locate the unit in such a way that it is stable in all circumstances including adverse weather conditions. 3