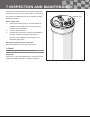
1
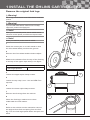
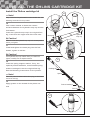
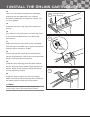
Öhlins Front Fork Cartridge Kit for
Motocross and Enduro
Owner’s Manual and General Mounting Instructions
Öhlins Headquarters Upplands Väsby, Sweden
Öhlins Racing AB - The Story
It was the 1970’s, a young man named Kenth
Congratulations! You are now the owner of an
Öhlin spent most of his spare time pursuing his
Öhlins product More than two hundred World
favourite sport: motocross.
Championships and other major world titles are
Being a careful observer, Kenth’s attention
was continously drawn to one specific detail -
definitive proof that Öhlins suspension offer
outstanding performance and reliability.
motocross bikes had more engine power than
Every product has gone through rigorous
their suspension could handle. It was not long
testing and engineers have spent thousands
before Kenth realised that better performance
of hours, doing their very best to use every
could be achieved by improved wheel
possible experience from our almost 40 years
suspension.
within the racing sport.
Öhlins Racing was established in 1976, and
The product that you now have in your
just two years later the company won its first
possession is pure racing breed that is built to
World Championship title. Despite being in the
withstand.
business for almost 40 years, the search for
By installing this product on your vehicle
perfection and new functions is still the main
you have made a clear statement… you are
focus of the company.
a serious rider with a focus on getting the
maximal handling ability and outstanding
feedback from your vehicle. Along comes the
fact that your Öhlins product will be a long
lasting friend, delivering the very best of comfort
and performance every time you go for a ride.
Go explore!
SAFETY PRECAUTIONS
General Warnings
SAFETY SYMBOLS
11 Note!
In this manual, mounting instructions and other
technical documents, important information concerning
safety is distinguished by the following symbols:
The shock absorber/front fork/steering damper is an
important part of the vehicle and will affect the stability.
11 Note!
The Safety Alert Symbol means: Warning! Your safety
is involved.
Read and ensure you understand the information in this
manual and other technical documents provided by Öhlins,
before using the product.
⚠⚠ Warning!
The Warning Symbol means: Failure to follow warning
instructions can result in severe or fatal injury to anyone
working with, inspecting or using the shock absorber, or
to bystanders.
11 Note!
Öhlins Racing AB can not be held responsible for
any damage to the shock absorber/front fork/steering
damper, vehicle, other property or injury to persons, if the
instructions for mounting, usage and maintenance are not
followed exactly.
✋✋ Caution!
The Caution Symbol means: Special precautions must be
taken to avoid damage to the shock absorber.
⚠⚠ Warning!
After installing the Öhlins product, take a test ride at low
speed to ensure your vehicle has maintained stability.
11 Note!
The Note Symbol indicates information that is important
regarding procedures.
⚠⚠ Warning!
If the suspension makes an abnormal noise, or the
function is irregular, or if you notice any leakage from
the product, stop the vehicle immediately and return the
product to an Öhlins dealer.
Product Specific Warnings
⚠⚠ Warning!
⚠⚠ Warning!
This product was developed and designed exclusively for
a specific vehicle model and shall only be installed on the
intended vehicle model in its original condition as delivered
from the vehicle manufacturer.
The product warranty shall only apply if the product
has been operated and maintained in accordance
with recommendations in this manual. If you have any
questions regarding usage, service, inspection and/or
maintenance please contact Öhlins.
11 Note!
When working with the Öhlins product, always read the
vehicle service manual.
11 Note!
This manual shall be considered as a part of the product
and shall accompany the product throughout its life cycle.
© Öhlins Racing AB. All rights reserved.
Any reprinting or unauthorized use without the written permission of Öhlins Racing AB is prohibited.
3
CONTENTS
Safety precautions.......................................... 3
Tools............................................................... 4
1 Install the öhlins cartridge kit........................ 5
Remove the original fork legs ..................... 5
Install the Öhlins cartridge kit...................... 6
2 Change spring............................................. 8
3 Setup........................................................... 9
4 Measure the spring preload......................... 10
5 Oil level and damping.................................. 11
6 Adjusters...................................................... 12
7 Inspection and maintenance........................ 13
TOOLS
OEM Fork cap tool*
Öhlins fork cap tool octagon
50 mm
Socket for OEM Base plug*
Socket for Öhlins Base plug*
Socket for Öhlins shaft end
12 mm
Pliers (for security snapring)
Plug
01890-01
* See the Mounting Instructions
4
1 INSTALL THE ÖHLINS CARTRIDGE KIT
Remove the original fork legs
⚠⚠ Warning!
We strongly recommend to let an Öhlins dealer install this
product.
⚠⚠ Warning!
If you work with a lifted vehicle, make sure that it is safely
supported to prevent it from tipping over.
4
11 Note!
When you work with this product, see the vehicle service
manual for vehicle specific procedures and important data.
6
11 Note!
Before you install this product clean the vehicle.
1
Place the motorcycle on a work stand so that
the front wheel barely touches the ground.
2
2
Remove the front wheel and the brake caliper.
3
Measure the distance from the top of the fork leg
to the top of the upper triple clamp, see figure.
Note measure
Fork height position
4
3
Loosen the upper triple clamp screws.
5
Loosen the top cap ½ turn. Use an OEM Fork
cap tool.
4
6
Loosen the lower triple clamp screws.
7
Remove the fork legs from the vehicle.
5
8
Clean the fork legs, make sure to clean
underneath the fork bottom.
9
Refer to the vehicle service manual to remove
the original front fork and spring from the fork
leg. Turn the fork legs upside down and pour out
all oil.
5
1 INSTALL THE ÖHLINS CARTRIDGE KIT
Install the Öhlins cartridge kit
10
11 Note!
Step 10 shall not be performed for some models. See the
Mounting Instructions for the product.
10
Use contact cleaner to clean the contact
surfaces between the hydraulic stop cup and the
fork bottom.
Insert the hydraulic stop cup in the original fork
leg, insert from the upper end of the fork tube.
Hydraulic
stop cup
Base plug
✋✋ Caution!
Make sure that the hydraulic stop cup is in correct position
before you tighten.
11
Install and tighten the base plug into the fork
bottom, tighten to 45 Nm.
✋✋ Caution!
If the hydraulic stop cup rotates when you install and
tighten, carefully use an impact machine.
12
12
Insert the spring support washer, if any, the
optional preload washer/s, recommeded spring
and the cartridge kit into the original fork leg.
Cartridge kit
See the Mounting Instructions for the product.
Spring
11 Note!
Place the preload washer/s below the spring, at the bottom
end of the fork leg.
13
Apply grease on the thread of the piston rod
Preload washer(s)
end.
Fork leg
13
6
1 INSTALL THE ÖHLINS CARTRIDGE KIT
14
Use a 12 mm socket to tighten the cartridge
14
shaft end into the base plug, turn counter
Cartridge shaft end/
Base valve plug
clockwise and tighten to maximum 18 Nm. Do
not over tighten.
15
Install the security snap-ring at the shaft end
groove.
16
Pour Öhlins Front fork fluid in the fork leg, refer
to the recommended setup in the Mounting
15
instructions.
17
Make sure that the front fork is fully extended.
Use the wrench (01892-01) to tighten the Öhlins
Security
snap-ring
fork top cap to maximum 10 Nm.
18
Check and set the rebound and compression
valves click positions, refer to the recommended
setup in the Mounting instructions.
19
Install the front fork legs into the triple clamps.
Set the fork legs at the same height position as
before. Refer to the vehicle service manual for
17
correct tightening torque.
20
Install the brake caliper and the front wheel.
Make sure that all removed parts are installed in
the same positions that they were before.
11 Note!
It is very important to tighten the triple clamps to the
correct torque, refer to the vehicle service manual.
7
2 CHANGE SPRING
1
Remove the original fork legs, see chapter 1.
2
2
Use a pair of pliers to remove the security snapring at the bottom of the fork.
Security
snap-ring
3
Turn clockwise to loosen the bottom end of the
cartridge kit.
4
Insert the plug (01890-01) into the fork bottom.
The plug will keep the oil in the fork while you
change the spring.
5
Remove the cartridge kit from the fork leg,
change the spring. Note the plastic preload
washer/s, if any.
3
11 Note!
Place the preload washer(s) below the spring, at the
bottom end of the fork leg.
6
Extend the cartridge kit as much as possible
with your hands.Install the cartridge kit into the
fork leg and push out the plug (01890-01).
5
7
4
Tighten the shaft end counter clockwise into the
fork bottom, tighten to 18 Nm.
6
Cartridge kit
8
Insert the security snap-ring.
9
Oil plug
Make sure the front fork is fully extended and
tighten the Öhlins fork top cap. Use wrench
(01892-01) and tighten to maximum 10 Nm.
✋✋ Caution!
Spring
Do not tighten to more than 10 Nm.
10
Install the front fork legs into the triple clamps.
Set the fork legs at the same height position as
before. Refer to the vehicle service manual for
correct tightening torque.
Preload
washer (s)
11
Install the brake caliper and the front wheel.
Make sure that all removed parts are installed in
the same positions that they were before.
Fork leg
8
3 SETUP
Check sag and ride height
1
Work on a flat surface. Put the motorcycle on
a workstand so that both wheels are off the
ground and the suspension is unloaded.
2
Mark, for example with a piece of tape, a point
immediately above the rear wheel axle.
3 Measure R1
Measure the distance from the marked point to a
fixed point, for example the wheel axle.
4 Measure R2
Put the motorcycle on the ground so that the
rear suspensions is slightly compressed. Repeat
the measurement process.
5 Measure R3
Sit on the motorcycle in normal riding position,
properly outfitted in your riding gear. Repeat the
measurement process.
Note measures
R1
R2
R3
Recommended measures
See the recommended free sag and ride height
measures in the Öhlins Mounting Instructions
for the shock absorber or in the vehicle
service manual.
If the ride height still differs from the
recommendations, you may need to change
spring, contact an Öhlins dealer for advice.
⚠⚠ Warning!
Incorrect spring rate may produce a fork angle that is too
steep or too flat. This in turn can lead to a tendency for
over- och understeering, which could seriously affect the
handling characteristics of the motorcycle.
9
4 MEASURE THE SPRING PRELOAD
Fork springs may differ in length. Thus we
2
recommend to measure the preload on each
Measure B
fork leg and install the required preload washers
3
to get the correct measure.
Measure C
Preload less than 0 mm will make the fork
springs loose when the front wheel is off the
4
ground, which can increase the risk of wear
Calculate preload:
inside the fork.
Preload = B - A - C
Front Forks MY 2014
Note measure
Recommended minimum spring preload: 4 mm
A
✋✋ Caution!
B
Preload washers must be placed below the spring,
otherwise they will restrict oil flow and the fork may break.
C
Preload B-A-C =
Measure the spring preload according to the
5
steps 1-5 and see the figure below:
For recommended preload refer to the setup
data in the Mounting Instructions or contact an
1 Measure A
Öhlins dealer for advice. To adjust the preload
Fork outer tube slid down to stop
you add or remove washers below the spring.
MY ≤2013: Fork outer tube slid down to stop
and cartridge left with full length. The internal
gas pressure extends the cartridge.
MY 2014 (MX only): The internal spring will
prevent the gas pressure from extending the
cartridge, thus you must extend the cartridge
with your hand 0-4 mm.
Measure the spring preload
1
A
2
B
3
C
10
5 OIL LEVEL AND DAMPING
To set the oil level
Proper oil level is a balance between sufficient
Additionally, lower oil level will let the fork dive
bottoming resistance and comfort. Higher oil
longer into the stroke during braking before
level will give better bottoming resistance, but
additional damping effect stiffens up the stroke,
might reduce comfort over smaller bumps.
see position C in the figure below.
Very fast riders may appreciate the additional
Bottoming issues
damping from a higher oil level on all parts of
Increase oil level in steps of 10 ml until
the track, as this keeps the fork running higher
unpleasant bottoming no longer occurs, or until
in the stroke, withstanding their additional forces
comfort on rest of the track becomes too harsh.
due to their higher velocities.
Harsh fork
11 Note!
Try to decrease oil level in steps of 10 ml to
Since small amounts of oil have great influence on the
performance, make sure to service a fork that leaks
immediately. We highly recommend to have an Öhlins
dealer service the fork.When you drain the fork, it is very
important to let all oil drain out to obtain a proper oil level
in the fork after service.
gain comfort until harshness no longer occurs or
bottoming resistance gets too low.
A
B
C
more oil
less oil
11
6 ADJUSTERS
Compression damping adjuster
Compression damping adjuster
Use a 3 mm Allen key to adjust the compression
damping adjuster.
closed
(position zero [0])
open
Rebound damping adjuster
Rebound damping adjuster
Use a 3 mm Allen key to adjust the rebound
damping adjuster.
closed
(position zero [0])
open
To set
The adjusters have a normal right hand thread.
Turn the damping adjusters gently clockwise to
fully closed (pos. zero [0]). To open, turn counter
clockwise, and count the clicks until you reach
the recommended number. For recommended
clicks see the Setup data in the Mounting
instructions or contact an Öhlins dealer for
advice. To adjust the static sag you need to
change to a softer or harder spring rate.
✋✋ Caution!
Turn the adjusters gently not to damage delicate sealing
surfaces.
11 Note!
The total front fork stroke may differ from the original
stroke, so that more or less of the steel tube will be
visible when the fork is fully compressed.
12
7 INSPECTION AND MAINTENANCE
Preventive maintenance and regular inspection
reduces the risk of poor performance. If there is
any need for additional service, please contact
Breather plug
an Öhlins dealer.
After every ride
1.
Place the motorcycle on a work stand so
that the wheels barely touch the ground,
suspension unloaded.
2.
Let the bike cool off.
3.
Aerate the front fork; Loosen the Breather
plug to release excessive pressure in
the front fork. Make sure to tighten the
Breather plug after.
Recommended service intervals
Recommended service every 20 hours
11 Note!
Contact an approved Öhlins dealer for service.
Disposal
Hand over your discarded Öhlins products to an
approved Öhlins dealer for proper disposal.
13
NOTES
14
NOTES
15
Öhlins Owner’s Manual MX/Enduro Cartridge | Part No. 07296-90_3 | Issued 2014-02-11 | © Öhlins Racing AB
Your Öhlins retailer:
Öhlins Racing AB
Box 722
SE-194 27, Upplands Väsby
Sweden
Phone: +46 (0)8 590 025 00
Fax: +46 (0)8 590 025 80
www.ohlins.com