1
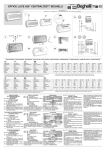
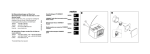
AF-JA/JZ-141215 Modell: SLR-11 99 170 04 SE Model: SLR-11 99 170 04 EN Trådlös RGB-kontroll Wireless RGB Controller SLR-11 SLR-11 För montering i Ø60 mm apparatdosa Endast avsedd för inomhusbruk Används med EXTA FREE sändare SLR-11 kontroll är utformad för att styra LED RGB-dioder i en krets med gemensam "+" potential (RGB-armaturer i LEDIX-serien, RGB-strippar och moduler) som drivs med 10-14V DC. Kontrollen är trådlös och används med vissa EXTRA FREE sändare eller med särskilt avsedd P-260 fjärrkontroll. Funktioner: • 5 program: färgval (för att välja 1 av 10 förprogrammerade färger), justering av ljusflöde (dimring), automatiskt färgändringsläge steglöst (FLOATING), automatiskt färgändringsläge i steg (STROBE) – endast för P-260 fjärrkontroll, steglöst färgval (RAINBOW) – endast för P-260 fjärrkontroll. • Trådlöst styrsystem (EXTA FREE sändare och särskilt avsedd P-260 fjärrkontroll). • 3 st kanaler med transistorstyrning av MOSFET-typ med maximalt 4A per kanal. • 9-bitars styrsystem garanterar steglös färgändring i FLOATING-läge. • Stor räckvidd (upp till 230 m i öppet område). • Låg strömförbrukning i standbyläge – kontrollen är konstruerad för kontinuerlig drift. Mounting in a Ø60 mm junction box Mounting indoor only Co-operation with EXTA FREE transmitters SLR-11 controller is designed to control LED RGB diodes in the circuit with common “+” potential (RGB LEDIX series standard fittings, RGB strips and modules) supplied with 10÷14V DC. The control is carried out wireless in cooperation with selected EXTRA FREE system transmitters or with dedicated P-260 remote control. Characteristic features: • 5 programmes: colour selection (to select 1 of 10 colours defined by the producer), brightening/dimming, fluent automatic colour change mode (FLOATING), step by step automatic colour change (STROBE) – only for the P-260 remote control, fluent colour selection (RAINBOW) – only for P-260 remote control, • wireless control system (EXTA FREE transmitters and dedicated P-260 remote control), • 3 transistor outputs (MOSFET) with a maximum current capacity of 4 A per each output, • 9-bits control system guarantees fluent colour change in FLOATING mode, • wide operation range (up to 230 m in the open area), • low power consumption in the standby mode – controller is designed for continuous operation Beskrivning DESCRIPTION SLR-11 kontroll är utformad för att användas tillsammans med RGB LED-diodarmaturer i LEDIX-serien och med andra RGB-produkter som drivs med 10-14V DC (strippar, moduler och LED RGB-armaturer) i en krets med gemensam "+" potential. Kontrollen är trådlös och används med vissa EXTRA FREE sändare eller med särskilt avsedd fjärrkontroll P-260. Beroende på sändare så styr kontrollen funktionerna: sätta på/stänga av, steglös justering av ljusflöde (dimring), val av 10 förprogrammerade färger, steglöst färgval och programmen för automatiskt färgändringsläge steglöst (FLOATING) och i steg (STROBE). Funktioner: • Trådlöst styrsystem för RGB LED-armaturer i LEDIX-serien. • Sätta på/stänga av, steglös justering av ljusflöde (dimring), val av 10 förprogrammerade färger, steglöst färgval. • Programval: automatiskt färgändringsläge steglöst (FLOATING) och automatiskt färgändringsläge i steg (STROBE). • Tiden för FLOATING och STROBE programmen justeras i 10 steg. • Används med sändare i EXTA FREE trådlösa styrsystem och med särskilt avsedd fjärrkontroll P-260. • Tack vare 9-bitars gemensam "+" potential blir ljusflödes-/dimningsfunktionen väldigt mjuk. • Låg strömförbrukning i standbyläge (0,25W) – kontrollen är konstruerad för kontinuerlig drift. SLR-11 controller is designed for cooperation with LED standard lamps with RGB LEDIX series diodes and with other RGB products supplied with 10÷14V DC (tapes, strips, modules and LED RGB lamps) in the circuit with common “+” potential. The control is carried out wireless in cooperation with selected EXTA FREE system transmitters or with a dedicated P-260 remote control. Depending on the transmitter the controller controls the functions: switching on/ switching off, fluent change of the illumination power, selection 1 of 10 colours with factory configuration, fluent colour selection and the programs for fluent automatic colour change (FLOATING) and step by step automatic colour change (STROBE). The controller features: • wireless control system for LED RGB standard fittings of the LEDIX system, • to carry out the functions as follows: switching on/ switching off, fluent change of the luminous flux intensity, selection 1 of 10 colours with a default setting, fluent colour selection, • programme realisation: automatic colour change (FLOATING) and step by step colour change (STROBE), • time for FLOATING and STROBE programmes is adjusted during 10 steps, • cooperation with transmitters of the EXTA FREE wireless control system and with a dedicated P-260 remote control, • 9-bit fast PWM outputs allow the brightening / dimming function to be very fluent, • low power consumption in the standby mode (0.25W) – controller is designed for continuous operation. Produktöversikt APPEARANCE Utgångsanslutningar (RGB+) för anslutning till RGB-produkter Optisk indikering vid överföring Output terminals (RGB+) for connection with RGB products Programmeringsknapp Optic signalling of the controller’s operation Programming button Anslutning till LED-driver (+, -) Power supply terminals (+, -) Montering MOUNTING OBS! Enheten är avsedd för enfas-installation och måste installeras i enlighet med de standarder som gäller för respektive land. Installation, anslutning och kontroll bör utföras av en behörig elektriker, som följer instruktionerna i manualen och enhetens funktioner. 1. Se till att spänningen är frånslagen. 2. Kontrollera att det inte finns någon spänning på anslutningskablar med hjälp av särskild mätutrustning. 3. Anslut nätadaptern till 230V AC. 4. Anslut kablarna till rätt styrplintar enligt kopplingsschemat. 5. Montera mottagaren i Ø60 mm apparatdosa. 6. Slå på nätadaptern från elnätet. 7. Lägg till valda sändare till mottagaren (beskrivning under rubriken PROGRAMMERING SÄNDARE) och försäkra dig om att det fungerar. CAUTION! The device is designed for single-phase installation and must be installed in accordance with standards valid in a particular country. Installation, connection and control should be carried out by a qualified electrician, who act in accordance with the service manual and the device functions. 1. Make sure that the power is disconnected. 2. Check that there is no voltage on connection cables by means of a special measuring equipment. 3. Connect the power supply to 230V AC. 4. Connect the cables to the appropriate control terminals in accordance with the connection diagram. 5. Mount the controller in the Ø60 mm junction box. 6. Switch on the power supply from the mains. 7. Add selected transmitters to the controller (a description is in TRANSMITTERS’ PROGRAMMING section) and check their proper functioning. Kopplingsschema DIAGRAM OBS: Nominell utspänning av nätadaptern (10-14V DC) och dess nominella uteffekt måste justeras för den LED-armatur som är ansluten till kontrollen. CAUTION: Nominal output voltage of the power supply (10÷14V DC) and its nominal output power must be adjusted for LED light source connected to the controller. B blå Exempel med RGBarmatur i LEDIX-serien 230V AC B blue Example of the RGB LEDIX series fitting G grön R röd + 14V DC 230V AC G green R red + 14V DC MAX. STRÖMKAPACITET: Upp till 25W per kanal för LED-produkter RGB som drivs med 10V Upp till 30W per kanal för LED-produkter RGB som drivs med 12V Upp till 35W per kanal för LED-produkter RGB som drivs med 14V MAXIMUM CURRENT CAPACITY: Up to 25W per channel for LED RGB products supplied with 10V Up to 30W per channel for LED RGB products supplied with 12V Up to 35W per channel for LED RGB products supplied with 14V Tekniska data Technical data Nominell matningsspänning: 10-14V DC Nominell effektförbrukning: 0,22W Antal kanaler: Max. strömstyrka/kanal: Styrningssignal: Funktioner: Program: Steg (FLOATING och STROBE) 3 2,5A PWM 9-bitar Sätta på/stänga av, Val av 10 förprogrammerade färger Justering av ljusflöde (dimring) Steglöst färgval – endast med P-260 fjärrkontroll Automatiskt färgändringsläge steglöst (FLOATING) Automatiskt färgändringsläge i steg (STROBE) – endast med P-260 fjärrkontroll 10 (till 50 min.) Styrning: Utvalda EXTA FREE* system eller P-260 sändare Frekvens: 868,32 MHz Överföring: Kodning: Max. antal sändare: Räckvidd: Omgivningstemperatur: Kapslingsklass: Skyddsklass: Mått: Vikt: Standarder: Envägs, utan kontroll Adressering 32 Upp till 230 m i öppet område -10 till +55ºC IP20 III 47,5x47,5x20 mm 27 g PN-EN 60669; PN-EN 61000 *SLR-11 kontrollen fungerar inte tillsammans med en tryckknappssändare t.ex. RNL-01 Nominal supply voltage: Nominal power consumption: Number of channels: Max. current in the channel: Controlling signal: 10 ÷ 14V DC 0,22W 3 2,5A PWM 9-bit Functions: Switch on/ switch off Selection 1 of 10 colours with factory configuration Change of the luminous flux intensity Fluent colour selection – only for the P-260 remote control Programs in operation: Fluent automatic colour change (FLOATING) Step by step automatic colour change (STROBE) – only for the P-260 remote control Steps (FLOATING and STROBE) 10 (to 50 min.) Control: Radio transmission: Transmission method: Coding: Max. number of transmitters: Range: Ambient temp. range: Casing protection degree: Protection class: Dimensions: Weight: Reference standard: Selected EXTA FREE* system or P-260 transmitters 868,32 MHz One-way without confirmation Yes – transmission with addressing 32 Up to 230 m in the open area -10 ÷ +55ºC IP20 III 47,5 x 47,5 x 20 mm 27 g PN-EN 60669; PN-EN 61000 *the SLR-11 controller does not cooperate with one push-button transmitters e.g. RNL-01 Tillämpning APPLICATION Exemplet visar hur man använder LEDIX-armaturer med RGB-radiokontroll och SLR11 trådlös RGB-kontroll. Armaturerna styrs med P-256/8 fjärrkontroll. Med hjälp av fjärrkontrollen är det möjligt att sätta på/stänga av alla 8 färger som lagts in på knapparna 1-8. Man kan också aktivera steglöst färgändringsläge (FLOATING) eller färgändringsläge i steg (STROBE). Kontrollen används med RNK-04 tryckknappssändare. Med hjälp av denna sändare kan RGB-stripparna stängas av/sättas på eller ljusflöde justeras (dimning) eller FLOATING-läge kan aktiveras. Kontrollen är utformad för montering i Ø60 mm apparatdosa. The application shows the method to use the LEDIX series fittings with RGB radio controller and RGB SLR-11 wireless controller. The fittings cooperate with the P-256/8 remote control. From the remote control level it is possible to switch on/switch off 1 of 8 colours added to 1÷8 keys or it can be possible to activate the fluent mode (FLOATING) or step by step mode (STROBE) for the colour change. The controller cooperates with a RNK-04 push-button transmitter. By means of this transmitter the RGB strips can be switched on/switched off or brightened/dimmed or the FLOATING mode can be released. The controller is designed for mounting in a typical junction box Ø=60 mm. RÄCKVIDD OPERATION TABLE Modell RNK-02 RNK-04 P-257/2 P-260 Symbol RNK-02 RNK-04 P-257/2 P-260 SLR-11 180 180 180 200 SLR-11 180 180 180 200 OBS: Den angivna räckvidden avser öppet område i ideala förhållanden utan några hinder. Om hinder finns mellan sändare och mottagare, är det lämpligt att minska avståndet enligt följande riktlinjer; tegel: från 10 till 40%, trä och gips: från 5 till 20%, armerad betong: från 40 till 80%, metall: från 90 till 100%, glas: från 10 till 20%. Medel- eller högspänningskraftledningar ovan eller under jord, radio- eller TV-sändare, mobilmaster nära utrustningen kan också påverka räckvidden negativt. CAUTION: The given range concerns open area - an ideal condition without any natural or artificial obstacles. If there are some obstacles between a transmitter and a receiver, it is advisable to decrease the range according to: bricks: from 10 to 40 %, wood and plaster: from 5 to 20 %, reinforced concrete: from 40 to 80 %, metal: from 90 to 100%, glass: from 10 to 20 %. Over- and underground medium and high electrical power lines, radio and television transmitters, GSM transmitters set close to a device system have also a negative influence on the range. PROGRAMMERING SÄNDARE TRANSMITTERS PROGRAMMING Trådlös EXTA FREE sändare Wireless EXTA FREE system transmitters Tryck på den första sändarens tryckknapp och släpp upp den. Den röda LED-dioden börjar blinka, efter ett tag lyser den med fast sken. Tryck ett längre tryck på PROG tryckknappen på SLR-11 enheten tills den röda LED-dioden börjar lysa. Släpp sedan upp PROG tryckknappen. Tryck på den andra sändarens tryckknapp och släpp upp den. Den röda LEDdioden börjar blinka och sedan slocknar den – SÄNDAREN ÄR TILLAGD. Press PROG push-button of SLR-11 device for a longer time until LED red diode switches on (constant signal). Next release PROG pushbutton. Press and release the first transmitter’s pushbutton. LED red diode switches on (first the signal pulsates, next the signal is constant). Press and release the second transmitter’s push-button. LED red diode switches on (the signal pulsates) and next it switches off - THE TRANSMITTER IS ADDED. Exempel på programmeringsprocedur med användning av P-257/2 fjärrkontroll. Proceduren för resten av de trådlösa EXTA FREE sändarna är analog. An exemplary programming procedure with the use of P-257/2 remote control. The procedure for the rest of radio EXTA FREE transmitters is analogous. P-260 fjärrkontroll Touch P-260 remote control Tryck ett längre tryck på PROG tryckknappen på kontrollen tills den röda STATUS-dioden börjar lysa. Släpp sedan upp PROG tryckknappen. Tryck ett längre tryck på PÅ/AV-knappen på P-260 fjärrkontrollen. Den röda STATUS-dioden på kontrollen börjar blinka, efter ett tag lyser den med fast sken. Släpp upp PÅ/AVknappen på P-260 fjärrkontrollen. Den röda STATUS-dioden börjar blinka och sedan stängs den av – SÄNDAREN ÄR TILLAGD. Press PROG push-button in the controller for a longer time until STATUS red diode switches on (constant signal). Next release PROG push-button. Press the switch on/switch off push-button of the P-260 remote control for a longer time. STATUS red diode switches on in the controller (first signal pulsates, next the signal is constant). Release switch on/switch off push-button of the P-260 remote control. STATUS red diode switches on (the signal pulsates), next it switches off - it means the TRANSMITTER IS ADDED. OBS: 32 olika sändare kan läggas till SLR-11 kontrollen. Om fler än 32 sändare läggs till, blinkar STATUS-dioden några gånger medan de läggs till. CAUTION: 32 different transmitters can be added to a single SLR-11 controller. In case of adding more than 32 transmitters, STATUS diode will flash a few times while adding them. Borttagning av trådlös Sändare RADIO TRANSMITTERS DELETION Tryck ett längre tryck på PROG tryckknappen på SLR-11 kontrollen. Efter 5 sekunder börjar den röda LED-dioden att blinka och sedan slocknar den. Släpp upp tryckknappen på SLR-11 enheten – MINNET ÄR RADERAT. Press PROG push-button in SLR-11 controller for a longer time. After 5 seconds LED red diode switches on (the signal pulsates) and then it switches off. Release the push-button in SLR-11 – THE MEMORY IS DELETED. Användning OPERATION Användning med EXTA FREE sändare (exempel med P-257/2) • Kort tryck på knapp 1 – sätta på/stänga av. • Långt tryck på knapp 1 (>3 s) – justering av ljusflöde (dimring) i följande ordning: ljusare – stop – mörkare. Funktionen finns även i FLOATING läge. • Kort tryck på knapp 2 – val av 10 förprogrammerade färger (se tabell). • Långt tryck på knapp 2 (>3 s) – enheten hamnar i FLOATING läge. • Kort tryck på knapp 2 i FLOATING läge – stegändring (1-10) för FLOATING läge. • Varje ny hastighet indikeras med blinkande av last som är ansluten till kontrollens utgång. Övergången mellan hastighet 1 och 10 indikeras med upprepad blinkning av lasten. Hastighet 1 växlar färg snabbast (hela cykeln tar ca 2 minuter), hastighet 10 växlar färg långsammast (hela cykeln tar 50 minuter). • Långt tryck på knapp 2 (>3 s) i FLOATING läge – gå ur detta läge. • Kontrollen kommer ihåg den senaste inställningen av läge och inställning av nivån på ljusstyrkan efter avstängning med hjälp av tryckknapp 1. Cooperation with the transmitters of the EXTA FREE system (example of P-257/2) • Press short push-button 1 – switching on/ switching off. • Press push-button 1 for a longer time (>3 s) – brightening/dimming in following sequence: brighten – stop – dim. The function is available also in the FLOATING mode. • Press short push-button 2 – selection 1 out of 10 colours from the default setting (see the table). • Press push-button 2 for a longer time (>3 s) – entry to the FLOATING mode. • Press short push-button 2 in the FLOATING mode – change of the step (1-10) for the FLOATING mode. • Each change of the step is signalled by a flashing of the load connected to the controller output. The transition between step 1 and 10 is signalled by repeated flashing of the load. The step 1 means that the colour change is the fastest (the whole cycle takes about 2 minutes), the step 10 means that the colour change is the slowest (the whole cycle takes about 50 minutes). • Press push-button 2 for a longer time (>3 s) in the FLOATING mode – exit of this mode. • The controller remembers the last setting of the mode and setting of the level of the luminous flux intensity after switching off by means of push-button 1. Knapp 1 och 2 Button 1 and 2 Vid användning av mer än en mottagare SLR-11, vänligen notera att den inte får placeras närmare än 20 cm från en annan mottagare på grund av störningsrisken. Det elektromagnetiska bruset från andra källor kan störa mottagarnas funktionen och orsaka mindre synkronisk drift ibland. Om detta inträffar är det nödvändigt att stänga av och sätta på (slå på) strömmen. When using more than one receiver SLR-11 please note that must not be placed closer more than 20 cm from another receiver because of the possibility of interference. The electro-magnetic noise from other sources can disturb proper operation of receivers causing less synchronic working sometimes. In that case switching off and on of the supply is necessary. Tabell med kontrollens förprogrammerade färger Colour table defined in the controller Användning med P-260 fjärrkontroll Sätt på en funktion/ett program genom att trycka på en av knapparna på fjärrkontrollen P-260 : • PÅ/AV – sätta på/stänga av. • Öka ljusflöde/Minska ljusflöde – genom att trycka på dessa knappar så kan man öka eller minska ljusflödet steglöst (dimring). Denna funktion är tillgänglig i FLOATING och STROBE lägen. • FLOATING – sätta på/stänga av programmet för automatisk färgändring steglöst. • STROBE – sätta på/stänga av programmet för automatisk färgändring i steg. • Pekplatta – möjliggör steglös färgändring. Om det aktiva läget är FLOATING eller STROBE, kommer följande knapptryckningar på respektive knapp att öka hastigheten på färgväxlingen (från 1 till 10 steg). Varje ny hastighet indikeras med blinkande av last som är ansluten till kontrollens utgång. Övergången mellan hastighet 1 och 10 indikeras med upprepad blinkning av lasten. Hastighet 1 växlar färg snabbast (hela cykeln tar ca 2 minuter), hastighet 10 växlar färg långsammast (hela cykeln tar 50 minuter). Cooperation with the P-260 remote control Switching on a suitable function/programme is carried out by pressing suitable pushbuttons of the P-260 remote control: • ON/OFF - switching on/ switching off. • Brightening/dimming function – pressing this push-button, the function carries out the fluent change of the luminous flux intensity. This function is available in FLOATING and STROBE modes. • FLOATING – activation/deactivation of the programme for automatic and fluent colour change. • STROBE – activation/deactivation of the programme for automatic and step by step colour change. • TOUCH AREA – allows the colour selection in a fluent way. If the active mode is the FLOATING or STROBE mode then the following pressing of the push-buttons described as FLOATING, STROBE carries out the speed change (from 1 to 10 step) in this mode. Each change of the step is signalled by flashing of the load which is connected to the controller’s output. The transition between step 10 and 1 is signalled by a repeated flashing of the load. The step 1 means that the colour change is the fastest (the whole cycle takes about 120 s), step 10 means that the colour change is the slowest (the whole cycle takes about 50 minutes). Öka ljusflöde Brightening PÅ/AV ON/OFF FLOATING-läge STROBE-läge FLOATING mode Minska ljusflöde Dimming Pekplatta Steglöst färgval Touch field Fluent colour selection STROBE mode