1
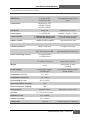
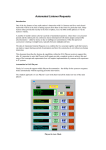
LGZ Broadcasting Tech Usage examples Tech Specs Instructions Troubleshooting [ JUST.REPLAY USER MANUAL] This document contains technical information on the just.REPLAY Device. Through examples and descriptions the features of the device are explained so that users can learn to operate it properly, safely and at an optimal capacity. LGZ Broadcasting Tech copyright. Just.REPLAY is a registered trademark. Manual version from May 2012 [JUST.REPLAY USER MANUAL] Purpose and use The just.REPLAY’s primary purpose is to offer to the operator fast and simple ways to deliver slowmotion replays to a producer. A single user shall easily be able to create high quality professional replays at chosen speeds from any of the available inputs. The graphical interface layout, the controller layout and the available features were all designed and implemented with the purpose of making the device as efficient, simple and straightforward as possible. The aim to steadily and easily create live replays layed the ground on which we built this device. More than that, we also wanted to give users a chance to create and playback highlights and clips. A thorough yet intuitive interface was therefore designed allowing the creation and management of clips and playlists. In this following user guide you’ll find examples and descriptions. You’ll also find suggestion as to how the workflow can be maximized and you’ll learn how to get out as much possible from all the features. 2 LGZ Broadcasting Tech [JUST.REPLAY USER MANUAL] Table of Content Purpose and use .............................................. 2 1. 2. 3. 4. 4.2.3 Technical specifications ........................... 4 4.3 CLIP MODE ............................ 15 Clip system .................................... 15 1.1 Transport and installation ............... 4 4.3.1 Create a clip .......................... 15 1.2 Power supply ................................... 4 4.3.2 Clip parameters..................... 15 1.3 Cooling system ................................ 4 4.3.3 Playlists ................................. 16 Technical Specifications table ..................... 5 4.3.4 Playing playlists ..................... 16 Usage examples ....................................... 6 4.3.5 Copying clips from a playlist . 16 2.1 Real-time replays ............................. 6 4.4 Sound recording ............................ 17 2.2 Editorial replays ............................... 7 4.5 Playback speed.............................. 17 2.3 Offside line replay ........................... 8 4.6 Configuration menu ...................... 17 2.4 Save time with PREVIEW MODE ...... 8 5. Kontrollens funktioner .......................... 18 2.5 Graphics and playback device ......... 8 6. Graphical user interface........................ 20 Getting started - settings ......................... 9 6.1 Overview ...................................... 20 3.1 Format choice .................................. 9 6.2 Audio-video information.............. 20 3.2 Empty disks ...................................... 9 6.3 Workflow ...................................... 21 3.3 Clip Settings ................................... 10 6.4 Clip information ............................ 21 3.4 Transition setting ........................... 10 6.4.1 CLIP OVERVIEW ..................... 21 3.5 Preview setting .............................. 10 6.4.2 LIST OVERVIEW ..................... 22 3.6 Sound setting ................................. 10 6.4.3 ACTIVE PLAYLIST ................... 22 3.7 Timecode setting ........................... 10 7. Super Slowmotion................................. 24 3.8 Save data locally ............................ 11 8. Troubleshooting .................................... 25 3.9 Interpolate setting ......................... 11 3.10 RECORD and EDIT MODE ............... 11 3.11 Syncronizing signals ................... 11 3.12 Sockets overview .......................... 12 MODES and features ............................. 14 4.1 Playing modes................................ 14 4.1.1 JOG......................................... 14 4.1.2 PLAY ....................................... 14 4.2 Work modes .................................. 14 4.2.1 STANDARD MODE.................. 14 4.2.2 PREVIEW MODE ..................... 14 LGZ Broadcasting Tech | version 1.3 3 [JUST.REPLAY USER MANUAL] 1. Technical specifications 1.1 Transport and installation The device is always supposed to be placed in a suitable standard 19” rack where it is properly mounted and given good airflow. During transport, the device must be steadily screwed in a protective case to avoid any potential damage. The case can then be placed in any direction as long as it is properly fastened to avoid sudden shocks that could damage the device. When used, the device must be in a horizontal position and must not be moved. It must be mounted in a rack or case. Use the chassihandles when moving the device between the case and a rack or vice-versa and be careful not to hit its backside on any surface to avoid damaging the sockets. 1.2 Power supply The device is turned on and off by pressing the ON/OFF switch on the devices front. The switch will be lit white when the device is on. It can take up to a minute for the device to start up or shut down properly. The device should be fed adequate and stable power AC 100-240V 12A 50/60Hz. This practically means that it accepts power from standard sockets in most countries but make sure that what you connect it too will indeed not blow its fuse. Most importantly make sure that it is delivered stable power. In the event of a power failure, all data prior to the loss of power (up to 10 seconds before the actual loss of power) will be safely stored. 1.3 Cooling system The device theoretically generates a maxmimum of 2218 BTU/hour. In practice, that number is lower but it can be used as a guideline. The device is cooled by several fans ensuring proper airflow trhough the device. Air is sucked in at the front before it is filtered and sent out at the back of the device. It is important to leave room in the front and the back of the device to allow for proper air circulation! OBS! Do not cover either front or backside of the device for proper air circulation! 4 LGZ Broadcasting Tech [JUST.REPLAY USER MANUAL] Technical Specifications table LGZ Replay Comments Diskspace SSD drives 1 disk per input 8-10 hrs in HD 16-20 hrs in SD Videoformat SD-SDI PAL 576i HD-SDI 720p50 HD-SDI 1080i50 Ref Signal The exact time may vary. The specified times are per input. Video Ref Blackburst or Trisync 3 x HD/SD-SDI 1080i50 / 720p50 / 576i25 Video Outputs 3 x HD/SD-SDI video loopar 1 x HD/SD-SDI PGM output 4 audio channels per input 4 in the output as well ON/OFF switch 1 switch on the frontside Light white when ON Screen socket DVI-D To connect the LCD screen 1920 x 1080 16:9 Or higher both ways XBlock LGZ controller model 001. Connects via USB Encrypted protocol protecting against illegal use. Video Inputs Screen resolution Controller Other controlling devices Dimensions Weight Power supply Temperature (in use) 1 x USB keyboard 1 x USB mouse 4U 19” rack, 50 cm deep (17,8 x 48,3 x 50 cm) Standard dimensions for easy setup in racks. 12 kg Light chassi for easy handling 650W power supply 100-240V AC CE marked reliable Corsair power supply 10 ~ 45°C Temperature (storage) - 30 ~ 60°C Air humidity (in use) 20 % ~ 80 % Shock resistance (storage) 5G Shock resistance (lagring) 70G Heat build-up Air filter 2218 BTU/hour 1 x 7mm thick dust filter Altitude (in use) -20 ~ 3000m Altitude (storage) -20 ~11000m Sound level Max value: 3,412 x 650 ~ 45 dB dB SPL level at 1m distance LGZ Broadcasting Tech | version 1.3 5 [JUST.REPLAY USER MANUAL] 2. Usage examples At live events, weither these are live-to-tape or livefeeds, producers often want instant replays that can be classified into two types. Real-time replays and editorial replays. The first type can be described as replays (often in slow-motion) of events that took place within 30 seconds of the operator showing them. Typically those will be replays of fouls or goals that just took place and they will often be shown in slow-motion from several angles. The second type can be described as replays that show one or several clips most often played back during commercial breaks or longer pauses. Those can often be highlights but also specific single replays of events requested by the event commentators. The most basic real-time instant replay can be achieved simply by moving the playback position with the JOGWHEEL to an instant of your choice. From there playback can be started by pressing PLAY or moving the SPEED lever. For the creation of playlists and highlights it is good practice to create clips of events and name them and place them into pre-made lists (more on it later). 2.1 Real-time replays On the just.REPLAY device, an event can be theoretically replayed from three angles (the device having three inputs). Most commonly an event will be shown several times, once per angle in which it looks good. Following are simple examples as to how such replays can easily be achieved. As a first step, while waiting for something to happen, users should preferably have the SPEED lever positioned on 0% and be in LIVE mode. When something then happens which you want to playback: - For the simplest of replays; use the JOGWHEEL to jog back to an instant before the event took place. Select the input you want to show it in. Start the playback by moving the lever or pressing PLAY. During plyback the angle can continually be changed by pressing any of the angles. - To play back a more advanced replay showing the event once per available angle; jog back with the JOGWHEEL to an instant before the event. Select the angle you’l want to show first. Press PRW to activate the PREVIEW MODE. Select the next input you’ll want to show. Jog again to a suitable instant for that angle. Start playback (PLAY or the lever) and at a time of your choosing press TAKE. This will mix in/cut in your second angle. You can now prepare your third angle and press TAKE once you want that one to show. Simply press PRW again to exit preview mode once you’re done. 6 LGZ Broadcasting Tech [JUST.REPLAY USER MANUAL] 2.2 Editorial replays When there is time, the operator can try to make ready editorial replays. By creating clips and arranging those into cliplists and highlights data can be made easily available for replays at later suitable times. In an icehockey game for example, an impressive tackle may take place without the game being interrupted thus not giving the producer time to show the replay right away. It could then be a good idea to save it as a clip so that if and when the commentators bring it up at a later time, you can quickly go back to it and play it back. - A clip is defined by it’s IN and OUT marks. Those are set in the timeline by pressing MARK IN and MARK OUT on the controller. Once both marks are defined and seen on the timeline, the clip can be created by pressing the LOG button. Pressing LOG will put your new clip at the bottom of the ALL CLIPS LIST (bottom left on the screen). It is now a good idea to name it right away using the keyboard. It is also now a good idea to send it to a playlist of your choosing by selecting a specific playlist and pressing SEND CLIP. This puts the newly created clip at the end of the selected playlist. Once inside a playlist, clip settings can be tuned and changed to fit in with the other clips thus creating a playlist of your choosing. The angle from which it will play back can be set by pressing SET INPUT. A clip also has a GTN (Go To Next) setting which can either be true or false. If true, during playback, once the clip reaches its end it will jump to the next clip and continue playing from there. If GTN is false it will, depending on what you’ve set your POST ROLL setting on, either stop playback or continue playing there (without jumping to the next clip). If all clips in a playlist are set with GTN on true, the list will loop infinitely. The transition between clips can be set to MIX or CUT by pressing SET MIX. With the help of these settings and by using the buttons MOVE UP and MOVE DOWN, clips can be set, rearranged and organized into lists of your choosing to create highlights or just ready certain clips for easy access. A hint is to beforehand create and name playlists meant to hold certain types of clips making it easier for the operator to keep the worflow organised. When a playlist is ready to be played and you have no more settings you want to change, the playlist can be loaded by pressing LOAD (SHIFT + GOTO) which sets the device in CLIP MODE. Once a playlist is loaded it is ready for playback. At any moment from the time it is loaded you can use the buttons BACK or NEXT to i.e mix to the next clip ahead of time. LGZ Broadcasting Tech | version 1.3 7 [JUST.REPLAY USER MANUAL] 2.3 Offside line replay A customer requested feature added in all products since 2012 (software version 3.1 or higher) is the possibility to jog to every field instead of only making the individual frames available. We also made it possible to simply show replays of offside events in sports like football (soccer). When an offside occurs, choose the angle on which a camera filming the longside of the court is recorded. Use the jogwheel to jog to the point in time where the player kicking the ball to offside touches the ball. Press the OUT button on the controller. Jog back a few seconds and start playing back the data by moving the lever or pressing the PLAY button. The playback will automatically stop on the OUT point. It can then be resumed by pressing PLAY again or moving the lever again – thus creating a profsionnal and field accurate replay of the offside situation. Showing your customers if the referee indeed made a correct assessment of the situation. 2.4 Save time with PREVIEW MODE As an operator it is important to use what little time there is. Events happen all the time but during commercials, breaks or longer pauses you will often be expected to play back longer playlists or highlights. By using the PREVIEW MODE once you’ve started playing them, you can continue creating clips and organizing playlists all the while your highlights are playing back. You can see that the PREVIEW MODE is engaged when the blue LED is lit on the controller. While it is on you can create clips, jog and switch inputs without affecting hte playback. You can simply come out of it by pressing PRW again. OBS! Be careful not to use the lever in PREVIEW MODE as the lever will always, not matter the active mode control the speed at which the PGM OUT plays. 2.5 Graphics and playback device The device saves all the data that is fed into it via its inputs and as you’ve already learned that data can be saved into clip. It is therefore quite common to use instant replay devices as playback devices for clips or graphics. If you have intros, outros or interviews you want to playback at some point during the production you can simply record them in to the LGZ-1 device and create clips of them. Those can then be arranged and played back at a time of your choosing. The loop functions also allows you to playback graphics that loop so another possibility is to use the device to loop out graphics if you don’t need it for replays. 8 LGZ Broadcasting Tech [JUST.REPLAY USER MANUAL] 3. Getting started - settings When the device is turned on, you will after a short while see the configuration menu. Here the operator can set settings and preferences to enhance his own personal workflow. (a screenshot of the configuration menu can bee seen at the end of this chapter). In the configuration menu the operator first chooses the format he will want to work in. It is also here he gets an overview of the data already present on the device. Each of these settings can be set using the controller (thus avoiding the use of a computer mouse). 3.1 Format choice All data is saved and can only be used in the format it was recorded in. The device can only be working in one format at a time and there is no way to send data between the different formats. The device supports the following formats: - PAL 720p50 1080i50 In the column ”Data recorded” you can see how much data already exists in each format. In the column ”Approximate time left” is an estimation of how much more data can be recorded. Under the table is an indicator of how much of the hard drives is currently used. If you press “Delete” you can after confirming the deletion remove all the data of the selected format. Be aware that it can take anything from 5 seconds up to several minutes! 3.2 Empty disks The device has a capacity of approximately up to 20 hrs in SD and up to 10 hrs in HD with the standard disks. The capacity still available will always be seen for each respective format. The deletion of data, once initiated can not be stopped nor restored. Make sure you do not delete data you may want to use at a later time. Deletion can take several minutes depending on how many clips you decide to save. A rule of thumb is that the deletion is proportional to 1/10th of the time occupied by the data you want to save. Deleting without saving any clips is instantenous. Attention! Recording will stop when the disks are full. With full disks, only 10mins of clips can be saved locally. Tryinf to save more clips will simply not work and nothing will be erased. LGZ Broadcasting Tech | version 1.3 9 [JUST.REPLAY USER MANUAL] 3.3 Clip Settings Under the tab named ”Clip Settings” the operator can set the GTN and MIX preferences. These set weither their respective parameters are set to TRUE or FALSE or MIX or CUT when a clip is created. The settings on all clips can be altered even after a clip has been set but this is a way to give the operator some leeway as to how he prefers to work, hopefully helping him become even more efficient. 3.4 Transition setting Under the ”Transition Settings” tab you can set how long you will want a MIX to be. The length of a MIX is numbered in frames and the default values are 8 frames in SD and 16 frames in HD. These can be changed by using the mouse or the jgwheel on the controller to a value between 1 and 50. 3.5 Preview setting Under this tab, the operator chooses weither the transition is a MIX or a CUT when the TAKE button is pressed. By default TAKE will mix between your inputs. 3.6 Sound setting Under the ”Sound Settings” tab the operator can choose from which input the sound that pays back comes from. Ether the source of the sound can be set to match the video. I.e if video from input 1 is played back it will playback sound from input 1 and if you switch to input 2 so will the sound. But if you always want the sound from input 1 to playback no matter what video input is playing back you can do so by pressing SET INPUT until the source of your choice is shown (1, 2 or 3). If set to Active Source it will always be synced with the video it was recorded with. Attention! The sound bars above each input only show the levels of the first two channels that are recorded (typically left and right). 3.7 Timecode setting In all formats the device can read incoming embedded timecode according to the SMPTE 12M-2 standard that replaces RP188. If no timecode can be read the device will generate its own. Even if you receive timecode but you’d rather not use you can press LOG to force the device to generate its own instead of reading incoming timecode. Embedded timecode is read on the signal that comes into INPUT 1. If you want to sync your workflow with other people and their equipment you may connect and XLR with LTC timecode to the device. (You still need a REF signal to synchronize your data!). In SD, the outputted signal has embedded timecode but due to hardware limitations no timecode is yet outputted in HD formats. Our supplier is aware of the flaw in their cards and they will hopefully soon address it. 10 LGZ Broadcasting Tech [JUST.REPLAY USER MANUAL] 3.8 Save data locally Data can be saved between productions even if you delete the rest of the data. Simply put, a clip can never be deleted from the configurations menu. For as long as you have clips in a certain format these won’t be deleted when you erase the rest of the data in that format. To entirely empty a format you must first delete all the clips inside that format, you can then return to the configurations menu and delete all the data. You can see under the “Save Clips” tab if a format has clips. When a clip is saved, 5 second margins on each side of the clip are saved as well to create a safe buffer when working with those at a later time. The clip is saved in all of its angles so you can work with it normally in your next project. Saved clips can be seen in new projects by their prefix “S” before their ID number. 3.9 Interpolate setting By pressing this setting (SEND CLIP) the operator can choose to activate an extra interpolation between frames that can help create smoother slow-motion replays at lower speed. If this is iused it is recommended that you use a longer exposure times on your cameras ”blurring” the images a little to help the interpolating effect look better. 3.10 RECORD and EDIT MODE Once all the parameters have been set to suitable settings, the device can finally be started. There are two modes in which it can be started. RECORD MODE and EDIT MODE. The first one is the one we recommend. It starts the device in the selected format and starts within 5 seconds recording everything that comes to its inputs. It will keep recording everything until you exit back to the configuratiosn menu. The EDIT MODE is in all aspect the same that RECORD MODE escept for one important detail – it doesn’t record incoming data. It was only added to let you easily, quickly and without recoirding extra “empty” data go back in to edit your clips and playlists or simply view already recorded data. 3.11 Syncronizing signals ATTENTION! It is recommended the incoming inputs (often the cameras) as well as the device itself are all syncronized by a Black Ref or Trisync signal. If the device isn’t synced, it uses input 1 as a master clock. Inputs 2 and 3 will then be synced to input 1 but that can result in frame loss or double frames in those inputs. That is unavoidable as 3 separate cameras that aren’t synced can under no circumstances always send pictures at exactly the same rate. Try therefore to sync your devices, and if you can’t, use the device with the best internal clock as input 1. LGZ Broadcasting Tech | version 1.3 11 [JUST.REPLAY USER MANUAL] 3.12 Sockets overview All the devices sockets can be found on its backside. The device has 8 BNC sockets, 4 USB ports, 1 power socket, 1 XLR socket and 1 DVI-D screen socket. Figure 1 || Simplified view of the devices backside The BNC sockets are used for the three HD/SD-SDI inputs – IN 1, IN 2 and IN 3. Each incoming signal has a dedicated non delayed LOOP socket. It is important to know these loops are only active once you’ve entered RECORD MODE. But if used this saves on using SDI splitters or router ports. Under these can be found respectively, the PGM OUT BNC socket on which the outgoing signal is found, and left to it is the REF IN socket through which the device can be synchronized with blackburst och Trisync. The USB ports are there to connect the controller, the keyboard and potenitally a mouse if you see fit. The XLR socket is where you can plug in an XLR with LTC timecode sound to synchronize your workflow with the rest of the production. The DVI-D socket is where you connect the accompanying LCD screen. It must be of a resolution of 1920x1080 (or higher) to show properly. ATTENTION! If you get an uncorrect resolution after startup, try rebooting the device with a screen of correct resolution (1920x1080 or higher) connected to it during boot-up. 12 LGZ Broadcasting Tech [JUST.REPLAY USER MANUAL] Figure 2 || Configuration menu LGZ Broadcasting Tech | version 1.3 13 [JUST.REPLAY USER MANUAL] 4. MODES and features From the moment the device enters RECORD MODE everything gets recorded. If you havemn’t plugged in any inputs yet those will be black. If there already was data in that format it will start recording at the end of the previous data. 4.1 Playing modes There are basically two playing modes and the device will always be in one of them. No matter the playing mode the device will always have data coming from its PGM OUT socket. 4.1.1 JOG The Jog mode is entered as soon as the JOGWHEEL (or shutter) is moved. In this mode the operator moves around in the already recorded data. Unless in preview mode (see further down) you can see in PGM OUT how the operator jogs around in the data. The shutter can be used to fast forward or backwards at very high speed where the jogwheel is commonly used for more precise movements. 4.1.2 PLAY The Play mode is activated by pressing PLAY or moving the speed LEVER. That will start playback at full speed (if PLAY was pressed) or at the speed that the lever is set on, it can be set to 0% and will then seemed “paused”. 4.2 Work modes There are three work modes and just like the playing modes, one of them will always be active. The most common one is the Standard mode. It is in this mode the device starts in. The two other work modes are the Preview mdoe and the Clip mode. These mdoes decide what different features can be accesed. 4.2.1 STANDARD MODE When neither in Preview nor Clip mode, you are in Standard mode and any changes to the lever or jogwheel will directly affect outgoing video. 4.2.2 PREVIEW MODE Preview mode is activated by pressing PRW. You can see it is on when the blue LED is lit blue on your controller as well as a few indicators on the screen. In this mode, the jogwheel and the INPUT buttons no longer affect the outgoing video. You can jog and change inputs and will only see th result in the replay preview screens. You can not enter Clip mdoe when Preview mode is engaged. The TAKE button is only active when Preview mode is on. 14 LGZ Broadcasting Tech [JUST.REPLAY USER MANUAL] 4.2.3 CLIP MODE Clip mode is activated by pressing LOAD (SHIFT + GOTO). This loads the selected playlist and makes it ready for playback. It also activates the BACK and NEXT buttons. It also takes over the PGM OUT picture and you can see under PGM OUT indicators showing which clip is currently showing as well as how much time there is left before the playlists reaches its end (if it is not looped). Clip mode is exited either by reaching the end of a playlist or by pressing GOTO again. 4.3 Clip system Clips and playlists are there to help you organise your data and worklow. With the help of those operators can easier see what replays are available to hi. Operators can also make important clips easier to find and reach. Following are descriptions of how clips work and can best be used and organized into playlists. 4.3.1 Create a clip A clip is created by marking it out with two marks. An IN mark and an OUT mark deciding where the clip starts respectively ends. Once both amrks have been set LOG can be pressed to actually create the clip. The clip is then added to the end of the CLIP OVERVIEW (far left) list. It is now recommended to right away name it with a short descriptive name of your choosing. 4.3.2 Clip parameters A clip is given a unique ID number as well as the following parameters which can at anytime (outside Clip mode) be set: Parameter Nr Default value Automatically assigned Start Time Duration Comment Definition Each clip is assgined a unique number to set it apart from the others. A clips starting time A clips duration in the format HH:MM:SS:FF Name or description set by the operator Input Input from which the replay will play GTN Sets if the playlist plays on once this clips end is reached Can be set to MIX or CUT and decides how the transition will be Decides weither the clip stops on a freeze frame or has a postroll Set by default to active input when saved Default is set in the configuration menu Default is set in the configuration menu Default is set in the configuration menu Transition Roll Empty All these parameters can be set and changed on a clip located in an active playlist (bottom right) on the screen. LGZ Broadcasting Tech | version 1.3 15 [JUST.REPLAY USER MANUAL] 4.3.3 Playlists It is good practice to create and name several playlists before the start of a production. Think through what kind of playlists you will need and how yo can best organise clips into playlists. New playlists are added simply by pressing ADD LIST and each list is given a unique number. To add a clip to a playlist you make sure the clip in CLIP OVERVIEW is selected and you make sure the playlist in LIST OVERVIEW is selected as well. You then press SEND CLIP. This creates a copy of the clip that is sent to that list. You can see it being added to the end of the Active Playlist and can now set its parameters to your liking. A playlist can hold hundreds of clips but we recommend keeping playlists relatively short to keep a good overview of your work. More than setting the parameters on your clips in their respective playlists, you can move them around and rearragne their order to fit your needs. MOVE UP and MOVE DOWN moves clips around inside their playlists. You can also adjust the starting mark and ending marks of a clip by selecting it and pressing SHIFT + IN or SHIFT + OUT. You will see on the timeline and in your list details how the clip changes. This is how you can relatively quickly and simply shape your clips into well timed highlights. To delete clips or even entire playlists just select a clip or a playlist and press DELETE (SHIFT + ADD LIST). This can not be undone so make sure you know you won’t need that specific clip or playlist. (It does not delete the data however, only the clip and you can at any moment go back to that moment on your timeline and create a new clip) 4.3.4 Playing playlists Once you are satisfied with your playlist you can at any time load it and ready it for playback. This is done by pressing LOAD (SHIFT + GOTO). The list will now show in red and the clip will be seen on your PGM OUT. You can now simply press PLAY or move the lever to start playback. Yo can also at anytime press BACK or NEXT to skip back or mix forward to the next clip. You can now also use the jogwheel to jog around your playlist (it automatically jumps between the clips) to see that you are happy with the result before actually playing it back. 4.3.5 Copying clips from a playlist Clips in playlists can be edited without affecting the original clip. Through user feedback and field tests we’ve seen a need to create a playlist from clips already located in other playlists. This is now possible thanks to the SHIFT + SEND CLIP feature. What this basically does is copy the clip currently selected in the Active playlists. It then sends this copy to the last playlist int the playlist list. An example of use is if you have in different cliplists nice looking clips of different events that you would like to gather into one new list. Start by creating a new list by pressing ADD LIST. Name it. It will end up at the bottom of the cliplist list. Go then trhough your other lists. Select the clips you want to copy and press SHIFT + SEND CLIP. Repeat on all the clips you want copied. You can now go to your last list and see how all your copied clips have now been added here, ready to be played out. 16 LGZ Broadcasting Tech [JUST.REPLAY USER MANUAL] 4.4 Sound recording Embedded sound in HD/SD-SDI on the first four embedded channels, on each of the three inputs are continually recorded synchronously to the video. Depending on the setting you chose in the configuration menu the playback of sound will switch source with the video or always come from the same source. It will anyhow always be synchronized with the video. It is important to know that audio will only playback when playback is at a speed of 100%. ATTENTION! Audio only plays back at a speed of 100% 4.5 Playback speed The speed lever always controls the speed of the video shown in PGM OUT. The lever can be used to start playback and it is therefore common that the lever is left at 0% when not used, waiting to start playback. The lever is often adjusted during playback as well to create fitting slow motion replays. Though, try not to overuse it as it just confuses the viewer if the playback speed changes too much in a short time. Be patient. If you want a certain clip or playlist to be played only at 100% you can start playback using PLAy which will always be at 100%. Be careful then not to move the lever that will if moved change the playback speed. 4.6 Configuration menu Once your production is done you may want to go back to the configuration menu to delete unnecessary data. You may also during work want to go back to change a setting. It however important to know that all recording is stopped once you go back to the configuration menu! The configuration menu can be reached while in RECORD MODE or EDIT MODE by pressing and holding down in this following order SHIFT + SELECT LEFT BANK + SELECT MIDDLE BANK + SELECT RIGHT BANK ATTENTION! This stops the recording of incoming data! No data is recorded while you are in the configuration menu. LGZ Broadcasting Tech | version 1.3 17 [JUST.REPLAY USER MANUAL] 5. Kontrollens funktioner Function Description 1 Sets the active input to Input 1 2 Sets the active input to Input 2 3 Sets the active input to Input 3 Arrow Down Moves the selection row one step down (can be held down) Arrow Up Moves the selected row one step up (can be held down) Play symbol Starts playback at 100% ADD LIST Creates a new empty playlist ALL GTN (SHIFT) Sets the GTN parameter on all clips in that playlist ALL MIX (SHIFT) Sets the MIX parameter on all clips in that playlist ALL INPUT (SHIFT) Sets the INPUT parameter on all clips in that playlist ALL ROLL (SHIFT) Sets the ROLL parameter on all clips in that playlist BACK Jumps back to beginning of previous clip (Clip mode only) DELETE (SHIFT) Delete the selected clip or playlist, can not be undone EDIT IN (SHIFT) Edits the IN mark on the selected clip EDIT OUT (SHIFT) Edits the OUT mark on the selected clip GOTO Jumps to the selected clip IN Sets an IN mark JOGWHEEL Used to jog around in the data LIVE Jumps to the latest recorded frame and plays from there LIST END Selects the last clip in the list LIST TOP Selects the first clip in the list LOAD (SHIFT) Toggles Clip mode LOG Creates a clip MOVE UP Moves the sleceted clip one step up MOVE DOWN Moves the selected clip one step down NEXT Jumps to beginning of next clip (only in Clip mode) PRW Toggles Preview mode SEND CLIP (SHIFT) Copies the selected clip to the selected list (shift feature, see 4.3.5) SET GTN Sets the GTN parameter on the selected clip SET MIX Sets the MIX parameter on the selected clip SET INPUT Sets the INPUT parameter on the selected clip SET ROLL Sets the ROLL parameter on the selected clip SHIFT Must be pressed to reach SHIFT features LEVER Sets playback speed and starts playback when moved TAKE Mixes or cuts to the selected preview window 18 LGZ Broadcasting Tech [JUST.REPLAY USER MANUAL] Figure 3 || Controller LGZ Broadcasting Tech | version 1.3 19 [JUST.REPLAY USER MANUAL] 6. Graphical user interface 6.1 Overview The just.REPLAY has a built-in multiview with integrated interface. The multiview can be seen on a standard LCD 16:9 screen with a resolution of 1920x1080 or higher. It is connected on the devices backside by DVI. This graphical interface shows other than the live previews a range of information meant to facilitate the operators worflow and enhance the overview it gives him of what is currently being done. Förutom Live bilderna som användaren jobbar med finns på skärmen en samling av information som underlättar arbetsflödet och ger en god överblick över vad som sker. Previews, audio and video data, workflow and editorial information are all gathered in a studied wauy one one screen. The top three windows on the left side of the interface are real-time previews of what is currently being fed to the device. The three windows below them respectively show the previews of where the operator is currently working. Those are the three Replay preview windows. The big preview window to the right shows what is currenty being outputted by the device on the PGM OUT socket. Below it is a range of information on currently active modes as well as what buttons are pressed or active. Corssing horizontally the whole interface is the timeline axis helping the operator get an overview of his clips. Below the timeline is the graphical representation of all clips and playlists. These are organized into three tables. The leftmost one shows the CLIP OVERVIEW where all created clips are listed in the order they were created. The middle table is the LIST OVERVIEW where all playlists are listed. Selecting one of these playlists changes which playlist is currently shown in the rightmost table, that table being the ACTIVE PLAYLIST table. 6.2 Audio-video information The audio-video information is made of the 6 preview screens and the PGM OUT screens. Above the live preview screens is shown the timecode of the data currently entering the device. Below the live previews can also be seen their respective sound levels. Below the Replay preview screen are three labels that can be lit red or blue. Red if that replay is currently the one being outputted, blue if Preview mode is on and that input is currently selected. Above the PGM OUT picture are the sound level gauges of the output signal. As mentioned before, what is shown on the PGM OUT screen is always what is currently being outputted by the device. 20 LGZ Broadcasting Tech [JUST.REPLAY USER MANUAL] 6.3 Workflow Workflow information can be found below the PGM OUT window as well as on the timeline. This is where data that help the operator keep an overview of his work can be seen. Symbol Description PREVIEW MODE Is lit blue when Preview mode is active CLIP MODE LIVE Is lit red when Clip mode is active. It then also shows the unique playlist and clip id as well as a countdown time of how much time is left on this playlist (except if its looped) Shows a number between 0 and 100 indicating the speed of your playback Is lit red when the user has reached live data MARK IN Is lit yellow when an IN mark has been placed MARK OUT Is lit yellow when an OUT mark has been placed LOG Is lit green for 1 second when LOG is pressed REF Is lit yellow only if the device has a REF signal lock HH:MM:SS:FF The white timecode above the red line show the time where the operator is currently working SPEED Horizontally across the screen is the timeline. It is made of three horizontal parts. The top one shows the timecode, the middle one shows a graphical representation for clips listed in the CLIP OVERVIEW list and the bottom one shows clips listed in the ACTIVE PLAYLIST. It makes it easier to see changes made to clips IN and OUT marks. 6.4 Clip information Below the timeline are the list representations. Only one can be active at a time. To select one use the A, B and C buttons on the controller. 6.4.1 CLIP OVERVIEW Here you can see a list of all the clips you’ve created. The controller buttons you can use when this list is active are the following: Up Arrow Down Arrow GOTO Keyboard letters DELETE LIST TOP LIST END Moves the selection row one step up Moves the selection row one step up Jumps to the beginning of the selected clip Set the clip name Deletes the selected clip Jumps to top of list Jumps to bottom of list LGZ Broadcasting Tech | version 1.3 21 [JUST.REPLAY USER MANUAL] 6.4.2 LIST OVERVIEW This shows a list of all the playlist you have created. It also shows how many clips a list holds and the list duration if it was played at 100%. Buttons you can use while it’s active are: Up Arrow Down Arrow LOAD Keyboard letters DELETE LIST TOP LIST END Moves the selection row one step up Moves the selection row one step up Loads (Clip mode) the selected playlist Set the clip name Deletes the selected clip Jumps to top of list Jumps to bottom of list 6.4.3 ACTIVE PLAYLIST This one shows the content of the currently selected playlist, meaning a list of clips. Buttons you can use while it’s active are: Up Arrow Down Arrow LOAD GOTO Keyboard letters DELETE LIST TOP LIST END MOVE UP MOVE DOWN SET MIX SET ROLL SET INPUT Moves the selection row one step up Moves the selection row one step up Loads (Clip mode) the selected playlist Jumps to the beginning of the selected clip Set the clip name Deletes the selected clip Jumps to top of list Jumps to bottom of list Moves to selected clip one step up Moves to selected clip one step down Sets the MIX setting on the selected clip Sets the ROLL setting on the selected clip Sets the INPUT setting on the selected clip If LOAD (Clip mode) is activated, you will not be able to delete clips from the active playlist. Neither will you be able to move clips around nor change any of the parameters. It is thought that once you load your playlist it is because you are ready to play it. On the other hand the features BACK and NEXT are activated and you can jog inside yourplaylist ATTENTION! CLIP MODE is automatically exited once the end of a playlist is reached. 22 LGZ Broadcasting Tech [JUST.REPLAY USER MANUAL] Figure 4 || Snapshot of the graphical user interface LGZ Broadcasting Tech | version 1.3 23 [JUST.REPLAY USER MANUAL] 7. Super Slowmotion In devices with software version 2.7 or later, the Super slowmotion (SSM) feature is available for 3 phase 75fps (150Hz) in the 576i25 and 1080i50 formats. They can be chosen in the configuration menu by selecting them with the mouse or using the LIST TOP and LIST END buttons to switch to and from the standard formats. Once a SSM mode is selected and the device is started in RECORD or EDIT MODE, the user interface will look similar. One big difference though is that the buttons 1, 2 and 3 do not any longer switch between angles 1, 2 and 3 since they all are a phase of the same camera feed. The button 1 is now instead a PLAY button that starts playback at exactly 33% of the standard speed. The button 3 is now instead a PLAY button that starts playback at exactly 16% of the standard speed. All other features work the same (except for the SET INPUT feature which is then disabled). To achieve the best looking replays we recommend playing back your replays with at 33% or 16%. A quite neat looking effect can also be observed when playing back at 1% when movement is so slow that the alternation between frames almost creates a 3D illusion. 24 LGZ Broadcasting Tech [JUST.REPLAY USER MANUAL] 8. Troubleshooting Here are listed some common troubles you might encounter and how they can be avoided - The device doesn’t start normally Try disconnecting everything except a screen with proper resolution. USB sticks, pressed keyboards or screens with incorrect resolutions can disrupt startup procedures. - The output signal on PGM OUT is jerky (especially applicab le to SUPER SLOWMO) Make sure you have a proper lock on your REF signal. Check the REF cable isn’t damaged. This can also be an issue with the internal workings of the SDI cards not synchronizing properly. The cards are reinitialized each time the software is started. Simply exit to the menu (press SHIT + A + B + C) and reenter the software (PLAY). Check if your ouput is now better or try again until your PGM output is smooth. - The output signal on PGM OUT rolls around In an environment with REF signal (witjout framestores) the device must be fed a REF signal as well or its ouput won’t be synchronized with the rest of the dataflow. - When I change the LTC source it doesn’t change on the screen If you change LTC source while the device is running you must disconnect the LTC for 5 seconds before reconnecting it so it can lock on the new LTC - My 3 replay previews aren’t perfectly in sync If none of your input sources are synchronized by an external REF signal, the device synchronizes them for you acting partly as a framestore. It also means i.e that your three cameras won’t run exactly at the same speed (that is why using REF signal is standard). This means that to keep the signals synced, some frames must be deleted and others doubled. Without using REF signal on your sources, that is unavoidable and only your INPUT 1 will be flawless. - The resolution is not correct The server can only show the interface on a 1920x1080 resolution screen. If you have such a screen, make sure the screen is connected before you start the device. If you have a screen with a larger resolution, you need to use DVI extenders with EDID function. We recommend you use the screen that comes with the server. - It doesn’t find the REF /Blackref / Trisync signal Make sure it is connected and transmitting a REF signal before starting the server. We test all units before shipping. The SDI cards are quite sensitive and a bad REF signal (even though other devices can lock onto it) may be responsible). If any of these hints couldn’t solve your issues. Contact your local dealer for more information or ask to be transferred to our technical support. LGZ Broadcasting Tech | version 1.3 25