1
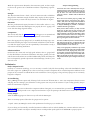
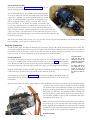
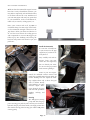
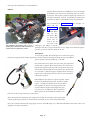
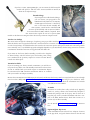
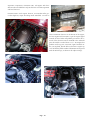
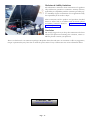
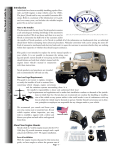
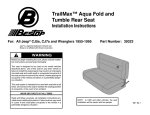
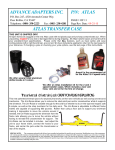
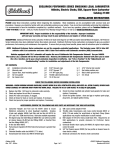
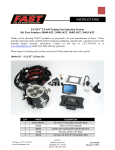
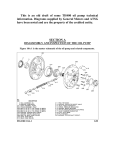
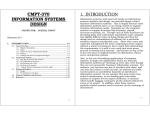
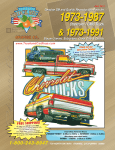
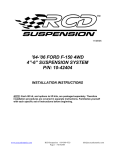
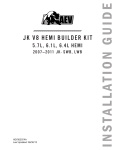
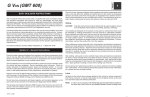
Installing Chevy & GM Engines in YJ Wrangler Jeeps
The Novak Guide to
Introduction
Individuals have been successfully installing popular Chevrolet and GM engines to Jeep vehicles since the 1960’s.
The Jeep YJ lends itself to even more successful swaps
than their famous CJ predecessors. Below is a summary of
the information we’ve gathered since our first YJ conversions several years ago, and includes the valuable insights
gained by us and our customers
Note to the Installer
This document and the use of any Novak products assumes
a safe and adequate working knowledge of the automotive
systems involved. We do not know and there is no way for
Novak to determine the skill level of the customer and/or the installer of Novak products, or for Novak to publish
all of the information on fundamentals that an individual should know before attempting these advanced procedures.
Vehicular conversion work can be among the most difficult of automotive mechanical and electrical tasks and it is
upon the customer to ascertain whether they are working within their expertise or whether they should acquire assistance.
This guide is not intended to replace the service manual specific to your
vehicle. It is not possible to document the wiring, routing and specific
system details of every Jeep and the installer should obtain use both their
vehicle’s manual and the engines donor vehicle’s manual in conjunction
with these instructions.
Novak products and procedures are intended and
recommended for off-road use only.
Your Local Legal Requirements
This guide is not meant to explain, interpret
or notify the installer of local or national laws
concerning vehicle changes, engine conversions
and the emissions systems surrounding them. It is the installer’s responsibility
to know and understand their local legal requirements and regulations and to make their installation conform to demands of the jurisdictions in which they live. Novak does not recommend
nor condone the disabling or modification of the vehicle or any system within it that could
render it out of conformance with any laws in which the vehicle may be licensed or operate.
Neither Novak Conversions nor its directors, principles or employees are responsible for any
changes made to your vehicle.
We recommend you consult and know your own
city, county, state or countries laws. If your vehicle requires referee inspection, you may wish to
establish a rapport with a referee and discuss your
plans and seek advice and approval from them.
About Your Engine Mounts
Novak’s weld-in engine mounts for the Jeep YJ
Wranglers provide immense strength and a rapid
and precise GM Gen. III+ V8 engine installation.
Ease of Installation
Page - -
American Made
With the engine mounts discussed in this instruction guide, we have sought
to achieve the greatest ease of installation without compromising engineering.
Strength
The Novak mounts feature a thick 3/16 steel construction and a welded box
design for the maximum strength available. They employ the best engineering and geometry to assure that they’ll survive even the wildest of engines.
Placement
We have predetermined engine placement for the installer. There is a very
fine window in which these GM engines can properly fit into a YJ Jeep, and
we’ve done this design legwork already.
Compactness
The mounts will clear the exhaust headers blockhuggers we recommend and
clearance from all other retained factory components is also excellent.
Note that sagging factory springs and / or modified axle bump stops, combined with mounting the engine too far forward could allow for axle interference with the engine oil pan. It is the responsibility of the installer to verify a
safe and non-interfering installation.
Vibration Isolation
Each mount kit comes with our high-grade isolators that are gauged well
for that ideal balance of isolation and firmness. The large, graded 5/8” bolts
and all associated hardware are included. Additionally, Novak will always be
here to inexpensively provide replacement isolator bushings, if needed - years
down the road.
A Project Strategy Warning
Conversions have most commonly been best performed by the Jeep owner and enthusiast as it’s rare
to find anyone who cares more about good work than
they do. We’ve seen some terrific and solid work
come out of owners / installers and also their hired
mechanics.
We’ve also seen or heard of projects go badly, and
unneccessarily and too often because the “professionals”, well, aren’t. This ranges from bad technical
advice to doing just plain shoddy work. The pretense
of adequate knowledge by installers or mechanics
can kill an otherwise great project.
Wisely choose what assistance you may need. Be
skeptical of any who claim of great conversion and
wiring work without seeing a portfolio or references
from a technician’s customers for whom they’ve done
similar custom work. We cannot stress enough that a
good powertrain repair technician may not necessarily be a good engine conversion technician.
The owner / installer may choose - based on their own
skills and project preferences - to delineate the scope
of their work versus the assistance they hire, e.g., mechanical installation versus electrical, etc.
Lastly, it’s also good policy to limit the scope of work
being performed. Draw a line in the sand and try limit
the conversion to itself, keeping body, chassis, interior and other restoration and upgrade projects separate until the powertrain swap is successfully done.
Failure to plan and execute the project correctly can
add great and wasted expense and give unsatisfactory
results.
Preliminaries
Body & Suspension Lifts
Contrary to conversion mythology, it is not necessary to install a body lift when installing a Chevrolet Small Block or GM
Gen. III+ engine in a YJ Wrangler. It is also not necessary to install a suspension lift or extended suspension snubbers for the
purpose of the conversion. A GM V6 & V8 can be installed in a factory YJ Jeep so long as factory springs are not excessively
fatigued or collapsed.
Air Conditioning
The YJ Wrangler frame is quite wide, allowing for the retention of all known Gen. I - III+ A/C compressors. The A/C circuits
will plug into the existing YJ or aftermarket cooling system. You may seek the assistance of your cooling specialty shop to
make the connections as required.
If you are wishing to run an onboard air compressor without losing A/C, we recommend that you install our Air Conditioning
Relocation kit, which provides a new compressor and mounts it up at the passenger side head location on Gen. III+ engines.
Factory Gauges
All of the OEM YJ gauges can function very well with the GM engine.
There are six major points of data that the gauges need to operate:
1. Speed: 1987-1991 Wranglers used a cable speedometer from the Jeep 231 transfer case.
If you are doing an electronically controlled automatic installation such as with the 4L60E (very common with Gen. III+ engines), Novak’s transfer case adapter assembly features an independant speed signal for the GM PCM to propery operate.
Page - -
If you are utilizing a manual transmission or classic automatic (TH350, TH400, 700R4, etc) , run a speed signal generator
with a speedometer cable-through option. These senders generate enough of a signal to notify the PCM of driving speeds
enough to put the engine into true closed loop.
1992-1995 models use a Vehicle Speed Sensor (VSS) at the transfer case output. This can be disconnected from the outgoing
Jeep PCM and connected directly into the YJ’s electronic speedometer. Just as above, you need to get a speed signal to the GM PCM,
and the use of a speed signal splitter such as the Dakota Digital
#SGI-5 is recommended to get the engine to go into closed loop.
2. Tachometer: 1987-1990 Wranglers used a conventional distributor signal with the 258 engine to the tachometer and 1991-1995
Wranglers used a signal from the Mopar PCM to the tachometer
3. Oil Pressure: provided by the Oil Pressure Sensor
4. Engine Temp: provided by the Engine Coolant Temperature Sensor (ECT)
5. Voltage: provided by the 12v current going across the wire harness
6. Fuel Level: provided by the Fuel Level Sending Unit
The strategy to keep a fully operational set of gauges is straightforward. Most of our work here is already done for us since most of these
sensors will remain connected to the Jeep gauges as per the factory,
including: #1, the speedo cable or VSS, #5, Voltage and #6, Fuel
Level. And, since GM engines conveniently offer multiple ports for water temperature and oil pressure, we will leave the Jeep ECT (#4) and
Oil Pressure (#3) sensors connected to the wiring harness and simply
install them into the GM engine.
This aftermarket variable reluctance speed signal generator will send a pulsed speed signal to the GM PCM from the
transfer case speedometer gear, while allowing for speedometer cable pass-through if you’re retaining your factory mechanical speedometer.
The remaining item from this list is the Tachometer. GM tach outputs vary, but none are compatible with the Jeep YJ factory gauge.
There are two ways to conquer this
challenge. First is to use a tachometer
adapter module, such as the Dakota
Digital #SGI-8, which can calibrate
your factory tachometer to your GM
engine.
The second tachometer option is to
replace the tach or the entire gauge
set with aftermarket gauges, which
is easily done as the YJ Wrangler uses
fairly standard gauge sizes.
Jeep Transfer Cases
This guide is based on the retention of the 231 transfer case in your
Jeep. They are extremely reliable, very durable, and easily and affordably adapted to your conversion powertrain. We do recommend the
use of a heavy-duty output shaft or slip-yoke eliminator assembly with
your NP231, for the sake of durability against your stronger motor and
better driveshaft angles.
Page - -
Note the location of the Jeep oil pressure sensor on this Gen.
III+ engine (above) and the water temperature sensor (below), It may be necessary to drill and tap as per the threads
in your factory or aftermarket sensor.
Your Powertrain Assembly
If you have purchased a Novak Turn-Key powertrain, you can
skip the following preliminary step.
It is recommended that you pre-assemble your powertrain outside
of the Jeep. Follow the instructions provided with your Novak
adapter kit to assemble your chosen gearboxes behind your GM
engine. You should assemble the powertrain as completely as possible, including the headers, wiring, accessories, belts, clutch releases, air intakes, etc. At Novak, we actually pre-assemble and
test run our powertrains prior to installing them into the Jeep. If you
assemble as much as the powertrain as you can and follow this same paradigm, asking the question, “Given battery, fuel and coolant, could I run this
engine on a stand?”, you will be well on your way. Because of superior access to
things and for organizational purposes, you will enjoy the work more and take a few
hours off of your project.
This section precedes the others in that it is a very good idea to have the powertrain assembled to the fullest extent possible
prior to disabling your Jeep for the conversion process.
Begin the Conversion
As with all other Jeeps, we’ll begin by disconnecting the negative battery cable and by then disconnecting the coolant, fuel,
air, vacuum, exhaust and electrical circuits into the engine. Once the coolant is drained, remove the radiator, A/C condenser,
transmission cooler, any winches, etc. Now, remove the grille from the fenders and front crossmember. It is not necessary to
remove the hood, as it may be tilted fully out of the way against the windshield frame.
Powertrain Removal
It is usually recommended to remove not just the engine, but the transmission and transfer case,
even if you are retaining both of them in your conversion, such as with the AX15manual transmissions. Because the GM engine will relocate the geartrain forward by about 2-1/2” to 3” forward,
removal and assembly to your new engine outside of the Jeep is generally helpful and not difficult.
Drop the crossmember / skidpan assembly, supporting the transmission and transfer case with jack
stands. Disconnect the front and rear driveshafts and set them out of the way.
Preparation Details
Make sure that all A/C
and heater circuits are
plugged off to prevent ingress of contaminants.
Few things will add to
your enjoyment of the
project as much as a
good pressure washing of
the engine bay while it is
open.
If your NP231 does not have an SYE kit installed, or if you have an NP231 with SYE transfer case
whose fluid is due for change, drain the transfer case fluid. You may wish to do the same for the
transmission.
Disconnect the transfer case shifter and speedometer connection. Remove the transfer case from the factory transmission adapter and set it aside. Note here that it is possible to remove the transfer
case with the engine and transmission assembly as you thread them
up and out of the engine bay. However, generally, it is easy to remove
the transfer case. Disconnect the transmission shifter assembly from
its housing. This is typically done by removing its four bolts that secure the shifter assembly to the top of the transmission. Disconnect
the hydraulic clutch release line.
Unbolt the factory engine mounts from the frame horns. Safely secure a lifting jig to your outgoing motor and carefully pull it from
the bay. Typically, the transmission causes the powertrain to tilt back
and allows it to feed out from the engine bay at the proper angle, but
having an assistant or two to guide it out is helpful.
Firewall Clearance
Page - -
No firewall modifications are required. Clearance with GM V8’s is excellent.
Engine Plate Installation
In preparation for the installation mount the provided engine block mount
plates onto the engine block bosses. Insert the provided carriage bolt through
the center hole of the block plate.
Notice that these engine plates are
adjustable fore and aft with three
conjoined holes. We recommend you
install them in the center hole location at first, and then adjust forward
if you have sufficient fan / radiator
clearance. Use the eight factory or
Novak-provided M10 (Gen III+) or 3/8” (Gen I-II) bolts. We recommend the installer use a drop of removable thread locking compound on
these threads, such as Loctite Blue upon final installation, and torque to
~35 ft. lbs.
Slide the upper isolator onto the carriage bolt, with the radiused cup side
towards the engine block. Note that the engine plate hole is radiused to
allow the carriage bolt to droop downward. This will ease your installation as the engine is lowered into the mounts. At this point, we recommend that you temporarily wrap the carriage bolt threads with two or three wraps of vinyl tape. This will help keep the upper
isolator from sliding off during assembly.
Frame Preparation
These mounts are a purely weld-in design when replacing either of the factory YJ engines. They require the complete removal
of the factory frame horns, and will be replaced by the
frame brackets as provided in the Novak kit.
Total removal of the factory I4 or I6 frame horns and
steering shaft support bracket is required. We recommend a reciprocating saw with appropriate speed and
blade, or a plasma cutter. Follow up with a clean grind or
disking of the frame.
Install the Engine Mounts
Your Novak engine mounts predetermine the location of
your GM engine, for height, left-right offset and longitudinal position. You’ll notice that one mount is wider than
another. This is the driver’s side mount. You’ll also notice
the mounts are cut to match the wall and contour of the
Jeep Wrangler frame. Position the mounts on the frame
and measure from the back edge of the round tube on
the YJ frame to the front leg’s edge of the engine mount
bracket hole. This measurement, corresponding with “A”
in the diagram above is 29-1/8”. We’ve found this to be
the ideal position for the widest variety of Generation
Page - -
III+ conversion circumstances.
While we have determined the engine location
based on a variety of installation scenarios, you
may wish to temporarily tack weld the brackets
to the frame rails and do a test installation of
your own V8 engine and verify any particulars
to your installation, such as transmission fit,
radiator fit, accessories, cooling system, etc.
Once you’re content with it all, lay MIG or
stick welds along the entire edge of the brackets for a maximum strength connection to the
Jeep frame. Allow your frame and bracket to
air cool. Do not accelerate the cooling process
with compressed air or water. We suggest you
follow up by wire brushing and coating the
brackets with primer and enamel as per your
preference.
Install the Powertrain
It’s now time to finally lower your motor into the Jeep
engine bay if you haven’t already done so.
Very carefully and with assistance, lower your powertrain into the engine bay.
You can thread your transfer case into the Jeep tunnel
with someone guiding it.
Lower in your new engine.
Install the underside isolator mounts and
install the provided TopLock nuts under the
isolator bushings. Do not squish the bushings. Tighten them only to where they just
start to deform. Overly
tight bushings can cause
excessive engine vibrations through the Jeep
and will cause premature
bushing cracking and
failure.
Steering
The GM power steering
pump will drive the Jeep
power steering gear perfectly well. You may need to have a
hydraulic shop or parts house make you a high-pressure line
that matches the YJ power steering gear and the GM power
steering pump.
Page - -
The return line is simply low-pressure 3/8” hose, as is available from
your local parts house. If you’re feeling creative, you can even run this line
through an external cooler to add to
the life of your pump and gear in hard
service situations.
Brakes
You can retain you factory braking
system all together. No changes are
necessary from the standpoint of the
conversion itself.
The GM engine provides vacuum at the rear of the manifold, whether it be a
Small Block Chevy or a GM Gen.III+. It may be necessary to tap for a simple,
barbed brass fitting on some manifolds that had the Hydroboost brakes.
The ABS computer is separate from all systems and runs independently. No mechanical, wiring or hydraulic changes need occur here.
Cooling System
The Jeep radiator will be both inadequate, poorly configured for a GM
engine and has a reputation for a lack of durability.
The Novak Radlock Radiator is
a tough and very
efficient radiator.
It is a cross-flow
design and it bolts
onto the Wrangler grille without
mods. With it, we
have seen success with the following coolant hoses: Lower may be Napa
#7473 or try a Gates #20842 or #21706. For the upper, try a Gates
#21833. We have also used Gates
hoses #22438 and #22437.
It is possible to run a mechanical fan and they almost always have plenty
of pulling power. Electric
fans are becoming more of
the norm. We recommend
our aggressive electric fan
with integrated shroud
assembly. These fans are
controlled by any GM
computer equipped with a
circuit to trigger a fan relay. Alternatively, you can
install a fan control module and install it to our fan
Page - -
motor per the manufacturer’s recommendations.
Exhaust
YJ Jeep exhaust systems are not difficult to run at all. It might
be possible to use some factory manifolds with your conversion engine. The YJ has a generous engine bay, but there are
still space limitations. As such, we generally recommend aftermarket headers for compatibility as well as performance.
While not necessary for a successful conversion,
some individuals will install fuel cells as part of a
broader project, which may include an internal or an
external electric fuel pump in the scenario.
We recommend our #CCLS1 headers for Gen.III+ engines and our
#CC158 headers for Chevrolet Small Block
V8’s for optimal layout. Run
the driver’s side
down and in
front of the oil
pan over to the
passenger’s side. Merge it and the
passenger bank into a Y pipe and send it out as a single circuit down the passenger side, up over the axle out exiting at the rear.
Fuel System
It is not only possible, but advantageous to use the factory Jeep
fuel injection pump, should a future replacement ever be required. The Jeep fuel pump in 1991-1995 Wranglers is capable of natively producing ~100 PSI.
For a little history and context, the 1991-1995 Jeep engine fuel
rail featured a regulator. These systems have two connections: a
high pressure supply connection and a low pressure return connection that feeds the bled fuel overage back into the fuel tank
via a return line. This fuel supply is regulated down at the Jeep
engine fuel rail. Removing the factory fuel system therefore
removes the regulator.
GM multipoint fuel injection engines typically require
between 45-58 PSI of fuel pressure. Gen.III+ engines
require ~58 PSI. To facilitate this, Novak offers a
fuel regulator kit that fits onto the Jeep fuel sending unit. This fuel regulator will supply the proper pressure for the GM Gen. III+ application.
The regulator can be installed in proximity to the
fuel tank so that a long return line is unnecessary.
Note that earlier Gen. III motors were regulated at the fuel rail. Starting in about 2002, GM
started regulating fuel pressure at the fuel tank or elsewhere on the circuit as described above.
For a fast connection between the Jeep supply circuit to the GM engine, use a Dorman 800-058 fuel line quick connect (as
supplied in the above Novak kit).
Page - -
If you have a 1987-1990 YJ Wrangler, you can remove the old factory fuel
module and replace it with the newer version (available at Novak) as
shown in the adjacent image.
Throttle Linkage
If your engine has a cable throttle linkage,
you can connect your Jeep pedal to the
GM throttle body. However, the majority
of GM engines now feature a “throttle by
wire” or electronic throttle assembly. For
these systems, you will need to install the GM
electronic pedal assembly and its associated Throttle Actuator Control (TAC) module, if required. Note
that most Gen.IV engines do not use a separate TAC
module as this function is integrated into the Gen.IV powertrain computer itself.
Transfer Case Linkage
We cannot stress enough the advantages of replacing your Jeep’s shifter with the Novak transfer case shifter assembly. This
shifter kit has become very popular for both the conversion and non-conversion crowds, simply because of its vast improvement
over the factory linkage. Its added benefit is that it makes the conversion process and typical transfer case relocation go much
more smoothly. It is a very affordable upgrade and highly adjustable to your installation, whether using manual or automatic
transmissions. Detailed instructions are supplied with this shifter kit.
If you must use the factory shifter assembly, you will need to lengthen
or shorten linkage rods and relocate pivot and anchor points, taking
into consideration the geometry required to actuate the New Process
transfer case shifter plate.
Transmission Shifter
If you’re retaining your factory manual transmission, you will also retain your factory shifter cane and assembly. Instructions on how to best
do this are included with your Novak engine to transmission adapter
kit. Instructions for GM automatic transmission shifters are included
with your transfer case adapter assembly.
Because the transmission tunnel shifters may be relocated, and because the factory tunnel cover may look like it’s been through
more wars than a Willys MB, Novak offers a new aluminum transmission tunnel cover that will give you a fresh start. Aftermarket shifter boots for both the transmission and transfer
case shifters are also available.
Air Intake
Conversion air intakes have really evolved nicely. Typically,
install a 4”, 90 deg. elbow at the throttle body and point it
towards the passenger side of the Jeep. You can then use a
length of pipe, such as extruded aluminum and then a coupler to the Mass Airflow Sensor, which then connects to a
cold-air style air filter assembly.
See the Novak air intake components page for assistance
here.
Engine Height & Top Covers
Classic Small Block V8’s and V6’s have adequate clearance
to the Jeep hood, and good clearance between the axle and
Page - -
suspension components. Generation III+ LS engines with their
shorter intakes and shallower oil pans also have excellent suspension
and hood clearance.
Generation III+ truck engines, however, are somewhat taller given their high-rise, torque increasing intake manifolds. In order to
achieve maximum clearance at the bottom of the engine,
we have engineered the mounts to put the engine higher
towards the hood. This will probably necessitate the removal of the decorative Vortec manifold covers. This will
gain the installer a needed about 1-1/2”. To mitigate this
problem and keep your conversion engine beautiful under your YJ hood, Novak offers its decorative engine top
cover in brushed, black-anodized aluminum and engraved
with the Novak logo, as shown in the adjacent image.
Page - 10 -
Disclaimer & Liability Limitations
The information contained in these instructions is for guidance
only, and does not guarantee or constitute a warranty of fitness,
applicability or compatibility with the customer’s particular project. Suitability of parts or information for an application is fully
the responsibility of the reader or buyer.
These instructions and the products and procedure described
herein are offered only in accordance with the Novak policies
and liability limitations found at: http://www.novak-adapt.
com/about/policies.htm
Conclusion
We strongly suggest that you keep these instructions for future
reference. For questions concerning your conversion, contact us.
We’ll be pleased to answer your questions.
There is no final word to our instruction packages. We update them often and invite our customers to offer any suggestions,
images or questions they may have that can make the process easier for any to follow. Note our contact information below.
©Novak, Inc.
www.novak-adapt.com
Page - 11 -