1
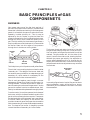
SELECT-A-GAS SCREW
CAP
SPRING
COVER
REGULATOR
SPRING
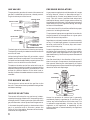
Remove the oven thermostat knob to be sure select-agas adjusting screw is in the proper position for the
type of gas being used. The select-a-gas screw is
located on the left side of the Robertshaw thermostat
and on the right side of the Harper thermostat.
LP
5. Use a wrench to unscrew the aluminum cap by
turning counterclockwise. Turn the cap over so the
hole end is up. Place the gasket between the cap and
regulator. Then place the cap and gasket on the
regulator and tighten. DO NOT OVERTIGHTEN.
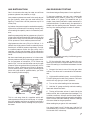
BURNER ORIFICE HOOD
ADJUSTMENT
TOP BURNERS
NAT.
OFF
NAT.
LP
OFF
OFF
KNOB SHAFT
SELECTOR KEY
TOP BURNER
VALVE
AIR SHUTTER
ORIFICE HOOD
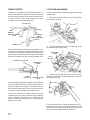
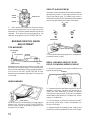
Remove the four top burner mounting screws, then
lift the burners off the brackets. Then screw the four
burner orifice hoods down till snug, approximately 2
to 2-1/2 turns. DO NOT OVERTIGHTEN. Burner
flames cannot be properly adjusted if this conversion
is not made.
Turn the screw clockwise to stop, for LP, and counterclockwise to stop, for NAT.
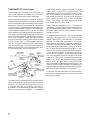
BROIL BURNER ORIFICE SPUD
(SELF-CLEANING MODELS ONLY)
1. Be sure the proper burner spud is selected for the
type of gas being used.
SCREWS
OVEN BURNER
2. Remove the two screws fastening the broil burner
assembly to the oven. Carefully pull the burner towards you, then downward to access the burner
orifice spud in the rear wall. Extra care is needed to
avoid breaking the ignitor coil. Place burner, screenside up, in a safe area.
OVEN ORIFICE
Screw the oven orifice hood down till snug, approximately 2 to 2 1/2 turns. DO NOT OVERTIGHTEN.
Burner flames cannot be properly adjusted if this
conversion is not made.
16
3. Use a nutdriver or wrench to remove the “NAT”
gas burner orifice spud. Install the selected “LP”
burner orifice spud.
4. Replace the burner assembly cover, making sure
the louvers are facing toward the rear of the range.