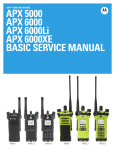
1
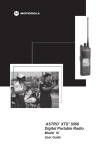
Motorola XTS5000 Portable Radio Care and Troubleshooting
Radio Care
The XTS 5000 radio casting has two vent ports that allow for pressure equalization in the radio. Never poke these
vents with any objects, such as needles, tweezers, or screwdrivers. This could create leak paths into the radio
and the radio’s submergibility will be lost.
(For XTS 5000 R Radios Only) The XTS 5000R radio is designed to be submerged to a maximum depth of 6
feet, with a maximum submersion time of 4 hours. Exceeding either maximum limit may result in damage to the
radio.
(For XTS 5000 R Radios Only) Elastomer technology materials used for seals in rugged portable radios can age
with time and environmental exposure. Therefore, Motorola recommends that rugged radios be checked annually
as a preventive measure in order to assure the watertight integrity of the radio. Motorola details the disassembly,
test, and reassembly procedures along with necessary test equipment needed to inspect, maintain and
troubleshoot radio seals in the radio’s service manual.
If the radio battery contact area has been submerged in water, dry and clean the radio battery contacts before
attaching a battery to the radio. Otherwise, the water could short-circuit the radio.
If the radio has been submerged in water, shake the radio well so that any water that may be trapped inside the
speaker grille and microphone port can be removed. Otherwise, the water will decrease the audio quality of the
radio.
Do not disassemble the radio. This could damage radio seals and result in leak paths into the radio. Any radio
maintenance should be performed only by a qualified radio technician.
Handling
Do not pound, drop, or throw the radio unnecessarily. Never carry the radio by the antenna.
Avoid subjecting the radio to an excess of liquids. Do not submerse the radio unless it is a ruggedized, XTS5000R
model.
Avoid subjecting the radio to corrosives, solvents or spirits.
Do not disassemble the radio.
Keep the accessory-connector cover in place until ready to use the connector. Replace the cover immediately
once the accessory has been disconnected.
Troubleshooting
Symptom
Radio Dead; Display Does Not
Turn On
Radio Will Not Turn Off
Radio Dead; Display Turns Off
No Receive Audio or Receiver Does Not
Unmute
Audio Distorted or Not Loud Enough
RF Sensitivity Poor – Does not receive
radio traffic.
No RF Power Out – Poor transmit range.
No Modulation; Distorted Modulation
Bad Microphone Sensitivity
No/Low signaling (PL, DPL, MDC)
No “KEYLOAD” on Radio Display When
Keyloading Cable is Attached to the Radio
Side Connector
Keyloader Displays “FAIL.”
Possible Cause
1. Dead Battery
2. Blown Fuse
3. On/Off Switch
4. Regulators
VOCON Board
RF or VOCON Board
Programming
Correction or Test
Replace with charged battery.
Send radio to the Radio Shop.
Synthesizer Not On Frequency
1. Synthesizer Not On Frequency
2. Antenna Switch/Connector
3. Receiver Front-End Tuning
1. TX Power Level or Frequency
2. No Injection To Power Amplifier
3. Antenna Switch/Connector
1. Programming
2. VOCON Board
1. Check Deviation and Compensation
2. Microphone
1. Programming
2. VOCON Board
1. Defective Keyloader Cable
2. Defective Radio
Send radio to the Radio Shop.
Send radio to the Radio Shop.
1. Wrong Keyloader Type
Use correct keyloader type. Refer to
Keyloader User Guide for more
information.
Try another keyloader
Send radio to the Radio Shop.
2. Bad Keyloader
3. Defective Radio
Send radio to the Radio Shop.
Send radio to the Radio Shop.
Send radio to the Radio Shop.
Send radio to the Radio Shop.
Send radio to the Radio Shop.
Send radio to the Radio Shop.
Send radio to the Radio Shop.
Send radio to the Radio Shop.
Battery
Battery Life
Battery life is determined by several factors. Among the more critical are the regular overcharge of batteries and the
average depth of discharge with each cycle. Typically, the greater the overcharge and the deeper the average discharge,
the fewer cycles a battery will last. For example, a battery which is overcharged and discharged 100% several times a
day, will last fewer cycles than a battery that receives less of an overcharge and is discharged to 50% per day. Further, a
battery which receives minimal overcharging and averages only 25% discharge, will last even longer.
Charging the Battery
Motorola batteries are designed specifically to be used with a Motorola charger and vice-versa. Charging in non-Motorola
equipment may lead to battery damage and void the battery warranty. Motorola-authorized battery chargers may not
charge batteries other than the ones listed in the user manual. The battery should be at about 77 °F (25 °C) (room
temperature), whenever possible. Charging a cold battery (below 50 ° F [10 °C]) may result in leakage of electrolyte and
ultimately in failure of the battery. Charging a hot battery (above 95 °F [35 °C]) results in reduced discharge capacity,
affecting the performance of the radio. Motorola rapid-rate battery chargers contain a temperature-sensing circuit to
ensure that batteries are charged within the temperature limits stated above.
Battery Charge Status
Your radio can indicate your battery’s charge status through:
• LED and sounds
• Conventional fuel gauge symbol on the display
• Smart fuel gauge symbol on the display
LED and Sounds
When your battery is low:
• You see the LED flash red when the PTT button is pressed
• You hear a low-battery “chirp” (short, high-pitched tone)
Conventional Fuel Gauge Symbol
A blinking fuel gauge symbol (
) is displayed only when the battery voltage drops to low level. In this case, replace the
battery with a fully charged one.
Smart Fuel Gauge Symbol
Consult the Smart Battery manual. All conditions must be met for a battery to be classified as a “Smart Battery.” When
your radio has a Smart Battery installed, the fuel gauge symbol is always displayed:
Replace the battery with a fully charged one when the fuel gauge shows the lowest level.