1
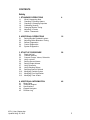
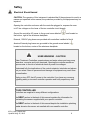
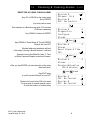
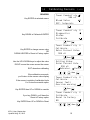
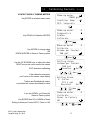
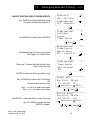
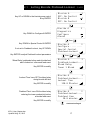
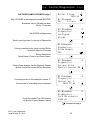
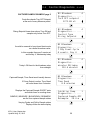
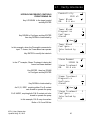
multiFLEX
M10 and M5
User Manual
11
M714_User_Master.doc
Updated Aug. 25, 2015
2
CONTENTS
Safety
1. STANDARD OPERATIONS
1.1
1.2
1.3
1.4
1.5
1.6
1.7
2. ADDITIONAL OPERATIONS
2.1
2.2
2.3
2.4
2.5
28
Read this first!
Connect Sensors
Connect Pumps, Valves, Solenoids
Verify controls
Setting Sensor Alarms
Setting Output Alarms
Verify Interlocks
Verify Blocking Relays
Selecting Special Controls
Modifying Variable Cycles
Modifying Feed Verification
Modifying Time & Date
4. ADDITIONAL INFORMATION
4.1
4.2
4.3
4.4
4.5
16
Setting Biocide Prebleed-Lockout
Adjusting Boiler Blowdown Timing
Sensor Diagnostics
Control Diagnostics
System Diagnostics
3. START UP PROCEDURE
3.1
3.2
3.3
3.4
3.5
3.6
3.7
3.8
3.9
3.10
3.11
3.12
4
What’s Happening Now
Checking & Clearing Alarms
Checking & Changing Setpoints
Calibrating Sensors
Changing Biocide Timing
Adjusting % Feeds
Userid - Passwords
46
Spare Parts
Technical Support
Specifications
Keypad Navigator
Revision Log
M714_User_Master.doc
Updated Aug. 25, 2015
3
Saftey
Electrical Shock Hazard
CAUTION: The operator of this instrument is advised that if the equipment is used in a
manner not specified in this manual, the protection provided by the equipment may be
impaired.
Opening the controller enclosure with the controller plugged in, exposes the user
to AC line voltages on the lower of the two controller circuit boards.
Ground the controller AC power to the ground screw labeled
the bottom, right of the aluminum backplate.
and located on
External, 120VAC plug boxes are provided with controllers installed in North
America External plug boxes are grounded to the ground screw labeled
located on the bottom, center of the aluminum backplate.
USER WARNING : CAUTION
Water Treatment Controllers operate steam and water valves and may pump
hazardous, corrosive and toxic chemicals. Opening the controller enclosure
exposes user to the risk of electrical shock at power line voltages.
Understand fully the implications of the control setpoints, interlocks and alarms
that you select. Harm to personnel and damage to equipment may result from
mis-application.
Unplug or turn OFF the AC power to the controller if you have any concerns
regarding safety or incorrect controller operation and notify supervisory staff.
YOUR CONTROLLER
Controllers are supplied in many different configurations.
The HELP section in the back of this manual contains the information for
terminating the sensors supplied with your specific controller.
The HELP section in the back of this manual depicts the installation plumbing
header showing the sensor set supplied with your specific controller.
M714_User_Master.doc
Updated Aug. 25, 2015
4
1.1
.
Power UP, first display, current date
Key ENTER for System menu
.
Key DOWN & enter to clear all alarms
And to view detail on Sensor ‘D’, Relay ‘2’ and
‘Sys’tem Alarms
.
.
Sensors and the relays they control are grouped
.
Key ENTER on sensor for sensor ‘O’ menu
& ENTER on the relay ‘1’ relay menu
.
.
.
Sensor ‘E’ menu: Diagnostics | Alarms | Calibrate |
Configure
.
Relay ‘2’ menu: Diagnostics | Configure |
Alarms | Timed Events | Setup
.
.
The display line with the ENTER arrow
Displays Relay ‘9’ menu on ENTER
.
Sampling timing is adjusted by keying ENTER, DOWN
to Configure & ENTER
.
.
.
Sensor display current value
Relays sown ON/OFF state and run time if ON
.
Water meters show volume from midnight
.
.
.
Flowswitch ‘T’ is ON and has been on for 560.2
minutes from midnight
.
Biocide B pump is controlled by Relay #8
and is now OFF:
M714_User_Master.doc
Updated Aug. 25, 2015
What’s Happening Now
System:2003-10-03
S/N: M0389001
Alarms: 16:38:11
D G 2 Sys
Tower Make-up
12800 Gal
Inhibitor Feed
OFF:
O
Tower Conduct'y
1246 uS
Tower 1 Bleed
ON:
18.6min
E
Blr 2 Conduct'y
5240 uS
B2 B'down Valve
ON:
0.4min
F
Corrosion Rate
1.45 mpy
Tower Bleed meter
34000 Gal
D
Flowswitch 1
ON:
560.2min
Biocide B
OFF:
T
5
1
2
9
Q
8
1.2
Checking & Clearing Alarms
CHECK ALARMS
Power UP, first display
.
.
Key DOWN to Alarms & ENTER
to view detail on Sensors ‘C’ ,‘K’ & Relay ‘3’
& to clear alarms
.
.
Key DOWN to view active alarms
& ENTER
.
.
.
.
.
.
Display on no active alarms
.
.
OR
Scroll down to view all active alarms
.
.
Name of alarming Sensor
Alarm type: pH Sensor value above High alarm for a
user set time.
.
.
.
.
.
Name of alarming Water Meter
Alarm type: Low alarm checked at midnight
High meter alarm trip immediately
.
.
.
.
Name of Output control alarming
Alarm type: Feed limit timer turns OFF Pump
Day Timer may be set to limit on time/day
.
M714_User_Master.doc
Updated Aug. 25, 2015
1 of 3
System:2003-10-03
S/N: M0389001
Alarms: 16:38:11
C K 3
Alarms:
Clear Alarms
Alarms
Alarms:
Alarms..............
No Active Alarms
Alarms:
Alarms..............
pH Sensor
Alarmed High
Alarms:
Alarms..............
Water Meter O
Alarmed Low
or
to exit
Alarms:
Alarms..............
Acid Pump
Limited, ON timer
6
1.2
Checking & Clearing Alarms
2 of 3
.
CLEAR ALARMS
Power UP, first display
.
.
Key ENTER
to view detail on Sensors ‘C’ ,‘K’ & Relay ‘3’
& to clear alarms
.
.
Key ENTER to Clear Alarms
.
.
.
.
Clear Alarms:
Resets only all active alarms
.
If you wish to end biocide events.
Prebleeds or lockouts.
OR restart special controls:
Clear the target relay alarm.
See page 3 of 3.
.
Information only display
EXIT key escapes
.
Internet HELP reference for more detail
Refer to Technical Support.
.
M714_User_Master.doc
Updated Aug. 25, 2015
System:2003-10-03
S/N: M0389001
Alarms: 16:38:11
C K 3
Alarms:
Clear Alarms
Alarms
Alarms:
Clear Alarms.........
Clear All Alarms
YES
Alarms
Alarms Cleared
Key to Exit
iNet HELP# 0700
7
1.2
Checking & Clearing Alarms
RESET RELAY USING CLEAR ALARMS
.
Key UP or DOWN to the output relay
& key ENTER
.
Any relay can be reset
.
This example is a Biocide pump with 16.6 minutes
of ON time remaining
.
Key DOWN to Alarms & ENTER
.
.
Key DOWN to ‘Reset Alarm & Time & ENTER
Relay 4 will turn OFF
.
Biocide feeds and prebleeds will end
If this relay is timing a biocide lockout, it will end
.
Special controls like Bleed & Feed, % Time
or Boiler Captured Sample controls will restart.
.
.
.
After you key ENTER you see the value of the relay
feed limit timer.
.
.
Key EXIT twice
& you’ll see that Relay 4 is now OFF
.
.
Relays don’t need to be ON to be reset
You may wish to restart special control
Or end the lockout of a bleed relay
M714_User_Master.doc
Updated Aug. 25, 2015
3 of 3
Biocide A
ON:owes 16.6
Biocide B
OFF: No Control
4
Biocide A
Diagnostics
Configure
Alarms
4
5
then
Biocide A
4
Alarms..............
Reset Alarm & Time
YES
then
Biocide A
4
Alarms ............
Minutes/Actuation
120.0 minutes
and
Biocide
OFF: No
Biocide
OFF: No
to exit
A
Control
B
Control
8
4
5
1.3
Checking & Changing Setpoints
.
.
Key UP or DOWN to the output relay
& key ENTER
.
Relays follow the controlling sensor
.
.
.
Key DOWN to Configure & ENTER
.
.
.
.
.
.
Key DOWN to ‘Turn ON’ & ENTER
Select ‘Measure Volume’ for water meter controls.
Current setpoint is 1000uS
.
.
.
Use the UP & DOWN keys to adjust the setpoint
RIGHT moves the cursor across the screen
.
EXIT abandons adjusting the setpoint
.
.
.
.
You can adjust ON or OFF setpoints or both
.
.
Key ENTER to adjust or UP – DOWN to view current
settings
.
.
.
.
.
Turn OFF > Turn ON not allowed with a Rising
Setpoint control
.
.
.
M714_User_Master.doc
Updated Aug. 25, 2015
Tower Conduct'vty
986 uS
Bleed Valve
OFF: Setpoints
E
Bleed Valve
Diagnostics
Configure
Alarms
2
2
then
Bleed Valve
2
Configure...........
Turn ON
1000 uS
then
Editing Value
Turn ON ............
1150
-- uS
Executes,
Exits
then
Bleed Valve
2
Configure...........
Turn OFF
980 uS
then
Editing Value
Turn OFF............
1130
uS
-Executes,
Exits
then
9
1.4
Calibrating Sensors
SENSORS
.
Key ENTER at selected sensor
.
.
.
.
.
.
.
Key DOWN to Calibrate & ENTER
.
.
.
.
.
.
Key ENTER to change sensor value
OR
DOWN & ENTER to Reset to Factory option
.
.
.
Use the UP & DOWN keys to adjust the value
RIGHT moves the cursor across the screen
.
EXIT abandons calibrating
.
.
If the calibration succeeds,
you’ll return to the sensor value display
.
If the sensor is outside of calibration limits
You’ll view the override option
.
.
Key ENTER then UP or DOWN to override
.
.
If you key DOWN, you’ll have the
Reset to Factory option
.
Key ENTER then UP or DOWN to Reset
.
M714_User_Master.doc
Updated Aug. 25, 2015
1 of 2
Tower Conduct'vty
986 uS
Bleed Valve
OFF: Setpoints
E
Tower Conduct'vty
Diagnostics
Alarms
Calibrate
E
2
then
Tower Conduct'vty E
Calibrate...........
Enter Current Value
986 uS
then
Editing Value:
Enter Current Valu..
996
-- uS
Executes,
Exits
then
Tower Conduct'vty E
Calibrate...........
Sensor fault
Override warning
then
Tower Conduct'vty E
Calibrate...........
Reset to Factory
NO
then
10
1.4
Calibrating Sensors
CONTACT HEAD & TURBINE METERS
.
Key ENTER at selected water meter
.
.
.
.
.
.
.
Key DOWN to Calibrate & ENTER
.
.
.
.
.
.
Key ENTER to change value
OR
DOWN & ENTER to Reset to Factory option
.
.
.
Use the UP & DOWN keys to adjust the value
RIGHT moves the cursor across the screen
.
EXIT abandons calibrating
.
.
If the calibration succeeds,
you’ll return to the sensor value display
.
Turbine and Paddlewheel meters
use pulses/unit volume as calibration value
.
.
.
.
If you key DOWN, you’ll have the
Reset to Factory option
.
Key ENTER then UP or DOWN to Reset
Setting Volume per Contact OR ‘K’ Factor to 100
M714_User_Master.doc
Updated Aug. 25, 2015
2 of 2
Make-up meter
O
23400 gal
Inhibitor Pump
1
OFF: Setpoints
Make-up meter
Diagnostics
Alarms
Calibrate
O
then
Make-up meter
O
Calibrate...........
Volume per Contact
100 gal
then
Editing Value:
Volume per Contact..
200 gal
-Executes,
Exits
then
Editing Value:
'K' Factor..........
321.5 gal
Executes,
Exits
then
Make-up meter
O
Calibrate...........
Reset to Factory
NO
or
11
or
1.5
Changing Biocide Timing
.
MODIFY EXISTING EVENT, REVIEW EVENTS
.
Key ENTER at selected chemical pump
This one’s powered by Relay No.5
.
.
.
.
.
.
Key DOWN to Timed Events & ENTER
.
.
.
.
.
.
This Biodispersant has 8 existing events
See Page 2 for Add an Event
.
.
.
.
If there are ‘0’ events then the Edit an Event
option does not exist
.
.
ENTER to select the Event you wish to edit
.
.
Key UP DOWN to Select one of 28 events
OR
Review existing timed events
.
Day = 1 to 28 for 4 week feed cycles
Day = 1 to 7 on weekly feed cycles
.
.
.
Key RIGHT to select the field you wish to modify
.
Key UP DOWN to modify the field
ENTER to update.
.
M714_User_Master.doc
Updated Aug. 25, 2015
1 of 2
Biocide A
ON: 36.5 min
Biodispersant
OFF: Setpoints
4
Biodispersant
Configure
Alarms
Timed Events
5
5
then
Biodispersant
5
Timed Events........
Add an Event
YES
Events,8
Biodispersant
5
Timed Events........
Edit an Event
YES
Select one:
Day Start ON min...
12 04:30
45
Executes,
Exits
then
Edit an Event:
Day Start ON min...
12 06:15
119
-Executes,
Exits
then
12
1.5
Changing Biocide Timing
.
ADD AN EVENT OR EVENTS
.
Key ENTER at selected chemical pump
.
Key DOWN to Timed Events & ENTER
.
.
.
Key RIGHT to select the field you wish to modify
.
Key UP DOWN to modify the field
ENTER to update.
.
.
Key UP DOWN to select ONCE | WEEKLY
| ALTERNATE WEEKS
.
7 Day Cycles select one of ONCE | DAILY
| ALTERNATE DAYS
1 Day Cycles select one of ONCE | HOURLY
| ALTERNATE HOURS
.
.
In this example, we added weekly events
Increasing the total events from 8 to 12.
.
.
.
Keying UP DOWN @ Add an Event
Displays the Delete all Events option
.
.
Key ENTER to remove all events
M714_User_Master.doc
Updated Aug. 25, 2015
2 of 2
Biodispersant
5
Timed Events........
Add an Event
YES
Events,8
Add an Event:
Day Start ON min...
6
15
-- 14:30
Executes,
Exits
then
Select one:
Event frequency.....
Once
Executes,
Exits
then
Biodispersant
5
Timed Events........
Add an Event
YES
Events,12
Biodispersant
5
Timed Events........
Delete all Events
YES
13
1.6
Adjusting % Feeds
.
ADJUST BASE FEED
Key UP or DOWN to the pump control
& key ENTER
.
.
.
.
.
Key DOWN to Configure & ENTER
.
.
.
.
.
.
Key DOWN to Special Control & ENTER
.
Key enter to View or change existing control
.
Percentage Time turns ON for user set %
every 5 minutes
.
.
.
Key ENTER to view adjust current %
.
.
.
.
.
Percentage Time is set to 28%
Pump runs for 84 seconds every 5 minutes
.
Key ENTER to modify
.
.
.
.
Key UP DOWN & RIGHT to modify
then key ENTER
.
31% is 93 sec. every 5 minutes
.
M714_User_Master.doc
Updated Aug. 25, 2015
1 of 2
Tower 1 Inhibitor
ON: 6.2 min
Tower 2 Inhibitor
OFF: No Control
6
Tower 1 Inhibitor
Diagnostics
Configure
Alarms
6
8
then
Tower 1 Inhibitor 6
Configure ..........
Special Control
Percentage Time
then
Tower 1 Inhibitor 6
Special Control.....
Percentage Time
Executes,
Exits
Tower 1 Inhibitor 6
Percentage Time.....
% ON Time
28%
Editing Value:
% ON Time...........
31%
-Executes,
Exits
then
14
1.6
Adjusting % Feeds
.
ADJUST % BLEED FEEDS
.
.
Key UP or DOWN to the pump control
& key ENTER
.
.
.
.
Key DOWN to Configure & ENTER
.
.
.
.
.
.
Key DOWN to Special Control & ENTER
.
Key enter to View or change existing control
.
.
Key DOWN if you wish to switch from
BLEED & FEED
to
BLEED THEN FEED
.
.
.
Key DOWN to % of Time & ENTER
.
.
.
Percentage Time is set to 54%
Pump runs for 162 seconds every 5 minutes
.
Key ENTER to modify
.
.
.
Key UP DOWN & RIGHT to modify
then key ENTER
.
49% is 147 sec. every 5 minutes
.
M714_User_Master.doc
Updated Aug. 25, 2015
2 of 2
Tower 1 Inhibitor
ON: 6.2 min
Tower 2 Inhibitor
OFF: No Control
6
Tower 2 Inhibitor
Diagnostics
Configure
Alarms
8
8
then
Tower 1 Inhibitor 6
Configure ..........
Special Control
Bleed & Feed
then
Tower 1 Inhibitor 6
Special Control.....
Bleed & Feed
Executes,
Exits
then
then
Tower 1 Inhibitor 6
Bleed & Feed........
% of Time
54 %
Editing Value:
% of Time...........
49%
-Executes,
Exits
then
15
1.7 Userid – Passwords
.
IGNORE IF PASSWORDS NOT ‘ON’
IN YOUR CONTROLLER
.
‘YES’ appears if passwords are ON’
Your present USERID also displays.
.
.
.
If ‘YES’ Key ENTER
& key in your password.
.
.
Key an incorrect password to log off.
Auto-logoff occurs 30 minutes after the last keystroke.
.
.
If you keyed a correct password,
you’ll see this display
.
.
.
If your password is incorrect,
you’ll still be the ‘public’ user
.
.
If you require the ADMIN password,
you’ll see this display when you are already
logged in under another userid
.
.
If you are any user but ‘public’
& you key DOWN @ ‘Login Required’
you can adjust your password
.
.
.
.
Keep your password simple
If you are using the keypad
.
.
System:
Passwords...........
Login Required
YES,public
Editing Value:
Key Password......
G
-Executes,
Exits
then
System:
Time & Date
LAN Setup
Passwords
System:
Passwords...........
Login Required
YES, public
System:
Passwords........
New Password
YES
System:
New Password
XK
-Executes,
Exits
then
M714_User_Master.doc
Updated Aug. 25, 2015
16
2.1
Setting Biocide Prebleed-Lockout
.
.
Key UP or DOWN to the biocide pump control
& key ENTER
.
.
.
.
.
.
Key DOWN to Configure & ENTER
.
.
.
.
Key DOWN to Special Control & ENTER
.
If not set to Prebleed-Lockout, key UP DOWN
.
.
Key ENTER to adjust Prebleed-Lockout parameters
.
.
‘Bleed Relay’ prebleeds before each biocide feed
and is locked-out after each feed event
.
Key ENTER to modify
.
.
.
.
‘Lockout Time’ turns OFF the bleed relay
during biocide kill time
.
Key ENTER to modify
.
.
.
‘Prebleed Time’ turns ON the bleed relay
reducing the tower conductivity before
a biocide feed event
.
Key ENTER to modify
.
M714_User_Master.doc
Updated Aug. 25, 2015
Biocide
OFF: No
Biocide
OFF: No
1 of 2
A
Control
B
Control
Biocide A
Diagnostics
Configure
Alarms
3
4
3
then
Biocide A
3
Configure ..........
Special Control
Prebleed-Lockout
then
then
Biocide A
3
Prebleed-Lockout---Bleed Relay
Tower 1 Bleed
Biocide A
3
Prebleed-Lockout---Lockout Time
120.0 Minutes
Biocide A
3
Prebleed-Lockout---Prebleed time
30.0 minutes
Continued on Page 2
17
2.1
Setting Biocide Prebleed-Lockout
.
You can ‘Prebleed’ until this sensor measures
the conductivity that you set
.
Key ENTER to modify
.
.
This is the ‘Prebleed’ conductivity target
.
‘Prebleed’ ends at this conductivity
OR at the end of ‘Prebleed Time’
.
Key ENTER to modify
Set high to control on ‘Prebleed Time’ only
.
.
.
All Prebleed-Lockout parameters are modified
by ENTER when the parameter is displayed
.
.
.
.
.
.
Key UP DOWN & RIGHT to modify
then key ENTER
.
.
.
.
.
.
Bleed solenoid or valve now turns ON
For 45 minutes before each feed event
on Biocide A, powered by Relay No.3
.
.
M714_User_Master.doc
Updated Aug. 25, 2015
2 of 2
Biocide A
3
Prebleed-Lockout---Prebleed Sensor
Tower Conduct'ty
Biocide A
3
Prebleed-Lockout---Prebleed Value
750.0 uS
Typical: Modify Bleed time
Biocide A
3
Prebleed-Lockout---Prebleed time
30.0 minutes
Editing Value:
Prebleed Time.......
45.0
minutes
-Executes,
Exits
then
Biocide A
3
Prebleed-Lockout---Prebleed time
45.0 minutes
18
2.2
Adjusting Boiler Blowdown Timing
.
Key UP or DOWN to the boiler blowdown control
& key ENTER
.
This example is using Relay No.2
.
It’s been ON for 1.2 minutes
either Blowing down OR Sampling
.
.
.
Key DOWN to Configure & ENTER
.
.
.
.
.
Key DOWN to Special Control & ENTER
.
.
Key ENTER twice to view or adjust timing
.
.
‘Sampling’ opens the blowdown valve so the
conductivity sensor gets a new sample.
.
Key ENTER to modify
.
.
.
.
‘Measure’ cools the sample at the conductivity sensor.
At the end of ‘Measure’ conductivity is compared
to the ON – OFF setpoints.
.
Key ENTER to modify
.
.
.
If the conductivity is above the TURN ON setpoint,
the valve opens for the Blowdown Time
.
Key ENTER to modify
.
M714_User_Master.doc
Updated Aug. 25, 2015
1 of 2
Boiler 1 Cond.
2546 uS
B1 Blowdown
ON: 1.2 minutes
E
B1 Blowdown
Diagnostics
Configure
Alarms
2
2
then
B1 Blowdown
2
Configure ..........
Special Control
Captured Sample
then
then
B1 Blowdown
2
Captured Sample----Sampling Time
30 seconds
B1 Blowdown
2
Captured Sample----Measure Time
60 seconds
B1 Blowdown
2
Captured Sample----Blowdown Time
60 seconds
Continued on Page 2
19
2.2
Adjusting Boiler Blowdown Timing
If the measured conductivity is below
the TURN OFF setpoint,
the next Sample occurs after the ‘Re-Sample delay’
.
If the measured conductivity is above
the TURN OFF setpoint,
Blowdown Time’s are followed by Measure Times
as the boiler conductivity falls.
.
Key ENTER to modify
.
If your installation does not include
a Fail-to-Sample sensor
‘none’ will be displayed
.
.
.
Key UP DOWN to Blowdown Time & ENTER
.
Key ENTER to adjust timing
.
.
.
.
.
Key UP DOWN & RIGHT to modify
then key ENTER
.
.
.
We’ve increased the Blowdown Time
from 60 to 90 seconds
.
Sampling Time, Measure Time and
Re-sample delay are adjusted
using the same key sequence
M714_User_Master.doc
Updated Aug. 25, 2015
2 of 2
B1 Blowdown
2
Captured Sample----Re-sample delay
45 minutes
B1 Blowdown
2
Captured Sample----Fail-to-Sample
B1 Fail-to-Sample
Typical: Modify Blowdown time
B1 Blowdown
2
Captured Sample----Blowdown Time
60 seconds
Editing Value:
Blowdown Time.......
90.0 seconds
-Executes,
Exits
then
B1 Blowdown
2
Captured Sample----Blowdown Time
90 seconds
20
2.3
Sensor Diagnostics
.
Key UP or DOWN to the desired sensor
& key ENTER
.
.
This example is a cooling tower conductivity sensor
Connected to input ‘E’
.
.
.
Key ENTER at Diagnostics
.
.
Each I/O type has it’s own set of Diagnostics
.
.
Sensors have driver cards
Water Meters and contact sets connect directly to
top-center terminal blocks
.
.
.
.
‘Operational’ sensors are not Alarmed
This example is a sensor operating outside
of the HIGH or LOW alarms
.
.
.
.
.
.
Current displayed value of the sensor
and sensor units
.
.
.
.
An increasing Gain indicates a fouled sensor
Gain Multiplier changes with sensor calibration
.
.
.
.
M714_User_Master.doc
Updated Aug. 25, 2015
1 of 2
Tower Conduct'vty
986 uS
Bleed Valve
OFF: Setpoints
E
Tower Conduct'vty
Diagnostics
Alarms
Calibrate
E
2
Tower Conduct'vty E
Diagnostics.........
Input Card Type
Conductivity
Tower Conduct'vty E
Diagnostics.........
Current State
Alarmed
Tower Conduct'vty E
Diagnostics.........
Displayed Value
968.4 uS
Tower Conduct'vty E
Diagnostics.........
Gain Multiplier
5.7160
Continued on Page 2
21
2.3
Sensor Diagnostics
.
.
Selecting ‘Reset to Factory’ during sensor calibration
sets the Gain Multiplier to the Default Gain
.
.
.
.
Conductivity adjusts Gain Multiplier to calibrate
.
.
pH, ORP and temperature
modifies Offset Adjust to calibrate
.
.
.
.
Selecting ‘Reset to Factory’ during sensor calibration
sets the Offset Adjust to the Default Offset
.
.
.
.
.
Measured Level is the raw sensor level
Before Gain Multiplier and Offset Adjust are applied
.
.
.
.
Each driver card range and configuration jumper
setting has a unique ID used by the
controller to auto-configure
Watermeters and contact sets do not require IDs
.
.
.
Some driver cards have internal drive levels
Corrosion Rate cards use Drive Level
to correct for DC isolation offsets
.
Key EXIT to return to sensor menu
M714_User_Master.doc
Updated Aug. 25, 2015
2 of 2
Tower Conduct'vty E
Diagnostics.........
Default Gain
5.6000
Tower Conduct'vty E
Diagnostics.........
Offset Adjust
-35.0000
Tower Conduct'vty E
Diagnostics.........
Default Offset
-35.0000
Tower Conduct'vty E
Diagnostics.........
Measured Level
184.5 mV
Tower Conduct'vty E
Diagnostics.........
Input card ID
76.7 mV
Tower Conduct'vty E
Diagnostics.........
Drive level
0.0 mV
22
2.4
Control Diagnostics
.
INHIBITOR FEED EXAMPLE page 1
.
Key UP DOWN to Inhibitor Pump & ENTER.
.
The pump is ON and owes 6.1 minutes of ON time
.
.
.
Key ENTER at Diagnostics
.
.
Each control type has it’s own set of Diagnostics
.
.
Key ENTER to turn ON the Pump
for 5 minutes
.
WARNING: Immediately turns ON pump
Unless blocked, interlocked or on biocide lockout
Select Alarms then
Reset Alarm & Time to end Prime Output
.
.
Current State displays Interlocked, Blocked,
Timed Out, status messages
.
.
.
.
Controlling sensor in this example is water meter ‘O’
.
Current value of control displayed
.
.
.
.
.
Volume controls measure a user set volume
before turning ON the pump
In this example 100 gallons
.
1 of 4
Make-up Meter
O
38400 gal
Inhibitor Pump
1
ON: owes 6.1
Inhibitor Pump
Diagnostics
Configure
Alarms
Inhibitor Pump
1
Diagnostics.........
Prime Output
YES
Inhibitor Pump
1
Diagnostics.........
Current State
ON: owes 5.6
Inhibitor Pump
1
Diagnostics.........
Control by: O
38400 gal
Inhibitor Pump
1
Diagnostics.........
Measure volume
100.00 gal
Continued on Page 2
M714_User_Master.doc
Updated Aug. 25, 2015
1
23
2.4
Control Diagnostics
.
INHIBITOR FEED EXAMPLE page 2
.
In this example, after each 100 gallons,
the Inhibitor pump turns ON for 20 seconds.
.
.
.
.
.
.
Water meter volume when last feed occurred
.
.
.
Event Cycles may repeat every 1,7 or 28 days
.
This example has 8 events which repeat
every 4 weeks, 28 days
.
Today is Day 9, Monday of week No.2
.
.
.
.
.
Today’s Inhibitor pump ON time from midnight
.
.
.
.
.
Inhibitor pump ON Time Owed
Increases while the cooling tower is making up
and decreases to zero when the make-up float closes.
.
.
.
Varying Cycles and Feed Verification status
Displays follow the Special Control display
.
M714_User_Master.doc
Updated Aug. 25, 2015
2 of 4
Inhibitor Pump
1
Diagnostics.........
Then turn ON for
20 sec
Inhibitor Pump
1
Diagnostics.........
Last fed at
38300 gal
Inhibitor Pump
1
Diagnostics.........
28 Day Event Cycle
8 events, Day 9
Inhibitor Pump
1
Diagnostics.........
minutes ON today
110.6 minutes
Inhibitor Pump
1
Diagnostics.........
Time Owed
0.3 minutes
Inhibitor Pump
1
Diagnostics.........
Special Control
none
24
2.4
Control Diagnostics
.
CAPTURED SAMPLE EXAMPLE page 1
.
Key UP DOWN to the blowdown control & ENTER.
.
Blowdown valve is ON and has been
ON for 1.2 minutes
.
.
.
Key ENTER at Diagnostics
.
.
Each control type has it’s own set of Diagnostics
.
.
.
Priming overrides boiler timing, turning ON the
blowdown valve for 5 minutes
.
Select Alarms then
Reset Alarm & Time to end Prime Output.
.
.
.
Current State displays that the Captured Sample
Special Control has turned ON the Blowdown
.
.
.
.
.
Controlling sensor in this example is sensor ‘F’
.
Current value of controlling sensor displayed
.
.
.
.
.
.
Controller checks Turn ON Setpoint
at the end of every Measure period
.
M714_User_Master.doc
Updated Aug. 25, 2015
3 of 4
Boiler 3 Cond.
3628 uS
B3 Blowdown
ON:
1.2 min
F
B3 Blowdown
Diagnostics
Configure
Alarms
4
4
B3 Blowdown
4
Diagnostics.........
Prime Output
YES
B3 Blowdown
4
Diagnostics.........
Current State
Special Control,ON
B3 Blowdown
4
Diagnostics.........
Control by: F
3420.23 uS
B3 Blowdown
4
Diagnostics.........
Turn ON setpoint
3300 uS
Continued on Page 2
25
2.4
Control Diagnostics
.
CAPTURED SAMPLE EXAMPLE page 2
.
Controller checks Turn OFF Setpoint
at the end of every Measure period.
.
.
.
.
Rising Setpoint blows down above Turn ON and
samples only below Turn OFF.
.
.
.
.
.
It would be unusual to have timed feed events
on a boiler blowdown valve.
.
In this example there are 0 events set
and its day 4, Wednesday today
.
.
.
.
Today’s ON time for the blowdown valve
from midnight
.
.
.
.
Captured Sample, Time Owed would usually be zero
If Prime Output is active, Time Owed
will count down from 5 minutes.
.
.
Displays the Captured Sample ON/OFF state
and which timer is counting down
SAMPLE | MEASURE | BLOWDOWN | RESAMPLE
are the four captured sample states
.
Varying Cycles and Fail-to-Sample status
Displays follow the state display
M714_User_Master.doc
Updated Aug. 25, 2015
4 of 4
B3 Blowdown
4
Diagnostics.........
Turn OFF setpoint
3275.00 uS
B3 Blowdown
4
Diagnostics.........
Control Type
Rising Setpoint
B3 Blowdown
4
Diagnostics.........
7 Day Event Cycle
0 events, Day 4
B3 Blowdown
4
Diagnostics.........
minutes ON today
234.6 minutes
B3 Blowdown
4
Diagnostics.........
Time Owed
0.0 minutes
Inhibitor Pump
1
Diagnostics.........
Captured Sample:OFF
Resample: 26.4 m
26
2.5
System Diagnostics
.
Power ON display
OR key UP DOWN to System: & ENTER.
.
.
.
.
.
.
Key ENTER at Diagnostics
.
.
.
.
Firmware version is followed by the two modules that
form the base controller
.
M7 is a 7 analog, 7 digital input module
M14 is a 14 analog, 12 digital input module
.
PR10 is a 10 relay output; PR5 a 5 relay output
.
.
.
PR10 controllers include an AC Current Transformer
AC Current is the total controller current including
All pumps, valve & solenoid current
.
.
.
OK is an intact, Relay 1 to 5 load fuse
.
OPEN is a failed fuse.
Pumps & Solenoids controlled by relays 1-5 are OFF.
.
.
.
.
OK is an intact, Relay 6 to 10 load fuse
.
OPEN is a failed fuse.
Pumps & Solenoids controlled by
relays 6-10 are OFF.
.
M714_User_Master.doc
Updated Aug. 25, 2015
1 of 2
System:2003-10-03
S/N: M0389001
Alarms: 16:38:11
D G 2 Sys
System:
Diagnostics
Enable I/O
Configure
System:
Diagnostics.........
Firmware Version
A814-M7-PR10
System:
Diagnostics.........
AC Current
4.26
System:
Diagnostics.........
Relay 1-5 Fuse
OK
System:
Diagnostics.........
Relay 6-10 Fuse
OPEN
Continued on Page 2
27
2.5
System Diagnostics
Current state of alarm contacts
.
The controller may be configured to
OPEN or CLOSE alarm contacts on alarm.
.
Displays the current state of the dry contacts at the
AL1 & AL2 terminal block on the PR5 or PR10 module
.
.
.
Increasing watchdog resets indicate external
electrical spikes or internal controller faults
.
.
.
.
.
.
Date and time of most recent full control reset
.
.
.
.
.
.
A Default Admin Password has not
been changed from the factory default
.
.
.
.
.
Internal calibration check
Factor required to correct internal 2.5V reference
1 +/- 0.05
.
.
Current loop and turbine water meter power supply
Thermally fused. Will read <10V if there is wiring a
loop or meter fault
.
Internal 12V Relay Supply, Ethernet Option
& Feed Verify Option
displays follow the 15V display.
M714_User_Master.doc
Updated Aug. 25, 2015
2 of 2
System:
Diagnostics.........
Alarms
CLOSED
System:
Diagnostics.........
Watchdog Resets
0
System:
Diagnostics.........
Reset to Factory
2003-11-08 10:30:00
System:
Diagnostics.........
Admin Password
Default
System:
Diagnostics.........
Internal 2.5V
0.9996
System:
Diagnostics.........
15V External Supply
20.276
28
3.1
Read this first!
ONE CONTROLLER – MANY APPLICATIONS
Controllers are shipped configured with a wide range of sensors
for one or more cooling towers, multiple boilers, hot & chilled closed loops,
condensate monitoring, waste water control and monitoring…
YOUR CONTROLLER – SENSOR SET
The installation instructions for your specific controller are
in the HELP section YELLOW pages.
HELP is the last tab in the manual binder.
YOUR APPLICATION CHANGES
The controller can be completely reconfigured using the keypad or optional browser
Feed methods and interlocking can be changed.
pH control can be switched to ORP
A tower controller can be switched to waste water or boiler-condensate controls
You need to automate sensor cleaning, measure more water meters,
Feed based on steam production, Bleed on the ratio of make-up & bleed volume…
YOU NEED TO ADD ANOTHER PH, ORP, BOILER CONDUCTIVITY…
Upgrade kits can expand the controller to 14 analog sensors,
10 watermeter-digital inputs and 10 Relay controls
The controller recognizes new sensor drivers and auto-configures.
The digital inputs can be switched between water meter inputs to contact closure inputs.
THE REST OF SECTION 3.
Not all of the following sections apply to your controller or application.
You may need some of these functions as your application evolves.
M714_User_Master.doc
Updated Aug. 25, 2015
29
3.2
Connect Sensors
1 of 4
M7 Type Controllers
Water meters are typically connected to inputs O,P & Q.
Flowswitches, fail-to-sample sensors and contact sets connected to R, S & T.
M14 Type Controllers
Water meters are typically connected to inputs O,P & Q and U,V & W.
Flowswitches, fail-to-sample sensors and contact sets connected to R, S & T and X,Y & Z.
Digital Inputs
Inputs ‘O’ to ‘Z’ may be user configured for water meters and volume measurements
OR contact closure and state, interlocking functions
Typical Water Meter & Flowswitch Connections
Water Meters, Turbine Meters, Flowswitches
and Contact Sets may be connected any
digital input 'O' to 'T'
CR2032
LNK ACT
Sensor Module
A&B
M7 Module
LAN
Black
Red
Contact Head
Water Meters
M714_User_Master.doc
Updated Aug. 25, 2015
O P Q R S T
15 VDC
Sensor Module
C&D
Red
Red
Flowswitches
& Interlocks
30
Connect Sensors
3.2
2 of 4
Typical Sensor Driver Connections
Red
Black
White
Green
ORP & pH
to S+
to Sto T+
to T-
Bare Shield to '-'
Clear, center wire to '+'
S+ S- T+ TRd Bk Wh Gn
Part: CT
1+ 1-
Conductivity
Temperature
Sensor
Conductivity
&
Temperature
2+ 2-
Part: OP
Sensor, Entry &
Solution Ground
Conductivity
Temperature
Sensor 1
pH or ORP
>100uS
<100uS
2nd sensor
connects to
2+ 2- Terminals
2O PO
ID
S2
S1
S1 S1 S2 S2
Part: OP
Single
Corrosion
Rate
pH or
ORP
Part: CR
S1 S1 S2 S2
Part: B
Sensor 1
Sensor cabling is
not polarized
Part: OP
Sensor 1
Boiler
or
Condensate
pH or ORP
2nd sensor
connects to
S2 Terminals
Sensor cabling is
not polarized
2nd sensor
connects to
S2 Terminals
M714_User_Master.doc
Updated Aug. 25, 2015
BLR
Sensor 1
CND
BLR
Boiler
Condensate
CND
Corrosion
Rate
Sensor 2
31
3.2
M714_User_Master.doc
Updated Aug. 25, 2015
Connect Sensors
32
3 of 4
Remote
Monitor
Proportional
Control
4-20mA Input
Loop Powered
Pump or Valve
+24V IN
1+ 1- 2+ 2Part: IO
Typical 4-20mA Output &
Input Connections
- +
15 VDC
Controller DC Supply
15 to 22 VDC Supply
Dual 4-20mA
Output
Loop Powered
Sensor
Dual output driver
shown.
Sinlge Driver has
1+ & 1- Terminals
1+
- +
2+
15 VDC
Part: CI
- +
Controller DC Supply
4-20mA Output
Powered Loop
15 to 22 VDC Supply
4-20mA
Current Loop
Dual Input
Loop 1
>3.5 mA
M714_User_Master.doc
Updated Aug. 25, 2015
Loop 2
>3.5 mA
Current Loop Inputs
may be any
combination
or powered and
loop powered
33
M714_User_Master.doc
Updated Aug. 25, 2015
Sensor F
Sensor G
Sensor H
Sensor A
Sensor D
Sensor C
Sensor K
Sensor L
Sensor J
Sensor I
Sensor N
Sensor M
Sensor E
Sensor B
Sensor E
Sensor F
Sensor C
Sensor G
Sensor D
Sensor A
Sensor B
3.2
Connect Sensors
M7 Module
Sensor Locations
M14 Module
Sensor Locations
M7 Module
34
4 of 4
3.3
M714_User_Master.doc
Updated Aug. 25, 2015
Connect Pumps,Valves,Solenoids
35
M714_User_Master.doc
Updated Aug. 25, 2015
36
3.4
Verify Controls
1 of 2
VERIFY SENSORS MATCH CONTROLS
.
Controlling sensors are followed by the
controlled pumps, valve & solenoids.
.
Make-meter connected to input ‘O’.
Controls the inhibitor pump powered by Relay 1.
.
Key ENTER to verify, modify pump setpoints
.
.
Conductivity Sensor connected to ‘B’
Controls the bleed solenoid powered by Relay 2
.
Key ENTER to verify, modify bleed setpoints
.
.
.
pH Sensor connected to ‘C’
Controls the acid pump powered by Relay 3
.
Key ENTER to verify, modify acid feed setpoints
Page 2 shows key sequence
.
.
.
Boiler Conductivity Sensor connected to ‘E’
Controls the blowdown valve powered by Relay 4
.
Key ENTER to verify, modify blowdown setpoints
.
.
.
Biocides follow sensor no used for control
As you key UP DOWN
.
.
.
Sensors may be used to control 4-20mA outputs
In controllers with IO Driver cards
.
Condensate Monitoring Sensor connected to ‘F’
Controls the C1 4-20mA control
.
Key ENTER to verify, modify 4-20mA span
M714_User_Master.doc
Updated Aug. 25, 2015
Tower Make-up
12650 gal
Inhibitor Pump
OFF: Setpoints
O
Tower conduct'ty
1862 uS
Bleed Solenoid
ON:
113.2 min
B
Tower pH
C
7.62 pH
Acid Pump
ON:
8.6 min
3
1
2
Boiler 1 cond.
3521 uS
Bl B'down Valve
OFF: Setpoints
E
Biocide 1
ON: owes 13.4
Biocide 2
OFF:No Control
7
4
8
Condensate Cond.
F
20.3 uS
4-20mA Output C1 C1
8.46 mA
20.3 uS
37
3.4
VERIFY – MODIFY SETPOINTS
The Tower pH sensor at input ‘C’
Controls the acid pump powered by relay 3
.
Key ENTER at Acid Pump to verify-modify setpoints
.
.
.
.
.
Key DOWN to Configure and key ENTER
.
.
.
.
Key DOWN to Turn ON Setpoint
Its’ currently 8.25pH, Key ENTER to Modify.
.
Key DOWN to verify-modify Turn OFF Setpoint.
.
.
.
Key ENTER at 4-20mA display
.
Key DOWN to Configure & key ENTER
.
.
.
.
.
.
4mA level = 0uS
.
Key ENTER to modify or DOWN
to verify-modify 20mA Level
.
.
20mA level = 100uS
.
Key ENTER to modify
.
M714_User_Master.doc
Updated Aug. 25, 2015
Verify Controls
2 of 2
Tower pH
C
7.62 pH
Acid Pump
ON:
8.6 min
3
Acid Pump
Diagnostics
Configure
Alarms
3
then
Acid Pump
3
Configure...........
Turn ON setpoint
8.25 pH
4-20mA Output C1
Diagnostics
Configure
C1
then
4-20mA Output C1 C1
Configure...........
4mA Level
0.00 uS
or
4-20mA Output C1 C1
Configure...........
20mA Level
100.00 uS
38
3.5
VERIFY – MODIFY ALARMS
Key UP DOWN to the target sensor
and key ENTER
.
.
.
.
.
.
Key DOWN to Alarms and key ENTER
.
.
.
.
.
.
Key ENTER to modify High Alarm
or DOWN for Low Alarm
.
.
.
.
.
Key ENTER to modify Low Alarm
or DOWN for Alarm Relay
.
.
.
.
A Tower pH alarm will trip the controller alarm relay
Key ENTER & UP DOWN to select NO
to not set the alarm relay on a pH alarm
.
.
.
A high or low alarm will register 5 minutes
after it occurs, to block alarms on transients
.
Key ENTER to modify
A delay of 0.0 minutes will alarm immediately.
M714_User_Master.doc
Updated Aug. 25, 2015
Setting Sensor Alarms
Tower pH
C
7.62 pH
Acid Pump
ON:
8.6 min
3
Tower pH
Diagnostics
Alarms
Calibrate
C
then
Tower pH
C
Alarms..............
High Alarm
10.00 pH
or
Tower pH
C
Alarms..............
Low Alarm
5.50 pH
or
Tower pH
C
Alarms..............
Set Alarm Relay
YES
or
Tower pH
C
Alarms..............
Delay on Alarm
5.0 minutes
39
3.6
VERIFY – MODIFY
FEED LIMIT ALARMS
Key UP DOWN to the target control
and key ENTER
.
.
.
.
.
.
Key DOWN to Alarms and key ENTER
.
.
.
An acid pump limit timer prevents overfeed
on pH sensor fault.
.
.
Key ENTER to modify Minutes/Actuation
or DOWN for Minutes/Day
.
.
.
.
.
Key ENTER to modify Minutes/Day
or DOWN for action on alarm
.
.
Acid pumps are usually set to Turn OFF on Alarm
Bleed controls are usually set to
NOT Turn OFF on alarm.
.
.
.
A feed limit alarm will trip the controller alarm relay
Key ENTER & UP DOWN to select NO
to not set the alarm relay on feed limiting.
.
Key down to view Reset & Most Recent Alarm.
M714_User_Master.doc
Updated Aug. 25, 2015
Setting Output Alarms
Tower pH
C
7.62 pH
Acid Pump
ON:
8.6 min
3
Acid Pump
Diagnostics
Configure
Alarms
3
then
Acid Pump
3
Alarms..............
Minutes/Actuation
45.0 minutes
or
Acid Pump
3
Alarms..............
Minutes/Day
600.0 minutes
or
Acid Pump
3
Alarms..............
Turn OFF on Alarm
YES
or
Acid Pump
3
Alarms..............
Set Alarm Relay
YES
40
3.7
INTERLOCKS PREVENT CONTROLS
FROM TURNING ON
Key UP DOWN to the target control
and key ENTER
.
.
.
.
.
Key DOWN to Configure and key ENTER
then key DOWN to Interlocked by
.
.
.
.
In this example, when the Flowswitch connected to
input ‘T’ closes, the Tower Bleed can operate
.
Key ENTER to modify the interlock
.
.
.
nd
In the 2 example, Steam Treatment is being fed
based on Steam demand
.
.
Key ENTER , then key DOWN
to Configure and key ENTER
.
.
.
.
Key DOWN to Interlocked by
An R | S, ‘ORS’ requiring either R or S contact
sets closed to operate the pump
.
R+S ‘ANDS’, requiring both R & S contact set to be
closed to operate the pump
.
In this example, R & S may close when
Boiler s1 & 2 are ON-line
M714_User_Master.doc
Updated Aug. 25, 2015
Verify Interlocks
Conductivity
1245 uS
Tower Bleed
ON:
8.6 min
E
Tower Bleed
Diagnostics
Configure
Alarms
2
2
then
Tower Bleed
2
Configure...........
Interlocked by
T
Steam Demand
32500 lb
Steam Treatment
ON:
10.4 min
P
Steam Treatment
Diagnostics
Configure
Alarms
5
5
then
Steam Treatment
5
Configure...........
Interlocked by
R|S
41
3.8
BLOCKING PREVENTS TWO
CONTROLS FROM TURNING ON
AT THE SAME TIME
This example shows an Inhibitor Pump,1 blocked
when the Oxidant Pump,3 is ON
to prevent Inhibitor – Oxidant reaction
.
.
Key ENTER
Key DOWN to Configure and key ENTER
then key DOWN to Blocking Relays
.
.
.
This example shows that Relay 1 is OFF
whenever relay 3 is ON
.
Key ENTER to modify the blocking relay
Selecting ‘none’ removes the block
.
.
.
This example shows an Inhibitor Pump
turned OFF when Relay 2 is ON.
.
Relay 2 is a tower bleed solenoid.
This block stops Inhibitor from being
pumped down the tower drain
.
.
Key ENTER , then key DOWN
to Configure and key ENTER
.
.
Key DOWN to Blocking Relays
A ‘2+3’ block would prevent the Inhibitor
from feeding during bleed AND Oxidant feed.
.
Key ENTER to modify the blocking relays
M714_User_Master.doc
Updated Aug. 25, 2015
Verify Blocking Relays
Inhibitor Pump
OFF:Blocked 3
Oxidizing Biocide
ON:
14.2 min
1
Inihibitor Pump
Diagnostics
Configure
Alarms
1
3
then
Inhibitor Pump
1
Configure...........
Blocking Relays
3
Inhibitor Pump
OFF:Blocked 2
Oxidizing Biocide
ON:
14.2 min
1
Inihibitor Pump
Diagnostics
Configure
Alarms
1
3
then
Inhibitor Pump
1
Configure...........
Blocking Relays
2+3
42
3.9
Selecting Special Controls
This example shows an Inhibitor Pump
with ‘Bleed then Feed’ Special Control
.
.
Key ENTER
Key DOWN to Configure and key ENTER
then key DOWN to Special Control
.
Displays current special control
.
Key UP DOWN to view available Special Controls
Meter controlled relays do not have Special Controls
No Control & sensor controlled relays can select from:
Bleed & Feed, Bleed then Feed, Captured Sample,
% Time, Prebleed-Lockout, Time Modulation,
Holding Time and Time Modulation
.
Key ENTER to view, modify current Special Control
.
.
.
.
Key ENTER to modify the Bleed Relay
Or DOWN to view the % of Time
.
.
.
In this Bleed Then Feed example:
For every 5 minutes of Tower Bleed time,
the Inhibitor runs for 46% or 136 seconds
AFTER the bleed turns OFF
.
.
.
Key ENTER to modify the % of Time
This example increase the % of time from 46% to 52%
.
.
Special Controls are detailed in the on-line
M714_Tech, technical service manual
M714_User_Master.doc
Updated Aug. 25, 2015
Inhibitor Pump
OFF: No Control
Biocide A
ON:
8.6 min
1
Inhibitor Pump
Diagnostics
Configure
Alarms
1
3
then
Inhibitor Pump
1
Configure...........
Special Control
Bleed then Feed
and
Inhibitor Pump
1
Bleed then Feed----Bleed Relay
Tower Bleed
Inhibitor Pump
1
Bleed then Feed----% of Time
46%
then
Editing Value:
% of Time...........
52%
-Executes
Exits
then
43
3.10
Modifying Variable Cycles
Variable Cycles may be used where varying
make-up conductivity cause water treatment fault.
Requires a make-up conductivity sensor
.
Key ENTER
.
.
.
.
Key DOWN to Variable Cycles and key ENTER
.
.
.
.
.
.
Key ENTER to modify Low Range
.
.
When the Make-up Conductivity is
less than Low Range
Bleed is controlled at Low Cycles
.
Key ENTER to modify the Low Cycles
.
.
.
.
.
.
Key ENTER to modify Medium Range
.
.
When the Make-up Conductivity is
less than Medium Range & greater than Low Range
Bleed is controlled at Medium Cycles
.
.
Key ENTER to modify the Medium Cycles
.
.
Conductivity
1384 uS
Tower Bleed
ON:
8.6 min
E
Tower Bleed
Timed Events
Setup
Variable Cycles
2
2
then
Tower Bleed
2
Variable Cycles.....
Low Range
350 uS
or
Tower Bleed
2
Variable Cycles.....
Low Cycles
6.100 cycles
or
Tower Bleed
2
Variable Cycles.....
Med. Range
650 uS
or
Tower Bleed
2
Variable Cycles.....
Med. Cycles
4.250 cycles
or
M714_User_Master.doc
Updated Aug. 25, 2015
1 of 2
Continued on Page 2
44
3.10 Modifying Variable Cycles
.
.
.
Key ENTER to modify High Range
.
.
When the Make-up Conductivity is
less than High Range & greater than Med. Range
Bleed is controlled at High Cycles
.
.
Key ENTER to modify the High Cycles
.
.
.
When the Tower Conductivity exceeds
Maximum Conductivity the
Bleed is controlled at Max Conductivity
.
.
Key ENTER to modify the Maximum Conductivity
.
.
2 of 2
Tower Bleed
2
Variable Cycles.....
High Range
1000 uS
or
Tower Bleed
2
Variable Cycles.....
High Cycles
2.500 cycles
or
Tower Bleed
2
Variable Cycles.....
Max Conduct.
3000 uS
or
or
Variable Cycles Primer
.
Variable Cycles must be set to YES in the Bleed control Configure menu option
The bleed relay must be controlled by a conductivity ratio.
Example: Control Equation is E/F where E = Tower Conductivity & F = Makeup Conductivity.
The Control Equation may be modified in the Bleed control Configure menu option
.
Variable Cycles modifies bleed setpoints as make-up conductivity changes
Setpoint adjustment is blocked when Variable Cycles is controlling.
Bleed Setpoint units are set to ‘cycles’ when Variable Cycles are selected.
.
You will need to modify the Range and Cycle Setpoints for your site
makeup water chemistry and water treatment program
M714_User_Master.doc
Updated Aug. 25, 2015
45
3.11
Modifying Feed Verification
Controller Option: Feed Verification calculates
Inhibitor ppm and Inhibitor tank level
with fail-to-feed alarms.
Requires a feed verification meter on the
inhibitor chemical pump feed.
.
Key ENTER
.
.
.
Key DOWN to Feed Verify and key ENTER
.
.
.
The Verify Meter measures the volume
pumped by the inhibitor pump
.
Key ENTER to modify Verify Meter sensor location
.
.
.
Inventory Location logs tank level,
lowering level as inhibitor is pumped
.
Key ENTER to modify Inventory location
.
.
.
ppm location logs the calculated ppm
based on volume pumped and the method used to
calculate cycles
.
Key ENTER to modify ppm location
.
.
One of three methods is used to calculate cycles
Fixed Cycles | Bleed Cycles | Meter Cycles
.
Key ENTER to modify the cycles method
.
1 of 2
Tower Make-up
18425 gal
Inhibitor Pump
ON:
10.6 min
O
Inhibitor Pump
Setup
Variable Cycles
Feed Verify
1
then
Inhibitor Pump
1
Feed Verify.........
Verify Meter
Meter Input Q
or
Inhibitor Pump
1
Feed Verify.........
Inventory location
Sensor Input G
or
Inhibitor Pump
1
Feed Verify.........
ppm location
Sensor Input H
or
Inhibitor Pump
1
Feed Verify.........
ppm method select
Fixed Cycles
Continued on Page 2
M714_User_Master.doc
Updated Aug. 25, 2015
1
46
3.11 Modifying Feed Verification
.
Fixed Cycles applies a user set cycles
to calculate ppm
.
.
Key ENTER to view-modify cycles
.
.
.
.
.
ppm is calculated using 3.5 cycles of concentration
Key ENTER to modify
.
.
.
.
Key UP DOWN and RIGHT to modify
then ENTER
.
Increasing the concentration from 3.5 to 4.23
increases the calculated ppm.
.
2 of 2
Select one:
ppm method select...
Fixed Cycles
Executes
Exits
Inhibitor Pump
1
ppm method select--Fixed Cycles
3.500 cycles
Inhibitor Pump
1
Fixed Cycles........
4.230
cycles
-Executes
Exits
then
.
Feed Verification Primer
.
Feed Verification must be set to YES in the Inhibitor pump control Configure menu option
The Inhibitor pump relay must be controlled by the make-up water meter.
.
A fail-to-feed alarm is set on the feed verification meter input if the meter
does not measure volume after the pump has been ON for 30 seconds
.
.
Meter Cycles ppm calculation requires a water meter on the tower bleed.
Cycles of concentration is calculated using ratio of the Make-up to Bleed meter volumes
.
Bleed Cycles ppm calculation requires the conductivity of the tower make-up.
Cycles of concentration is calculated using ratio of the Tower to Make-up conductivities
M714_User_Master.doc
Updated Aug. 25, 2015
47
3.12
Time & Date are battery backed
Adjusting Timer & Date may not be
required on start-up
.
.
Key ENTER at System:
.
.
.
.
Key DOWN to Time & Date and key ENTER
.
.
.
.
.
Displays current Date and Time
.
.
Key ENTER to modify
.
.
.
.
Key UP DOWN and RIGHT to modify
the Date and Time
.
.
Key ENTER
.
.
Displays modified Date & Time
.
EXIT returns to System:
.
M714_User_Master.doc
Updated Aug. 25, 2015
Time & Date
System:2003-10-27
S/N: M0389001
Alarms: 16:38:11
none
System:
Enable I/O
Configure
Time & Date
then
System:
Time & Date.........
Adjusts Date-Time
2003-10-27 16:38
System:
Adjusts Date-Time...
03-11-27 17:38
Wed
-Executes
Exits
then
System:
Time & Date.........
Adjusts Date-Time
2003-11-27 17:38
48
4.1
Spare Parts
Fusing
Protects
Rating / Type
Power Relays
Fuse 1-5
&
Fuse 6-10
Controller – Modem
Control Fuse
Manufacturer - Vendor
Littlelfuse, Type 217, 250VAC
6.3 Amps @ 120VAC Digikey Part# F953-ND
3 Amps @ 250VAC Digikey Part# F950-ND
5mm x 20mm,
Fast Acting www.digikey.com 1-800-344-4539
Cooper Bussmann, PC-TRON,
PCC Series, 250VAC
1.5 Amp @ 120VAC Digikey Part# 283-2758-ND
½ Amp @ 250VAC Digikey Part# 283-2120-ND
www.digikey.com 1-800-344-4539
Controller Parts
Part#
M-FUSES
Cable-Xover
Description
120VAC Fuse Kit, 20 x 6.3A Relay Fuses,
4 x 1 Amp control fuses
Crossover cable, Controller RJ45 to Notebook NIC
Mod-LCD4
Replacement 4x20 LCD Display
Mod-M3000
Micro controller module
Mod-M7
Seven analog, Six digital input module
Mod-M14
Fourteen analog, Twelve digital input module
Mod-PR5
Five power relay, power module
Mod-PR10
Ten power relay, power module
Modem
Modem, serial cable & power cube
SFCBL4
120VAC Four Plug box, flex conduit & fittings, pre-wired
SFCBL2
120VAC Two Plug box, flex conduit & fittings, pre-wired
H-SEN6
Sensor entry gland, six cable seal
Replacement Sensors and Upgrade Kits
Refer to 4.2 Technical Support
M714_User_Master.doc
Updated Aug. 25, 2015
49
4.2
Technical Support
ProMinent Fluid Controls, Inc.
(formerly Aquatrac, Inc.)
.
136 Industry Drive
Pittsburgh, PA
15275
412-787-2484
8:00AM - 5:00PM EST
Other Keypad Functions
Navigation to keypad functions is detailed in Section 4.4, Keypad Navigator
Upgrade Kits
Controls can be added to installed controllers.
Upgrade kits include sensor, entry fitting, driver card and installation instructions
On-Line Help
Internet HELP is linked in real time by browser users
with internet accessible controllers
Keypad connect to www.aquatrac.com/help with ‘iNet HELP#’ from LCD display
Browser Users Manual
Download M714_browse from www.aquatrac.com
Controller Technical Manual
Download M714_tech from www.aquatrac.com
M714_User_Master.doc
Updated Aug. 25, 2015
50
4.3
Specifications
1 of 4
Controllers configured M7-PR5, M7-PR10, M14-PR5 & M14-PR10
Analog – Digital I/O
Analog Inputs
4-20 ma Outputs
Rating - Detail
M7: 7 Analog Sensors
3 Dual & 1 Single Driver
M14: 14 Analog Sensors
7 Dual Drivers
Auto-configure on
Driver installation and removal
Single & Dual Drivers
0 to 8, DC isolated,
loop powered.
Nominal 0.1% resolution.
Auto polarity correction field wiring.
Digital Inputs
M7: 6
Dry Contacts, 250mS response
Water Meters, 400 Hz max
0.5mA @ 5VDC
measurement current
M7: 5
Each 4-20mA output uses an
Analog Input.
Auto-configure on
Driver installation and removal
User configurable as water
meters or contact sets.
M14: 12
Relay Outputs
Notes
1 SPST, 4 SPDT
Contact head meters software
debounced.
Turbine-Paddle wheel rating =
Seametrics max pulse rate.
Alarm Relay
Dry contact set, Unfused
Relays rated 10A, 120VAC
Fused in sets of 5 relays
Detection and Alarm on fusing
User selected NO or NC
Load Current
PR10 Only
Measures total AC load current
M14: 10 2 SPST, 8 SPDT
Communications
User Interface
Keypad - LCD
10 BaseT, TCP-IP
Ethernet LAN
(Optional)
Rating – Detail
5 Key Tactile feedback: UP /
DOWN / ENTER / EXIT / RIGHT
Scan rate 100mS nominal
4 Line x 20 Character, Backlit
User adjustable contrast
HTML, Telnet micro Web Server
Password, UserID protected.
Full command, control, reconfigure
Browser can show LCD is real
time.
via browser.
Network parameters and ports
User set.
Modem
(Optional)
M714_User_Master.doc
Updated Aug. 25, 2015
Notes
Auto-configures views linking
sensors and controls.
HELP links for on-line users.
56K, V.90 Remote Telnet access.
Dial-out on alarm to pager or PC
Dedicated controller serial port.
Forced dial-out diagnostics
51
4.3
Specifications
2 of 4
Controls
Rating - Detail
ON/OFF
User set deadband and controlling
sensor(s) or contact set.
Any relay can be user
configured for any Control.
User defined rising, falling or
between Setpoints or active only
during timed events
Control by up to 4 analog
sensors using +,-,x & / math
Biocide Feed
28 Events per relay
(Timed Events)
1 minute resolution
Each relay can be set to 1,7 or
28 day cycle.
Lockout, Prebleed on both time
and conductivity.
Timed events may exist
concurrently with other controls
User defined control by sensor or
relay control equation.
Software ZERO & SPAN adjust.
Proportional 4-20mA
Proportional ON/OFF
Volumetric
Auto-Manual switching.
Interlocked current loops go to
4mA
Timed Modulation and Timed
Cycling Special Controls
ON time modified by Setpoint to
actual delta.
User set, measure volume
Rate-to-Volume conversion
routes analog input to Water
Meter(s).
& pump ON time.
Sequential control, measures
Makeup volume, then bleeds for
user set volume.
Timed
Bleed & Feed and Bleed then Feed
Includes % of Bleed Time.
User set % Time
Prime
Holding Time
Captured Sample – Boilers
Notes
Sample / Measure / Blowdown /
Resample user set timing.
% Bleed & Feed based on 5
minute period.
% Time & Prime on 5 minute
period.
Holding time averages sensor
values for control.
Any sensor may be used.
Support for high pressure sites
Fail-to-Sample sensor support
included.
Interlocking
1 to 4 contact set inputs,
AND & OR support
Blocking
1 to 4 relays may block any other
relay
Relay OFF when contact set
opens.
Support for common
Oxidant –Inhibitor feed.
If Blocking relay ON, this relay
OFF
M714_User_Master.doc
Updated Aug. 25, 2015
52
4.3
Controls
Alarms – Feed Limit Timers
Specifications
Rating - Detail
3 of 4
Notes
Minutes / Actuation
User defined OFF on Feed Limit
Minutes / Day
Auto reset on Bleed & Feed and
User defined trip alarm relay,
Bleed then Feed
and/or dial-out
Variable Cycles
Three user defined ranges of
make-up conductivity and target
cycles.
User defined maximum tower
conductivity.
Feed Verification
(Option)
ppm calculation based on volume
fed and cycles of concentration.
Requires control by the ratio of
analog sensors.
1% deadband on cycles and
maximum conductivity
Requires feed volume meter or
4-20mA input on feed rate.
Alarm on fail to feed.
User selected cycles method:
Fixed, Ratio of Tower/Makeup
conductivity, Ratio of
Makeup/Bleed Volume.
Data Logging
Rating - Detail
Log Content
Analog Inputs: Min, Max & Average
Digital -Water Meters: Volume
Fail-to-to feed is no volume fed
after 30 seconds
Notes
Year to date included for Meters
Digital-Contact Set: ON Time
Log Size
600 entries for each of 26 analog
and digital inputs and each of 10
relay outputs
600 entries = 25 Days
at 60 minutes Logging Rate
21,600 Entries Total
Logging Rate
User set independently for each
I/O from 5 to 1440 minutes / entry
Default 60 minutes
Log File Format
User defined start & end date for
XML download
.dtd defines date stamping for
each of 21,600 log entries
XML
System
Rating - Detail
Controller Configuration
User selected Save and Restore to
FLASH memory
Makes current configuration
factory default.
1 sec. Hardware relay lockout
Active on power up and
firmware blocked
Enable ETHERNET, Feed
Verification.
Upgrades locked to Serial# and
date limited.
Watchdog
Field Upgrades
Notes
Add Sensors and Drivers
M714_User_Master.doc
Updated Aug. 25, 2015
53
4.3
Electrical
AC Input
Fusing
Specifications
Rating - Detail
4 of 4
Notes
120 or 240 VAC, 50/60Hz,
Switch selectable
M10 Version
5x20mm, 120VAC fusing:
12.6 Amps @ 120VAC
Relays 1-5 & 6-10: 6.3A ea.
6 Amps @ 240VAC
Control: 1.5A
M5 Version
6.3 Amps @ 120VAC
3 Amps @ 240VAC
Surge-Spike Suppression
Relays 2-5 and 7-10, NO contacts
snubbed 0.1uF, 150R
Controller, transformer isolated
from AC line
Varistor on control AC input
AC Terminals
AC Input: AWG 12, 240mm2
AC Outputs: AWG 14, 150mm
2
Electrical grounds at bottom of
aluminum backplate
Conductor insulation rated
600VAC minimum.
Sensor, Digital Input
Terminals
AWG 22, 0.25 – 0.50mm2
DC Loop – Turbine Meter
Power
15 – 22 VDC, unregulated
Field wiring terminals
Thermally fused @ 200mA
on M7 & M14
Conductor insulation rated
600VAC minimum.
Mechanical
Enclosure
Rating
Non-metallic, NEMA4X, IP65
M10 Version
Rating, Dimensions,
Weight
14”W x 17”H x 6.75”D
355mm W x 430mm H x 170mm D
17lb. 7.7kg nominal
M5 Version
12.5”W x 15”H x 6.5”D
320mm W x 380mm H x 165mm D
11.8lb. 5.4kg nominal
120VAC Plug Boxes
Rated for outdoor use.
Limited to 5 Amps / plugbox
2 & 4 plug boxes provided with 36”
of flexible non-metallic conduit
Environmental
M714_User_Master.doc
Updated Aug. 25, 2015
MAX AWG14, 150 150mm2
Notes
Nominal dimensions, excluding
entry fittings and flexible
conduit. Including mounting.
Enclosure door hinged left.
Allow 18”, left for door opening.
Allow 24”, below for cableconduit access.
Plug boxes not included:
1. At hardwired and
240VAC sites.
2. With controllers shipped
outside of North America
Pollution Degree 2,
Altitude 2000m,
Installation Category II,
Humidity 5% to 95%,
54
Temperature 0C to 40C
M714_User_Master.doc
Updated Aug. 25, 2015
55
4.4
Activity
Top Level
UP DOWN
to:
Keypad Navigator 1 of 2
then
DOWN
& ENTER
then
& Notes
4-20mA Output
MANUAL-AUTO
Output
C1..C8
Configure
ENTER & ENTER to toggle
MANUAL-AUTO
4-20mA Output
Control Modify
Output
C1..C8
Configure
DOWN to Control by:
4-20mA Output
C1..C8 Location
Output
C1..C8
Diagnostic
DOWN to Output Card @:
See Section 3.2, 4 of 4
Alarm Relay OPEN-CLOSE
System:
Configure
DOWN to
Alarm opens contacts
Biocide Cycle:
Set 1, 7,28 days
Output 1..10
Setup
DOWN to Event Cycle
Contact Set to Meter: Modify Input O..Z
Configure
DOWN to Digital Input Type
ENTER, DOWN to Contact
Head OR Turbine Meter
Control Type
(Action on Setpoints)
Output 1..10
Configure
DOWN to Control Type
Rising/Falling & Between
Setpoints OR Active only
during Timed Events
Default Configuration LOAD
System:
Configure
DOWN to Load Configuration
Restores Default Controller
Default Configuration SAVE
System:
Configure
DOWN to Save Configuration
Makes current configuration
the default
Disable Input
Input A..Z
Configure
DOWN to Disable Input
Disable Output
Output 1..10
C1..C8
Setup
DOWN to Disable Output
M714_User_Master.doc
Updated Aug. 25, 2015
56
4.4
Activity
Top Level
UP DOWN
to:
Enable I/O
Keypad Navigator 2 of 2
then
DOWN
& ENTER
then
& Notes
System:
Enable I/O
DOWN to inputs or outputs
Key ENTER & DOWN to
select
Input A..Z
Configure
DOWN to Description
Input A..Z
Configure
DOWN to Digits after decimal
LCD & Browser display
Input A..Z
Configure
DOWN to Displayed Units
LAN:
IP, Netmask, Gateway,
MAC, Ports
System:
LAN Setup
WARNING !
Do not modify network
parameters without site IT
permission.
Metric:
System:
Configure
DOWN to Metric Units
Meter to Contact Set: Modify Input O..Z
Configure
DOWN to Digital Input Type
ENTER,
DOWN to Contact Set
Output Name:
Output 1..10
Setup
DOWN to Description
System:
Passwords
DOWN to New Password
for current userid
System:
Configure
DOWN to Keypad Password
Upgrade
Requires upgrade code
Linked to controller serial#
Input Name:
Modify
Input Resolution:
Input Units:
Password:
Modify
Modify
ON-OFF
Modify
Modify
Passwords: ON-OFF
Upgrade:
Reset Passwords System:
M714_User_Master.doc
Updated Aug. 25, 2015
57
4.5
Issued
Revision Log 1 of 1
Contents
2004-01-01
Original issued
2004-03-16
Section 1.7.
Removes ‘userid’ selection for keypad log-in. Applies
only to controllers with Keypad Passwords ON
2004-04-05
Cover page revised, Repagination, Safety grounding
information added to page 3.
2004-04-21
Section 4.3 - Specification
1. Specification revised to match controller nameplate
2. M5 & M10 enclosure sizing and weights added
3. Installation cabling insulation rating specified.
Section 3.1 – Read This First!
1. Emphasis added for controller specific HELP section
2007-10-02
Section 4.3 – Specification / Environmental
Added CSA statements. Page 51
2015-8-24
Safety
Added caution statement on pg. 4
M714_User_Master.doc
Updated Aug. 25, 2015
58