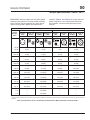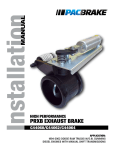
1
RECREATIONAL VEHICLE CHASSIS MAINTENANCE
MANUAL
Models: MC
MCL
XCL
XCM
XCP
XCR
XCS
STI-425-4 (2/12)
Published by
Daimler Trucks North America LLC
4747 N. Channel Ave.
Portland, OR 97217
Printed in U.S.A.
Foreword
Scheduled maintenance provides a key element for safe operation of your vehicle. A proper
maintenance program also helps to minimize downtime and to safeguard warranties. This maintenance manual provides information necessary for years of safe, reliable, and cost-efficient vehicle
operation.
IMPORTANT: The maintenance operations in this manual are not all-inclusive. Also refer to
other component and body manufacturers’ instructions for specific inspection and maintenance instructions.
Perform the pretrip inspection and daily/weekly/monthly maintenance as outlined in the vehicle
operator’s manual. Perform the operations in this maintenance manual at scheduled intervals based
upon distance traveled or months of operation. Your authorized servicing dealer has the qualified
technicians and equipment to perform this maintenance for you. Your dealership can also set up a
scheduled maintenance program tailored specifically to your needs. Optionally, your dealership can
assist you in learning how to perform the maintenance procedures in this manual.
IMPORTANT: Descriptions and specifications in this manual were in effect at the time of
printing. Freightliner Custom Chassis Corporation (FCCC) reserves the right to discontinue
models and to change specifications or design at any time without notice and without
incurring obligation. Descriptions and specifications contained in this publication provide no
warranty, expressed or implied, and are subject to revision and editions without notice.
Refer to www.Daimler-TrucksNorthAmerica.com and www.FreightlinerChassis.com for more
information, or contact Daimler Trucks North America LLC at the address below.
Environmental Concerns and Recommendations
Whenever you see instructions in this manual to discard materials, you should attempt to reclaim and
recycle them. To preserve our environment, follow appropriate environmental rules and regulations
when disposing of materials.
NOTICE: Parts Replacement Considerations
Do not replace suspension, axle, or steering parts (such as springs, wheels, hubs, and steering gears)
with used parts. Used parts may have been subjected to collisions or improper use and have
undetected structural damage.
© 1997–2012 Daimler Trucks North America LLC
All rights reserved. No part of this publication, in whole or in part, may be translated, reproduced,
stored in a retrieval system, or transmitted in any form by any means, electronic, mechanical,
photocopying, recording, or otherwise, without the prior written permission of Daimler Trucks North
America LLC. Daimler Trucks North America is a Damiler company.
Daimler Trucks North America LLC
Service Systems and Documentation (CVI-SSD)
P.O. Box 3849
Portland, OR 97208-3849
Introduction
Descriptions of Service Publications
Daimler Trucks North America LLC distributes the following major service publications in paper and electronic
(via ServicePro®) formats.
Workshop/Service
Manual
Workshop/service manuals contain service and repair information for all vehicle
systems and components, except for major components such as engines, transmissions, and rear axles. Each workshop/service manual section is divided into
subjects that can include general information, principles of operation, removal,
disassembly, assembly, installation, and specifications.
Maintenance Manual
Maintenance manuals contain routine maintenance procedures and intervals for
vehicle components and systems. They have information such as lubrication
procedures and tables, fluid replacement procedures, fluid capacities, specifications, and procedures for adjustments and for checking the tightness of fasteners. Maintenance manuals do not contain detailed repair or service information.
Driver’s/Operator’s
Manual
Driver’s/operator’s manuals contain information needed to enhance the driver’s
understanding of how to operate and care for the vehicle and its components.
Each manual contains a chapter that covers pre-trip and post-trip inspections,
and daily, weekly, and monthly maintenance of vehicle components.
Driver’s/operator’s manuals do not contain detailed repair or service information.
Service Bulletins
Service bulletins provide the latest service tips, field repairs, product improvements, and related information. Some service bulletins are updates to information in the workshop/service manual. These bulletins take precedence over
workshop/service manual information, until the latter is updated; at that time, the
bulletin is usually canceled. The service bulletins manual is available only to
dealers. When doing service work on a vehicle system or part, check for a valid
service bulletin for the latest information on the subject.
IMPORTANT: Before using a particular service bulletin, check the current
service bulletin validity list to be sure the bulletin is valid.
Parts Technical Bulletins
Parts technical bulletins provide information on parts. These bulletins contain
lists of parts and BOMs needed to do replacement and upgrade procedures.
Web-based repair, service, and parts documentation can be accessed using the following applications on the
AccessFreightliner.com website.
ServicePro
ServicePro® provides Web-based access to the most up-to-date versions of the
publications listed above. In addition, the Service Solutions feature provides diagnostic assistance with Symptoms Search, by connecting to a large knowledge
base gathered from technicians and service personnel. Search results for both
documents and service solutions can be narrowed by initially entering vehicle
identification data.
PartsPro
PartsPro® is an electronic parts catalog system, showing the specified vehicle’s
build record.
EZWiring
EZWiring™ makes Freightliner Custom Chassis Corporation, Freightliner, Sterling, Thomas Built Buses, and Western Star products’ wiring drawings and floating pin lists available online for viewing and printing. EZWiring can also be accessed from within PartsPro.
Recreational Vehicle Chassis Maintenance Manual, May 2011
I–1
Introduction
Descriptions of Service Publications
Warranty-related service information available on the AccessFreightliner.com website includes the following
documentation.
Recall Campaigns
Recall campaigns cover situations that involve service work or replacement of
parts in connection with a recall notice. These campaigns pertain to matters of
vehicle safety. All recall campaigns are distributed to dealers; customers receive
notices that apply to their vehicles.
Field Service Campaigns
Field service campaigns are concerned with non-safety-related service work or
replacement of parts. All field service campaigns are distributed to dealers; customers receive notices that apply to their vehicles.
I–2
Recreational Vehicle Chassis Maintenance Manual, May 2011
Introduction
Page Description
For an example of a maintenance manual page, see Fig. 1.
A
C
B
33
Front Axle
33−01 Knuckle Pin Lubricating
(See
Fig. 1)
33−02 Tie−Rod End Lubricating and
Inspecting
33−03 Toe−In Inspection
D
E
11/11/2002
A.
B.
C.
D.
E.
f020075
Maintenance Operation Number consists of the Group Number followed by the Sequence Number
Group Title
Group Number
Release Date
Group Number/Page Number
Fig. 1, Example of a Maintenance Manual Page
Recreational Vehicle Chassis Maintenance Manual, May 2011
I–3
Introduction
Maintenance Manual Contents
Group No.
Group Title
00 . . . . . . . . . . . . . . . . . . . . . . General Information
01 . . . . . . . . . . . . . . . . . . . . . . . . . . . . . . . . Engine
09 . . . . . . . . . . . . . . . . . . . . . . . . . . . . . . Air Intake
15 . . . . . . . . . . . . . . . . . . . Alternators and Starters
20 . . . . . . . . . . . . . . . . . . . Engine Cooling/Radiator
26 . . . . . . . . . . . . . . . . . . . . . . . . . . . Transmission
30 . . . . . . . . . . . . . . . . . . . . . . . . . . Throttle Control
32 . . . . . . . . . . . . . . . . . . . . . . . . . . . . . Suspension
33 . . . . . . . . . . . . . . . . . . . . . . . . . . . . . . Front Axle
35 . . . . . . . . . . . . . . . . . . . . . . . . . . . . . . Rear Axle
40 . . . . . . . . . . . . . . . . . . . . . . . . Wheels and Tires
41 . . . . . . . . . . . . . . . . . . . . . . . . . . . . . . . Driveline
42 . . . . . . . . . . . . . . . . . . . . . . . . . . . . . . . . Brakes
46 . . . . . . . . . . . . . . . . . . . . . . . . . . . . . . . Steering
47 . . . . . . . . . . . . . . . . . . . . . . . . . . . . . . . . . . Fuel
49 . . . . . . . . . . . . . . . . . . . . . . . . . . . . . . . Exhaust
54 . . . . . . . . . . . . . . . . . . . . . . . . . . . . . . . Electrical
83 . . . . . . . . . . . . . . . . . Heater and Air Conditioner
I–4
Recreational Vehicle Chassis Maintenance Manual, May 2011
General Information
00
Index, Alphabetical
Title of Maintenance Operation (MOP)
MOP Number
15,000 Mile or 12 Month Maintenance. . . . . . . . . . . . . . . . . . . . . . . . . . . . . . . . . . . . . . . . . . . . . . . . . . . 00–04
30,000 Mile or 24 Month Maintenance. . . . . . . . . . . . . . . . . . . . . . . . . . . . . . . . . . . . . . . . . . . . . . . . . . . 00–05
45,000 Mile or 36 Month Maintenance. . . . . . . . . . . . . . . . . . . . . . . . . . . . . . . . . . . . . . . . . . . . . . . . . . . 00–06
60,000 Mile or 48 Month Maintenance. . . . . . . . . . . . . . . . . . . . . . . . . . . . . . . . . . . . . . . . . . . . . . . . . . . 00–07
6000 Mile or 6 Month Initial Maintenance . . . . . . . . . . . . . . . . . . . . . . . . . . . . . . . . . . . . . . . . . . . . . . . . 00–03
General Maintenance Schedule Information. . . . . . . . . . . . . . . . . . . . . . . . . . . . . . . . . . . . . . . . . . . . . . . 00–01
Metric/U.S. Customary Conversion Tables. . . . . . . . . . . . . . . . . . . . . . . . . . . . . . . . . . . . . . . . . . . . . . . . 00–10
Noise Emission Controls Maintenance. . . . . . . . . . . . . . . . . . . . . . . . . . . . . . . . . . . . . . . . . . . . . . . . . . . 00–08
Torque Specifications Tables. . . . . . . . . . . . . . . . . . . . . . . . . . . . . . . . . . . . . . . . . . . . . . . . . . . . . . . . . . 00–11
Vehicle Maintenance Schedule Table . . . . . . . . . . . . . . . . . . . . . . . . . . . . . . . . . . . . . . . . . . . . . . . . . . . 00–02
Verification of Inspections Log. . . . . . . . . . . . . . . . . . . . . . . . . . . . . . . . . . . . . . . . . . . . . . . . . . . . . . . . . 00–09
Recreational Vehicle Chassis Maintenance Manual, February 2012
00
General Information
General Maintenance Schedule Information: 00–01
General Maintenance Schedule
Information
Performing regular maintenance on your vehicle will
help ensure that your vehicle delivers safe reliable
service and optimum performance for years to come.
Failure to follow a regular maintenance program can
result in inefficient operation and unscheduled down
time.
When the vehicle reaches the distance or time
(whichever comes first) given for a maintenance interval, see the Vehicle Maintenance Schedule Table
for a list of the maintenance operations to be performed at that maintenance interval. Use the maintenance operation reference numbers to find detailed
instructions in the manual for each operation.
NOTE: Maintenance instructions in this manual
are based on average vehicle use and normal
operating conditions. Unusual vehicle operating
conditions may require service at more frequent
intervals.
Tear-Out Checklists
IMPORTANT: Additional copies of the checklists
should be made before giving this to a dealer,
as they may not be returned to you. The correct
number of checklists are included to cover the
warranty period, however, if you want copies of
the checklists for future maintenance after the
warranty expires, you will need to make them.
Freightliner Custom Chassis Corporation
(FCCC) will not be able to send you additional
copies.
At the back of the maintenance manual, there are
checklists for each maintenance interval up to 60,000
miles (96 540 km). When a maintenance interval
needs to be performed, take the vehicle to an authorized Freightliner dealer, remove the appropriate
checklist, and give it to the dealer. These are the
items that will be inspected for maintenance.
For specific engine maintenance information, see the
Cummins Operation and Maintenance Manual.
IMPORTANT: Maintenance operations appearing
in italics in the following tables are for emission
control components. Numbers in the table are
reference numbers matching those in the text of
this manual.
Camp Freightliner Owner
Training
Owners who want to learn more about their vehicle
can attend a two-day training class, offered at the
Freightliner Custom Chassis Service Center in
Gaffney, South Carolina. Some of the items covered
during the training include the air brake system, electrical system, vehicle storage, weight distribution, and
maintenance intervals.
To learn more about the class or to register, go to
www.freightlinerchassis.com. After entering the
website, click "Motorhomes" and select "Owner Info".
A class description and the registration form are located under the "Camp Freightliner" tab.
If needed, service work can be scheduled for your
vehicle at the service center during your stay.
Recreational Vehicle Chassis Maintenance Manual, February 2012
00/1
00
General Information
Vehicle Maintenance Schedule Table: 00–02
Maintenance Operation Procedures and Schedule
Maintenance Interval in Miles x 1000
6 15 30 45 60 75
Maintenance Operation Number
and Description
90 105 120 135 150 165 180 195 210 225 240 255 270 285
Maintenance Interval in Kilometers x 1000
9 24 48 72 96 120 145 169 193 217 241 265 290 314 338 362 386 410 434 458
Maintenance Interval in Months
6 12 24 36 48 60
72
84
96 108 120 132 144 156 168 180 192 204 216 228
01–01 Engine Drive Belt Inspecting •
•
•
•
•
•
•
•
•
•
•
•
•
•
•
•
•
•
•
•
01–02 Engine-Support Fasteners
Checking
•
•
•
•
•
•
•
•
•
•
•
•
•
•
•
•
•
•
•
•
•
•
•
•
•
•
•
•
•
•
•
•
•
•
•
•
•
•
•
01–03 Pacbrake Inspecting and
Maintenance
09–01 Air Cleaner Inspecting and
Replacing*
•
•
•
•
•
•
•
•
•
•
•
•
•
•
•
•
•
•
•
•
09–02 Charge Air Cooler
Inspecting and Cleaning
•
•
•
•
•
•
•
•
•
•
•
•
•
•
•
•
•
•
•
•
15–01 Alternator, Battery, and
Starter Checking
•
•
•
•
•
•
•
•
•
•
•
•
•
•
•
•
•
•
•
•
20–01 Radiator Cap Checking
•
•
•
•
•
•
•
•
•
•
•
•
•
•
•
•
•
•
•
•
20–02 Radiator Inspecting and
Cleaning
•
•
•
•
•
•
•
•
•
•
•
•
•
•
•
•
•
•
•
•
20–03 Coolant Replacing†
20–04 Mechanical Fan Drive
Gearbox Oil Changing
•
26–01 Transmission Breather
Checking
•
•
•
•
•
•
•
•
•
•
•
•
•
•
•
•
•
•
•
•
•
•
•
•
•
•
•
•
•
•
•
•
•
•
•
•
•
•
•
•
•
•
•
•
•
•
•
•
30–01 Throttle Pedal Pivot Pin
Lubricating
•
•
•
•
•
•
•
•
•
•
•
•
•
•
•
•
•
•
•
•
32–01 Suspension Fastener
Torque Checking
•
32–02 Suspension Height Control
Valve Checking
•
26–02 Allison MD/MH Series
Transmission Fluid Level Checking
26–03 Allison Transmission Fluid
and Filter Changing (internal/
external filter)‡
•
•
•
•
•
•
•
•
•
•
•
•
•
•
•
•
•
•
•
•
•
•
•
•
•
•
•
•
32–03 Suspension Inspecting
•
•
•
•
•
•
•
•
•
•
•
•
•
•
•
•
•
•
•
•
32–04 ZF IFS Lubricating
•
•
•
•
•
•
•
•
•
•
•
•
•
•
•
•
•
•
•
•
32–05 Suspension Inspecting
•
•
•
•
•
•
•
•
•
•
•
•
•
•
•
•
•
•
•
•
32–06 Suspension U-Bolt Torque
Checking
•
•
•
•
•
•
•
•
•
•
•
•
•
•
•
•
•
•
•
•
33–01 Knuckle Pin Lubricating
•
•
•
•
•
•
•
•
•
•
•
•
•
•
•
•
•
•
•
•
00/2
Recreational Vehicle Chassis Maintenance Manual, February 2012
00
General Information
Vehicle Maintenance Schedule Table: 00–02
Maintenance Operation Procedures and Schedule
Maintenance Interval in Miles x 1000
6 15 30 45 60 75
Maintenance Operation Number
and Description
90 105 120 135 150 165 180 195 210 225 240 255 270 285
Maintenance Interval in Kilometers x 1000
9 24 48 72 96 120 145 169 193 217 241 265 290 314 338 362 386 410 434 458
Maintenance Interval in Months
6 12 24 36 48 60
33–02 Tie-Rod End Lubricating
and Inspecting
•
33–03 All-Axle Alignment Checking
•
72
84
96 108 120 132 144 156 168 180 192 204 216 228
•
•
•
•
•
•
•
•
•
•
•
•
•
•
•
•
•
•
•
•
•
•
•
•
•
•
•
•
•
•
•
•
•
•
•
•
•
•
33–04 Wheel Bearing Removal,
Cleaning, Checking, Repacking,
and Adjusting§
33–05 Oil-Filled Hubs Oil Level
Checking
•
33–06 Oil-Filled Hubs Oil Changing
35–01 Axle Lubricant Checking
•
•
•
•
•
•
•
•
•
•
•
•
•
•
•
•
•
•
•
•
•
•
•
•
•
•
•
•
•
•
35–03 Axle Breather Checking
•
•
•
•
•
•
•
•
•
•
•
•
•
•
•
•
•
•
•
•
35–04 Oil-Filled Hubs Oil Level
Checking, Tag Axle
•
•
•
•
•
•
•
•
•
•
•
•
•
•
•
•
•
•
•
•
35–02 Axle Lubricant Changing¶
35–05 Oil-Filled Hubs Oil
Changing, Tag Axle
40–01 Wheel Nut Checking
•
•
•
•
•
•
•
•
•
•
•
•
•
•
•
•
•
•
•
•
40–02 Wheel Cleaning and
Polishing**
41–01 Driveline Inspecting and
Lubricating
•
•
•
•
•
•
•
•
•
•
•
•
•
•
•
•
•
•
•
•
42–01 Brake System Valves
Inspecting
•
•
•
•
•
•
•
•
•
•
•
•
•
•
•
•
•
•
•
•
42–02 Air Dryer Inspecting
•
•
•
•
•
•
•
•
•
•
•
•
•
•
•
•
•
•
•
•
42–03 Air Dryer Desiccant and
Coalescent Filter Replacing††
•
42–04 Camshaft Bracket Bushing
Lubricating
•
•
•
•
•
•
•
•
•
•
•
•
•
•
•
•
•
•
•
•
•
•
•
•
42–05 Slack Adjuster Lubricating
•
•
•
•
•
•
•
•
•
•
•
•
•
•
•
•
•
•
•
•
42–06 Foot Brake Valve Actuator
Lubricating
•
•
•
•
•
•
•
•
•
•
•
•
•
•
•
•
•
•
•
•
42–07 Bendix Hydro-Max® Brake
System Inspecting (front-engine
diesel chassis)
•
•
•
•
•
•
•
•
•
•
•
•
•
•
•
•
•
•
•
•
Recreational Vehicle Chassis Maintenance Manual, February 2012
00/3
00
General Information
Vehicle Maintenance Schedule Table: 00–02
Maintenance Operation Procedures and Schedule
Maintenance Interval in Miles x 1000
6 15 30 45 60 75
Maintenance Operation Number
and Description
90 105 120 135 150 165 180 195 210 225 240 255 270 285
Maintenance Interval in Kilometers x 1000
9 24 48 72 96 120 145 169 193 217 241 265 290 314 338 362 386 410 434 458
Maintenance Interval in Months
6 12 24 36 48 60
72
84
96 108 120 132 144 156 168 180 192 204 216 228
42–08 Brake Caliper Slide Pin
Lubricating, Bosch Brakes (frontengine diesel chassis)‡‡
42–09 Brake Lines Checking,
Hydraulic Disc or Air Brakes
•
•
•
•
•
•
•
•
•
•
•
•
•
•
•
•
•
•
•
•
42–10 Brake Lining Wear
Checking, Hydraulic Disc Brakes
(front-engine diesel chassis)
•
•
•
•
•
•
•
•
•
•
•
•
•
•
•
•
•
•
•
•
42–11 Brake Inspecting
•
•
•
•
•
•
•
•
•
•
•
•
•
•
•
•
•
•
•
•
•
•
•
•
•
•
•
•
•
•
•
•
•
•
•
•
•
•
•
42–12 Meritor Roller Pin
Lubricating
46–01 Drag Link Lubricating
•
•
•
•
•
•
•
•
•
•
•
•
•
•
•
•
•
•
•
•
46–02 Power Steering Reservoir
Fluid Level Checking
•
•
•
•
•
•
•
•
•
•
•
•
•
•
•
•
•
•
•
•
•
•
•
•
•
•
•
•
•
•
•
•
•
•
•
•
•
•
•
46–03 Power Steering Reservoir
Fluid and Filter Changing§§
46–04 Steering Driveline
Lubricating
•
•
•
•
•
•
•
•
•
•
•
•
•
•
•
•
•
•
•
•
46–05 Steering Gear Lubricating
•
•
•
•
•
•
•
•
•
•
•
•
•
•
•
•
•
•
•
•
46–06 Hydraulic Reservoir Filter
Changing (metal reservoir only)
•
•
•
•
•
•
•
•
•
•
47–01 Fuel Tank Mounts and Fuel
Line Checking
•
•
•
•
•
•
•
•
•
•
47–02 Fuel/Water Separator
Element Replacing¶¶
49–01Exhaust System Inspecting
(Noise Emission Control)
•
•
•
•
•
•
•
•
•
•
•
•
•
•
•
•
•
•
•
•
54–01 Ground Cables Checking
and Cleaning
•
•
•
•
•
•
•
•
•
•
•
•
•
•
•
•
•
•
•
•
54–02 Battery Voltage Checking
•
•
•
•
•
•
•
•
•
•
•
•
•
•
•
•
•
•
•
•
00/4
Recreational Vehicle Chassis Maintenance Manual, February 2012
00
General Information
Vehicle Maintenance Schedule Table: 00–02
Maintenance Operation Procedures and Schedule
Maintenance Interval in Miles x 1000
6 15 30 45 60 75
Maintenance Operation Number
and Description
90 105 120 135 150 165 180 195 210 225 240 255 270 285
Maintenance Interval in Kilometers x 1000
9 24 48 72 96 120 145 169 193 217 241 265 290 314 338 362 386 410 434 458
Maintenance Interval in Months
6 12 24 36 48 60
83–01 Air Conditioner Inspecting
•
•
•
•
•
•
72
84
•
•
96 108 120 132 144 156 168 180 192 204 216 228
•
•
•
•
•
•
•
•
•
•
•
•
* Inspect the air cleaner every 12 months. Replace the air cleaner element every 24 months, or when filter restriction reaches 25 inH20 (if equipped with an air
restriction gauge).
† Beginning with model-year 2002 RV chassis, the coolant replacement interval is increased to 100,000 miles (161 000 km) or 60 months. You must check and,
if necessary, recharge the SCA (supplemental coolant additive) levels and freeze point every 25,000 miles (40 000 km) or 6 months. See the Cummins Operation and Maintenance Manual for further information.
‡ For oil and filter change intervals, see the applicable Allison Operator’s Manual.
§ For Freightliner/Meritor axles, check for correct end play every 15,000 miles (24 135 km). For ZF axles, lubricate grease fittings annually, and disassemble,
inspect, and repack the bearings every 1, 000,000 miles (1 609 000 km).
¶ For Freightliner rear axles with petroleum-based oil, change the lubricant every 100,000 miles (161 000 km) or every 12 months, whichever comes first; if
synthetic oil is used, change the lubricant every 250,000 miles (402 000 km) or every 12 months, whichever comes first. For Meritor rear axles with petroleumbased oil, change the lubricant every 100,000 miles (161 000 km) or every 12 months, whichever comes first; if synthetic oil is used, change the lubricant every
250,000 miles (402 000 km) or every 36 months, whichever comes first.
** Perform these steps each time the wheels and/or the vehicle is washed.
†† Replace the Bendix AD9 filter and the Haldex (Midland) PURest® air dryer filter kit every 36 months.
‡‡ Lubricate every 6 months OR every 18,000 miles (28 000 km), whichever comes first.
§§ Change the TRW inline power steering filter every 12 months.
¶¶ See the Cummins Operation and Maintenance Manual for fuel/water separator element replacing intervals.
Table 1, Maintenance Operation Procedures and Schedule
Recreational Vehicle Chassis Maintenance Manual, February 2012
00/5
00
General Information
6000 Mile or 6 Month Initial Maintenance: 00–03
Procedure
Performed
(check off or
initial)
6000 Mile (9654 km) or 6 Month Initial Maintenance*
Inspect
_____ Engine Drive Belt Inspecting
01–01
Check
_____ Engine-Support Fasteners Checking
01–02
Change
Engine Oil and Filter (see the engine manufacturer’s
_____
manual)
Inspect
_____ Pacbrake Inspecting and Maintenance
01–03
Inspect
_____ Air Cleaner Inspecting and Replacing
09–01
Inspect
_____
Check
_____ Alternator, Battery, and Starter Checking
Inspect/
Checkt
_____
Change
_____ Mechanical Fan Drive Gearbox Oil Changing
20–04
Change
_____ Transmission Fluid and Filter (if required by Allison)
26–03
Inspect
_____ Transmission Hose Routing for Chaffing and Leaks
—
Charge Air Cooler Inspecting and Cleaning (if cleaning is
needed)
Radiator (radiator cap, coolant freeze points, SCA levels,
hose routing for chaffing and leaks)
—
09–02
15–01
20–01,
20–02,
20–03
Lubricate _____ Throttle Pedal Pivot Pin Lubricating
30–01
Inspect
_____ Suspension
32–01,
32–06
Check
_____ Suspension Height Control Valve Checking
32–02
Lubricate _____ ZF IFS Lubricating
Check
00/6
MOP
32–04
_____ Suspension U-Bolt Torque Checking
32–06
Lubricate _____ Knuckle Pin Lubricating
33–01
Lubricate _____ Tie-Rod End Lubricating and Inspecting
33–02
Check
33–03
_____ All-Axle Alignment Checking
Wheel Bearing Removal, Cleaning, Checking, Repacking,
Check/
_____
and Adjusting
Lubricate
33–04
Check/
Change
_____ Oil-Filled Hubs Oil Level Checking (front and tag axle)
33–05,
33–06,
35–04,
35–05
Check
_____ Axle Seals for Leaks
—
Change
_____ Axle Lubricant Changing (Freightliner axle only)
35–02
Check
_____ Axle Breather Checking
35–03
Check
_____ Wheel Nut Checking
40–01
Check
_____ Tire Pressure
—
Lubricate _____ Driveline Inspecting and Lubricating
41–01
Inspect
42–01
_____ Brake System Valves Inspecting
Recreational Vehicle Chassis Maintenance Manual, February 2012
00
General Information
6000 Mile or 6 Month Initial Maintenance: 00–03
Procedure
Performed
(check off or
initial)
Inspect
_____
6000 Mile (9654 km) or 6 Month Initial Maintenance*
MOP
Air Dryer and Air Lines for Proper Routing, Chaffing, and
Leaks
42–02
Lubricate _____ Camshaft Bracket Bushing Lubricating
42–04
Lubricate _____ Slack Adjuster Lubricating
42–05
Lubricate _____ Foot Brake Valve Actuator Lubricating
42–06
Inspect
Bendix Hydro-Max® Brake System Inspecting (front_____
engine only)
Lubricate _____
Brake Caliper Slide Pin Lubricating, Bosch Brakes (frontengine diesel chassis)
42–07
42–08
Check
_____ Brake Lines Checking, Hydraulic Disc or Air Brakes
42–09
Check
_____
Brake Lining Wear Checking, Hydraulic Disc Brakes
(front-engine only)
42-10
Inspect
_____ Brake Inspecting (Air Brakes)
Drain
_____ Air Tanks
42–11
—
Lubricate _____ Drag Link Lubricating
46–01
Lubricate _____ Steering Driveline Lubricating
46–04
Lubricate _____ Steering Gear Lubricating
46–05
Change
_____ Hydraulic Reservoir Filter Changing (metal reservoir only)
46–06
Inspect
_____ Fuel Tank Mounts and Fuel Line Checking
47–01
Change
_____ Fuel Filters
Inspect
_____ Exhaust System Inspecting
49–01
Check
_____ Ground Cables Checking and Cleaning
54–01
Inspect
_____ Air Conditioner Component Inspection
83–01
Customer†_____________________________________
—
Date ____________
* Additional copies are available on the Freightliner Custom Chassis Corporation website (www.freightlinerchassis.com).
† Your signature on this form indicates that you have reviewed and agree to the service items to be performed.
Any items you wish to exclude should be indicated with a "no" to the left of that service item.
Recreational Vehicle Chassis Maintenance Manual, February 2012
00/7
00
General Information
15,000 Mile or 12 Month Maintenance: 00–04
Procedure
Performed
(check off or
initial)
00/8
15,000 Mile (24 135 km) or 12 Month Maintenance*
MOP
Inspect
_____ Engine Drive Belt Inspecting
01–01
Check
_____ Engine-Support Fasteners Checking
01–02
Change
Engine Oil and Filter (see the engine manufacturer’s
_____
manual)
—
Inspect
_____ Pacbrake Inspecting and Maintenance
01–03
Change
_____ Air Cleaner Inspecting and Replacing
09–01
Inspect
_____
Check
_____ Alternator, Battery, and Starter Checking
Inspect/
Check
_____
Change
_____ Transmission Fluid and Filter (if required by Allison)
Inspect
_____ Transmission Hose Routing for Chaffing and Leaks
Charge Air Cooler Inspecting and Cleaning (if cleaning is
needed)
Radiator (radiator cap, coolant freeze points, SCA levels,
hose routing for chaffing and leaks)
09–02
15–01
20–01,
20–02,
20–03
26–03
—
Lubricate _____ Throttle Pedal Pivot Pin Lubricating
30–01
Inspect
_____ Suspension
32–01,
32–06
Check
_____ Suspension Height Control Valve Checking
32–02
Lubricate _____ ZF IFS Lubricating
32–04
Check
32–06
_____ Suspension U-Bolt Torque Checking
Lubricate _____ Knuckle Pin Lubricating
33–01
Lubricate _____ Tie-Rod End Lubricating and Inspecting
33–02
Wheel Bearing Removal, Cleaning, Checking, Repacking,
Check/
_____
and Adjusting
Lubricate
33–04
Check/
Change
_____ Oil-Filled Hubs Oil Changing (front and tag axle)
33–05,
33–06,
35–04,
35–05
Check
_____ Axle Seals for Leaks
Change
_____ Axle Lubricant Changing (Freightliner and Meritor axles)
35–02
Check
_____ Axle Breather Checking
35–03
Check
_____ Tire Pressure
—
—
Lubricate _____ Driveline Inspecting and Lubricating
41–01
Inspect
_____ Brake System Valves Inspecting
42–01
Inspect
_____
Air Dryer and Air Lines for Proper Routing, Chaffing, and
Leaks
42–02
Lubricate _____ Camshaft Bracket Bushing Lubricating
42–04
Lubricate _____ Slack Adjuster Lubricating
42–05
Recreational Vehicle Chassis Maintenance Manual, February 2012
00
General Information
15,000 Mile or 12 Month Maintenance: 00–04
Procedure
Performed
(check off or
initial)
15,000 Mile (24 135 km) or 12 Month Maintenance*
Lubricate _____ Foot Brake Valve Actuator Lubricating
Inspect
_____
Lubricate _____
Hydro-Max®
Bendix
engine only)
MOP
42–06
Brake System Inspecting (front-
Brake Caliper Slide Pin Lubricating, Bosch Brakes (frontengine diesel chassis)
42–07
42–08
Check
_____ Brake Lines Checking, Hydraulic Disc or Air Brakes
42–09
Check
_____
Brake Lining Wear Checking, Hydraulic Disc Brakes
(front-engine only)
42-10
Inspect
_____ Brake Inspecting (Air Brakes)
42–11
Lubricate _____ Meritor Roller Pin Lubricating
42–12
Drain
_____ Air Tanks
—
Lubricate _____ Drag Link Lubricating
46–01
Change
46–03
_____ Power Steering Reservoir Fluid and Filter Changing
Lubricate _____ Steering Driveline Lubricating
46–04
Lubricate _____ Steering Gear Lubricating
46–05
Change
_____ Hydraulic Reservoir Filter Changing (including TRW)
46-06
Inspect
_____ Fuel Tank Mounts and Fuel Line Checking
47-01
Change
_____ Fuel Filters
—
Inspect
_____ Exhaust System Inspecting
49–01
Check
_____ Ground Cables Checking and Cleaning
54–01
Inspect
_____ Air Conditioner Component Inspection
83–01
Customer†_____________________________________
Date ____________
* Additional copies are available on the Freightliner Custom Chassis Corporation website (www.freightlinerchassis.com).
† Your signature on this form indicates that you have reviewed and agree to the service items to be performed.
Any items you wish to exclude should be indicated with a "no" to the left of that service item.
Recreational Vehicle Chassis Maintenance Manual, February 2012
00/9
00
General Information
30,000 Mile or 24 Month Maintenance: 00–05
Procedure
Performed
(check off or
initial)
30,000 Mile (48 270 km) or 24 Month Maintenance*
Inspect
_____ Engine Drive Belt Inspecting
01–01
Check
_____ Engine-Support Fasteners Checking
01–02
Change
Engine Oil and Filter (see the engine manufacturer’s
_____
manual)
Inspect
_____ Pacbrake Inspecting and Maintenance
01–03
Inspect
_____ Air Cleaner Inspecting and Replacing
09–01
Inspect
_____
Check
_____ Alternator, Battery, and Starter Checking
Inspect/
Check
_____
Change
_____ Mechanical Fan Drive Gearbox Oil Changing
20–04
Change
_____ Transmission Fluid and Filter (if required by Allison)
26–03
Inspect
_____ Transmission Hose Routing for Chaffing and Leaks
—
Charge Air Cooler Inspecting and Cleaning (if cleaning is
needed)
Radiator (radiator cap, coolant freeze points, SCA levels,
hose routing for chaffing and leaks)
—
09–02
15–01
20–01,
20–02,
20–03
Lubricate _____ Throttle Pedal Pivot Pin Lubricating
30–01
Inspect
_____ Suspension
32–01,
32–06
Check
_____ Suspension Height Control Valve Checking
32–02
Lubricate _____ ZF IFS Lubricating
Check
00/10
MOP
32–04
_____ Suspension U-Bolt Torque Checking
32–06
Lubricate _____ Knuckle Pin Lubricating
33–01
Lubricate _____ Tie-Rod End Lubricating and Inspecting
33–02
Wheel Bearing Removal, Cleaning, Checking, Repacking,
Check/
_____
and Adjusting
Lubricate
33–04
Check/
Change
_____ Oil-Filled Hubs Oil Level Checking (front and tag axle)
33–05,
33–06,
35–04,
35–05
Check
_____ Axle Seals for Leaks
Change
_____ Axle Lubricant Changing (Freightliner axle only)
Check
_____ Axle Breather Checking
35–03
Check
_____ Wheel Nut Checking
40–01
Check
_____ Tire Pressure
—
35–02
—
Lubricate _____ Driveline Inspecting and Lubricating
41–01
Inspect
_____ Brake System Valves Inspecting
42–01
Inspect
Air Dryer and Air Lines for Proper Routing, Chaffing, and
_____
Leaks
42–02
Recreational Vehicle Chassis Maintenance Manual, February 2012
00
General Information
30,000 Mile or 24 Month Maintenance: 00–05
Procedure
Performed
(check off or
initial)
30,000 Mile (48 270 km) or 24 Month Maintenance*
MOP
Lubricate _____ Camshaft Bracket Bushing Lubricating
42–04
Lubricate _____ Slack Adjuster Lubricating
42–05
Lubricate _____ Foot Brake Valve Actuator Lubricating
42–06
Inspect
_____
Lubricate _____
Bendix Hydro-Max® Brake System Inspecting (frontengine only)
42–07
Brake Caliper Slide Pin Lubricating, Bosch Brakes (frontengine diesel chassis)
42–08
Check
_____ Brake Lines Checking, Hydraulic Disc or Air Brakes
42–09
Check
Brake Lining Wear Checking, Hydraulic Disc Brakes
_____
(front-engine only)
42-10
Inspect
_____ Brake Inspecting (Air Brakes)
42–11
Lubricate _____ Meritor Roller Pin Lubricating
42–12
Drain
_____ Air Tanks
—
Lubricate _____ Drag Link Lubricating
Change
_____
Power steering fluid reservoir (fluid and filter changing,
inline filter changing [including TRW])
46–01
46–03,
46–06
Lubricate _____ Steering Driveline Lubricating
46–04
Lubricate _____ Steering Gear Lubricating
46–05
Inspect
_____ Fuel Tank Mounts and Fuel Line Checking
47–01
Change
_____ Fuel Filters
Inspect
_____ Exhaust System Inspecting
49–01
Check
_____ Ground Cables Checking and Cleaning
54–01
Inspect
_____ Air Conditioner Component Inspection
83–01
Customer†_____________________
—
Date ________
* Additional copies are available on the Freightliner Custom Chassis Corporation website (www.freightlinerchassis.com).
† Your signature on this form indicates that you have reviewed and agree to the service items to be performed.
Any items you wish to exclude should be indicated with a "no" to the left of that service item.
Recreational Vehicle Chassis Maintenance Manual, February 2012
00/11
00
General Information
45,000 Mile or 36 Month Maintenance: 00–06
Procedure
Performed
(check off or
initial)
00/12
45,000 Mile (72 405 km) or 36 Month Maintenance*
MOP
Inspect
_____ Engine Drive Belt Inspecting
01–01
Check
_____ Engine-Support Fasteners Checking
01–02
Inspect
_____ Pacbrake Inspecting and Maintenance
01–03
Change
_____
Change
_____ Air Cleaner Inspecting and Replacing
Inspect
_____
Check
_____ Alternator, Battery, and Starter Checking
Inspect/
Check
_____
Change
_____ Transmission Fluid and Filter (if required by Allison)
Inspect
_____ Transmission Hose Routing for Chaffing and Leaks
Engine Oil and Filter (see the engine manufacturer’s
manual)
Charge Air Cooler Inspecting and Cleaning (if cleaning is
needed)
Radiator (radiator cap, coolant freeze points, SCA levels,
hose routing for chaffing and leaks)
—
09–01
09–02
15–01
20–01,
20–02,
20–03
26–03
—
Lubricate _____ Throttle Pedal Pivot Pin Lubricating
30–01
Inspect
_____ Suspension
32–01,
32–06
Check
_____ Suspension Height Control Valve Checking
32–02
Lubricate _____ ZF IFS Lubricating
32–04
Check
32–06
_____ Suspension U-Bolt Torque Checking
Lubricate _____ Knuckle Pin Lubricating
33–01
Lubricate _____ Tie-Rod End Lubricating and Inspecting
33–02
Wheel Bearing Removal, Cleaning, Checking, Repacking,
Check/
_____
and Adjusting
Lubricate
33–04
Check/
Change
_____ Oil-Filled Hubs Oil Changing (front and tag axle)
33–05,
33–06,
35–04,
35–05
Check
_____ Axle Seals for Leaks
Change
_____ Axle Lubricant Changing (Freightliner and Meritor axles)
35–02
Check
_____ Axle Breather Checking
35–03
Check
_____ Tire Pressure
—
—
Lubricate _____ Driveline Inspecting and Lubricating
41–01
Inspect
_____ Brake System Valves Inspecting
42–01
Inspect
_____
Air Dryer and Air Lines for Proper Routing, Chaffing, and
Leaks
42–02
Lubricate _____ Camshaft Bracket Bushing Lubricating
42–04
Lubricate _____ Slack Adjuster Lubricating
42–05
Recreational Vehicle Chassis Maintenance Manual, February 2012
00
General Information
45,000 Mile or 36 Month Maintenance: 00–06
Procedure
Performed
(check off or
initial)
45,000 Mile (72 405 km) or 36 Month Maintenance*
Lubricate _____ Foot Brake Valve Actuator Lubricating
Inspect
_____
Lubricate _____
Hydro-Max®
Bendix
engine only)
MOP
42–06
Brake System Inspecting (front-
Brake Caliper Slide Pin Lubricating, Bosch Brakes (frontengine diesel chassis)
42–07
42–08
Check
_____ Brake Lines Checking, Hydraulic Disc or Air Brakes
42–09
Check
_____
Brake Lining Wear Checking, Hydraulic Disc Brakes
(front-engine only)
42-10
Inspect
_____ Brake Inspecting (Air Brakes)
42–11
Lubricate _____ Meritor Roller Pin Lubricating
42–12
Drain
_____ Air Tanks
—
Lubricate _____ Drag Link Lubricating
46–01
Inspect
46–03
_____ Power Steering Reservoir Fluid and Filter Changing
Lubricate _____ Steering Driveline Lubricating
46–04
Lubricate _____ Steering Gear Lubricating
46–05
Inspect
_____ Hydraulic Reservoir Filter Changing (including TRW)
46–06
Inspect
_____ Fuel Tank Mounts and Fuel Line Checking
47–01
Change
_____ Fuel Filters
—
Inspect
_____ Exhaust System Inspecting
49–01
Check
_____ Ground Cables Checking and Cleaning
54–01
Inspect
_____ Air Conditioner Component Inspection
83–01
Customer†_____________________________________
Date ____________
* Additional copies are available on the Freightliner Custom Chassis Corporation website (www.freightlinerchassis.com).
† Your signature on this form indicates that you have reviewed and agree to the service items to be performed.
Any items you wish to exclude should be indicated with a "no" to the left of that service item.
Recreational Vehicle Chassis Maintenance Manual, February 2012
00/13
00
General Information
60,000 Mile or 48 Month Maintenance: 00–07
Procedure
Performed
(check off or
initial)
60,000 Mile (96 540 km) or 48 Month Maintenance*
Inspect
_____ Engine Drive Belt Inspecting
01–01
Check
_____ Engine-Support Fasteners Checking
01–02
Change
Engine Oil and Filter (see the engine manufacturer’s
_____
manual)
Inspect
_____ Pacbrake Inspecting and Maintenance
01–03
Inspect
_____ Air Cleaner Inspecting and Replacing
09–01
Inspect
_____
Check
_____ Alternator, Battery, and Starter Checking
Inspect/
Check
_____
Change
_____ Mechanical Fan Drive Gearbox Oil Changing
20–04
Change
_____ Transmission Fluid and Filter (if required by Allison)
26–03
Inspect
_____ Transmission Hose Routing for Chaffing and Leaks
—
Charge Air Cooler Inspecting and Cleaning (if cleaning is
needed)
Radiator (radiator cap, coolant freeze points, SCA levels,
hose routing for chaffing and leaks)
—
09–02
15–01
20–01,
20–02,
20–03
Lubricate _____ Throttle Pedal Pivot Pin Lubricating
30–01
Inspect
_____ Suspension
32–01,
32–06
Check
_____ Suspension Height Control Valve Checking
32–02
Lubricate _____ ZF IFS Lubricating
Check
00/14
MOP
32–04
_____ Suspension U-Bolt Torque Checking
32–06
Lubricate _____ Knuckle Pin Lubricating
33–01
Lubricate _____ Tie-Rod End Lubricating and Inspecting
33–02
Wheel Bearing Removal, Cleaning, Checking, Repacking,
Check/
_____
and Adjusting
Lubricate
33–04
Check/
Change
_____ Oil-Filled Hubs Oil Level Checking (front and tag axle)
33–05,
33–06,
35–04,
35–05
Check
_____ Axle Seals for Leaks
Change
_____ Axle Lubricant Changing (Freightliner axle only)
Check
_____ Axle Breather Checking
35–03
Check
_____ Wheel Nut Checking
40–01
Check
_____ Tire Pressure
—
35–02
—
Lubricate _____ Driveline Inspecting and Lubricating
41–01
Inspect
_____ Brake System Valves Inspecting
42–01
Inspect
Air Dryer and Air Lines for Proper Routing, Chaffing, and
_____
Leaks
42–02
Recreational Vehicle Chassis Maintenance Manual, February 2012
00
General Information
60,000 Mile or 48 Month Maintenance: 00–07
Procedure
Performed
(check off or
initial)
60,000 Mile (96 540 km) or 48 Month Maintenance*
MOP
Lubricate _____ Camshaft Bracket Bushing Lubricating
42–04
Lubricate _____ Slack Adjuster Lubricating
42–05
Lubricate _____ Foot Brake Valve Actuator Lubricating
42–06
Inspect
_____
Lubricate _____
Bendix Hydro-Max® Brake System Inspecting (frontengine only)
42–07
Brake Caliper Slide Pin Lubricating, Bosch Brakes (frontengine diesel chassis)
42–08
Check
_____ Brake Lines Checking, Hydraulic Disc or Air Brakes
42–09
Check
Brake Lining Wear Checking, Hydraulic Disc Brakes
_____
(front-engine only)
42–10
Inspect
_____ Brake Inspecting (Air Brakes)
42–11
Lubricate _____ Meritor Roller Pin Lubricating
42–12
Drain
_____ Air Tanks
—
Lubricate _____ Drag Link Lubricating
Change
46–01
_____ Power Steering Reservoir Fluid and Filter Changing
46–03
Lubricate _____ Steering Driveline Lubricating
46–04
Lubricate _____ Steering Gear Lubricating
46–05
Change
_____ Hydraulic Reservoir Filter Changing (including TRW)
46–06
Inspect
_____ Fuel Tank Mounts and Fuel Line Checking
47–01
Change
_____ Fuel Filters
Inspect
_____ Exhaust System Inspecting
49–01
Check
_____ Ground Cables Checking and Cleaning
54–01
Inspect
_____ Air Conditioner Component Inspection
Customer†_____________________________________
—
83–01
Date ____________
* Additional copies are available on the Freightliner Custom Chassis Corporation website (www.freightlinerchassis.com).
† Your signature on this form indicates that you have reviewed and agree to the service items to be performed.
Any items you wish to exclude should be indicated with a "no" to the left of that service item.
Recreational Vehicle Chassis Maintenance Manual, February 2012
00/15
00
General Information
Noise Emission Controls Maintenance: 00–08
Noise Emission Control
Maintenance
Federal Law, Part 205:
Transportation Equipment Noise
Emission Controls
Part 205, Transportation Equipment Noise Emission
Controls, requires the vehicle manufacturer to furnish, with each new vehicle, such written instructions
for the proper maintenance, use, and repair of the
vehicle by the ultimate purchaser to provide reasonable assurance of the elimination or minimization of
noise-emission-control degradation throughout the
life of the vehicle. In compliance with the law, the
noise emission controls maintenance information in
each applicable group of this manual, in conjunction
with the chassis workshop manual, provides these
instructions to owners.
Recommendations for
Replacement Parts
Replacement parts used for maintenance or repair of
noise emission controls should be genuine Freightliner Custom Chassis Corporation (FCCC) parts. If
other than genuine FCCC parts are used for replacement or repair of components affecting noise emission control, the owner should be sure that such
parts are warranted by their manufacturer to be
equivalent to genuine FCCC parts in performance
and durability.
of design incorporated into any new vehicle for
the purpose of noise control, prior to its sale or
delivery to the ultimate purchaser, or while it is in
use.
2. The use of the vehicle after such device or element of design has been removed or rendered
inoperative by any person.
Among those acts presumed to constitute tampering are the acts listed below:
A. Removal of, or rendering inoperative, the engine speed governor so as to allow engine
speed to exceed manufacturer’s specifications.
B. Removal of, or rendering inoperative, the fan
clutch, including bypassing the control on
any thermostatic fan drive to cause it to operate continuously.
C. Removal of the fan shroud.
D. Removal of, or rendering inoperative, exhaust components, including exhaust pipe
clamping.
E. Removal of air intake components.
Maintenance Instructions
Scheduled intervals are in the maintenance table in
this group. A "Verification of Inspections Log (Group
49)" follows, and should be filled in each time noise
emission controls on the vehicle are maintained or
repaired.
Freightliner Noise Emission
Controls Warranty
See the vehicle owner’s warranty information book
for warranty information concerning noise emission
controls.
Tampering With Noise Controls is
Prohibited
Federal law prohibits the following acts or the causing thereof:
1. The removal or rendering inoperative by any person (other than for purposes of maintenance,
repair, or replacement) of any device or element
00/16
Recreational Vehicle Chassis Maintenance Manual, February 2012
00
General Information
Verification of Inspections Log: 00–09
Verification of Inspections Log
Verification of Inspections Log, Group 49
Date
Mileage
Item
Cost
Maintenance Facility
Group 49—Exhaust System Components
Recreational Vehicle Chassis Maintenance Manual, February 2012
00/17
00
General Information
Metric/U.S. Customary Conversion Tables: 00–10
When You Know U.S.
Customary
Multiply
By
To Get Metric
When You
Know Metric
Multiply
By
To Get U.S. Customary
Length
inches (in)
25.4
millimeters (mm)
0.03937
inches (in)
inches (in)
2.54
centimeters (cm)
0.3937
inches (in)
feet (ft)
0.3048
meters (m)
3.281
feet (ft)
yards (yd)
0.9144
meters (m)
1.094
yards (yd)
miles (mi)
1.609
kilometers (km)
0.6215
miles (mi)
square inches (in2)
645.16
square millimeters (mm2)
0.00155
square inches (in2)
square inches (in2)
6.452
square centimeters (cm2)
0.155
square inches (in2)
square feet (ft2)
0.0929
square meters (m2)
10.764
cubic inches (in3)
16387.0
cubic millimeter (mm3)
0.000061
cubic inches (in3)
cubic inches (in3)
16.387
cubic centimeters (cm3)
0.06102
cubic inches (in3)
cubic inches (in3)
0.01639
liters (L)
61.024
cubic inches (in3)
fluid ounces (fl oz)
29.54
milliliters (mL)
0.03381
pints (pt)
0.47318
liters (L)
2.1134
pints (pt)
quarts (qt)
0.94635
liters (L)
1.0567
quarts (qt)
Area
square feet (ft2)
Volume
fluid ounces (fl oz)
gallons (gal)
3.7854
liters (L)
0.2642
cubic feet (ft3)
28.317
liters (L)
0.03531
cubic feet (ft3)
gallons (gal)
cubic feet (ft3)
0.02832
cubic meters (m3)
35.315
cubic feet (ft3)
Weight/Force
ounces (av) (oz)
28.35
grams (g)
0.03527
ounces (av) (oz)
pounds (av) (lb)
0.454
kilograms (kg)
2.205
pounds (av) (lb)
U.S. tons (t)
907.18
kilograms (kg)
0.001102
U.S. tons (t)
U.S. tons (t)
0.90718
metric tons (t)
1.1023
U.S. tons (t)
Torque/Work Force
inch–pounds (lbf·in)
11.298
Newton–centimeters (N·cm)
0.08851
inch–pounds (lbf·in)
foot–pounds (lbf·ft)
1.3558
Newton–meters (N·m)
0.7376
foot–pounds (lbf·ft)
3.37685
kilo Pascals (kPa)
0.29613
inches of mercury (inHg)
kilo Pascals (kPa)
0.14503
pounds per square inch (psi)
Pressure/Vacuum
inches of mercury (inHg)
pounds per square inch (psi) 6.895
Table 2, Metric/U.S. Customary Conversion
When You Know
Subtract
Then
Divide By
degrees Fahrenheit (°F)
32
1.8
To Get
When You
Know
degrees Celsius (°C)
Multiply
By
Then
Add
To Get
1.8
32
degrees Fahrenheit (°F)
Table 3, Temperature Conversion
00/18
Recreational Vehicle Chassis Maintenance Manual, February 2012
00
General Information
Torque Specifications Tables: 00–11
IMPORTANT: Grade 8 regular hex zinc-yellow plated
capscrews and cadmium- and wax-coated prevailing
torque locknuts may be tightened to a lower torque
value than the grade 8 regular hex fasteners de-
scribed in Table 4. See Table 5 for torque values for
grade 8 regular hex zinc-yellow plated capscrews
and cadmium- and wax-coated prevailing torque
locknuts.
Torque Values for U.S. Customary Thread Fasteners With Lubricated* or Plated Threads†
Regular Hex
Thread
Diameter–
Pitch
Grade 5
Bolt
Grade 5 or
B Nut
Torque: lbf·ft (N·m)
f230003
f230002
1/4–20
Flanged
Grade 8 or
8.2 Bolt
Grade 8 or
C Nut
Torque: lbf·ft (N·m)
f230004
7 (9)
8 (11)
f230005
Grade 5
Bolt
Grade B
Nut
Torque: lbf·ft (N·m)
f230006
f230007
Grade 8 or
8.2 Bolt
Grade G
Nut
Torque: lbf·ft (N·m)
f230009
f230008
6 (8)
10 (14)
1/4–28
8 (11)
9 (12)
7 (9)
12 (16)
5/16–18
15 (20)
16 (22)
13 (18)
21 (28)
5/16–24
16 (22)
17 (23)
14 (19)
23 (31)
3/8–16
26 (35)
28 (38)
23 (31)
37 (50)
3/8–24
30 (41)
32 (43)
25 (34)
42 (57)
7/16–14
42 (57)
45 (61)
35 (47)
60 (81)
7/16–20
47 (64)
50 (68)
40 (54)
66 (89)
1/2–13
64 (87)
68 (92)
55 (75)
91 (123)
1/2–20
72 (98)
77 (104)
65 (88)
102 (138)
9/16–12
92 (125)
98 (133)
80 (108)
130 (176)
9/16–18
103 (140)
110 (149)
90 (122)
146 (198)
5/8–11
128 (173)
136 (184)
110 (149)
180 (244)
5/8–18
145 (197)
154 (209)
130 (176)
204 (277)
3/4–10
226 (306)
241 (327)
200 (271)
320 (434)
3/4–16
253 (343)
269 (365)
220 (298)
357 (484)
7/8–9
365 (495)
388 (526)
320 (434)
515 (698)
7/8–14
402 (545)
427 (579)
350 (475)
568 (770)
1–8
—
582 (789)
—
—
1–12
—
637 (863)
—
—
1–14
—
652 (884)
—
—
* Freightliner recommends that all plated and unplated fasteners be coated with oil before installation.
† Use these torque values if either the bolt or nut is lubricated or plated (zinc-phosphate conversion-coated, cadmium-plated, or waxed, Geomet 321XL coated,
or waxed).
Table 4, Torque Values for U.S. Customary Thread Fasteners With Lubricated or Plated Threads
Recreational Vehicle Chassis Maintenance Manual, February 2012
00/19
00
General Information
Torque Specifications Tables: 00–11
Torque Values for Grade 8 Regular Hex Zinc-Yellow Plated Capscrews and
Cadmium- and Wax-Coated Prevailing Torque Locknuts*
Regular Hex
Thread Diameter-Pitch
Grade 8 or 8.2 Bolt
Grade 8 or C Nut
Torque: lbf·ft (N·m)
f230005
f230004
1/4–20
6 (8)
1/4–28
7 (9)
5/16–18
13 (18)
5/16–24
14 (19)
3/8–16
23 (31)
3/8–24
26 (35)
7/16–14
37 (50)
7/16–20
41 (56)
1/2–13
56 (76)
1/2–20
63 (85)
9/16–12
81 (110)
9/16–18
90 (122)
5/8–11
112 (152)
5/8–18
126 (171)
3/4–10
198 (268)
3/4–16
221 (300)
7/8–9
319 (433)
7/8–14
352 (477)
1–8
479 (649)
1–12
524 (710)
1–14
537 (728)
* Freightliner recommends that all plated and unplated fasteners be coated with oil before installation.
Table 5, Torque Values for Grade 8 Regular Hex Zinc-Yellow Plated Capscrews
and Cadmium- and Wax-Coated Prevailing Torque Locknuts
00/20
Recreational Vehicle Chassis Maintenance Manual, February 2012
00
General Information
Torque Specifications Tables: 00–11
Torque Values for U.S. Customary Thread Fasteners With Dry (Unlubricated)* Plain (Unplated) Threads†
Regular Hex
Thread
Diameter–Pitch
Grade 5 Bolt
Grade 5 or B
Nut
Torque: lbf·ft (N·m)
Grade 8 or C
Nut
Torque: lbf·ft (N·m)
f230003
f230002
Flanged
Grade 8 or 8.2
Bolt
f230004
Grade 8 or 8.2
Bolt
Grade G Nut
Torque: lbf·ft (N·m)
f230005
f230009
f230008
1/4–20
8 (11)
10 (14)
—
1/4–28
9 (12)
12 (16)
—
5/16–18
15 (20)
22 (30)
22 (30)
5/16–24
17 (23)
25 (34)
—
3/8–16
28 (38)
40 (54)
40 (54)
3/8–24
31 (42)
45 (61)
—
7/16–14
45 (61)
65 (88)
65 (88)
7/16–20
50 (68)
70 (95)
—
1/2–13
70 (95)
95 (129)
95 (129)
1/2–20
75 (102)
110 (149)
—
9/16–12
100 (136)
140 (190)
140 (190)
9/16–18
110 (149)
155 (210)
—
5/8–11
135 (183)
190 (258)
190 (258)
5/8–18
155 (210)
215 (292)
—
3/4–10
240 (325)
340 (461)
340 (461)
3/4–16
270 (366)
380 (515)
—
7/8–9
385 (522)
540 (732)
—
7/8–14
425 (576)
600 (813)
—
1–8
580 (786)
820 (1112)
—
1–12
635 (861)
900 (1220)
—
1–14
650 (881)
915 (1241)
—
* Threads may have residual oil, but will be dry to the touch.
† Male and female threads (bolt and nut) must both be unlubricated and unplated; if either is plated or lubricated, use Table 4. Freightliner recommends that all
plated and unplated fasteners be coated with oil before installation.
Table 6, Torque Values for U.S. Customary Thread Fasteners With Dry (Unlubricated) Plain (Unplated) Threads
Recreational Vehicle Chassis Maintenance Manual, February 2012
00/21
00
General Information
Torque Specifications Tables: 00–11
Torque Values for Metric Thread Fasteners With Lubricated* or Plated Threads†
Class 8.8 Bolt
Class 8 Nut
Thread
Diameter–Pitch
Torque: lbf·ft (N·m)
8.8
Class 10 Nut
Torque: lbf·ft (N·m)
10.9
8
f230010
Class 10.9 Bolt
f230011
10
f230012
f230013
M6
5 (7)
7 (9)
M8
12 (16)
17 (23)
M8 x 1
13 (18)
18 (24)
M10
24 (33)
34 (46)
M10 x 1.25
27 (37)
38 (52)
M12
42 (57)
60 (81)
M12 x 1.5
43 (58)
62 (84)
M14
66 (89)
95 (129)
M14 x 1.5
72 (98)
103 (140)
M16
103 (140)
148 (201)
M16 x 1.5
110 (149)
157 (213)
M18
147 (199)
203 (275)
M18 x 1.5
165 (224)
229 (310)
M20
208 (282)
288 (390)
M20 x 1.5
213 (313)
320 (434)
M22
283 (384)
392 (531)
M22 x 1.5
315 (427)
431 (584)
M24
360 (488)
498 (675)
M24 x 2
392 (531)
542 (735)
M27
527 (715)
729 (988)
M27 x 2
569 (771)
788 (1068)
M30
715 (969)
990 (1342)
M30 x 2
792 (1074)
1096 (1486)
* Freightliner recommends that all plated and unplated fasteners be coated with oil before installation.
† Use these torque values if either the bolt or nut is lubricated or plated (zinc-phosphate conversion-coated,
cadmium-plated, or waxed, Geomet 321XL coated, or waxed).
Table 7, Torque Values for Metric Thread Fasteners With Lubricated or Plated
Threads
00/22
Recreational Vehicle Chassis Maintenance Manual, February 2012
Engine
01
Index, Alphabetical
Title of Maintenance Operation (MOP)
MOP Number
Engine Drive Belt Inspecting. . . . . . . . . . . . . . . . . . . . . . . . . . . . . . . . . . . . . . . . . . . . . . . . . . . . . . . . . . 01–01
Engine-Support Fasteners Checking . . . . . . . . . . . . . . . . . . . . . . . . . . . . . . . . . . . . . . . . . . . . . . . . . . . . 01–02
Pacbrake Inspecting and Maintenance . . . . . . . . . . . . . . . . . . . . . . . . . . . . . . . . . . . . . . . . . . . . . . . . . . 01–03
Recreational Vehicle Chassis Maintenance Manual, April 2010
01
Engine
01–01 Engine Drive Belt
Inspecting
2
WARNING
3
The engine and the belt must be cool before you
check the belt. Handling a hot belt can cause personal injury.
1. Inspect the belt for damage.
Transverse (across the belt width) cracks are
acceptable.
Longitudinal (direction of belt length) cracks that
intersect with transverse cracks are not acceptable.
2. Replace the belt if it has unacceptable cracks, is
frayed, or has pieces of material missing.
For additional information, see the Cummins Operation and Maintenance Manual.
1
11/08/2005
f0120111
1. Front and Rear-Engine Rear Mount Bolt
2. Engine Mount Bracket-to-Engine Bolts
3. Frame Mount Bracket Bolts
Fig. 1, Front and Rear-Engine Rear Mount (ISB chassis
built after 2002)
01–02 Engine-Support
Fasteners Checking
1. Check the rear engine-support fasteners. See
Fig. 1. Tighten the rear engine-mount bolt 157
lbf·ft (213 N·m).
Tighten the insulator-to-frame mount bracket
bolts 91 lbf·ft (123 N·m).
Tighten the engine mount bracket-to-engine bolts
62 lbf·ft (84 N·m).
2. Check the 3/4–10 front-engine front mount bolt.
See Fig. 2. Tighten it 95 lbf·ft (128 N·m).
Check the 3/4–10 rear-engine front mount bolt.
Tighten it 95 lbf·ft (128 N·m).
01–03 Pacbrake Inspecting and
Maintenance
Pacbrake recommends lubricating the moving parts
of the exhaust brake with a synthetic based lubricant
at every oil change. Once the lubricant is applied, the
exhaust brake should be cycled a few times to ensure that the lubricant penetrates into the mating
parts.
Recreational Vehicle Chassis Maintenance Manual, April 2010
1
11/08/2005
f012110
1. Front and Rear-Engine Front Mount Bolt
Fig. 2, Front and Rear-Engine Front Mount (ISB chassis
built after 2002)
1. With the engine turned off, use Pacbrake Synthetic Lube or Synco Super Lube, and spray or
coat a sufficient amount on the restricter air cylinder valve shaft and the attaching locations at
each end of the actuation cylinder. See Fig. 3 for
the exhaust brake lubrication points.
2. Using your hands or a pair of pliers, slide the
valve several times to distribute the lubricant
down the shaft and the attaching locations.
01/1
01
Engine
1
2
03/20/2003
f012035
1. Air Cylinder
2. Pacbrake
Fig. 3, Pacbrake Exhaust Brake Lube Point Locations
NOTE: Operation of the Pacbrake could be affected by starting the engine and idling for short
periods of time. During a cold engine start-up,
moisture occurs in the engine and the exhaust
system that creates a corrosion hazard. The
brake housing may trap water in the valve shaft
bore causing corrosion, resulting in an improper
or non-functioning brake. If it is necessary to
periodically start the engine, reach normal operating temperatures before shutting down the engine.
01/2
Recreational Vehicle Chassis Maintenance Manual, April 2010
Air Intake
09
Index, Alphabetical
Title of Maintenance Operation (MOP)
MOP Number
Air Cleaner Inspecting and Replacing . . . . . . . . . . . . . . . . . . . . . . . . . . . . . . . . . . . . . . . . . . . . . . . . . . . 09–01
Charge Air Cooler Inspecting and Cleaning . . . . . . . . . . . . . . . . . . . . . . . . . . . . . . . . . . . . . . . . . . . . . . . 09–02
Recreational Vehicle Chassis Maintenance Manual, January 2010
09
Air Intake
09–01 Air Cleaner Inspecting
and Replacing
air intake piping, or a disconnected or damaged air
restriction indicator.
NOTE: Remove and visually inspect the air
cleaner element for obvious damage such as
holes, cuts, or dents. Remove loose debris,
such as leaves or pine needles, from the filter
housing.
H20 VACUUM
IN
25
20
15
10
7
Inspect the air cleaner and plumbing for holes or
tears at the recommended interval. If the air cleaner
is damaged, replace it. See Group 09 of the Recreational Vehicle Chassis Workshop Manual for removal and installation procedures, or take the vehicle
to an authorized Freightliner dealer. A typical air
cleaner mounting is shown in Fig. 1.
H20 VACUUM
PUSH TO RESET
05/22/97
f090176
Fig. 2, Air Restriction Indicator
Replace the air cleaner at the recommended interval,
or when filter restriction reaches 25 inH2O. See the
Recreational Vehicle Chassis Operator’s Manual for
specific restriction values for your engine. See
Group 09 of the Recreational Vehicle Chassis Workshop Manual for removal and installation procedures,
or take the vehicle to an authorized Freightliner
dealer.
09–02 Charge Air Cooler
Inspecting and Cleaning
07/11/2007
f090451
Fig. 1, Air Cleaner Mounting
Engine damage can occur if the air intake system is
not properly maintained. Use the air intake restriction
indicator to check for air intake system damage or
leaks. See Fig. 2. Make sure the engine is off and
note the existing reading on the indicator. Reset the
indicator by pushing it down. See Fig. 2. Start the
engine and take a short test drive. Check the indicator again and note the level of restriction on the indicator, verifying it is at the same level as seen earlier.
A decrease from the previous level of restriction or a
very low air restriction indicator reading (0 to 4
inH2O) could indicate an air intake system problem
such as a damaged air filter, loose or disconnected
Recreational Vehicle Chassis Maintenance Manual, January 2010
Good airflow through the radiator and charge air
cooler core is essential for proper engine cooling.
The cores allow air passage, but form a barrier that
tends to collect insects and airborne debris.
If the charge air cooler core fins are bent, use a
small pair of needle-nose pliers or a small screwdriver to straighten them. If the fins are clogged, use
compressed air or water directed from the fan side of
the radiator core to backflush any material restricting
airflow.
Ensure that the hoses are not chafing and that the
system is closed with no air leaks.
09/1
Alternators and Starters
15
Index, Alphabetical
Title of Maintenance Operation (MOP)
MOP Number
Alternator, Battery, and Starter Checking. . . . . . . . . . . . . . . . . . . . . . . . . . . . . . . . . . . . . . . . . . . . . . . . . 15–01
Recreational Vehicle Chassis Maintenance Manual, April 2010
15
Alternators and Starters
15–01 Alternator, Battery, and
Starter Checking
WARNING
Batteries release explosive gas as a by-product of
their chemical activity. Do not smoke when working around batteries. Put out all flames and remove any source of sparks or intense heat. Make
sure the battery compartment is completely
vented before disconnecting or connecting the
battery cables.
Battery acid is extremely harmful if splashed in
the eyes or on the skin. Always wear a face shield
and protective clothing when working around batteries.
Damaged, chafed, or kinked wiring can cause
electrical short-circuits and lead to fires, causing
property damage, injury, or death. Clean, inspect,
and maintain wiring and connections carefully.
1. Check the tightness of the alternator bracket fasteners and alternator mounting fasteners; tighten
the fasteners as needed. For torque values, see
Group 15 of the Recreational Vehicle Chassis
Workshop Manual, or take the vehicle to an authorized Freightliner dealer.
2. Check that all electrical connections at the alternator and starter are clean. Clean and tighten all
charging system electrical connections as
needed. Spray each electrical connection at the
alternator and starter with dielectric red enamel.
Trace and inspect all wiring and cables connected to:
Find the cause of any problems and repair, replace, and reroute wires and clamps as necessary.
IMPORTANT: Ensure that wires and cables are
not near any heat sources; if they are, reroute
them.
4. Clean all circuit breakers and relays.
5. Check the alternator wiring for missing insulation,
kinks, and heat damage. Replace or repair as
needed.
6. On the bundled cable that runs from the batteries
to the starter, ensure that tie straps are installed
at least every 12 inches (30 cm). Replace any
missing tie straps, and add tie straps where
spacing between them exceeds 12 inches (30
cm).
7. Ensure that all cables have sufficient slack to
allow for engine movement, and that there is no
force on any wiring connectors.
8. If any convoluted tubing is damaged, check the
wiring inside it. Replace any damaged or missing
convoluted tubing.
9. Inspect the battery cables for wear, and replace
as needed. Clean the cable connector terminals
with a wire brush. See Group 54 of the Recreational Vehicle Chassis Workshop Manual for
troubleshooting instructions, and for adjustment,
repair, or replacement instructions, or take the
vehicle to an authorized Freightliner dealer.
9.1
Clean and tighten the battery ground
cable, terminal, and clamps.
9.2
Inspect the retainer assembly (or battery
hold-downs) and the battery box. Replace
worn or damaged parts. Remove any corrosion with a wire brush, and wash with a
weak solution of baking soda and water.
Rinse with clean water, then dry. Paint
the retainer assembly, if needed, to prevent rusting.
9.3
Check that foreign objects, such as
stones, bolts, and nuts, are removed from
the battery box.
9.4
After cleaning, connect the cables to the
batteries, and tighten them to the torque
specifications listed on the battery, generally 10 to 15 lbf·ft (14 to 20 N·m).
• alternator
• starter and depopulation studs
• batteries
• magnetic switch
• cab
• jump-start studs
• battery isolation relays
• battery shutoff switches
3. Check wires and cables for wear, chafing, kinks,
discolored insulation, or loose clamps or ties.
Recreational Vehicle Chassis Maintenance Manual, April 2010
15/1
15
9.5
Alternators and Starters
Coat the battery terminals with dielectric
grease.
10. Check the terminals on the battery shut-off
switch and the starter relay. Make sure that the
terminal connections are clean and tight. Coat
the terminal connections with dielectric red
enamel after cleaning.
15/2
Recreational Vehicle Chassis Maintenance Manual, April 2010
Engine Cooling/Radiator
20
Index, Alphabetical
Title of Maintenance Operation (MOP)
MOP Number
Coolant Replacing . . . . . . . . . . . . . . . . . . . . . . . . . . . . . . . . . . . . . . . . . . . . . . . . . . . . . . . . . . . . . . . . . 20–03
Mechanical Fan Drive Gearbox Oil Changing . . . . . . . . . . . . . . . . . . . . . . . . . . . . . . . . . . . . . . . . . . . . . 20–04
Radiator Cap Checking. . . . . . . . . . . . . . . . . . . . . . . . . . . . . . . . . . . . . . . . . . . . . . . . . . . . . . . . . . . . . . 20–01
Radiator Inspecting and Cleaning . . . . . . . . . . . . . . . . . . . . . . . . . . . . . . . . . . . . . . . . . . . . . . . . . . . . . . 20–02
Recreational Vehicle Chassis Maintenance Manual, February 2012
20
Engine Cooling/Radiator
20–01 Radiator Cap Checking
fins of the radiator. Depending on the condition of the
radiator, this process may have to be performed several times.
WARNING
Do not remove or loosen the radiator cap until the
engine and cooling system have completely
cooled. Use extreme care when removing the cap.
A sudden release of pressure from removing the
cap prior to the system cooling can result in a
surge of scalding coolant that could cause serious personal injury.
The radiator cap is the most ignored part in the cooling system. If it is suspect, replace it. An inspection
means checking the cap with a pressure tester. A
radiator cap in good condition will not open below 9
psi (62 kPa). A visual check is also in order: look for
signs of deterioration of the inner gasket. Also look
for cracks or breaks in the spring retainer in the cap
and for corrosion or deposits on the spring itself. If
the spring is not in perfect condition, it has probably
lost tension; replace it. See Fig. 1.
20–03 Coolant Replacing
At the intervals specified in the maintenance schedule, or whenever the coolant becomes dirty, flush
and refill the cooling system.
NOTE: The coolant replacement interval is increased to 100,000 miles (161 000 km) or 60
months, whichever comes first. For this interval
to apply, you must check and, if necessary, recharge the SCA (supplemental coolant additive)
levels and the freeze point every 25,000 miles
(40 000 km) or 6 months, whichever comes first.
See the Cummins Operation and Maintenance
Manual for further information.
WARNING
Do not remove or loosen the radiator cap until the
engine and cooling system have completely
cooled. Use extreme care when removing the cap.
A sudden release of pressure from removing the
cap prior to the system cooling can result in a
surge of scalding coolant that could cause serious personal injury.
1. Drain the cooling system, as follows.
1.1
05/31/2007
Turn the cap slowly counterclockwise until
it reaches a "stop." Do not press down
while turning the cap. Wait until any remaining pressure (indicated by a hissing
sound) is relieved, then press down on
the cap and continue turning it counterclockwise.
f200705
Fig. 1, Surge Tank Coolant Fill Cap
20–02 Radiator Inspecting and
Cleaning
Inspect the radiator for clogging or damage and
clean and/or repair it if necessary. Soak the radiator
with a non-corrosive degreaser such as Simple
Green. Let the unit sit for several minutes to work
through the radiator. Using low water pressure, rinse
the radiator. Be careful not to damage or bend the
Recreational Vehicle Chassis Maintenance Manual, February 2012
When the engine is cool, remove the radiator cap.
1.2
When the cap is removed, run the engine
until the upper radiator hose is hot—this
shows that the thermostat is open and
the coolant is flowing through the system.
WARNING
Use extreme care when draining coolant that is
very warm. It may still be hot enough to cause serious personal injury by scalding.
20/1
20
1.3
Engine Cooling/Radiator
Stop the engine. Remove the lower radiator hose to drain the coolant. Drainage
may be speeded by removing the plug in
the bottom of the water inlet.
3.1
Slowly add a 50/50 mixture of antifreeze
and water to the surge tank until the system is filled. Install the coolant fill cap.
3.2
Start the engine and run it at low idle for
10 seconds; then at high idle for 1
minute. Return to low idle.
3.3
Run the engine, with the radiator cap removed, until the upper radiator hose is
hot. With the engine idling, add coolant to
the radiator until it is between the MIN
and MAX lines on the surge tank. Install
the radiator cap.
2. Flush the cooling system, as follows.
CAUTION
During filling, air must be vented from the engine
coolant passages. Any air trapped in the system
can cause severe engine damage.
2.1
Connect the lower radiator hose and install the plug in the bottom of the water
inlet.
2.2
Open the engine venting petcock.
2.3
Add water to the surge tank until the system is filled.
2.4
Start the engine. Run it at low idle for 10
seconds, then at high idle for 1 minute.
Return to low idle.
2.5
Close the lower petcock when a steady
stream of water is flowing from it. Don’t
let more than 1.5 quarts (1.4 L) of water
escape.
2.6
Close the upper petcock when a steady
stream of water is flowing from it. Don’t
let more than 1.5 quarts (1.4 L) of water
escape.
2.7
Repeat several times until the drained
liquid is nearly colorless.
2.8
Completely drain the system, then close
the radiator and block the drain valves.
2.9
1. Park the vehicle on a level surface, shut down
the engine, and set the parking brake. Chock the
tires.
2. Place a drain pan under the fan drive gearbox.
IMPORTANT: Label the plugs as they are removed. The breather/fill plug must always be
installed in the top of the gearbox, opposite the
drain plug.
3. Remove the drain plug and breather/fill plug,
shown in Fig. 2, to begin draining the oil.
2
1
3
Disconnect all hoses from the surge tank.
Remove the tank and pour out any fluid.
Scrub and clean the inside of the surge
tank with soap and water. Flush it with
clean water, then drain it. Install the surge
tank and hoses.
IMPORTANT: On vehicles with EPA07-compliant
engines, the coolant capacity varies depending
on the engine and accessory installation. After
servicing the cooling system, always verify that
the coolant level is between the MIN and MAX
lines on the surge tank.
3. Fill the cooling system, as follows.
20/2
20–04 Mechanical Fan Drive
Gearbox Oil Changing
08/31/2011
1. Pinion Shaft
2. Breather/Fill Plug
3. Oil Level Plug
5
4
f200744
4. Drain Plug
5. Cross-Shaft
Fig. 2, Mechanical Fan Drive Gearbox
Recreational Vehicle Chassis Maintenance Manual, February 2012
Engine Cooling/Radiator
20
4. Remove the oil level plug. See Fig. 2.
5. Flush the fan drive gearbox with an approved
nonflammalbe, nontoxic solvent such as:
• Lubriplate Syn Flush
• Lubriplate Pure Flush
• Whitmore’s Flushing Oil
• Medallion™ Flushing Oil Kosher
6. Using degreaser, clean the thread on the drain
hole and drain plug.
7. Install the drain plug.
8. Fill the fan drive gearbox with Mobil® Delvac
75W–90 lubricant until the lubricant starts to
come out of the oil level plug hole.
9. Using degreaser, clean the thread on the oil level
and fill holes and both plugs.
10. Install the plugs, making certain that the
breather/fill plug is used in the fill plug hole.
Recreational Vehicle Chassis Maintenance Manual, February 2012
20/3
Transmission
26
Index, Alphabetical
Title of Maintenance Operation (MOP)
MOP Number
Allison MD/MH Series Transmission Fluid Level Checking . . . . . . . . . . . . . . . . . . . . . . . . . . . . . . . . . . . . 26–02
Allison Transmission Fluid and Filter Changing (internal/external filter) . . . . . . . . . . . . . . . . . . . . . . . . . . . 26–03
Transmission Breather Checking. . . . . . . . . . . . . . . . . . . . . . . . . . . . . . . . . . . . . . . . . . . . . . . . . . . . . . . 26–01
Recreational Vehicle Chassis Maintenance Manual, January 2010
26
Transmission
26–01 Transmission Breather
Checking
Transmission housing breathers must remain clear. A
plugged breather could result in pressure build-up,
which could cause lubricant leakage.
COLD RUN (lower) band is satisfactory for operating the vehicle. See Fig. 2. If the level is not
within the COLD RUN band, add or drain fluid
until it reaches the middle of the COLD RUN
band.
If the breather is plugged, clean or replace it. See
Fig. 1. Check more often if the vehicle is operating
under very dusty conditions.
f270074
11/16/2000
Fig. 2, Transmission Dipstick
4. Perform a hot check at the first opportunity after
normal operating temperature, 160 to 200°F (71
to 93°C), is reached.
Hot Check
Recommended Method
f260007a
05/27/93
Fig. 1, Transmission Breather
26–02 Allison MD/MH Series
Transmission Fluid
Level Checking
Cold Check
IMPORTANT: After replacing the transmission
fluid or changing the filter(s), it is important to
check the fluid level cold to determine if the
transmission has a sufficient amount of fluid to
be safely operated until a hot check can be
performed.
1. A cold check may be made when the sump temperature is 60 to 104°F (15 to 40°C).
2. Run the engine for at least one minute to clear
the fluid system of air.
3. With the engine running, wipe the dipstick clean
and check the fluid level. Any level within the
Recreational Vehicle Chassis Maintenance Manual, January 2010
With the vehicle on a level surface and the transmission in neutral at operating temperature, perform the
steps below.
1. On the transmission shift selector, press the up
and down arrow keys simultaneously. See Fig. 3.
2. Release the arrow keys and wait for a twominute countdown.
3. The transmission shift selector display screen will
display one of the following messages.
• OL - OK indicates an acceptable oil level.
• OL - HI followed by a number indicates the
amount that is over-filled.
• OL - LO followed by a number indicates
the amount that is under-filled.
• OL - 70 indicates that the transmission is
not up to operating temperature.
Alternate Method
1. Operate the transmission in a Drive (D) range
until normal operating temperature, 160 to 200°F
(71 to 93°C), is reached.
26/1
26
Transmission
3. Wipe the dipstick clean and check the fluid level.
A safe operating level is any level within the HOT
RUN (upper) band on the dipstick. See Fig. 2.
1
4. If the fluid is not within this range, add or drain
fluid as needed to bring the level to the top of
the HOT RUN band. See Table 1 for approved
transmission lubricants. See Table 2 for lubricant
capacities.
M
O
N
I
T
O
R
S
E
L
E
C
T
R
MODE
26–03 Allison Transmission
Fluid and Filter
Changing (internal/
external filter)
N
D
03/04/2008
f270159
1. Shift Selector Display Screen
Fig. 3, Transmission Shift Selector
NOTE: The fluid must be warm to ensure an
accurate check. The fluid level rises as temperature increases.
2. Park the vehicle. Shift to Neutral (N) and apply
the parking brake. Let the engine run at idle.
IMPORTANT: For oil and filter change intervals,
see the applicable Allison Operator’s Manual. To
request a replacement Allison Operator’s
Manual, call 1-888-666-5799.
Oil and filter change intervals can also be found
at www.allisontransmission.com. Choose
"Service", and click "Service Tips". Then, select
the appropriate transmission to view fluid and
filter change recommendations.
Approved Allison Transmission Lubricants*
TES-295 Approval
Number
Company
Product Brand Name
AN-051005
ExxonMobil Lubricants and Petroleum Specialties Company
Mobil Delvac Synthetic ATF
AN-011001
Castrol Heavy Duty Lubricants
TranSynd
AN-031002
BP
Autran Syn 295
AN-031003
Cognis Corporation
Emgard 2805
AN-031004
International Truck & Engine Company
Fleetrite Synthetic ATF
AN-071006
John Deere & Company
HD SynTran
* To check the latest Allison approved fluids, go to www.allisontransmission.com. Lubricants listed in order of preference. Do not mix types of oil.
Table 1, Approved Allison Transmission Lubricants
Automatic Transmission Lubricant Capacities
26/2
Model
Refill Capacity*:
qt (L)
1000, 2000, and 2000 MH
16.0 (15.1)
Recreational Vehicle Chassis Maintenance Manual, January 2010
26
Transmission
Automatic Transmission Lubricant Capacities
Model
Refill Capacity*:
qt (L)
3000 MH† and 4000 MH
17.5 (16.5)
* Quantities listed are approximate. Add the recommended amount of fluid
as listed under refill capacity. Do not overfill.
† Some Allison 3000 MH transmissions have a deeper oil sump than other
models. These models require 3 additional quarts (2.8 L) of ATF.
Table 2, Automatic Transmission Lubricant
Capacities
Recreational Vehicle Chassis Maintenance Manual, January 2010
26/3
Throttle Control
30
Index, Alphabetical
Title of Maintenance Operation (MOP)
MOP Number
Throttle Pedal Pivot Pin Lubricating. . . . . . . . . . . . . . . . . . . . . . . . . . . . . . . . . . . . . . . . . . . . . . . . . . . . . 30–01
Recreational Vehicle Chassis Maintenance Manual, January 2010
30
Throttle Control
30–01 Throttle Pedal Pivot Pin
Lubricating
Using a silicone spray, lubricate the throttle pedal
pivot pins as shown in Fig. 1 and Fig. 2.
1
2
2
3
1
07/09/2009
f300408a
2
1. Throttle Pedal
Assembly
2. Pivot Pins
3. Base Plate
Fig. 1, Floor-Mounted Throttle Pedal
07/09/2009
f300409a
1. Throttle Pedal Assembly
2. Pivot Pin (not shown)
Fig. 2, Suspended Throttle Pedal
Recreational Vehicle Chassis Maintenance Manual, January 2010
30/1
Suspension
32
Index, Alphabetical
Title of Maintenance Operation (MOP)
MOP Number
Neway Suspension Inspecting . . . . . . . . . . . . . . . . . . . . . . . . . . . . . . . . . . . . . . . . . . . . . . . . . . . . . . . . 32–03
Suspension Fastener Torque Checking . . . . . . . . . . . . . . . . . . . . . . . . . . . . . . . . . . . . . . . . . . . . . . . . . . 32–01
Suspension Height Control Valve Checking. . . . . . . . . . . . . . . . . . . . . . . . . . . . . . . . . . . . . . . . . . . . . . . 32–02
Suspension Inspecting . . . . . . . . . . . . . . . . . . . . . . . . . . . . . . . . . . . . . . . . . . . . . . . . . . . . . . . . . . . . . . 32–05
Suspension U-Bolt Torque Checking . . . . . . . . . . . . . . . . . . . . . . . . . . . . . . . . . . . . . . . . . . . . . . . . . . . . 32–06
ZF IFS Lubricating . . . . . . . . . . . . . . . . . . . . . . . . . . . . . . . . . . . . . . . . . . . . . . . . . . . . . . . . . . . . . . . . . 32–04
Recreational Vehicle Chassis Maintenance Manual, April 2010
32
Suspension
32–01 Suspension Fastener
Torque Checking
32–02 Suspension Height
Control Valve Checking
WARNING
Inspect the suspension fasteners. Failure to perform inspections could result in separation of
worn suspension components and loss of vehicle
control, possibly causing personal injury or death,
or property damage.
1. Chock the front or the rear tires. Working at the
front of the vehicle or at the rear of the vehicle,
raise the vehicle so that the tires just clear the
ground and the suspension is fully extended.
Place safety stands under the vehicle frame.
2. Check the suspension fasteners. See Table 1 for
correct fastener torques.
3. Check the torque of the rear axle U-bolts.
In a diagonal pattern, tighten all 5/8–18 U-bolt
nuts 205 lbf·ft (278 N·m); tighten all 3/4–16
U-bolt nuts 300 lbf·ft (407 N·m); and tighten all
7/8–14 U-bolt nuts 460 lbf·ft (624 N·m).
NOTICE
Failure to retorque the U-bolt nuts could result in
spring breakage and abnormal tire wear.
WARNING
Inspect the height control components and check
their operation. Failure to perform these inspections and checks could result in separation of
worn suspension components and loss of vehicle
control, possibly causing personal injury or death,
or property damage.
1. Park the vehicle on a level surface. Apply the
parking brake and chock the tires to prevent the
vehicle from moving.
2. Inspect the front and rear suspensions for any
signs of damage, loose components, wear, or
cracks. Replace any damaged components to
prevent failure or equipment breakdown.
3. Inspect all bolts and nuts at the pivot axle connections to assure that they are properly torqued.
Check all other nuts and bolts for proper torque.
See Group 00 of this manual for proper torque
specifications.
4. Check the air pressure gauge to confirm that
there is in excess of 65 psi (448 kPa) in the air
system, and inspect the air springs for sufficient
and equal firmness.
4. Remove the safety stands and lower the vehicle
to the ground.
Suspension Torque Specifications (lubricated threads)
Description
Size
Torque: lbf·ft (N·m)
Shock Absorber Mount Locknut
3/4–16
110 to 150 (149 to 203)
Air Spring Upper Mounting Plate Locknut
3/4–16
31 to 42 (42 to 57)
Air Spring Upper Mounting Plate Capscrew
1/2–13
31 to 42 (42 to 57)
Air Spring Lower Mounting Plate Capscrew
1/2–13
31 to 42 (42 to 57)
1-1/4–12
600 to 700 (814 to 949)
3/4–16
150 to 200 (203 to 271)
Transverse Beam Bushing Locknuts
Equalizing Beam Center Bushing Locknut
Equalizing Beam Front Bushing Locknut
Control Rod Ball Stud Locknut
Control and Torque Rod Mounting Locknuts
1-1/8–12
1-1/4–12
600 to 700 (814 to 949)
1-1/8–12
550 to 650 (746 to 881)
5/8–18
110 to 150 (149 to 203)
Table 1, Suspension Torque Specifications (lubricated threads)
Recreational Vehicle Chassis Maintenance Manual, April 2010
32/1
32
Suspension
NOTE: Height control valves control all front and
rear suspension air springs. Check for air leaks
by applying a soapy solution. Then, check for
bubbles at all air connections and fittings.
5. Check the ride height of the air suspension by
measuring the distance from the center of the
lower shock bolt to the bottom of the frame rail.
See Fig. 1. See Table 2 for height control valve
adjustment measurements. If ride height is incorrect, adjust the air suspension.
Height Control Valve Adjustment Measurements
Suspension
Measurement
Inches ±1/4 (mm ±6)
AS120 (front)
10 (254) or
10-1/2 (267)*
AS140 (front)
11 (279)
IFS114 (front)
17-1/2 (445)
IFS ZF (front)
15-3/4 (400)
ADL-RS17/19/21
10-1/4 (260)
AD200-RS17/19
9-3/4 (248)
AD200-RS15
9-3/8 (238)
ADTB280 (rear)
17-1/4 (438)
Airliner 15k (rear)
8-3/4 (222)
AD123 (rear)
18 (457)
* Some vehicles have a different shock location. When this is the case, the
vehicle will have a 55 degree wheel cut. Ride height for these vehicles
should be set at 10-1/2 inches (267 mm).
Table 2, Height Control Valve Adjustment
Measurements
32–03 Neway Suspension
Inspecting
WARNING
Inspect the components and check their operation
as described below. Failure to perform these inspections and checks could result in separation of
worn suspension components and loss of vehicle
control, possibly causing personal injury or death,
or property damage.
1. Chock the front or the rear tires. Working at the
front of the vehicle or at the rear of the vehicle,
32/2
raise the vehicle so that the tires just clear the
ground and the suspension is fully extended.
Place safety stands under the vehicle frame.
2. Squeeze all air springs to check for complete
deflation. It may take ten minutes for the pressure to bleed down from the air spring. See
Fig. 2. If any air springs remain partially or fully
inflated, see Group 32 of the Recreational Vehicle Chassis Workshop Manual, or take the vehicle to an authorized Freightliner dealer. Inspect
the air springs for cracks, tears, or other damage.
3. Inspect each air spring for wear at the pedestal
connection. Inspect for leaks at the upper and
lower pedestal connections using a soapy solution. Replace any worn air springs; for instructions, see Group 32 of the Recreational Vehicle
Chassis Workshop Manual, or take the vehicle to
an authorized Freightliner dealer.
4. Inspect the bolts and nuts at the pivot connections, the transverse beam connections, and the
axle connections to ensure they are tightened to
the correct torque specification.
5. Check all of the other suspension components
for any sign of damage, looseness, wear, or
cracks. Replace worn or damaged parts. See
Group 32 of the Recreational Vehicle Chassis
Workshop Manual, or take the vehicle to an authorized Freightliner dealer.
6. Inspect for cracked welds. If cracks are found,
contact Neway immediately for further instructions.
7. Inspect the torque rod and track bar pivot bushings for excessive wear. Replace worn or damaged bushings. See Group 32 of the Recreational Vehicle Chassis Workshop Manual, or
take the vehicle to an authorized Freightliner
dealer.
8. Move the axle up and down while checking for
signs of looseness due to worn parts at the front
pivot connections. Replace any worn parts by
following the procedures in Group 32 of the Recreational Vehicle Chassis Workshop Manual, or
take the vehicle to an authorized Freightliner
dealer.
9. Check for leaks on the height control valves by
applying a soapy solution, then, watching for
bubbles at all air connections and fittings.
Recreational Vehicle Chassis Maintenance Manual, April 2010
32
Suspension
1
A
3
2
09/28/98
f320423a
A. Measure here for suspension ride height.
1. Frame Rail
2. Axle Housing
3. Axle Centerline
Fig. 1, Ride Height Inspection (typical Neway suspension shown)
10. Inspect the shock absorbers for oil leaks and
worn rubber bushings. Replace the shock absorbers and/or rubber bushings if wear or damage is noted. For instructions, see Group 32 of
the Recreational Vehicle Chassis Workshop
Manual, or take the vehicle to an authorized
Freightliner dealer.
32–04 ZF IFS Lubricating
11. Remove the safety stands and lower the vehicle
to the ground. Run the engine until air pressure
of at least 100 psi (689 kPa) is maintained
throughout the system.
1. Chock the rear tires and apply the parking brake.
Raise the front of the vehicle with a jack so the
tires just clear the ground and the suspension is
fully extended. Place safety stands under the
vehicle frame.
IMPORTANT: Repeat this check at both ends of
the vehicle.
12. Check that all air springs are inflated. If the air
springs do not inflate, see Group 32 of the Recreational Vehicle Chassis Workshop Manual for
possible causes and corrections, or take the vehicle to an authorized Freightliner dealer.
Recreational Vehicle Chassis Maintenance Manual, April 2010
IMPORTANT: Do not raise the vehicle by placing a jack under the control arm(s). The weight
of the vehicle could damage the control arms
and cause alignment issues.
WARNING
Never work around or under a vehicle that is supported only by a jack. Always support the vehicle
with safety stands. Jacks can slip, causing the
vehicle to fall, which could result in serious injury
or death.
32/3
32
Suspension
02/21/2005
f321032
Fig. 2, Holland Neway ADL 120/123 Suspension
IMPORTANT: Every 50,000 miles (80 450 km),
ZF recommends that the wheel hub be removed
to check the wheel bearing lash, and adjust as
needed.
2. Remove the wheel hub. See Group 33 of the
Recreational Vehicle Chassis Workshop Manual
for wheel bearing service procedures, or take the
vehicle to an authorized Freightliner dealer.
3. Lubricate the steering knuckle/control arm at indicated maintenance intervals. Use only an NLGI
Grade 2 lithium-based grease, multipurpose
grease, or mineral oil on the lubricating points.
See Fig. 3 and Fig. 4.
32–05 Suspension Inspecting
Freightliner Spring Front and
Rear Suspension Spring
Assemblies Inspection
Inspect the front and rear suspension spring assemblies for pitted, cracked, broken, or abnormally bent
leaves and extreme rust. If any of these conditions
exist, replace the spring assembly. See Group 32 of
the Recreational Vehicle Chassis Workshop Manual
for instructions, or take the vehicle to an authorized
Freightliner dealer.
WARNING
Do not replace individual leaves of a damaged leaf
spring assembly; replace the complete spring as-
32/4
Recreational Vehicle Chassis Maintenance Manual, April 2010
32
Suspension
two top leaves, a loss of vehicle control could
occur. Failure to replace a damaged spring assembly could cause an accident resulting in property
damage, serious personal injury, or death.
2
1
IMPORTANT: On multi-leaf suspensions, closely
inspect each component of the leaf spring assemblies, including the brackets, U-bolts, and
related parts.
60-Inch Taper-Leaf Spring
Component Check
3
09/30/2004
f321018
1. Steering Knuckle Bearing Grease Fitting (upper)
2. Control Arm
3. Steering Knuckle Bearing Grease Fitting (lower)
Fig. 3, Pressure Grease Fitting Positions, RL-75E
No lubrication is required on the 60-inch taper-leaf
spring front and rear suspension.
Inspect the rear shackle brackets for bushing wear or
cracks.
Inspect the stabilizer bar, if present, for irregular
bushing wear or cracks in the brackets. Check the
rubber helper spring, if present, for cracks.
2
32–06 Suspension U-Bolt
Torque Checking
1
Check the U-bolt torque of both the front and rear
axles where applicable.
CAUTION
09/30/2004
1.
2.
3.
4.
4
3
f321019
Steering Knuckle Bearing Grease Fitting (upper)
Control Arm Grease Fitting (upper)
Control Arm Grease Fitting (lower)
Steering Knuckle Bearing Grease Fitting (lower)
Fig. 4, Pressure Grease Fitting Positions, RL-75EM
sembly. Visible damage (cracks or breaks) to one
leaf causes hidden damage to other leaves. Replacement of only the visibly damaged part(s) is
no assurance that the spring is safe. On front
spring assemblies, if cracks or breaks exist in the
Recreational Vehicle Chassis Maintenance Manual, April 2010
Failure to retorque the U-bolt nuts could result in
spring breakage and abnormal tire wear.
1. Park the vehicle on a flat surface, apply the parking brake, and chock the tires.
2. Check the U-bolt torque in a diagonal pattern.
Set a click-type torque wrench to the highest
torque value for the fastener being checked. See
Table 3 for U-bolt torque specifications. Turn the
wrench in a clockwise motion (looking up) until
the torque wrench clicks.
3. Remove the chocks.
32/5
32
Suspension
U-Bolt Torque Values
Description
Torque:
lbf·ft (N·m)
Size
5/8–18
Stage
Stage
Stage
Stage
1:
2:
3:
4:
Hand tighten
60 (81)
200 (271)
180 to 230 (245 to 313)
3/4–16
Stage
Stage
Stage
Stage
1:
2:
3:
4:
Hand tighten
60 (81)
200 (271)
270 to 330 (367 to 449)
Spring Assembly U-Bolt High Nuts*
* Tighten in the sequence shown in Fig. 5.
Table 3, U-Bolt Torque Values
03/10/2011
4
1
2
3
f320783
Fig. 5, Tightening Sequence for U-Bolt High Nuts
32/6
Recreational Vehicle Chassis Maintenance Manual, April 2010
Front Axle
33
Index, Alphabetical
Title of Maintenance Operation (MOP)
MOP Number
All-Axle Alignment Checking . . . . . . . . . . . . . . . . . . . . . . . . . . . . . . . . . . . . . . . . . . . . . . . . . . . . . . . . . . 33–03
Knuckle Pin Lubricating . . . . . . . . . . . . . . . . . . . . . . . . . . . . . . . . . . . . . . . . . . . . . . . . . . . . . . . . . . . . . 33–01
Oil-Filled Hubs Oil Changing. . . . . . . . . . . . . . . . . . . . . . . . . . . . . . . . . . . . . . . . . . . . . . . . . . . . . . . . . . 33–06
Oil-Filled Hubs Oil Level Checking . . . . . . . . . . . . . . . . . . . . . . . . . . . . . . . . . . . . . . . . . . . . . . . . . . . . . 33–05
Tie-Rod End Lubricating and Inspecting . . . . . . . . . . . . . . . . . . . . . . . . . . . . . . . . . . . . . . . . . . . . . . . . . 33–02
Wheel Bearing Removal, Cleaning, Checking, Repacking, and Adjusting . . . . . . . . . . . . . . . . . . . . . . . . . 33–04
Recreational Vehicle Chassis Maintenance Manual, September 2011
33
Front Axle
33–01 Knuckle Pin Lubricating
Hold a high-pressure grease gun on each fitting until
fresh grease appears. See Fig. 1 or Fig. 2. This will
ensure that all of the old contaminated grease has
been forced out.
1
A
1
09/06/96
f320032a
Pump lubricant into each grease fitting until fresh grease
comes out at A.
1. Grease Fitting
Fig. 1, Meritor Axle Grease Fittings
When lubricating Meritor axle knuckle pin bushings
or Alliance Brand Product (ABP) axle needle bearings at the initial maintenance (IM) interval, first wipe
the lube fittings clean. Then, slowly feed (for Meritor
axles) multipurpose chassis grease (NLGI grade 1 or
2) into each bushing area, or (for ABP axles), lithium
12-hydroxy stearate (with molybdenum disulfide) WL
grade 2 grease into each needle bearing area, while
turning the wheels from extreme right to left, and
back again (lock-to-lock). This will eliminate small air
pockets and improve grease distribution.
NOTE: The grease seal will accept the grease
pressure without damaging the seal, and is designed to have grease pumped out through it
during lubrication. Even if grease leaks out
around the top or bottom plate, continue pumping until new grease is seen at the seal on the
bushing or needle bearing opposite the grease
fitting.
When lubricating knuckle pin bushings or needle
bearings after the IM maintenance interval, first wipe
the lube fittings clean. Then, (for Meritor axles) apply
multipurpose chassis grease, or (for ABP axles),
lithium 12-hydroxy stearate (with molybdenum disulfide) WL grade 2 grease, until new grease is seen at
the grease seal on the bushing or needle bearing
opposite the fittings.
33–02 Tie-Rod End Lubricating
and Inspecting
1
2
IMPORTANT: DOT roadside tie-rod assembly
replacement criteria specifies that if tie-rod endplay is 1/8 inch (3 mm) or greater, measured on
the road, the vehicle must be taken out of service immediately. If less than 1/8 inch (3 mm),
the vehicle does not have to be taken out of
service but a major out-of-service inspection
and maintenance must be scheduled as soon
as possible.
1
06/13/2003
f330213
1. Grease Fitting
2. Steering Knuckle
Fig. 2, ABP Axle Grease Fittings
Recreational Vehicle Chassis Maintenance Manual, September 2011
1. Wipe the tie-rod end grease fittings clean, then
(for Meritor axles) pump multipurpose chassis
grease (NLGI grade 1 or 2), or (for Freightliner
axles), lithium 12-hydroxy stearate (with molybdenum disulfide) WL grade 2 grease, to the tierod ends until all used grease is forced out and
new grease appears at the ball stud neck.
33/1
33
Front Axle
NOTE: Inspect the tie-rod end boots for cracks,
wear, or damage. If a boot is cracked, worn, or
damaged, replace the tie-rod assembly.
Freightliner Axle Tie-Rod End Nut
2. Inspect the tie-rod ends, as follows.
Thread
Torque: lbf·ft (N·m)
5/8–16
60 to 115 (81 to 156)
5/8–18
60 to 115 (81 to 156)
2.1
2.2
Shake the cross-tube. Movement or
looseness between the tapered shaft of
the ball and the cross-tube socket members means that the tie-rod end assembly
must be replaced.
The threaded portion of the tie-rod end
assembly must be inserted all the way
into the cross-tube split for adequate
clamping. See Fig. 3. Replace the parts if
this cannot be done. For instructions, see
the axle manufacturer’s service manual.
OK
nut torque specifications.
3/4–16
90 to 170 (122 to 230)
7/8–14
160 to 300 (217 to 407)
Table 1, Freightliner Axle Tie-Rod End Nut
Freightliner Axle Tie-Rod End Clamp Nut
Thread
Torque: lbf·ft (N·m)
1/2–13
35 to 45 (47 to 61)
5/8–11
40 to 60 (54 to 81)
5/8–18
50 to 64 (73 to 87)
3/4–10
155 to 175 (210 to 237)
Table 2, Freightliner Axle Tie-Rod End Clamp Nut
33–03 All-Axle Alignment
Checking
1
NOTE: The final stage manufacturer is responsible for setting the vehicle ride height with air
suspension and some vehicle alignments. On
full-railed chassis, this includes the final toe-in
setting on the front axle. For modular style
chassis, both the front axle toe-in and rear axle
thrust angle settings are included.
OK
Drive Axle Alignment Checking
f320033a
02/27/2007
IMPORTANT: The tie-rod end threads must be visible
throughout the entire length of the split.
NOTE: Pinch bolt not shown to provide clarity.
1. Cross-Tube Split
Fig. 3, Tie-Rod End Adjustment
2.3
33/2
Check the tie-rod end nut and clamp nut
torques. For Meritor axles, tighten the tierod end nut 100 lbf·ft (136 N·m), and
tighten the clamp nut 40 to 55 lbf·ft (54 to
75 N·m). For Freightliner axles, see
Table 1 for tie-rod end nut torque specifications and Table 2 for tie-rod end clamp
NOTE: The maximum tolerance from perpendicular for rear axle alignment should be ±0.25
degree.
Check the axle alignment, parallelism, and thrust
angle measurements for the rear axle. Use the applicable procedure and specifications in Group 35 of
the Recreational Vehicle Chassis Workshop Manual,
or take the vehicle to an authorized Freightliner
dealer.
Toe-In Inspection
For vehicle alignment to be accurate, the shop floor
must be level in every direction. The turn plates for
Recreational Vehicle Chassis Maintenance Manual, September 2011
33
Front Axle
the front wheels must rotate freely without friction,
and the alignment equipment must be calibrated
every three months by a qualified technician from the
equipment manufacturer. Freightliner dealers must
have proof of this calibration history.
A
NOTE: Toe-in should be within 0 to 1/32 inch
(0.8 mm).
1. Apply the parking brake, and chock the rear
tires.
2. Raise the front of the vehicle until the tires clear
the ground. Check that the safety stands will
support the combined weight of the body, axle,
and frame. Place safety stands under the axle.
3. Using spray paint or a piece of chalk, mark the
entire center rib of each front tire.
B
f330082a
08/29/94
NOTE: B minus A equals toe-in.
Fig. 4, Wheel Toe-In (overhead view)
4. Place a scribe or pointed instrument against the
marked center rib of each tire, and turn the tires.
Hold the scribe firmly in place so that a single
straight line is scribed all the way around each
front tire.
5. Place a turn-plate or turntable under both front
tires. Remove the safety stands from underneath
the axle, then lower the vehicle. Remove the
lockpins from the gauges; make sure that the
tires are pointing straight ahead.
NOTE: If turn-plates or turntables are not available, lower the vehicle. Remove the chocks
from the rear tires and release the parking
brake. Move the vehicle backward and then forward about six feet (two meters).
6. Place a trammel bar at the rear of the front tires;
locate the trammel pointers at spindle height,
and adjust the pointers to line up with the scribe
lines on the center ribs of the front tires. See
Fig. 4. Lock the pointers in place. Check that the
scale is set to zero.
7. Place the trammel bar at the front of the tires
and adjust the scale end so that the pointers line
up with the scribe lines. See Fig. 5 and Fig. 6.
8. Read the toe-in from the scale, and compare it to
the toe-in specification in Group 33 of the Recreational Vehicle Chassis Workshop Manual, or
take the vehicle to an authorized Freightliner
dealer. If corrections are needed, see Group 33
of the Recreational Vehicle Chassis Workshop
Manual, or take the vehicle to an authorized
Freightliner dealer.
Recreational Vehicle Chassis Maintenance Manual, September 2011
f330014a
08/30/94
Fig. 5, Trammel Bar Positioning
33–04 Wheel Bearing Removal,
Cleaning, Checking,
Repacking, and
Adjusting
Freightliner/Meritor
Check for correct end play. Correct end play is between 1 to 0.005 inch (25.4 to 0.12 mm).
ZF IFS
ZF recommends that all grease fittings be lubricated
once a year, preferably before periods of inactivity.
The wheel hub should be disassembled, inspected,
and the wheel bearings repacked every 1,000,000
miles (1 609 000 km).
33/3
33
Front Axle
4. Rotate the wheels, allow the oil to settle, and
check the levels again.
5. Install the filler caps securely.
6. Remove the chocks from the tires.
33–06 Oil-Filled Hubs Oil
Changing
WARNING
Be careful not to overfill the hubs. Overfilling may
cause oil to be forced out of the hubs and to contaminate the brake linings and other brake components. This could result in loss of vehicle control
and lead to personal injury and property damage.
1. With the vehicle on a level surface, rotate the
front wheels so that the front hub drain plugs are
positioned downward.
2. Chock the tires.
f400100a
08/30/94
Fig. 6, Setting Trammel Bar Pointers
33–05 Oil-Filled Hubs Oil Level
Checking
3. Place suitable containers under the hubs, remove the filler plugs (in the ends of the hub
caps) and the drain plugs, and allow the hubs to
drain completely. See Fig. 7.
2
WARNING
Be careful not to overfill the hubs. Overfilling may
cause oil to be forced out of the hubs and to contaminate the brake linings and other brake components. This could result in loss of vehicle control
and lead to personal injury and property damage.
1
1. With the vehicle on a level surface, rotate the
front wheels and allow the oil in the hubs to
settle.
A
2. Chock the tires.
IMPORTANT: The oil level should be at, or no
more than 1/4 inch (6 mm) above the level indicators on the hub caps.
3. If necessary, remove the filler caps (in the ends
of the hub caps) and add enough oil (80W–90
hypoid gear oil) to bring the oil to the proper
level.
33/4
f330247b
07/09/2009
A. Hub Cavity Full
1. Fill Plug/Magnetic Drain
2. Drain Plug
Fig. 7, Oil-Filled Hub Cap
Recreational Vehicle Chassis Maintenance Manual, September 2011
Front Axle
33
4. Install the drain plugs and tighten 25 lbf·in (282
N·cm).
5. Add approximately 1 to 1-1/2 pints (0.5 to 0.7 L)
of oil (80W–90 hypoid gear oil) to each hub.
6. Rotate the wheels, allow the oil to settle, and
check the levels.
IMPORTANT: Fill the hubs to the level indicators
on the hub caps, or to no more than 1/4 inch (6
mm) above the indicators. See Fig. 7.
7. Install the filler plugs securely.
Recreational Vehicle Chassis Maintenance Manual, September 2011
33/5
Rear Axle
35
Index, Alphabetical
Title of Maintenance Operation (MOP)
MOP Number
Axle Breather Checking . . . . . . . . . . . . . . . . . . . . . . . . . . . . . . . . . . . . . . . . . . . . . . . . . . . . . . . . . . . . . 35–03
Axle Lubricant Changing. . . . . . . . . . . . . . . . . . . . . . . . . . . . . . . . . . . . . . . . . . . . . . . . . . . . . . . . . . . . . 35–02
Axle Lubricant Checking. . . . . . . . . . . . . . . . . . . . . . . . . . . . . . . . . . . . . . . . . . . . . . . . . . . . . . . . . . . . . 35–01
Oil-Filled Hubs Oil Changing, Tag Axle . . . . . . . . . . . . . . . . . . . . . . . . . . . . . . . . . . . . . . . . . . . . . . . . . . 35–05
Oil-Filled Hubs Oil Level Checking, Tag Axle . . . . . . . . . . . . . . . . . . . . . . . . . . . . . . . . . . . . . . . . . . . . . . 35–04
Recreational Vehicle Chassis Maintenance Manual, September 2010
35
Rear Axle
35–01 Axle Lubricant Checking
NOTE: If the vehicle is exposed to water deep
enough to cover the hubs, disassemble and inspect them for water damage and/or contamination. See Group 35 of the Recreational Vehicle
Chassis Workshop Manual for instructions, or
take the vehicle to an authorized Freightliner
dealer.
1. Clean the area around the filler plug, and remove
the plug.
2. Make sure that the lubricant is level with the bottom of the filler plug hole. See Fig. 1.
A
B
f350061a
08/17/2009
A. Correct (lube level at bottom of fill hole)
B. Incorrect (lube level below fill hole)
Fig. 1, Axle Lubricant Checking
3. Add S.A.E. 80W–90 multipurpose gear lubricant,
or an S.A.E. 75W–90 multipurpose synthetic
gear lubricant. Either type of lubricant must meet
Military Specification L–2105–D and be suitable
for American Petroleum Institute service classification GL–5. Install and tighten the filler plug.
4. Inspect the axle for signs of leakage. If leakage
is indicated and the lubricant level is down, have
your dealer perform any necessary maintenance.
35–02 Axle Lubricant Changing
Freightliner Axle
1. Remove the filler plug, then the drain plug (in the
center bottom of the axle housing), and allow the
differential to drain completely.
3. Fill the differential with 80/90 hypoid gear oil
through the rear axle fill hole. See Table 1 for
axle lubricant capacities.
Freightliner Drive Axle Lubricant Capacity
Differential/Hubs
Capacity: qt (L)
Differential Only
5.8 (5.5)
Differential and Hubs
7.4 (7.0)
Table 1, Freightliner Drive Axle Lubricant Capacity
NOTE: A normal oil change does not include the
hubs. Drain the differential and add 5.8 qt (5.5
L) of 80/90 hypoid gear oil through the rear axle
fill hole. The lubricant level should be at the bottom of the fill hole.
IMPORTANT: The entire axle capacity (axle
completely dry) is 7.4 qt (7 L). Each hub contains 0.80 qt (0.75 L) of lubricant. To protect the
outer bearings from oil starvation, jack up (articulate) each side of the axle a minimum of 4
inches (10 cm) to ensure that oil flows to the
outer bearings. Articulate the short-side arm for
45 seconds and the long-side arm for 90 seconds. After articulating the axle, add 0.80 qt
(0.75 L) of lubricant through the fill hole (in addition to the 5.8 qt [5.5 L] of a normal oil change)
for each hub that has been removed. Check the
oil level again and ensure that the axle is neither under- nor over-filled.
4. Install the fill plug and tighten it securely.
Meritor Axle
1. Remove the filler plug, then the drain plug, and
allow the differential to drain completely.
2. Install the drain plug. Tighten it 24 lbf·ft (34 N·m).
3. Fill the differential with an SAE 80W–90 multipurpose gear lubricant, or an SAE 75W–90 multipurpose synthetic gear lubricant. See Table 2 for
axle lubricant capacities. Either type of lubricant
must meet Military Specification L–2105–D and
be suitable for American Petroleum Institute service classification GL–5. The lubricant level
within the differential must be even with the bottom of the fill hole.
2. Install the drain plug and tighten it securely.
Recreational Vehicle Chassis Maintenance Manual, September 2010
35/1
35
Rear Axle
4. Install the fill plug. Tighten it 24 lbf·ft (34 N·m).
Meritor Drive Axle Lubricant Capacity
Axle Model
Capacity: pt (L)*
RS-15-120
16 (7.6)
RS-17-145
33.6 (15.9)
RS-19-145
34.4 (16.3)
RS-21-145
32 (15.1)
RS-23-160
42 (19.9)
RS-23-165
42 (19.9)
1
2
* Quantities listed are approximate and include 1 pint (0.5 L) for each wheel
end and with the drive pinion at 3 degrees.
Table 2, Meritor Drive Axle Lubricant Capacity
35–03 Axle Breather Checking
NOTE: On Freightliner axles, the axle housing
breather is located on the carrier assembly.
The axle housing breather must remain unobstructed. Whenever the axle lubricant is checked or
changed, also make sure that the breather is open.
Check more often under poor operating conditions. If
the breather is plugged, clean or replace it as
needed. See Fig. 2 and Fig. 3.
1
03/28/2007
f350484
1. Axle Housing Breather
2. Breather Tube
Fig. 3, Freightliner Axle Housing
35–04 Oil-Filled Hubs Oil Level
Checking, Tag Axle
WARNING
Be careful not to overfill the hubs. Overfilling may
cause oil to be forced out of the hubs and to contaminate the brake linings and other brake components. This could result in loss of vehicle control
and lead to personal injury and property damage.
1. With the vehicle on a level surface, remove the
hub cap (also referred to as a beauty ring). See
Fig. 4.
2. Rotate the rear wheels and allow the oil in the
hubs to settle.
3. Chock the tires.
IMPORTANT: The oil level should be at, or no
more than 1/4 inch (6 mm) above the level indicators on the hub caps.
2
3
06/07/94
f350002a
1. Axle Housing Breather
2. Fill Plug
3. Temperature Indicator Plug
Fig. 2, Meritor Axle Housing (typical)
35/2
4. If necessary, remove the filler caps (in the ends
of the hub caps) and add enough oil (80W–90
hypoid gear oil) to bring the oil to the proper
level.
5. Rotate the wheels, allow the oil to settle, and
check the levels again.
6. Install the filler caps securely.
Recreational Vehicle Chassis Maintenance Manual, September 2010
35
Rear Axle
2
2
1
1
A
07/28/2010
f400295
1. Cap Head
2. Hub Cap (Beauty Ring)
Fig. 4, Rear Axle Hub Cap Assembly
NOTICE
Do not overtighten the cap head. Too much force
will strip the screw.
7. Install the hub cap and tighten the cap head just
until snug.
35–05 Oil-Filled Hubs Oil
Changing, Tag Axle
WARNING
Be careful not to overfill the hubs. Overfilling may
cause oil to be forced out of the hubs and to contaminate the brake linings and other brake components. This could result in loss of vehicle control
and lead to personal injury and property damage.
1. With the vehicle on a level surface, remove the
hub cap (also referred to as a beauty ring).
f330247b
07/09/2009
A. Hub Cavity Full
1. Fill Plug/Magnetic Drain
2. Drain Plug
Fig. 5, Oil-Filled Hub Cap
5. Install the drain plugs and tighten securely.
6. Add approximately 1 to 1-1/2 pints (0.5 to 0.7 L)
of oil (80W–90 hypoid gear oil) to each hub.
IMPORTANT: Fill the hubs to the level indicators
on the hub caps, or to no more than 1/4 inch (6
mm) above the indicators. See Fig. 5.
7. Rotate the wheels, allow the oil to settle, and
check the levels.
8. Install the filler plugs securely.
NOTICE
Do not overtighten the cap head. Too much force
will strip the screw.
9. Install the hub cap and tighten the cap head just
until snug.
2. Rotate the rear wheels so that the rear hub drain
plugs are positioned downward.
3. Chock the tires.
4. Place suitable containers under the hubs, remove the filler plugs (in the ends of the hub
caps) and the drain plugs, and allow the hubs to
drain completely. See Fig. 5.
Recreational Vehicle Chassis Maintenance Manual, September 2010
35/3
Wheels and Tires
40
Index, Alphabetical
Title of Maintenance Operation (MOP)
MOP Number
Wheel Cleaning and Polishing . . . . . . . . . . . . . . . . . . . . . . . . . . . . . . . . . . . . . . . . . . . . . . . . . . . . . . . . 40–02
Wheel Nut Checking. . . . . . . . . . . . . . . . . . . . . . . . . . . . . . . . . . . . . . . . . . . . . . . . . . . . . . . . . . . . . . . . 40–01
Recreational Vehicle Chassis Maintenance Manual, May 2011
40
Wheels and Tires
40–01 Wheel Nut Checking
IMPORTANT: In addition to the maintenance
interval in this manual, check the wheel nut
torque the first 50 to 100 miles (80 to 160 km)
of operation after a wheel has been removed
and installed.
NOTE: On each wheel stud, the end that faces
away from the vehicle is stamped with an "L" or
an "R," depending on which side of the vehicle
the stud is installed. Studs stamped with an "L"
are left-hand threaded and are installed on the
driver’s side of the vehicle. Studs stamped with
an "R" are right-hand threaded and are installed
on the passenger’s side of the vehicle.
When checking wheel nuts on a dual disc assembly,
remove one outer nut at a time, tighten the inner nut,
then reinstall the outer nut. Repeat this procedure for
all of the inner wheel nuts in the sequence shown in
Fig. 1, Fig. 2, or Fig. 3. Then, tighten all of the outer
wheel nuts in the same sequence.
B
2
1
4
5
3
6
6
3
5
4
2
1
08/20/96
f400119
A. Front and Inner Rear Dual
B. Outer Rear Dual
Fig. 1, Wheel Nut Tightening Sequence (6-stud hubs)
A
B
2
1
4
3
5
8
CAUTION
Too little wheel nut torque can cause wheel
shimmy, resulting in wheel damage, stud breakage, and extreme tire tread wear. Too much wheel
nut torque can break studs, damage threads, and
crack discs in the stud hole area.
A
7
6
6
7
8
5
3
4
1
2
06/23/2000
f400159
A. Front and Inner Rear Dual
B. Outer Rear Dual
Fig. 2, Wheel Nut Tightening Sequence (8-stud hubs)
Tighten the wheel nuts.
• On 6-stud, stud-pilot hubs, tighten the wheel
nuts 450 to 500 lbf·ft (610 to 678 N·m). See
Fig. 1 for the tightening sequence.
• On 8-stud or 10-stud, hub-pilot hubs with
20-mm studs, tighten the wheel nuts 280 to 310
lbf·ft (380 to 420 N·m). See Fig. 2 or Fig. 3 for
the tightening sequence.
• On 8-stud or 10-stud, hub-pilot hubs with
22-mm studs, tighten the wheel nuts 450 to 500
lbf·ft (610 to 678 N·m). See Fig. 2 or Fig. 3 for
the tightening sequence.
NOTE: Wheel nuts for 20-mm stud hubs require
a 1- 3/16-inch (30-mm) socket. Wheel nuts for
22-mm stud hubs require a 1-5/16-inch (33-mm)
socket.
Recreational Vehicle Chassis Maintenance Manual, May 2011
A
9
B
2
10
7
1
8
4
5
3
6
6
3
5
4
8
10
1
09/28/98
7
9
2
f400142
A. Front and Inner Rear Dual
B. Outer Rear Dual
Fig. 3, Wheel Nut Tightening Sequence (10-stud hubs)
40/1
40
Wheels and Tires
40–02 Wheel Cleaning and
Polishing
Accuride® Machined and
Polished Aluminum Wheels
IMPORTANT: Do not scrub the wheels before
rinsing off particles with high-pressure water.
Rubbing debris against the surface of the wheel
can result in scratches. Synthetic cleaning pads
and wire brushes should not be used to clean
the wheels.
Do not use strong detergents, alkaline, or acidic
cleaners to clean Accuride aluminum wheels.
These solutions can etch the surface of the aluminum and leave dull areas. Do not use polishes or wax on Accuride ACCU-SHIELD aluminum wheels.
1. Rinse the wheel with high-pressure water to remove debris.
2. Use a 100% cotton cloth dipped in a mild soap
solution to help remove built up dirt and grease.
Dish soap or automotive car wash soap are recommended.
3. Rinse the remaining soap residue from the
wheel. Do not allow soap residue to dry on the
surface of the wheel.
4. Dry the wheel thoroughly with a 100% cotton
cloth.
5. Commercial bug/tar/grime cleaners may be used
to remove stuck-on particles from the wheel. It is
recommended that the cleaner be tested in an
inconspicuous area for discoloration before treating the wheel.
6. Do not use strong solvents to remove grease or
grime from the surface of the wheel. Damage to
the wheel surface finish might occur.
7. Do not use polishes or wax on ACCU-SHIELD
aluminum wheels. The finish will maintain the
bright and shiny surface for years to come without the need for special polishes.
40/2
Recreational Vehicle Chassis Maintenance Manual, May 2011
Driveline
41
Index, Alphabetical
Title of Maintenance Operation (MOP)
MOP Number
Driveline Inspecting and Lubricating . . . . . . . . . . . . . . . . . . . . . . . . . . . . . . . . . . . . . . . . . . . . . . . . . . . . 41–01
Recreational Vehicle Chassis Maintenance Manual, January 2010
41
Driveline
41–01 Driveline Inspecting and
Lubricating
5
Inspecting
Before lubricating the driveline U-joints and slipjoints, make the following checks.
1
1. Check that the yoke-strap capscrews are tightened 50 to 60 lbf·ft (68 to 81 N·m).
NOTICE
2
3. Check the driveshaft for missing balance
weights, and for debris buildup. Remove any
buildup. If any balance weights are missing, remove the driveshaft and have it balanced. For
instructions, see Group 41 of the Recreational
Vehicle Chassis Workshop Manual, or take the
vehicle to an authorized Freightliner dealer.
4. Check that the yoke plug is not loose or missing.
Replace the yoke plug if needed. If the yoke plug
is missing, the splined shaft may be hitting the
yoke plug and knocking it out; check the driveshaft for proper length.
U-Joint Lubricating
1. Wipe all old grease and dirt from each U-joint
grease fitting.
2. Use a hand-type grease gun, or a high-pressure
gun with a low-pressure adaptor, to lubricate the
U-joints. See Fig. 1.
NOTE: If a low-pressure adaptor is not used
with the high-pressure gun, the U-joints may not
receive enough lubricant.
Recreational Vehicle Chassis Maintenance Manual, January 2010
3
4
3
6
Do not overtighten the yoke-strap capscrews, due
to the extreme load occurring at high-speed rotation. A loose or broken capscrew at any point in
the driveline weakens the driveline connection,
which could eventually result in serious vehicle
damage.
2. Check the slip-joints for spline wear by trying to
bend the sleeve-yoke and splined shaft back and
forth. If looseness is greater than 0.007 inch
(0.18 mm), replace both the sleeve-yoke and the
splined shaft.
7
8
3
1
A
f410050a
10/20/93
A. After grease appears, cover the pressure-relief hole
while continuing to lubricate.
5. Yoke Plug Pressure1. Slip-Joint Grease
Relief-Hole
Fitting (with grease
6. Slip-Joint Seal
gun attached)
7. Full-Round Yoke
2. Yoke Plug
8. U-Joint Grease Fitting
3. Grease
4. Half-Round Yoke
Fig. 1, Slip-Joint and U-Joint Lubricating
3. Using lithium 12-hydroxy stearate grease (NLGI
grade 1 or 2, with EP additives), lubricate until
new grease can be seen at all four U-joint seals.
NOTICE
Fresh lubricant must be seen escaping from all
four of the bearing cup seals of each U-joint. If
not, the U-joint may fail prematurely.
4. If the bearing will not take grease, replace the
U-joint assembly. For instructions, see Group 41
of the Recreational Vehicle Chassis Workshop
Manual, or take the vehicle to an authorized
Freightliner dealer.
5. Check the old grease. If it appears rusty, gritty, or
burned, replace the U-joint assembly. For instructions, see Group 41 of the Recreational Vehicle
41/1
41
Driveline
Chassis Workshop Manual, or take the vehicle to
an authorized Freightliner dealer.
6. Wipe any excess grease from the seals and
grease fittings.
Slip-Joint Spline Lubricating
1. Wipe all old grease and dirt from the slip-joint
grease fitting.
2. Use a hand-type grease gun or a high-pressure
gun with a low-pressure adaptor, to lubricate the
slip-joint. Using lithium 12-hydroxy stearate
grease (NLGI grade 1 or 2, with EP additives),
lubricate until fresh grease appears at the
pressure-relief hole in the yoke plug. Then cover
the relief hole with your finger, as shown in
Fig. 1, while continuing to lubricate until fresh
grease appears at the slip-joint seal. This ensures complete lubrication of the splines.
3. Wipe any excess grease from the pressure-relief
hole, slip-joint seal, and grease fitting.
41/2
Recreational Vehicle Chassis Maintenance Manual, January 2010
Brakes
42
Index, Alphabetical
Title of Maintenance Operation (MOP)
MOP Number
Air Dryer Desiccant and Coalescent Filter Replacing . . . . . . . . . . . . . . . . . . . . . . . . . . . . . . . . . . . . . . . . 42–03
Air Dryer Inspecting . . . . . . . . . . . . . . . . . . . . . . . . . . . . . . . . . . . . . . . . . . . . . . . . . . . . . . . . . . . . . . . . 42–02
Bendix Hydro-Max® Brake System Inspecting (front-engine diesel chassis). . . . . . . . . . . . . . . . . . . . . . . . 42–07
Brake Caliper Slide Pin Lubricating, Bosch Brakes (front-engine diesel chassis) . . . . . . . . . . . . . . . . . . . . 42–08
Brake Inspecting. . . . . . . . . . . . . . . . . . . . . . . . . . . . . . . . . . . . . . . . . . . . . . . . . . . . . . . . . . . . . . . . . . . 42–11
Brake Lines Checking, Hydraulic Disc or Air Brakes. . . . . . . . . . . . . . . . . . . . . . . . . . . . . . . . . . . . . . . . . 42–09
Brake Lining Wear Checking, Hydraulic Disc Brakes (front-engine diesel
chassis)
. . . . . . . . . . . . . . . . . . . . . . . . . . . . . . . . . . . . . . . . . . . . . . . . . . . . . . . . . . . . . . . . . . . . . . . . . 42–10
Brake System Valves Inspecting . . . . . . . . . . . . . . . . . . . . . . . . . . . . . . . . . . . . . . . . . . . . . . . . . . . . . . . 42–01
Camshaft Bracket Bushing Lubricating . . . . . . . . . . . . . . . . . . . . . . . . . . . . . . . . . . . . . . . . . . . . . . . . . . 42–04
Foot Brake Valve Actuator Lubricating. . . . . . . . . . . . . . . . . . . . . . . . . . . . . . . . . . . . . . . . . . . . . . . . . . . 42–06
Meritor Roller Pin Lubricating . . . . . . . . . . . . . . . . . . . . . . . . . . . . . . . . . . . . . . . . . . . . . . . . . . . . . . . . . 42–12
Slack Adjuster Lubricating. . . . . . . . . . . . . . . . . . . . . . . . . . . . . . . . . . . . . . . . . . . . . . . . . . . . . . . . . . . . 42–05
Recreational Vehicle Chassis Maintenance Manual, May 2011
42
Brakes
42–01 Brake System Valves
Inspecting
1. Clean the valves exterior and inspect them for
corrosion and damage.
2. Inspect the air lines connected to the valves for
signs of wear or damage. Replace the lines as
needed.
3. Check the valves for leakage.
42–03 Air Dryer Desiccant and
Coalescent Filter
Replacing
NOTE: Desiccant change intervals may vary
from vehicle to vehicle. Typical desiccant cartridge life is three years. However, if experience
has shown that extended or shortened life has
resulted on a particular installation, then the interval can be increased or decreased accordingly.
3.1
Apply the service brakes and hold them
on a full line pressure of at least 80 psi
(552 kPa).
3.2
Check the air line fittings for leaks; tighten
or replace the fittings as needed.
3.3
Coat the exhaust port and body of the
valves with soapy water, and check for
leakage. Leakage is excessive if it produces a 1-inch (25-mm) bubble within 5
seconds.
1. Park the vehicle on a level surface. Apply the
parking brakes and chock the tires.
If a brake valve does not function as described above, or if leakage is excessive,
replace it with a new or remanufactured
unit. Repeat the leakage checks before
placing the vehicle in service.
3. Loosen the desiccant cartridge with a strap
wrench at the base of the cartridge. Spin off the
cartridge and discard it.
42–02 Air Dryer Inspecting
1. Check the reservoirs for moisture by pulling the
lanyards. A small amount (a teaspoon or less) is
normal. Larger amounts may mean that the desiccant needs to be replaced. Check the mounting
and connecting lines.
2. Tighten the fasteners that attach the air dryer to
the vehicle. Use the following torque values.
28 lbf·ft (38 N·m) for SAE grade 5, 3/8–16 fasteners.
Bendix AD-9
Replacement
2. Completely drain all air reservoirs. Air pressure
gauges should read 0 psi (0 kPa).
4. Remove the O-ring from the threaded neck and
discard it.
5. Remove the coalescent filter and discard it.
IMPORTANT: Lubricate the new O-rings prior to
installation.
6. Install the new small O-ring in the groove on the
bottom of the new coalescent filter.
7. Insert the coalescent filter with the O-ring end
going into the air dryer opening first. The end of
the filter with the "X" will then be facing out.
8. Install the other new O-ring over the threaded
neck of the desiccant cartridge.
135 lbf·ft (183 N·m) for SAE grade 5, 5/8–11 fasteners.
9. Screw on the desiccant cartridge until resistance
is detected. Then, tighten the cartridge 1/4 to 3/4
of a turn by hand.
Check all air lines, fittings, and electrical connections for damage, leakage, or looseness.
Operational Check
3. Replace damaged or leaking parts, and tighten
loose fittings or electrical connections.
1. Start the engine and build air pressure to 120 psi
(827 kPa).
2. Listen for the purge valve to open and release
air. A large volume of air will be expelled, fol-
Recreational Vehicle Chassis Maintenance Manual, May 2011
42/1
42
Brakes
lowed by a slow flow of air lasting approximately
30 seconds.
3. Shut down the engine and remove the chocks
from the tires.
3
4. Perform the inspections in Maintenance Operation 42–02.
Haldex PURest1
NOTE: The PURest cartridge contains both the
desiccant and filter in one piece.
Replacement
2
1. Remove the four mounting bolts and discard.
See Fig. 1. Lift the canister about 1/2 inch and
remove.
2. Place the assembly upside-down as shown in
Fig. 2. Press the cartridge down to compress the
rubber spring then rotate counterclockwise 45
degrees to release the cartridge. The cartridge
itself contains no hazardous material, but there
may be a small amount of oil from the
compressor.
1
3. Clean the inside of the canister and aluminum
housing.
4. Remove the cartridge O-ring and discard.
5. Remove the new cartridge from the kit and make
certain the rubber spring is attached. See Fig. 3.
6. Install the new cartridge into the canister. Align
the slots on the cartridge with the dimplets inside
the canister. Press the cartridge into the canister
and rotate clockwise 45 degrees to engage the
cartridge, as shown in Fig. 4.
7. Place a new O-ring on the aluminum housing.
8. Place the cartridge assembly on the air dryer
housing and install four new mounting bolts. Use
an alternating diagonal pattern and tighten the
bolts 35 to 40 lbf·ft (47 to 54 N·m).
Operational Check
1. Start the engine and build air pressure to 100 psi
(690 kPa) and shut-off the engine.
2. Check for air leaks at the inlet, outlet, and canister assembly. Correct any leakage problem.
1Information in this section is provided by Haldex and is used with permission.
42/2
01/07/2011
f422526
1. O-ring
2. Cartridge
3. Mounting Bolts
Fig. 1, PURest Air Dryer Assembly
3. Restart the engine and build-up pressure to cutout pressure. At cut-out pressure, the air dryer
purge valve opens and immediately expels a
large volume of air, followed by a slow flow of air
lasting approximately 30 seconds.
42–04 Camshaft Bracket
Bushing Lubricating
Pump grease into the camshaft bracket bushing until
it appears at the slack adjuster end of the bracket.
See Fig. 5.
Use an NLGI Grade 1 or Grade 2 multipurpose chassis grease. If grease leaks out from under the cam
head, the camshaft bracket grease seal is worn or
damaged. For grease seal replacement instructions,
Recreational Vehicle Chassis Maintenance Manual, May 2011
42
Brakes
A
A
A
B
B
01/10/2011
f422527
A. Canister/cartridge assembly shown upside-down.
B. Rotate the cartridge counterclockwise 45 degrees to
release it from the canister.
Fig. 2, Releasing the Cartridge
B
A
01/10/2011
B
f422529
A. Install the new cartridge into the canister.
B. Press the cartridge into the canister and rotate
clockwise 45 degrees to engage the cartridge.
Fig. 4, Cartridge Rotation and Engagement
42–05 Slack Adjuster
Lubricating
01/07/2011
f422528
Fig. 3, New Cartridge with Rubber Spring
see Group 42 of the Recreational Vehicle Chassis
Workshop Manual, or take the vehicle to an authorized Freightliner dealer.
Camshaft brackets without grease fittings are fitted
with special seals and packed with extendedlubrication-interval chassis grease. Grease them only
when the camshaft is disassembled for servicing.
Recreational Vehicle Chassis Maintenance Manual, May 2011
IMPORTANT: Perform Maintenance Operation
42–11 before lubricating the slack adjusters.
Automatic slack adjusters must be lubricated periodically to ensure proper brake operation.
WARNING
Failure to lubricate slack adjusters could lead to
dragging brakes or a brake failure, resulting in
property damage, personal injury, or death.
42/3
42
Brakes
1
2
1
3
3
4
2
5
05/28/93
A.
1.
2.
3.
A
7
f420011a
Grease Exit
Brake Chamber
Slack Adjuster
Non-Pressure-Relief Grease Fitting
Fig. 5, Camshaft Bracket Bushing Lubrication
6
10/20/93
1.
2.
3.
4.
Brake Chamber
Clevis
Actuator Rod
Boot
f420012a
5. Pull-Pawl Seal
6. Manual Adjusting Nut
7. Grease Fitting (or
Lube Plug)
Fig. 6, Meritor Automatic Slack Adjuster (other slack
adjustors are similar)
Haldex
NOTICE
1
Do not use moly-disulfide-loaded grease or oil.
Both the life and reliability of the slack adjuster
will be reduced if this type of grease is used.
3
Lubricate a Haldex automatic slack adjuster at the
grease fitting with any extreme-pressure NLGI Grade
1 or Grade 2 grease if the operating temperature is
–20°F (–29°C) and above. If the operating temperature is below –20°F (–29°C), use a low-temperature
extreme-pressure grease.
2
2
3
4
5
Meritor
Lubricate the slack adjuster at the grease fitting until
grease is forced past the pressure-relief capscrew or
past the gear splines around the inboard snap ring.
Use high-temperature, NLGI Grade 1 waterproof
grease. See Fig. 6.
Bendix
Using a quality multipurpose chassis lubricant, NLGI
Grade 2, lubricate the automatic slack adjuster
through the lube fitting. See Fig. 7. Lubricate the
slack adjuster until clean lubricant flows from the
grease relief opening in the boot.
42/4
6
7
7
06/17/2010
1.
2.
3.
4.
Yoke
Yoke Pin
Link Pin
Link
f430511
5. Boot
6. Lube Fitting
7. Worm Gear
Fig. 7, Bendix Automatic Slack Adjuster
Recreational Vehicle Chassis Maintenance Manual, May 2011
42
Brakes
42–06 Foot Brake Valve
Actuator Lubricating
A
1. Clean any dirt, gravel, and other foreign material
from the base of the brake pedal, the plunger
boot, and the brake base bracket.
2. Use light oil to lubricate the brake pedal roller
and pivot pin.
3. Check the brake plunger boot for cracks, holes,
or deterioration. Replace it if necessary.
B
4. Lift the edge of the brake plunger boot and
check the plunger for existing lubrication.
4.1
If the plunger is dry, remove it by removing the brake pedal and brake plunger
boot. Lubricate the plunger and the inside
surface of the boot with barium grease
(p/n BW 246671) or Pennzoil Adhezoplex
EP2. Install the plunger, boot, and the
brake pedal.
IMPORTANT: Use only these approved lubricants.
4.2
If the plunger has grease on it, lift the
edge of the brake plunger boot enough to
apply 2 to 4 drops of light oil around the
brake plunger, where it slides into the
brake base bracket. Install the plunger
boot around the brake base bracket.
42–07 Bendix Hydro-Max®
Brake System Inspecting
(front-engine diesel
chassis)
1. Check the fluid level in the hydraulic brake fluid
reservoir. If needed, fill the reservoir up to the
ridge that surrounds the reservoir. See Fig. 8.
Use only heavy-duty brake fluid, DOT 3.
2. Check all hydraulic lines and fittings for damage,
leakage, or looseness.
Replace damaged or leaking components, and
tighten loose fittings.
3. Check the brake module for leaks. If leaks are
found, repair or replace the brake module. See
Group 42 of the Recreational Vehicle Chassis
Workshop Manual for replacement instructions,
Recreational Vehicle Chassis Maintenance Manual, May 2011
f460513a
10/31/94
A. Open caps and check fluid level.
B. Fill to this level.
Fig. 8, Hydraulic Brake Fluid Reservoir
or take the vehicle to an authorized Freightliner
Chassis dealer.
4. Check the electrical connections and harnesses.
Make sure the connectors are fully seated and
the harnesses are not chafed or cut. Repair or
replace any damaged harness. Disconnect any
loose connectors and inspect the terminals for
corrosion. If corrosion is present, replace the terminals. If corrosion is not present, reconnect the
connector.
5. Check the fuse for the hydraulic brake booster
pump, as follows.
5.1
Open the cover to the main power distribution module (PDM).
5.2
Pull the fuse in position F6 for the HydroMax relay.
5.3
Inspect the relay to make sure the fuse is
not damaged. If the fuse is damaged, install a new fuse. If the fuse is not damaged, install the fuse in position F6.
5.4
Close the PDM cover.
6. Check the operation of the Hydro-Max brake
booster, as follows.
6.1
With the ignition off, depress the brake
pedal and listen for the back-up motor to
42/5
42
Brakes
engage. Also note that the pedal force
relieves; the pedal should depress easily.
6.2
With the ignition on, engine running, parking brake released, ensure that the
BRAKE warning indicator light is not on.
This is a dual indicator and indicates that
the parking brake is set, and warns if
there is a hydro-max failure other than
loss of back-up motor power.
42–08 Brake Caliper Slide Pin
Lubricating, Bosch
Brakes (front-engine
diesel chassis)
2
1
4
3
06/20/2002
f422357
1. Flange-Head Bolt
2. Leading Pin
3. Trailing Pin
4. Rubber Bushing
Fig. 9, ZOH-T Slide Pins and Bolts
NOTE: There is no set maintenance interval for
lubricating pin-slide hydraulic disc brake calipers.
Apply 1/8 oz (3.5 g) Aeroshell grade 5 grease to
each of the two guide pin and guide pin bore sets.
See the Bosch Pin Slide Disc Brakes Service Manual
for additional information.
IMPORTANT: The later ZOH-T caliper has important differences from the early ZOPS caliper.
ZOPS calipers (since 1998) and ZOH-T calipers
(since 2002) use different slide pins and bolts.
See Fig. 9 and Fig. 10. The later trailing pin is
identified by notches and has a rubber bushing.
Flange-head instead of hexhead bolts are used
with the later caliper. The later bolts have a fine
thread rather than a coarse thread pitch, are
longer, differently colored, and are tightened to a
higher torque specification. Use only the ZOH-T
bolts to assemble a ZOH-T caliper. The ZOPS
caliper bolts have a different thread pitch and
will not assemble correctly in a ZOH-T caliper
mounting. Also, the ZOH-T bolts will not assemble correctly in a ZOPS caliper. Do not interchange parts. It is permissible to use both
ZOH-T pins and ZOH-T bolts in a ZOPS anchor
plate, but they must be replaced as sets. Both
the pins and the bolts must be changed.
42/6
3
1
2
3
06/20/2002
f422358
1. Hexhead Bolt
2. Blue Patch
3. Slide Pin
Fig. 10, ZOPS Slide Pins and Bolts
DANGER
The correct pins, bolts, and bolt torque must be
used. If not, brake function could be impaired and
lead to loss of control of the vehicle, which could
result in personal injury, death, or property damage.
IMPORTANT: The ZOH-T caliper assembly is
similar in appearance to the existing ZOPS caliper. The only obvious difference is that one of
the anchor plate slide pins (trailing side) has
notches for identification. With ZOH-T calipers,
install the solid pin (no bushing) only in the anchor plate leading hole position. Install the pin
with the rubber bushing and notches only in the
Recreational Vehicle Chassis Maintenance Manual, May 2011
42
Brakes
anchor plate trailing hole position. Tighten the
leading-side pin first, then tighten the trailingside pin.
2. Check the brake lining wear. On front and rear
axles, replace linings worn to less than 3/16 inch
(4.8 mm).
Tighten ZOH-T bolts 93 to 107 lbf·ft (126 to 145
N·m).
3. Make sure that the brake rotor and linings are
free of oil and grease.
Tighten ZOPS bolts 70 to 80 lbf·ft (95 to 108 N·m).
NOTE: To replace the brake linings, see the applicable foundation brake section in Group 42 of
the Recreational Vehicle Chassis Workshop
Manual, or take the vehicle to an authorized
Freightliner dealer.
42–09 Brake Lines Checking,
Hydraulic Disc or Air
Brakes
Check all hydraulic/air lines and fittings for damage,
leakage, or looseness.
Replace damaged or leaking components, and
tighten loose fittings.
42–10 Brake Lining Wear
Checking, Hydraulic
Disc Brakes (frontengine diesel chassis)
Before checking lining wear with the wheel removed,
review the following brake lining exposure warnings.
WARNING
Breathing brake lining dust (asbestos or nonasbestos) could cause lung cancer or lung disease. Unless exposure can be reduced below legal
limits, wear an air purifying respirator approved
by MSHA or NIOSH at all times when servicing the
brakes, starting with removal of the wheels and
continuing through assembly.
To minimize the possibility of creating airborne brake
lining dust, clean the dust from the brake rotor, brake
caliper, and brake assembly, using an industrial-type
vacuum cleaner equipped with a high-efficiency filter
system. Then, using a rag soaked in water and
wrung until nearly dry, remove any remaining dust.
Do not use compressed air or dry brushing to clean
the brake assembly.
1. Apply the brake and chock the tires to prevent
vehicle movement.
Recreational Vehicle Chassis Maintenance Manual, May 2011
42–11 Brake Inspecting
IMPORTANT: This procedure should be performed prior to lubrication of the brake components.
Parking Brake Operational Check
CAUTION
Perform the following check in a clear safe area. If
the parking brakes fail to hold the vehicle, personal injury or property damage may result.
1. With the engine running, and air pressure at cutout pressure, set the parking brake.
2. Put the vehicle in the lowest gear and gently attempt to move it forward. The vehicle should not
move. If the vehicle moves, the parking brakes
are not operating correctly and must be repaired
before the vehicle is returned to service. See
Group 42 of the Recreational Vehicle Chassis
Workshop Manual for repair procedures, or take
the vehicle to an authorized Freightliner dealer.
Brake Component Inspection
1. Park the vehicle on a level surface, set the parking brake, and chock the tires. Once the tires are
chocked, release the parking brake.
WARNING
Manually adjusting an automatic slack adjuster to
bring the pushrod stroke within legal limits is
likely masking a mechanical problem. Adjustment
is not repairing. Before adjusting an automatic
slack adjuster, troubleshoot the foundation brake
42/7
42
Brakes
system and inspect it for worn or damaged components. Improperly maintaining the vehicle braking system may lead to brake failure, resulting in
property damage, personal injury, or death.
2. With the engine off, and 100 psi (689 kPa) of air
tank pressure, have an assistant apply and hold
an 80 to 90 psi (550 to 620 kPa) brake application.
3. Check to see if the colored over-stroke band on
each brake chamber pushrod is exposed.
If a band shows, the stroke is too long. Check
the foundation brake components for wear or
damage, and repair as needed. See Group 42 of
the Recreational Vehicle Chassis Workshop
Manual for inspection, troubleshooting, and repair procedures, or take the vehicle to an authorized Freightliner dealer.
4. Measure the applied chamber stroke. See
Table 1 for the proper stroke for the type of
chamber being used. If the stroke is too short,
the brakes may drag or will not fully apply. Check
for improper operation or adjustment of the automatic slack adjuster. See Group 42 of the Recreational Vehicle Chassis Workshop Manual for
inspection and troubleshooting procedures, or
take the vehicle to an authorized Freightliner
dealer.
5. Start the engine and build air pressure to at least
100 psi (689 kPa). Shut down the engine.
6. Check all of the foundation brake components for
damage, wear, and loose or missing parts. Repair as needed. See Group 42 of the Recreational Vehicle Chassis Workshop Manual for
repair procedures, or take the vehicle to an authorized Freightliner dealer.
42–12 Meritor Roller Pin
Lubricating
WARNING
Remove all grease or oil from the camshaft head,
rollers and brake linings. Always replace linings
contaminated with grease or oil, which can increase stopping distances, causing component
damage and serious personal injury.
For Q and P series Meritor brakes, lube the cam anchor and cam roller pins when the brake is disassembled, or every six months, with Meritor specification grease 0-617-A or 0-617-B. See Fig. 11 for roller
and anchor pin lubrication points.
Brake Chamber Stroke Specifications
Chamber
Manufacturer
Type*
Size†
12
Standard Stroke
Haldex
42/8
Max Applied Stroke: inch (mm)
1-3/8 (35)
16
20
1-3/4 (44)
24
2-1/2-Inch Extended Stroke
24
2 (51)
3-Inch Extended Stroke
24
2-1/2 (64)
Standard Stroke
30
2 (51)
Long Stroke
30
2-1/2 (64)
Recreational Vehicle Chassis Maintenance Manual, May 2011
42
Brakes
Brake Chamber Stroke Specifications
Chamber
Size†
Type*
Manufacturer
Max Applied Stroke: inch (mm)
9
12
Standard Stroke
16
20
Meritor
24
Long Stroke
24
Standard Stroke
30
Less than 1-1/2 (38)
Less than 1-3/4 (44)
Less than 1-7/8 (48)
Less than 2 (51)
* Long stroke design is indicated by a tag, or embossing, on the brake chamber.
† Specifications are relative to a brake application with 80 to 90 psi (550 to 620 kPa) air pressure in the brake chambers.
Table 1, Brake Chamber Stroke Specifications
1
2
3
03/02/2004
f430370
1. Cam Roller Pin Lube Point (Q Series)
2. Cam Roller Pin Lube Points (Q, Q Plus, and P
Series)
3. Cam Anchor Pin Lube Points (Q, Q Plus, and P
Series)
Fig. 11, Cam and Anchor Roller Pin Lubrication Points
Recreational Vehicle Chassis Maintenance Manual, May 2011
42/9
Steering
46
Index, Alphabetical
Title of Maintenance Operation (MOP)
MOP Number
Drag Link Lubricating . . . . . . . . . . . . . . . . . . . . . . . . . . . . . . . . . . . . . . . . . . . . . . . . . . . . . . . . . . . . . . . 46–01
Hydraulic Reservoir Filter Changing (metal reservoir only) . . . . . . . . . . . . . . . . . . . . . . . . . . . . . . . . . . . . 46–06
Power Steering Reservoir Fluid Level Checking. . . . . . . . . . . . . . . . . . . . . . . . . . . . . . . . . . . . . . . . . . . . 46–02
Power Steering Reservoir Fluid and Filter Changing . . . . . . . . . . . . . . . . . . . . . . . . . . . . . . . . . . . . . . . . 46–03
Steering Driveline Lubricating . . . . . . . . . . . . . . . . . . . . . . . . . . . . . . . . . . . . . . . . . . . . . . . . . . . . . . . . . 46–04
Steering Gear Lubricating. . . . . . . . . . . . . . . . . . . . . . . . . . . . . . . . . . . . . . . . . . . . . . . . . . . . . . . . . . . . 46–05
Recreational Vehicle Chassis Maintenance Manual, February 2012
46
Steering
46–01 Drag Link Lubricating
1. Using a clean rag, wipe the dirt from both grease
fittings on the drag link.
2. Using a pressure gun, apply multipurpose chassis grease at the grease fittings until old grease
is forced out of the socket.
NOTE: Use multipurpose chassis grease NLGI
grade 1 (6% 12-hydroxy lithium stearate grease)
or NLGI grade 2 (8% 12-hydroxy lithium stearate grease). The grade 2 chassis grease is preferred.
46–02 Power Steering
Reservoir Fluid Level
Checking
Approved Power Steering Fluid
Fluid Type
Approved Fluid*
Hydraulic System Fluid (power
steering with side-mounted radiator)
15W40
* Use the same lubricant when assembling parts as is used in the power
steering system.
Table 1, Approved Power Steering Fluid
4. Install the dipstick (fill cap) in the power steering
reservoir.
Rear-Mounted
1. Park the vehicle on a level surface, shut down
the engine, and apply the parking brake. Chock
the rear tires.
2. Clean around the power steering reservoir cap
with a clean rag, then remove the reservoir cap.
See Fig. 1.
Side-Mounted
1. Park the vehicle on a level surface, shut down
the engine, and apply the parking brake. Chock
the rear tires.
MAX
2. Clean around the power steering reservoir dipstick (fill cap) with a clean rag, then remove the
dipstick.
Min
WARNING
Fill only with approved clean fluid. Do not mix
fluid types. Any mixture or any unapproved fluid
could lead to seal deterioration and leaks. Fluid
leakage could cause loss of power steering assist,
possibly resulting in personal injury and property
damage.
3. With the power steering fluid at operating temperature, check the fluid level on the dipstick. If
below the "Add" mark, add enough fluid to bring
the level up to the "Full" mark on the dipstick.
See Table 1 for approved power steering fluid.
Approved Power Steering Fluid
Fluid Type
Automatic Transmission Fluid
Approved Fluid*
Dexron® III
f461177
04/10/97
Fig. 1, Steering System Hydraulic Fluid Reservoir (rearmounted)
WARNING
Fill only with approved clean fluid. Do not mix
fluid types. Any mixture or any unapproved fluid
could lead to seal deterioration and leaks. Fluid
leakage could cause loss of power steering assist,
possibly resulting in personal injury and property
damage.
IMPORTANT: Do not confuse coolant with hydraulic fluid. Both are pink in color.
Recreational Vehicle Chassis Maintenance Manual, February 2012
46/1
46
Steering
3. Fill the reservoir to a level between the MIN and
MAX marks. Use only Dexron III automatic transmission fluid (ATF), or an equivalent. See
Table 1 for approved power steering fluid.
6. Fill the reservoir with approved power steering
fluid. See Table 1.
4. Replace the reservoir cap.
46–03 Power Steering
Reservoir Fluid and
Filter Changing
2
1. Remove the dipstick, if so equipped.
2. Drain the power steering reservoir by disconnecting the power steering gear-to-reservoir hose
from the reservoir. Catch the fluid from the reservoir in a drain bucket, then cap the reservoir
port.
3. Loosen the clamps on each end of the inline
power steering filter and save them for reuse.
Remove the old filter, if so equipped.
IMPORTANT: Do not use teflon tape on the
threads of the hose-barb fittings.
4. Unscrew the hose-barb fitting and the 90-degree
hose-barb elbow fitting from the old filter and inspect them for any damage. If no damage is
found, screw the two fittings into the new 25micron filter. If damage is found in the fittings,
replace them with a new 1/2–14 NPT hose-barb
fitting and elbow.
IMPORTANT: Ensure that the "TO RESERVOIR"
arrow on the power steering filter, if so
equipped, is pointing towards the power steering
fluid reservoir and that the hose-barb 90-degree
elbow fitting is located on the bottom of the
power steering filter. See Fig. 2.
5. Place the ends of the power steering gear-toreservoir hose onto the hose-barb fittings and
tighten the two hose clamps securely.
WARNING
Fill only with approved clean fluid. Do not mix
fluid types. Any mixture or any unapproved fluid
could lead to seal deterioration and leaks. Fluid
leakage could cause loss of power steering assist,
possibly resulting in personal injury and property
damage.
46/2
3
1
05/06/2005
f462014
1. Hose-Barb Elbow Fitting
2. Hose-Barb Fitting
3. 25-Micron Power Steering Filter
Fig. 2, Power Steering Filter, Typical Installation (if so
equipped)
7. Place the disconnected end of the steering gearto-reservoir hose in a drain bucket. Do not start
the engine while draining the system. Raise the
front of the vehicle with a floor jack and support
it with jack stands. Have an assistant turn the
steering wheel to full lock left and right, and capture the fluid flowing from the hose in the drain
bucket. Add fluid to the reservoir as needed.
Continue turning the steering wheel until clean
power steering fluid flows from the hose into the
drain bucket. Remove the plug from the reservoir
and reconnect the steering gear-to-reservoir
hose to the reservoir.
8. Tighten the hose fitting nut finger-tight, then with
a wrench, tighten until there is firm resistance.
Tighten one-sixth turn more. Do not overtighten.
Remove the jack stands and lower the vehicle.
9. Fill the reservoir with approved fluid as needed.
Start the engine and let it idle for 10 seconds.
Have an assistant turn the steering wheel from
lock-to-lock until no bubbles are seen in the reservoir. Shut down the engine.
Recreational Vehicle Chassis Maintenance Manual, February 2012
46
Steering
10. Install a new cover gasket, the cover, and the
dipstick.
11. Start the engine and check the power steering
reservoir fluid level. If the fluid level is low, add
more of the approved fluid to bring the level up
to the full mark on the dipstick. Turn the steering
wheel from lock-to-lock to flush out any air. Shut
down the engine.
46–06 Hydraulic Reservoir
Filter Changing (metal
reservoir only)
NOTE: On XC chassis vehicles with a sidemounted radiator, the hydraulic reservoir supplies both the steering and the fan circuits.
1. Drain the entire steering and fan hydraulic systems.
46–04 Steering Driveline
Lubricating
2. Remove the reservoir lid and remove the nut that
secures the filter.
Wipe the grease fittings clean. Using a pressure gun,
apply a lithium-based grease (NLGI grade 2) sparingly to the universal joints and slip-joint splines.
3. Remove the old filter and install the new filter.
4. Install the filter nut and tighten it securely.
5. Fill the reservoir with the approved hydraulic
fluid. See Table 1.
46–05 Steering Gear
Lubricating
6. Start the engine, run it for five seconds, then
shut down the engine.
1. Wipe off debris from the grease fitting.
2. Using a hand-type grease gun, apply multipurpose chassis grease until the grease starts coming out of the sector shaft dirt and water seal.
Figure 3 shows the location of the sector shaft
grease fitting.
7. Fill the reservoir with 15W40 hydraulic system
fluid.
8. Start the engine. Turn the steering wheel lock-tolock several times until the steering wheel turns
easily. Shut down the engine.
9. Fill the reservoir with 15W40 hydraulic system
fluid.
NOTE: The steering circuit is now purged. Follow the remaining steps to purge the fan circuit.
10. Start the engine. Run the engine at half-throttle
until the fans engage (loud chirping sound). Shut
down the engine.
11. The fan circuit is now purged. Top off the reservoir fluid and install the reservoir lid.
1
f460515a
04/13/93
1. Sector Shaft Grease Fitting
Fig. 3, Sector Shaft Lubricating
Recreational Vehicle Chassis Maintenance Manual, February 2012
46/3
Fuel
47
Index, Alphabetical
Title of Maintenance Operation (MOP)
MOP Number
Fuel Tank Mounts and Fuel Line Checking . . . . . . . . . . . . . . . . . . . . . . . . . . . . . . . . . . . . . . . . . . . . . . . 47–01
Fuel/Water Separator Element Replacing . . . . . . . . . . . . . . . . . . . . . . . . . . . . . . . . . . . . . . . . . . . . . . . . 47–02
Recreational Vehicle Chassis Maintenance Manual, January 2010
47
Fuel
47–01 Fuel Tank Mounts and
Fuel Line Checking
WARNING
Inspect the components as described below. Failure to perform these inspections could result in
the failure of the fuel tank mounting assembly and
loss of vehicle control, possibly causing personal
injury or death, or property damage.
1. Chock the tires. Working at the front of the vehicle or at the rear of the vehicle, raise the vehicle so that the tires just clear the ground and
so that the suspension is fully extended. Place
safety stands under the vehicle frame.
2. Check the T-bolts that attach the fuel tank
mounting straps to the mounting brackets. Check
to see that the nuts are tight.
3. Inspect the fuel tank straps for damage or wear.
Replace them if necessary.
4. Inspect the fuel tank for leaks or damage. Replace the tank if necessary.
IMPORTANT: Do not attempt to repair a damaged fuel tank; always replace a damaged fuel
tank.
5. Inspect the fuel lines for damage or wear.
6. Remove the safety stands and lower the vehicle.
Remove the chocks from the tires.
47–02 Fuel/Water Separator
Element Replacing
1. Chock the front tires.
2. Locate the fuel/water separator.
3. See the Cummins Operation and Maintenance
Manual for fuel/water separator element replacing intervals.
4. Remove the chocks from the tires.
Recreational Vehicle Chassis Maintenance Manual, January 2010
47/1
Exhaust
49
Index, Alphabetical
Title of Maintenance Operation (MOP)
MOP Number
Exhaust System Inspecting (Noise Emission Control). . . . . . . . . . . . . . . . . . . . . . . . . . . . . . . . . . . . . . . . 49–01
Recreational Vehicle Chassis Maintenance Manual, January 2010
49
Exhaust
49–01 Exhaust System
Inspecting (Noise
Emission Control)
• DEF Tank—holds DEF and regulates its temperature.
The exhaust system must be free of leaks, binding,
grounding, and excessive vibrations. In addition to
inspecting the exhaust system at the scheduled
maintenance interval, inspect the exhaust system if
the noise level of the vehicle has increased. Replace
parts that show leakage, wear, or damage, with
genuine Freightliner parts.
• SCR Catalyst—the housing containing a treated
ceramic flow-through block where the DEF and
exhaust gases undergo selective catalytic reduction.
These conditions are usually caused by loose, broken, or misaligned clamps, brackets, or pipes. If any
of these conditions exist, check the exhaust system
components and alignment. Align or replace as necessary. For alignment or adjustment instructions, see
Group 49 of the Recreational Vehicle Chassis Workshop Manual, or take the vehicle to an authorized
Freightliner dealer.
EPA10 Exhaust System
Definitions of Aftertreatment
System (ATS) Terms
Refer to the following list of definitions of ATS terms
and components.
• Aftertreatment System (ATS)—the entire exhaust system from the turbocharger to the tail
pipe, including the Selective Catalytic Reduction
(SCR) components.
• Aftertreatment Device (ATD)—a device that removes pollutants from exhaust gas after the gas
leaves the combustion chamber.
• BlueTec®—Daimler’s proprietary SCR technology.
• Diesel Oxidation Catalyst (DOC)—a flowthrough device that enhances the oxidation of
hydrocarbons in the ATD.
• Diesel Particulate Filter (DPF)—a component in
the ATD that traps particulate matter from the
exhaust gas.
• Diesel Exhaust Fluid (DEF)—the chemical agent
that reacts with the exhaust gases in the SCR
to reduce NOx.
• DEF Pump—filters and supplies DEF to the
DEF metering unit.
Recreational Vehicle Chassis Maintenance Manual, January 2010
• DEF Metering Unit—mixes DEF with compressed air, and meters this mixture into the
exhaust flow via an injection nozzle.
• Selective Catalytic Reduction (SCR)—a process
used to reduce NOx emissions.
Inspection
IMPORTANT: The Environmental Protection
Agency’s 2010 regulations mandate lowered
exhaust emissions, thus requiring exhaust system components that reduce emissions. In particular the aftertreatment device (ATD), which is
part of the aftertreatment system (ATS), requires
special attention during regularly scheduled
maintenance inspections. See Fig. 1 for Cummins ATD sensor locations. If any discrepancies
are discovered, refer to the engine manufacturer’s service literature for repair instructions.
1. Check for leakage at the clamp that attaches the
exhaust pipe to the turbocharger exhaust outlet.
If leakage exists, tighten the nut on the clamp to
the required torque. If leakage persists, install a
new clamp.
2. Check the exhaust pipe, bellows, and each exhaust seal clamp for leakage, wear, cracks, or
damage. Replace damaged components as
needed. If leakage exists at a clamp, tighten the
nuts to the required torque. If leakage persists,
install a new exhaust seal clamp. Do not reuse
seal clamps. Once a seal clamp is loosened or
removed, it must be replaced.
3. If present, check the condition of the insulation
material around the exhaust pipe between the
turbocharger and the ATD.
4. Check the ATD mounting bands for tightness.
Tighten to 30 lbf·ft (41 N·m) if needed. Do not
overtighten.
5. Check for leaks around the clamps that attach
the ATD in the ATS, and around the clamps that
retain the DPF in the ATD. No leaks are allowed
anywhere in the system.
49/1
49
Exhaust
4
10. Check the DEF tank, pump, metering unit, and
lines for leaks. See Group 49 of the Recreational Vehicle Chassis Workshop Manual for
repair procedures.
5
3
11. Check any wires, lines, or hoses within 4 inches
(10 cm) of the exhaust system for heat damage.
Repair or reroute as needed.
6
The Environmental Protection Agency’s 2010 regulations require lower nitrogen oxide (NOx) exhaust
emissions. Selective catalytic reduction (SCR) uses
diesel exhaust fluid (DEF) to lower NOx emissions in
the vehicle exhaust. A filter in the DEF pump prevents clogging of the DEF metering unit injection
nozzle.
2
1
7
10/20/2009
1.
2.
3.
4.
5.
6.
7.
Diesel Exhaust Fluid (DEF) Filter
Replacement
f490386
Exhaust Outlet
SCR Outlet NOx Sensor
DPF Outlet Pressure Sensor
DPF Intake Pressure Sensor
DPF Inlet Temperature Sensor
SCR Inlet Temperature Sensor
SCR Outlet Temperature Sensor
Fig. 1, Cummins ATD Sensor Locations
See the engine manufacturer’s maintenance manual
for DEF filter replacement instructions and maintenance intervals.
EPA07 Exhaust System
Definitions of ATS Terms
Refer to the following list of definitions of ATS terms
and components.
• Aftertreatment System (ATS) — the entire exhaust system from the turbocharger to the tail
pipe.
6. Check all sensors attached to the ATD for leaks
or damaged wires. No leaks are allowed.
• Aftertreatment Device (ATD)—a muffler-like canister that houses a DPF and sensors.
7. Check the DPF exterior surface for dents or
other damage. A dent over 3 inches (76 mm) in
diameter and 1/4-inch (6-mm) deep could cause
internal damage to the DPF, causing it to malfunction.
• Diesel Particulate Filter (DPF)—a filter that collects and holds particulate matter (soot and
ash).
8. Check the SCR catalyst for dents and other
damage.
9. Check for heat discoloration on the surface of
the ATD. Heat discoloration may indicate internal
damage; especially around the DPF.
NOTE: Diesel exhaust fluid creeps, causing
white crystals to form around the line fittings.
The presence of crystals does not mean the
system has a leak. Replacing fittings or troubleshooting components is not necessary unless
there is a system failure or a fault code.
49/2
• Diesel Oxidation Catalyst (DOC)—oxidizes hydrocarbons and reduces NOx.
• Sensors—detect temperatures and pressure
within the ATS.
• Diffuser—a device, used as a deflector, for distributing, mixing, and reducing the velocity of air
flow.
Inspection
IMPORTANT: The Environmental Protection
Agency’s 2007 regulations require lower exhaust emissions, thus requiring new exhaust
Recreational Vehicle Chassis Maintenance Manual, January 2010
Exhaust
49
system components. See Fig. 2. In particular
the aftertreatment device (ATD), which is part of
the aftertreatment system (ATS), requires special attention during regularly scheduled maintenance inspections. If any discrepancies are discovered, refer to the engine manufacturer’s
service literature for repair instructions.
1. Check for leakage at the clamp that attaches the
exhaust pipe to the turbocharger exhaust outlet.
If leakage exists, tighten the nut on the clamp to
the required torque. If leakage persists, install a
new clamp.
2. Check the exhaust pipe, bellows, and each exhaust seal clamp for leakage, wear, cracks, or
damage. Replace damaged components as
needed. If leakage exists at a clamp, tighten the
nuts to the required torque. If leakage persists,
install a new exhaust seal clamp. Do not reuse
seal clamps. Once a seal clamp is loosened or
removed, it must be replaced.
3. If present, check the condition of the insulation
material around the exhaust pipe between the
turbocharger and the ATD, as well as the exhaust wrap from the ATD to the diffuser.
4. Check the ATD mounting bands for tightness.
Tighten to 30 lbf·ft (41 N·m) if needed. Do not
overtighten.
5. Check for leaks around the clamps that attach
the ATD in the ATS, and around the clamps that
retain the DPF in the ATD. No leaks are allowed
anywhere in the system.
6. Check all sensors attached to the ATD for leaks
or damaged wires. No leaks are allowed.
7. Check the DPF exterior surface for dents or
other damage. See Fig. 2, Item A. A dent over 3
inches (76 mm) in diameter and 1/4-inch (6-mm)
deep could cause internal damage to the DPF,
causing it to malfunction.
8. Check for heat discoloration on the surface of
the ATD. Heat discoloration may indicate internal
damage; especially around the DPF.
9. Check any wires, lines, or hoses within 4 inches
(10 cm) of the exhaust system for heat damage.
Repair or reroute as needed.
Recreational Vehicle Chassis Maintenance Manual, January 2010
49/3
49
Exhaust
3
2
4
1
B
5
4
C
4
9
A
8
7
11/2/2006
A.
B.
1.
2.
3.
4.
5.
6
f490284
Inspect this area of the canister for dents.
DOC Area
Inlet Temperature Sensor
Marmon Fitting at Inlet from Turbocharger
Sensor Housing
DPF V-Band Mounting Clamps
Inlet Temperature Sensor
C. DPF Area
6.
7.
8.
9.
Exhaust Outlet to Diffuser
Outlet Temperature Sensor
DPF Outlet Pressure Sensor
DPF Intake Pressure Sensor
Fig. 2, Cummins Aftertreatment Device
49/4
Recreational Vehicle Chassis Maintenance Manual, January 2010
Electrical, Instruments, and Controls
54
Index, Alphabetical
Title of Maintenance Operation (MOP)
MOP Number
Battery Voltage Checking . . . . . . . . . . . . . . . . . . . . . . . . . . . . . . . . . . . . . . . . . . . . . . . . . . . . . . . . . . . . 54–02
Ground Cables Checking and Cleaning. . . . . . . . . . . . . . . . . . . . . . . . . . . . . . . . . . . . . . . . . . . . . . . . . . 54–01
Recreational Vehicle Chassis Maintenance Manual, September 2007
Electrical, Instruments, and Controls
54
54–01 Ground Cables
Checking and Cleaning
Check that the ground cables are clean, undamaged,
and tight. If needed, disconnect them, clean the mating surfaces with a soda solution, then connect them
securely. Spray the ground cable connections with
dielectric red enamel.
54–02 Battery Voltage
Checking
Check the battery open circuit voltage using an accurate voltmeter. If the voltmeter registers 12.5V or
below, fully charge the battery to 12.65V. A fully
charged battery will have a voltage of 12.65V with
the charger disconnected.
Recreational Vehicle Chassis Maintenance Manual, September 2007
54/1
Heater and Air Conditioner
83
Index, Alphabetical
Title of Maintenance Operation (MOP)
MOP Number
Air Conditioner Inspecting. . . . . . . . . . . . . . . . . . . . . . . . . . . . . . . . . . . . . . . . . . . . . . . . . . . . . . . . . . . . 83–01
Recreational Vehicle Chassis Maintenance Manual, Apirl 2010
Heater and Air Conditioner
83
83–01 Air Conditioner
Inspecting
WARNING
Wear eye protection, gloves, and protective clothing when working on the air conditioning system.
Leaking refrigerant from a damaged hose or line
could cause blindness or serious skin burns.
1. Park the vehicle on a level surface, shutdown the
engine, apply the parking brake, and chock the
tires.
CAUTION
To avoid the possibility of burns, make certain
that the engine and air conditioner components
are not hot.
2. Check the appearance of the air conditioner
compressor pulley assembly. If the friction surface of the pulley shows signs of excessive
grooving due to belt slippage, replace both the
pulley and the drive plate. Visually inspect the
refrigerant compressor drive belt for damage,
and check that the belt is set at the proper tension. Also check the tightness of the compressor
mounting fasteners. For instructions and torque
values and for removal and installation procedures, see Group 83 of the Recreational Vehicle
Chassis Workshop Manual, or take the vehicle to
an authorized Freightliner dealer.
3. Inspect the compressor clutch coil wire. Ensure
that the connector is not damaged or loose. Replace the wire if it is damaged.
4. Check the overall condition of the air conditioning
hoses. Look for cracks, cuts, and abrasions on
the hoses. Replace damaged hoses; see Group
83 of the Recreational Vehicle Chassis Workshop Manual for replacement instructions, or
take the vehicle to an authorized Freightliner
dealer. Also, visually check for loose fittings on
all air conditioning components. Do not overtighten the fittings.
5. Check for a buildup of road debris on the condenser fins. Using air pressure and a whisk
broom or a soapy spray of water, carefully clean
off the condenser. Be careful not to bend the
fins.
Recreational Vehicle Chassis Maintenance Manual, Apirl 2010
83/1