Transcript
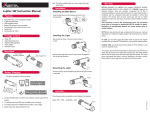
Acumen Inc.
www.vetta.com
2007 All Rights Reserved
NANO LUX
Open the rubber cap at the rear of the Headlight and plug the Power Cord with Remote
Control into the socket. (If the Power Cord is not long enough, please use the One-to-One
Power Cord provided to connect the Tube Pack to the Power Cord with Remote Control).
Wind the Cord around the frame and secure it with the Velcro Ties to ensure that it will not
hinder riding.
HOW TO INSTALL THE HEADLIGHT
Installing the Headlight on your Helmet
Please see the illustration as follows:
ENGLISH
REV.1
Helmet Velcro
HOW TO CONNECT THE HEADLIGHT WITH A TAILLIGHT TSL-C (Optional)
TSL-C
READ INSTRUCTIONS BEFORE FIRST USE
1.
Nano LUX is powered by common AA batteries: both rechargeable & non-rechargeable AA
batteries are applicable. Please thoroughly familiarize yourself with this manual and keep it
for future reference.
Plu
2.
HOW TO OPERATE THE HEADLIGHT
FOR SAFE OPERATION (IMPORTANT)
● Your Headlight and Tube Pack are splash proof and sealed to withstand wet weather
conditions. However, do not place them under water deliberately.
● Avoid exposing the Headlight to be exposed to extremely hot or cold weather conditions.
● Securely connect the plug to avoid the Headlight accidentally turning off or the wire
connection inadvertently falling out.
● The Headlight becomes hot when turned on. Never touch the Headlight until it has
cooled down. Injury may result.
● The Headlight kit is not intended for use by children.
● Safely and properly dispose of the old battery according to your local regulations when it
comes to the end of its useful life.
WHAT'S IN THE PACKAGE
4.
Press the POWER button on the Remote Control once to turn on the Headlight in high
intensity mode. Press again to turn it off. Press the button a third time to turn on the
Headlight in low intensity mode. Press once more to turn off the light.
3.
Step 1: Use the Adhesive Shim provided to stick the Helmet Mount on the Helmet (see
Figure 1).
Step 2: Secure the Helmet Mount with the Helmet Velcro provided (see Figure 2).
Step 3: Slide-in the Headlight until an audible “CLICK” is heard (see Figure 3).
Step 4: Connect the Tube Pack and put it in your backpack (If the cord is not long enough,
please connect the One-to-One Power Cord with the Tube Pack and the cord) (see
Figure4).
Installing the Headlight on your Bike Handlebar
G
B
Handlebar
C
H
D
E
1.
2.
4.
K
L
M
3.
N
Instruction Manual
O
Q
P
A. Headlight
B. Bike Mount
C. Helmet Mount
D. Adhesive Shim
E. Bracket
F. 4xAA batteries
G. Tube Pack
H. Power Cord with Remote Control
I. One-to-One Power Cord
J. Helmet Velcro (2 pcs)
K.Tube Pack Velcro
L. Velcro Ties
M. Screws(2 pcs)
N. Zip Ties
O. Colored Filters (4 pcs)
P. Magnifier
Q. Instruction Manual
Step 1: To tighten the Bike Mount on the Handlebar, turn the knob clockwise until the Bike
Mount firmly holds its position on the Handlebar (see Figure 1).
Step 2: Slide-in the Headlight until an audible “CLICK” is heard (see Figure 2).
Step 3: Open the rubber cap of the Headlight. Securely connect the Tube Pack with the
Headlight by using the Power Cord with Remote Control provided. Wind the Power
Cord around the frame and secure it with the Velcro Ties to ensure that it will not
hinder riding (see Figure3).
Step 4: Cut off the unwanted band (see Figure 4).
HOW TO INSTALL THE TUBE PACK AND REMOTE CONTROL
Down Tube
HOW TO INSTALL BATTERIES INTO TUBE PACK
Screw
Tube Pack utilizes common AA batteries: both rechargeable & non-rechargeable AA
batteries are applicable.
Zip Tie
OR
Water Bottle Braze-ons
1.
Unscrew
Tube Pack Velcro
2.
3.
Handlebar
Power Button
Screw off the cap of the Tube Pack and place 4 × AA batteries correctly as shown into the
Tube Pack. Cover the cap and screw on it.
Note: Do not mix new and old batteries.
Red LED indicator on the Remote
Control shows low battery.
Red LED Indicator
HOW TO INSTALL THE MAGNIFIER AND COLORED FILTER
To install the Magnifier/Colored Filters,
● Add the Magnifier or a Colored Filter in front of the Protective Len by turning it clockwise.
● Stack a Colored Filter on the Magnifier to achieve a colored, wide beam effect.
Step 1: If your bike has Water Bottle Braze-ons on the frame, please follow the instructions
to mount the Tube Pack onto the bike (see Figure1):
a) Unscrew the Water Bottle Braze-ons.
b) Place the Bracket on the Down Tube and line it up with the holes.
c) If you have a water bottle cage, place the water bottle cage on top of the
Bracket and then tightly screw the braze-ons back on.
OR
a) If your bike does not have Water Bottle Braze-ons, then: Tighten the Bracket on
the Down Tube with Zip-ties (see Figure1).
b) Further secure the Tube Pack with the Tube Pack Velcro.
Step 2: Open the rubber cap at the end of the Tube Pack connector. Connect the Tube
Pack to the Power Cord with Remote Control. (If the cord is not long enough,
please use the One-to-One Power Cord to connect the Tube Pack to the Power
Cord with Remote Control) (see Figure2).
Step 3: Tightly wrap the Remote Control’s Velcro around the Handlebar to securely place
the Remote Control on the Handlebar (see Figure3).
HOW TO CONNECT THE HEADLIGHT WITH THE TUBE PACK
Protective Len
Magnifier
Bulb Module
Locking Tab
O-Ring
Protective Len
SPECIFICATIONS
Cut
J
Protective Len
Note: When replacing a light bulb, make sure the light bulb and Headlight have been
thoroughly cooled off.
I
F
HOW TO REPLACE A LIGHT BULB
Step 1: Push the locking tab inward to slide the Headlight out of the Bike Mount (or Helmet
Mount).
Step 2: Unscrew the Protective Len and take the O-Ring off.
Step 3: Remove the old Bulb Module and replace it with a new light bulb.
Step 4: Put the O-Ring back in place, and tightly screw the Protective Len back on to form
a splash-proof seal.
Step 5: Slide the Headlight into the Bike Mount (or Helmet Mount). You should hear an
audible “CLICK” when it is properly locked into position.
Please see the illustration as follows:
A
g
Dimension:
Headlight: ø 43mmx50mm
Tube Pack: ø 26.8mmx252mm
Weight:
Headlight: 55g
Tube Pack: 150g
Operation Mode:
HIGH/LOW
Run Time:
Approx.10 hours @ Low Intensity
Approx.5 hours @ High Intensity
Temperature:
Operating at -15℃ to 45℃
BulbType:
3.7V, 3-watt Solid State Emitter
Battery Type:
AA batteries
Life of the Bulb:
Approx 8, 000 hours continuous use
Water Resistant:
Splash Proof
WARRANTY POLICY
ACUMEN INC. WARRANTS ALL VETTA (The Company) PRODUCTS AGAINST
MANUFACTURER DEFECTS FOR A PERIOD OF 3 YEARS. Subject to the following
limitations, terms and conditions, components will be free of manufacturing defects in
materials and workmanship. The 3 year limited warranty is conditioned upon the
components being used and operated in normal riding conditions. This warranty does not
cover normal wear and tear (i.e. battery replacement, broken wire), rider abuse, acts of
God, improper installation or product alteration.
This warranty is void if the components were not purchased (new) from or through
an authorized VETTA retailer or dealer. Examples of unauthorized dealers are online
auction sites or online retailers.
ACUMEN INC. at its sole discretion will repair or replace items at its own cost. Users are
responsible for all freight and shipping charges, when returning items for warranty service.
ACUMEN INC. will pay the freight when returning serviced items, via USPS or UPS to
consumers or dealers, once the item(s) has been repaired or replaced.
REQUIREMENTS FOR WARRANTY SERVICING
1. Prior to shipping an item back, you must first obtain a Return Authorization Number (s)
(RA#). Each item being returned must have an individual RA#.
2. To obtain an RA #, you must either contact the retailer where the product was originally
purchased from, or contact VETTA directly at customer service @ vetta.com.
3. For trouble shooting purposes, we request that the complete unit with packaging be
returned to ACUMEN INC. unless otherwise stated by VETTA representative.
ITEMS TO BE INCLUDED IN RETURNS
1. The defective product(s)
2. A letter clearly stating the problem(s) with the returned item(s).
3. Copy of the original sales receipt showing proof of purchase date.
4. The Company is not responsible for loss or additional damages while in transit to
ACUMEN INC.
5. Clearly mark the RA# on the outside of the return packaging. All items without an RA #
will be refused and returned to the return address on the package.
The Company shall not be held responsible for replacing items with new items for greater
than the amount of the original item purchase price. This limited warranty does provide the
original owner with certain legal rights and recourse. The original owner may possess other
rights or recourse, depending on the state or country. Please check the web to help answer
any question and service manual.
CUSTOMER SERVICE CENTER
Acumen, Inc.
101A Executive Dr., Suite 100,Sterling, VA 20166, USA
Colored Filter
Op
en
Velcro Tie
Acumen Europe BV
Spoordreef 25 - 27, 1315 GK Almere, The Netherlands.
Email: customerservice@vetta. com
Website: www. vetta. com