1
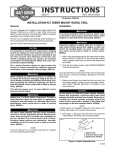
-J05389
REV. 2011-04-15
FLTR FAT MINI-APE HANDLEBAR
Handlebar Removal
GENERAL
NOTE
Kit Number
Cover the front fender and the fuel tank with clean shop towels
to prevent scratching. Damage to the finish could result.
55800094
Models
For model fitment information, see the P&A Retail Catalog or
the Parts and Accessories section of www.harley-davidson.com
(English only).
1.
See the service manual and remove the front brake master
cylinder and clutch lever assemblies from the handlebar
and move them out of the way.
2.
See the service manual and disconnect the clutch cable
from the clutch lever.
3.
See the service manual and disconnect the clutch cable
from the side cover. Remove the cable from the vehicle.
4.
See the MOLEX ELECTRICAL CONNECTORS section
of the service manual. Disconnect the handlebar control
wiring.
5.
Disconnect the handlebar control wiring from the gray
sixteen-way and black twelve-way main harness connectors inside the headlamp nacelle.
Additional Parts Required
Separate purchase and installation of additional parts or
accessories may be required for proper installation of this kit
on your model motorcycle. See the P&A Retail Catalog or the
Parts and Accessories section of www.harley-davidson.com
(English only) for a list of required parts or accessories for your
model.
The rider's safety depends upon the correct installation
of this kit. Use the appropriate service manual procedures.
If the procedure is not within your capabilities or you do
not have the correct tools, have a Harley-Davidson dealer
perform the installation. Improper installation of this kit
could result in death or serious injury. (00333a)
NOTE
DO NOT remove the wires from the Molex handlebar switch
connector pin housings inside the nacelle.
6.
Note the wire colors and positions in each cavity of the
socket housings leading from the switches. Refer to the
wiring diagram and the MOLEX ELECTRICAL CONNECTORS section in the service manual. Remove the
wires (with socket terminals) from the socket housings.
7.
See the service manual. Remove the right side switch
housing assembly and harness.
8.
See the service manual for removal of the left side switch
housing assembly and wire harness.
9.
If the plastic wiring retainer clips that secured both switch
harnesses to the handlebar are still attached to the harnesses or handlebar, remove and discard them.
NOTE
This instruction sheet references service manual information.
A service manual for your model motorcycle is required for this
installation and is available from a Harley-Davidson Dealer.
Kit Contents
See Figure 4 and Table 1.
INSTALLATION
Preparation
10. If the left side hand grip is not glued to the handlebar:
Remove the end cap from the grip, if so equipped.
To prevent accidental vehicle start-up, which could cause
death or serious injury, remove main fuse before proceeding. (00251b)
1.
See the service manual and remove the main fuse.
2.
See the service manual and remove the outer fairing and
remove the instrument nacelle and bezel.
3.
See the service manual and remove the ignition switch
and switch plate.
Remove the hand grip and set it aside for installation onto
the new handlebar.
11. Remove the end cap from the existing right handlebar grip
if so equipped.
Remove the grip from the handlebar.
NOTES
The twist grip sensor in the right side of the handlebar has a
seal cap that protects internal electrodes from dirt and moisture,
and also serves as a retention device for the throttle grip.
To remove the grip, a slight tug may be necessary to release
the index pins in the grip from the receptacle in the seal cap.
-J05389
1 of 6
If the throttle grip IS being replaced: Discard the throttle grip
and proceed to Step 11.
is00328g
1
If the throttle grip IS NOT being replaced: Upon removing
the grip, note if the seal cap is attached to the end of the twist
grip sensor.
•
If the seal cap is attached to the sensor, proceed to Step
11.
•
If the seal cap is still fastened to the index pins inside the
throttle grip, use a stiff piece of mechanics' wire to lasso
the seal cap and pull it free of the index pins.
2
6
7
The original equipment (O.E.) twist grip sensor MUST be
replaced with a new sensor. If carefully removed, the O.E.
sensor can be saved for possible re-use at a later time.
Access the six-way twist grip sensor jumper harness
connector [204] inside the vehicle, and disconnect
the black Molex connector halves.
b.
Gently pull the twist grip sensor and wires out of the
handlebar until the small green connector pair is
exposed.
c.
Note: the external latch on the small green twist grip
sensor connector inside the handlebar will break if
the twist grip sensor is pulled too hard.
A damaged latch will prevent positive engagement of
the pin and socket housings. Since the pin and socket
housings are not serviceable, any damage will
render the O.E. twist grip sensor or jumper harness unusable.
Disconnect the green socket housing on the sensor
from the green pin housing on the jumper harness
inside the handlebar by carefully prying up the latch
with a small, flat screwdriver or similar tool.
d.
Remove the twist grip sensor from the vehicle and
set aside for possible future use.
e.
Pull the jumper harness out through the lower center
wire exit slot in the handlebar and set aside for possible future use.
13. See Figure 1. Remove and discard the screws (1) that
fasten the handlebar upper clamp (2) to the risers (4).
Remove and discard the clamp. Remove the handlebar
(3) from the motorcycle.
6
5
1.
2.
3.
4.
5.
6.
7.
8.
9.
9
Clamp screw (4)
Upper clamp
Handlebar
Handlebar riser (2)
Riser attaching screw (2)
Cup washer (4)
Spacer (2)
Handlebar bushing (4)
Ground strap
Figure 1. Handle Clamp and Risers
New Handlebar Wiring
NOTE
Handlebar Kit MUST be installed
HANDLEBAR SWITCH WIRING ONLY.
1.
with
INTERNAL
Obtain three pieces of string, mechanics' wire or equivalent, each of sufficient length to extend inside the
handlebar, from the end of the bar to the lower center wire
slot, plus six to twelve inches (15-30 cm) of additional
length to extend beyond the openings.
a.
Tie a small weight (for example, a spare nut or washer
small enough to fit through the center wire slot) to one
end of each string.
b.
Insert the weighted end of two of the strings into the
right side handlebar end (with twist grip sensor
teeth), and tip the handlebar so that the weights and
strings slide down the handlebar to the lower center
wire slot.
14. Remove risers (4), riser bolts (5), cup washers (6), spacer
sleeves (7), rubber bushings (8) and ground strap (9).
Retain riser bolts and cup washers for later installation.
-J05389
4
8
12. Refer to TWIST GRIP SENSOR: REMOVAL in the service
manual, and follow the instructions for your model motorcycle to remove the O.E. twist grip sensor.
a.
3
If necessary, an air hose can be used to blow the
weights and strings through the handlebar to the
center slot.
c.
While ensuring that the non-weighted ends of the
strings remain extended out of the right side
handlebar end, pull the weighted ends out of the
lower center wire slot. Remove the weights from the
strings.
d.
With a tweezers or similar tool, fish one string out
through the switch wiring slot near the right side
handlebar end.
2 of 6
Allow the second string to remain extended out of the
right side handlebar end.
e.
is03096
1
Repeat Steps 1b through 1c with the one remaining
string and the left side handlebar end.
Fish the string out through the switch wiring slot near
the left side handlebar end.
2.
If not already done, remove the plastic wiring retainer clips
that secured both handlebar switch harnesses to the original handlebar.
3.
Use tape to wrap the wire terminal ends from each source
to make separate leaders. Wrap each leader tight enough
to enter the wire entrance hole at the handlebar switch
location, and pass easily through the new handlebar.
4.
See Figure 4. Slide a grommet (8) on each switch wire
bundle.
3
3
NOTE
DO NOT attempt to re-use the O.E. twist grip sensor with the
new handlebar. The small green connector on the O.E. sensor
is not compatible with internal handlebar switch wiring. The
O.E. sensor MUST be replaced with a new sensor (Part
Number 32310-08), sold separately.
5.
1. Upper switch housing screw
2. Lower switch housing screw
3. Pinch points
Obtain the Twist Grip Sensor Kit (purchased separately).
Use tape to wrap the wire terminals on the ends of the
Twist Grip Sensor wires to make a single leader. Wrap
the leader tight enough to pass easily through the new
handlebar.
6.
2
Tie or tape the end of the string from the right side
handlebar end hole to the Twist Grip Sensor wire bundle.
7.
Tie or tape the end of the string from the right side switch
wire hole to the right side switch wire bundle.
8.
Apply a light coat of liquid soap, window cleaner, or allpurpose lubricant such as WD-40®, to the right side switch
and Twist Grip Sensor wire bundles.
Wiring in the switch housings must be routed exactly as
shown. Pinch points in the switch housings can shortcircuit or sever wires, which could cause loss of control
resulting in death or serious injury. (00415b)
Figure 2. Switch-Housing Wire Routing (Right-Side
Housing Shown)
9.
Gently feed the Twist Grip Sensor wire bundle into the
right side handlebar end.
See Figure 2. Route the right side switch wire bundle
through the switch housing as shown. Gently feed the wire
bundle into the right side switch wire hole.
Pull the bundles down through the new handlebar and
toward the center of the bar, while fitting the index tabs
on the twist grip sensor into the slots on the end of the
handlebar. One index tab and slot are smaller than the
other to prevent improper assembly.
Carefully pull the wires through hole in handlebar to prevent stripping the wires. Stripped wires can cause short
circuits and damage vehicle electrical components, which
could cause loss of vehicle control resulting in death or
serious injury. (00418b)
10. Pull the taped ends of the wire bundles through the wireexit hole at the bottom center of the handlebar.
Grommets in each of the wiring holes in the handlebar
must remain in position after routing the wiring through
the handlebar. Operation without the grommets in place
can damage wires, causing a short circuit which could
result in death or serious injury. (00416d)
11. Tie the end of the string from the left side switch wire
hole to the left side switch wire bundle.
12. If necessary, apply a light coat of liquid soap, window
cleaner, or all-purpose lubricant such as WD-40®, to the
left side switch wire bundle.
-J05389
3 of 6
13. Route the left side switch wire bundle through the switch
housing similar to that shown in Figure 2 for the right side
wiring. Gently feed the wire bundle into the left side switch
wire hole.
Pull the bundle down through the new handlebar and
toward the center of the bar.
14. Insert the switch wire grommets into place in the switch
wire holes in the handlebar.
15. Loosely fasten the brake lever and clutch lever clamps to
the new handlebar.
16. Loosely fasten the handlebar switch housings to the new
handlebar.
17. Remove the tape from the ends of the wire bundles.
18. Check for electrical continuity between the handlebar and
each wire in the wire bundles. Continuity would indicate
a short circuit, which would require examination of the
wires and routing in the switch housing.
New Handlebar Installation
1.
See Figure 3. Position each riser (6) with the mounting
hole to the outside as shown.
9.
Obtain the six-way black Molex pin housing from the Twist
Grip Sensor Kit. Insert each pin terminal from the twist
grip sensor into the correct cavity of the pin housing as
follows:
From the yellow conduit,
a.
BLACK wire to cavity 1
b.
WHITE wire to cavity 2
c.
RED wire to cavity 3
From the black conduit,
a.
BLACK wire to cavity 4
b.
WHITE wire to cavity 5
c.
RED wire to cavity 6
10. Connect the six-way black Molex pin housing from the
twist grip sensor to the black six-way socket housing inside
the nacelle.
Position the previously installed PVC tubing to prevent
chafing of the twist grip sensor wires at the center
handlebar wire hole, inside the nacelle.
4
Install the new risers (6) and new rigid bushings (9) onto
the upper fork bracket with the saved hardware as shown.
Snug the riser bolts, but do not fully tighten at this time.
2.
Center the new handlebar (7) on the risers.
3.
Position the new handlebar upper clamps (included in the
Handlebar Riser Kit) with the rounded "lobes" (8) inboard,
as shown, and loosely install with new clamp screws and
flat washers from the kit.
NOTE
The handlebar upper clamps are machined to leave a gap
between the clamp and riser on one side of the handlebar when
installed. The non-gap side will be to the front of the handlebar
on the left clamp and to the rear on the right clamp when the
lobes are oriented inward.
4.
Snug only the front screw (1) on the left side clamp.
b.
Snug only the rear screw (2) on the right side clamp.
NOTE
See the service manual for disconnection and connection
procedures.
5.
Insert each socket terminal from the right side switch harness into the correct cavity of the black socket housing
removed earlier.
6.
Insert each socket terminal from the left side switch harness into the correct cavity of the gray socket housing
removed earlier.
7.
Connect the gray socket housing to the gray eight-way
pin housing inside the nacelle. Connect the black socket
housing to the black six-way pin housing inside the nacelle.
If equipped, connect the three-way cruise control pin and
socket housings in the same manner.
8.
is04718b
3
8
12
1
8
7
10
9
5
6
Snug the upper clamp screws, but do not fully tighten, in
the following sequence:
a.
2
1.
2.
3.
4.
5.
6.
7.
8.
9.
10.
11.
12.
10
6
11
Tighten left front screw
Tighten right rear screw
Tighten left rear screw
Tighten right front screw
Front of vehicle
Riser mounting holes to outside
Handlebar
Upper clamp with lobes to inside (2)
Rigid bushing from kit (4)
Cup washers, previously removed (4)
Riser bolt, previously removed (2)
Ground strap (left side only)
Figure 3. Handlebar and Clamp Assembly to Risers
11. Slowly turn the front wheel to the full-right fork stop and
then the full-left fork stop to be sure the handlebar does
not contact the fairing. If contact occurs and the handlebars
are properly centered, raise or lower the handlebar angle
as necessary until proper clearance is attained.
Obtain the PVC tubing from the Twist Grip Sensor Kit.
Install the tubing over ALL of the wires coming from the
twist grip sensor.
-J05389
4 of 6
NOTES
The upper handlebar clamp screws MUST be final-tightened
in the following sequence so that proper clamping is achieved.
FINAL ASSEMBLY
1.
Position the PVC tubing on the twist grip sensor wires
(installed in New Handlebar Installation, Step 7) to prevent chafing of the twist grip sensor wires against the sharp
edges inside the fairing, such as the heat sink fins on the
radio (if so equipped) or the sharp edges of the radio or
storage box mounting bracket.
2.
Refer to INSTRUMENT NACELLE: FLTR: INSTALLATION
in the service manual, and follow the instructions to install
the instrument nacelle and bezel.
There will be a slight gap between the upper clamps and the
risers toward the left rear and right front of the handlebar after
tightening.
12. See Figure 3. Tighten the upper handlebar clamp screws
as follows:
a.
Tighten the left front screw (1) to 12-16 ft-lbs (16.321.7 Nm).
b.
Tighten the right rear screw (2) to 12-16 ft-lbs (16.321.7 Nm).
c.
Tighten the left rear screw (3) to 12-16 ft-lbs (16.321.7 Nm).
d.
Tighten the right front screw (4) to 12-16 ft-lbs (16.321.7 Nm).
13. One at a time, remove the riser bolts. Apply a small
amount of Loctite® 271 (Red) to the bolt threads and install.
Tighten the riser bolts to 30-40 ft-lbs (41-54 Nm).
See UPPER FAIRING AND WINDSHIELD: FLTR: OUTER
FAIRING: INSTALLATION in the service manual, and
install the outer fairing.
Replace brake line gaskets. Re-using original gaskets can
cause brake failure and loss of vehicle control, which could
result in death or serious injury. (00318a)
14. Install a new (purchased separately) or original hand grip
on the left end of the new handlebar according to the hand
grip instruction sheet or an appropriate service manual.
Avoid leakage. Be sure gaskets, banjo bolt(s), brake line
and caliper bore are clean and undamaged before
assembly. (00321a)
15. Adjust the positions of the switch housing and the clutch
lever assembly on the handlebar for rider comfort.
3.
16. Tighten the top then the bottom clutch lever clamp screws
to 72-108 in-lbs (8.1-12.2 Nm).
17. Tighten the lower then the upper switch housing screws
to 35-45 in-lbs (4.0-5.1 Nm).
NOTE
If the hand grips are patterned, align the pattern on the right
hand grip with the pattern on the left hand grip while the throttle
is in the fully-closed position.
18. Refer the appropriate service manual, and follow the
instructions given to install the new (purchased separately)
or original right hand grip/throttle sleeve.
19. Adjust the position of the switch housing and the brake
lever assembly on the handlebar for rider comfort. The
brake master cylinder must be as close to level as possible
when the vehicle is on the sidestand and the handlebar
is turned to the left steering stop.
NOTE
Tighten the top brake lever clamp screw before tightening the
bottom screw.
20. Tighten the top then the bottom brake lever clamp screws
to 72-108 in-lbs (8.1-12.2 Nm).
NOTE
Tighten the lower switch housing screw before tightening the
upper screw. This will leave any gap in the switch housing at
the front for best appearance.
21. Tighten the lower then the upper switch housing screws
to 35-45 in-lbs (4.0-5.1 Nm).
If replacing OE brakelines, carefully inspect the new (sold
separately) or existing front brake line or lines for damage
or defects, and replace if damaged. Install per FRONT
BRAKE MASTER CYLINDER: FRONT BRAKE LINE,
INSTALLATION in the service manual or the instructions
included with the brake lines.
If NOT replacing OE brakelines, go to step 5.
4.
Bleed the brakes. See BLEEDING HYDRAULIC BRAKES
in the service manual.
5.
Install a new clutch cable (sold separately) per the
CLUTCH CABLE: INSTALLATION instructions in the service manual.
SAFETY CHECK
Be sure that steering is smooth and free without interference. Interference with steering could result in loss of
vehicle control and death or serious injury. (00371a)
•
Be sure cables are not pinched between the frame
and/or forks.
•
Be sure clutch cables do not pull tight when handlebars are turned fully to left or right fork stops.
•
Be sure throttle/idle control cables do not pull tight
when handlebars are turned fully to left or right fork
stops.
1.
Verify that the Ignition/Light Key Switch is turned to the
OFF position.
2.
Install main fuse.
22. Verify that the right hand grip/throttle sleeve rotates and
returns freely and does not bind on the handlebar or switch
housing.
-J05389
5 of 6
Be sure that all lights and switches operate properly before
operating motorcycle. Low visibility of rider can result in
death or serious injury. (00316a)
3.
Turn the Ignition/Light Key Switch to IGNITION, but do
not start the motorcycle. Test each handlebar switch for
proper operation.
4.
Turn the handlebar to the left and right steering stops,
testing the handlebar control functions at each stop.
5.
Apply the front brake hand lever to test operation of the
brake lamp.
Before starting engine, be sure throttle control will snap
back to idle position when released. A throttle control that
prevents engine from automatically returning to idle can
lead to loss of control, which could result in death or serious injury. (00390a)
After repairing the brake system, test brakes at low speed.
If brakes are not operating properly, testing at high speeds
can cause loss of control, which could result in death or
serious injury. (00289a)
SERVICE PARTS
is07009
2
3
4
5
6
1
8
7
Figure 4. Service Parts: FLTR Fat Mini-Ape Handlebar
Table 1. Service Parts Table
Item
Description (Quantity)
Part Number
1
Handlebar, 1-1/4 in, 12 inch mini-ape, chrome
Not Sold Separately
2
Riser kit, fat handlebar (includes items 3 through 6)
56789-05
3
•
Screw, socket head (4)
4816A
4
•
Washer (4)
6046
5
•
Clamp, 1-1/4 inch handlebar (2)
55962-02
6
•
Riser, 1-1/4 inch handlebar (2)
56380-02
7
Bushing (4)
Not Sold Separately
8
Grommet
11386
-J05389
6 of 6