1
D − Charging TPA*S4N41Y through
TPA*S4N42Y
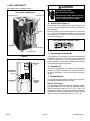
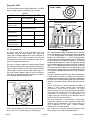
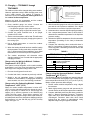
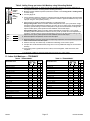
Blocking Outdoor Coil
The outdoor unit should be charged during warm weather.
However, applications arise in which charging must occur
in the colder months. The method of charging is
determined by the unit’s refrigerant metering device and
the outdoor ambient temperature.
*Outdoor coil should be blocked one
side at a time with cardboard or plastic
sheet until proper testing pressures are
reached.
cardboard or plastic sheet
*Four−sided unit shown.
Measure the liquid line temperature and the outdoor
ambient temperature as outlined below:
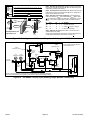
1.. Close manifold gauge set valves. Connect the
manifold gauge set to the service valves.
FIGURE 14
D
1.. With the manifold gauge hose still on the liquid service
port and the unit’s pressure stabilized, use a digital
thermometer to record the liquid line temperature.
D
2.. At the same time, record the liquid line pressure reading.
low pressure gauge to vapor valve service port
high pressure gauge to liquid valve service port
2.. Connect the center manifold hose to an upright
cylinder of HFC−410A.
3.. Set the room thermostat to call for heat. This will create
the necessary load for properly charging the system in
the cooling cycle.
4.. Use a digital thermometer to record the outdoor
ambient temperature.
5.. When the heating demand has been satisfied, switch
the thermostat to cooling mode with a set point of 68_F
(20_C). When pressures have stabilized, use a digital
thermometer to record the liquid line temperature.
3.. Use a temperature/pressure chart for HFC−410A to
determine the saturation temperature for the liquid line
pressure reading.
4.. Subtract the liquid line temperature from the saturation
temperature (according to the chart) to determine
subcooling.
5.. Compare the subcooling value results with those in
table 3. If subcooling is greater than shown, recover
some refrigerant. If subcooling is less than shown, add
some refrigerant.
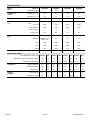
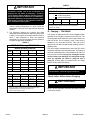
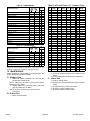
TABLE 3
TPA*S4N41Y through TPA*S4N42Y
6.. The outdoor temperature will determine which
charging method to use. Proceed with the appropriate
charging procedure.
TPA036S4 Subcooling Values for Charging
=
Charge using the Weigh−In Method − Outdoor
Temperature < 65_F (18_C)
If the system is void of refrigerant, or if the outdoor ambient
temperature is cool, first, locate and repair any leaks and
then weigh in the refrigerant charge into the unit.
Model
°F (°C)*
_ Saturation Temperature
_ Liquid Line Temperature
_ Subcooling Value
−036
−042
−048
−060
8 (4.4)
6 (3.3)
11 (6.1)
11 (6.1)
*F: +/−1.0°; C: +/−0.5°
1.. Recover the refrigerant from the unit.
2.. Conduct leak check; evacuate as previously outlined.
Charge using the Approach Method − Outdoor
Temperature > 65_F (18_C)
3.. Weigh in the unit nameplate charge. If weighing
facilities are not available or if charging the unit during
warm weather, use one of the following procedures.
The following procedure is intended as a general guide and
is for use on expansion valve systems only. For best results,
indoor temperature should be 70°F (21°C) to 80°F (26°C).
Monitor system pressures while charging.
Charge using the Subcooling Method − Outdoor
Temperature < 65°F (18°C)
When the outdoor ambient temperature is below 65°F
(18°C), use the subcooling method to charge the unit. It
may be necessary to restrict the air flow through the
outdoor coil to achieve pressures in the 200−250 psig
(1379−1724 kPa) range. These higher pressures are
necessary for checking the charge. Block equal sections of
air intake panels and move obstructions sideways until the
liquid pressure is in the 200−250 psig (1379−1724 kPa)
range. See figure 14.
TPA*S4
1.. Record outdoor ambient temperature using a digital
thermometer.
2.. Attach high pressure gauge set and operate unit for
several minutes to allow system pressures to stabilize.
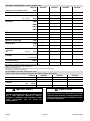
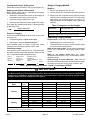
3.. Compare stabilized pressures with those provided in
table 4, Normal Operating Pressures." Pressures
higher than those listed indicate that the system is
overcharged. Pressures lower than those listed
indicate that the system is undercharged. Verify
adjusted charge using the approach method.
Page 11
Revised 05−2009