1
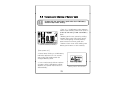
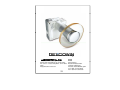
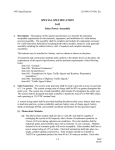
IFU--01 IFU Creative Innovation and Technology User Manual Serial No. ※ The graphic images in this manual can be different form the one in the actual product. Thank you for purchasing DX3000. Please read this manual carefully before using DX3000. The quality of this product guarantee is contained in this manual. 0086 Portable X X--ray System MODEL : DX3000 Ver.2.0 E S Super S Smallll ! Super S Li Light ht ! ☞ Convenience of cordless - Use the charging battery-pack take-off type ☞ Great reduction of X-ray exposure - Up to 1/7 of existing X-ray systems Adopting ng h high-frequency gh q n y circuit o of inverter n type yp ☞ Adop ☞ The most suitable to diverse digital sensors. - Simultaneous using of digital sensor and film ☞ Auto set Timer - Automatic exposure time set up by adult, child, and location of teeth ☞ More than 300 radiography is possible with one time charging of battery ☞ More compact/weight than existing portable dental X-ray (1.8Kg) 2 User Manual 1 Contents 1. User Manual 1. Contents •••••••••••••••••••••••••••••••••••••••••••••••••••••••••••••••••••• 4 1 2. Preface ••••••••••••••••••••••••••••••••••••••••••••••••••••••••••••••••••••• 6 3. Safety Marks •••••••••••••••••••••••••••••••••••••••••••••••••••••••••••••• 7 3.1 Warning •••••••••••••••••••••••••••••••••••••••••••••••••••••••••• 8 3.2 Caution ••••••••••••••••••••••••••••••••••••••••••••••••••••••••• 10 3 3 Checking for Confirmation •••••••••••••••••••••••••••••••••• 10 3.3 4. Features of product ••••••••••••••••••••••••••••••••••••••••••••••••••••• 11 5. Specifications •••••••••••••••••••••••••••••••••••••••••••••••••••••••••••• 12 6. Product consist •••••••••••••••••••••••••••••••••••••••••••••••••••••••••• 15 7. Product Description 7.1 Features •••••••••••••••••••••••••••••••••••••••••••••••••••••••••• 16 7.2 LCD Window and functions ••••••••••••••••••••••••••••••••••• 18 7.3 Each part of the button and functions •••••••••••••••••••••• 19 7.4 X-ray Exposure using Remote control •••••••••••••••••••••• 20 7.5 Replacement and charge of the battery-pack ••••••••••••• 21 y p charge g ••••••••••••••••••••••••••••••••••••••••••• 22 7.6 Battery-pack 8. Operation 8.1 Starting and ending of system•••••••••••••••••••••••••••••••• 24 8.2 X-ray generating time control •••••••••••••••••••••••••••••••• 24 8.3 Relation between X-ray generating time and part of teeth (table) ••••••••••••••••• 24 8.4 X-ray EXPOSURE ••••••••••••••••••••••••••••••••••••••••••••••• 25 8.5 User Set Up Mode••••••••••••••••••••••••••••••••••••••••••••••• 26 8.6 Replacing and charging of battery-pack ••••••••••••••••••• 29 4 C t t Contents 9. Maintenance and Keeping •••••••••••••••••••••••••••••••••••••••••••• 10. Instruction and Troubleshooting guidelines •••••••••••••••••••••••• 11. Quality Guaranteed •••••••••••••••••••••••••••••••••••••••••••••••••••• 12. Warranty •••••••••••••••••••••••••••••••••••••••••••••••••••••••••••••••• 13. Instruction for Quick Start •••••••••••••••••••••••••••••••••••••••••••• 30 33 34 35 36 Service Manual Specifications ••••••••••••••••••••••••••••••••••••••••••••••••••••••••••••••• 39 High Voltage Tank ••••••••••••••••••••••••••••••••••••••••••••••••••••••••••• 41 Electro-Magnetic Compatibility ••••••••••••••••••••••••••••••••••••••••••• 48 Radiation Safety ••••••••••••••••••••••••••••••••••••••••••••••••••••••••••••• 50 5 2 P 2. Preface f Thank h k you ffor purchasing h i the h portable bl X X-ray system off Dexcowin Co., Ltd.. This product has been so developed as to not only take radiographs in analog way using conventional film, but also be used in Dental Digital Radiograph, DDR using digital sensor as well. Please use following requirement for application. pp on Applications This product has to be used only for dental diagnosis for taking dental or extraextra-oral XX-ray radiograph. TYPE B Applied Part Type B Applied Part provide the lowest degree of patient protection of all the types of applied part and are not suitable for direct cardiac application. For proper and safe use of this product product, this device has to be used only authorized and qualified personal as doctors and diagnosis and treatment XX-ray engineers, and has to be used after fully familiarized with user manual. 6 3 S 3. Safety f t M Marks k Warning, caution, and acknowledgement indication in this manual are provided for assuring of proper use of the product to protect the user’s safety and to prevent the loss of the property. Therefore the users have to observe these safety requirements. Warning Caution Check Warning marks indicate and explain for the cases which might be harm to the user, cause death or property damage. Caution marks indicate and explain for the cases which might cause harm to the body due to improper use of the product.. The check marks indicate and explain for The cases which the user must follow in installation, operation and maintenance/repair of this product. 7 31W 3.1 Warning i 1. In use • Not to exceed the dose of X-ray that is necessary for image diagnosis. Be handled or operated only by qualified personnel. Something wrong with the patient during using of the product. Proper actions have to be taken such as stop the using product. Stop operating the unit, when there is problem with the unit. Please, contact the authorized A/S center. Use the product avoiding the follow places. – Where there is chemical material or explosive gas. – Where it is damp. – Where there is direct ray of light – Where ventilation is poor – Dusty place – Humid place – Salty place keep the following temperature and humidity for normal operation of the unit ; – F safe-keeping, For f k i • temperature -40∼70°C, • humidity 10~90%RH – During using, • temperature -10~40°C, • humidityy 30~70%RH – For optimum condition, • temperature -10~30°C, • humidity 40~60%RH • • • • • 8 2. Safekeeping not in use • • Do not keep the unit where it is damp, salty, and dusty, which might i ht cause th the b bad d effects ff t ffor operating ti off th the unit. it Do not place the unit long at the place where the temperature changes steeply or in the direct ray of light. Do not keep the unit where there is explosive gas or chemical materials. Do not keep the battery battery-pack pack long in the charger while connecting with the electricity. Keep the charged battery-pack in the separate keeping case. 3. Other • Contact the authorized A/S center in case of the unit is out of order. • • • Discard in the EU this Symbol indicates waste of electrical and electronic equipment must not be disposed as unsorted municipal waste and must be collected separately. To minimize the risks involved in disposing of these waste products, products please contact an authorized representative of the manufacturer or an authorized waste management company for information concerning the decommissioning of your equipment. 9 3.2 Caution • • Do not expose the unit to the extreme shock or vibration Do not use the unit, placing it at dusty, dirty, and inclined place. Do not jerk the connection cable between the charging desk device and the charger Do not allow the patient touch the unit and do not leave the unit within the reach of the patient • • 3.3 Confirmation check • • • • • • • • Check the condition of the battery-pack y p and the unit before using, make sure the proper operation state of the unit Check again the parts of the unit that is touching directly the patient. Use the unit according to the procedure for operation Use the unit in the comfortable place where ventilation is good After using of the unit, check indicating lamp for remaining battery without fail and charge the battery if the remaining of the battery is not sufficient. For charging of battery-pack, use only the exclusive charger without exception. Keep the unit clean by using the clean dry piece of cloth to prevent the terminal of battery-pack from touch of metal and other different materials. The unit and parts should have the regular check without fail. 10 4 F 4. Features t off product d t • Name of product : Portable X-ray System • Model : DX3000 • Real meaning portable system by using replaceable battery-pack • ph LCD window ndo and nd user-friendly nd y interface n by y simple p Graphic button-touch Life time is 8 years LCD window indicates; – Exposure time setup by adult and child – Film and digital mode – Operation status of the unit – Remaining of battery – Exposure time setup by part of the teeth • • • Function F ti ffor user – Simultaneous use of digital and film – Automatic power disconnecting time setup – Continuation of back light time setup – Remaining voltage of battery indication • 3-steps time increase level by part of teeth (1-Step) (2-Step) 11 (3-Step) 5 S 5. Specifications ifi ti • Name : Mobile X-ray System • Item Classification : 2, Code: A11080.02 (in Korea) • Grade : Class Ⅱb (MDD 93/42/EEC as amended by 2007/47/EC) • Classification : B Type applied part • T b V Tube Voltage lt : 60kV(fi 60kV(fixed) d) • Tube Current : 2mA (fixed) • X-Ray Tube Focal Size : 0.8mm • Cooling system : Oil cooling • Total filtration : 1.5 mm Al (Inherent filtration : 0.8mm, fixed added filter :0.7 mm Aluminum) • Target angle : 19 ~ 20° • Time Set-up function : 0.05 ~ 1.35 sec (Film/Digital included) • Source to image receptor distance : >10cm (fixed by cone) • X-ray field : 50 ㎜ (round-style) • Size of main body : 139(W) x 163.5(H) x 66.5mm(D) • Weight of body : About 1.8 kg (except the battery pack) 12 S Specifications ifi ti • Battery-pack – – – • Material : Lithium-Polymer Charge Condition • Current : 1.0 A • Voltage : 16 16.8 8 VDC • Temperature : 0 °C ~ 40° C Use condition • Max. current : 20 A • Voltage range : 12(min) ~ 16.8(MAX) V • Temperature : -20 °C ~ 60 °C Charger – – – – Model : JBL910A-1600 Input Voltage : 100 ~ 250 VAC Output Voltage : 16.8 VDC Current : 1.0A 13 Specifications • Distance from X-ray focal source to X-ray field and angle 10cm X-ray 5cm Field Focal Spot • Please use this product by Hand-Held like below picture. Don't put any material that can attenuate intensity of X X-ray between XX-ray field and subject at XX-ray exposure. 14 6 P 6. Product d t consist i t • Portable X-ray System : DX3000 • Components ¾ Battery-pack 2EA ¾ Charger 1EA ¾ Device for charger 1EA • Accompanying document ¾ User Manual CD ¾ Quality Assurance • Keeping case 15 7. Product description 7.1 Features LOW battery indicating lamp Skid-proof p g grip p EXPOSURE lamp EXPOSURE button Remote control connector Cone X-ray Field Battery pack (50mm round) cover Time (Mode) control button LCD window Power button & lamp Label Handle Focal spot location pointer The design of the product is subject to change without notice to enhance the performance. 16 7. Product description 7.1 Features CAUTION, CONSULT ACCOMPANYING DOCUMENTS DATE OF MANUFACTURE PRODUCT LABEL STICKER SERIAL NUMBER AUTHORISED REPRESENTATIVE IN THE EUROPEAN COMMUNITY The design of the product is subject to change without notice to enhance the performance. 17 Product Description 7.2 LCD Window and functions ① ② ⑤ ⑥ ⑦ ⑧ ③ ⑨ ④ ① ② ③ ④ ⑤ ⑥ ⑦ Adult mode : Adult mode indicates Teeth part of adult : Adult teeth part indicates Child mode : Child mode indicates Teeth part of child : Child teeth part indicates Indication of status : Indication of the present operation of the unit Status of battery : Indicate the remaining of battery by 3-steps Digital mode icon : Indicates digital sensor is setup and disappears when film mode is setup. (default is film mode) ⑧ Exposure time display : Indicates irradiation time at each part of teeth mode d ⑨ 3-step time increase level by part of teeth The specifications and functions in this manual are subject to change without notice to enhance the performance. 18 Product description 7.3. Each part of the buttons and functions Top side button Front side button EXP button Power button z z z Time (mode) control button button : Turn on/off the unit Time (Mode) control button : Time setup by each teeth mode (24 steps in each mode) ¾ button : Time increase ¾ button : Time decrease button: Exposing of X-ray with buzzer sound only while the button is being pressed and irradiation will stop when button is released. (DMS method-Dead Man Switch) 19 Descriptions 7.4 X-ray Exposure using Remote control Remote Control Jack Remote Control Connector Allows user to operate X-ray by way of approved remote control. • Use only approved Remote Control. • Approved remote control is not included with the XX-ray, but can be purchased as an option from distributors. 20 Product description 7.5 Replacement and charge of the battery-pack [LCD Screen when low battery] • The battery pack replacement ¾ ¾ ¾ ¾ ¾ If LOW battery direction ramp is blinking or LOW battery sign appears on battery pack residual quantity expression.( ) Turn off the power when the LOW battery sign appears. Please open the th b battery tt y pack k cover v and d change h with extra xt b battery tt y pack. k Fixing lever down and then pull the cover forward for opening the battery pack cover. Put homologizing correctly guide line of the pack top portion and battery pack insertion slot of device. Please close cover after making sure whether battery pack came into end certainly. Please change battery pack when LOW battery sign of LCD screen blinking for expend the length of using battery pack. When change battery pack, please take care not to drop battery pack. 21 Product description 7.6 Battery-pack charge – Please p power p plug g of AC code to concert after connect device for charger and charger. – Please thread battery pack when battery pack is inserted to battery pack holder to direction that is correct on slot of device for charger. Battery pack insert direction Battery holder exercise direction Slot Holder LED – – If the charge is completed, charge lamp changes from red color to green. When segregate battery pack in device for charger after charge is completed, l t d please l pullll b backward k d and d segregate t b battery tt pack k holder. Keep the battery pack separately or unplugged after charge lamp changes green or not in use. 22 Product description Please keep the following rules whenever charging the battery pack. 9 9 9 9 Use only appointed charger and battery pack pack.. Keep apart the battery pack in the special storage case after charging completed. Avoid the recharge for charge completed pack. pack. Take care not to contact the metal goods of coin, key key,, clip etc. on the battery terminal plate. Battery pack is consumer goods Duration of batterybattery-pack is shorted slowly than first purchase. Please buy new battery pack if duration decreases by half than when use first first. Purchase inquires in the A/S center. Exhaust of battery pack Used battery pack should not throw away in trash but please p p put that in the recycling y g box or exclusive case. 23 8 Operation 8. 8.1 Starting and ending of the system • Press the power button during “1 second” then logo will appear and become initial stage. • Press the power button during “1 second” in active state, power turns off. 82 X 8.2 X-ray ray generating time control • • ▲ : Increase time set-up ▼ : Decrease time set-up 8.3 Relation between X-ray generating time and part of teeth (Table) ( ) 0.10~ 0.10 0.15 0.15~ 0.15 0.25 0.25~ 0.25 0.30 0.30~ 0.30 0.40 0.40~ 0.40 0.45 0.45~ 0.45 0.55 0.55~ 0.55 0.60 0.60~ 0.60 0.05~ 0.10 0.10~ 0.15 0.20~ 0.25 0.25~ 0.30 0.30~ 0.40 0.40~ 0.45 0.45~ 0.50 0.55~ 24 • • 8.4 X-ray EXPOSURE Using Hand-Held button : Exposing of X-ray with buzzer sound only while the button is being pressed. X-ray is generated only while button is pressed. So even though the buzzer sound is being made, the generation of XX-Ray stops when taking the hand off the button. Setting time is stored to product that do exposure on last. Time is not stored that do not exposure. • The status indication changes from READY to EXPOSURE while the X-Ray is being generated. READY → EXPOSURE State Change 25 8.5 User Set Up Mode • At the status of power on, pressing the and releasing, you will enter into User Set-up Mode together and then ① ② ③ ⑥ ④ ⑤ • • • • ① ② ③ ④ ⑤ ⑥ - Move between menu : button - Change the set up value : button - Exit the user set up mode : After turning off the unit by pressing , turn on the unit again, then unit starts with changed mode and set up value. Menu explanation : Mode : Film ; film/digital mode indicates Power-save ; automatic power disconnection time (default : 5 min) Back-light ; activating of back-light (default :1sec) Bat ; remaining voltage of battery Exp ; the number of time of EXPOSURE of the unit Ver. 1.01 ; version of the unit 26 ① Film/Digital mode • • Using button, locate the menu in “Set up Mode" position, and by pressing the button, film mode or digital mode can be selected. When digital mode is selected, the digital mode icon is displayed as followings g ; [User set up mode] Digital i i lM Mode d IIcon For film mode, exposure time is from 0.2s up to 1.35s, for digital mode, exposure time is from 0.05s up to 1.20s, each mode has 24 steps of ranges. ② Automatic power disconnection time • • While the unit is not in use, the power is automatically disconnected following by the set-up time in order to save unnecessary power consumption. ti Default is set-up as 5 minute and it could be adjusted by 1minute. According to the convenience of the user interval from 1 minute up to 10 minutes. 27 ③ Back-light activating time – – The light Th li h ill illuminating i i time i can b be set ffor LCD window. i d Basically, setting value of 1 second is given and can be adjusted by 1 second up to 10 second for user convenience. ④R Remaining i i voltage lt off b battery tt – Display value of voltage that is remained in battery-pack ⑤ Numbers of times of exposure of the unit – Display the number of exposure times of the unit up to now ⑥ Version of the unit – Displays the version of the present unit 28 8.6 Replacing and charging of battery-pack Change with the extra battery pack when the LOW battery di ti lamp direction l starts t t flicking. fli ki [Low battery screen] • Turn off, if LOW battery sign appears. Please open battery pack cover (side of product) d t) and d change h with ith extra t b battery tt pack. • Battery pack cover opens by pulling forward after press fixing lever down. • Put homologizing correctly battery pack insertion slot and guide line line. • Please close cover after making sure battery pack came to end certainly. [Auto power off] • Power lamp flicking or LOW battery indication appears on LCD screen, stop using and replace with the charged battery-pack. • If use continuously without replace of battery after LOW battery patent appears, the power will be shut off automatically. 29 [Auto power off screen] 9. Maintenance and Keeping • • • • • • • Keep the unit and the battery-pack in the place where only authorized personnel can reach. Please clean often the product by using piece of cloth and to keep radiation aperture's clean because patients are contacted directly. Do not put the unit close to the heat such as stove and heating device during using. Please do not remodel device arbitrary. For safe use, it is recommended to have the unit checked regularly at the designated A/S Center Center. For using and keeping, avoid as following places ; – Damp places – Places in the direct ray of light – Dusty places Moist places – – Places in poor ventilation – Salty places – Where there is explosive gas or with chemicals. For normal operation, following temperature and humidity have to be kept ; – For safe-keeping • Temperature -40∼70°C • Humidity 10~90%RH – During using • Temperature -10~40°C • Humidity 30~70%RH – For optimum condition, • Temperature -10~30°C • Humidity 40~60%RH 30 Maintenance and Keeping • Safe-keeping (DX3000) – Keep the unit avoiding the place where it is damp and in the direct ray of light. – Do not keep the unit where it is dusty, dirty, and sloping. – Do not keep the unit where it is so high temperature temperature, or so low temperature. – When the unit is not in use for long, remove the batterypack and keep it separately. • Safe-keeping of the charger and the table-top device for charging; – Care has to be taken not to let the foreign material be stick at the terminal of the charging device. It has to be kept after lightly cleaning with cotton bud or soft cloth – When not in use, take the plug off the outlet, and when it will not be used for long, keep it in the case. – Be careful of metal material such as coins, key, and clip, etc.) not to be contacted with terminal plate of batterypack or charger. – Do not attempt to use charger with other makers' battery 31 Maintenance and Keeping • Daily / Monthly tests and Annual maintenance 1) Daily tests - When turned on power of product, please confirm whether on sound is heard and normal early screen appears. - Change establishment investigation time using manufacturing button and time confirms whether is changed normally in display. EXPOSURE phrase and - Please confirm whether buzzer sound is heard and "EXPOSURE" investigation lamp of LCD screen are seen normally at X-ray exposure. - Please confirm charging of battery pack and normal operation existence and nonexistence of charger. 2) Monthly tests - Please confirm whether duration of use of used battery pack is suitable. Buy new battery pack if duration of use decreases comparing with first purchase by half. Battery pack is consumer goods, duration of use is shorted slowly than bought. 3) Annual maintenance - Every year for safe use of product, safety check-up is necessary. 32 10 I 10.Instruction i &T Troubleshooting bl h i guidelines id li User should check below symptoms list before asking repair. Symptoms Management Battery indication lamp is flicking - Check the remaining battery, and replace with charged battery - Ensure E if th the b battery-pack tt k cover iis properly l closed, and if the cover open, close the cover completely to the end. The sound of Power On or LCD window does not work when the unit is turned on - Check if the battery-pack is loaded or replace the battery-pack. h b battery will ill not b be used d ffor llong time, i - If the separate the battery from the unit for prevention discharge. LCD window is not lit after the sound of Power On is heard. - Replace the battery-pack. ( If the status remain same even after having replaced l d the h b battery, contact with i h the h d designated i d A/S Center for repair) The power turns off itself while in use - Check the remaining battery - This unit features automatic power disconnection to save the unnecessary consumption of the battery-pack. Check the set-up of the automatic power disconnection 33 11 Quality 11. Q lit G Guaranteed t d • This product is warranted its quality from the date of purchase to one-year. • It is hard to recognize the warranty period, the warranty is applicable three months after it was manufactured. • Products defects by itself or improper workmanship, the product will be either repaired free of charge or exchanged according to the status of the product. • Even within the warranty period, if the damage is caused by f il failure off the h user, free f off charge h iis not applied. li d • The attached level for sealing is broken, free of charge and warranty are not applied. • The repair at the place any other than designated A/S Center is excluded from warranty • The service period will not be extended for the product which was repaired with charge or free of charge. 34 12. Warranty I N F O Name of Product Portable X-ray System Date of Purchase 20 . . . Name Name of M d l Model DX3000 Place of Purchase Phone Address The product of DEXCOWIN Co., Ltd. observes regulation for protection of consumers notified by The Ministry of Economy. Creative Innovation and Technology DEXCOWIN Co., Ltd. #606, Woolim Lions Valley II 680, Gasan-dong, Geumcheon-gu, Seoul, Korea For service : contact with phone 82-2-2027-2880 http://www.dexcowin.com 35 13 Instruction 13. I t ti ffor Q Quick i k St Startt Quick Start summarized tables which are explained in the user manual manual. This explanation can not take whole explanation of product use method. This is just for user convenience to help understand the unit prior to actual use. Based on this summarized Quick Start, use the unit after having read the manual completely without fail. If you use this unit after familiarized with it, you can easily use with Quick Start. 36 Instruction for Quick Start Ready Power ON Check Insert the battery-pack into the unit Using Button, turn the unit on and LCD window is lit with sound Check the balance of battery-pack and make sure the conditions of the product Mode selection Select the method of radiography such as film or digital sensor Exposure time Select the exposure time by location of teeth for radiography Radiography Radiography the area of patient's teeth using film (Digital sensor) Power Off After press OFF sound button, LCD screen turns off with Operating Method - Power On / Off : button - How to set up the mode of radiography ① User set-up mode + ② Move the menu Change the mode - Select the time ① Increase set-up time ② Decrease set-up time - EXPOSURE of X-Ray : 37 Button Service Manual Specification • Manufacturer : DEXCOWIN Co. Ltd.. • Name of Medical equipment : Portable X-ray System • Model : DX3000 • Device Classification : Class Ⅱb (MDD 93/42/EEC as amended by 2007/47/EC) • Classification Type of protection against electric shock : Internal powered equipment Degree of protection against electric shock : TYPE B Applied part • Voltage range: 12V ~ 16.8V DC • Power consumption:240W Max. • Applications This product has to be used only for dental diagnostic X-ray system for dental or extra-oral X-ray radiograph. 39 • Battery-pack – – – • Material : Lithium-Polymer Charge Condition • Current : 1.0 A • Voltage : 16.8 VDC • Temperature : 0 °C ~ 40° C Use condition • Max. current : 20 A • Voltage range : 12(min) ~ 16.8(MAX) V • Temperature : -20 20 °C C ~ 60 °C C Charger – – – – M d l : JBL910A Model JBL910A-1600 1600 Input Voltage : 100 ~ 250 VAC Output Voltage : 16.8 VDC Current : 1.0A 40 High Voltage Tank • 1. X-ray tube : D-081B I. II. III. Model : D-081B Manufacture : TOSHIBA Electrical Data Circuit : Self-rectified (Center-grounded) Operating Tube Voltage : 50kV ~ 65kV Max Focal Spot : 0.8 [mm] Max. Input Energy (at 1.0s) : 600W(refer to rating charts) IV. Mechanical Data Dimensions - Overall length : 69 mm Max Diameter : 31 mm Max. Target Angle : 20 degrees Inherent Filtration : 0.8 mm Al Weight (Approx.) : 96g Cooling Method : Oil cooling 41 High Voltage Tank V. Maximum and Minimum Ratings Maximum Tube Voltage : 65kV Maximum Inverse Tube Voltage: 75kV Maximum Tube Current : 19mA (see rating charts) Maximum Filament Current : 2.0A Filament Voltage : 2.9 2.9~4.0 4.0 V (At max. filament current) Temperature Characteristics Anode Heat Storage Capacity : 6.0 kJ(8.5KHU) Max. Anode Heat Dissipation Rate : 128 W(180 HU/s) • Maximum Rating Charts (Absolute Maximum Rating Charts) 42 High Voltage Tank • Emission & Filament Characteristics • Anode Thermal Characteristics 43 High Voltage Tank 2. X-ray Tube : XD XD12 12-0.56 56//70 I. II II. III. Model : XD XD12 12-0.56 56//70 Manufacture : WANRAY Electrical Data Circuit : Self Self-rectified (Center (Center-grounded) Operating Tube Voltage : 40 40kV kV ~ 100 100kV kV Max Focal Spot : 0.8 [mm] Power (Is) W : 560 W Max Continuous Power(W) : 110 110W W IV. Mechanical Data Dimensions - Overall length : 73 mm Max.. Diameter : 30 Max 30..5 mm Target Angle : 19 degrees Inherent Filtration : 0.5 mm Al Weight (Approx. (Approx.) : 120 120g g Cooling Method : Oil immersed and convection oil cooling 44 High Voltage Tank V. Rating Characteristics VI. Filament Characteristic 45 High Voltage Tank VII. Anode Heating & Cooling Characteristics VIII. Cathode Emission Characteristic 46 High Voltage Tank • Distance from focal spot to radiation aperture and the diameter of X-ray field [㎜] 47 Electro-Magnetic Compatibility ( MC) (EMC) • As this product is used without connection of a cable, there is no EMC risk. • This product has EMI characteristics characteristics, less than 4 4.9dB 9dB at 1000MHz 1000MHz, which may make an interference with another device having similar characteristics. Avoid to use together with these devices (Refer to table 1). • Keep away from devices which make a serious radiation noise or a strong electromagnetic field (Refer to table 2) 2). • As this product is not used with cable, there is no risk of EMC interference with another device through the cable. If this product is remade for connection with another device or part intentionally, it will make an interference with another device, the manufacture don't don t take responsibility for risk of EMC (Refer to EMC part of Service manual). 48 Electro-Magnetic Compatibility (EMC) Electro-Magnetic Electro Magnetic Interference • • • Radiated emission (electric field) : 30Mhz ~ 1000MHz Min. limit margin : 4.9 dB at 1000 MHz Radiated emission data Table 1 Freq. MHz Antenna Pol. H/V Reading Level dBuV Correctio n (AF+CL) dB/m Emission Level Limit (10m) dBuV/m Margin dBu/V 1000 H/V- <2.0 30.1 <32.1 37 >4.9 Electro-Magnetic Susceptibility Table 2 Radiated Field Frequency range Field strength Modulation Frequency step 80-2500 MHz 3 V/m 10 V/m AM 80% 1KHz sine wave 1% / 3s Test ffrequency Field level (EMF) Duration Axis of orientation i t ti 50 Hz 3 A/m 60 seconds each axis X , Y, Z axis Magnetic Field 49 Radiation safety 1. Leakage radiation ¾ The following is leakage radiation at 1m from focal spot. U i [mR/h, Unit: [ /h (mGy/h)] ( G /h)] 0°(360°) 45° 315° 270° 90° 1m 225° 135° 180° Test 1 Test 2 Test 3 0°(360°) ND ND ND 45° ND ND ND 90° ND ND ND 135° ND ND ND 180° ND ND ND 225° ND ND ND 270° 270 ND ND ND 315° ND ND ND ND : Not Detected ¾ The following is leakage radiation at 1cm from case surface. Unit: [mR/h, (mGy/h)] 3 93(0 0393) 3.93(0.0393) 1.43(0.0143) 3.08 2.79 (0.0308) (0.0279) 7.8(0.078) 0.02 (0.0002) 5 85(0 0585) 5.85(0.0585) 0.04(0.0004) 7.19(0.0719) 5.23(0.0523) Leakage radiation at 1cm from case surface is less than 8mR/h(0.08mGy/h). 50 Radiation Safety 2. Strayed Radiation ¾ ¾ The following designate significant zone of occupancy. occupancy Please put private protection devices within this area. 2-1. Set the significant zone of occupancy significant zone of occupancy 51 Radiation Safety 2-2. Test method and result of stray radiation Test Method of stray radiation Test result of stray radiation 52 Creative Innovation and Technology DEXCOWIN Co., Ltd. #606 Woolim Lions Valley II 680 #606, 680, GasanGasan -dong, Geumcheon Geumcheon-gu, gu, Seoul, Korea For service : contact with phone 8282-2-2027 20272880 http://www.dexcowin.com 53 Paul Sweeney Boston Dental Scientific C/Isabel Colbrand 10, Local 68, 28050 Madrid, Spain Tel : 00340034-91 91-358 358-8006 Fax : 0034 0034-91 91-358 358-8018