1
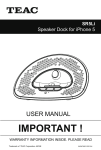
SERVICE MANUAL
High Efficiency
Aluminum Tube
CHARGE AIR COOLER
Please read and follow
instructions carefully
before proceeding with
any service work and/or
repairs. Consult factory
before proceeding with any
possible warranty claims.
2
JANUARY 2011
High Efficiency Aluminum Tube Charge Air Cooler
CONTENTS
Standard Parts................................................................ Page 3
External Cleaning and Tube Removal............................ Page 4
Seal Removal and Header Plate Preparation................. Page 5
New Seal Installation...................................................... Page 5
Tube Installation............................................................. Page 6
Retainer Bar Installation and Final Assembly................. Page 7
Pressure Testing............................................................ Page 7
Manufacturing and Parts Facilities................................. Page 8
Captured seal provides dependable service
The MESABI ® Charge Air Cooler (CAC) features a tube-to-header
rubber seal that is held captive in the header plate by a special sealing
process. The flexible seals absorb stresses and thermal expansion that
can cause conventional coolers to fail.
The CAC has all the features of MESABI ® flexible core heat
exchangers.
• Lightweight aluminum cooling tubes and frame.
• Field-repairable using simple hand tools.
• For air-to-air heat exchange.
This service manual is available to print online at www.MESABI.com. A service video
is also available for viewing online, or request a DVD from L&M Radiator. The service
video does not replace the information contained in this service manual.
L&M RADIATOR, INC. GENERAL WARRANTY
Consult L&M before proceeding with warranty claims
or repairs. Failure to do so may void this limited
warranty. This limited warranty allocates the risk of
failure of the product(s) between the buyer and L&M
and is reflected in the purchase price.
L&M does not warranty products incorporated into
L&M products that are not manufactured by L&M.
Buyer’s sole recourse with respect to such products
will be subject to the warranty of the individual
manufacturer.
L&M warrants that MESABI® products will conform
to L&M’s written quotation specifications and
drawings. MESABI® framework components are
warranted for 18 months from the date of invoice
against defects in materials and workmanship
during normal usage. L&M warranty against
seal leakage during normal operation is stated in
individual product literature.
OTHER THAN AS STATED HEREIN, L&M MAKES
NO REPRESENTATION OR WARRANTY OF
ANY KIND, EXPRESSED OR IMPLIED, AS
TO MERCHANTABILITY OR FITNESS FOR A
PARTICULAR PURPOSE, OR ANY OTHER
MATTERS WITH RESPECT TO THE SALE
OF L&M PRODUCT(S) AND ALL IMPLIED
WARRANTIES OF MERCHANTABILITY OR
FITNESS FOR A PARTICULAR PURPOSE ARE
HEREBY DISCLAIMED. IN NO EVENT WILL
L&M’S LIABILITY INCLUDE ANY SPECIAL,
INCIDENTAL, CONSEQUENTIAL OR PUNITIVE
DAMAGES, EVEN IF L&M KNEW OF THE
LIKELIHOOD OF SUCH DAMAGES.
L&M’s liability is limited to the rework or
replacement (at L&M’s sole option) of products or
parts manufactured by L&M that are determined by
L&M to be defective in workmanship or material or
do not meet L&M’s quoted specifications.
L&M product warranty does not apply if the product
has been subjected to abnormal use or conditions,
unauthorized modifications or repair, corrosion,
misuse, neglect, abuse, accident, improper
installation, or other acts which are not the fault of
L&M, including damage caused by shipping.
Any action or lawsuit for breach of the limited
warranty in these L&M terms and conditions
must be commenced in Minnesota. This warranty
supersedes all previously published warranties.
MESABI ® PRODUCT
SPECIFIC WARRANTY
ALUMINUM TUBE
CHARGE AIR COOLER
MESABI® aluminum tube
charge air coolers are
covered by the L&M General
Warranty along with the
following Product Specific
Warranty:
L&M Radiator warrants
MESABI® aluminum tube
charge air coolers against
seal leakage during normal
operation for 18 months from
date of invoice.
3
Standard Parts – MESABI Charge Air Cooler
®
8
1
9
2
10
7
5
3
4
Exploded View – High Efficiency
Aluminum Tube Charge Air Cooler
DESCRIPTION
6
12
11
1
1.
2.
3.
4.
5.
6.
7.
8.
9.
10.
11.
12.
PART NO.
Seal........................................................... 103997
Retainer Bar................................ refer to parts list
Retainer Bolt (5/16” x 21/2”, 18-855) ......... 64801.09
Washer................................................ 106900.01
O-Ring................................................. 106902.01
Allen Wrench (3/16” for retainer bolt)......... standard
Retainer Bar (tapped)................. refer to parts list
Inspection Mirror....................................... 104574
Brush.......................................................... 63451
Seal Tool..................................................... 97892
Tube Assembly Tool................................. 105760
Support Bar................................. refer to parts list
Assembly Lubricant (not shown)............... 100276
4
External Cleaning and Tube Removal
Fig.1
Helpful Hints:
• Read this manual thoroughly
• Work in a clean environment
• Good lighting is a must
• Use the proper tools and lubricant
• Call L&M Customer Service with questions
External Cleaning
To maintain efficiency and assure maximum life of
a MESABI ® Charge Air Cooler, reasonable care
must be taken when cleaning. In some cases it may be best to blow out any dry dirt
with shop air prior to washing the core with a high
pressure hot water wash. If there is any doubt about the
cleaning method to be used, try the method on a portion
of a single tube first, or contact L&M Customer Service.
Removing MESABI® Tubes
After a thorough cleaning as described previously, blow
the cooler dry, then remove the retainer bar from tubes
as shown. When reinstalling tubes, the long unfinned
tube end and retainer bar will need to be installed at this
tank – see figure 14, page 6. Use a standard 3/16” Allen
wrench to remove bolts from retainer bar. NOTE: Mark
the tank from which the retainer bar is removed.
Fig.2
Fig.3
For g eneral ex ter nal c leaning, high pressure
hot water (with or without soap) can be used at
pressures up to 1200 psi (8274 kPa). (CAUTION!
To prevent fin deformation, stay at least 6” away
from the core and you must spray straight into
the core – not at an angle. If the cooler is still
in the machine, you may have to use an offset
angled nozzle so that you can spray straight into
the core. If there is any doubt, try your cleaning
method on a small portion of the core first.)
It is important to start on the air exit side. Work from
the top to the bottom. Concentrate on small areas and
work slowly. Wash until the water exiting the opposite
side is free from dirt and debris. Complete this side and
then repeat the process from the other side.
Many radiator shops use a hot alkaline soap or caustic
soda in their boil-out tanks with chemical additives.
Soaking in high pH solutions may damage the
aluminum alloy, depending on the exact characteristics
of the solution. Solutions that are either too alkaline
(pH>9.0) or too acidic (pH<5.0) are not recommended.
Slide the front end of the tube assembly tool
between the header plate and the fin on a single
tube. Then squeeze the handle together. The tube
will become free from the lower seal. With the tube
tool still on the tube, pull the tube out of the core as
shown in Fig 2. Then remove tool and use hands to
pull tube from upper seal as shown in Fig 3.
CAUTION: Minimize the removal angle and do
not force the tube out. Care must be taken to
not damage the tube.
5
Seal Removal and Header Plate Preparation
After the tubes are removed, clean the header plate area with a high
pressure washer; then blow the inside and outside surfaces of the
tanks thoroughly dry with air.
CAUTION: Following these steps
carefully will help ensure the seals are
removed properly, and that the seal
groove is not scratched or marred.
s
Fig. 4 Insert the pick end of the
seal tool under the seal and
pull out slightly.
Fig. 6 Insert a clean brush into the
Fig. 5 Insert the seal tool between the
seal and groove then remove the seal
from the groove.
header plate tube hole. Rotate the
brush to remove any debris that
may be in the groove. Use clean
compressed air to blow tanks clean.
(Seals that are inadvertently
dropped into tank must be
removed.)
Fig. 7 With a clean brush apply
assembly lubricant to the seal groove.
Do this by putting lubricant on the
brush, and inserting it into the seal
groove and use a twisting motion to
spread an even coat in groove. (Use
a pea sized amount of lubricant per
hole.)
New Seal Installation
Fig. 9 With your finger, push the other
Fig. 8 Use the flat hooked end of the
seal tool, pull the seal into an oval
shape and insert one end of seal into
the seal groove.
Fig. 10 Use the back of the seal
s
end of the seal into the groove while
controlling the opposing end with the
flat end of the seal tool.
tool to press the seal firmly into the
groove.
Fig. 11 To avoid pinching the seal
between the tube and groove, a small
amount of lubricant may be needed to
hold the seal tightly to the long sides of
the groove.
NOTE: The seal needs to be
completely seated into the
groove in order for tube to be
installed properly.
s
Fig.12 Use the brush to smooth any
excess lubricant.
6
Tube Installation
IMPORTANT: Before inserting new or original tubes into the header plates,
new seals must be installed and lubricated properly.
Fig. 13 Prior to installing tubes, the tube ends must
be clean and undamaged. (A cloth buffing wheel can
be used.) Precaution should be taken when buffing
so as not to mar the tube finish. Use a brush and
assembly lubricant to apply a thin film on the first
1/4” of tube ends.
s
Fig. 14 At a convenient starting
point, push the top end of the tube
(end with the longest unfinned
section) into the tank marked
earlier when the retainer bar was
removed. See Figure 1.
Fig. 15 Place the bottom
end of the tube into respective
seal in the bottom header plate.
CAUTION: Minimize the
insertion angle and do not
force the tube. Care must
be taken not to damage
seal or tube.
Fig. 16 Push the tube
down and into the seal until
the fin is located on top
of the header plate. This
can usually be done by
grasping the tube with
your hands and pulling
downward until seated, or
by using the tube assembly
tool.
CAUTION: Be sure the
tube is properly centered
in the seal before pushing
the tube into place.
Fig. 17 Using a light and inspection mirror, inspect
each seal after tube insertion. Look for seal
protruding into the tank.
7
Retainer Bar Installation and Final Assembly
Fig.18 Retainer bar system.
NOTE: Use high temperature anti-seize product on
Fig.19 Insert the tapped (threaded) retainer bar into the
back side of the cooler.
Fig. 20 Insert the front retainer bar, with retainer bolts,
Fig. 21 With a 3/16” Allen wrench, tighten bolts to
threads to aid in removal.
washers and o-rings through cooler.
45 inch pounds of torque.
Pressure Testing
Pressure testing procedure that follows recommends
testing to 50 psi (345 kPa). You should test to pressure
rating specified on tag attached to your cooler. If there
is no pressure rating specified, please contact L&M
Customer Service with the part number of your cooler.
Always bring pressure up slowly and use personal
protection gear. Tube retainer and support bars (if
applicable) must be installed prior to testing.
1. Install fittings or cover plates in or over all ports. One port
to have an air supply connector.
2. Pressurize with shop line pressure not exceeding 50 psi
(345 kPa) and submerge in water. Repair or tighten fittings
• If you have any questions regarding the procedures described in this Service
Manual, please contact L&M Radiator and ask for Customer Service. See back
page for contact information.
to eliminate leaking. Note that air bubbles from trapped air in
exterior pockets could appear for 10 to 15 minutes. This is
normal. Repeat as needed until no leaks are detected.
3. After successful pre-testing to find and repair major leaks,
then cycle test. Pressurize to 50 psi (345 kPa) and hold
submerged for 15 minutes. Repair any leaks that occur
and repeat until you have reached a 15 minute time period
successfully. Then cycle to zero and pressure back to 50
psi (345 kPa) and hold for one minute. Repeat this process
three more times and hold the last cycle for five minutes.
After any repairs in this stage, start the cycling testing over
from the beginning until you have a successful test.
• All information, illustrations and specifications in this Service Manual are based on
the latest information at the time of publication or posting online at www.MESABI.com. The right is reserved to make changes at any time without notice.
MESABI heat exchangers are the world
standard for heat exchanger reliability
®
L & M Q u ali t y Pol i c y
L & M R a d i a tor F a c tor y - D i r e c t S a l e s a n d S e r v i c e
“The Quality Policy of L&M Radiator
is to produce a quality engineered,
quality manufactured product through
continuous improvement that we deliver
to the customer’s satisfaction.”
Because so many of our radiators and heat exchangers are a custom
design, all sales are on a factory-direct basis. This assures that our customers
receive a product that meets their cooling/heating requirements, offered to them
at the least possible price.
We ship most parts within 24 hours. On-site technical and engineering
assistance is available almost anywhere in the world within a few days notice.
Manufactured and distributed by:
Radiator
Toll Free: 800-346-3500 (U.S.A. and Canada)
Web Site: MESABI.com
Email: [email protected]
UNITED STATES
WORLD HEADQUARTERS
L&M Radiator, Inc.
1414 East 37th Street
Hibbing, Minnesota 55746 U.S.A.
Telephone: (218) 263-8993
Fax: (218) 263-8234
MEXICO
L&M Radiator, Inc.
Hibbing, Minnesota U.S.A.
L&M Radiator, Inc.
Independence, Iowa U.S.A.
L&M Radiator, Inc.
El Paso, Texas U.S.A.
L&M Radiator, Inc.
Yankton, South Dakota U.S.A.
L y M de Mexico S.A. de C.V.
Calle De La Plata y Los Nogales
Parque Industrial
Hermosillo, Sonora, Mexico
Telephone: 011-52-662-251-0480
Fax: 011-52-662-251-0638
Email: [email protected]
ISO
CERTIFIED
ISO
CERTIFIED
AUSTRALIA
L&M Radiator Pty. Ltd.
Cnr. Kew & Kathleen Streets
Welshpool, Western Australia 6016
Telephone: +61-8-93616855
Fax: +61-8-94703075
Email: [email protected]
MESABI® is a registered trademark of L&M Radiator, Inc.
Copyright © 2011 L&M Radiator, Inc.