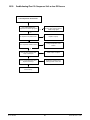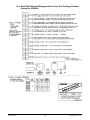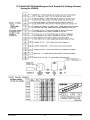
1
MaximICE
®
LIQUID ICE TES SYSTEM
ORE-25, 50, & 100
OWNER’S MANUAL
PART NO. 9840502
EFFECTIVE SEPTEMBER 1, 1998
REVISED DECEMBER 1, 2000
®
THERMAL STORAGE PRODUCTS
Part No. 9840502
®
MaximICE® LIQUID ICE TES SYSTEM
ORE-25, 50, & 100 OWNER’S MANUAL
TABLE OF CONTENTS
Section 1.0 - Introduction
1.0
1.1
1.2
Introduction . . . . . . . . . . . . . . . . . . . . . . . . . . . . . . . . . . . . . . . . . . . . . . . . . . . . . . . . . . . . . . . . . . . .1
Delivery Inspection . . . . . . . . . . . . . . . . . . . . . . . . . . . . . . . . . . . . . . . . . . . . . . . . . . . . . . . . . . . . . . .1
Safety Considerations . . . . . . . . . . . . . . . . . . . . . . . . . . . . . . . . . . . . . . . . . . . . . . . . . . . . . . . . . . . . .1
Section 2.0 - Thermal Storage System - System Overview
2.0
2.1
2.2
2.3
Thermal Storage System - System Overview
Refrigeration Circuit . . . . . . . . . . . . . . . . .
Ice-Build Circuit . . . . . . . . . . . . . . . . . . . .
Building Cooling Circuit . . . . . . . . . . . . . .
.
.
.
.
.
.
.
.
.
.
.
.
.
.
.
.
.
.
.
.
.
.
.
.
.
.
.
.
.
.
.
.
.
.
.
.
.
.
.
.
.
.
.
.
.
.
.
.
.
.
.
.
.
.
.
.
.
.
.
.
.
.
.
.
.
.
.
.
.
.
.
.
.
.
.
.
.
.
.
.
.
.
.
.
.
.
.
.
.
.
.
.
.
.
.
.
.
.
.
.
.
.
.
.
.
.
.
.
.
.
.
.
.
.
.
.
.
.
.
.
.
.
.
.
.
.
.
.
.
.
.
.
.
.
.
.
.
.
.
.
.
.
.
.
.
.
.
.
.
.
.
.
.
.
.
.
.
.
.
.
.
.
.
.
.
.
.
.
.
.
.
.
.
.
.
.
.2
.2
.2
.3
Section 3.0 - Installation
3.0
3.1
3.2
3.3
3.4
3.5
3.6
3.7
3.8
3.9
3.10
3.11
3.12
3.13
3.14
3.15
3.16
3.17
3.18
3.19
3.20
3.21
3.22
3.23
Installation . . . . . . . . . . . . . . . . . . . . . . . . . . . . . . . . . . . . . . . . . . . . . . . . . . . . . . . . . . . . . . . . . . . . .4
Equipment Rigging . . . . . . . . . . . . . . . . . . . . . . . . . . . . . . . . . . . . . . . . . . . . . . . . . . . . . . . . . . . . . .4
Foundation . . . . . . . . . . . . . . . . . . . . . . . . . . . . . . . . . . . . . . . . . . . . . . . . . . . . . . . . . . . . . . . . . . . . .4
Anchoring . . . . . . . . . . . . . . . . . . . . . . . . . . . . . . . . . . . . . . . . . . . . . . . . . . . . . . . . . . . . . . . . . . . . . .4
Figure 1—Anchorage Details . . . . . . . . . . . . . . . . . . . . . . . . . . . . . . . . . . . . . . . . . . . . . . . . . . . . . . . .4
Serviceability . . . . . . . . . . . . . . . . . . . . . . . . . . . . . . . . . . . . . . . . . . . . . . . . . . . . . . . . . . . . . . . . . . .5
Shipping Charge . . . . . . . . . . . . . . . . . . . . . . . . . . . . . . . . . . . . . . . . . . . . . . . . . . . . . . . . . . . . . . . . .5
Remote Refrigeration Piping . . . . . . . . . . . . . . . . . . . . . . . . . . . . . . . . . . . . . . . . . . . . . . . . . . . . . . . .5
Refrigerant Piping Pressure Test . . . . . . . . . . . . . . . . . . . . . . . . . . . . . . . . . . . . . . . . . . . . . . . . . . . . . .5
System Evacuation . . . . . . . . . . . . . . . . . . . . . . . . . . . . . . . . . . . . . . . . . . . . . . . . . . . . . . . . . . . . . . .5
Refrigerant Charge . . . . . . . . . . . . . . . . . . . . . . . . . . . . . . . . . . . . . . . . . . . . . . . . . . . . . . . . . . . . . . .5
Condensing Unit . . . . . . . . . . . . . . . . . . . . . . . . . . . . . . . . . . . . . . . . . . . . . . . . . . . . . . . . . . . . . . . . .5
Electrical . . . . . . . . . . . . . . . . . . . . . . . . . . . . . . . . . . . . . . . . . . . . . . . . . . . . . . . . . . . . . . . . . . . . . . .6
Electrical Specifications: ORE-25 . . . . . . . . . . . . . . . . . . . . . . . . . . . . . . . . . . . . . . . . . . . . . . . . . . . . .6
Electrical Specifications: ORE-50 . . . . . . . . . . . . . . . . . . . . . . . . . . . . . . . . . . . . . . . . . . . . . . . . . . . . .6
Electrical Specifications: ORE-100 . . . . . . . . . . . . . . . . . . . . . . . . . . . . . . . . . . . . . . . . . . . . . . . . . . . .7
Ice Storage Tank - Full Ice Sensor Option . . . . . . . . . . . . . . . . . . . . . . . . . . . . . . . . . . . . . . . . . . . . . .7
Ice Storage Tank - Vent Line . . . . . . . . . . . . . . . . . . . . . . . . . . . . . . . . . . . . . . . . . . . . . . . . . . . . . . . .7
Ice Storage Tank - Spraying System . . . . . . . . . . . . . . . . . . . . . . . . . . . . . . . . . . . . . . . . . . . . . . . . . . .7
Glycol Solution Specification . . . . . . . . . . . . . . . . . . . . . . . . . . . . . . . . . . . . . . . . . . . . . . . . . . . . . . . .7
Freeze Protection . . . . . . . . . . . . . . . . . . . . . . . . . . . . . . . . . . . . . . . . . . . . . . . . . . . . . . . . . . . . . . . .9
Insulation . . . . . . . . . . . . . . . . . . . . . . . . . . . . . . . . . . . . . . . . . . . . . . . . . . . . . . . . . . . . . . . . . . . . . .9
ORE Drive Assembly . . . . . . . . . . . . . . . . . . . . . . . . . . . . . . . . . . . . . . . . . . . . . . . . . . . . . . . . . . . . . .9
Figure 2—ORE Drive Assembly Detail . . . . . . . . . . . . . . . . . . . . . . . . . . . . . . . . . . . . . . . . . . . . . . . .10
Gravity Feed System . . . . . . . . . . . . . . . . . . . . . . . . . . . . . . . . . . . . . . . . . . . . . . . . . . . . . . . . . . . . .10
Figure 3—MaximICE ORE-25 Drive Assembly . . . . . . . . . . . . . . . . . . . . . . . . . . . . . . . . . . . . . . . . . . .11
Figure 4—MaximICE ORE-50 Drive Assembly . . . . . . . . . . . . . . . . . . . . . . . . . . . . . . . . . . . . . . . . . . .12
Figure 5—MaximICE ORE-100 Drive Assembly . . . . . . . . . . . . . . . . . . . . . . . . . . . . . . . . . . . . . . . . . .13
Figure 6—ORE Countercrank Assembly . . . . . . . . . . . . . . . . . . . . . . . . . . . . . . . . . . . . . . . . . . . . . . .14
Packing Material(s) . . . . . . . . . . . . . . . . . . . . . . . . . . . . . . . . . . . . . . . . . . . . . . . . . . . . . . . . . . . . . .15
Figure 7—MaximICE Refrigeration Schematic Diagram . . . . . . . . . . . . . . . . . . . . . . . . . . . . . . . . . . . .15
TABLE OF CONTENTS - CONTINUED
Section 10.0 - Troubleshooting Failures
10.1
10.2
10.3
10.4
10.5
10.6
10.7
10.8
10.9
10.10
10.11
Low-Pressure Evaporator - Freeze-Up Protection Alarm
Unit Fails on Vent Switch . . . . . . . . . . . . . . . . . . . . . . .
Unit Will Not Start . . . . . . . . . . . . . . . . . . . . . . . . . . . .
Compressor Operates with High Discharge Pressure . . .
Compressor Operates with Low Suction Pressure . . . . .
System Will Not Make Ice . . . . . . . . . . . . . . . . . . . . . .
Compressor Fails on Motor Overload . . . . . . . . . . . . . .
System Will Not Cool Building/Process Load . . . . . . . .
Excessive Evaporator Shell Vibration . . . . . . . . . . . . . .
Compressor Fails on Low Oil Pressure . . . . . . . . . . . . .
Excessive Wear . . . . . . . . . . . . . . . . . . . . . . . . . . . . . .
.
.
.
.
.
.
.
.
.
.
.
.
.
.
.
.
.
.
.
.
.
.
.
.
.
.
.
.
.
.
.
.
.
.
.
.
.
.
.
.
.
.
.
.
.
.
.
.
.
.
.
.
.
.
.
.
.
.
.
.
.
.
.
.
.
.
.
.
.
.
.
.
.
.
.
.
.
.
.
.
.
.
.
.
.
.
.
.
.
.
.
.
.
.
.
.
.
.
.
.
.
.
.
.
.
.
.
.
.
.
.
.
.
.
.
.
.
.
.
.
.
.
.
.
.
.
.
.
.
.
.
.
.
.
.
.
.
.
.
.
.
.
.
.
.
.
.
.
.
.
.
.
.
.
.
.
.
.
.
.
.
.
.
.
.
.
.
.
.
.
.
.
.
.
.
.
.
.
.
.
.
.
.
.
.
.
.
.
.
.
.
.
.
.
.
.
.
.
.
.
.
.
.
.
.
.
.
.
.
.
.
.
.
.
.
.
.
.
.
.
.
.
.
.
.
.
.
.
.
.
.
.
.
.
.
.
.
.
.
.
.
.
.
.
.
.
.
.
.
.
.
.
.
.
.
.
.
.
.
.
.
.
.
.
.
.
.
.
.
.
.
.
.
.
.
.
.
.
.
.
.
.
.
.
.
.
.
.
.
.
.
.
.
.
.
.
.
.
.
.
.
.
.
.
.
.
.
.
.
.
.
.
.
.
.
.
.
.
.
.
.
.
.
.
.
.
.
.
.
.
.
.
.
.
.
.
.
.
.
.
.
.
.
.
.
.
.
.
.
.
.
.
.
.
.
.
.
.
.
.
.
.
.
.
.
.
.
.
.
.
.
.
.
.
.33
.34
.35
.36
.37
.38
.39
.40
.41
.42
.43
.
.
.
.
.
.
.
.
.
.
.
.
.
.
.
.
.
.
.
.
.
.
.
.
.
.
.
.
.
.
.
.
.
.
.
.
.
.
.
.
.
.
.
.
.
.
.
.
.
.
.
.
.
.
.
.
.
.
.
.
.
.
.
.
.
.
.
.
.
.
.
.
.
.
.
.
.
.
.
.
.
.
.
.
.
.
.
.
.
.
.
.
.
.
.
.
.
.
.
.
.
.
.
.
.
.
.
.
.
.
.
.
.
.
.
.
.
.
.
.
.
.
.
.
.
.
.
.
.
.
.
.
.
.
.
.
.
.
.
.
.
.
.
.
.
.
.
.
.
.
.
.
.
.
.
.
.
.
.
.
.
.
.
.
.
.
.
.
.
.
.
.
.
.
.
.
.
.
.
.
.
.
.
.
.
.
.
.
.
.
.
.
.
.
.
.
.
.
.
.
.
.
.
.
.
.
.
.
.
.
.
.
.
.
.
.
.
.
.
.
.
.
.
.
.
.
.
.
.
.
.
.
.
.
.
.
.
.
.44
.44
.44
.45
.45
.45
.45
Section 11.0 - Start-Up Requirements
11.1
11.2
11.3
11.4
11.5
11.6
11.7
MaximICE Start-Up Request Form . . . . . . . . . . . .
MaximICE Evaporator Unit . . . . . . . . . . . . . . . . . .
Refrigerant Piping for Remote Condenser Systems
Water Piping . . . . . . . . . . . . . . . . . . . . . . . . . . . .
Electrical . . . . . . . . . . . . . . . . . . . . . . . . . . . . . . .
Installing Contractor Shall Furnish the Following .
Compressor Package . . . . . . . . . . . . . . . . . . . . . .
.
.
.
.
.
.
.
.
.
.
.
.
.
.
.
.
.
.
.
.
.
.
.
.
.
.
.
.
Section 12.0 - Wiring Diagram
12.1 Schematic Wiring Diagram (50 hz), Part No. 9841026 . . . . . . . . . . . . . . . . . . . . . . . . . . . . . . . . . . . . .46
12.2 Schematic Wiring Diagram (60 hz), Part No. 9823978 . . . . . . . . . . . . . . . . . . . . . . . . . . . . . . . . . . . . .47
Section 13.0 - Equipment Specifications
13.1
13.2
13.3
13.4
13.5
13.6
13.7
13.8
13.9
13.10
13.11
13.12
Model
Model
Model
Model
Model
Model
Model
Model
Model
Model
Model
Model
ORE-25, Flooded Refrigerant Feed, Pumped Slush Discharge, Drawing No. 8200139 . . . . . . . . .48
ORE-25, Flooded Refrigerant Feed, Pumped Slush Discharge Schematic, Drawing No. 8200146 .49
ORE-25, Flooded Refrigerant Feed, Gravity Slush Discharge, Drawing No. 8200153 . . . . . . . . . .50
ORE-25, Flooded Refrigerant Feed, Gravity Slush Discharge Schematic, Drawing No. 8200160 . .51
ORE-50, Flooded Refrigerant Feed, Pumped Slush Discharge, Drawing No. 8200140 . . . . . . . . .52
ORE-50, Flooded Refrigerant Feed, Pumped Slush Discharge Schematic, Drawing No. 8200147 .53
ORE-50, Flooded Refrigerant Feed, Gravity Slush Discharge, Drawing No. 8200154 . . . . . . . . . .54
ORE-50, Flooded Refrigerant Feed, Gravity Slush Discharge Schematic, Drawing No. 8200161 . .55
ORE-100, Flooded Refrigerant Feed, Pumped Slush Discharge, Drawing No. 8200141 . . . . . . . .56
ORE-100, Flooded Refrigerant Feed, Pumped Slush Discharge Schematic, Drawing No. 8200148 57
ORE-100, Flooded Refrigerant Feed, Gravity Slush Discharge, Drawing No. 8200155 . . . . . . . . .58
ORE-100, Flooded Refrigerant Feed, Gravity Slush Discharge Schematic, Drawing No. 8200162 .59
Section 14.0 - Start-Up Request Form . . . . . . . . . . . . . . . . . . . . . . . . . . . . . . . . . . . . . . . . . . . . . . . . . . .60
Section 15.0 Warranty . . . . . . . . . . . . . . . . . . . . . . . . . . . . . . . . . . . . . . . . . . . . . . . . . . . . . . . . . . . . . . . .61
Notes . . . . . . . . . . . . . . . . . . . . . . . . . . . . . . . . . . . . . . . . . . . . . . . . . . . . . . . . . . . . . . . . . . . . . . . . . . . . . . .62
TABLE OF CONTENTS - CONTINUED
Section 4.0 - Pre Start-Up/Installation Requirements
4.1
4.2
4.3
4.4
4.5
4.6
Evaporator Unit Drive . . . . . . .
Water Loop/Piping . . . . . . . . . .
Electrical . . . . . . . . . . . . . . . . . .
Refrigerant Piping . . . . . . . . . . .
Start-Up Coordination/Inspection
Start-Up Policy . . . . . . . . . . . . .
.
.
.
.
.
.
.
.
.
.
.
.
.
.
.
.
.
.
.
.
.
.
.
.
.
.
.
.
.
.
.
.
.
.
.
.
.
.
.
.
.
.
.
.
.
.
.
.
.
.
.
.
.
.
.
.
.
.
.
.
.
.
.
.
.
.
.
.
.
.
.
.
.
.
.
.
.
.
.
.
.
.
.
.
.
.
.
.
.
.
.
.
.
.
.
.
.
.
.
.
.
.
.
.
.
.
.
.
.
.
.
.
.
.
.
.
.
.
.
.
.
.
.
.
.
.
.
.
.
.
.
.
.
.
.
.
.
.
.
.
.
.
.
.
.
.
.
.
.
.
.
.
.
.
.
.
.
.
.
.
.
.
.
.
.
.
.
.
.
.
.
.
.
.
.
.
.
.
.
.
.
.
.
.
.
.
.
.
.
.
.
.
.
.
.
.
.
.
.
.
.
.
.
.
.
.
.
.
.
.
.
.
.
.
.
.
.
.
.
.
.
.
.
.
.
.
.
.
.
.
.
.
.
.
.
.
.
.
.
.
.
.
.
.
.
.
.
.
.
.
.
.
.
.
.
.
.
.
.
.
.
.
.
.
.
.
.
.
.
.
.
.
.
.
.
.
.
.
.
.
.
.
.
.
.
.
.
.
.
.
.
.
.
.
.
.
.
.
.
.
.
.
.
.
.
.
.16
.16
.17
.17
.17
.17
Section 5.0 - Start-Up/Refrigerant Charging
5.0
Start-Up/Refrigerant Charging . . . . . . . . . . . . . . . . . . . . . . . . . . . . . . . . . . . . . . . . . . . . . . . . . . . . . .18
Section 6.0 - Sequence Of Control
6.0
6.1
6.2
6.3
6.4
6.5
Sequence of Control . . . . . .
Start-Up Sequence . . . . . . . .
Shutdown Sequence . . . . . .
Restart Sequence . . . . . . . . .
Alarm Condition Sequence .
Additional Control Elements
.
.
.
.
.
.
.
.
.
.
.
.
.
.
.
.
.
.
.
.
.
.
.
.
.
.
.
.
.
.
.
.
.
.
.
.
.
.
.
.
.
.
.
.
.
.
.
.
.
.
.
.
.
.
.
.
.
.
.
.
.
.
.
.
.
.
.
.
.
.
.
.
.
.
.
.
.
.
.
.
.
.
.
.
.
.
.
.
.
.
.
.
.
.
.
.
.
.
.
.
.
.
.
.
.
.
.
.
.
.
.
.
.
.
.
.
.
.
.
.
.
.
.
.
.
.
.
.
.
.
.
.
.
.
.
.
.
.
.
.
.
.
.
.
.
.
.
.
.
.
.
.
.
.
.
.
.
.
.
.
.
.
.
.
.
.
.
.
.
.
.
.
.
.
.
.
.
.
.
.
.
.
.
.
.
.
.
.
.
.
.
.
.
.
.
.
.
.
.
.
.
.
.
.
.
.
.
.
.
.
.
.
.
.
.
.
.
.
.
.
.
.
.
.
.
.
.
.
.
.
.
.
.
.
.
.
.
.
.
.
.
.
.
.
.
.
.
.
.
.
.
.
.
.
.
.
.
.
.
.
.
.
.
.
.
.
.
.
.
.
.
.
.
.
.
.
.
.
.
.
.
.
.
.
.
.
.
.
.
.
.
.
.
.
.
.
.
.
.
.
.
.
.
.
.
.
.
.
.
.
.
.
.
.
.
.
.
.
.
.
.
.
.
.
.19
.19
.19
.20
.20
.20
Label, Danger, “Unit Starts Up Automatically” . . . . . . . .
Label, Electric Symbol, Part No. 8820623 . . . . . . . . . . .
Label, Danger, “High Voltage” . . . . . . . . . . . . . . . . . . .
Label, Caution, “Do Not Run Dry,” Part No. 8850229 . . .
Label, Caution, “If The Bearing Gap,” Part No. 9842772
Equipment dB Ratings . . . . . . . . . . . . . . . . . . . . . . . . .
.
.
.
.
.
.
.
.
.
.
.
.
.
.
.
.
.
.
.
.
.
.
.
.
.
.
.
.
.
.
.
.
.
.
.
.
.
.
.
.
.
.
.
.
.
.
.
.
.
.
.
.
.
.
.
.
.
.
.
.
.
.
.
.
.
.
.
.
.
.
.
.
.
.
.
.
.
.
.
.
.
.
.
.
.
.
.
.
.
.
.
.
.
.
.
.
.
.
.
.
.
.
.
.
.
.
.
.
.
.
.
.
.
.
.
.
.
.
.
.
.
.
.
.
.
.
.
.
.
.
.
.
.
.
.
.
.
.
.
.
.
.
.
.
.
.
.
.
.
.
.
.
.
.
.
.
.
.
.
.
.
.
.
.
.
.
.
.
.
.
.
.
.
.
.
.
.
.
.
.
.
.
.
.
.
.
.
.
.
.
.
.
.
.
.
.
.
.
.
.
.
.
.
.
.21
.21
.21
.22
.22
.22
Maintenance . . . . . . . . . . . . . . . . . . . . . . . . . . . . . . . . . . .
Daily Checks . . . . . . . . . . . . . . . . . . . . . . . . . . . . . . . . . . .
Recommended Inspection Procedures . . . . . . . . . . . . . . . .
Figure 8—Drive Plate Inspection Criteria . . . . . . . . . . . . . .
Figure 9—Drive Plate Inspection Criteria . . . . . . . . . . . . . .
Figure 10—Countercrank Inspection Criteria . . . . . . . . . . . .
Figure 11—Whip Rod Inspection Criteria . . . . . . . . . . . . . .
Figure 12—Bearing Sleeve Inspection Criteria . . . . . . . . . . .
Figure 13—Tube Insert Inspection Criteria . . . . . . . . . . . . .
Figure 14—Eccentric Crank Inspection Criteria . . . . . . . . . .
Recommended Drive Component(s) Replacement Schedule
Recommended Monitoring Points . . . . . . . . . . . . . . . . . . . .
.
.
.
.
.
.
.
.
.
.
.
.
.
.
.
.
.
.
.
.
.
.
.
.
.
.
.
.
.
.
.
.
.
.
.
.
.
.
.
.
.
.
.
.
.
.
.
.
.
.
.
.
.
.
.
.
.
.
.
.
.
.
.
.
.
.
.
.
.
.
.
.
.
.
.
.
.
.
.
.
.
.
.
.
.
.
.
.
.
.
.
.
.
.
.
.
.
.
.
.
.
.
.
.
.
.
.
.
.
.
.
.
.
.
.
.
.
.
.
.
.
.
.
.
.
.
.
.
.
.
.
.
.
.
.
.
.
.
.
.
.
.
.
.
.
.
.
.
.
.
.
.
.
.
.
.
.
.
.
.
.
.
.
.
.
.
.
.
.
.
.
.
.
.
.
.
.
.
.
.
.
.
.
.
.
.
.
.
.
.
.
.
.
.
.
.
.
.
.
.
.
.
.
.
.
.
.
.
.
.
.
.
.
.
.
.
.
.
.
.
.
.
.
.
.
.
.
.
.
.
.
.
.
.
.
.
.
.
.
.
.
.
.
.
.
.
.
.
.
.
.
.
.
.
.
.
.
.
.
.
.
.
.
.
.
.
.
.
.
.
.
.
.
.
.
.
.
.
.
.
.
.
.
.
.
.
.
.
.
.
.
.
.
.
.
.
.
.
.
.
.
.
.
.
.
.
.
.
.
.
.
.
.
.
.
.
.
.
.
.
.
.
.
.
.
.
.
.
.
.
.
.
.
.
.
.
.
.
.
.
.
.
.
.
.
.
.
.
.
.
.
.
.
.
.
.
.
.
.
.
.
.
.
.
.
.
.
.
.
.
.
.
.23
.23
.23
.24
.25
.26
.27
.28
.29
.29
.30
.30
.
.
.
.
.
.
.
.
.
.
.
.
.
.
.
.
.
.
.
.
.
.
.
.
.
.
.
.
.
.
.
.
.
.
.
.
.
.
.
.
.
.
.
.
.
.
.
.
.
.
.
.
.
.
.
.
.
.
.
.
.
.
.
.
.
.
.
.
.
.
.
.
.
.
.
.
.
.
.
.
.
.
.
.
.
.
.
.
.
.
.
.
.
.
.
.
.
.
.
.
.
.
.
.
.
.
.
.
.
.
.
.
.
.
.
.
.
.
.
.
.
.
.
.
.
.
.
.
.
.
.
.
.
.
.
.
.
.
.
.
.
.
.
.
.
.
.
.
.
.
.
.
.
.
.
.31
.31
.31
.31
.32
Section 7.0 - Safety
7.1
7.2
7.3
7.4
7.5
7.6
Section 8.0 - Maintenance
8.0
8.1
8.2
8.3
8.4
Section 9.0 - Recommended Spare Parts
9.0
9.1
9.2
9.3
9.4
Recommended Spare Parts
ORE Common Parts . . . . .
ORE-25 Parts . . . . . . . . . .
ORE-50 Parts . . . . . . . . . .
ORE-100 Parts . . . . . . . . .
.
.
.
.
.
.
.
.
.
.
.
.
.
.
.
.
.
.
.
.
.
.
.
.
.
.
.
.
.
.
.
.
.
.
.
.
.
.
.
.
.
.
.
.
.
.
.
.
.
.
.
.
.
.
.
.
.
.
.
.
.
.
.
.
.
.
.
.
.
.
.
.
.
.
.
.
.
.
.
.
.
.
.
.
.
.
.
.
.
.
.
.
.
.
.
.
.
.
.
.
.
.
.
.
.
.
.
.
.
.
.
.
.
.
.
.
.
.
.
.
.
.
.
.
.
SECTION 1.0 - INTRODUCTION
1.0
Introduction
The MaximICE® evaporator assembly is a thermal energy storage system intended for producing a large
amount of ice slurry. The ice slurry is used to take advantage of off-peak electrical power usage (usually
at night). The ice slurry is then used during the on-peak electrical usage periods for air-conditioning or
process cooling. This in turn reduces the electrical demand usage and energy costs. Compared to
traditional cooling systems, the MaximICE system utilizes smaller equipment, thus reducing capital cost.
The MaximICE should only be operated by trained personnel and serviced by qualified electrical and
refrigeration technicians. Any use of the equipment not covered by the instructions is prohibited.
This manual has been prepared to present to the owner and service technician the installation, operation,
and maintenance procedures recommended by Paul Mueller Company for the MaximICE thermal storage
system. The installation plans, piping layouts, etc., must be detailed in accordance with local codes. If
you are uncertain about any installation or operating procedure outlined in this manual, please contact
the Mueller Thermal Storage Department for guidance at 1-800-683-5537 or (417) 831-3000.
1.1
Delivery Inspection
Each MaximICE evaporator is tested (operational or electrical test) at the factory prior to shipment;
however, damage can occur during shipment. The unit should be thoroughly inspected upon arrival at
the installation site. Any damage noted should be reported immediately to the transportation company
so that an authorized transportation representative can examine the unit, determine the extent of the
damage, and take the necessary steps to rectify the claim. At the same time, a Paul Mueller Company
representative should be notified of any claim made.
1.2
Safety Considerations
Installation, start-up, and service of this equipment pose hazards due to automatic equipment
operation, high system pressure, and electrical power service. It is extremely important to consider all
aspects of safety when working on or around machinery and high voltage. This equipment will be
connected to a high-voltage and/or current power supply which can seriously injure or kill a worker.
There is moving equipment which can start automatically and cause serious injury. It is imperative that
only qualified service personnel install and service this equipment.
This equipment is designed for use with and contains R-22 hydrochlorofluorocarbon (HCFC),
R-717 ammonia or other types of refrigerant. This equipment shall be serviced and disposed
of in accordance with the current Ozone Depleting Substance Regulation - Clean Environment
Act.
When working on this equipment, observe precautions identified in the literature provided, any tags,
stickers, and labels attached to the equipment, and any other safety precautions that apply.
▲ Follow all applicable safety codes.
▲ Wear safety glasses and work gloves.
▲ Use care in handling, rigging, and setting bulky equipment.
MaximICE TES-ORE 25-100 Owner’s Manual
Part No. 9840502
1
Effective September 1, 1998
Revised December 1, 2000
SECTION 2.0 - THERMAL STORAGE SYSTEM - SYSTEM OVERVIEW
2.0
Thermal Storage System - System Overview
It is very important that each component be properly sized and selected. Extreme care must be taken if
individual component(s) are selected and supplied by others. System performance and operation can
be compromised if any part of the system is incorrectly sized.
The typical MaximICE system consists of three individual circuits: refrigeration circuit, ice building
circuit, and cooling circuit. The working system includes an ice storage tank, plate-and-frame heat
exchanger, coolant pump(s), temperature control valve, and piping. The following information
describes each component of the system, along with its operational function.
2.1
Refrigeration Circuit
The expansion device consists of a standard (Sporlan) expansion valve equipped with a Level-Master
(LMC). The bulb of a conventional thermostatic element has been modified to an insert-type bulb
which incorporates a low-wattage electrical heater. The bulb is installed within a canister which is
attached to the Low-Pressure Receiver (LPR). As the refrigerant level drops, electrically added heat
increases pressure within the thermostatic element and opens the valve.
As the liquid refrigerant level raises, the electrical input is balanced by heat transfer from the bulb to
the liquid refrigerant, and the LMC either modulates or eventually shuts off. Liquid flows from the
condenser to a suction-line heat exchanger (tube in tube) where the refrigerant temperature is cooled
approximately 10°F (5.5°C). The high-pressure liquid then enters the expansion valve flashing to
intermediate pressure, enters the evaporator (bottom), and surrounds the evaporator tubes.
The evaporator is also coupled to the LPR employing a gravity-feed, constant liquid refrigerant
recirculation effect. Gravity-feed liquid flows from the LPR, enters the evaporator (bottom), and mixes
with refrigerant supplied from the expansion valve. A two-phase refrigerant flows from the evaporator
into the accumulator, where dry suction gas is then returned to the compressor. Inside each evaporator
tube is a free hanging 3/8" (9.5 mm) stainless steel rod running the entire tube length. A plastic
countercrank holds the whip rod in place, while a small pin is attached to the drive plate. The drive
motor coupled to the drive plate rotates the attached whip rods continuously (approximately 800 rpm)
during system operation. The drive is equipped with a soft-start system to reduce starting internal
torque. A seal gasket provides an air-tight seal at the drive-shaft penetration point, located on the top
plate. Solution pouring into the evaporator tubes and gravity drains gives up heat to the refrigerant,
producing a boiling effect, pushing liquid/gas out the top. As two-phase refrigerant enters the LPR, gas
velocity is reduced and the separated dry vapor is drawn into the compressor. The whip-rod spinning
action creates a high agitation rate, increasing solution to tube surface contact. The end result is a
highly efficient slurry ice maker (see Figure 7, “MaximICE Refrigeration Schematic Diagram,” on page 15).
2.2
Ice-Build Circuit
The circuit consists of an insulated tank (ice storage tank) with necessary fittings for field plumbing. It
must include an internal water spray system for “burning” ice uniformly during the melt mode. The ice
slurry is pumped to the storage tank, filling the tank as shown from the top down. Once the ice
inventory reaches the full ice, a temperature-sensing device will cycle the unit off.
MaximICE TES-ORE 25-100 Owner’s Manual
Part No. 9840502
2
Effective September 1, 1998
Revised December 1, 2000
2.3
Building Cooling Circuit
The circuit consists of a plate-and-frame heat exchanger, coolant pumps, and temperature regulating
valve. Low-temperature glycol solution is pumped from the bottom of the ice storage tank into the
plate-and-frame heat exchanger and returned over the ice pile via a spraying system. The spraying
system may consist of a specially designed spray ball(s) drilled with holes or a spraying nozzle(s).
Warm building load water is then pumped into the heat exchanger and cooled. Depending on the
building, temperatures may vary from 37-42°F (3-6°C).
NOTE: The ORE glycol solution loop must incorporate a heat exchanger to separate the building
process from the ORE solution loop. This reduces the amount of piping which carries the glycol
solution, minimizing the cost and danger associated with piping leaks. All system fluid piping should
be properly insulated.
MaximICE TES-ORE 25-100 Owner’s Manual
Part No. 9840502
3
Effective September 1, 1998
Revised December 1, 2000
SECTION 3.0 - INSTALLATION
3.0
Installation
NOTE: It is very important in installations where the customer supplies certain components (ice
storage tank, heat exchanger, valves, and/or fittings) that the following information and details are
addressed. PMC shall not be held responsible for performance on systems constructed, piped, or
designed differently than outlined in this manual.
3.1
Equipment Rigging
The MaximICE unit and ice storage tank must be lifted in accordance with industry practice. Lifting
lugs and sleeves are not intended to be used for extended periods of time. The evaporator section is
designed for four-point top lifting only. Please refer to equipment specifications section for weights.
!
▲
CAUTION: A spreader bar must be employed during the lifting process—failure to do so will
result in equipment damage.
3.2
Foundation
MaximICE units should be anchored to a concrete or structural steel base. Due to the varying
conditions across the globe, it is recommended than an architectural engineer be consulted to
determine the thickness of the concrete pad or structural steel in accordance with local codes. The
concrete pad or structural steel must be level within 1/8" (3 mm) to adequately support the refrigeration
equipment.
3.3
Anchoring
According to local codes and practices, the refrigeration equipment should be welded or bolted down
with appropriately sized hold-down anchor bolts (not furnished with equipment) and are to be
securely anchored to the concrete pad by the customer. Refer to Figure 1 below for anchorage details.
Polyethylene tank(s) will require tie-down straps. All applicable seismic zone regulations and proper
construction practices should be considered in areas designed by the state.
Figure 1 - Anchorage Details
MaximICE TES-ORE 25-100 Owner’s Manual
Part No. 9840502
4
Effective September 1, 1998
Revised December 1, 2000
3.4
Serviceability
Accessibility is required for servicing the equipment. A 3' (0.9 m) clearance around the evaporator
compartment and a 4' (1.2 m) clearance above the top are required. Review the appropriate submittal
drawing for exact required top clearance.
3.5
Shipping Charge
All units are shipped with a dry nitrogen charge (approximately 5 psig/35 kPa) that is required to be
bled off prior to installation. Extreme care must be taken while removing flanges or caps when the
system is under pressure.
3.6
Remote Refrigeration Piping
The refrigerant connections (suction, liquid) on the evaporator skid are sized based on the condensing
unit located within 10' (3 m) of equivalent length tubing of the ORE skid. For systems with more than
the equivalent 100' (30 m), increase tubing size accordingly. The liquid line should be sized to prevent
excessive pressure drop to ensure a solid liquid column to the expansion valve. Use only Trade K or L
refrigerant-grade tubing or Schedule 40 pipe. When brazing refrigerant tubing, an inert gas should be
passed through the line at low pressure to prevent scaling and oxidation inside the tubing—dry
nitrogen is preferred. Use suitable silver solder alloy on all refrigerant tubing. Refrigerant lines should
be supported and fastened properly.
3.7
Refrigerant Piping Pressure Test
After all lines are connected, the entire system must be leak tested, including the ORE and condensing
unit. The complete system should be pressurized to not more than 150 psig (1,000 kPa) using dry
nitrogen vapor. The use of an electronic-type leak detector is highly recommended due to its greater
sensitivity of small leaks. It is recommended that this pressure be held for a minimum of four hours
and then rechecked.
3.8
System Evacuation
Prior to connecting hoses, remove the core from the Schrader fitting. A minimum evacuation to 500
microns and a five-minute hold period is recommended. Proper evacuation processes include vacuum
pump oil changes and large-diameter, short-hose connections to both high and low sides of the
system.
3.9
Refrigerant Charge
See Section 5.0 for further details.
3.10
Condensing Unit
Provide a suitable solid base under protective shelter with adequate air circulation. The most important
consideration when determining the location of the air-cooled equipment is ambient air supply and
removal of heated air to prevent air recirculation. A minimum distance of 3' (0.9 m) clearance should
be provided for proper hot air removal and servicing.
The general rule of thumb for evaporative-cooled units is to allow a minimum distance around the unit
of 6' (1.8 m) for smaller units and 8' (2.4 m) or more with larger units. Consult PMC for further details.
MaximICE TES-ORE 25-100 Owner’s Manual
Part No. 9840502
5
Effective September 1, 1998
Revised December 1, 2000
3.11
Electrical
The MaximICE wiring schematic identifies the minimum remote interconnecting field/customer wiring
required. All power wiring and grounding must be installed in accordance with all local, state, and
national codes. Separate field-supplied breaker/disconnect is required and shall be supplied by others.
Article 440 of the NEC requires that the system have “disconnecting means capable of disconnection of
air conditioning and refrigeration equipment including motor compressor and controllers from the
circuits feeder.” The circuit breaker and/or fused disconnect switch should be selected and located
within the NEC guidelines.
3.12
Electrical Specifications: ORE-25 (but not limited to)
PLC: 24 Volts, Inputs DC, Outputs AC, Power Supply 120 volts AC
3.13
50 Hertz: Drive Motor 3/4 Horsepower
200 volts
3.5 amps (± .2)
762 rpm
50 Hertz: Drive Motor 3/4 Horsepower
380 volts
1.75 amps (±.2)
857 rpm
60 Hertz: Drive Motor 3/4 Horsepower
208 volts
3.7 amps (± .2)
794 rpm
60 Hertz: Drive Motor 3/4 Horsepower
230 volts
3.05 amps (± .2)
794 rpm
60 Hertz: Drive Motor 3/4 Horsepower
460 volts
1.53 amps (± .2)
833 rpm
60 Hertz: Drive Motor 3/4 Horsepower
380 volts
1.75 amps (± .2)
794 rpm
Electrical Specifications: ORE-50 (but not limited to)
PLC: 24 Volts, Inputs DC, Outputs AC, Power Supply 120 volts AC
50 Hertz: Drive Motor 1.5 Horsepower
200 volts
6.0 amps (± .2)
850 rpm
50 Hertz: Drive Motor 1.5 Horsepower
380 volts
3.0 amps (± .2)
850 rpm
60 Hertz: Drive Motor 1.5 Horsepower
208 volts
5.2 amps (± .2)
850 rpm
60 Hertz: Drive Motor 1.5 Horsepower
230 volts
4.75 amps (± .2)
850 rpm
60 Hertz: Drive Motor 1.5 Horsepower
460 volts
2.35 amps (± .2)
850 rpm
MaximICE TES-ORE 25-100 Owner’s Manual
Part No. 9840502
6
Effective September 1, 1998
Revised December 1, 2000
3.14
Electrical Specifications: ORE-100 (but not limited to)
PLC: 24 Volts, Inputs DC, Outputs AC, Power Supply 120 volts AC
3.15
50 Hertz: Drive Motor 3 Horsepower
200 volts
13.8 amps (± .2)
850 rpm
50 Hertz: Drive Motor 3 Horsepower
380 volts
6.9 amps (± .2)
850 rpm
60 Hertz: Drive Motor 3 Horsepower
230 volts
12.6 amps (± .2)
850 rpm
60 Hertz: Drive Motor 3 Horsepower
460 volts
6.3 amps (± .2)
850 rpm
Ice Storage Tank - Full Ice Sensor Option
To determine a full ice storage tank condition, a temperature bulb is mounted in the evaporator
solution inlet which sends a signal to a digital temperature controller located in the PMC control box.
As the amount of ice increases within the storage tank, the glycol percentage increases and lowers the
solution freeze point. At approximately 24 to 26°F (-4.4 to -3.3°C) the PLC receives an input from the
controller initiating a full ice shutdown.
3.16
Ice Storage Tank - Vent Line
To ensure proper solution flow, a vent system is incorporated. Attach the vent line to the top of the ice
storage tank top. The line must be mounted to ensure full draining, with no loops or kinks.
3.17
Ice Storage Tank - Spraying System
To ensure that the stored liquid ice is burned efficiently and a low-temperature supply solution can be
maintained to the cooling loads, spray devices(s) must be used to distribute the warm solution over the
liquid ice. For field-fabricated storage tanks, spray distribution system should be supplied in sufficient
numbers and location, based upon spray pattern, to provide maximum coverage over the liquid ice.
Please consult PMC for field-fabricated storage tank spray distribution systems.
3.18
Glycol Solution Specification
The MaximICE TES system uses a very low concentration of propylene or ethylene glycol solution as
the storage medium to promote the growth of the ice crystals.
Glycol Manufacturer-Supplied Information—
The following information should be provided to the owner:
▲
▲
▲
▲
Manufacturer’s name, address, and telephone numbers.
Material safety data sheet.
Instruction for system cleaning, flushing, and testing of system water prior to charging.
Off-season lay-up of equipment.
Solution Additives—Prior to filling and charging the storage tank, the interior of the tank and all
piping runs should be thoroughly cleaned to remove pipe scale, dirt, and other impurities. The system
should also be checked for leaks at this time.
MaximICE TES-ORE 25-100 Owner’s Manual
Part No. 9840502
7
Effective September 1, 1998
Revised December 1, 2000
It is imperative that these guidelines be followed. Since the concentration in the tank will be
between 7.0% and 7.5% (by weight), the additives present in the HVAC-grade inhibited glycol will not
be sufficient to protect the system from corrosion and bacterial growth. Dipotassium phosphate
(K2HPO4) must be used as a corrosion inhibitor to protect steel and stainless steel components at a
concentration no less than 4,000 ppm as PO4 (7,350 ppm as dry K2HPO4). An azole-type corrosion
inhibitor must be added to protect copper and brass components. The best choice is halogen-resistant
azole like BetzDearborn AZ8104 (10 ppm). Alternatively, one may use tolyl triazole (30 ppm of typical
formulation with approximately 20% active ingredient). Anti-foaming agents (such as Dow Corning
1410) may also be added as needed.
To inhibit bacterial growth, add 200 ppm of quaternary amine. Typical quaternary amines are C12 to
C18 mixtures of n-alkyl dimethyl benzyl ammonium chloride or n-alkyl dimethyl ethyl benzyl
ammonium chloride. Manufacturers include Albemarle Chemical (BQ 451-5), Lonza (Barquat 50-65),
and Stepan Company (BTC 818).
Dry ingredients (such as dipotassium phosphate) must be dissolved in water prior to addition to the
ice slurry tank. A small tank and mixer is convenient for this purpose.
Water Quality—Water used to make up the glycol solution must meet certain standards of purity.
Distilled or de-ionized water is recommended. Levels of chlorides and sulfates should be less than 25
ppm each. Total hardness should be less than 100 ppm expressed as ppm calcium carbonate. If good
quality water is unavailable, pre-diluted solutions are available from manufacturers.
Local conditions must always be taken into consideration, particularly when it comes to biofouling and
scaling/fouling deposits. A local water-treatment authority should be consulted for guidance in this
matter. PMC recommends calling your county or city water department to find out the specification of
your local water supply. If the water contains less than 100 ppm of hardness, it can be used to dilute
your glycol-based heat transfer fluid. Another option would be to test the water yourself with a HACH
test kit.
One word of caution about the common practice of using softeners when filling HVAC systems: resins
typically used in these softeners will replace the calcium and magnesium ions with sodium ions. This, in
itself, is fine. However, these resins do not sufficiently reduce high concentrations of chloride or sulfate
ions. To accomplish the latter, another type of ion exchange resin must be used. Resins that remove
calcium and magnesium ions are typically regenerated with a strong brine solution, and the excess
sodium chloride is flushed out as waste water. This must be followed by thoroughly flushing the
regenerated resin bed with water. Otherwise, an excess of chloride ions will be flushed into the so-called
good quality water. Glycol manufacturers recommend using de-mineralized water that has been distilled,
de-ionized, or passed through a reverse osmosis (RO) process to remove certain minerals and salts.
Good water quality is typically defined by the following parameters:
▲
▲
▲
▲
▲
Less
Less
Less
Less
Less
than
than
than
than
than
50 ppm of calcium
50 ppm of magnesium
100 ppm (or 6 grains) of total hardness
25 ppm of chloride
25 ppm of sulfate
After combining the proper amounts of water and inhibited glycol, the system should be mixed for a
minimum of four hours to achieve uniformity. This can be accomplished with the MaximICE feed and
solution pumps or with the cooling load pump. Solution concentration should be verified using a
refractometer to measure Refractive Index (RI).
MaximICE TES-ORE 25-100 Owner’s Manual
Part No. 9840502
8
Effective September 1, 1998
Revised December 1, 2000
The supplier of the glycol should be consulted to determine correct RI for the inhibited solution used
at the temperature tested. Adjustments to the solution may be necessary to achieve the correct
concentration. This should always be done prior to starting the MaximICE system, as glycol
concentration will change as the production of liquid ice begins. An accurate measurement of the
concentration of glycol can be accomplished using a hand-held refractometer. This instrument is
portable, requires only a few drops of fluid, and needs no adjustment for fluid temperature. PMC
recommends that the glycol solution be tested every month (see Maintenance and Service Manual).
It is also recommended that the owner test the alkalinity four times per year for the first year and
annually after that.
Glycol Solution Concentration Adjustments—It is sometimes necessary to increase or decrease the
concentration of the glycol solution in your system to replace fluid lost through leakage or moisture
absorbed from the atmosphere. Either adjustment can be carried out in batch or continuous operation.
Procedure for Adjusting Freezing Point of Glycol Fluids—If the concentration of glycol must be
increased, use the formula below to determine the amount of solution to drain and the number of
gallons of glycol to add to increase glycol concentration.
A = V(D-P)/(100-P)
To decrease the glycol concentration, the following formula should be used to determine the volume
to drain and replace with high-quality water:
A = V(P-D)/P
Where:
3.19
A = The quantity (in gallons or m3) of glycol to be added to the system to lower the freeze point or
the quantity (in gallons or m3) of glycol solution that must be drained from the system to decrease
glycol concentration.
V = The total solution capacity of the system in gallons or m3.
D = The volume percent of glycol desired in the system.
P = The volume percent of glycol presently in the system.
.
Freeze Protection
Units located outside shall require freeze-up protection (heat tape on all solution lines). A glycol
solution is required for the MaximICE system; however, during low ambient conditions (outside
temperatures below 27°F or -3°C), the solution may freeze and cause piping damage.
3.20
Insulation
All glycol solution piping should be insulated with 2" (50 mm) polyfoam/Armaflex to prevent external
heat gain. The ice storage tank(s) supplied by PMC (polyethylene type) must be placed on top of at
least 3" (75 mm) of styrofoam with a loading strength of 25 psi (175 kPa). Heat gain and proper
insulation practices should be considered for concrete tanks constructed on site.
3.21
ORE Drive Assembly
The drive system is designed with very close tolerances to ensure proper clearance, water sealing, and
operation of all drive components extreme caution should be taken during installation.
!
▲
CAUTION: Do not operate drive system without circulating glycol solution.
NOTE: Refer to Figures 3 through 6 with the following drive installation steps:
▲ Using a flashlight, inspect each tube for any foreign debris.
▲ Apply a thin coat of petroleum jelly on each countercrank prior to installing (lower end, top edges).
MaximICE TES-ORE 25-100 Owner’s Manual
Part No. 9840502
9
Effective September 1, 1998
Revised December 1, 2000
▲ Working clockwise at the alignment mark, place each countercrank in a left-hand/right-hand
arrangement. Countercrank type is determined by positioning the drive pin at six o’clock and
checking the slot point direction.
NOTE: The ORE-50 and 100 have several countercranks that may appear out of sequence. See the
appropriate layout drawing for specific alignment.
▲ Install each whip rod.
▲ Position all drive pins towards the evaporator top tube sheet alignment mark.
▲ Install lower rubber gasket.
▲ Install drive plate by matching the top tube sheet alignment mark with the drive plate.
NOTE: The evaporator top sheet and drive plate are labeled with an alignment mark(s) to ensure
proper assembly.
▲ Install clear PVC top water chamber.
▲ Install upper rubber gasket.
▲ Install top head.
▲ Install drive motor. Adjustments can be made to the eccentric crank during assembly by rotating
the motor fan blades with small screwdriver.
▲ Tighten top plate mounting bolt using a star pattern while tightening bolts.
▲ Adjust motor for approximately 1/16" (1.6 mm) clearance between the eccentric crank and drive plate
bearing (no pressure on drive plate).
Figure 2 - ORE Drive Assembly Detail
3.22
Gravity Feed System
A gravity feed ice-discharge system, with a telescopic-type housing mounted to the evaporator (bottom) that
extends into the ice opening, is incorporated for systems where the evaporator is installed on top of the ice
storage tank. A watertight seal must be applied once the unit is set in place and the housing is lowered into
the opening. The gap (about 1/2"/12 mm) can be filled with insulation rope and sealed with a layer of
silicone.
MaximICE TES-ORE 25-100 Owner’s Manual
Part No. 9840502
10
Effective September 1, 1998
Revised December 1, 2000
Figure 3 - MaximICE ORE-25 Drive Assembly
MaximICE TES-ORE 25-100 Owner’s Manual
Part No. 9840502
11
Effective September 1, 1998
Revised December 1, 2000
Figure 4 - MaximICE ORE-50 Drive Assembly
MaximICE TES-ORE 25-100 Owner’s Manual
Part No. 9840502
12
Effective September 1, 1998
Revised December 1, 2000
Figure 5 - MaximICE ORE-100 Drive Assembly
MaximICE TES-ORE 25-100 Owner’s Manual
Part No. 9840502
13
Effective September 1, 1998
Revised December 1, 2000
Figure 6 - ORE Countercrank Assembly
MaximICE TES-ORE 25-100 Owner’s Manual
Part No. 9840502
14
Effective September 1, 1998
Revised December 1, 2000
3.23
Packing Material(s)
The whip rods are secured in place with cellophane wrap, which must be removed from the bottom of
each evaporator. On units with an ice discharge pump option, the outlet manifold ships loose and
should be installed after the cellophane wrap.
Figure 7 - MaximICE Refrigeration Schematic Diagram
MaximICE TES-ORE 25-100 Owner’s Manual
Part No. 9840502
15
Effective September 1, 1998
Revised December 1, 2000
SECTION 4.0 - PRE START-UP/INSTALLATION REQUIREMENTS
4.1
Evaporator Unit Drive
The unit must be level within 1/8" (3 mm) over the entire length and width of the evaporator
compartment (shim and grout as necessary).
The unit must be uniformly supported along the base beams.
The unit must not have restricted access. At least 4' (1.2 m) of clearance is required on all sides of the
unit. Service access must be provided for removal of whip rods (approximately 4' or 1.2 m above
evaporator compartment). Do not suspend or support any piping or conduit from this unit.
This unit contains rotating equipment, thus vibration and sound control may be required for this unit. Where
vibration may be transmitted to a structure, all external piping to the unit should be vibration isolated.
4.2
Water Loop/Piping
All piping must be complete and correctly installed.
Water piping shall be flushed and drained prior to final connection to the MaximICE. The flushing
procedure shall use an environmentally approved cleaning solution and consist of flushing the piping
at not less than 10 ft/sec (3 m/sec) velocity for six hours. The water piping shall then be flushed with
clean water to remove any residue.
All exposed exterior water piping shall be heat traced and insulated. The Paul Mueller Company
warranty specifically excludes any liability for freezing damage resulting from low ambient temperatures.
The ice storage tank must be cleaned with an approved cleaning solution and rinsed with clean water
prior to adding water/glycol solution. The water piping system, including the tank, shall then be filled
with clean water and 7% glycol to 60% of the height of the tank. The water/glycol solution should be
analyzed by a water-treatment authority and properly treated for oxygen corrosion, scales, algae, and
fungus growth. The water should be periodically checked by a water-treatment authority.
Water-cooled condenser water piping shall be cleaned and flushed to remove all debris. The
condenser/cooling tower water shall be properly treated. A properly sized strainer should be used on
the condenser water supply to the MaximICE. The condenser, condenser water piping, condenser
pump, and cooling tower must be properly protected against freeze damage resulting from low
ambient temperatures.
Evaporative condensers shall be flushed and properly treated. A proper water-treatment system usually
consists of a continuous blow down and chemical feeder. The condenser, condenser water piping,
condenser water make-up line, and pump must be properly protected against freeze damage. The Paul
Mueller Company warranty specifically excludes any liability for damage resulting from low ambient
temperature. Failure to maintain proper operation of the condenser by allowing fouling will
result in decreased MaximICE system performance and operation.
Water-cooled units may be provided with a condenser water-regulating valve, which is shipped loose
for field installation at the outlet side of the condenser.
Remote, evaporatively cooled, air-cooled condenser or cooling towers, when supplied by other than
PMC, require head pressure/capacity control. Consult factory for details and minimum requirements.
(If applicable) Water cooled oil cooler, if installed, shall be connected by the installing contractor to a
water source with a maximum water temperature of 85°F (30°C), with the required flow rate shown on
the submittal. Supply water piping must be properly protected against freeze damage by the installer.
MaximICE TES-ORE 25-100 Owner’s Manual
Part No. 9840502
16
Effective September 1, 1998
Revised December 1, 2000
4.3
Electrical
All power wiring and grounding must be installed in accordance with all local, state, and national
codes. All wiring to the MaximICE shall be copper—do not use aluminum wire.
The following control interlocks must be installed prior to operating the unit:
Water flow—Proof of condenser water flow is required. Either a flow switch or a pressure differential
switch can be employed.
For a remote, evaporatively cooled condenser—Proof of condenser water pump and fan operation
is required.
For a remote, air-cooled condenser—Proof of operation or signal upon a unit failure is required.
4.4
Refrigerant Piping
The installing contractor shall provide and install all interconnection piping and service valves. All
refrigerant (R-22) piping shall be Type L or K hard copper or Schedule 40 steel piping. All piping shall
be purged with an inert gas during welding or brazing. Ammonia (R-717) must be piped per ASHRAE
15 latest revision.
A pressure leak test of the complete refrigeration system is required once field piping is complete. The
system shall be proven tight at 25 psig (175 kPa) below the lowest setting pressure relief valve.
The entire system must be evacuated to at least 500 microns with a five minute hold period.
The contractor shall provide a charging line from the charging connection on the MaximICE unit to the
charging drum(s).
4.5
Start-Up Coordination/Inspection
Upon arrival of PMC authorized start-up personnel at the job site, a start-up coordination meeting will
be held and a walk-through inspection of the job site conditions will be conducted. All trades involved
in the installation should be represented. This includes, but is not limited to, the general contractor,
mechanical contractor, plumbing contractor, tank contractor, and owner’s representative. The start-up
will not continue until all requirements for correct and safe operation of the MaximICE are satisfied.
The installing trades should be available to resolve installation problems as required during the startup period.
Contractors’ personnel and the owner’s representative who will be operating and maintaining the unit
should be available for training during the entire start-up period.
4.6
Start-Up Policy
MaximICE units require two, three, or four days of start-up assistance depending on the size of
equipment. Delays in the start-up caused by failure to comply with any of the following procedures
are not the responsibility of PMC. Additionally, start-up time caused by delays, not the responsibility of
PMC, must be authorized by customer in advance. Failure to follow these procedures will result in
delays and may result in the voiding of the equipment warranty. Contact the Paul Mueller Company
Thermal Energy Storage Department if you have any questions pertaining to the installation
requirements of this equipment.
MaximICE TES-ORE 25-100 Owner’s Manual
Part No. 9840502
17
Effective September 1, 1998
Revised December 1, 2000
SECTION 5.0 - START-UP/REFRIGERANT CHARGING
5.0
Start-Up/Refrigerant Charging
Apply main power at least 12 hours prior to starting unit. This will allow the compressor crankcase
ample time to boil off any possible liquid refrigerant within the compressor.
NOTE: Refrigerant charges provided are conservative and will vary due to condenser type and
equipment layout. Final charging will be necessary once the system is under a stable operating
condition.
Approximate refrigerant charge(s):
ORE-25 = 400 lbs (180 kg)
ORE-50 = 700 lbs (320 kg)
ORE-100 = 1,000 lbs (450 kg)
Locate the 5/8" flare fitting on the ORE evaporator. Only this fitting can be used to charge the system
with liquid refrigerant. Add refrigerant to bring the pressure up, and equalize prior to starting.
Continue to add refrigerant until a 10% liquid level is reached in the high pressure receiver during
normal operation.
The air/evaporative condenser package is equipped with a fan cycling head-pressure control system,
which maintains a minimum compressor discharge pressure during low ambient conditions (175
psig/1,200 kPa).
MaximICE TES-ORE 25-100 Owner’s Manual
Part No. 9840502
18
Effective September 1, 1998
Revised December 1, 2000
SECTION 6.0 - SEQUENCE OF CONTROL
6.0
Sequence of Control
The operation of the MaximICE unit is controlled by a Programmable Logic Controller (PLC), a very
reliable, continuous-duty, automatic control device. By observing LED input/output lights, the
operational status can be determined, serving as a useful tool during troubleshooting. It is
recommended to study the system wiring diagram while matching the proper input/output LED lights
with each function. Exhaust all other possible failure causes before assuming a PLC control
malfunction. It is highly unlikely that the program is causing a failure.
The on/auto/off switch located in the control enclosure facilitates unit operation within the panel. A
manual switch reset is required after a system failure shutdown. The MaximICE unit is programmed
with a unique system start-up and shutdown sequence unlike common refrigeration equipment. The
following information describes a typical system operation sequence.
NOTE: The PLC is equipped with dual, low-voltage 24V; input side is 24VDC and output side is 24VAC.
6.1
Start-Up Sequence
▲ Select either “MANUAL” or “AUTO” on local 3 position toggle switch.
MANUAL—System starts immediately.
AUTO—System starts when remote “Enable” signal is received.
▲ Slush pump and feed pump on.
▲ Enable temperature sensor while system fluid circulates for 5 minutes.
▲ End of 5-minute circulation. Check to see if high ice condition exists:
— No full ice condition—Drive motor, pump-down solenoid, and LLM heater are energized.
Continue start-up.
— Full ice condition exists—System shutdown on full ice.
— Periodically, the system shall restart the glycol solution to verify a full ice condition. If full ice
exists after a 5-minute check, the system should remain off.
▲ 10-seconds delay after drive is on—Condensing unit, oil return solenoid, and unload
solenoid(s) are energized; system operates unload for 2 minutes. At the end of 2 minutes, the
unload solenoid(s) are de-energized, allowing for full load compressor capacity.
▲ Start-up sequence complete.
6.2
Shutdown Sequence
▲ Shutdown initiated by either selecting “OFF” on the toggle switch, removing the remote enable
signal (if in AUTO), or “high ice” condition (temperature set point reached) in tank.
▲ Unload solenoids on 5-minute delay.
▲ End of 5-minute delay—Condensing unit, oil return solenoid, unload solenoid, and LLM heater
turn off.
▲ After 15-minute delay—drive shuts down.
MaximICE TES-ORE 25-100 Owner’s Manual
Part No. 9840502
19
Effective September 1, 1998
Revised December 1, 2000
▲ End of 30-second delay—Slush and feed pump shut down.
▲ Shutdown sequence complete.
NOTE: When a unit shutdown is initiated for any reason, the unit will complete the shutdown
sequence before a restart is enabled. If the unit is in the process of starting, the start-up sequence will
be completed before the shutdown sequence begins. If an immediate shutdown is required, the
“E-STOP” switch must be pushed.
6.3
Restart Sequence
60-minute (typical) delay for restart after full ice condition—Unit will automatically start the solution
pump(s) and check for absence of full ice condition. If full ice exists, the pumps shall shutdown and
another 60-minute delay will take place and the restart process will repeat.
▲ Pressing the “E-Stop” push button or an alarm condition will initiate shutdown.
▲ All operating components are de-energized immediately.
▲ Toggle switch must be moved to “OFF” position to reset alarm condition after shutdown is complete.
▲ Alarm status.
6.4
Alarm Condition Sequence
▲ Condensing unit alarm—Compressor motor overload, high discharge switch, and low oil pressure
switches are wired in series.
▲ Motor overload—Drive motor, slush pump, and solution pump in series.
▲ Freeze-Up Protection—Evaporator low pressure switch set for (3 psi/20 kPa to 5 psi/35 kPA)
below normal operating pressure (lowest).
▲ High-level solution vent line switch—Ice slurry discharge from ORE interruption.
▲ Glycol solution flow switch—Glycol solution feed to ORE interruption.
▲ Emergency stop.
6.5
Additional Control Elements
▲ Vent switch intermediate trip/alarm:
a.
Vent switch must be tripped for 10 seconds before intermediate trip condition.
b.
Condensing unit will shut down for 10 minutes while the rest of the system continues to
function as usual.
c.
After 10 minutes:
1. Vent switch clear. Condensing unit restarts.
2. Vent switch not clear. System shutdown on vent alarm. If intermediate trip condition
occurs three times in 30 minutes, system shuts down on vent alarm.
▲ High vent switch—The entire unit shuts down after a 5-second delay.
▲ Drive motor will not operate when the high temperature solution feed indicates glycol
temperatures above 55°F (13°C).
MaximICE TES-ORE 25-100 Owner’s Manual
Part No. 9840502
20
Effective September 1, 1998
Revised December 1, 2000
SECTION 7.0 - SAFETY
7.1
Label, Danger, “Unit Starts Up Automatically”
The unit is intended to operate automatically and will start at any time. Power must be disconnected
and locked-out when servicing the unit.
7.2
Label, Electrical Symbol, Part No. 8820623
Indicates the high voltage electrical components of the system.
7.3
Label, Danger, “High Voltage”
This unit should be serviced by qualified electrical and refrigeration technicians.
MaximICE TES-ORE 25-100 Owner’s Manual
Part No. 9840502
21
Effective September 1, 1998
Revised December 1, 2000
7.4
Label, Caution, “Do Not Run Unit Dry,” Part No. 8850229
Major damage will occur if the drive parts are ran without the solution.
7.5
Label, Caution, “If this Gap Measurement...,” Part No. 9842772
If the bearing gap is not set correctly, it will cause the failure of the drive bearing and the drive plate.
7.6
Equipment dB Readings
The equipment’s dB readings. (A weighting, taken during ice-making at 3 feet (1 M) from evaporator
are listed below.)
ORE-25
75
!
▲
ORE-50
75
ORE-100
78
WARNING: When operating or servicing the equipment, adequate hearing protection must be
used.
MaximICE TES-ORE 25-100 Owner’s Manual
Part No. 9840502
22
Effective September 1, 1998
Revised December 1, 2000
SECTION 8.0 - MAINTENANCE
8.0
Maintenance
The MaximICE system is designed to be a low-maintenance piece of equipment. Preventive
maintenance is the key to a properly operating unit. It is recommended to maintain an inspection log
book for tracking the history of operation.
8.1
Daily Checks
▲ Inspect the ORE unit for solution leaks and excessive vibrations. Check for proper compressor
suction pressure and temperature.
▲ Inspect around ice storage tank for solution leaks (piping, fittings, and tank surface).
▲ Check for oil spots around condensing unit.
▲ Listen to compressor for any noises different than normal. Sound level(s) should be constant.
▲ Listen to the ORE. The whip rods should make a sibilant noise (sh...). Rattling noises may indicate
one or more frozen tubes.
8.2
Recommended Inspection Procedures
The following points should be inspected when performing preventive maintenance on the MaximICE
thermal energy storage system.
▲ Drive Component Inspection—
a.
Turn the on/auto/off control switch inside the ORE control panel to the off position. At this time,
the liquid line solenoid and the oil return solenoid will close and the unit will pump down.
b.
After the pumps and the drive assembly stop, turn the main power off to the unit.
c.
Remove the insulation from the inlet shell and set aside.
d.
Remove the inlet solution header (this will consist of removing 8 flange bolts and 2 union fittings).
e.
On the top plate there will be 12 9/16" nuts. Remove all 12 nuts and the lock washers.
(NOTE: Do not remove the motor.) If this preventive maintenance is performed on an ORE100, 200, 300, or 400, and a hoist is not available, the motor may have to be removed due to
the weight and the awkwardness of the drive motor and top plate. If you have to remove the
motor, the following steps must be followed: There are three 3/4" bolts with a lock nut on the
bolt. Remove the 3/4" bolts from the motor mounting plate, not the adjusting inserts. This will
allow the motor to be removed by lifting it along with the motor lifting lugs that are provided
with the motor straight up.
f.
With the motor and the top plate removed, the drive plate will be visible. Carefully lift the
drive plate up and out of the evaporator and set aside.
g.
With the drive plate removed, the counter cranks and the tops of the whip rods will be
exposed. You will notice they are configured in a left and right format. Refer to Figures 3, 4,
or 5 for counter crank arrangement. Randomly pull 8 to 10 counter cranks, along with the
whip rods, out of the evaporator for inspection. Look at the counter cranks to see if there is
any sign of scoring or frictional wear. If so, refer to the tolerance chart to see if these parts
need to be replaced or if they are in specification. Then they can be reinstalled in the
evaporator and returned to service.
MaximICE TES-ORE 25-100 Owner’s Manual
Part No. 9840502
23
Effective September 1, 1998
Revised December 1, 2000
▲ Drive Plate—
With the drive plate removed and placed on a flat surface, check all the holes and make sure the
holes in the drive plate are round and not elongated. If there are any holes that are out of round,
please refer to the tolerance chart to see if the drive plate can be reinstalled or if it needs to be
replaced.
Figure 8 - Drive Plate Inspection Criteria
MaximICE TES-ORE 25-100 Owner’s Manual
Part No. 9840502
24
Effective September 1, 1998
Revised December 1, 2000
Figure 9 - Drive Plate Inspection Criteria
MaximICE TES-ORE 25-100 Owner’s Manual
Part No. 9840502
25
Effective September 1, 1998
Revised December 1, 2000
Figure 10 - Countercrank Inspection Criteria
MaximICE TES-ORE 25-100 Owner’s Manual
Part No. 9840502
26
Effective September 1, 1998
Revised December 1, 2000
Figure 11 - Whip Rod Inspection Criteria
MaximICE TES-ORE 25-100 Owner’s Manual
Part No. 9840502
27
Effective September 1, 1998
Revised December 1, 2000
Figure 12 - Bearing Sleeve Inspection Criteria
▲ Drive Plate Bearing Housing—
Make sure that there is not any apparent scoring inside the bearing sleeve. Measure the ID of the
bearing sleeve and refer to the tolerance chart to see if this part can be reinstalled or needs
replacing. The lip on the bearing sleeve should be fully seated into the bearing housing.
▲ Freeze-Up Protection Switch—
Remove the 2 wires that are connected to the freeze-up protection switch. Shut the angle valve off
at the evaporator and remove the hose that is connected to the freeze-up protection switch.
(NOTE: Loosen the hose fitting very slowly because of the possibility of the presence of liquid in
the line.) Using a VOM meter, set the meter to the OHM position. Attach the leads to the NC set of
contacts on the freeze-up protection switch. Attach the suction hose from your gauge set (blue
hose) to the freeze-up protection switch. Attach your charging hose (yellow hose) to a bottle of
pressurized gas, preferably nitrogen. When pressure is applied to the switch it will show you the
exact pressure of your suction gauge. The freeze-up protection switch should be set to open at 35
psig (240 kPa). If the switch opens before the 35 psig (240 kPa), adjust the switch accordingly.
▲ Water Regulating Valve—
You will see 2 valve stems on the inlet and on the outlet side of the solution regulating valve.
Using a 0-50 (0-350 kPa) psig gauge with the proper valve stem connection, take a pressure
reading on the inlet side of the solution regulating valve. This pressure must be at least 5 psig (35
kPa) and no more than 32 psig (220 kPa). If the pressure on the inlet of the regulator is not within
these parameters, the machine is either not getting enough solution and has the possibility of
freeze-up or, if it exceeds the pressure, the unit will not be running at the designed capacity. The
design flow rates are 65, 130, and 245 gpm (245, 490, and 930 l/min) for the ORE-25, -50, and -100.
MaximICE TES-ORE 25-100 Owner’s Manual
Part No. 9840502
28
Effective September 1, 1998
Revised December 1, 2000
Figure 13 - Tube Insert Inspection Criteria
REPLACE IF EITHER SURFACE
SCORED OR HAS ROUGHNESS
IS 250 µ INCH Ra (6.25 µ m) OR
MORE.
REPLACE IF ANY CRACKS
VISIBLE.
Figure 14 - Eccentric Crank Inspection Criteria
REPLACE IF SURFACE
ROUGHNESS IS 125 µ INCH Ra
(3.1 µ m) OR MORE
MaximICE TES-ORE 25-100 Owner’s Manual
Part No. 9840502
29
Effective September 1, 1998
Revised December 1, 2000
8.3
Recommended Drive Component(s) Replacement Schedule
▲ 1,000 hours—
a.
Disassemble drive assembly.
b.
Inspect wear surfaces.
c.
Apply a thin coating of Petroleum-Gel to all surface wearing drive parts.
▲ 8,000 hours—
a.
Possible replacement of countercranks, drive plate, and flange bearing.
b. Clean ORE inlet strainer.
NOTE: The above schedule is based on good glycol solution quality and normal wear. Systems with
poor water quality and operational difficulties may require more frequent replacement.
8.4
Recommended Monitoring Points
▲
▲
▲
▲
▲
▲
▲
▲
▲
▲
▲
▲
▲
▲
▲
▲
▲
▲
Temperatures (°F)
Ambient
Solution Supply To Process
Solution Supply To Evaporator
Compressor Discharge
Compressor Suction
Condenser Liquid Outlet
Pressures (psig)
Compressor Discharge
Condenser Liquid Outlet
Drier Core ∆P
Evaporator Suction
Main Voltage
AMPS
Compressor Motor
Evaporator Drive Motor
Evaporator Solution Pump Motor
Evaporator Slurry Pump Motor
MaximICE TES-ORE 25-100 Owner’s Manual
Part No. 9840502
30
Effective September 1, 1998
Revised December 1, 2000
SECTION 9.0 - RECOMMENDED SPARE PARTS
9.0
Recommended Spare Parts
The following list consists of specialty-type or hard-to-find parts, while most all other parts can be
purchased locally. See Figure 4.
9.1
ORE Common Parts:
Description
Recommended Qty.
PMC Part #
1
9840018
1
9841307
(ORE-25 - 20) (ORE-50 - 40) (ORE-100 - 80)
8850044
Oil Return Solenoid Valve (R-22)
Oil Return Solenoid Valve (R-717)
Whip Rod
9.2
Counter Crank - Right Hand
(ORE-25 - 20) (ORE-50 - 40) (ORE-100 - 80)
9842676
Counter Crank - Left Hand
(ORE-25 - 20) (ORE-50 - 40) (ORE-100 - 80)
9842677
Thrust Washer (manufactured before 10/1/99)
(ORE-25 - 20) (ORE-50 - 40) (ORE-100 - 80)
9840477
Full Ice Sensor (temperature controller)
1
9840492
Full Ice Sensor (RTD)
1
9840550
Liquid Level Valve - Heater & Cord
1
9840551
ORE-25 Parts:
Description
9.3
Recommended Qty.
PMC Part #
Drive Plate
1
9840975
Drive Motor Shaft Seal
1
9823991
Housing Bearing
1
9840455
Liquid Level Valve Kit (LMC-MVE-20)
1
9840557
Liquid Level Valve Kit (LMC-MVE-26)
1
9840558
Liquid Level Valve Kit (LMC-MVE-34)
1
9840559
Liquid Level Valve (LMC-AAE-30)
1
9842708
Power Head & Heater - MVE (R-22)
1
9840556
Power Head & Heater - MVE, VVE, & WVE (R-22)
1
9840564
Power Head & Heater - (R-717 only)
1
9842704
ORE-50 Parts:
Description
Recommended Qty.
PMC Part #
Drive Plate
1
9842626
Drive Plate Assembly (plate, housing bearing, bearing sleeve)
1
9842640
Drive Motor Shaft Seal
1
9840339
Housing Bearing
1
9842349
Liquid Level Valve Kit (LMC-MVE-42)
1
9840560
Liquid Level Valve Kit (LMC-MVE-52)
1
9840561
Liquid Level Valve Kit (LMC-MVE-70)
1
9840562
Liquid Level Valve Kit (LMC-AAE-50)
1
9842707
Power Head & Heater (LMC-MVE, VVE) (R-22 only)
1
9840564
Power Head & Heater (R-717 only)
1
9842704
Crank Electric Assembly
1
9842862
MaximICE TES-ORE 25-100 Owner’s Manual
Part No. 9840502
31
Effective September 1, 1998
Revised December 1, 2000
9.4
ORE-100 Parts:
Description
Drive Plate
Recommended Qty.
PMC Part #
1
9842620
Drive Plate Assembly (plate, housing bearing, bearing sleeve)
1
9842872
Drive Motor Shaft Seal
1
9840666
Housing Bearing
1
9842349
Bearing Sleeve
1
9840320
Liquid Level Valve Kit (LMC-VVE-100)
1
9840562
Liquid Level Valve Kit (LMC-AAE-100)
1
9842705
Liquid Level Valve Kit (LMC-WVE-135)
1
9840563
Power Head & Heater (R-22 only)
1
9840564
Power Head & Heater (R-717 only)
1
9842704
Crank Electric Assembly
1
9842681
MaximICE TES-ORE 25-100 Owner’s Manual
Part No. 9840502
32
Effective September 1, 1998
Revised December 1, 2000
SECTION 10.0 - TROUBLESHOOTING FAILURES
10.1
Troubleshooting Chart 1: Low-Pressure Evaporator - Freeze-Up Protection Alarm
Low-pressure evaporator — freeze-up
protection: PLC Output O:Y12
Continuous light
Is the glycol solution
concentration level
above 7%?
no
With no ice in the tank,
measure percentage level
and adjust to 7% minimum.
no
Are the (drive motor) speed pots
adjusted correctly?
(50 hz units only.)
yes
Remove drive assembly and
replace countercranks.
yes
Is the drive plate rotating at
the correct speed?
yes
Is the motor operating
properly?
Check voltage and amp draw.
yes
Are any of the countercranks
broken?
no
no
Is the R-22 charge correct?
(See Section 5.0 for discussion of
correct charge.)
Find leak, repair, and properly
charge system.
no
Is oil accumulating in evaporator?
yes
Is the liquid level valve operating
properly?
yes
Increase oil return flow back to
compressor.
Adjust, repair, or replace.
no
and
yes
Is evaporator solution
flow rate correct?
Check oil separator for missing
filter elements.
Check inline strainer/filter and
pump operation.
no
yes
no
Is the full ice sensor faulty and the tank
over filling with ice, allowing ice slurry
to be pumped into the evaporator?
yes
Check pressure drop across flow
control valve—must be at least 12
psi (83 kPa).
Adjust, replace.
no
Is compressor capacity too large
for ORE?
Reduce compressor capacity.
yes
no
Does ice build up on tubes during
either start-up or
pump-down?
yes
Increase pre-wash and post-wash
times.
and
Make sure compressor is unloaded
(>50% capacity) during pumpdown and start-up.
no
MaximICE TES-ORE 25-100 Owner’s Manual
Part No. 9840502
33
Effective September 1, 1998
Revised December 1, 2000
10.2
Troubleshooting Chart 2: Unit Fails on Vent Switch
Unit fails on vent switch:
PLC Output O:Y14
Continuous light
Is the ice slurry pump
operating properly?
no
Check power to pump, fuses,
contactor, and motor.
yes
Is a valve closed on the ice slurry
pump? Discharge?
Open valve.
yes
no
Is the vent line above the
maximum glycol solution level?
Locate vent line above
maximum glycol level.
yes
no
Is the vent line float switch
operating properly?
Replace switch.
no
yes
Is there excessive foaming in the
inlet shell or vent line?
MaximICE TES-ORE 25-100 Owner’s Manual
Part No. 9840502
Add antifoam to solution.
yes
34
Effective September 1, 1998
Revised December 1, 2000
10.3
Troubleshooting Chart 3: Unit Will Not Start
Unit will not start.
Is power supplied to
control box?
no
Check 115V power
supply, control
transformer, and fuse.
no
Turn switch to “on”
position.
yes
Is the on/off switch in
the “on” position?
yes
Is the PLC
run light “on”?
no
Check for main power - contact
factory.
yes
Is the PLC-CPU fault light “on”?
yes
Contact factory.
no
Is the PLC toggle switch in the
“run” position?
Toggle to “run” position.
no
yes
Is the full ice light “on” and tank full
of ice?
yes
Allow process load to melt ice.
Allow unit to restart.
Replace.
no
no
Is the full ice light “on” but no ice is
in storage tank?
yes
Is the PLC input I:XO light “on”?
yes
Are the ice level sensors operating
properly?
no
no
Is the temperature sensor showing
full ice condition, but full ice light is
not “on”?
Is the PLC input I:XO light “on”?
yes
Contact factory.
Contact factory.
no
no
Is an alarm light “on”?
yes
Identify failure and restart unit.
yes
Is there voltage
(24 VDC) at PLC
output O:Y11?
no
Contact factory.
MaximICE TES-ORE 25-100 Owner’s Manual
Part No. 9840502
35
Effective September 1, 1998
Revised December 1, 2000
10.4
Troubleshooting Chart 4: Compressor Operates with High Discharge Pressure
Compressor operates with high
discharge pressure.
Air-Cooled
Condenser
Is the condenser fan “on”?
Verify that the fan contactor
is pulled in. Check for
failed fan motor.
no
yes
Clean coil with condenser coil soap
solution.
Is the condenser coil clean?
no
yes
Any Type of
Condenser
Is the liquid level valve
controlling properly?
Adjust, repair, or replace.
no
yes
Is the liquid line filter
drier clogged?
WaterCooled
Condenser
Replace.
yes
Check the temperature rise
through the condenser and adjust
cooling water flow as necessary.
Is the cooling water flow sufficient?
no
yes
Is the cooling water inlet
temperature too high (above
design)?
Check cooling tower for problems.
yes
no
Is the condenser fouled or scaled?
MaximICE TES-ORE 25-100 Owner’s Manual
Part No. 9840502
Clean the tube to remove fouling or
scale.
yes
36
Effective September 1, 1998
Revised December 1, 2000
10.5
Troubleshooting Chart 5: Compressor Operates with Low Suction Pressure
Compressor operates with low
suction pressure.
Is the R-22 charge
correct?
no
Find leak, then repair and properly
charge system.
yes
Are the liquid line filter
driers clogged?
yes
Replace.
no
Is the drive plate turning at correct
speed?
no
Are the speed pots adjusted
correctly?
yes
Is the motor operating properly?
Check voltage and amp draw.
yes
Are any of the
countercranks broken?
yes
Remove drive
assembly and replace
countercranks.
no
Is ice freezing up in the evaporator
tubes?
yes
Shut unit down. Remove drive assembly and thaw out ice.
Caution: Unit will most likely freeze up again.
Cause for freeze up must be determined.
no
Is the liquid level valve controlling
properly?
Adjust, repair, or replace.
no
yes
Is the evaporator
solution flow rate
correct?
no
Check feed supply pressure,
in-line strainer/filter, pump
operation.
yes
With no ice in the tank, measure
percentage level and adjust to
7% minimum.
yes
Is the glycol solution concentration
level above 7%?
MaximICE TES-ORE 25-100 Owner’s Manual
Part No. 9840502
37
Effective September 1, 1998
Revised December 1, 2000
10.6
Troubleshooting Chart 6: System Will Not Make Ice
System will not make ice.
Is the solution temperature above
30°F (-1.0°C)?
yes
Allow unit to operate and decrease
solution temperature. Ice making
should begin below 30°F (-1°C).
no
Find leak, repair,
and charge unit.
no
Is the R-22 charge correct?
yes
Is the liquid level valve
controlling properly?
Adjust, repair, or replace.
no
yes
Is the compressor
operating properly?
no
Check suction versus discharge pressure.
Normally discharge pressure exceeds
suction by approximately 150 psig.
yes
Glycol concentration solution may be too
high. With no ice in the tank, measure
glycol concentration and adjust to 7-8%.
yes
Is the unit shutting off on
temperature sensor prior to making
ice? Operating as a chiller only?
yes
Check set point on high ice sensor.
It should be 24-26°F
(-4.4 to -3.3°C).
MaximICE TES-ORE 25-100 Owner’s Manual
Part No. 9840502
38
Effective September 1, 1998
Revised December 1, 2000
10.7
Troubleshooting Chart 7: Compressor Fails on Motor Overload
Compressor continues to fail
on internal motor overload.
Is the voltage correct at
the motor?
no
Check motor nameplate data and
apply correct voltage.
no
Check motor wiring to find cause
of single phasing.
yes
Do all three legs draw some
amps?
yes
Is the compressor discharge
pressure above 300 psig?
yes
Verify condenser operation.
no
Is the compressor discharge
temperature above 180°F (82°C)?
Verify oil coolingcondenser operation.
yes
no
Is the suction superheat extremely
high?
MaximICE TES-ORE 25-100 Owner’s Manual
Part No. 9840502
yes
Verify expansion device operation.
39
Effective September 1, 1998
Revised December 1, 2000
10.8
Troubleshooting Chart 8: System Will Not Cool Building/Process Load
System will not cool
building/process load.
Is there ice in
the storage tank?
no
Allow system to operate and begin
making ice. If possible, turn
building/process cooling pump off.
no
Check pump motor voltage, amp draw, pump
discharge pressure, and impeller. Most likely
the motor is faulty. Repair/replace.
yes
Is the building/process cooling
pump operating properly?
yes
no
Is the pressure drop across the
plate heat exchanger above
normal?
no
Disassemble valve.
Clean, repair, or install
repair kit.
Is the process flow rate correct?
yes
Disassemble and clean heat
exchanger plates.
yes
Is the heat exchanger
temperature water regulating valve
controlling properly?
no
Clean spray ball or spray nozzle in
ice storage tank.
yes
Add charge. Fix leaks.
Is refrigerant level too low?
yes
no
Are some of the tubes frozen?
yes
See Chart, Section 9.1.
no
Is solution bypassing ice in tank?
(LWT will be higher than design.)
yes
Check spray nozzle performance.
no
Add glycol and water.
Is solution level in tank correct?
no
yes
Does tank reach 50% ice fraction
before shutting down?
yes
Reset high ice level (temperature)
switch.
no
Are process/building loads higher
than expected (design basis)?
MaximICE TES-ORE 25-100 Owner’s Manual
Part No. 9840502
yes
Contact Factory
40
Effective September 1, 1998
Revised December 1, 2000
10.9
Troubleshooting Chart 9: Excessive Evaporator Shell Vibration
Excessive Evaporator Shell Vibration
Are all countercranks installed
correctly?
no
Remove drive assembly and install
left and right countercranks
correctly. (See Figures 3-5.)
yes
Are any countercranks damaged?
yes
Remove drive assembly and replace
damaged countercranks. Note: Remove ice
slurry pump and clean impeller vanes.
no
Is the drive plate damaged?
yes
Remove drive assembly and
replace damaged drive plate.
no
Are any whip rods damaged?
yes
Remove drive assembly and replace damaged
whip rods. Note: Remove any whip rod material
within ice slurry pump or ORE outlet shell.
no
Is ice freezing up in the evaporator
tubes?
yes
See Chart #1 - Low Pressure
Evaporator Freeze-Up.
yes
Adjust drive speed slightly higher
or lower (± 10%) to get away from
resonance.
no
See Section 3.2 for foundation
details.
no
Is system 50 hz?
no
Is system supported properly?
yes
Is motor loose?
yes
Secure motor bolts with Loctite and
split washers.
For ORE-50 and -100 models
manufactured before 11/1/99, an
improved mounting plate is available.
no
Are motor bearings worn out?
yes
Replace bearings and mechanical seal as necessary. Make
sure motor drainage holes at motor bottom flange aren’t
plugged. Do not run cold solution in unit when drive off.
no
Is bearing sleeve worn out or
loose?
MaximICE TES-ORE 25-100 Owner’s Manual
Part No. 9840502
yes
Replace bearing sleeve. Also, replace
housing bearing (if plastic on 100 & 50)
with stainless steel version.
41
Effective September 1, 1998
Revised December 1, 2000
10.10
Troubleshooting Chart 10: Compressor Fails on Low Oil Pressure
Low Compressor Oil Pressure.
Is an oil level visible in the
compressor crankcase sight glass?
no
Add oil to compressor at suction
service valve until level reaches
middle of sight glass.
yes
Is compressor oil pressure low?
Replace oil pump.
yes
no
Is the compressor rotation correct?
Change compressor motor
rotation.
no
yes
Is the oil return solenoid valve
faulty or damaged?
Clean, repair, or replace.
yes
yes
Is the oil hand expansion valve
adjusted incorrectly?
Readjust to maintain a slow,
steady liquid/oil mixture flow.
yes
no
Contact factory.
MaximICE TES-ORE 25-100 Owner’s Manual
Part No. 9840502
42
Effective September 1, 1998
Revised December 1, 2000
10.11
Troubleshooting Chart 11: Excessive Wear
Does solution have correct
phosphate levels (4,000 ppm)?
no
Add k2HPO4 inhibitor. Systems with stainless steel
tubes are especially sensitive to this issue and may
experience rapid wear of eccentric, tube inserts,
countercrank pins, whip rod heads, and necks.
yes
Is solution cloudy in appearance?
yes
Add 1 micron sidestream filter to remove suspended solids. Run
until solution is clear. Systems with agitated ice slurry tanks are
especially sensitive to this issue, and may experience rapid wear
of eccentric, tube inserts, whip rod neck, and countercranks.
no
Are the left countercranks worn
more than the right (or vice versa)?
yes
This is normal for Acetal countercranks,
especially in chilling service. Replace
with PEEK countercranks.
yes
Drive running too fast. Adjust
speed to < 850 rpm.
no
Is the eccentric pin worn on one
side only?
yes
This is normal. Only one side is loaded (load
force rotates with eccentric). To extend life,
switch drive motor leads so opposite side of
pin becomes loaded.
no
Is plastic housing bearing
“wallowed out”?
yes
Replace with stainless steel
housing bearing and new sleeve
bearing.
yes
Check for proper clearance between
drive plate and eccentric.
Replace sleeve bearing.
no
Is thrust face of sleeve bearing
broken or worn out?
no
Does drive plate have a number of
oval shaped or enlarged holes?
yes
Sleeve bearing is worn out or loose
in housing. See above.
yes
Unit ran while tube full of ice and
countercranks frozen in position.
See Chart 1: Low Pressure
Evaporator Freeze-Up.
no
yes
Are any countercranks cracked?
yes
Drive plate not centered inside inlet
shell. Adjust inner shell so drive
plate clears it everywhere in orbit.
yes
Unit ran while tubes full of ice and
countercrank frozen in position.
See Chart 1.
yes
Pin on countercrank has rough
surface. Replace drive plate and
countercrank.
Driveplate lifted off countercranks.
Contact PMC to discuss problem.
no
Has the drive motor failed?
yes
no
yes
Are whip rods worn at neck and
bottom?
yes
Mechanical seal failure. Replace
seal and bearings.
Condensation build-up inside
motor. Add drainage holes at motor
bottom flange. Do not run cold
solution in unit when drive off.
Unit ran while tubes full of ice. See
Chart 1. Replace whip rods.
yes
yes
yes
Motor overloaded because tubes
frozen solid. See Troubleshooting
Chart 1.
Whip rod cannot roll. Replace bent
whip rod. Check head thickness.
Make sure only one thrust washer
is used (Acetal countercranks).
Notify PMC if problem continues.
May lead to tube failure if
underlying problem is not fixed.
yes
High solution level. Check vent
switch for proper operation. See
Chart 2.
MaximICE TES-ORE 25-100 Owner’s Manual
Part No. 9840502
43
Effective September 1, 1998
Revised December 1, 2000
SECTION 11.0 - START-UP REQUIREMENTS
11.1
MaximICE® Start-Up Request Form
Prior to requesting start-up, verify that all the following items are complete. Only PMC-qualified startup personnel shall be authorized for start-up. Unauthorized start-up of equipment will result in
immediate void of warranty.
Purchaser:
Address:
Contact Person:
Telephone No.:
Facsimile No.:
Unit Model:
Unit Serial No.:
Installation Location:
Address:
11.2
MaximICE Evaporator Unit
▲ Equipment must be inspected for any damage that may have occurred during shipping. If damage
is found, a claim should be made against the trucking company.
▲ Check the packing slip or bill of lading to ensure that all accessory parts called for in the sales
order are included.
▲ The unit must be level to within 1/8" (3 mm) over the length and width.
▲ All remote piping must be cleaned.
▲ All pumps must be secured (vertical shaft pumps should be properly protected and aligned).
▲ Control wiring connected between the ORE and the condensing unit.
▲ All shipping material removed from the inlet shell and the bottom of the evaporator.
11.3
Refrigerant Piping For Remote Condenser Systems
▲ All remote refrigerant piping must be installed in accordance with the approved piping practice
(ANSI/AMSE).
▲ All piping must be properly supported.
▲ Pressure test complete system for leak (including PMC equipment).
▲ Complete system evacuated.
▲ Full refrigerant charge (provided by others) to be on-site at start-up.
MaximICE TES-ORE 25-100 Owner’s Manual
Part No. 9840502
44
Effective September 1, 1998
Revised December 1, 2000
11.4
Water Piping
▲ (If required) strainer installed.
▲ Check for water leaks.
▲ All flow controls checked and calibrated.
▲ (Water-cooled condenser) install water regulating valve on the condenser outlet.
▲ (Oil cooler) water piping installed.
▲ Check water loop design control.
▲
11.5
Freeze protection installed on all applicable piping.
Electrical
▲ Adequate power supply to unit.
▲ Three-phase and control wiring completed to the unit and any remote equipment.
▲ All wiring and grounding conforms to national, state, and local electrical codes.
▲ (High voltage systems) megohmmeter test main wiring circuit complete to compressor motor.
▲ All wire is copper (no aluminum wiring).
11.6
Installing Contractor Shall Furnish The Following
▲ All materials and labor necessary to assist in the installation/start-up.
▲ A refrigeration service mechanic to assist PMC start-up personnel during start-up for necessary
training in the operation of the unit. This training is essential in performing in-warranty labor
incumbent upon contractor and/or end user.
11.7
Compressor Package
▲ Check compressor/motor alignment and align as necessary to within ±.004" (0.1 mm)
angular/parallel.
▲ Check oil pump/motor alignment and align as necessary to within ±.004" (0.1 mm)
angular/parallel.
MaximICE TES-ORE 25-100 Owner’s Manual
Part No. 9840502
45
Effective September 1, 1998
Revised December 1, 2000
SECTION 12.0 - WIRING DIAGRAMS
12.1
Schematic Wiring Diagram (50 hz), Part No. 9841026
MaximICE TES-ORE 25-100 Owner’s Manual
Part No. 9840502
46
Effective September 1, 1998
Revised December 1, 2000
12.2
Schematic Wiring Diagram (60 hz), Part No. 9823978
MaximICE TES-ORE 25-100 Owner’s Manual
Part No. 9840502
47
Effective September 1, 1998
Revised December 1, 2000
SECTION 13.0 - MUELLER MaximICE LIQUID ICE EVAPORATOR
EQUIPMENT SPECIFICATIONS
13.1 Model ORE-25 Flooded Refrigerant Feed, Pumped Slush Discharge,
Drawing No. 8200139
MaximICE TES-ORE 25-100 Owner’s Manual
Part No. 9840502
48
Effective September 1, 1998
Revised December 1, 2000
13.2 Model ORE-25 Flooded Refrigerant Feed, Pumped Slush Discharge Schematic,
Drawing No. 8200146
MaximICE TES-ORE 25-100 Owner’s Manual
Part No. 9840502
49
Effective September 1, 1998
Revised December 1, 2000
13.3 Model ORE-25 Flooded Refrigerant Feed, Gravity Slush Discharge,
Drawing No. 8200153
MaximICE TES-ORE 25-100 Owner’s Manual
Part No. 9840502
50
Effective September 1, 1998
Revised December 1, 2000
13.4 Model ORE-25 Flooded Refrigerant Feed, Gravity Slush Discharge Schematic,
Drawing No. 8200160
MaximICE TES-ORE 25-100 Owner’s Manual
Part No. 9840502
51
Effective September 1, 1998
Revised December 1, 2000
13.5 Model ORE-50 Flooded Refrigerant Feed, Pumped Slush Discharge,
Drawing No. 8200140
MaximICE TES-ORE 25-100 Owner’s Manual
Part No. 9840502
52
Effective September 1, 1998
Revised December 1, 2000
13.6 Model ORE-50 Flooded Refrigerant Feed, Pumped Slush Discharge Schematic,
Drawing No. 8200147
MaximICE TES-ORE 25-100 Owner’s Manual
Part No. 9840502
53
Effective September 1, 1998
Revised December 1, 2000
13.7 Model ORE-50 Flooded Refrigerant Feed, Gravity Slush Discharge,
Drawing No. 8200154
MaximICE TES-ORE 25-100 Owner’s Manual
Part No. 9840502
54
Effective September 1, 1998
Revised December 1, 2000
13.8 Model ORE-50 Flooded Refrigerant Feed, Gravity Slush Discharge Schematic,
Drawing No. 8200161
MaximICE TES-ORE 25-100 Owner’s Manual
Part No. 9840502
55
Effective September 1, 1998
Revised December 1, 2000
13.9 Model ORE-100 Flooded Refrigerant Feed, Pumped Slush Discharge,
Drawing No. 8200141
MaximICE TES-ORE 25-100 Owner’s Manual
Part No. 9840502
56
Effective September 1, 1998
Revised December 1, 2000
13.10 Model ORE-100 Flooded Refrigerant Feed, Pumped Slush Discharge Schematic,
Drawing No. 8200148
MaximICE TES-ORE 25-100 Owner’s Manual
Part No. 9840502
57
Effective September 1, 1998
Revised December 1, 2000
13.11 Model ORE-100 Flooded Refrigerant Feed, Gravity Slush Discharge,
Drawing No. 8200155
MaximICE TES-ORE 25-100 Owner’s Manual
Part No. 9840502
58
Effective September 1, 1998
Revised December 1, 2000
13.12 Model ORE-100 Flooded Refrigerant Feed, Pumped Slush Discharge Schematic,
Drawing No. 8200162
MaximICE TES-ORE 25-100 Owner’s Manual
Part No. 9840502
59
Effective September 1, 1998
Revised December 1, 2000
SECTION 14.0 - START-UP REQUEST FORM
14.0
Start-Up Request Form
I request that a factory-authorized service representative be scheduled to perform start-up on
or about the week of
. Please note that this is a requested date and must
be confirmed by the service department. Start-up is usually performed within five days (travel
included). Upon arrival on site, the start-up technician will verify that the system is capable of
being started and that the items identified in the prestart-up check list have been satisfied.
If site construction/installation cannot be completed within 24 hours, the service technician
will depart from the job site. In this situation, all costs associated with this trip will be
charged to the purchaser on a time-and-material basis. The technician will return to the
installation site to perform start-up upon the following conditions:
▲ Verification of the purchaser that all construction items/issues are in compliance with and
satisfy the concerns of the start-up technician.
▲
Full payment has been received for the initial start-up trip.
Please fax to (417) 862-9008, attention Thermal Energy Storage Department. You will be
contacted within two weeks to confirm the start-up of your unit(s). Contact our service
department if you have any questions regarding this form or the installation of your
equipment. We will be happy to assist you.
MaximICE TES-ORE 25-100 Owner’s Manual
Part No. 9840502
60
Effective September 1, 1998
Revised December 1, 2000
SECTION 15.0 - WARRANTY
WA R R A N T Y
Mueller ® MaximICE® for Thermal Storage
One-Year Parts Warranty
Paul Mueller Company (hereinafter referred to as Company) will repair or (or at the Company’s option) replace any part or portion of a
Mueller MaximICE Evaporator Assembly found to be defective in workmanship or material under normal use, service, and installation
procedures, for a period of one (1) year from date of installation by the original purchaser/user or eighteen (18) months from the date
of shipment from the Company factory, whichever occurs first. This Warranty covers replacement of parts or repair of the equipment
only. This warranty does not cover consumable products or parts such as refrigerant, driers, glass, or rubber components (See General
Provisions.)
Claim Procedure for One-Year Parts Warranty
All defective parts covered by the one-year parts warranty must be returned to Paul Mueller Company with an attached Returned
Goods Tag (O-209) and with transportation cost prepaid. Current instructions for return procedures, provided by the Thermal Storage
Products Service Department, must be followed to receive warranty.
General Provisions
This warranty does not cover items such as: refrigerant, transportation, mileage, freight, product loss, cost of substitutions, or labor and
parts charged by others. Replacement and/or repair of certain components not manufactured by the Company will be handled by
authorized service stations designated by the manufacturer of the component. Transportation and inspection cost incurred by the
Company will be charged to the purchaser/user if returned material is not found to be defective. The above will constitute the
Company’s total responsibility. The above warranties will not apply in the event of abuse; negligence; improper installation procedures;
alterations by unauthorized service; damage by flood, fire, windstorm, lightning; or acts of God. Oral statements made by employees or
representatives of the Company, will not constitute warranties. The above warranties apply only to the original purchaser/user and
original installation location and are not transferable.
®
THERMAL STORAGE PRODUCTS
Paul Mueller Company
P.O. Box 828 • Springfield, Missouri 65801-0828, U.S.A.
Telephone: (417) 831-3000 • Facsimile: (417) 862-9008
MaximICE TES-ORE 25-100 Owner’s Manual
Part No. 9840502
61
Effective September 1, 1998
Revised December 1, 2000
NOTES
MaximICE TES-ORE 25-100 Owner’s Manual
Part No. 9840502
62
Effective September 1, 1998
Revised December 1, 2000
®
P.O. Box 828 • Springfield, Missouri 65801-0828, U.S.A.
Phone: (417) 831-3000 • 1-800-MUELLER • Fax: (417) 862-9008
www.muel.com • E-mail: [email protected]
International Inquiries: Fax: (417) 831-6906 • E-mail: [email protected]
(12/00) Part No. 9840502