1
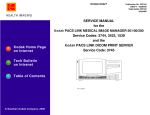
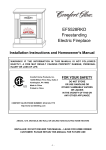
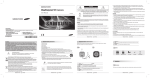
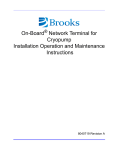
Frequency Converter Installation
Instructions
8040520 Revision AA
Frequency Converter Installation
Instructions
Information provided within this document is subject to change without notice, and although believed to be
accurate, Brooks Automation assumes no responsibility for any errors, omissions, or inaccuracies.
AcuLigner™, AquaTran™, Assure™, AutoTeach™, AXM™, Basic Blue™, BiSymmetrik™, CenterSmart™,
Cool Solutions™, Crate to Operate™, e-RMA™, e-Spares™, FastRegen™, FIXLOAD™, FrogLeg™, Fusion™,
InLigner™, In-Sight®, InCooler™, Interface™, Jet™, Jet Engine™, M2 Nano™, PASIV™, PowerPak™, PerformanceBlue™, PowerPak™, PowerTools™, QuadraFly™, Radius™, Razor™, Reliance™, Reliance ATR™,
RetroEase™, SCARA™, SmartPM™, SPOTLevel™, Synetics™, The New Pathway to Productivity™, Time
Optimal Trajectory™, Time Optimized Path™, TopCooler™, TopLigner™, Ultimate Blue™, AC-407™, VacuTran™, and Vision™ are trademarks of Brooks Automation.
AcuTran®, AeroLoader®, AcuTrap®, Brooks®, Brooks Automation®, Conductron®, Convectron®, Cryodyne®,
Cryotiger®, E-VOLUTION®, GOLDLink®, Granville-Phillips®, Guardian®, GUTS®. Hercules®, In-Sight®, Leapfrog®, MagnaTran®, MapTrak®, Marathon®, Marathon Express®, Micro-Ion®, MiniConvectron®, MultiTran®,
On-Board®, Polycold®, Stabil-Ion®, TrueBlue®, TurboPlus®,We Deliver Productivity®, and Zaris® are registered
trademarks of Brooks Automation.
All other trademarks are properties of their respective owners.
© Brooks Automation 2012, All Rights Reserved. The information included in this manual is Brooks Proprietary
Information and is provided for the use of Brooks customers only and cannot be used for distribution, reproduction, or sale without the express written permission of Brooks Automation. This information may be incorporated into the user’s documentation, however any changes made by the user to this information is the
responsibility of the user.
For Technical Support:
Location
GUTS® Contact Number
North America
+1-800-FOR-GUTS (1-800-367-4887)
+1-978-262-2900
Europe
+49-1804-CALL-GUTS (+49-1804-2255-4887)
Japan
+81-45-477-5980
China
+86-21-5131-7066
Taiwan
+886-3-5525225
Korea
+82-31-288-2500
Singapore
+65-6464-1481
Visit us online: www.brooks.com
May 23, 2012
Oct. 14, 2008
Part Num 8040520 Revision AA
Part Num 8040520 Revision 103
This technology is subject to United States export Administration Regulations and authorized to the destination
only; diversion contrary to U.S. law is prohibited.
Printed in the U.S.A.
Brooks Automation
8040520 Revision AA
Contents
Introduction
Purpose . . . . . . . . . . . . . . . . . . . . . . . . . . . . . . . . . . . . . . . . . . . . . . . . . . . . . . . . . . . . . .1-1
Frequency Converter Applications . . . . . . . . . . . . . . . . . . . . . . . . . . . . . . . . . . . . . . .1-1
Specifications . . . . . . . . . . . . . . . . . . . . . . . . . . . . . . . . . . . . . . . . . . . . . . . . . . . . . . . . .1-1
Safety
Introduction . . . . . . . . . . . . . . . . . . . . . . . . . . . . . . . . . . . . . . . . . . . . . . . . . . . . . . . . . .2-1
Signal Word Descriptions . . . . . . . . . . . . . . . . . . . . . . . . . . . . . . . . . . . . . . . . . . . . . . .2-1
Safety Shape Descriptions. . . . . . . . . . . . . . . . . . . . . . . . . . . . . . . . . . . . . . . . . . . . . . .2-3
References . . . . . . . . . . . . . . . . . . . . . . . . . . . . . . . . . . . . . . . . . . . . . . . . . . . . . . . . . . . .2-3
Installation
Introduction . . . . . . . . . . . . . . . . . . . . . . . . . . . . . . . . . . . . . . . . . . . . . . . . . . . . . . . . . .3-1
9600 Compressor with On-Board Cryopumps . . . . . . . . . . . . . . . . . . . . . . . . . . . . .3-1
9600 Compressor with Cryo-Torr Cryopumps . . . . . . . . . . . . . . . . . . . . . . . . . . . . .3-3
8200 Single Phase Compressor with an On-Board Cryopump . . . . . . . . . . . . . . . .3-5
8510 Compressor with On-Board Cryopumps . . . . . . . . . . . . . . . . . . . . . . . . . . . . .3-13
8500 Compressor with Cryo-Torr Cryopumps . . . . . . . . . . . . . . . . . . . . . . . . . . . . .3-17
1020R Compressor with On-Board Cryopumps . . . . . . . . . . . . . . . . . . . . . . . . . . . .3-19
1020R Compressor with Cryo-Torr Cryopumps. . . . . . . . . . . . . . . . . . . . . . . . . . . .3-21
Brooks Automation
8040520 Revision AA
8040520
1
Appendices
Overview . . . . . . . . . . . . . . . . . . . . . . . . . . . . . . . . . . . . . . . . . . . . . . . . . . . . . . . . . . . . .4-1
Appendix A: Customer Support Information . . . . . . . . . . . . . . . . . . . . . . .4-2
Customer Support Center Locations. . . . . . . . . . . . . . . . . . . . . . . . . . . . . . . .4-2
Guaranteed Up-Time Support (GUTS®) . . . . . . . . . . . . . . . . . . . . . . . . . . . .4-2
Product Information . . . . . . . . . . . . . . . . . . . . . . . . . . . . . . . . . . . . . . . . . . . . .4-2
E-mail. . . . . . . . . . . . . . . . . . . . . . . . . . . . . . . . . . . . . . . . . . . . . . . . . . . . . . . . . .4-2
8040520
2
Brooks Automation
8040520 Revision AA
1
Introduction
Purpose
The Frequency Converter, P/N 8043202G001 - G005, 8124106G001 - G005, and
8124114G001 - G005, allows CTI-CRYOGENICS’ equipment to operate efficiently
when connected to a supply voltage with a line frequency of 50Hz.
The Frequency Converter, shown in Figure 1-1, is designed for use with CTI-CRYOGENICS’ 9600, 8200, 8510, 8500, and 1020R compressors, and On-Board and CryoTorr Cryopumps.
Frequency Converter Applications
The Frequency Converter supports various configurations of CTI-CRYOGENICS’
compressors and cryopumps. Refer to Section 2 - Installation for information on
installing the Frequency Converter for your particular compressor and cryopump
application.
Specifications
Table 1-1: Frequency Converter General Specifications
Parameter
Brooks Automation
8040520 Revision AA
Value
Weight
50 lbs (22.67 kg)
Ambient Temperature
50 - 100 º F (10 - 38 º C)
8040520
1-1
Front Panel View
LT1
COMPRESSOR
REMOTE
CRYO-TORR®
POWER IN
1
CRYO-TORR® POWER OUT
3
2
CUSTOMER
REMOTE
ON-BOARD®
POWER IN
1
ON-BOARD® POWER OUT
2
3
Rear Panel View
Figure 1-1: Frequency Converter Chassis Front and Rear Views
8040520
1-2
Brooks Automation
Figure 1-2: Frequency Converter Dimensions
Brooks Automation
8040520 Revision AA
8040520
1-3
8040520
1-4
Brooks Automation
2
Safety
Overview
This chapter describes safety conventions for the Brooks Automation Product. All
personnel involved in the operation or maintenance of the product must be familiar
with the safety precautions outlined here.
NOTE: These safety recommendations are basic guidelines. If the facility where the Product is installed has additional safety guidelines they should be followed as well,
along with the applicable national and international safety codes.
Introduction
Follow all safety precautions during installation, normal operation, and when servicing CTI-Cryogenics products.
This chapter explains the safety conventions used throughout this manual. CTI-Cryogenics uses a specific format for cautions and warnings, which includes standard signal words and safety shapes.
See also the Customer Support appendix or call your local Customer Support Center for
assistance.
Signal Word Descriptions
All cautions and warnings contain signal words, which call attention to safety messages and designate the degree of hazard seriousness. The following table shows the
signal words and their meanings that may be used in this document.
Brooks Automation
8040520 Revision AA
8040520
2-1
Table 2-1: Safety Signal Words
Term
8040520
2-2
Example
Definition
CAUTION
A signal word that indicates a situation or unsafe practice, which if not
avoided may result in equipment
damage. A CAUTION is highlighted
in yellow.
CAUTION
A signal word accompanied by a
safety shape that indicates a potentially hazardous situation or unsafe
practice.
If not avoided, the action may result in
minor or moderate personal injury or
equipment damage. A CAUTION is
highlighted in yellow.
WARNING
A signal word accompanied by a
safety shape that indicates indicates a
potentially hazardous situation.
If not avoided, the action may result in
serious injury or death. A WARNING
is highlighted in orange.
Brooks Automation
8040520 Revision AA
Safety Shape Descriptions
All cautions and warnings contain safety shapes, which have specific safety meanings. The following table shows some of the safety shapes used in this document and
their meanings.
Table 2-2: Safety Shapes
Example
Term
Shape Definition
General Warning
Indicates a general hazard. Details
about this hazard appear in the safety
notice explanation.
High Voltage
Hot Surface
Indicates a high voltage hazard.
Indicates a surface is hot enough to
cause discomfort or a burn.
References
For more information about safety standards, see the following documents:
•
ISO 7010: 2003(E), Graphic symbols - Safety colours and safety signs - Safety
signs used in workplaces and public areas
•
ISO 3864-1: 2002(E), Graphic symbols - Safety colours and safety signs - Part 1:
Design principles for safety signs in workplaces and public areas
Brooks Automation
8040520 Revision AA
8040520
2-3
8040520
2-4
Brooks Automation
8040520 Revision AA
3
Installation
Introduction
This chapter provides all the information needed to connect the Frequency Converter
to the 9600, 8200, 8510, 8500, and 1020R Compressors, which, in turn, are connected to
On-Board or Cryo-Torr Cryopumps.
9600 Compressor with On-Board Cryopumps
This procedure involves the following components:
•
9600 Low-Voltage Compressor, CTI-CRYOGENICS P/N 8135900G001
•
Frequency Converter, CTI-CRYOGENICS P/N 8043202G002, 8124106G002, or
8124114G002, which includes On-Board Power Cable, CTI-CRYOGENICS P/
N 8112463G050
•
On-Board Cryopumps
NOTE: If installing a new 9600 Compressor along with the Frequency Converter, refer to
the 9600 Compressor Installation, Operation, and Service Instructions manual CTI-CRYOGENICS P/N 8040444.
1.
Carefully place the Frequency Converter on top of the 9600 Compressor as
shown in Figure 2-1.
2.
Connect the three On-Board power cables to the ON-BOARD POWER OUT
outputs 1, 2 and 3 on the Frequency Converter.
3.
Connect the On-Board Cryopump power cable, P/N 8112463G050 (supplied),
between the ON-BOARD POWER IN, input on the Frequency Converter and
the cryopump electrical outlet on the 9600 compressor.
4.
Set the control circuit breaker on the rear panel of the 9600 compressor to the
ON position.
Brooks Automation
8040520 Revision AA
8040520
3-1
CAUTION
Allow a 1.0 inch minimum space above the
top of the Frequency Converter for adequate
ventilation
Frequency Converter
CTI-CRYOGENICS
P/N 8043202G002,
P/N 8124106G002,
or
P/N 8124114G002
On-Board Cryopump
Power Cables
CTI-CRYOGENICS
P/N 8112463GXXX
Figure 3-1: 9600 LV Compressor with On-Board Cryopumps
8040520
3-2
Brooks Automation
8040520 Revision AA
9600 Compressor with Cryo-Torr Cryopumps
This procedure involves the following components:
•
9600 Low-Voltage Compressor, CTI-CRYOGENICS P/N 8135900G001
•
Frequency Converter, CTI-CRYOGENICS P/N 8043202G005, 8124106G005, or
8124114G005, which includes a cryopump power cable, CTI-CRYOGENICS
P/N 8043209G050
•
Cryo-Torr Cryopumps
NOTE: If installing a new 9600 Compressor along with the Frequency Converter, refer to
the 9600 Compressor Installation, Operation, and Service Instructions manual CTI-CRYOGENICS P/N 8040444.
1.
Carefully place the Frequency Converter on top of the 9600 Compressor as
shown in Figure 2-2.
2.
Connect the three cryopump power cables to the CRYO-TORR POWER OUT
outputs 1, 2 and 3 on the Frequency Converter.
3.
Connect the cryopump power cable, P/N 8043209G050 (supplied), between
the CRYO-TORR POWER IN, input on the Frequency Converter and the
cryopump electrical outlet on the 9600 compressor.
4.
Set the control circuit breaker on the rear panel of the 9600 compressor to the
ON position.
Brooks Automation
8040520 Revision AA
8040520
3-3
CAUTION
Allow a 1.0 inch minimum space above the
top of the Frequency Converter for adequate
ventilation
Frequency Converter
CTI-CRYOGENICS
P/N 8043202G005,
P/N 8124106G005,
or
P/N 8124114G005
Power Cable
CTI-CRYOGENICS
P/N 8032222GXXX
To Cryo-Torr
Cryopumps
9600 to Frequency
Converter Power Cable
CTI-CRYOGENICS
P/N 8043209G050
Figure 3-2: 9600 LV Compressor with an Cryo-Torr Cryopumps
8040520
3-4
Brooks Automation
8040520 Revision AA
8200 Single Phase Compressor with an On-Board Cryopump
This procedure involves the following components:
•
8200 Single Phase, Water or Air Cooled Compressor
•
Frequency Converter, CTI-CRYOGENICS P/N 8043202G004, 8124106G004, or
8124114G004, which includes power cable CTI-CRYOGENICS P/N
8132646G050
•
One On-Board Cryopump
NOTE: If installing a new 8200 Compressor along with the Frequency Converter, refer to
the 8200 Compressor Installation, Operation, and Service manual CTICRYOGENICS P/N 8040353 for information on setting the control module to the
proper operating voltage range before installing the Frequency Converter.
1.
Carefully place the Frequency Converter on top of the 8200 Compressor as
shown in Figure 2-3.
2.
Connect the On-Board Cryopump power cable CTI-CRYOGENICS P/N
8112463GXXX between one of the ON-BOARD POWER OUT connectors on
the rear panel of the Frequency Converter and the POWER IN connector on the
On-Board Cryopump Module.
3.
Connect the power cable CTI-CRYOGENICS P/N 8132646G050 between the
ON-BOARD POWER IN connector on the rear panel of the Frequency Converter and the ON-BOARD POWER connector on the rear panel of the 8200
compressor as shown in Figure 2-3.
NOTE: Make sure the Frequency Selector Switch is set to the 60Hz position. Failure to do
so will result in improper system operation.
4.
Set the Frequency Selector Switch on the front panel of the 8200 compressor to
the 60Hz position.
5.
Set the Power Switch on the front panel of the 8200 compressor to the ON position.
Brooks Automation
8040520 Revision AA
8040520
3-5
CAUTION
Allow a 1.0 inch minimum space above the
top of the Frequency Converter for adequate
ventilation
Power Cable
CTI-CRYOGENICS
P/N 8132646G050
Frequency Converter
CTI-CRYOGENICS
P/N 8043202G004,
P/N 8124106G004,
or
P/N 8124114G004
Power Cable
CTI-CRYOGENICS
P/N 8112463GXXX
8200 Compressor
Figure 3-3: 8200 Single Phase Compressor with an On-Board Cryopump
8040520
3-6
Brooks Automation
8040520 Revision AA
8200 Single Phase Compressor with Cryo-Torr Cryopumps
This procedure involves the following components:
•
8200 Single Phase, Water or Air Cooled Compressor
•
Frequency Converter, CTI-CRYOGENICS P/N 8043202G003, 8124106G003, or
8124114G003, which includes power cable CTI-CRYOGENICS P/N
8043072G050
•
Cryo-Torr Cryopumps
NOTE: If installing a new 8200 Compressor along with the Frequency Converter, refer to
the 8200 Compressor Installation, Operation, and Service manual CTICRYOGENICS P/N 8040353 for information on setting the control module to the
proper operating voltage range before installing the Frequency Converter.
1.
Carefully place the Frequency Converter on top of the 8200 Compressor as
shown in Figure 2-4.
2.
Connect the Cryo-Torr Cryopump power cable CTI-CRYOGENICS P/N
8032222GXXX between one of the CRYO-TORR POWER OUT connectors on
the rear panel of the Frequency Converter and the connector on the Cryo-Torr
Cryopump as shown in Figure 2-4.
3.
Connect the power cable CTI-CRYOGENICS P/N 8043072G050 between the
CRYO-TORR POWER IN connector on the rear panel of the Frequency Converter and the COLD HEAD POWER connector on the rear panel of the 8200
compressor as shown in Figure 2-4.
NOTE: Make sure the Frequency Selector Switch is set to the 60Hz position. Failure to do
so will result in improper system operation.
4.
Set the Frequency Selector Switch on the front panel of the 8200 compressor to
the 60Hz position.
5.
Set the Power Switch on the front panel of the 8200 compressor to the ON position.
Brooks Automation
8040520 Revision AA
8040520
3-7
CAUTION
Allow a 1.0 inch minimum space above the
top of the Frequency Converter for adequate
ventilation
Power Cable
CTI-CRYOGENICS
P/N 8043072G050
Power Cable
CTI-CRYOGENICS
P/N 8032222GXXX
Frequency Converter
CTI-CRYOGENICS
P/N 8043202G003,
P/N 8124106G003,
or
P/N 8124114G003
To Cryo-Torr
Cryopump
8200 Compressor
Figure 3-4: 8200 for Single Phase Compressor with Cryo-Torr Cryopumps
8040520
3-8
Brooks Automation
8040520 Revision AA
8200 Three Phase Compressor with an On-Board Cryopump
This procedure involves the following components:
•
8200 Three Phase Compressor
•
Frequency Converter, CTI-CRYOGENICS P/N 8043202G002, 8124106G002, or
8124114G002, which includes On-Board Cryopump power cable CTI-CRYOGENICS P/N 8112463G050
•
One On-Board Cryopump
NOTE: If installing a new 8200 Compressor along with the Frequency Converter, refer to
the 8200 Compressor Installation, Operation, and Service manual CTICRYOGENICS P/N 8040353 for information on setting the control module to the
proper operating voltage range before installing the Frequency Converter.
1.
Carefully place the Frequency Converter on top of the 8200 Compressor as
shown in Figure 2-5.
2.
Connect the On-Board Cryopump power cable CTI-CRYOGENICS P/N
8112463GXXX between one of the ON-BOARD POWER OUT connectors on
the rear panel of the Frequency Converter and the POWER IN connector on the
On-Board Cryopump Module as shown in Figure 2-5.
3.
Connect the power cable CTI-CRYOGENICS P/N 8112463G050 (supplied)
between the ON-BOARD POWER IN connector on the rear panel of the Frequency Converter and the ON-BOARD POWER connector on the rear panel of
the 8200 compressor as shown in Figure 2-5.
4.
Set the Power Switch on the front panel of the 8200 compressor to the ON position.
Brooks Automation
8040520 Revision AA
8040520
3-9
CAUTION
Allow a 1.0 inch minimum space above the
top of the Frequency Converter for adequate
ventilation
Power Cable
CTI-CRYOGENICS
P/N 8112463G050
Power Cable
CTI-CRYOGENICS
P/N 8112463GXXX
Frequency Converter
CTI-CRYOGENICS
P/N 8043202G002,
P/N 8124106G002,
or
P/N 8124114G002
To On-Board
Cryopump
8200 Compressor
Figure 3-5: 8200 Three-Phase Compressor with an On-Board Cryopump
8040520
3-10
Brooks Automation
8040520 Revision AA
8200 Three Phase Compressor with Cryo-Torr Cryopumps
This procedure involves the following components:
•
8200 Three Phase Water Cooled Compressor
•
Frequency Converter, CTI-CRYOGENICS P/N 8043202G001, 8124106G001,
8124114G001, which includes Frequency Converter Cable Kit, CTI-CRYOGENICS P/N 8080005K012
•
Cryo-Torr Cryopumps
NOTE: NOTE: An 8200 Three Phase Compressor does not support Cryo-Torr Cryopump
Remote ON/OFF capability.
NOTE: If installing a new 8200 Compressor along with the Frequency Converter, refer to
the 8200 Compressor Installation, Operation, and Service manual CTICRYOGENICS P/N 8040353 for information on setting the control module to the
proper operating voltage range before installing the Frequency Converter.
1.
Carefully place the Frequency Converter on top of the 8200 Compressor as
shown in Figure 2-6.
2.
Connect the Cryo-Torr Cryopump power cable CTI-CRYOGENICS P/N
8032222GXXX between one of the CRYO-TORR POWER OUT connectors on
the rear panel of the Frequency Converter and the connector on the Cryo-Torr
Cryopump as shown in Figure 2-6.
3.
Connect the power cable CTI-CRYOGENICS P/N 8043054G050 between the
CRYO-TORR POWER IN connector on the rear panel of the Frequency Converter and the COLD HEAD POWER connector on the rear panel of the 8200
compressor as shown in Figure 2-6.
4.
Set the Power Switch on the front panel of the 8200 compressor to the ON position.
Brooks Automation
8040520 Revision AA
8040520
3-11
CAUTION
Allow a 1.0 inch minimum space above the
top of the Frequency Converter for adequate
ventilation
Power Cable
CTI-CRYOGENICS
P/N 8043054G050
Power Cable
CTI-CRYOGENICS
P/N 8032222GXXX
Frequency Converter
CTI-CRYOGENICS
P/N 8043202G001,
P/N 8124106G001,
or
P/N 8124114G001
To Cryo-Torr
Cryopump
8200 Compressor
Figure 3-6: 8200 Three-Phase Compressor with Cryo-Torr Cryopumps
8040520
3-12
Brooks Automation
8040520 Revision AA
8510 Compressor with On-Board Cryopumps
This procedure involves the following components:
•
8510 Low-Voltage Compressor, CTI-CRYOGENICS P/N 8031315
•
Frequency Converter, CTI-CRYOGENICS P/N 8043202G002, 8124106G002, or
8124114G002, which includes On-Board Power Cable, CTI-CRYOGENICS P/
N 8112463G050
•
On-Board Cryopumps
NOTE: NOTE: If installing a new 8510 Compressor along with the Frequency Converter,
refer to the 8510 Compressor Installation, Operation, and Service manual
CTI-CRYOGENICS P/N 8040232 for information on setting the control module
to the proper operating voltage range before installing the Frequency Converter.
1.
Carefully place the Frequency Converter on top of the 8510 Compressor as
shown in Figure 2-7.
2.
Connect the three On-Board power cables to the ON-BOARD POWER OUT
outputs 1, 2 and 3 on the Frequency Converter.
NOTE: Make sure the On-Board Cryopump Power cable is connected to COLD HEAD 3
output on the compressor in step 3. The CUSTOMER REMOTE capability will
not function if connected to output 1 or 2.
3.
Connect the On-Board Cryopump power cable, P/N 8112463G050 (supplied),
between the ON-BOARD POWER IN, input on the converter and the COLD
HEAD 3 output on the compressor.
4.
Set the Power Switch on the front panel of the 8510 compressor to the ON position.
Brooks Automation
8040520 Revision AA
8040520
3-13
CAUTION
Allow a 1.0 inch minimum space above the
top of the Frequency Converter for adequate
ventilation
Frequency Converter
CTI-CRYOGENICS
P/N 8043202G002,
P/N 8124106G002,
or
P/N 8124114G002
On-Board Cryopump
Power Cables
CTI-CRYOGENICS
P/N 8112463GXXX
Frequency Converter
Power Cable
CTI-CRYOGENICS
P/N 8112463G050
NOTE: Must be
connected to COLD
HEAD 3 connector to
support remote option.
8510 Compressor
Figure 3-7: 8510 Compressor with On-Board Cryopumps
8040520
3-14
Brooks Automation
8040520 Revision AA
8500 Compressor with On-Board Cryopumps
This procedure involves the following components:
•
8500 Compressor, CTI-CRYOGENICS P/N 8031348G001 or G002
•
Frequency Converter, CTI-CRYOGENICS P/N 8043202G002, 8124106G002, or
8124114G002, which includes Frequency Converter Cable Kit, CTI-CRYOGENICS P/N 8080005K012 8011 Compressor Controller
•
On-Board Cryopumps
NOTE: NOTE: If installing a new 8500 Compressor along with the Frequency Converter,
refer to the 8500 Compressor Installation, Operation, and Service manual
CTI-CRYOGENICS P/N 8040324 for information on setting the control module
to the proper operating voltage range before installing the Frequency Converter.
NOTE: If installing a new 8011 Controller along with the Frequency Converter, refer to the
8011 Controller and 8011 Control Module manual CTI-CRYOGENICS P/N
8040309 for proper setup before installing the Frequency Converter.
1. Carefully place the 8011 Controller on top of the 8500 compressor
as shown in Figure 2-8.
2. Carefully place the Frequency Converter on top of the 8011 Controller
as shown in Figure 2-8.
NOTE: NOTE: Make sure the cryopump cable is connected to COLD HEAD 3 output on
the compressor. The CUSTOMER REMOTE capability will not function if connected to output 1 or 2.
3. Connect the cryopump cable CTI-CRYOGENICS P/N 8043054P050
between COLD HEAD 3 connector on the 8500 Compressor and 1 IN
connector on the 8011 Controller.
4. Connect the On-Board power cable CTI-CRYOGENICS P/N
8112463G050 between the 1 OUT connector on the 8011 Controller
and the ON-BOARD POWER IN connector on the Frequency
Converter.
5. Connect the On-Board Cryopump power cables CTI -CRYOGENICS
P/N 8112463GXXX between the ON-BOARD POWER OUT
connectors on the Frequency Converter and the On-Board Cryopumps.
6. Set the Power Switch on the front panel of the 8500 compressor to the
ON position.
Brooks Automation
8040520 Revision AA
8040520
3-15
CAUTION
Allow a 1.0 inch minimum space above the
top of the Frequency Converter for adequate
ventilation
Frequency Converter
CTI-CRYOGENICS
P/N 8043202G002,
P/N 8124106G002,
or
P/N 8124114G002
On-Board 8011
Controller
On-Board Cryopump
Power Cables
CTI-CRYOGENICS
P/N 8112463GXXX
INPUT
POWER
IN
IN
IN
OUT
OUT
OUT
COMPRESSOR
POWER
Input Power Cable
On-Board Cryopump
Power Cables
CTI-CRYOGENICS
P/N 8112463G050
8500 Compressor
Power Cable
Cryopump Cable
CTI-CRYOGENICS
P/N 8043054P050
8500
Compressor
Figure 3-8: 8500 Compressor with an On-Board Cryopump
8040520
3-16
Brooks Automation
8040520 Revision AA
8500 Compressor with Cryo-Torr Cryopumps
This procedure involves the following components:
•
8500 Compressor, CTI-CRYOGENICS P/N 8031348G001 or G002
•
Frequency Converter, CTI-CRYOGENICS P/N 8043202G001, 8124106G001, or
8124114G001, which includes Frequency Converter Cable Kit, CTI-CRYOGENICS P/N 8080005K012 which can be used with an optional remote
•
Cryo-Torr Cryopumps
NOTE: If installing a new 8500 Compressor along with the Frequency Converter, refer to
the 8500 Compressor Installation, Operation, and Service manual CTICRYOGENICS P/N 8040324 for information on setting the control module to the
proper operating voltage range before installing the Frequency Converter.
1.
Carefully place the Frequency Converter on top of the 8500 Compressor as
shown in Figure 2-9.
2.
Connect the cables to the corresponding CRYO-TORR POWER outputs 1, 2
and 3 on the Frequency Converter.
3.
Connect the standard remote cable between the COMPRESSOR REMOTE
input on the converter and the REMOTE input on the compressor (optional).
4.
Connect the Power Cable between the CRYO-TORR POWER IN input on the
converter and the COLD HEAD 3 output on the compressor.
NOTE: Make sure the cryopump cable is connected to COLD HEAD 3 output on the compressor. The CUSTOMER REMOTE capability will not function if connected to
output 1 or 2.
5.
Set the Power Switch on the front panel of the 8500 compressor to the ON position.
Brooks Automation
8040520 Revision AA
8040520
3-17
CAUTION
Allow a 1.0 inch minimum space above the
top of the Frequency Converter for adequate
ventilation
Frequency Converter
CTI-CRYOGENICS
P/N 8043202G001,
P/N 8124106G001,
or
P/N 8124114G001
Cryo-Torr Cryopump
Power Cables
CTI-CRYOGENICS
P/N 8032222GXXX
Standard Remote Cable
CTI-CRYOGENICS
P/N 8043042P050
(optional)
Frequency Converter
Power Cable
CTI-CRYOGENICS
P/N 8043054G050
NOTE: Must be
connected to COLD
HEAD 3 connector to
support remote option.
8500
Compressor
Figure 3-9: 8500 Compressor with Cryo-Torr Cryopumps
8040520
3-18
Brooks Automation
8040520 Revision AA
1020R Compressor with On-Board Cryopumps
This procedure involves the following components:
•
1020R Compressor, CTI-CRYOGENICS P/N 8031023G001 and G002
•
On-Board 8011 Controller
•
Frequency Converter, CTI-CRYOGENICS P/N 8043202G002, 8124106G002, or
8124114G002, which includes On-Board Power Cable, CTI-CRYOGENICS P/N
8112463G050
•
On-Board Cryopumps
NOTE: If installing a new 1020R Compressor along with the Frequency Converter, refer to
the 1020R Compressor Installation, Operation, and Service manual CTICRYOGENICS P/N 8040274 for information on setting the control module to the
proper operating voltage range before installing the Frequency Converter.
NOTE: If installing a new 8011 Controller along with the Frequency Converter, refer to the
8011 Controller and 8011 Control Module manual CTI-CRYOGENICS P/N
8040309 for proper setup information before installing the Frequency Converter.
1.
Carefully place the On-Board 8011 Controller on top of the 1020R Compressor
as shown in Figure 2-10.
2.
Carefully place the Frequency Converter on top of the 8011 Controller as
shown in Figure 2-10.
3.
Connect the three On-Board cryopump power cables CTI-CRYOGENICS P/N
81122463GXXX into the ON-BOARD POWER OUT connectors 1, 2 and 3 on the
Frequency Converter as shown in Figure 2-10.
4.
Connect the cryopump power cable, hard wired to the compressor, to the
COLD HEADS 1 IN connector on the 8011 Controller.
5.
Connect the On-Board power cable, CTI-CRYOGENICS P/N 8112463G050
(supplied) to the On-Board POWER IN input on the converter and the
CRYOPUMPS 1 OUT connector on the 8011 Controller.
6.
Turn on SYSTEM POWER at the compressor.
Brooks Automation
8040520 Revision AA
8040520
3-19
CAUTION
Allow a 1.0 inch minimum space above the
top of the Frequency Converter for adequate
ventilation
Frequency Converter
CTI-CRYOGENICS
P/N 8043202G002,
P/N 8124106G002,
or
P/N 8124114G002
Input Power Cable
On-Board 8011
Controller
On-Board Power Cable
CTI-CRYOGENICS
P/N 8112463G050
On-Board Cryopump
Power Cables
CTI-CRYOGENICS
P/N 8112463GXXX
INPUT
POWER
IN
IN
IN
OUT
OUT
OUT
COMPRESSOR
POWER
On-Board Cryopump
Power Cable
(Hard wired to 1020R
Compressor)
1020R Compressor
Power Cable
Figure 3-10: 1020R Compressor with On-Board Cryopumps
8040520
3-20
Brooks Automation
8040520 Revision AA
1020R Compressor with Cryo-Torr Cryopumps
This procedure involves the following components:
•
1020R Compressor, CTI-CRYOGENICS P/N 8031023G001 and G002
•
Frequency Converter, CTI-CRYOGENICS P/N 8043202G001, 8124106G001, or
8124114G001, which includes the Frequency Converter Cable Kit CTI-CRYOGENICS P/N 8080005K012
•
Cryo-Torr Cryopumps
NOTE: NOTE: If installing a new 1020R Compressor along with the Frequency Converter, refer to the 1020R Compressor Installation, Operation, and Service
manual CTI-CRYOGENICS P/N 8040274 for information on setting the control
module to the proper operating voltage range before installing the Frequency Converter.
1.
Carefully place the Frequency Converter on top of the 1020R Compressor as
shown in Figure 2-11.
2.
Connect the three Cryo-Torr cryopump power cables CTI-CRYOGENICS P/N
8032222GXXX into the CRYO-TORR POWER OUT connectors 1, 2 and 3 on the
Frequency Converter as shown in Figure 2-11.
3.
Connect the Cryo-Torr Cryopump Power Cable to the CRYO-TORR POWER
IN connector on the Frequency Converter.
4.
Turn on SYSTEM POWER at the compressor.
Brooks Automation
8040520 Revision AA
8040520
3-21
CAUTION
Allow a 1.0 inch minimum space above the
top of the Frequency Converter for adequate
ventilation
Frequency Converter
CTI-CRYOGENICS
P/N 8043202G001,
P/N 8124106G001,
or
P/N 8124114G001
Cryo-Torr Cryopump
Power Cables
CTI-CRYOGENICS
P/N 8032222GXXX
Cryo-Torr Cryopump
Power Cable
(Hard wired to 1020R
Compressor)
Figure 3-11: 1020R Compressor with Cryo-Torr Cryopumps
8040520
3-22
Brooks Automation
8040520 Revision AA
4
Appendices
Overview
The following appendices are included to provide the user with a single location for
specific information related to the Brooks Automation Product.
Contents
Overview . . . . . . . . . . . . . . . . . . . . . . . . . . . . . . . . . . . . . . . . . . . . . . . . . . . . . . . . . . . . .4-1
Appendix A: Customer Support Information . . . . . . . . . . . . . . . . . . . . . . .4-2
Customer Support Center Locations. . . . . . . . . . . . . . . . . . . . . . . . . . . . . . . .4-2
Guaranteed Up-Time Support (GUTS®) . . . . . . . . . . . . . . . . . . . . . . . . . . . .4-2
Product Information . . . . . . . . . . . . . . . . . . . . . . . . . . . . . . . . . . . . . . . . . . . . .4-2
E-mail. . . . . . . . . . . . . . . . . . . . . . . . . . . . . . . . . . . . . . . . . . . . . . . . . . . . . . . . . .4-2
Brooks Automation
8040520 Revision AA
8040520
4-1
Appendix A: Customer Support Information
Customer Support Center Locations
To locate a Customer Support Center near you, please visit our website
www.brooks.com on the world wide web and select CONTACT on the home page.
Guaranteed Up-Time Support (GUTS®)
For 24-hour, 7-day per week Guaranteed Up-Time Support (GUTS) dial:
1 800-367-4887 - Inside the United States of America
+1 508-337-5599 - Outside the United States of America
Product Information
Please have the following information available when calling so that we may assist
you:
•
Product Part Number
•
Product Serial Number
•
Product Application
•
Specific Problem Area
•
Hours of Operation
•
Equipment Type
•
Vacuum System Brand/Model/Date of Manufacture
E-mail
For your convenience, you may also e-mail us at:
[email protected]
8040520
4-2
Brooks Automation
8040520 Revision AA