1
ASSEMBLY
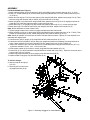
For Model BH8026 (see Figure 3):
1. Attach caster assembly (# 23) to base frame (# 24) using M8x16 bolts, washers and nuts (# 14, 21 & 22).
2. Install 3.5 " middle wheels (# 33) to base frame (# 24) using M8x60 bolts, rod cover, washers and nuts (# 31,
32, 22 & 21).
3. Attach two front legs (# 27 & 35) to base frame (# 24) using M16x85 bolts, washers and nuts (# 43 & 9). Then
secure the legs with stop bar and pin (#25 & 34) to the front hole of the legs.
4. Attach upright (# 18) to base frame using M12x80 bolts, washers and nuts (# 20 & 10). Upright must lean towards the rear of the base frame as shown. Leave nuts finger tight.
5. Attach braces (# 17) to upright(# 18) with M12x80 bolt, washer and nut (# 13 & 2). Leave nut finger tight.
6. Attach braces (#17 to inside of base frame (24) using M12x35 bolts, washers and nuts (# 20 & 2).
Note: Braces assemble to inside of base frame.
7. Tighten upright to base frame, braces to upright, and braces to base frame bolts.
8. Attach hydraulic unit (# 41) to the bracket (# 39) using M10x30 bolts, washers and nuts ( # 38, 37 & 36). Then
position to mounting ears on post, attach using M16x75 bolt, washer and nut (# 10 & 9).
Note: Handle of hydraulic unit must face the front of the base frame as shown. Tighten nut. Lean hydraulic unit
assembly back against post.
9. Connect boom (# 8) to upright (# 18) using M20x100 bolt, washer and nut (# 12 & 11).
10. Hold boom and pivot hydraulic unit out away from upright and position ram between mounting brackets on
boom. Attach hydraulic unit to boom with M16x75 bolt, washer and nut (# 10 & 9). Tighten nut.
11. Slide boom extension (# 4) into boom and secure in retracted position using M12x70 bolt and nut (# 7 & 2).
4 positions available: 1/2 ton, 1 ton, 1 1/2 ton and 2 ton.
12. Slide square washer (# 5) into boom, secure using M8x16 bolt and washer (# 6, 22)
13. Insert hook (# 1) to boom extension using M12x60 bolt, washer and nut (# 3 & 2). Inpect the set screw on the
hook to make sure it is in place.
14. Attach legs support bracket (# 19) to upright (# 18) with M6x10 bolts (# 42).
15. Attach handle to upright (# 18) with M8x16 bolts (# 14).
To fold for storage:
a. Remove stop bar and pin (#
25 & 34).
b. Raise leg until it leans on the
leg support bracket (# 19).
Figure 3 - Assembly Illustration for model BH8026
3