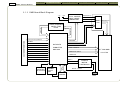
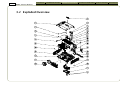
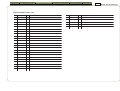
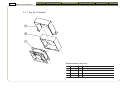
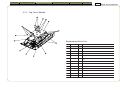
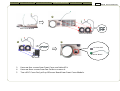
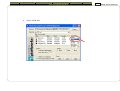
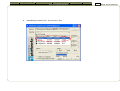
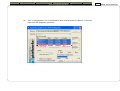
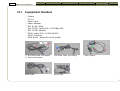
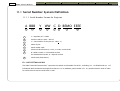
1
Introduction Fundamental Principle Mechanical Construction Procedure of Disassembly Troubleshooting Function Test and Alignment Procedure Firmware Upgrading Procedure Function of Boards Specifications DDC Key-In Procedure Appendix 0-1 EP737 SERVICE MANUAL Preface This manual is prepared for the maintenance service for EP737 Micro-portable XGA DLP Projector. Maintenance procedures described in this manual are intended to isolate faulty parts and replace them in the field. It also aims to serve as a guide in procuring replacement parts for this product. This manual is copyrighted and all rights are reserved. This product may not, in whole or in part, be copied, photocopied, translated or reduced to any electronic or machine readable form without prior written consent except for copies retained by the purchaser for backup purpose. This manual includes system overview, major system assembly, components description, and the Troubleshooting making explanations on how to detect errors. It also includes a flow chart for checking or correcting faults. No warranty or representation, either expressed or implied, is made with respect to this documentation, its quality, performance, merchantability or fitness for particular purpose. No event that the vendor will be liable for direct, indirect, special, incidental or consequential damages arising out of the user or inability to use this product or documentation. ¡ NOTICE : The information found in this manual is subject to change without prior notice. Any subsequent changes made to the data herein will be incorporated in further edition. Copyright 2002, October All Rights Reserved Manual Version 1.0 Document # 863-G04-01A P/N : 36.86305.001 0-2 EP737 SERVICE MANUAL Introduction Fundamental Principle Mechanical Construction Procedure of Disassembly Troubleshooting Function Test and Alignment Procedure Firmware Upgrading Procedure Function of Boards Specifications DDC Key-In Procedure Appendix Table of Contents (I) Introduction....................................................................................................................... 1-1 Product Highlights......................................................................................................................... 1-2 Technical Specifications................................................................................................................ 1-3 Fundamental Principle....................................................................................................... 2-1 Function Block Diagram................................................................................................................ 2-2 Optics............................................................................................................................................. 2-6 Mechanical Construction.................................................................................................... Package Overview.......................................................................................................................... Exploded Overview........................................................................................................................ Recommendation Spare Parts List................................................................................................ 3-1 3-2 3-4 3-26 Procedure of Disassembly.................................................................................................. 4-1 Disassemble Lamp Module............................................................................................................ 4-3 Disassemble Top Cover and Keypad Board.................................................................................. 4-4 Disassemble Left Cover, Right Cover and I/O Bezel Module....................................................... 4-6 Disassemble Front Cover.............................................................................................................. 4-8 Disassemble Thermal Board and Main Board............................................................................... 4-10 Disassemble Ballast and Fan Module........................................................................................... 4-12 Disassemble DC-DC Board and Interlock Switch......................................................................... 4-14 Disassemble Engine, DMD and DMD Board.................................................................................. 4-15 Disassemble Color Wheel, Photo Sensor Board and Thermal Switch.......................................... 4-17 Disassemble Elevator Module....................................................................................................... 4-18 Function of Boards............................................................................................................. DMD Board..................................................................................................................................... Main Board..................................................................................................................................... Keypad Board................................................................................................................................. Thermal Board................................................................................................................................ 5-1 5-2 5-7 5-15 5-16 Introduction Fundamental Principle Mechanical Construction Procedure of Disassembly Troubleshooting Function Test and Alignment Procedure Firmware Upgrading Procedure Function of Boards Specifications DDC Key-In Procedure Appendix 0-3 EP737 SERVICE MANUAL Table of Contents (II) DC-DC Board.................................................................................................................................. 5-21 Ballast............................................................................................................................................. 5-23 Specifications.................................................................................................................... Lamp Specifications....................................................................................................................... DMD Specifications........................................................................................................................ DC-DC Specifications..................................................................................................................... Lamp Driver Specifications............................................................................................................ 6-1 6-2 6-5 6-8 6-9 Troubleshooting................................................................................................................. 7-1 Equipment Needed........................................................................................................................ 7-2 Main Procedure.............................................................................................................................. 7-2 Function Test & Alignment Procedure................................................................................ Product........................................................................................................................................... Test Equipment.............................................................................................................................. Test Condition............................................................................................................................... Test Display Modes and Patterns.................................................................................................. Inspection Procedure..................................................................................................................... 8-1 8-2 8-2 8-2 8-3 8-9 Firmware Upgrading Procedure......................................................................................... Equipment Needed........................................................................................................................ Setup Procedure............................................................................................................................. Upgrading Procdure....................................................................................................................... 9-1 9-2 9-3 9-4 DDC Key-In Procedure.................................................................................................................................... Equipment Needed........................................................................................................................ Setup Procdure............................................................................................................................... DDC Key-in Procedure................................................................................................................... 10-1 10-2 10-3 10-4 Appendix........................................................................................................................... 11-1 Serial Number System Definition.................................................................................................. 11-2 Introduction Fundamental Principle Mechanical Construction Procedure of Disassembly Troubleshooting Function Test and Alignment Procedure Firmware Upgrading Procedure Function of Boards Specifications DDC Key-In Procedure Appendix Introduction 1 This manual is applied to 0.7*1 DMD Color Projector with digital imaging functionality based on Digital Micromirror Device (DMD) technology. Its the mode of single panel, 150 watt long life P-VIP lamp. The manual gives you a brief description of basic technical information to help in service and maintaining the product. Your customers will appreciate the quick response time when you immediately identify problems that occur with our products. We expect your customers will appreciate the service that you offer them. This manual is for technicians and people who have an electronic background. Send the product back to the distributor for repairing and do not attempt to do anything that is complex or is not mentioned in the troubleshooting. 1-1 EP737 SERVICE MANUAL 1-2 EP737 SERVICE MANUAL Introduction Fundamental Principle Mechanical Construction Procedure of Disassembly Troubleshooting Function Test and Alignment Procedure Firmware Upgrading Procedure Function of Boards Specifications DDC Key-In Procedure Appendix 1-1 Product Highlights - One panel 0.7 DMD XGA projection system with 1300 ANSI lumens (Marketing) OSRAM 150 - Watt Compact P-VIP Lamp (user replaceable) High efficiency cooling system with low system acoustic noise level Light weight Approx. 3.9 lbs. Manual focus projection 1 : 1.2 zoom lens True 1024 x 768 resolution, 16.7M True colors With up, down, left, and right screen reverse SXGA / XGA / SVGA / VGA / MAC compatibility with one M1-DA input terminal Auto image re-sizing to 1024 x 768 full screen Auto detection of computer signal input Auto Image synchronization (Auto-tracking / frequency / position adjustment) Powerful enlarge and freeze function Automatically saves adjustments for future use On-screen menu with up to 10 languages Built-in one speaker with 2 Watt amplifier Self protect timer for hot re-strike of compact P-VIP lamp Wireless remote control with USB mouse function and laser pointer Adaptive voltage control fan speed Noise : Expect Marketing spec - 32dB(A) (30 min) Real Engineering spec - Max 37 dB(A) (1hr) => Same as H55. - Build-in full screen NTSC / PAL / SECAM video capability with S-video / Composite / Component and HDTV terminals Introduction Fundamental Principle Mechanical Construction Procedure of Disassembly Troubleshooting Function Test and Alignment Procedure Firmware Upgrading Procedure Function of Boards Specifications DDC Key-In Procedure Appendix 1-2 Technical Specifications 1-2.1 Optical Features Pro je c tio n L e ns F/2.44~2.69, f=28.8~34.5mm. 1.2X Manual Zoom L ens Pro je c tio n I ma ge S ize Ad justable from 23.4" to 295.3" (Diagonal) (Suggested Projec tion Image Size : 36.9"~245.9") Thro w Dista nc e 1.4m~12m (Suggested throw d istanc e : 1.5~10m) (Marketing Spec . - 1.14m~12m) B rightne ss 1300 AN SI L umens (Marketing) 1150 AN SI L umens (Average) 1000 AN SI L umens (Minimum) Co ntra st 1600 : 1 Marketing (Full W hite and B lac k) 1450 : 1 Typic al (Full W hite and B lac k) 1300 : 1 Minimum (Full W hite and B lac k) U nifo rmity 85% Marketing 75% Typic al 65% Minimum Co lo r Te mpe ra ture 7500oK (Default) 7000 to 8800oK (Min. to Max.) (Japan Stand ard ) (Japan Stand ard ) (Japan Stand ard ) 1-3 EP737 SERVICE MANUAL 1-4 EP737 SERVICE MANUAL Introduction Fundamental Principle Mechanical Construction Procedure of Disassembly Troubleshooting Function Test and Alignment Procedure Firmware Upgrading Procedure Function of Boards Specifications DDC Key-In Procedure Appendix 1-2.2 Electrical Features Po we r S upply - U niversal AC 100-240V ~ 50/60H z w ith PFC input - (W attage to be d eterminate) for 150W Compac t P-V IP L amp@normal operation - V arianc e FAN speed c ontrol (Depend on temperature variant) Po we r Co nsumptio n - 190 W att +/- 10% at normal operation Stand by mod e < 35W Te rmina ls - Computer Input (V ESA M1-DA Female Terminal x 1) - Composite V id eo Input (R CA jac k x 1) - S V id eo Input (Mini DIN 4-pin x 1) - Aud io line Input (3.5mm phone jac k x 1) - Monitor Output (D-Sub 15-pin female terminal x 1) I nput signa l spe c . - H sync Freq uenc y 15 ~ 100 kH z - V sync Freq uenc y 43 ~ 120 H z - V id eo Signal R G B (PC) Analog R G B 0.7V p-p, 75 ohm Analog R G B 1V p-p, 75 ohm, Sync . signal Separate TTL H , V Sync . Composite TTl Sync . - V id eo Composite vid eo 1V p-p, 75 ohm S-vid eo L uminanc e 0.714V p-p, 75 ohm Chrominanc e 0.286V p-p, 75 ohm Vide o Co mpa tibility - Stand ard s : N TSC PAL SECAM H DTV Audio - One 4-Ohm, 2W , internal speaker - 2 W atts amplifier - Input sensitivity 0.3V rms. - M(3.58 MH z), 4.43 MH z, - B , D, G , H , I, M, N - B , D, G , K, K1, L - 480i; 480P; 720P; 1080i Introduction Fundamental Principle Mechanical Construction Procedure of Disassembly Troubleshooting Function Test and Alignment Procedure Firmware Upgrading Procedure Function of Boards Specifications DDC Key-In Procedure Appendix 1-2.3 Mechanical Features Dime nsio ns (W x H x D) - 9.68 x 8.05 x 2.8 +/- 0.034 inc hes (246 x 204.4 x 71.2 +/- 1mm, w /o lens) - 9.68 x 8.73 x 3.1 +/- 0.034 inc hes (246 x 221.7 x 78.6 +/- 1mm, w ith lens) We ight Approx. 3.9 lbs. Tilt Angle 8 d egree w ith elevator mec hanism K e ysto ne c o rre c tio n +/- 16 d egree (32 d egree) L a mp Do o r Pro te c tio n L amp pow er supply shut off automatic ally w hen d oor open 1-2.4 Environmental Features Te mpe ra ture Operating : 10~40oC Storage : -20~60oC M a ximum H umidity Operating : 10~40oC, 80%R H (Max.), non-c ond ensing\ Storage : -20~60oC, 80%R H (Max.), non-c ond ensing Ac o ustic no ise le ve l 32 d B A (expec t marketing spec .) 35 d B A (Typic al, U nd er 25oC) 37 d B A (Max., U nd er 25oC) L a mp L ife 1,500 hours marketing 1,200 hours typic al, 50% survival rate Altitude - Operating : 0~2,500 ft 10oC~40oC 2,500~5,000 ft 10oC~35oC 5,000~10,000 ft 10oC~25oC - Storage : 40,000 ft M TB F Operating more than 12,000 hours (90% Confid enc e L evel) 1-5 EP737 SERVICE MANUAL Introduction Fundamental Principle Mechanical Construction Procedure of Disassembly Troubleshooting Function Test and Alignment Procedure Firmware Upgrading Procedure Function of Boards Specifications DDC Key-In Procedure Appendix Fundamental Principle 2 This section provides the conceptual drawing about optics of projector. You can realize optical projection system through the following diagram and the integral part of configuration, too. 2-1 EP737 SERVICE MANUAL 2-2 Introduction Fundamental Principle Mechanical Construction Procedure of Disassembly Troubleshooting Function Test and Alignment Procedure Firmware Upgrading Procedure EP737 SERVICE MANUAL Function of Boards Specifications DDC Key-In Procedure Appendix 2-1 Function Block Diagram DMD Board Main Board Serial EEPROM Xtal=20MHz MCLK=125MHz DCLK=60MHz VESA M1 Input Video Input DVI Port Video Port SDRAM 64M Flash ROM CONTROL FPGA A/D Converter AD9883165MHz Image Processor PW16620RK DVI Receiver SiI141 Video Processor SAA7118 RGB Data IR Receiver Mouse Remote Mouse Processor DATAPATH FORMATTER DPF2 Display Image DC 3.3V, 5V, 12V MOTOR CONTROLLER Lamp Enable LampLit BALLAST MICRO CONTROLLER Control Signal DCLK=60MHz IR Signal Power AC 110V ~ 220V Xtal=58MHz DC 400V 12V to Lamp Driver DC to DC DC 3.3V, 5V, 12V Control Signal DC 3.3V, 5V, 12V Thermal Board Interlock Switch Thermal Sensor*2 Fan*4 Normal=AC 85V Lamp turning on=20KV PROJECTION LENS RGB Light Source Control Signal 150W LAMP 0.7 XGA DDR DMD MIRROR Light Source COLOR WHEEL Introduction Fundamental Principle Mechanical Construction Procedure of Disassembly Troubleshooting Function Test and Alignment Procedure Firmware Upgrading Procedure Function of Boards Specifications DDC Key-In Procedure Appendix 2-3 EP737 SERVICE MANUAL 2-1.1 Main Board Block Diagram AMP LT1399 AD9883 A/D Analog Input ASOGOUT EPROM 24LC21A ACTDATA DRE [0..7] DGE [0..7] DBE [0..7] DCLKOZ YSYNCOZ HSYNCOZ GRE [0..7] GGE [0..7] GBE [0..7] GBLKSPL AGCOAST Multiplexer 74LVC157 Pixel Work 166 <Analog> D-Sub Output AGFBK AUSOUT Multiplexer 74LVC157 GHS GUS GPEN GFBk Image Processor DMD BOARD DHSOUT. DVSOUT. DFPGPEN. GRE [0..7] DHSOUT. DFP/VGA# GGE [0..7] GBE [0..7] SDA 1 SCL 1 SiI141 Digital Receiver Video Input TO PC Audio Input Video Dicoder SAA7118 RS-232 Transceiver MAX202 Audio Amplifier LM4832 Vy [0..7] VUV [0..7] VCLK VPEN VVS VHS VFIELD CLOCK Generator ICS 501/502 RESETZ LAMPLITZ RESET 7SEC STANDBY MCLK DCLK THERMAL BOARD Speaker VPPEN A [18:1] D [0:15] ROMOEn ROMWEn BOOTWE FLASH ROM TE28F800 Keypad Control SYNC KEYPAD IR Receiver IRDATA 1 IRDATA 2 PWBT ERR_OUT SHUTDW# SDA SCL Audio Amplifier LM1877 RESET CIRCUIT Microprocessor PW166 RXD TXD IR SYNC IR-R IR-ONOFF IR-F IR-R USB Controller cy7c63612 USB_D+ USB_D- PW_LED LED 1 LED 2 TO PC EP737 SERVICE MANUAL Introduction Fundamental Principle Mechanical Construction Procedure of Disassembly Troubleshooting Function Test and Alignment Procedure Firmware Upgrading Procedure Function of Boards Specifications DDC Key-In Procedure Appendix 2-1.2 DMD Board Block Diagram + 12V CONFIG/SEQUENCE MICRO. CODE FLASH RV(7:0), GY(7:0), BU(7:0) VSYNCZ HSYNCZ OLACT SYNCVAL VOFFSET/VCC2 VBIAS VRESET RESET ASIC IIC BUS SR16 CONTROL DMD CONTROL 0.7 DDR DMD 1024*768 DMD DATA (63:0) LAMP CONTROL & STATUS DMDCLLK UNIV. SERIAL BUS COLOR WHEEL INDEX MRSTZ PIXEL CLOCK MOTOR CONTROL RAMBUSTM CLOCK GEN Short Channel CLOCK OSC. OR CRYSTAL MBIASRST(16) CONTROL DATAPATH FORMATTER DDP1000 ACTDATA VCC2, VOFFSET, VBIAS, VRESET GENERATION ADDRESS(18) DATA (16) + 5V CUSTOMER FRONT END 2-4 RDRAM ALLERGO MOTOR CONTROLLER MOTOR STATUS MOTOR DRIVE Introduction Fundamental Principle Mechanical Construction Procedure of Disassembly Troubleshooting Function Test and Alignment Procedure Firmware Upgrading Procedure Function of Boards Specifications DDC Key-In Procedure Appendix 2-5 2-1.3 Thermal Board Block Diagram THERMAL BOARD Interface 3P Connector*4 FAN1-4 THERMAL SENSOR 2P Connector 4P Connector*2 3P Connector 14P Connector +15VSBY +5VSBY +3.3VSBY LAMPEN_OUT THERMAL SWITCH 30P Connector to Formatter Board 3P Connector LAMPLIT_IN PHOTO SENSOR +12V*1 +5V*2 +3.3V*2 GND LAMPEN (RESETZ) CWINDEX LAMPLIT Power on/off (only 5V, 15V) DC TO DC POWER SUPPLY IR SENSOR EP737 SERVICE MANUAL 2-6 EP737 SERVICE MANUAL Introduction Fundamental Principle Mechanical Construction Procedure of Disassembly Troubleshooting Function Test and Alignment Procedure Firmware Upgrading Procedure 2-2 Optics 2-2.1 Conceptual Drawing 1 8 3 2 4 7 5 6 1. 150W P-VIP Lamp 5. Mirror 2 2. Color Wheel 6. Mirror 1 3. Hollow Rod 7. Relay Lens 4. Condenser Lens 8. DMD Module Function of Boards Specifications DDC Key-In Procedure Appendix Introduction Fundamental Principle Mechanical Construction Procedure of Disassembly Troubleshooting Function Test and Alignment Procedure Firmware Upgrading Procedure Function of Boards Specifications DDC Key-In Procedure Appendix 2-7 2-2.2 Basic Functions 150W P-VIP Lamp The light source. Color Wheel Separating the light beam into and produce R.G.B colors. Hollow Rod Making the light beam uniform. Condenser Lens Condensing the light beam. Mirror Folding optical path. DMD Module Displaying component. EP737 SERVICE MANUAL Introduction Fundamental Principle Mechanical Construction Procedure of Disassembly Troubleshooting Function Test and Alignment Procedure Firmware Upgrading Procedure Function of Boards Specifications DDC Key-In Procedure Appendix Mechanical Construction 3 This section provides the package and exploded overview, replaceable parts list and recommendatiom parts list for the portable projector. You can place an order for correct parts in the recommendation parts list. 3-1 EP737 SERVICE MANUAL 3-2 EP737 SERVICE MANUAL Introduction Fundamental Principle Mechanical Construction Procedure of Disassembly Troubleshooting Function Test and Alignment Procedure Firmware Upgrading Procedure Function of Boards Specifications DDC Key-In Procedure Appendix 3-1 Package Overview Replacement Parts List Item 1 P/N R ev. D escription AK.86301.001 A 36.00012.002 B WARRANT C ARD , US FOR LPP SERIES PIZZA BOX MOD ULE FOR EP737 2 36.00018.001 A EXTEND ED WARRANTY ;REGISTRATION FORM,USA FOR LPP SERIES 3 36.86301.001 A QUIC K START C ARD MULTILINGUAL EP737 4 42.86301.001 A C ABLE RS-232(BLUE) TO MINI D IN 3PIN 1800mm EP737 5 42.50110.011 A C ABLE RC A 1.8M XB31 6 42.50209.031 A C ABLE S-VID EO 1.8M XB31 7 42.85804.001 A C ABLE M1-A TO VGA/USB(A) 1.8M MOLEX 8 42.85811.001 A C ABEL MINI JAC K TO MINI JAC K 1.8M BLAC K XB31 9 36.86302.001 A USER'S GUID E FOR EP737 10 46.80301.001 B BATTERY #4 1.5V 11 55.83302.001 A C ARTON AC C ESSORY BOX EzPro 730 12 56.86301.001 A PARTITION FOR AC C ESSORY BOX EPE EP737 13 70.83443.001 A AC C ESSORY REMOTE C ONNTROLLER EzPro 735(OPTOMA LA B E L) Introduction Fundamental Principle Mechanical Construction Procedure of Disassembly Troubleshooting Function Test and Alignment Procedure Firmware Upgrading Procedure Function of Boards Specifications DDC Key-In Procedure Appendix 3-3 EP737 SERVICE MANUAL Replacement Parts List Item P/N R ev. D escription SP.86303.001 A C EILING MOUNT C ONNEC TOR AND C ABLE EP737 1 35.52302.091 A LABEL C ARTON 108*92 BLANK 2 36.86303.001 A C EILING MOUNT MANUAL EP737 3 51.52121.001 A PEBAG ZIPPER #3 100*70*0.04 LMT-5020 4 51.80725.001 A PE BAG 20*20*50C M U TYPE 5 55.80706.001 A C ARTON AB 20*20*48C M FOR C EILING MOUNT 6 56.86303.001 A C USHION BOTTOM FOR C EILING MOUNT EPE EP737 7 56.85809.001 A C USHION TOP FOR C EILING MOUNT EPE XB31 8 61.80726.001 A SC REW/NUT 5/16 INC H STRUC TURE 9 75.86307.001 A ASSY C EILING MOUNT MOD ULE EP737 10 85.1A523.060 A SC REW PAN MEC H M3*6 Ni NYLOK 11 42.50209.021 A C ABLE S-VHS 5M EzPro 600 12 42.86305.001 A C ABLE M1-A TO VGA/USB(A) 5M MOLEX EP737 13 42.80715.011 A C ABLE MINI JAC K TO RC A 5M 3-4 EP737 SERVICE MANUAL Introduction Fundamental Principle Mechanical Construction Procedure of Disassembly Troubleshooting Function Test and Alignment Procedure Firmware Upgrading Procedure 3-2 Exploded Overview Function of Boards Specifications DDC Key-In Procedure Appendix Introduction Fundamental Principle Mechanical Construction Procedure of Disassembly Troubleshooting Function Test and Alignment Procedure Firmware Upgrading Procedure Function of Boards Specifications DDC Key-In Procedure Appendix 3-5 EP737 SERVICE MANUAL Replacement Parts List Item P/N R ev. D C .86301.001 A 1 42.85802.002 2 D escription Item P/N R ev. D escription D .C . EP737 23 70.85810.001 A D C _D C MOD ULE XB31 A W.A. 14 #26 50mm UL1061 THERMAL-BD /BALLAST XB31 24 85.00025.041 A HEX I/O M2.5*H6.6*L4.0 BRASS 42.85803.001 A W.A. 4P #22 185mm D C -D C /BALLAST XB31 25 52.86309.001 A MAIN BOARD BOTTOM RUBBER EP737 3 42.85809.001 A W.A. 3P #28 125mm BALLAST/THERMAL BD 26 61.86317.001 A SAFE BRAKE FOR LAMP GAP SUS304 EP737 4 51.00071.001 A SPAC ER SUPPORT PG-MC F-6 XB31 27 85.1A525.040 A SC REW PAN MEC H M2.5*4 Ni NLK 5 51.86301.001 A LAMP BOTTOM C OVER NORYL N300X EP737 6 61.00018.002 A LOC K SC REW PAN MEC H M3*8.5-3.5 B 7 61.86302.001 A FAN GUID E BRAC KET AL 5052 EP737 8 61.86304.001 A OPTOMA LOGO AL EP737 9 70.86301.001 A ASSY TOP C OVER MOD ULE EP737 10 70.86302.001 A ASSY BOTTOM C OVER MOD ULE EP737 11 70.86303.001 A ASSY FRONT C OVER MOD ULE EP737 12 70.86305.001 A ASSY RIGHT C OVER MOD ULE EP737 13 70.86306.001 A ASSY LEFT C OVER MOD ULE EP737 14 70.86307.001 A ASSY ENGINE MOD ULE EP737 15 75.86302.001 A BUY ASSY FOC US RING FRONT EP737 16 80.86302.001 E PC BA THERMAL BOARD EP737 17 85.1A626.050 A SC REW PAN MEC H M2.6*5 BLAC K NYLOK 18 85.1A623.060 A SC REW MAC HINE PAN M3*6 NYLOK VX3600 19 70.86315.001 A ASSY PC BA MAIN BOARD MOD ULE EP737 20 70.86308.001 A ASSY LAMP MOD ULE EP737 21 70.86309.001 A FAN 50-15 MOD ULE EP737 22 70.86318.001 A FAN FAL3F PANASONIC MOD ULE EP737 3-6 EP737 SERVICE MANUAL Introduction Fundamental Principle Mechanical Construction Procedure of Disassembly Troubleshooting Function Test and Alignment Procedure Firmware Upgrading Procedure Function of Boards Specifications DDC Key-In Procedure Appendix 3-2.1 Fan 50-15 Module Replacement Parts List Item P/N R ev. D escription 70.86309.001 A FAN 50-15 MOD ULE EP737 1 49.86304.001 A MISC FAN SUNON 5015 L=70mm EP737 2 52.86303.001 A FAN RUBBER SUNON 5015 RUBBER EP737 3 61.86316.001 A FAN BRAC KET SUNON 5015 SUS304 EP737 Introduction Fundamental Principle Mechanical Construction Procedure of Disassembly Troubleshooting Function Test and Alignment Procedure Firmware Upgrading Procedure Function of Boards Specifications DDC Key-In Procedure Appendix 3-7 EP737 SERVICE MANUAL 3-2.2 Top Cover Module Replacement Parts List Item P/N R ev. D escription 70.86301.001 A ASSY TOP C OVER MOD ULE EP737 1 61.86303.001 A TOP C OVER Mg ALLOY AZ-91D EP737 2 51.86302.001 A KEY PAD PC +ABS C 6200 EP737 3 51.86303.001 A LED LENS PC EP737 4 80.86303.001 D PC BA KEYPAD BOARD EP737 5 42.85801.001 A C ABLE FFC 14P 0.5Pi tch 140mm KEY BD /FRONT END BD X B 31 6 85.1A626.050 A SC REW PAN MEC H M2.6*5 BLAC K NYLOK 7 52.86304.001 A TOP SEALING SPONGE PORON EP737 8 61.86311.001 A TOP C OVER EMI SPRING EP737 9 55.86301.001 A HEAT INSULATION PAD EP737 10 51.00068.001 A NYLON WASHER PG U-5 FOR BALLAST XB31 11 61.86314.001 A LIGHT C UT UP FOR LAMP MOD ULE AL EP737 12 85.1G923.064 A PLASTIC SC REW M3.0*6.4 PG S-306-N66 XB31 3-8 EP737 SERVICE MANUAL Introduction Fundamental Principle Mechanical Construction Procedure of Disassembly Troubleshooting Function Test and Alignment Procedure Firmware Upgrading Procedure 3-2.3 Bottom Cover Module 7 Function of Boards Specifications DDC Key-In Procedure Appendix Introduction Fundamental Principle Mechanical Construction Procedure of Disassembly Troubleshooting Function Test and Alignment Procedure Firmware Upgrading Procedure Function of Boards Specifications DDC Key-In Procedure Appendix 3-9 EP737 SERVICE MANUAL Replacement Parts List Item P/N R ev. 70.86302.001 A 1 51.00068.001 2 D escription Item P/N R ev. D escription ASSY BOTTOM C OVER MOD ULE EP737 21 85.1C 224.050 A SC REW PAN MEC H M4*5 C OLOR W/TOOTH WASHER A NYLON WASHER PG U-5 FOR BALLAST XB31 22 85.1D 122.050 A SC REW PAN MEC H M2*5 Ni (W/WASHER j5.0) 51.00075.001 A WIRE MOUNTS PG-FW-4D XB31 23 85.1G923.064 A PLASTIC SC REW M3.0*6.4 PG S-306-N66 XB31 3 51.85803.002 A AD JUST FOOT PC +ABS C 6200 C S-SA05A SB21 24 51.86319.001 A BALLAST MYLAR FRPP EP737 4 51.86304.001 A ELEVATOR FOOT NORYL N300X EP737 25 51.86323.001 A LIMIT SWITC H HOLD ER NORYL N300X EP737 5 51.86305.001 A ELEVATOR HOOK NORYL N300X EP737 26 86.00122.015 A NUT HEX M2.0*0.4P L1.5 Ni 6 52.85801.001 A RUBBER-FOOT D =16.0mm 2.5t XB31 27 52.86308.001 A LENS STAND PAD EP737 7 52.86311.001 A D MD HEATSINK THERMAL PAD 14*35*1t EP737 8 52.85818.001 A LEFT RUBBER FOOT D =16.0mm 4.0t XB31 9 61.00022.001 A SELF-LOC KING RING (SPN j1.5) 10 61.86305.001 A BOTTOM C OVER Mg ALLOY AZ-91D EP737 11 61.86306.001 A BOTTOM C OVER MESH IRON NET EP737 12 61.86307.001 A ELEVATOR BRAC KET SUS304 EP737 13 61.86308.001 A ELEVATOR FOOT SPRING SUS301 EP737 14 61.86309.001 A ELEVATOR PUSH SPRING SUS301 EP737 15 52.86305.001 A ELEVATOR FOOT RUBBER EP737 16 52.86306.001 A BTM SEALING SPONGE PORON EP737 17 75.86305.001 A ASSY LIMIT SWITC H C HERRY D B1C A1LB-5A EP737 18 70.86311.001 A BALLAST MOD ULE EP737 19 85.00025.041 A HEX I/O M2.5*H6.6*L4.0 BRASS 20 85.1A626.050 A SC REW PAN MEC H M2.6*5 BLAC K NYLOK 3-10 EP737 SERVICE MANUAL Introduction Fundamental Principle Mechanical Construction Procedure of Disassembly Troubleshooting Function Test and Alignment Procedure Firmware Upgrading Procedure Function of Boards Specifications DDC Key-In Procedure Appendix 3-2.4 Main Board Module Replacement Parts List Item P/N R ev. D escription 70.86315.001 A ASSY PC BA MAIN BOARD MOD ULE EP737 1 80.86301.001 E PC BA MAIN BOARD EP737 2 75.86303.001 A BUY ASSY IO BEZEL MOD ULE EP737 3 85.005AG.040 A SC REW I/O STEEL #4-40UNC *H4*L5.5 NYLOK 4 52.86309.001 A MAIN BOARD BOTTOM RUBBER EP737 Introduction Fundamental Principle Mechanical Construction Procedure of Disassembly Troubleshooting Function Test and Alignment Procedure Firmware Upgrading Procedure Function of Boards Specifications DDC Key-In Procedure Appendix 3-11 EP737 SERVICE MANUAL 3-2.4 Front Cover Module Replacement Parts List Item P/N R ev. D escription 70.86303.001 A ASSY FRONT C OVER MOD ULE EP737 1 75.86301.001 A BUY FRONT C OVER MOD ULE EP737 2 76.86301.001 A ASSY IR-SENSOR 3P #28 UL1007 160mm Green EP737 3 51.86321.001 A IR C OVER PAD FRONT EP737 4 70.86304.001 A ASSY FRONT FAN MOD ULE EP737 5 85.1A626.050 A SC REW PAN MEC H M2.6*5 BLAC K NYLOK 3-12 EP737 SERVICE MANUAL Introduction Fundamental Principle Mechanical Construction Procedure of Disassembly Troubleshooting Function Test and Alignment Procedure Firmware Upgrading Procedure Function of Boards Specifications DDC Key-In Procedure Appendix 3-2.5 ASSY Front Fan Module Replacement Parts List Item P/N R ev. D escription 70.86304.001 A ASSY FRONT FAN MOD ULE EP737 1 52.86301.001 A FAN RUBBER FRONT C OVER RUBBER EP737 2 49.86301.001 A MISC FAN SUNON 5010 L=300mm EP737 3 49.86303.001 A MISC FAN SUNON 5015 L=250mm EP737 4 51.86307.001 A FAN HOLD ER FRONT C OVER NORYL EP737 5 51.86322.001 A FAN GUID E FRONT NORYL N300X EP737 6 85.1A626.050 A SC REW PAN MEC H M2.6*5 BLAC K NYLOK Introduction Fundamental Principle Mechanical Construction Procedure of Disassembly Troubleshooting Function Test and Alignment Procedure Firmware Upgrading Procedure Function of Boards Specifications DDC Key-In Procedure Appendix 3-13 EP737 SERVICE MANUAL 3-2.6 ASSY Right Cover Module Replacement Parts List Item P/N R ev. D escription 70.86305.001 A ASSY RIGHT C OVER MOD ULE EP737 1 51.86311.001 A RIGHT C OVER PC +ABS C 6200 EP737 2 75.86306.001 A ASSY SPEAKER RUBBER PAD -FIBER EP737 3 49.86302.001 A SPEAKER 2W 40hm 51*20.1*13.1mm 80mml 4 85.1D 122.050 A SC REW PAN MEC H M2*5 Ni (W/WASHER j5.0) 3-14 EP737 SERVICE MANUAL Introduction Fundamental Principle Mechanical Construction Procedure of Disassembly Troubleshooting Function Test and Alignment Procedure Firmware Upgrading Procedure Function of Boards Specifications DDC Key-In Procedure Appendix 3-2.7 BUY Front Cover Module Replacement Parts List Item P/N R ev. D escription 75.86301.001 A BUY FRONT C OVER MOD ULE EP737 1 51.86308.001 A ELEVATOR PUSH BUTTOM PC +ABS C 6200 EP737 2 51.86310.001 A IR LENS FRONT PC 1225Y EP737 3 51.86309.001 A FRONT C OVER NORYL N300X EP737 Introduction Fundamental Principle Mechanical Construction Procedure of Disassembly Troubleshooting Function Test and Alignment Procedure Firmware Upgrading Procedure Function of Boards Specifications DDC Key-In Procedure Appendix 3-15 EP737 SERVICE MANUAL 3-2.8 ASSY Left Cover Module Replacement Parts List Item P/N R ev. D escription 70.86306.001 A ASSY LEFT C OVER MOD ULE EP737 1 51.86312.001 A LEFT C OVER NORLY N300X EP737 2 53.86302.001 A NOISE ELIMINATING PAD FRONT EP737 3 53.86303.001 A NOISE ELIMINATING PAD BAC K EP737 3-16 EP737 SERVICE MANUAL Introduction Fundamental Principle Mechanical Construction Procedure of Disassembly Troubleshooting Function Test and Alignment Procedure Firmware Upgrading Procedure Function of Boards Specifications DDC Key-In Procedure Appendix 3-2.8 Lamp Module 10 5 6 1 8 11 7 Replacement Parts List Item 2 9 3 4 P/N R ev. D escription 70.86308.001 A ASSY LAMP MOD ULE EP737 1 23.85815.001 A OSRAM 150W 1.3MM ARC P16 REFLEC TOR 2 51.86315.001 A LAMP HOLD ER BOTTOM PPS EP737 3 61.00018.002 A LOC K SC REW PAN MEC H M3*8.5-3.5 B 4 61.83109.001 A LAMP EXC HANGE HAND LER 5 61.85804.001 A LAMP HOLD ER Mg ALLOY , XB31 6 61.86313.001 A LIGHT C UT FOR LAMP MOD ULE AL EP737 7 61.86315.001 A LIGHT C UT D OWN FOR LAMP MOD ULE AL EP737 8 85.1A321.030 A SC REW PAN MEC H M1.7*3 BLAC K 9 85.41623.050 A SC REW FLAT M3*5 BLAC K NYLOK SOC KET 10 86.0A123.024 A HEX NUT M3*0.5P L2.4 Ni 11 85.1A626.050 A SC REW PAN MEC H M2.6*5 BLAC K NYLOK Introduction Fundamental Principle Mechanical Construction Procedure of Disassembly Troubleshooting Function Test and Alignment Procedure Firmware Upgrading Procedure Function of Boards Specifications DDC Key-In Procedure Appendix 3-17 EP737 SERVICE MANUAL 3-2.9 Engine Module Replacement Parts List Item P/N R ev. D escription 70.86307.001 A ASSY ENGINE MOD ULE EP737 1 61.85815.001 A SHOULD ER SC REW FOR D MD XB31 2 52.85806.001 A RUBBER WASHER FOR D MD XB31 3 61.86312.001 A D MD -HEATSINK AD C 12 EP737 4 52.85810.001 A D MD HEATSINK THERMAL PAD 19*14*1t 5 51.86328.001 A D MD -HEAT-SINK-INSULATOR MYLAR EP737 6 80.86304.001 A PC BA D MD BOARD EP737 7 75.85803.001 A C ONTAC T HOUSING INTERC ON 7502-001 FOR D D R 0.7" XGA X B 31 8 48.858D M.D 11 A D MD 1024*768 PI*EL D D R 0.7" XGA 9 51.85814.001 A D MD HOLD ER D D R 07 ULTEM 2300 XB31 10 52.85802.001 A D MD -LIGHT-MASK XB31 RUBBER 11 70.86312.001 A ENGINE SUB MOD ULE EP737 12 52.85819.001 A TUBE C OLOR WHEEL, SUMITUBE F32,BLAC K 13 52.86310.001 A D MD FAN INSULATOR RUBBER EP737 3-18 EP737 SERVICE MANUAL Introduction Fundamental Principle Mechanical Construction Procedure of Disassembly Troubleshooting Function Test and Alignment Procedure Firmware Upgrading Procedure Function of Boards Specifications DDC Key-In Procedure Appendix 3-2.10 Engine SUB Module Replacement Parts List Item P/N R ev. D escription 70.86312.001 A ENGINE SUB MOD ULE EP737 1 23.85802.001 A SILFLEX-VIS MIRROR 1 2 23.85802.011 A SILFLEX-VIS MIRROR 2 3 23.85806.001 A ASPHERIC C OND ENSER B270 LENSf 28MM 4 23.85806.011 A ASPHERIC TRUNC ATE RELAY LENS f 46MM 5 51.85815.001 A ENGINE BOTTOM BMC , XB31 6 52.85808.001 A PORON-LENS BLAC K XB31 7 52.85816.001 A RUBBER-ANTI-D UST BLAC K XB31 8 61.85805.001 A ROD SPRING SUS301 0.2t , XB31 9 61.85806.001 A MIRROR1 SPRING SUS301 0.25t , XB31 10 61.85807.001 A MIRROR2-SPRING SUS301 0.25t, XB31 11 70.86310.001 A OPTIC AL ZOOM LENS MOD ULE EP737 12 70.85822.001 A ENGINE PRE-ASSY MOD ULE XB31 13 70.86313.001 A C OLOR WHEEL MOD ULE EP737 14 70.85824.001 A ROD MOD ULE XB31 15 76.85802.001 B ASSY PHOTO-SENSOR-BD UL1007 #28 170mm Blue XB31 16 85.1A525.060 A SC REW PAN MEC H M2.5*6 Ni NYLOK C ARUSO 17 85.1A626.050 A SC REW PAN MEC H M2.6*5 BLAC K NYLOK Introduction Fundamental Principle Mechanical Construction Procedure of Disassembly Troubleshooting Function Test and Alignment Procedure Firmware Upgrading Procedure Function of Boards Specifications DDC Key-In Procedure Appendix 3-19 EP737 SERVICE MANUAL 3-2.11 ENGINE PRE-ASSY MODULE Replacement Parts List Item P/N R ev. D escription 70.86316.001 A ENGINE PRE-ASSY MOD ULE EP737 1 61.85803.001 A ENGINE TOP MG ALLOY , XB31 2 23.85810.001 A PYREX UV-IR FILTER f 16.750.25MM 3 61.81517.001 A BRAC KET for UV-IR FILTER 4 85.4A622.030 A SC REW FLAT MEC H M2*3 BLAC K NYLOK C ARUSO 5 43.86317.001 A THERMAL SWITC H WITH BRAC KET KLIXON 6 85.1A626.050 A SC REW PAN MEC H M2.6*5 BLAC K NYLOK 3-20 EP737 SERVICE MANUAL Introduction Fundamental Principle Mechanical Construction Procedure of Disassembly Troubleshooting Function Test and Alignment Procedure Firmware Upgrading Procedure Function of Boards Specifications DDC Key-In Procedure Appendix 3-2.12 Optical Zoom Lens Module Replacement Parts List Item P/N R ev. D escription 70.86310.001 A OPTIC AL ZOOM LENS MOD ULE EP737 1 23.81901.003 A OPTIC AL ZOOM LENS OF NEW C OATING 0.7"D MD C ARUSO 2 70.86314.001 A ASSY ZOOM RING MOD ULE EP737 3 51.86313.001 A FOC US RING BASE PC +ABS C 6200 EP737 4 85.4A622.030 A SC REW FLAT MEC H M2*3 BLAC K NYLOK C ARUSO 5 85.YA121.025 A SC REW FLAT HEAD TAP M1.7*2.5 Ni Introduction Fundamental Principle Mechanical Construction Procedure of Disassembly Troubleshooting Function Test and Alignment Procedure Firmware Upgrading Procedure Function of Boards Specifications DDC Key-In Procedure Appendix 3-21 EP737 SERVICE MANUAL 3-2.13 ASSY ZOOM RING MODULE Replacement Parts List Item P/N R ev. D escription 70.86314.001 A ASSY ZOOM RING MOD ULE EP737 1 51.86314.001 A ZOOM RING PC +ABS C 6200 EP737 2 52.86307.001 A ZOOM RING RUBBER EP737 3-22 EP737 SERVICE MANUAL Introduction Fundamental Principle Mechanical Construction Procedure of Disassembly Troubleshooting Function Test and Alignment Procedure Firmware Upgrading Procedure Function of Boards Specifications DDC Key-In Procedure Appendix 3-2.14 ASSY FOCUS RING FRONT Replacement Parts List Item P/N R ev. D escription 75.86302.001 A BUY ASSY FOC US RING FRONT EP737 1 51.86316.001 A FOC US RING PC +ABS C 6200 EP737 2 51.86317.001 A FOC US RING SUIT PC +ABS C 6200 EP737 Introduction Fundamental Principle Mechanical Construction Procedure of Disassembly Troubleshooting Function Test and Alignment Procedure Firmware Upgrading Procedure Function of Boards Specifications DDC Key-In Procedure Appendix 3-23 EP737 SERVICE MANUAL 3-2.15 BUY ASSY LENS COVER Replacement Parts List Item P/N R ev. D escription 75.86304.001 A BUY ASSY LENS C OVER EP737 1 51.86320.001 A LENS C OVER PC +ABS C 6200 EP737 2 51.86306.001 A LENS C OVER SPRING PC EP737 3 51.83150.001 A C AP STRAP 3-24 EP737 SERVICE MANUAL Introduction Fundamental Principle Mechanical Construction Procedure of Disassembly Troubleshooting Function Test and Alignment Procedure Firmware Upgrading Procedure Function of Boards Specifications DDC Key-In Procedure Appendix 3-2.16 Color Wheel Module Replacement Parts List Item P/N R ev. D escription 70.86313.001 A C OLOR WHEEL MOD ULE EP737 1 23.85819.011 A R90G100W85B85 D D R C W (MOTOR20.5MM) 2 61.86310.001 A C OLOR WHEEL HOLD ER SEC C 1.2t EP737 3 52.83615.001 A C OLORWHEEL D ISC RUBBER,EzPro755 4 61.83628.001 A C OLORWHEEL SHOULD ER SC REW,EzPro755 Introduction Fundamental Principle Mechanical Construction Procedure of Disassembly Troubleshooting Function Test and Alignment Procedure Firmware Upgrading Procedure Function of Boards Specifications DDC Key-In Procedure Appendix 3-25 EP737 SERVICE MANUAL 3-2.17 ROD MODULE Replacement Parts List Item P/N R ev. D escription 70.86317.001 A ROD MOD ULE EP737 1 23.85817.011 A HLE HOLLOW ROD 6.75*4.9*24.2 MMN3 2 61.85823.001 A ROD HOLD ER SUS 301 0.2t 3-26 EP737 SERVICE MANUAL Introduction Fundamental Principle Mechanical Construction Procedure of Disassembly Troubleshooting Function Test and Alignment Procedure Firmware Upgrading Procedure 3-3 Recommendation Spare Parts List Item P/N R ev. D escription Ty pe 1 35.52302.091 A LABEL C ARTON 108*92 BLANK CM 2 35.86301.001 A SPEC LABEL BLANK EP737 CM 3 36.00018.001 A EXTEND ED WARRANTY ;REGISTRATION FORM,USA FOR LPP SERIES CM 4 36.86301.001 A QUIC K START C ARD MULTILINGUAL EP737 CM 5 36.86302.001 A USER'S GUID E FOR EP737 CM 6 42.50110.011 A C ABLE RC A 1.8M XB31 CM 7 42.50209.031 A C ABLE S-VID EO 1.8M XB31 CM 8 42.81505.051 A C ABLE POWER-C ORD AC C 5 3P#18/SPT-2 UNSHLD 6ft BLAC K(N,A);XB31 CM 9 76.81904.001 A ASSY FAN FAL3F12LH 50*20 C ARUSO CM 10 42.86301.001 A C ABLE RS-232(BLUE) TO MINI D IN 3PIN 1800mm EP737 CM 11 42.85804.001 A C ABLE M1-A TO VGA/USB(A) 1.8M MOLEX CM 12 42.85811.001 A C ABEL MINI JAC K TO MINI JAC K 1.8M BLAC K XB31 CM 13 42.85802.002 A W.A. 14*26 50mm UL1061 THERMAL BD /BALLAST XB31 CM 14 42.85803.001 A W.A. 4P #22 185mm D C -D C /BALLAST XB31 CM 15 42.85808.001 A W.A. GROUND FOR BALLAST 135mm XB31 CM 16 42.85801.001 A C ABLE FFC 14P 0.5Pi tch 140mm KEY BD /FRONTEND BD XB31 CM 17 42.85809.001 A W.A. 3P #28 125mm BALLAST/THERMAL BD CM 18 42.83603.001 A C ABLE M1-D TO D VI/USB(A) 5M MOLEX EP737 CM 19 42.83604.001 A C ABLE M1-A TO HD TV/USB(A) 5M MOLEX EP737 CM 20 48.858D M.D 11 A D MD 1024*768 PI*EL D D R 0.7" XGA SW 21 49.81901.001 A PANASONIC SC IROC C O FAN FAL3F12LH 50*20mm CM Function of Boards Specifications DDC Key-In Procedure Appendix Introduction Fundamental Principle Mechanical Construction Procedure of Disassembly Troubleshooting Function Test and Alignment Procedure Firmware Upgrading Procedure D escription Function of Boards Specifications DDC Key-In Procedure Appendix Item P/N R ev. Ty pe 22 49.86301.001 A MISC FAN SUNON 5010 L=300mm EP737 CM 23 49.86302.001 A SPEAKER 2W 40hm 51*20.1*13.1mm 80mm CM 24 49.86304.001 A MISC FAN SUNON 5015 L=70mm EP737 CM 25 51.00061.001 A PLASTIC RIVET j3.0 SR-3L CM 26 51.00068.001 A NYLON WASHER PG U-5 FOR BALLAST XB31 CM 27 51.00071.001 A SPAC ER SUPPORT PG-MC F-6 XB31 CM 28 51.81537.001 A ESD BAG LD PE 300*400*0.1mm CM 29 51.83138.001 A D C TO D C BOARD HOLD ER CM 30 51.83142.001 A FUSE C OVER (FH-1L-UL) CM 31 51.85814.001 A D MD HOLD ER D D R 07 ULTEM 2300 XB31 CM 32 51.85827.001 A D C _D C _BD MYLAR 0.5t XB31 Black CM 33 51.85828.001 A D MD -HEAT-SINK-INSULATOR MYLAR XB31 CM 34 51.86301.001 A LAMP BOTTOM C OVER NORYL N300X EP737 CM 35 51.86302.001 A KEY PAD PC +ABS C 6200 EP737 CM 36 51.86303.001 A LED LENS PC EP737 CM 37 51.86304.001 A ELEVATOR FOOT NORYL N300X EP737 CM 38 51.86305.001 A ELEVATOR HOOK NORYL N300X EP737 CM 39 51.86311.001 A RIGHT C OVER PC +ABS C 6200 EP737 CM 40 51.86319.001 A BALLAST MYLAR FRPP EP737 CM 3-27 EP737 SERVICE MANUAL 3-28 EP737 SERVICE MANUAL Introduction Fundamental Principle Mechanical Construction Procedure of Disassembly Troubleshooting Function Test and Alignment Procedure Firmware Upgrading Procedure Item P/N R ev. D escription Ty pe 41 51.86321.001 A IR C OVER PAD FRONT EP737 CM 42 51.86323.001 A LIMIT SWITC H HOLD ER NORYL N300X EP737 CM 43 51.86325.001 A ENGINE LIGHT C UT MYLAR C 850PVC 0.1t CM 44 51.86326.001 A FAN FAL3F D UC T FRONT PPS EP737 CM 45 51.86327.001 A FAN FAL3F D UC T BAC K PPS EP737 CM 46 51.86307.001 A FAN HOLD ER FRONT C OVER NORYL EP737 CM 47 51.86322.001 A FAN GUID E FRONT NORYL N300X EP737 CM 48 52.85802.001 A D MD -LIGHT-MASK XB31 RUBBER CM 49 52.85806.001 A RUBBER WASHER FOR D MD XB31 CM 50 52.85810.001 A D MD HEATSINK THERMAL PAD 19*14*1t CM 51 52.85812.001 A LOC K_RUBBER FOR FAN_FAL3F_D UC T XB31 CM 52 52.85814.001 A WASHER RUBBER FOR FAN_PANASONIC XB31 CM 53 52.85819.001 A TUBE C OLOR WHEEL, SUMITUBE F32,BLAC K CM 54 52.86303.001 A FAN RUBBER SUNON 5015 RUBBER EP737 CM 55 52.86305.001 A ELEVATOR FOOT RUBBER EP737 CM 56 52.86309.001 A MAIN BOARD BOTTOM RUBBER EP737 CM 57 52.86310.001 A D MD FAN INSULATOR RUBBER EP737 CM 58 52.86301.001 A FAN RUBBER FRONT C OVER RUBBER EP737 CM 59 53.86304.001 A SOFT C ARRY BAG EP737 CM 60 55.83601.002 A C ARTON AB 424*384*322 EP755 CM Function of Boards Specifications DDC Key-In Procedure Appendix Introduction Fundamental Principle Mechanical Construction Procedure of Disassembly Troubleshooting Function Test and Alignment Procedure Firmware Upgrading Procedure Function of Boards Specifications DDC Key-In Procedure Appendix Item P/N R ev. D escription Ty pe 61 56.86301.001 A PARTITION FOR AC C ESSORY BOX EPE EP737 CM 62 56.86302.001 A C USHION EPE EP737 CM 63 57.00001.001 A PAC K SIO2 D RIER 20g CM 64 61.00018.002 A LOC K SC REW PAN MEC H M3*8.5-3.5 B CM 65 61.86302.001 A FAN GUID E BRAC KET AL 5052 EP737 CM 66 61.85815.001 A SHOULD ER SC REW FOR D MD XB31 CM 67 61.86304.001 A OPTOMA LOGO AL EP737 CM 68 61.86307.001 A ELEVATOR BRAC KET SUS304 EP737 CM 69 61.86308.001 A ELEVATOR FOOT SPRING SUS301 EP737 CM 70 61.86309.001 A ELEVATOR PUSH SPRING SUS301 EP737 CM 71 61.86312.001 A D MD -HEATSINK AD C 12 EP737 CM 72 61.86314.001 A LIGHT C UT UP FOR LAMP MOD ULE AL EP737 CM 73 61.86316.001 A FAN BRAC KET SUNON 5015 AL EP737 CM 74 70.86306.001 A ASSY LEFT C OVER MOD ULE EP737 CM 75 70.86319.001 A ASSY TOP C OVER MOD ULE EP737 (RMA) SW 76 70.86320.001 A ENGINE SUB MOD ULE EP737 (RMA) SW 77 70.86321.001 A ASSY BOTTOM C OVER MOD ULE EP737 (RMA) SW 78 70.86313.001 A C OLOR WHEEL MOD ULE EP737 SW 79 75.85803.001 A C ONTAC T HOUSING INTERC ON 7502-001 FOR D D R 0.7" XGA XB31 CM 80 75.85813.001 A ASSY D C TO D C BOARD XB31 SW 81 75.86304.001 A BUY ASSY LENS C OVER EP737 CM 82 75.86305.001 A ASSY LIMIT SWITC H C HERRY D B1C A1LB-5A EP737 CM 83 75.85801.001 B ASSY BALLAST+PFC XB31 SW 3-29 EP737 SERVICE MANUAL 3-30 EP737 SERVICE MANUAL Introduction Fundamental Principle Mechanical Construction Procedure of Disassembly Troubleshooting Function Test and Alignment Procedure Firmware Upgrading Procedure Item P/N R ev. D escription Ty pe 84 75.86301.001 A BUY FRONT C OVER MOD ULE EP737 CM 85 75.86303.001 A BUY ASSY IO BEZEL MOD ULE EP737 CM 86 75.86306.001 A ASSY SPEAKER RUBBER PAD -FIBER EP737 CM 87 76.85802.001 B ASSY PHOTO-SENSOR-BD UL1007 #28 170mm Blue XB31 CM 88 76.86301.001 A ASSY IR-SENSOR 3P#28 UL1007 160mm Green EP737 CM 89 80.86301.001 E PC BA MAIN BOARD EP737 SW 90 80.86302.001 E PC BA THERMAL BOARD EP737 SW 91 80.86303.001 D PC BA KEYPAD BOARD EP737 SW 92 80.86304.001 A PC BA D MD BOARD EP737 SW 93 85.005AG.040 A SC REW I/O STEEL CM 94 85.00025.041 A HEX I/O M2.5*H6.6*L4.0 BRASS CM 95 85.1A626.050 A SC REW PAN MEC H M2.6*5 BLAC K NYLOK CM 96 85.1A525.040 A SC REW PAN MEC H M2.5*4 Ni NLK CM 97 85.1A623.060 A SC REW MAC HINE PAN M3*6 NYLOK VX3600 CM 98 SP.86301.001 A C EILING MOUNT C ONNEC TOR EP737 CM 99 SP.86302.001 A LAMP REPLAC E MOD ULE FOR EP737 CM 100 SP.86303.001 A C EILING MOUNT C ONNEC TOR AND C ABLE EP737 CM Note : SW = Swap Spare Parts, CM = Consume Spare Parts. You can place an order for swap or consume spare parts to do replacement. Or just return swap spare parts back for repair, but consume spare parts is not acceptable for repair or return. SW is repairable, when its defective please return back the defective but complete parts to swap for good parts. Regarding CM, its not repairable and you should give the order to do replacement and discard the defective parts directly. The recommendation spare parts list is built for the convenience of disass embly procedure. If there is any comment or recommendation on the item of SW or CM, please let us know. Function of Boards Specifications DDC Key-In Procedure Appendix Introduction Fundamental Principle Mechanical Construction Procedure of Disassembly Troubleshooting Function Test and Alignment Procedure Firmware Upgrading Procedure Function of Boards Specifications DDC Key-In Procedure Appendix Procedure Of Disassembly 4 This section provides disassembly procedures for EP737 Micro Portable XGA DLP Projector. Before you begin any of these procedures, be sure to turn off the power, computer system, and other attached devices; then disconnect the power cable from the electronically outlet. Moreover, when you disassemble the projector, be sure to put the screws in a safe place and separate them according to grouping. 4-1 EP737 SERVICE MANUAL 4-2 EP737 SERVICE MANUAL Introduction Fundamental Principle Mechanical Construction Procedure of Disassembly Troubleshooting Function Test and Alignment Procedure Firmware Upgrading Procedure Function of Boards Specifications DDC Key-In Procedure Appendix Tools Needed : Long Nose Nipper Screw Bit (+) : 101 Hex Sleeves 5mm Screw Bit (+) : 102 Screw Bit (+) : 107 Introduction Fundamental Principle Mechanical Construction Procedure of Disassembly Troubleshooting Function Test and Alignment Procedure Firmware Upgrading Procedure Function of Boards Specifications DDC Key-In Procedure Appendix 4-1 Disassemble Lamp Module Lamp Module Lamp Bottom Cover 2 1. 2. 1 Loosen two screws of Lamp Bottom Cover to remove Lamp Bottom Cover. Loosen two screws of Lamp Module to pull out Lamp Module. 4-3 EP737 SERVICE MANUAL 4-4 EP737 SERVICE MANUAL Introduction Fundamental Principle Mechanical Construction Procedure of Disassembly Troubleshooting Function Test and Alignment Procedure Firmware Upgrading Procedure Function of Boards Specifications DDC Key-In Procedure Appendix 4-2 Disassemble Top Cover and Keypad Board 1 2 3 4 Top Cover 5 FFC Bottom Cover 1. 2. 3. 4. 5. Right Cover Left Cover Remove five screws of Bottom Cover. Remove one screw beside Right Cover. Remove one screw beside Left Cover. Turn over the projector, then life up Top Cover from Left and Right side. Unplug FFC from Main Board to remove Top Cover. Introduction Fundamental Principle Mechanical Construction Procedure of Disassembly Troubleshooting Function Test and Alignment Procedure Firmware Upgrading Procedure FFC Function of Boards Specifications DDC Key-In Procedure Appendix EP737 SERVICE MANUAL 7 4-5 Keypad 6 8 LED Lens 9 Keypad Board Light Cut Up Top Cover 6. 7. 8. 9. Unscrew four screws to remove Keypad Board and Keypad Unplug FFC from Keypad Board. Separate Keypad Board, Keypad and LED Lens. Unscrew two screws to remove Light Cut Up. Keypad Board 4-6 EP737 SERVICE MANUAL Introduction Fundamental Principle Mechanical Construction Procedure of Disassembly Troubleshooting Function Test and Alignment Procedure Firmware Upgrading Procedure Function of Boards Specifications DDC Key-In Procedure Appendix 4-3 Disassemble Left Cover, Right Cover and I/O Bezel Module 1 2 Left Cover I/O Bezel Module 1. 2. Remove four hex screws to remove I/O Bezel Module. Unscrew one screw to remove Left Cover. Introduction Fundamental Principle Mechanical Construction Procedure of Disassembly Troubleshooting Function Test and Alignment Procedure Firmware Upgrading Procedure Function of Boards Specifications DDC Key-In Procedure Appendix 4-7 3 Right Cover 4 Right Cover Speaker 3. 4. Unplug one wire from Main Board and unscrew one screw to remove Right Cover. Remove two screws to take off speaker from Right Cover. EP737 SERVICE MANUAL 4-8 EP737 SERVICE MANUAL Introduction Fundamental Principle Mechanical Construction Procedure of Disassembly Troubleshooting Function Test and Alignment Procedure Firmware Upgrading Procedure Function of Boards Specifications DDC Key-In Procedure Appendix 4-4 Disassemble Front Cover 2 1 Front Cover Module Focus Ring Front Cover Module 1. 2. Pull out Focus Ring from Front Cover Module. Unscrew three screws from Front Cover Module and unplug three wires from Thermal Board Take off Front Cover Module from Bottom Cover Module. Introduction Fundamental Principle Mechanical Construction Procedure of Disassembly Troubleshooting Function Test and Alignment Procedure Firmware Upgrading Procedure Function of Boards Specifications DDC Key-In Procedure Appendix 4-9 EP737 SERVICE MANUAL 3 Front Cover Module Front Fan Module 4 5 IC Cover Pad IR Sensor Board Fan Guide 3. 4. 5. Unscrew four screws from Front Cover and take off it. Unscrew three screws from Fan Guide to remove it. Tear off IC Cover Pad, pull up IR Sensor Board from Front Cover Module. 4-10 EP737 SERVICE MANUAL Introduction Fundamental Principle Mechanical Construction Procedure of Disassembly Troubleshooting Function Test and Alignment Procedure Firmware Upgrading Procedure 4-5 Disassemble Thermal Board and Main Board 1 2 Fan Guide Bracket Thermal Board 1. 2. Unscrew two screws to remove Fan Guide Bracket. Unscrew one screw and unplug five wires from Thermal Board to remove it. Function of Boards Specifications DDC Key-In Procedure Appendix Introduction Fundamental Principle Mechanical Construction Procedure of Disassembly Troubleshooting Function Test and Alignment Procedure Firmware Upgrading Procedure Function of Boards Specifications DDC Key-In Procedure Appendix 4-11 EP737 SERVICE MANUAL 3 Main Board 4 Main Board Bottom Rubber 3. 4. Unscrew two hex screws and two screws from Main Board. Pull up Main Board and Separate Main Board and Main Board Bottom Rubber. 4-12 EP737 SERVICE MANUAL Introduction Fundamental Principle Mechanical Construction Procedure of Disassembly Troubleshooting Function Test and Alignment Procedure Firmware Upgrading Procedure Function of Boards Specifications DDC Key-In Procedure Appendix 4-6 Disassemble Ballast and Fan Module 1 3 Ignite Wire Ballast 2 2 1. 2. 3. Unscrew two screws from Engine Module and pull out the Ignite Wire. Unscrew two long hex screws and one plastic screw from Ballast Module. Unscrew one screw from grounding then pull put the Ballast Module. Introduction Fundamental Principle Mechanical Construction Procedure of Disassembly Troubleshooting Function Test and Alignment Procedure Firmware Upgrading Procedure Function of Boards Specifications DDC Key-In Procedure Appendix 4-13 4 Fan Module Fan Module Bottom Module 4. Unscrew four screws to remove two Fan Module from Bottom Module. EP737 SERVICE MANUAL 4-14 EP737 SERVICE MANUAL Introduction Fundamental Principle Mechanical Construction Procedure of Disassembly Troubleshooting Function Test and Alignment Procedure Firmware Upgrading Procedure 4-7 Disassemble DC-DC Board and Interlock Switch 2 Interlock Switch Bottom Cover 1 DC-DC Board 1 1. 2. Unplug one wire from DC-DC Board. Unscrew one screw to remove DC-DC Module from Bottom Cover. Unscrew one screw to remove Interlock Switch from Bottom Cover. Function of Boards Specifications DDC Key-In Procedure Appendix Introduction Fundamental Principle Mechanical Construction Procedure of Disassembly Troubleshooting Function Test and Alignment Procedure Firmware Upgrading Procedure Function of Boards Specifications DDC Key-In Procedure Appendix 4-15 EP737 SERVICE MANUAL 4-8 Disassemble Engine, DMD and DMD Board 1 Engine Module 1. Unscrew four screws to remove Engine Module 4-16 EP737 SERVICE MANUAL Introduction Fundamental Principle Mechanical Construction Procedure of Disassembly Troubleshooting Function Test and Alignment Procedure Firmware Upgrading Procedure Function of Boards Specifications DDC Key-In Procedure Appendix 3 Engine DMD Holder DMD Light-Mask DMD Contact Housing Intercon 2 Rubber Washer Shoulder Screw DMD Board DMD Heatsink 2. 3. Unscrew four shoulder screws and Rubber Washers to remove DMD Heatsink, DMD Board, and Contact Housing Intercon. Remove DMD from DMD Holder. Introduction Fundamental Principle Mechanical Construction Procedure of Disassembly Troubleshooting Function Test and Alignment Procedure Firmware Upgrading Procedure Function of Boards Specifications DDC Key-In Procedure Appendix 4-17 EP737 SERVICE MANUAL 4-9 Disassemble Color Wheel, Photo Sensor Board and Thermal Switch 1 2 Color Wheel Holder Color Wheel Photo Sensor Board 3 1. 2. 3. Thermal Switch Unscrew one screw to remove Color Wheel and Photo Sensor Board from Engine. Unscrew one screw to remove Photo Sensor Board from Color Wheel Holder. Unscrew one screw to remove Thermal Switch from Engine. Engine 4-18 Introduction Fundamental Principle Mechanical Construction Procedure of Disassembly Troubleshooting Function Test and Alignment Procedure Firmware Upgrading Procedure EP737 SERVICE MANUAL Function of Boards Specifications DDC Key-In Procedure Appendix 4-10 Disassemble Elevator Module 1 2 Elevator Hook Noyal Elevator Push Spring Elevator Bracket Elevator Foot Noyal Elevator Foot Spring Bottom Cover 1. 2. Unscrew two screws to remove Elevator Bracket and Elevator Foot Spring from Bottom Cover. Pull out Elevator Hook Noyal rightward. Then remove Elevator Hook Noyal, Elevator Push Spring and Elevator Foot Noyal. Introduction Fundamental Principle Mechanical Construction Procedure of Disassembly Troubleshooting Function Test and Alignment Procedure Firmware Upgrading Procedure Function of Boards Specifications DDC Key-In Procedure Appendix Function Of Boards 5 This section provides each connector location on boards, signal and function of each board. They will be useful for your detecting the defective boards. 5-1 EP737 SERVICE MANUAL 5-2 EP737 SERVICE MANUAL Introduction Fundamental Principle Mechanical Construction Procedure of Disassembly Troubleshooting Function Test and Alignment Procedure Firmware Upgrading Procedure 5-1 DMD Board 5-1.1 The Locations of Connectors J1 J501 Function of Boards Specifications DDC Key-In Procedure Appendix Introduction Fundamental Principle Mechanical Construction Procedure of Disassembly Troubleshooting Function Test and Alignment Procedure Firmware Upgrading Procedure Function of Boards Specifications DDC Key-In Procedure Appendix 5-3 EP737 SERVICE MANUAL 5-1.2 J501 : Color Wheel Connector PI N # S igna l N a me De sc riptio n PI N # S igna l N a me De sc riptio n 1 CW CTR Color W heel Motor Drive Signal 2 CW Y3 Color W heel Motor Drive Signal 3 CW Y2 Color W heel Motor Drive Signal 4 CW Y1 Color W heel Motor Drive Signal 5-1.3 J1 : To Main Board Connector PI N # S igna l N a me De sc riptio n PI N # S igna l N a me De sc riptio n 1 GN D G round 2 G Y6 Digital G reen Signal Input 3 G Y7 Digital G reen Signal Input 4 GN D G round 5 GN D G round 6 G Y4 Digital G reen Signal Input 7 G Y5 Digital G reen Signal Input 8 GN D G round 9 GN D G round 10 G Y2 Digital G reen Signal Input 11 G Y3 Digital G reen Signal Input 12 GN D G round 13 GN D G round 14 G Y0 Digital G reen Signal Input 15 G Y1 Digital G reen Signal Input 16 GN D G round 17 GN D G round 18 R V6 Digital R ed Signal Input 19 R V7 Digital R ed Signal Input 20 GN D G round 21 GN D G round 22 R V4 Digital R ed Signal Input 23 R V5 Digital R ed Signal Input 24 GN D G round 25 GN D G round 26 R V2 Digital R ed Signal Input 27 R V3 Digital R ed Signal Input 28 GN D G round 29 GN D G round 30 R V0 Digital R ed Signal Input 5-4 EP737 SERVICE MANUAL Introduction Fundamental Principle Mechanical Construction Procedure of Disassembly Troubleshooting Function Test and Alignment Procedure Firmware Upgrading Procedure Function of Boards Specifications DDC Key-In Procedure Appendix PI N # S igna l N a me De sc riptio n PI N # S igna l N a me De sc riptio n 31 R V1 Ditigal R ed Signal Input 32 GN D G round 33 GN D G round 34 B U6 Ditigal B lue Signal Input 35 B U7 Ditigal B lue Signal Input 36 GN D G round 37 GN D G round 38 B U4 Ditigal B lue Signal Input 39 B U5 Ditigal B lue Signal Input 40 GN D G round 41 GN D G round 42 B U2 Ditigal B lue Signal Input 43 B U3 Ditigal B lue Signal Input 44 GN D G round 45 GN D G round 46 B U0 Ditigal B lue Signal Input 47 B U1 Ditigal B lue Signal Input 48 GN D G round 49 GN D G round 50 OL ACT Overlay Ac tive 51 ACTDATA Data Enable 52 GN D G round 53 GN D G round 54 H SYN CZ H orizontal Sync . 55 V SYN CZ V ertic al Sync . 56 GN D G round 57 GN D G round 58 SYN CV AL Sync . V alid 59 CL KIN Data Cloc k 60 GN D G round 61 GN D G round 62 L AMPEN L amp Enable 63 R ESETZ R eset Sync . 64 L AMPL ITZ L amp L it 65 PW R G OOD Pow er G ood Sync . 66 L AMPSYN C L amp Sync . 67 AR MTEST1 Test Point 68 PW M0 Test Point 69 AR MTEST2 Test Point 70 PW M1 Test Point Introduction Fundamental Principle Mechanical Construction Procedure of Disassembly Troubleshooting Function Test and Alignment Procedure Firmware Upgrading Procedure Function of Boards Specifications DDC Key-In Procedure Appendix 5-5 PI N # S igna l N a me De sc riptio n PI N # S igna l N a me De sc riptio n 71 SDA0 Serial Data 72 GN D G round 73 GN D G round 74 SCL 1 Serial Cloc k 75 SCL 0 Serial Cloc k 76 GN D G round 77 GN D G round 78 SDA1 Serial Data 79 P3P3V _IN +3.3V 80 GN D G round 81 P3P3V _IN +3.3V 82 TSTPN T0 Test Point 83 P3P3V _IN +3.3V 84 TSTPN T1 Test Point 85 P3P3V _IN +3.3V 86 TSTPN T2 Test Point 87 GN D G round 88 TSTPN T3 Test Point 89 P2P5V _IN +2.5V 90 P2P5V _IN +2.5V 91 P2P5V _IN +2.5V 92 P2P5V _IN +2.5V 93 P2P5V _IN +2.5V 94 P2P5V _IN +2.5V 95 P2P5V _IN +2.5V 96 P2P5V _IN +2.5V 97 CW IN DEX Color W heel Ind ex 98 GN D G round 99 GN D G round 100 USB P N o Connec tion 101 PW M2 Test Point 102 GN D G round 103 GN D G round 104 USB N N o Connec tion 105 P5V _IN +5V 106 GN D G round 107 P5V _IN +5V 108 P12V _IN +12V 109 GN D G round 110 P12V _IN +12V EP737 SERVICE MANUAL 5-6 EP737 SERVICE MANUAL Introduction Fundamental Principle Mechanical Construction Procedure of Disassembly Troubleshooting Function Test and Alignment Procedure Firmware Upgrading Procedure Function of Boards Specifications DDC Key-In Procedure Appendix PI N # S igna l N a me De sc riptio n PI N # S igna l N a me De sc riptio n 111 TCK Test Point 112 GN D G round 113 GN D G round 114 SPAR E64 Test Point 115 TD1 Test Point 116 TR STZ Test Point 117 TMS1 Test Point 118 TMS2 Test Point 119 TDO1 Test Point 120 TDO2 Test Point Introduction Fundamental Principle Mechanical Construction Procedure of Disassembly Troubleshooting Function Test and Alignment Procedure Firmware Upgrading Procedure Function of Boards Specifications DDC Key-In Procedure Appendix 5-2 Main Board 5-2.1 The Locations of Connectors J5 J10 J6 J7 J1 J4 J9 J3 5-7 EP737 SERVICE MANUAL 5-8 EP737 SERVICE MANUAL Introduction Fundamental Principle Mechanical Construction Procedure of Disassembly Troubleshooting Function Test and Alignment Procedure Firmware Upgrading Procedure Function of Boards Specifications DDC Key-In Procedure Appendix 5-2.2 J10 : Speaker Connector PI N # S igna l N a me De sc riptio n PI N # S igna l N a me De sc riptio n 1 SPEAKER + To Speaker + 2 SPEAKER - To Speaker - 5-2.3 J6 : To Keypad Interface Connector PI N # S igna l N a me De sc riptio n PI N # S igna l N a me De sc riptio n 1 +3.3V +3.3V 2 MEN U Keypad Menu Control 3 MEN U-U Keypad Up Control 4 MEN U-D Keypad Dow n Control 5 MEN U-L Keypad L eft Control 6 MEN U-R Keypad R ight Control 7 PW B OTTON Pow er B utton Control 8 +3.3V +3.3V 9 GN D G round 10 GN D G round 11 L E D1 L E D1 12 L E D2 L E D2 13 PW _L ED Pow er L ED 14 GN D G round 5-2.4 J3 : RCA-Jack_IP Connector PI N # S igna l N a me De sc riptio n PI N # S igna l N a me De sc riptio n 1 CV IDEO Composite V id eo Input 2 GN D G round 5-2.5 J4 : S-VHS Connector PI N # S igna l N a me De sc riptio n PI N # S igna l N a me De sc riptio n 1 GN D G round 2 GN D G round 3 SV IDEO1 L uminanc e Signal Input 4 SV IDEO2 Chrominanc e Signal Input Introduction Fundamental Principle Mechanical Construction Procedure of Disassembly Troubleshooting Function Test and Alignment Procedure Firmware Upgrading Procedure Function of Boards Specifications DDC Key-In Procedure Appendix 5-9 5-2.6 J5 : To DMD Board Connector PI N # S igna l N a me De sc riptio n PI N # S igna l N a me De sc riptio n 1 GN D G round 2 G D6 G reen Data 3 G D7 G reen Data 4 GN D G round 5 GN D G round 6 G D4 G reen Data 7 G D5 G reen Data 8 GN D G round 9 GN D G round 10 G D2 G reen Data 11 G D3 G reen Data 12 GN D G round 13 GN D G round 14 G D0 G reen Data 15 G D1 G reen Data 16 GN D G round 17 GN D G round 18 R D6 R ed Data 19 R D7 R ed Data 20 GN D G round 21 GN D G round 22 R D4 R ed Data 23 R D5 R ed Data 24 GN D G round 25 GN D G round 26 R D2 R ed Data 27 R D3 R ed Data 28 GN D G round 29 GN D G round 30 R D0 R ed Data 31 R D1 R ed Data 32 GN D G round 33 GN D G round 34 B D6 B lue Data 35 B D7 B lue Data 36 GN D G round 37 GN D G round 38 B D4 B lue Data 39 B D5 B lue Data 40 GN D G round EP737 SERVICE MANUAL 5-10 EP737 SERVICE MANUAL Introduction Fundamental Principle Mechanical Construction Procedure of Disassembly Troubleshooting Function Test and Alignment Procedure Firmware Upgrading Procedure Function of Boards Specifications DDC Key-In Procedure Appendix PI N # S igna l N a me De sc riptio n PI N # S igna l N a me De sc riptio n 41 GN D G round 42 B D2 B lue Data 43 B D3 B lue Data 44 GN D G round 45 GN D G round 46 B D0 B lue Data 47 B D1 B lue Data 48 GN D G round 49 GN D G round 50 OL ACT Overlay Ac tive 51 ACTDATA Data Enable 52 GN D G round 53 GN D G round 54 H SYN CZ H orizontal Sync . 55 V SYN CZ V ertic al Sync . 56 GN D G round 57 GN D G round 58 SYN CV AL D Sync . V alid 59 DCL KOZ Data Cloc k Output 60 GN D G round 61 GN D G round 62 L AMPEN L amp Enable 63 R ESETZ R eset 64 L AMPL ITZ L amp L it 65 PW R G OOD Pow er G ood 66 L AMPSYN C L amp Sync . 67 AR MTEST1 Test Point 68 PW M0 Test Point 69 AR MTEST2 Test Point 70 PW M1 Test Point 71 S DA Serial Data 72 GN D G round 73 GN D G round 74 SCL 1 Serial Cloc k 75 SCL Serial Cloc k 76 GN D G round 77 GN D G round 78 SDA1 Serial Data 79 +3.3V IN +3.3V 80 GN D G round Introduction Fundamental Principle Mechanical Construction Procedure of Disassembly Troubleshooting Function Test and Alignment Procedure Firmware Upgrading Procedure Function of Boards Specifications DDC Key-In Procedure Appendix 5-11 PI N # S igna l N a me De sc riptio n PI N # S igna l N a me De sc riptio n 81 +3.3V IN +3.3 82 TSTPN T0 Test Point 83 +3.3V IN +3.3 84 TSTPN T1 Test Point 85 +3.3V IN +3.3 86 TSTPN T2 Test Point 87 GN D G round 88 TSTPN T3 Test Point 89 +2.5V DMD +2.5V 90 +2.5V DMD +2.5V 91 +2.5V DMD +2.5V 92 +2.5V DMD +2.5V 93 +2.5V DMD +2.5V 94 +2.5V DMD +2.5V 95 +2.5V DMD +2.5V 96 +2.5V DMD +2.5V 97 CW IN DEX Color W heel Ind ex 98 GN D G round 99 GN D G round 100 N .C. N o Connec tion 101 PW M2 Test Point 102 GN D G round 103 GN D G round 104 N .C. N o Connec tion 105 +5V +5V 106 GN D G round 107 +5V +5V 108 +12V +12V 109 GN D G round 110 +12V +12V 111 TCK Test Point 112 GN D G round 113 GN D G round 114 SPAR E64 Test Point 115 TD1 Test Point 116 TR STZ Test Point 117 TMS1 Test Point 118 TMS2 Test Point 119 TDO1 Test Point 120 TDO2 Test Point EP737 SERVICE MANUAL 5-12 EP737 SERVICE MANUAL Introduction Fundamental Principle Mechanical Construction Procedure of Disassembly Troubleshooting Function Test and Alignment Procedure Firmware Upgrading Procedure Function of Boards Specifications DDC Key-In Procedure Appendix 5-2.7 J7 : To Thermal Board PI N # S igna l N a me De sc riptio n PI N # S igna l N a me De sc riptio n 1 GN D G round 2 GN D G round 3 +5V +5V 4 +5V +5V 5 +5V +5V 6 +5V +5V 7 GN D G round 8 +5V +5V 9 GN D G round 10 GN D G round 11 GN D G round 12 GN D G round 13 +12V +12V 14 +12V +12V 15 GN D G round 16 GN D G round 17 +3.3V IN +3.3V 18 +3.3V IN +3.3V 19 +3.3V IN +3.3V 20 +3.3V IN +3.3V 21 GN D G round 22 GN D G round 23 +5V SB Y +5V 24 +5V SB Y +5V 25 GN D G round 26 PW _L ED Pow er L ED 27 PW B OTTON Stand by Sync . 28 IR _ON OFF IR _ON OFF 29 CW IN DEX Color W heel Ind ex 30 L AMPEN L amp Enable 31 L AMPL ITZ L amp L it 32 SH UTDW # Shut Dow n 33 PW R G OOD Pow er G ood 34 ER R _OUT Error Sync . Output 35 TSDA Serial Data 36 IR _ R IR _Data 37 TSCL Serial Cloc k 38 H PDPCN T +12V 39 L E D1 L E D1 40 L E D2 L E D2 Introduction Fundamental Principle Mechanical Construction Procedure of Disassembly Troubleshooting Function Test and Alignment Procedure Firmware Upgrading Procedure Function of Boards Specifications DDC Key-In Procedure Appendix 5-13 EP737 SERVICE MANUAL 5-2.8 J1 : VESA M1-Display Interface Connector PI N # S igna l N a me De sc riptio n PI N # S igna l N a me De sc riptio n 1 R X2+ Transmit Data 2 R X2- Transmit Data 3 R X2 Shield G round 4 R XC Shield G round 5 H SYN C Analog H orizontal Sync . Input 6 V SYN C Analog V ertic al Sync . Input 7 N .C. N o Connec tion 8 +5V H PD +5V 9 N .C. N o Connec tion 10 N .C. N o Connec tion 11 R X1+ Transmit Data 12 R X1- Transmit Data 13 R X1 Shield G round 14 R XC+ Transmit Data 15 R XC- Transmit Data 16 U S B _ D+ R emote Mouse USB + 17 U S B _ D- R emote Mouse USB - 18 N .C. N o Connec tion 19 E DI D_ W EDID W rite USE 20 DW L OAD Firmw are Dow nload Use 21 R X0+ Transmit Data 22 R X0- Transmit Data 23 R X0 Shield G round 24 USB +5V Input +5V 25 GN D G round 26 DDCDAT DDC Data 27 DDCCL K DDC Cloc k 28 DDC+5V +5V 29 M1_R XD Firmw are Dow nload Use 30 M1_TXD Firmw are Dow nload Use C1 V G AIN _R Analog R ed Sync . Input C2 V G AIN _G Analog G reen Sync . Input C3 V G AIN _B Analog B lue Sync . Input C4 V G AIN _B Analog B lue Sync . Input C5 V id eo R eturn G round 5-14 EP737 SERVICE MANUAL Introduction Fundamental Principle Mechanical Construction Procedure of Disassembly Troubleshooting Function Test and Alignment Procedure Firmware Upgrading Procedure Function of Boards Specifications DDC Key-In Procedure Appendix 5-2.9 J9 : Audio In Connector PI N # S igna l N a me De sc riptio n PI N # S igna l N a me De sc riptio n 1 GN D G round 2 AIN _R Aud io R ight Channel Input 3 AIN _L Aud io R ight Channel Input 4 N .C. N o Connec tion 5 N .C. N o Connec tion Introduction Fundamental Principle Mechanical Construction Procedure of Disassembly Troubleshooting Function Test and Alignment Procedure Firmware Upgrading Procedure Function of Boards Specifications DDC Key-In Procedure Appendix 5-15 EP737 SERVICE MANUAL 5-3 Keypad Board 5-3.1 The Locations of Connectors J1 5-3.2 J1 : Keypad Connector PI N # S igna l N a me De sc riptio n PI N # S igna l N a me De sc riptio n 1 +5V +5V 2 MEN U Keypad Menu Control 3 MEN U-U Keypad Up Control 4 MEN U-D Keypad Dow n Control 5 MEN U-L Keypad L eft Control 6 MEN U-R Keypad R ight Control 7 PW B OTTON Pow er B utton Control 8 +5V SB +5V 9 GN D G round 10 GN D G round 11 L E D1 L E D1 12 L E D2 L E D2 13 PW _L ED PW _L ED 14 GN D G round 5-16 EP737 SERVICE MANUAL Introduction Fundamental Principle Mechanical Construction Procedure of Disassembly Troubleshooting Function Test and Alignment Procedure Firmware Upgrading Procedure 5-4 Thermal Board 5-4.1 The Locations of Connectors J5 J3 J4 J6 J8 J2 J10 J7 J11 JP2 Function of Boards Specifications DDC Key-In Procedure Appendix Introduction Fundamental Principle Mechanical Construction Procedure of Disassembly Troubleshooting Function Test and Alignment Procedure Firmware Upgrading Procedure Function of Boards Specifications DDC Key-In Procedure Appendix 5-17 EP737 SERVICE MANUAL 5-4.2 J5 : Fan3 Connector PI N # S igna l N a me De sc riptio n PI N # S igna l N a me De sc riptio n 1 FAN _POW ER 3 Fan3 Pow er 2 FAN _L OCK FAN L oc k Sync . 3 GN D G round 5-4.3 J3 : Fan2 Connector PI N # S igna l N a me De sc riptio n PI N # S igna l N a me De sc riptio n 1 FAN _POW ER 2 Fan2 Pow er 2 FAN _L OCK FAN L oc k Sync . 3 GN D G round 5-4.4 J8 : Thermal Switch Connector PI N # S igna l N a me De sc riptio n PI N # S igna l N a me De sc riptio n 1 TH ER MAL ER R OR # Thermal Error Sync . 2 GN D G round 5-4.5 J6 : Photo Sensor Connector PI N # S igna l N a me De sc riptio n PI N # S igna l N a me De sc riptio n 1 GN D G round 2 PH OTO_IN Photo Sensor Input Signal 3 +3.3V +3.3V 5-18 EP737 SERVICE MANUAL Introduction Fundamental Principle Mechanical Construction Procedure of Disassembly Troubleshooting Function Test and Alignment Procedure Firmware Upgrading Procedure Function of Boards Specifications DDC Key-In Procedure Appendix 5-4.6 J2 : Fan4 Connector PI N # S igna l N a me De sc riptio n PI N # S igna l N a me De sc riptio n 1 FAN _POW ER 4 Fan1 Pow er 2 FAN _L OCK Fan L oc k Sync . 3 GN D G round 5-4.7 J4 : Fan1 Connector PI N # S igna l N a me De sc riptio n PI N # S igna l N a me De sc riptio n 1 FAN _POW ER 1 Fan1 Pow er 2 FAN _L OCK Fan L oc k Sync . 3 GN D G round 5-4.8 J10 : IR Receiver Connector PI N # S igna l N a me De sc riptio n PI N # S igna l N a me De sc riptio n 1 IR _ R IR R ec eiver 2 GN D G round 3 +5V SB Y +5V Stand by Pow er 5-4.8 J11 : To Lamp Ballast Connector PI N # S igna l N a me De sc riptio n PI N # S igna l N a me De sc riptio n 1 L AMPEN _OUT L amp Enable Sync . 2 GN D G round 3 L AMPL IT_IN L amp L it Feed bac k Sync . Introduction Fundamental Principle Mechanical Construction Procedure of Disassembly Troubleshooting Function Test and Alignment Procedure Firmware Upgrading Procedure Function of Boards Specifications DDC Key-In Procedure Appendix 5-19 5-4.9 J7 : To DC-DC Connector PI N # S igna l N a me De sc riptio n PI N # S igna l N a me De sc riptio n 1 L AMPEN _OUT L amp Enable 2 +3.3V SB Y +3.3V 3 +5V SB Y +5V 4 GN D G round 5 GN D G round 6 +13.1V SB Y +13.1V 7 +13.1V SB Y +13.1V 8 N .C. N o Connec tion 9 GN D G round 10 GN D G round 11 GN D G round 12 +5V SB Y +5V 13 +13.3V SB Y +3.3V 14 L AMPL IT_IN L amp L it 5-4.10 JP2 : To Main Board Connector PI N # S igna l N a me De sc riptio n PI N # S igna l N a me De sc riptio n 1 GN D G round 2 GN D G round 3 +5V +5V 4 +5V +5V 5 +5V +5V 6 +5V +5V 7 GN D G round 8 +5V +5V 9 GN D G round 10 GN D G round 11 GN D G round 12 GN D G round 13 +12V +12V 14 +12V +12V 15 GN D G round 16 GN D G round 17 +3.3V +3.3V 18 +3.3V +3.3V 19 +3.3V +3.3V 20 +3.3V +3.3V EP737 SERVICE MANUAL 5-20 EP737 SERVICE MANUAL Introduction Fundamental Principle Mechanical Construction Procedure of Disassembly Troubleshooting Function Test and Alignment Procedure Firmware Upgrading Procedure Function of Boards Specifications DDC Key-In Procedure Appendix PI N # S igna l N a me De sc riptio n PI N # S igna l N a me De sc riptio n 21 GN D G round 22 GN D G round 23 +5V SB Y +5V 24 +5V SB Y +5V 25 GN D G round 26 PW _L ED Pow er L ED 27 PW B OTTON Stand by Sync . 28 IR _ON OFF IR _ON OFF 29 CW IN DEX Color W heel Ind ex 30 L AMPEN L amp Enable 31 L AMPL IT L amp L it 32 SH UT_DOW N # Shut Dow n Sync . 33 PW R G OOD Pow er G ood 34 ER R _OUT Thermal Error Sync . 35 TSDA Serial Data 36 IR _ R IR _Data 37 TSCL Serial Cloc k 38 +13.1V SB Y +13.1V 39 L E D1 L E D1 40 L E D2 L E D2 Introduction Fundamental Principle Mechanical Construction Procedure of Disassembly Troubleshooting Function Test and Alignment Procedure Firmware Upgrading Procedure Function of Boards Specifications DDC Key-In Procedure Appendix 5-21 EP737 SERVICE MANUAL 5-5 DC-DC Board 5-5.1 The Locations of Connectors J4 J1 J2 5-5.2 J2 : Interlock Connector PI N # S igna l N a me De sc riptio n PI N # S igna l N a me De sc riptio n 1 L AMP IN TER L OCK L amp Door Interloc k 2 L AMP IN TER L OCK L amp Door Interloc k 5-5.3 J1 : To Ballast Connector PI N # S igna l N a me De sc riptio n PI N # S igna l N a me De sc riptio n 1 SYSTEM POW ER +400V 2 N .C. N o Connec tion 3 GN D G round 4 SYSTEM POW ER +12V 5-22 EP737 SERVICE MANUAL Introduction Fundamental Principle Mechanical Construction Procedure of Disassembly Troubleshooting Function Test and Alignment Procedure Firmware Upgrading Procedure Function of Boards Specifications DDC Key-In Procedure Appendix 5-5.4 J4 : To Thermal Board Connector PI N # S igna l N a me De sc riptio n PI N # S igna l N a me De sc riptio n 1 L AMPEN _OUT L amp Enable Signal Output 2 +3.3V SB Y +3.3V Stand by Pow er 3 +5V SB Y +5V Stand by Pow er 4 GN D G round 5 GN D G round 6 +13.1 V SB Y +13.1V Stand by Pow er 7 +13.1V SB Y +13.1V Stand by Pow er 8 N .C. N o Connec tion 9 GN D G round 10 GN D G round 11 GN D G round 12 +5V SB Y +5V Stand by Pow er 13 +3.3V SB Y +3.3V Stand by Pow er 14 L AMPL IT_IN L amp L it Signal Input Introduction Fundamental Principle Mechanical Construction Procedure of Disassembly Troubleshooting Function Test and Alignment Procedure Firmware Upgrading Procedure Function of Boards Specifications DDC Key-In Procedure Appendix 5-23 5-6 Ballast 5-6.1 The Locations of Connectors CN1 CN3 5-6.2 CN3 : Control Board Connector PI N # S igna l N a me De sc riptio n PI N # S igna l N a me De sc riptio n 1 L AMPEN _OU T Start Control Input 2 GN D G round 3 L AMPL IT Fla Output 5-6.2 CN1 : Power Supply Connector PI N # S igna l N a me De sc riptio n PI N # S igna l N a me De sc riptio n 1 +400V +400V 2 N .C. N o Connec tion 3 GN D G round 4 V CC +12V EP737 SERVICE MANUAL Introduction Fundamental Principle Mechanical Construction Procedure of Disassembly Troubleshooting Function Test and Alignment Procedure Firmware Upgrading Procedure Function of Boards Specifications DDC Key-In Procedure Appendix Specifications 6 This chapter provides DMD, Lamp, Lamp Driver and DC-DC specifications. All specifications are for your reference. 6-1 EP737 SERVICE MANUAL 6-2 EP737 SERVICE MANUAL Introduction Fundamental Principle Mechanical Construction Procedure of Disassembly Troubleshooting Function Test and Alignment Procedure Firmware Upgrading Procedure 6-1 Lamp Specifications ¡ Operating and Measurement Conditions B a lla st type Test c ond itions stable at 150W w ith OSR AM PT V IP 150 AC/100-240 H l ballast R a te d la mp wa tta ge 150W B urne r po sitio n 0o to +20o (0o optic al axis horizontal) B urning po sitio n H orizontal ¡ Temperature L a mp burne r M o fo il, ba c k < 350oC L a mp burne r M o wire < 400oC L a mp burne r M o fo il, fro nt < 350oC B urne r te mpe ra ture 900oC~1000oC Validation of max . permissible temperatures by reference thermocouple measurement based on a reference lamp housing. ¡ Typical Burner Characteristics (Initial) U V-o utput UV A (315-400 nm) 9W typic al U V B (280-315 nm) < 0,13 W U V C (248-280 nm) < 0,013 W U V-o utput thro ugh dic hro ic re fle c to r (248-400 nm) 2.5W typic al To ta l visible flux (400-780 nm) 38W typic al IR (780-2500 nm) 38W typic al Function of Boards Specifications DDC Key-In Procedure Appendix Introduction Fundamental Principle Mechanical Construction Procedure of Disassembly Troubleshooting Function Test and Alignment Procedure Firmware Upgrading Procedure Function of Boards Specifications DDC Key-In Procedure Appendix ¡ Average Lamp Life and Lumen Maintenance S witc hing c yc le 3.5 hrs on 0.5 hrs off L a mp life time 1000 hrs typic al L a mp life L amp output > 50% of initial lumen output ¡ Rise Time R ise time to 80% of the stabilized luminous output is < 90 sec w ithout forc ed c onvec tion. Extensive c ooling of the hulb d uring lamp run-up phase has to be avoid ed . ¡ Light output B a lla st type Test c ond itions on elec tronic pow er supply OSR AM PT V IP 150 AC/100-240 H l stable S ta biliza tio n time 5 min, w ithout forc ed c ooling L umino us flux thro ugha pe rture Typ. : 5400 lm @ 5.0 x 3.8 mm2rec t. aperture R e c ta ngula r a pe rture Min. : 5000 lm @ 5.0 x 3.8 mm2rec t. aperture Co lo r c o o rdina te s Typ. x : 0.280 +/- 0.020 Typ. y : 0.290 +/- 0.020 ¡ Hot Restrike If the unit has been off for more than 60 sec . the lamp must restrike. (Ignition voltage 20 kV +/- 3 kV ) N o forc ed c ooling is req uired follow ing lamp sw itc h-off. 6-3 EP737 SERVICE MANUAL 6-4 EP737 SERVICE MANUAL Introduction Fundamental Principle Mechanical Construction Procedure of Disassembly Troubleshooting Function Test and Alignment Procedure Firmware Upgrading Procedure Function of Boards Specifications DDC Key-In Procedure Appendix ¡ Instructions for use - For lamp replacement : switch off power, disconnect power cord, allow lamp to reach room temperature. - This VIP lamp operates at high pressure and at high temperature and may unexpectedly shatter. - This VIP lamp generates ultraviolet radiation which may cause skin and eye irritation with prolonged exposure. - This VIP lamp must be operated only in suitably designed, enclosed fixtures which prevent direct observation of the arc and will prevent lamp fragments from exiting, in the unlikely event of a lamp shattering. - The burning position is 0o to +/- 15o (0o optical axis horizontal). - Do not touch the lamp with bare hands. - If necessary, lamp can be cleaned with lint free towel before operation. - The lamp must be operated with the OSRAM lamp driver PT VIP 150 AC/100-240 H1. - Protect lamp environment against high ignition pulses. - Avoid direct contact of objects to reflector cover glass. - Faster on-off-cycles than specified will reduce lamp life. - For most stable, i.e. flickerfree, operation, it is recommended to operate lamp at drive frequencies (via SCI signal) of 300Hz or greater. - Operate lamp only in accordance to UL 1950 regulations. - This lamp must not be operated with a broken, cracked or loose reflector or cover glass. - Do not operate the lamp in proximity to paper, cloth, or other combustible material nor cover it with such materials. Otherwise it could cause a fire. - Do not operate the lamp in an atmosphere containing an inflammable substance, such as thinner. Otherwise it could cause a fire or explosion. - Thoroughly ventible the area of the room when operating teh lamp in an oxygen atmosphere (in the air). If ozone is inhaled, it could cause headaches, nausea, dizziness, etc. - Leave the area immediately if the lamp shatters while being operated and ventilate the area for at least 30 minutes in order to avoid the inhalation of mercury fumes. Otherwise, it could be harmful to users health. Disposal For disposal of spent lamps, always consult federal, state, local and provincial hazardous waste disposal rules and regulations to ensure proper disposal. Caution This lamp emits ultra violet (UV) radiation and operates at high pressure. This lamp may only be used in enclosed fixtures that comply with UL1572. Due to the high within the lamp, P-VIPâ lamps may only be operated within enclosed, purpose-built housings. Introduction Fundamental Principle Mechanical Construction Procedure of Disassembly Troubleshooting Function Test and Alignment Procedure Firmware Upgrading Procedure Function of Boards Specifications DDC Key-In Procedure Appendix 6-2 DMD Specifications Table 1. Physical, Optical and Thermal Parameters Parameter Min No m Max Unit Phy sical N umber of c olumns 1024 N umber of row s 768 Mirror pitc h (w id th) mm 13.68 Total w id th (ac tive mirror array) [1024 pixels] --- 14.008 --- mm Total height (ac tive mirror array) [768 pixels] --- 10.506 --- mm Mirror tilt (half angle) (N ote 1) 11 12 13 Degrees Axis of rotation - upper right to low er left 44 45 46 Degrees 0.1 % Optical Flatness grad ient over total mirror array Ac tive area fill fac tor (by d esign) 85.2 % Mirror metal spec ular reflec tivity (420-700nm) 89.4 % Corning 7056 W ind ow material d esignation (Type A) W ind ow refrac tive ind ex @ 545nm (Type A) W ind ow transmittanc e - inc lud ing AR c oating, measured @ 420-680 nanometers (N ote 3) W ind ow flatness (@ 550 nanometers) spheric al pow er/irregularity (astigmatism, etc .) W ind ow aperture photopic reflec tivity 1.487 97 % 4/12 fringes 23 % Thermal Thermal imped anc e, ac tive area to c ase (N ote 4) 0.6 C/W o 6-5 EP737 SERVICE MANUAL 6-6 EP737 SERVICE MANUAL Introduction Fundamental Principle Mechanical Construction Procedure of Disassembly Troubleshooting Function Test and Alignment Procedure Firmware Upgrading Procedure Function of Boards Specifications DDC Key-In Procedure Appendix Note 1 : Tilt Angle Tolerances Limits on variability of mirror tilt half angle are critical in the design of the accompanying optical system. Variations in tilt angle within a device may result in apparent non-uniformities, such as line pairing and image mottling, acress the projected image. Variations in the average tilt angle between devices may result in colorimetry and system contrast variations. The specified limits represent the tolerances of the tilt angles within a device. Note 2 : Active Area Reflectivity The DMD specular reflectivity is defined as the ratio of the light incident upon the mirror array to the light specularly reflected from it. The measurement is made with all mirrors in the full on state without electronic duty cycle effects (i.e. measure using 100% duty cycle). The specified specular reflectivity applies to any arbitrary point on the DMD active area. Note 3 : Window Transmittance Angle of incidence 0o - 45o at 42-680nm. Double pass system. Two AR coating surfaces at 0.5% reflectivity per AR coating. Note 4 : Thermal Performance The DMD is designed to conduct absorbed and dissipated heat to the back of the package where it can be removed by an appropriate heat sink. The heat sink and cooling system must be capable of maintaining the package within the specified operational temperatures. The total heat load on the DMD is largely driven by the incident light absorbed by the active area although other contributions include light energy absorbed by the window aperture and electrical power dissipation of the array. Optical systems should be designed to minimize the light energy falling outside the window clear aperture since any additional thermal load in this area can significantly degrade the reliability of the device. For more information on thermal characteristics and applications of the 0.7XGA DMD, refer to Texas Instruments DMD Thermal Guide for 0. 7XGA Type A. Introduction Fundamental Principle Mechanical Construction Procedure of Disassembly Troubleshooting Function Test and Alignment Procedure Firmware Upgrading Procedure Function of Boards Specifications DDC Key-In Procedure Appendix Table 2. Absolute Max. Ratings Parameter Min Max Unit L ogic supply voltage, V CC -0.5 4.5 V DC Mirror elec trod e voltage, V CC2 -0.5 8 V DC R ead bac k referenc e voltage, EV CC -0.5 4.5 V DC Input V oltage, MB R ST -2.8 2.8 V Input V oltage, other inputs -0.5 4.5 V DC +/-25 mA Short c irc uit output c urrent Operating temperature - for array and points 1,2 & 3 0 65 o 15 o -40 80 o Operating relative humid ity (none-c ond ensing) 0 95 % Storage relative humid ity (none-c ond ensing) 0 95 % 35 pound s-forc e Differential temperature - any tw o of the referenc e points 1, 2 & 3 Storage temperature Mec hanic al Stud Attac h L oad C C C 6-7 EP737 SERVICE MANUAL 6-8 EP737 SERVICE MANUAL Introduction Fundamental Principle Mechanical Construction Procedure of Disassembly Troubleshooting Function Test and Alignment Procedure Firmware Upgrading Procedure 6-3 DC-DC Specifications ¡ Dimensions and Weight DC-DC Co nve rte r S ize 70 x 42 x 27mm DC-DC Co nve rte r We ight 46g ¡ DC-DC Converter Data N o rma l M a x. I nput Wa tta ge 32W 50W Po we r Dissipa tio n 7W 12W Output Vo lta ge 1 3.3V Output Curre nt1 1.5A Output Vo lta ge 2 5V Output Curre nt2 1.5A Output Vo lta ge 3 13V Output Curre nt3 1.0A 2.0A 2.5A 1.5A Function of Boards Specifications DDC Key-In Procedure Appendix Introduction Fundamental Principle Mechanical Construction Procedure of Disassembly Troubleshooting Function Test and Alignment Procedure Firmware Upgrading Procedure Function of Boards Specifications DDC Key-In Procedure Appendix 6-4 Lamp Driver Specifications ¡ Dimensions and Weight L a mp Drive r S ize 177 x 50 x 31mm L a mp Drive r We ight 250g ¡ Lamp Driver Data I nput Vo lta ge , no rma l 100V -240V AC, 50/60H z I nput Curre nt, no rma l 2.1A-0.9A I nput Wa tta ge , no rma l 210W Po we r Dissipa tio n 20W normal, 30W max. Output Vo lta ge (L a mp) 85V AC rec tangular Output Curre nt (L a mp) 1.8A Output Wa tta ge (L a mp) 156W (at R =46.3ohm at 85V ) I gnitio n Pulse Typ. 8kV peak symm. max. 10kV peak symm. Typ. 1.5s max. 4s H o t R e strike De la y 60s max. E na ble -Dsa ble -E na ble Cyc le 15s min. S witc h o ff L a mp Vo lta ge 135V Co o ling M e tho d Forc ed air c ooling at 1.5m/s minimum The rma l Pro te c tio n T1 sw itc h point 100oC +/-5oC E le c tric a l Pro te c tio n Short c ut + output /- output for max. 10s no protec tion for short to G N D max. 2.4A 130-140V 6-9 EP737 SERVICE MANUAL 6-10 EP737 SERVICE MANUAL Introduction Fundamental Principle Mechanical Construction Procedure of Disassembly Troubleshooting Function Test and Alignment Procedure Firmware Upgrading Procedure ¡ Environmental Requirements for Lamp and Lamp Driver Ambie nt Te mpe ra ture Operating : 10oC to 40oC N on-operating : -20oC to 70oC H umidity Operating : 5% to 95% relative, non-c ond ensing N on-operating : 5% to 95% relative, non-c ond ensing Altitude Operating : max. 10,000ft (3,000m) @ 40oC N on-operating : max. 40,000ft @ 70oC Vibra tio n Operating : rand om, stand alone 0.015g2/H z 5H z to 1000H z, all primary axis, 30 minutes per orientation N on-operating : sine, stand alone Q<=5 1G c ontrol, 5H z to 500H z, all three primary axis, 5 minutes sw eep rate S ho c k) Operating : stand alone 50g 11ms half sine pulse, all primary axis, three shoc ks per orientation Note : Lamp mounting must ensure the a.m. vibration and shock conditions. Function of Boards Specifications DDC Key-In Procedure Appendix Introduction Fundamental Principle Mechanical Construction Procedure of Disassembly Troubleshooting Function Test and Alignment Procedure Firmware Upgrading Procedure Function of Boards Specifications DDC Key-In Procedure Appendix Troubleshooting 7 This chapter provides technicians and people who have an electronic background a primary description about maintaining the product. Moreover, you can get the appropriate operation to solve some complicated problems of component repairing and professional problems. 7-1 EP737 SERVICE MANUAL 7-2 EP737 SERVICE MANUAL Introduction Fundamental Principle Mechanical Construction Procedure of Disassembly Troubleshooting Function Test and Alignment Procedure Firmware Upgrading Procedure 7-1 Equipment Needed EP737 Projector VESA M1 to VGA Cable PC (Personal Computer) Audio Input, Video Input Screw Drivers 7-2 Main Procedure Start Connect Power cord, analog or digital signal and audio signal, then turn power on Is Lamp light on ? Yes Continue No A. Power Troubleshooting Function of Boards Specifications DDC Key-In Procedure Appendix Introduction Fundamental Principle Mechanical Construction Procedure of Disassembly Troubleshooting Function Test and Alignment Procedure Firmware Upgrading Procedure Function of Boards Specifications DDC Key-In Procedure Appendix Continue Is Image OK ? No B. Image Performance Troubleshooting Yes Is function OK? No C. Function Troubleshooting Yes Is Audio OK? No D. Audio Troubleshooting Yes Is Remote Control OK? Yes No Fault Found End No E. Remote Control Troubleshooting 7-3 EP737 SERVICE MANUAL 7-4 EP737 SERVICE MANUAL Introduction Fundamental Principle Mechanical Construction Procedure of Disassembly Troubleshooting Function Test and Alignment Procedure Firmware Upgrading Procedure Function of Boards Specifications DDC Key-In Procedure Appendix 7-2.1 A. Power Troubleshooting Start Is LED indicator OK? No Check power cord & input power voltage Yes No Yes Is Fan working? Yes Supply AC Power No Change DC-DC Reassembly lamp Replacement Cover No Lamp Replacement Cover assembly OK? No Change Ballast Change Thermal BD No No Change DC-DC No Change Main BD Change Fan Module Yes Is Lamp lit? Yes No Can hear the sound of lamp ignition Change Ballast No Yes Reassembly Lamp Module End No No Replace Lamp Module Change Main BD No Change Thermal BD No Change DC-DC Introduction Fundamental Principle Mechanical Construction Procedure of Disassembly Troubleshooting Function Test and Alignment Procedure Firmware Upgrading Procedure Function of Boards Specifications DDC Key-In Procedure Appendix 7-5 EP737 SERVICE MANUAL 7-2.2 B. Performance Troubleshooting Start Have image? No Change M/B No Change DMD Board Yes Change M/B No Change DMD Board No Change DMD CHIP Yes Have garbage pattern? No Uniformity OK? No Change Engine Module Yes Is color OK? Yes Continue No Color Adjust No Procedure * Note 1 Change Photo Sensor No Change M/B No Change DMD Board 7-6 EP737 SERVICE MANUAL Introduction Fundamental Principle Mechanical Construction Procedure of Disassembly Troubleshooting Function Test and Alignment Procedure Firmware Upgrading Procedure Function of Boards Specifications DDC Key-In Procedure Appendix Continue Yes Dot defect isnt compliant with the spec.? Yes Change DMD CHIP No Have line bar? Yes Adjust frequency Yes Adjust tracking No Change M/B No Have noise? No End No Change M/B No Change DMD Board No Change DMD CHIP Introduction Fundamental Principle Mechanical Construction Procedure of Disassembly Troubleshooting Function Test and Alignment Procedure Firmware Upgrading Procedure Function of Boards Specifications DDC Key-In Procedure Appendix Color Adjust Procedure : * Notice : PC shall run R.G.B. gray scale pattern. 1. Power on. Press Up, Up, Left button when the No Signal show on the screen. 2. Choose Display Source 3. Choose Color Wheel Index. 4. Press Left or Right button to adjust. 4Note 1 : It may need to be used when you replace Main Board or Optical Engine alone. 7-2.3 C. Function Troubleshooting Start Does OSD show up? No Is KeyPad Board OK? Yes No Can function be adjusted? Yes End No Is Keypad Board ok? No Change Keypad Board Yes Change Main Board No Change Remote Controller No Change Key Pad Board Yes Is Remote Controller OK? Change Battery Yes Change Main Board 7-7 EP737 SERVICE MANUAL 7-8 EP737 SERVICE MANUAL Introduction Fundamental Principle Mechanical Construction Procedure of Disassembly Troubleshooting Function Test and Alignment Procedure Firmware Upgrading Procedure 7-2.4 D. Audio Troubleshooting Start Can hear sound? No Change Main Board No Change Spearker No Change Speaker No Change M/B Yes Sound is clear without noise? Yes End Function of Boards Specifications DDC Key-In Procedure Appendix Introduction Fundamental Principle Mechanical Construction Procedure of Disassembly Troubleshooting Function Test and Alignment Procedure Firmware Upgrading Procedure 7-2.5 E. Remote Control Troubleshooting Start Yes Replace the battery No Yes Change Remote Controller No Yes Change IR Board No Change Main Board Yes End Function of Boards Specifications DDC Key-In Procedure Appendix 7-9 EP737 SERVICE MANUAL Introduction Fundamental Principle Mechanical Construction Procedure of Disassembly Troubleshooting Function Test and Alignment Procedure Firmware Upgrading Procedure Function of Boards Specifications DDC Key-In Procedure Appendix Function Test & Alignment Procedure 8 This chapter provides equipment, conditions, patterns, and procedure needed for Function Test and Alignment. It also includes compatible modes. All information is for your reference. 8-1 EP737 SERVICE MANUAL 8-2 EP737 SERVICE MANUAL Introduction Fundamental Principle Mechanical Construction Procedure of Disassembly Troubleshooting Function Test and Alignment Procedure Firmware Upgrading Procedure Function of Boards Specifications DDC Key-In Procedure Appendix 8-1 Product EP737 Projector 8-2 Test Equipment IBM PC with XGA resolution (Color Video Signal & Pattern Generator) VCR with Multi-system(NTSC/PAL/SECAM) Chroma meter Minolta CL-100/T-10 Hi-Pot 8-3 Test Condition Circumstance Brightness : Dark room less than 10 lux Inspection Distance : 2.0m Screen Size : 60 inches diagonal (wide) Before function test and alignment, each EP737 should be run-in and warmed-up for at least 5 minutes with following conditions. 1.) In room temperature 2.) With cycled display colors (R,G,B,White) 3.) With cycled display modes 640 x 350 (H=31.5 KHz, V=70 Hz) 640 x 400 (H=31.5 KHz, V=70 Hz) 640 x 480 (H=37.5 KHz, V=75 Hz) 720 x 400 (H=31.5 KHz, V=70 Hz) 800 x 600 (H=53.7 KHz, V=85 Hz) 800 x 600 (H=37.9 KHz, V=60 Hz) 1024 x 768 (H=48.4 KHz, V=60 Hz) 1024 x 768 (H=68.7 KHz, V=85 Hz) Test Display Mode & Pattern (Refer to 8-4.1 & 8-4.2) Function Test and Alignment Procedure Introduction Fundamental Principle Mechanical Construction Procedure of Disassembly Troubleshooting Function Test and Alignment Procedure Firmware Upgrading Procedure Function of Boards Specifications DDC Key-In Procedure Appendix 8-4 Test Display Modes and Patterns 8-4.1 Compatible Modes Analog : R e so lutio n V-S ync (H z) H -S ync (K H z) Co mpa tibility 640 x 350 70 31.5 V GA 640 x 350 85 37.9 V GA 640 x 400 70 31.5 V GA 640 x 400 85 37.9 V GA 640 x 480 60 31.5 V GA 640 x 480 72 37.9 V GA 640 x 480 75 37.5 V GA 640 x 480 85 43.3 V GA 720 x 400 70 31.5 V GA 720 x 400 85 37.9 V GA 800 x 600 56 35.2 SV GA 800 x 600 60 37.9 SV G A 800 x 600 72 48.1 SV GA 800 x 600 75 46.9 SV GA 800 x 600 85 53.7 SV GA 1024 x 768 43.4 35.5 XGA 1024 x 768 60 48.4 XGA 1024 x 768 70 56.5 XGA 1024 x 768 75 60.0 XGA 1024 x 768 85 68.7 XGA 1280 x 1024 60 63.98 SXGA 1280 x 1024 75 79.98 SXGA 8-3 EP737 SERVICE MANUAL 8-4 EP737 SERVICE MANUAL Introduction Fundamental Principle Mechanical Construction Procedure of Disassembly Troubleshooting Function Test and Alignment Procedure Firmware Upgrading Procedure Analog : R e so lutio n V-S ync (H z) H -S ync (K H z) Co mpa tibility 640 x 480 66.66 34.98 MAC L C 13" 640 x 480 66.68 35 MAC II 13" 832 x 624 74.55 49.725 MAC 16" 1024 x 768 75 60.24 MAC 19" 1152 x 870 75.06 68.68 MAC 640 x 480 60 31.35 MAC G 4 640 x 480 120 68.03 MAC G 4 1024 x 768 120 97.09 MAC G 4 640 x 480 117 60 i MAC DV 800 x 600 95 60 i MAC DV 1024 x 768 75 60 i MAC DV 1152 x 870 75 68.49 i MAC DV 1280 x 960 75 75 i MAC DV 1280 x 1024 85 90.9 i MAC DV Function of Boards Specifications DDC Key-In Procedure Appendix Introduction Fundamental Principle Mechanical Construction Procedure of Disassembly Troubleshooting Function Test and Alignment Procedure Firmware Upgrading Procedure Digital : Function of Boards Specifications DDC Key-In Procedure Appendix R e so lutio n V-S ync (H z) H -S ync (K H z) Co mpa tibility 640 x 350 70 31.5 V GA 640 x 350 85 37.9 V GA 640 x 400 70 31.5 V GA 640 x 400 85 37.9 V GA 640 x 480 60 31.5 V GA 640 x 480 72 37.9 V GA 640 x 480 75 37.5 V GA 640 x 480 85 43.3 V GA 720 x 400 70 31.5 V GA 720 x 400 85 37.9 V GA 800 x 600 56 35.2 SV GA 800 x 600 60 37.9 SV G A 800 x 600 72 48.1 SV GA 800 x 600 75 46.9 SV GA 800 x 600 85 53.7 SV GA 1024 x 768 60 48.4 XGA 1024 x 768 70 56.5 XGA 1024 x 768 75 60.0 XGA 8-5 EP737 SERVICE MANUAL 8-6 EP737 SERVICE MANUAL Introduction Fundamental Principle Mechanical Construction Procedure of Disassembly Troubleshooting Function Test and Alignment Procedure Firmware Upgrading Procedure Function of Boards Specifications DDC Key-In Procedure Appendix 8-4.2 Function Test Display Pattern I te m Te st Co nte nt Pa tte rn S pe c ific a tio n R e ma rk 1 Freq uenc y & Trac king Fine L ine Moire Eliminate visual w avy noise. Figure 1 2 Contrast/B rightness G ray Sc ale G ray levels should be d istinguishable. Figure 2 3 R , G , B and W hite Color Performanc e R , G , B and W hite Color Eac h R , G , B c olor should be normal. Figure 3~6 4 Sc reen U niformity & Flic ker Full W hite Should be c ompliant w ith the like new spec . Figure 6 5 Dead /B lemish Pixel R , G , B , W hite, Dark, B lue 180, G ray 30 The numbers of d ead /blemish pixels should be c ompliant w ith the like new spec . Figure 3~9 6 B ound ary B ound ary Frame H orz. and V ert. position of vid eo shuld be ad justable to be w ithin the sc reen frame. Figure 7 Introduction Fundamental Principle Mechanical Construction Procedure of Disassembly Troubleshooting Function Test and Alignment Procedure Firmware Upgrading Procedure Fine Line Morie Pattern (Figure 1) R. Color Pattern (Figure 3) Function of Boards Specifications DDC Key-In Procedure Appendix Contrast & Brightness (Figure 2) G. Color Pattern (Figure 4) 8-7 EP737 SERVICE MANUAL 8-8 EP737 SERVICE MANUAL Introduction Fundamental Principle Mechanical Construction Procedure of Disassembly Troubleshooting Function Test and Alignment Procedure Firmware Upgrading Procedure B. Color Pattern (Figure 5) Gary 30 Pattern (Figure 8) Full White Pattern (Figure 6) Blue 180 Pattern (Figure 9) Function of Boards Specifications DDC Key-In Procedure Appendix Dark Pattern (Figure 7) Boundary Frame (Figure 10) Introduction Fundamental Principle Mechanical Construction Procedure of Disassembly Troubleshooting Function Test and Alignment Procedure Firmware Upgrading Procedure Function of Boards Specifications DDC Key-In Procedure Appendix 8-9 EP737 SERVICE MANUAL 8-5 Inspection Procedure RESET : Please press Menu button on the projector panel to enter Image-II Function then choose Reset Function, press Left Button to choose YES and to see if it works. This action will allow you to erase all end-users settings and restore the original factory setting. Hi-Pot and Grounding Test : ¡ ¡ Hi-Pot Specification : 1.5kVAC, 10mA, 2 seconds. Grounding Specification : 12VDC, 25A, 0.1 ohm. Clock and Clock Phase : Test Signal : 1024 x 768 @ 75Hz Test Pattern : Line Moire Pattern ¡ Check and see if image sharpness and focus is well performed. ¡ If not, readjust by following steps. - Enter Image-II menu and select Frequency Function to adjust the total pixel number of pixel clock in one line period. - Then select Tracking Function and use right or left arrow key to adjust the value to minimize video flicker. R, G, B and White Colors Contrast : Test Signal : 1024 x 768 @ 75Hz Test Pattern : 64 or 16 R, G, B and White colors Intensities Pattern ¡ Please check and see if each colors is normal and distinguishable. ¡ If not, please return the unit to repair area. 8-10 Introduction Fundamental Principle Mechanical Construction Procedure of Disassembly Troubleshooting Function Test and Alignment Procedure Firmware Upgrading Procedure EP737 SERVICE MANUAL Function of Boards Specifications DDC Key-In Procedure Appendix Screen Uniformity and Flicker : Test Signal : 1024 x 768 @ 75Hz Test Pattern : Full White Pattern ¡ Please check and see if its in normal condition. ¡ If not, please return the unit to repair area. Dead Pixel/Blemish Pixel : Test Signal : 1024 x 768 @ 75Hz Test Pattern : Gray 30, Blue 180, White, Dark, Red, Green and Blue Pattern ¡ Please check and see if there are dead pixels on DMD chip. ¡ The total numbers and distance of dead pixels should be complaint with like new specification. Check for Secondary Display Modes Test signal : 1.) 2.) 3.) 4.) 5.) 6.) 640 x 350 @ 70.09 / 85.08Hz 640 x 480 @ 72.81 / 75.00 / 85.01Hz 720 x 400 @ 70.08 / 85.04Hz 800 x 600 @ 56.25 / 60.32 / 72.19 / 75.00 / 85.06Hz 832 x 624 @ 74.55Hz 1024 x 768 @ 43.48 / 60.00 / 70.00 / 75.03 / 85.00Hz Normally when the primary mode 1024 x 768 @ 85Hz is well adjusted and complaint with the like new specification, then the secondary display modes will be great possibility to be complaint with the specification. But we still have to check with general test pattern to make sure every secondary modes is complaint with like new specification. Factory Reset : After final QC step, we have to erase all saved change again and restore the factory defaults. Please select and enter Factory Reset Function to see if it is workable. This action will allow you erase all end-users settings and restore the original factory setting. Introduction Fundamental Principle Mechanical Construction Procedure of Disassembly Troubleshooting Function Test and Alignment Procedure Firmware Upgrading Procedure Function of Boards Specifications DDC Key-In Procedure Appendix Firmware Upgrading Procedure 9 This chapter provides the related information about the necessary equipment, hardware setup and software upgrade procedures for Firmware Upgarde. The data is for your reference. 9-1 EP737 SERVICE MANUAL 9-2 EP737 SERVICE MANUAL Introduction Fundamental Principle Mechanical Construction Procedure of Disassembly Troubleshooting Function Test and Alignment Procedure Firmware Upgrading Procedure 9-1 Equipment Needed * Software : * Hardware : - Bootcode.axe Bootcode.hex Configdata.hex Gui.hex RomCode.axe Flasher.hex pwSDK.inf ChkSum.txt Flasher.hex DISPSUM.exe FlashUpgrader MFC Application - Fixture 1. Cable RS-232(Blue) To MINI DIN 3PIN 1800mm EP737. (P/N : 42.86301.001, Rev.A) - PC - EP737 Projector Function of Boards Specifications DDC Key-In Procedure Appendix Introduction Fundamental Principle Mechanical Construction Procedure of Disassembly Troubleshooting Function Test and Alignment Procedure Firmware Upgrading Procedure Function of Boards Specifications DDC Key-In Procedure Appendix 9-2 Setup Procedure 1. Connecto RS232 to mini din 3Pin cable to COM1 of PC and EP737. COM1 RS232 Cable 9-3 EP737 SERVICE MANUAL 9-4 EP737 SERVICE MANUAL Introduction Fundamental Principle Mechanical Construction Procedure of Disassembly Troubleshooting Function Test and Alignment Procedure Firmware Upgrading Procedure 9-3 Upgrading Procedure 1. Execute FlashUpgrader MFC Application. Function of Boards Specifications DDC Key-In Procedure Appendix Introduction Fundamental Principle Mechanical Construction Procedure of Disassembly Troubleshooting Function Test and Alignment Procedure Firmware Upgrading Procedure 2. Click Choose button. Function of Boards Specifications DDC Key-In Procedure Appendix 9-5 EP737 SERVICE MANUAL 9-6 EP737 SERVICE MANUAL 3. Introduction Fundamental Principle Mechanical Construction Procedure of Disassembly Troubleshooting Function Test and Alignment Procedure Firmware Upgrading Procedure Search <pwSDK.inf> file from EP737 F/W folder, then click Open button. 1 2 Function of Boards Specifications DDC Key-In Procedure Appendix Introduction Fundamental Principle Mechanical Construction Procedure of Disassembly Troubleshooting Function Test and Alignment Procedure Firmware Upgrading Procedure 4. Select Serial Port. Function of Boards Specifications DDC Key-In Procedure Appendix 9-7 EP737 SERVICE MANUAL 9-8 EP737 SERVICE MANUAL 5. Introduction Fundamental Principle Mechanical Construction Procedure of Disassembly Troubleshooting Function Test and Alignment Procedure Firmware Upgrading Procedure Select COM1 Port. Function of Boards Specifications DDC Key-In Procedure Appendix Introduction Fundamental Principle Mechanical Construction Procedure of Disassembly Troubleshooting Function Test and Alignment Procedure Firmware Upgrading Procedure 6. Function of Boards Specifications DDC Key-In Procedure Appendix Select Baud Rate to be 115200, then click Flash button. 1 2 9-9 EP737 SERVICE MANUAL 9-10 EP737 SERVICE MANUAL 7. Introduction Fundamental Principle Mechanical Construction Procedure of Disassembly Troubleshooting Function Test and Alignment Procedure Firmware Upgrading Procedure Plug in the Power Cord to EP737, then press and hold on Standby key on EP737 keypad. Note : The Firmware upgrade program will be stop if you havnt hold the standby button. Function of Boards Specifications DDC Key-In Procedure Appendix Introduction Fundamental Principle Mechanical Construction Procedure of Disassembly Troubleshooting Function Test and Alignment Procedure Firmware Upgrading Procedure 8. Downloading <Flasher.hex> and <Gui.hex> files. Function of Boards Specifications DDC Key-In Procedure Appendix 9-11 EP737 SERVICE MANUAL 9-12 EP737 SERVICE MANUAL 9. Introduction Fundamental Principle Mechanical Construction Procedure of Disassembly Troubleshooting Function Test and Alignment Procedure Firmware Upgrading Procedure Keep on downloading <RomCode.hex> file. Function of Boards Specifications DDC Key-In Procedure Appendix Introduction Fundamental Principle Mechanical Construction Procedure of Disassembly Troubleshooting Function Test and Alignment Procedure Firmware Upgrading Procedure 10. Function of Boards Specifications DDC Key-In Procedure Appendix After <Configdata.hex> file is downloaded, await starting up EP737 (about 2-3 seconds), then finish the upgrading procedure 9-13 EP737 SERVICE MANUAL Introduction Fundamental Principle Mechanical Construction Procedure of Disassembly Troubleshooting Function Test and Alignment Procedure Firmware Upgrading Procedure Function of Boards Specifications DDC Key-In Procedure Appendix DDC Key-in Procedure 10-1 10 This chapter provides the related information about the necessary equipment, DDC key-in procedure. The data is all for your reference. EP737 SERVICE MANUAL 10-2 EP737 SERVICE MANUAL Introduction Fundamental Principle Mechanical Construction Procedure of Disassembly Troubleshooting Function Test and Alignment Procedure Firmware Upgrading Procedure 10-1 Equipment Needed * * * * * * * * * * Fixture PC set Power Cord Power Adapter DVI TO M1 Cable VGA TO M1 Cable (P/N : 42.85804.001) DFP TO DVI Adapter RS232 cable (P/N : 42.83618.001) EP737 Projector EDID Driver : depends on the model 2 1 1). DVI TO M1 Cable (For Digital) 2). DFP TO DVI Adapter VGA TO M1 Cable (For Analog) Power Cable RS232 Cable Power Adapter Function of Boards Specifications DDC Key-In Procedure Appendix Introduction Fundamental Principle Mechanical Construction Procedure of Disassembly Troubleshooting Function Test and Alignment Procedure Firmware Upgrading Procedure Function of Boards Specifications DDC Key-In Procedure Appendix 10-2 Setup Procedure 1. 2. 3. 4. Plug in the power of the fixture JP1 and JP5 on the fixture are close, and JP2 is open. (Figure 1) Turn on the fixture. Confirm A is short circuit. P3 P2 JP1 Power-Switch P1 JP2 A Power JP5 (Figure 1 : Fixture) 10-3 EP737 SERVICE MANUAL 10-4 EP737 SERVICE MANUAL Introduction Fundamental Principle Mechanical Construction Procedure of Disassembly Troubleshooting Function Test and Alignment Procedure Firmware Upgrading Procedure 10-3 DDC Key-in Procedure 10-3.1 Digital : 1. 2. 3. Connect P1 of the fixture with COM1 port of PC by RS232 cable. Connect P3 of the fixture with M1-D/A Input Port of EP737 by DVI TO M1 cable. Connect Power of the fixture with power source by Power Adapter. COM1 M1-D/A Input Port P1 P3 Power (Figure 1 : Finish Setup) Function of Boards Specifications DDC Key-In Procedure Appendix Introduction Fundamental Principle Mechanical Construction Procedure of Disassembly Troubleshooting Function Test and Alignment Procedure Firmware Upgrading Procedure 1. Function of Boards Specifications DDC Key-In Procedure Appendix Turn on EP737 and run EDID program in the computer. 10-5 EP737 SERVICE MANUAL 10-6 EP737 SERVICE MANUAL 2. Introduction Fundamental Principle Mechanical Construction Procedure of Disassembly Troubleshooting Function Test and Alignment Procedure Firmware Upgrading Procedure The following picture will show on the screen. Function of Boards Specifications DDC Key-In Procedure Appendix Introduction Fundamental Principle Mechanical Construction Procedure of Disassembly Troubleshooting Function Test and Alignment Procedure Firmware Upgrading Procedure 3. Function of Boards Specifications DDC Key-In Procedure Appendix 10-7 EP737 SERVICE MANUAL Key S/N into the blank space beside Bar Code, then press Enter key on keyboard to begin programming. 10-8 EP737 SERVICE MANUAL 4. 5. Introduction Fundamental Principle Mechanical Construction Procedure of Disassembly Troubleshooting Function Test and Alignment Procedure Firmware Upgrading Procedure Function of Boards Specifications DDC Key-In Procedure Appendix After finishing the above actions, DFP Success will appear on the screen. Power on EP737, then input digital signal. If ther is no display, it means EDID isnt keyed in sucessfully. Please repeat the step 1~5 again. (Note : Cant run two EDID programs at the same time.) Successful signal Introduction Fundamental Principle Mechanical Construction Procedure of Disassembly Troubleshooting Function Test and Alignment Procedure Firmware Upgrading Procedure Function of Boards Specifications DDC Key-In Procedure Appendix 10-3.2 Analog : 1. 2. 3. 4. Connect P1 of the fixture with COM1 port of PC by RS232 cable. Connect P3 of the fixture with M1-D/A Input Port of EP737 by DVI TO M1 cable. Connect Power of the fixture with power source by Power Adapter. Connect AC Power Input Port of EP737 with power source by Power Cord. AC Power Input Port COM1 M1-D/A Input Port Power VGA Cable 10-9 EP737 SERVICE MANUAL 10-10 EP737 SERVICE MANUAL 1. Introduction Fundamental Principle Mechanical Construction Procedure of Disassembly Troubleshooting Function Test and Alignment Procedure Firmware Upgrading Procedure Turn on EP737 and run EDID program in the computer. Function of Boards Specifications DDC Key-In Procedure Appendix Introduction Fundamental Principle Mechanical Construction Procedure of Disassembly Troubleshooting Function Test and Alignment Procedure Firmware Upgrading Procedure 2. The following picture will show on the screen. Function of Boards Specifications DDC Key-In Procedure Appendix 10-11 EP737 SERVICE MANUAL 10-12 EP737 SERVICE MANUAL 3. Introduction Fundamental Principle Mechanical Construction Procedure of Disassembly Troubleshooting Function Test and Alignment Procedure Firmware Upgrading Procedure Function of Boards Specifications DDC Key-In Procedure Appendix Key S/N into the blank space beside Bar Code, then press Enter key on keyboard to begin programming. Introduction Fundamental Principle Mechanical Construction Procedure of Disassembly Troubleshooting Function Test and Alignment Procedure Firmware Upgrading Procedure 4. Execute EDID programming, wait a moment. Function of Boards Specifications DDC Key-In Procedure Appendix 10-13 EP737 SERVICE MANUAL 10-14 EP737 SERVICE MANUAL 5. Introduction Fundamental Principle Mechanical Construction Procedure of Disassembly Troubleshooting Function Test and Alignment Procedure Firmware Upgrading Procedure After finishing the above actions, VGA Success will appear on the screen. (Note : Cant run two EDID programs at the same time.) Successful signal Function of Boards Specifications DDC Key-In Procedure Appendix Introduction Fundamental Principle Mechanical Construction Procedure of Disassembly Troubleshooting Function Test and Alignment Procedure Firmware Upgrading Procedure Function of Boards Specifications DDC Key-In Procedure Appendix Appendix 11 11-1 EP737 SERVICE MANUAL 11-2 EP737 SERVICE MANUAL Introduction Fundamental Principle Mechanical Construction Procedure of Disassembly Troubleshooting Function Test and Alignment Procedure Firmware Upgrading Procedure Function of Boards Specifications DDC Key-In Procedure Appendix 11-1 Serial Number System Definition 11-1.1 Serial Number Format for Projector A BBB 2 1 Y WW C D BEMO EEEE 3 4 5 6 7 1 : A = Optoma, B~Z = OEM 2 : Product code (ex: 863 = EP737) 3 : Y = Last number of the year (ex: 2002 - 2) 4 : Week of year 5 : Panel vendor code 6 : Electrical classification (1=110V, 2=220V, 0=universal) 7 : B = BIOS version, E = PCB board version, 8 M = Mechanical version, O = Optical version 8 : Serial code (from 0001~) EX : A863235T0AAAA1001 This label A863235T0AAAA1001 represents the whole serial number for EP737, including Ver. 1st of BIOS and Ver. 1 of PCB Board. Both mechanical and optical version are 1st. In addition, panel vendor is T1. Its produced on 35-week of 2002 for universal area and its serial code is 1001. Introduction Fundamental Principle Mechanical Construction Procedure of Disassembly Troubleshooting Function Test and Alignment Procedure Firmware Upgrading Procedure ] Function of Boards Specifications DDC Key-In Procedure Appendix Readers Response Dear readers: Thank you for your backing our service manual up. In order to refine our content of the service manual and satisfy your requirement. We expect you can offer us some precious opinions for reference. 11-3 EP737 SERVICE MANUAL ] C. Do you have any other opinion or suggestion about this service manual? Assessment : A. What do you think about the content after reading EP737 Service Manual? U ni t Excel l ent G ood Fai r Bad 1. Introduction 2. Fundamental Principle 3. Mechanical Construction 4. Procedure of Disassembly Readers basic data: 5. Function of Boards 6. Specifications N ame: 7. Troubleshooting Company: 8. Function Test & Alignment Procedure Add: 9. Firmware Upgrading Procedure Tel: 10. DDC Key- In Procedure E- mail: Title: Fax: 11. Appendix B. Are you satisfied with the EP737 service manual? It em 1. Service Manual Content 2. Service Manual Layout 3. Format and Listing 4. CD Label and Autorun Design Excel l ent G ood Fai r Bad After your finishing this form, please send it back to Coretronic Customer Service Dept. by fax: 886-3-578-8357 or E-mail to [email protected] Thanks :)