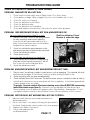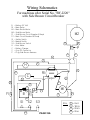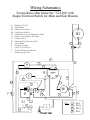
1
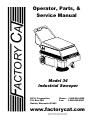
ACTORY CA Operator, Parts, & Service Manual Model 34 Industrial Sweeper R.P.S. Corporation P.O. Box 368 Racine, Wisconsin 53401 Phone: 1-800-634-4060 Fax: 1-866-632-6961 www.factorycat.com Copyright R.P.S. Corporation 2002 Edition 7, World Rights Reserved. 1-800-634-4060 Machine Install / Warranty Registration Installing Dealer: Installed By: Location: (City, State): Install Date: End-User Company Name www.factorycat.com End-User Contact: Address: City/State: Zip Phone: Fax: Email: Model: Serial #: Hour Meter: BUYER’S REPRESENTATIVE HAS RECEIVED INSTRUCTION IN PROPER OPERATION OF THE FOLLOWING CONTROLS AND FEATURES: SCRUBBERS Filling solution tank, Solution tank sight tube, Solution drain hose or valve for flushing and freezing conditions Adjusting controls & operation, Double scrubbing, Squeegee lift delay, vacuum switch (horn honking) and vacuum timer Recovery tank draining & cleaning, vacuum screen removal and cleaning, drain saver basket emptied. Shroud and pad/brush removal and installation Side Wiper and Curtain adjustment and maintenance for water control Solution valve and filter operation (removal and cleaning) LCD display operation, 4 hour meters (key switch, brush, traction drive, vacuum) Tank tilt back feature, only when both tanks are fully drained Squeegee hose removal and checking for clogs BURNISHERS Train and have customer demonstrate proper removal and replacement of burnishing pad Pad pressure gauge and proper operating range to avoid tripping the circuit breaker SWEEPERS Demonstrate proper removal and replacement of main broom and side brooms Method for cleaning the dust filter, empting out the debris hopper and correct installation Correct operation of the main broom and side broom levers, and understands to park with brushes in UP position Trained on the “Wet-Sweep” bypass door and not to operate through standing water ALL MACHINES Checking battery electrolyte level and confirm monthly check that battery terminals are tight Parking brake override Charging operation and customer understands batteries have limited “cycles” and recharging = 1 cycle Seat and steering wheel adjustment Customer has read and understands the list of WARNINGS in the Operator manual Battery and Machine Maintenance Guide posters hung up and reviewed Manufacturer’s website is a good source of information and sign up for quarterly newsletters In addition to the above items the buyers representative has received the operator’s manual and been advised to read the manual before operating the machine. Installed By (print) Buyers Representative (print) Signature Signature Buyer agrees to pay for any repairs, adjustments, or secondary training that manufacturer determines is excluded from the warranty. COMPLETE AND FAX FORM TO 1-866-632-6961 or online www.factorycat.com STANDARD WARRANTY POLICY (RPS Corporation) ZW^ŽƌƉŽƌĂƚŝŽŶǁĂƌƌĂŶƚƐŝƚƐŵĂĐŚŝŶĞƐ͕ƉĂƌƚƐĂŶĚĂĐĐĞƐƐŽƌŝĞƐƚŽďĞĨƌĞĞŽĨŵĂŶƵĨĂĐƚƵƌĞƌ͛Ɛ defects for the periods specified below. Warranty will be granted at the sole discretion of RPS Corporation and is subject to final claim and parts review by R.P.S. Corporation and its vendors. This policy is effective January 1, 2010 and is subject to change on production units at a future date. COVERAGE, EXCLUSIONS AND LIMITATIONS: Coverage: All Models sold (Sweepers, Scrubbers, Burnishers) Parts: 36 months / 1,500 hours ŽŶ͞Power On͟ŚŽƵƌŵĞƚĞƌ Labor: 12 months Travel: 3 months (150 mile maximum) Poly Tanks: 7 Years OEM Parts: 3 months Validity: Fully completed Machine Delivery Form (online or fax) is on record at RPS. Limitation: Warranty will begin on date of machine installation to end-user or 6 months after shipment from RPS Corp to the distributor if unsold at that time. This warranty includes all parts on the machine except normal wear parts. Some of these exceptions are: 1. Any Brooms, Brushes, Pads or Pad Drivers including Center Clip Retainers 2. Floor Seals, Wipers, Splash Curtains, Squeegees or Gaskets. 3. Filters, Dust Collection Bags or Screens 4. The safety pins design to fail in shear, which are a fail-safe device 5. Belts, Hoses or Tubing. 6. Caster Wheels, Tires or internal tire tubes. 7. Vacuum motors with evidence of water/foam passage or more than 450 hours 8. Lights (Strobe, Headlights or bulbs). 9. The Batteries (see below). NOT COVERED: Routine maintenance, adjustments or parts damaged from abuse, neglect, improper use of the machine, or lack of ƐĐŚĞĚƵůĞĚ͞ĚĂŝůLJ͕ ǁĞĞŬůLJ͕ŵŽŶƚŚůLJ͟maintenance in accordance with our published PM Sheets. POLY TANKS: 7 Years Coverage against leakage due to ŵĂŶƵĨĂĐƚƵƌĞƌ͛ƐĚĞĨĞĐƚŝŶŵĂƚĞƌŝĂůƐŽƌ workmanship. NOTE: Freight coverage for 3-Years under the parts section of warranty. BATTERIES: Warranted through battery manufacturer for One (1) Year (prorated) from the date of delivery. The battery manufacturer approves or denies the warranty coverage after analysis. We rely on solely on their review. NOTE NOT COVERED: Damage from lack of water, failure to use OEM charger, or non-distilled water. SAFETY WARNINGS! 1. READ THIS MANUAL CAREFULLY BEFORE OPERATING, ADJUSTING OR REPAIRING THIS MACHINE. 2. CHARGING THE BATTERY WILL PRODUCE EXPLOSIVE HYDROGEN GAS. Do not smoke or allow an open flame near a charging battery. Do not charge battery with the hood (lid) of the machine closed or hydrogen gas may accumulate within. 3. DRESS SAFELY. Do not wear rings or metal wrist watches while working on this machine. They can cause an electrical short, which, in turn, can cause burns. Do not work on this machine while wearing a tie, scarf or other dangling neckwear. These can tangle in the rotating brooms, belts, and pulleys and cause serious injury or even death. 4. OPERATE THE SAFETY SWITCH MANUALLY ONLY FOR REPAIR AND MAINTENANCE PROCEDURES AS OUTLINED IN THIS BOOK. This safety switch stops the motors whenever the hood (lid) is raised. 5. DO NOT USE THIS MACHINE AS A STEP LADDER OR CHAIR. 6. MACHINE IS HEAVY. DO NOT LIFT IT UNAIDED. DO NOT USE HANDLEBAR AS LIFTING POINT. 7. DO NOT WORK ON UNDERSIDE OF MACHINE WITHOUT PROPERLY SUPPORTING UNIT. 8. MAKE SURE HOOD (LID) IS SECURED IF YOU WORK UNDER IT AROUND OTHER PEOPLE. Another person may accidentally bump the lid in its over-center position, causing it to come down on you while you work beneath it. 9. IF YOU PLAN TO LEAVE YOUR MACHINE FOR EVEN A MINUTE, TURN OFF THE MAIN POWER SWITCH AND SET THE PARKING BRAKE. PAGE 1 SHORT LIST OF DO'S AND DON'TS 1. TO GO: Pull on the clutch lever gently, to propel the machine forward. Pull harder to go faster 2. TO STOP: Let go of the clutch lever to roll to a stop. Push down and forward on the lever to set the brake. 3. TO SWEEP: The main broom has to be on the floor. Use left-hand lever to lower it. Pull lever back, then to right 5. DON'T RUN BATTERY ALL THE WAY DOWN!! The 4. TO SWEEP: The side broom has to be on the floor. Use right-hand lever to lower it. Pull lever back, then to left. Single switch, controls main broom and side broom. On two switch models, use right hand switch for side broom. machine will begin to slow and a red light will come on when battery is about to go dead. When this happens, stop sweeping immediately, and go back to base to recharge. If battery runs down too low, the automatic on-board charger will not pick it up again unless you run the charge through two charge cycles. 7. BATTERY NEEDS WATER. Check battery 6. TO RECHARGE: Open the hood and plug in charger. A green light will turn on, when light turns off, battery is fully charged. water every two weeks. Fill half-way to ring with distilled water. Do not overfill. Do not let acid spill on battery or on machine. If it does, flush with water, and sprinkle with baking soda on the spill. PAGE 2 8. KEEP CRANK VERTICAL: Before emptying hopper, turn crank fast 10 times. Crank must be vertical to open the hopper. SHORT LIST OF DO'S AND DON'TS 10. SIDE BROOM ADJUSTMENT. Very Important. Your side broom must not be squashed flat, but must look like this. RIGHT! The broom must be mounted in the top hole of the broom shaft, and the adjusting screw must be screwed in so broom just touches the floor in front. WRONG! If adjusted too flat, your machine's side broom will shut itself off periodically to cool down the motor. You will sweep poorly and severely damage the side broom. 11. GOTTA SWEEP GREAT. No kidding. This is the world's best walk-behind sweeper. If your sweeper isn't sweeping just great, seems hard to use, or is making funny noises.....Something is Wrong. Here is what to do: 1. Read this book. 2. Call your dealer for info or service. If you forgot your dealer's name, call the Factory toll free 800-634-4060, and we will give you his name and phone number. PAGE 3 IDENTIFYING THE CONTROLS 1. Main Broom Position Lever. 6 9 2. Side Broom Position Lever. 3. Main Power On/Off Switch. (On single switch machines, this switch has three positions, and can also turn on the side broom.) 16 3 4. Side Broom On/Off Switch. (Not found on single switch machines.) 2 4 1 18 8 5. Clutch and Brake Lever. 6. Adjustable Handlebar. 7 7. Handlebar Adjustment Clamps. (4) 8. Filter Shaker Crank. 10 9. Hood Latch. 10. Side Broom Adjustment Knob. 13 11. Battery Andersen Connector 11 12. Vaccuum Bypass. 14 13. Dust Filter Access Plate. 14. Hour Meter (or optional Battery Condition Meter). 12 15. On-Board Electronic Battery Charger. 15 16. Clutch & Brake Cable Adjustment. 17 17. Safety Shut-Off Switch (operated by closing the hood). 5 18. Low Battery Light. PAGE 4 HOW IT WORKS 2. Main Broom, which is tubular in shape, and extends across width of machine, rotates in direction shown, pushing dirt and debris into hopper. Side broom (when used) picks up dirt in corners and pushes it toward the middle of the machine where the main broom picks it up. 3. The main broom creates dust. The automatic vaccuum system sucks up this dust; then, the filter catches it. 4. The filter empties into the hopper. It is cleaned by turning the crank at the rear of the machine, which shakes the filter clean. 5. 6. 7. 8. CLEAN AIR FILTER 1. FORWARD MOTION FAN MAIN BROOM DIRT FORWARD MOTION OF SWEEPER BRINGS DIRT TO RAPIDLY ROTATING MAIN BROOM. MAIN BROOM KICKS IT UP TO HOPPER. A drive system is provided. Pulling the lever on the handlebar operates a clutch wheel. The clutch wheel drives both rear wheels via a differential axle. A parking brake is provided. It stops the clutch wheel from turning, which locks up both rear wheels. OPERATING TIPS The machine can only pick up dirt when it runs over it. It can not pick up dirt while sitting still. Some bulky articles are hard to pick up and require a lot of floor space in front of the article to give the main broom a chance to "grab" the item. Sweeping smart means avoiding dead ends. If you have to back up the machine out of a corner, you will probably leave some dirt behind. Power for the main broom, vaccuum fan, and drive system all comes from a large electric motor. A second motor drives the side broom. Slow down if the floor is very dirty, or if you notice the machine is not picking everything up. The machine can only transfer so many pounds of material per minute. The battery must be recharged after extended use. It will run the machine for about 3-4.5 hours on a charge. Remember that running the battery down too low will require recharging the battery twice to pick it back up again. PAGE 5 OPERATING INSTRUCTIONS Clutch and Brake Lever Stop (Brake) 1. PLEASE CAREFULLY READ WARNINGS ON PAGE TWO OF THIS MANUAL. Neutral Forward Refer to Page 4 for location of controls. 2. To make the machine move under its own power - without sweeping: -Turn on Main Switch -Make sure both brooms are off ground. (See Steps 5 & 6 Below) -Gently pull clutch lever, on handle bar, towards you. You can regulate speed by varying how hard you pull on this lever. Pull the lever toward you to go forward. The harder you pull, the faster the machine will go. Release the lever to coast to a stop. Push this lever down towards the ground and then forward to engage the brake. 3. To Stop: Let go of the clutch lever. To stop machine when going down hill, set parking brake, by pushing the clutch lever down and forward. This locks rear wheels. 4. To Sweep: Main broom only. Pull main broom lever to the right to lower broom to the floor. Broom will drop, causing lever to move toward front of machine You do not normally need to use the brake to stop. Always use the brake when you park the machine and pick the brooms up off of the floor to avoid "Flat Spotting" them. Main Broom Control: Broom Lowered Note that the machine will not sweep unless broom is lowered to the ground. Up 5. To Sweep: Main and side brooms. Pull side broom lever to the left to lower brush to the floor. Broom will drop, causing lever to move toward front of machine. Down Then turn on the side broom. Operating Tip: When side broom is in use, the broom should contact the floor from about 11 O'Clock until about 5 O'Clock. (See Page 11 for illustration). The adjuster is under the hood (lid) as shown. (Page 4, Item 10). Turn the knob clockwise to raise the broom. NOTE: Side Broom does not work by itself. Main broom must be down if sweeper is to pick up anything. Broom Raised Pull main broom lever toward you, and then toward the center of the machine. This releases the catch and permits the main broom to drop. To bring the main broom back up again, pull lever from "Lock" position, into "Release" position. PAGE 6 OPERATING INSTRUCTIONS 6. To Remove The Dirt Hopper: To Sweep a Wet Floor. If you are going to sweep a wet surface, you should do so with the air system shut off. Otherwise, the vaccuum fan will pull water into the filter, making it muddy and hard to clean. To shut off the air to the filter, open the small door at the end of the back painted filter housing (Page 4, Item 12). NOTE: Remember to close the air shut-off door again, when you're back on dry pavement or you'll blow outdust wherever you sweep. 7. To Unload Hopper. CRANK should be vertical before removing or replacing the hopper drawer. Otherwise, you may break the safety pin on the crank mechanism. When machine stops sweeping well, the hopper is full. Underside of Machine Turn off the machine. Then turn the shaker crank handle at the rear of the machine about ten times. The handle should then be left in the vertical position. This cleans the filter. Finally, pull the dirt hopper all the way out of the machine. It has a handle on each side. When you put the hopper back, make sure crank handle is straight up and down - or the cleaning mechanism will prevent the hopper from sliding back in. 8. Safety Pin Watch out for low battery. NOTE: The Sweeper will shut itself off when the battery gets too low. Low voltage could otherwise damage the motors. A red warning light (Page 4, Item 18) warns you just before battery is completely discharged. Don't get caught with a dead battery. Return back to base for a recharge early. Batteries vary in their energy capacity. O.E.M batteries usually offer between three and five hours of service on a charge. 9. Side Broom's Circuit Breaker. If the side broom stops by itself, its protective circuit breaker has probably tripped. The usual reason for this is that the side broom is adjusted improperly and has too much down pressure. Breaker will automatically reset. See Sidebroom Adjustment in this book, Page 11. PAGE 7 Handle Bar Asm, Not Shown SAFETY TIP: Recharging 1. Always Turn Off Machine and Set Parking Brake before Charging. 2. Always Leave the Hood (Lid) Open. OPERATING INSTRUCTIONS 10. Recharging Battery. Built-In Battery Charger. If your machine is equipped with a built-in battery charger, simply turn off the machine, set the brake, open the hood (lid), and plug in the charger to a wall outlet with the correct voltage. In North America, our chargers are usually equipped for a single phase 110V (60Hz) operation, the same power as used in houses. The three prong plug requires a grounded outlet. Do not use without grounding. The built-in charger is completely automatic. Its electronic circuitry will tell it when the battery is charged, and shut itself off. After the battery achieves correct voltage, the charger will give a "polish" to the battery by shifting to high voltage input for a limited period of time. The green light on the right hand side of the charging unit will glow when the charger is plugged in - provided that the charger is also plugged in properly. The green light will go out at the end of the charge cycle. External Battery Charger. If you use an external battery charger, unplug Andersen connector before beginning charge. Open hood and follow the charger instructions. NOTE: Some battery chargers are not automatic, and will not shut off when battery is fully charged. You can seriously damage a battery by overcharging it. BATTERY SAFETY WARNINGS Charging a battery produces explosive hydrogen gas. Leave the hood (lid) of the machine open while the battery is charging to avoid buildup of gas inside machine. Do not smoke or expose open flame or spark to area around battery during charging. Follow the instructions that came with your charger. Many chargers are not automatic and can over-heat the battery if not properly set. Watch for battery acid. If acid gets in the eye, wash out with water for twenty minutes and call a physician. PAGE 8 ABOUT BATTERIES: We do not recommend use of anything but a deep cycle battery, one made to run a long time between recharging. An automotive battery, designed to be recharged (by the cars alternator) right after short use, will give poor service. We do not recommend use of a battery that weighs more than 120lbs, since this could make steering difficult. GENERAL RULES FOR BATTERY CARE: 1. KEEP THE BATTERY CLEAN. Dirt on the battery transmits electricity and can cause quicker discharge. 2. KEEP THE BATTERY FULL OF WATER. A low water level can ruin the battery very quickly. Water should always cover the plates inside the battery. (You see the tops of them when you remove the cap). Many batteries have "rings" that are visible inside the cell holes. In these batteries, fill to ring. We recommend you use only distilled water. The minerals in ordinary water can coat the lead plates, shortening battery life. 3. CHARGE THE BATTERY WITH THE CAPS IN PLACE.. Do not remove the caps for a normal charge. These caps include proper venting, and will keep the charging process from projecting a thin layer of acid on surrounding machine parts. 4. If you must use an external charger, be sure to unplug the Andersen connector before doing so. Otherwise, you can damage the red light warning system. Do not use an external charger that is too big for the battery or wrong voltage. (Charger must be 12V and must not put out more than 25 amps. 5. ACID. Batteries contain corrosive sulfuric acid. As mentioned above, leave the vented caps in place when charging, so acid will not bubble out ofthe battery. Take care that acid does not fall on the steel surfaces of the machine; eventually it will cause the machine to rust. Treat acid spills with water to dilute the acid. To clean up: use solution of water and baking soda, applied with a small brush. Keep using the solutino until the fizzing stops. This will neutralize the acid. 6. MAKE SURE CONNECTIONS TO THE BATTERY ARE TIGHT. Loose connections will cause arcing, which will eat into and destroy the battery terminals. 7. WATCH THE GREASE. Never put grease on the inside of the connector. The grease will cause arcing and deterioration of the connector. You can put grease on the outside of the terminal after it is mounted to the battery. 8. DO NOT HAMMER ON THE BATTERY OR ITS CONNECTORS. Batteries are heavy but fragile. Hammering on the posts on the battery can break the connectors inside. Use a puller to remove connectors, not a hammer or screwdriver. 9. DO NOT STORE BATTERY ON A CONCRETE FLOOR. Doing so can cause quick discharge and even damage to the battery. Store the battery on wood, cardboard, or other self insulating material. PAGE 9 MAIN BROOM MACHINE MAINTENANCE BATTERIES: The highest maintenance item on your machine will be its storage battery. Please read the "About Batteries" section of this book. MAIN BROOMS: Replace the main brooms when they stop sweeping to your standards. We recommend you use our brooms. They are made for your machine. Our brand of broom has a precision plastic core that is carefully balanced and has machined insert points so the broom fits tightly on the machine's hubs. Brooms made by "will fit" companies to fit our machines are often made with rough drain-pipe cores. They often bounce even when new. Bouncing brooms do not sweep. Vee-Broom. Preferred Style A new main broom has two and a half inches of fiber on it. Normally, a main broom with one and a half inches or less of fiber will not sweep as well as a new broom. Spiral-Broom. Does not sweep as well as Vee-Broom. We recommend the "Vee" type filter pattern, which is able to fit the hopper fuller than the "Spiral" type filter pattern. 3 4 MAIN BROOM REPLACEMENT 1 Note that you do not need to reverse the broom periodically - as on other brands because our broom suspension does not bend and splay the outerfibers of the broom. Remove (1) Hopper, (2) Access Panel, (3) Idler Arm (1 Bolt), and then remove (4) the old Broom. TO REPLACE MAIN BROOM: 1. Turn off machine and unplug battery connector. Shake the filter. 2. Raise main broom off ground with broom lever. 3. Remove dirt hopper and broom access door (3 screws). 4. Unbolt broom as shown (Item 3 in photo). 5. Pull out old broom. 6. Push on new broom-being careful to line up the slot on the broom with the driver's slots. Push the broom all the way in. 7. Make sure "Vee" of the Vee broom points forward when viewed from the top. 2 SPECIAL NOTE: Always "park" the main broom when machine is not in use. If you leave the main broom on the floor for an extended period without turning it, you will put a flat spot in its fiber. This will cause "broom bounce" and bad sweeping. PAGE 10 MACHINE MAINTENANCE SIDE BROOM ADJUSTMENT TO REPLACE SIDE BROOM: Side broom will not sweep if it is flat on the ground. 1. Turn off machine and unplug battery. 2. Raise side broom off of ground with control lever. Fiber should touch the ground in an 11 O'Clock to 5 O'Clock pattern as shown here. 3. Turn side broom adjustment knob clockwise until broom is as high as it will go. (Operating Tip: The knob will be easier to turn, if you pull on the broom lever at the same time; this relieves pressure from the adjustment). FRONT OF MACHINE (Top View of Machine) 11 12 11 1 12 1 10 2 3 9 2 4. Pull clevis pin from side broom and remove broom. (New broom has replacement plastic mount included, so no need to unscrew the old one). 8 4 7 6 5 3 5. If your machine's side broom mounting shaft has more than one mounting hole for the broom pin, always use the top hole. 6. Lower broom - with motor off - and turn adjustment control until broom pattern shows 11 O'Clock to 5 O'Clock contact pattern. (see next column). 4 5 TO ADJUST DRIVE CHAIN The drive chain drives the rear wheels. If it is too loose, it will come off of the drive sprocket. If it is too tight, the chain will bind and/or the clutch lever will become hard to operate. In either case, the chain will make "popping" noises that show chain adjustment is needed. A properly adjusted chain leaves about 1/4 to 1/2 inch of slack, as shown. DETAIL A A The Broom Adjuster is in the front right corner of engine compartment. Turn clockwise to raise broom. To adjust the chain, it is not necessary to remove the battery if you use the right tools. 1.) Turn off machine and unplug Andersen connector. 2.) Pull clutch lever all the way closed (lever touching handlebar) and tie or tape it into that position. 3.) Use a 3/4" combination wrench on left side of bolt that goes thru the clutch wheel. Use a 3/4" ratchet (socket) wrench on the right side. 4.) Loosen the through bolt and pull up on it with the two wrenches. 5.) Tighten bolt. 6.) Test unit. Chain should not bind the clutch lever action and should not slap against the rear cover. To adjust drive chain; loosen clutch wheel bolt and pull it's axle up or down. No more than 1/2 inch of play in chain; measured here. Some slack is required. PAGE 11 MACHINE MAINTENANCE Clutch Adjustment: CLUTCH AND BRAKE ADJUSTMENT When set properly, machine should not "creep" in neutral, but lever should begin to take hold when lever is depressed 1/2" or so. To set neutral, a thin business card should just barely fit between clutch donut (wheel) and drive spindle (capstan). Adjust clutch at handlebar. As explained in "How it Works", (Page 5), the clutch and brake operate with the same control and by way of the same clutch donut. If the clutch slips: 1. Inspect the clutch donut. If in good repair, Clutch Donut then adjust. If donut looks melted, then replace - it got too hot from slipping. 2. To adjust clutch: Loosen the nut at the end of the cable where it enters the handlebar housing. Also loosen the nut inside the handlebar housing. Now, tighten the outer nut until the clutch engages and the machine starts to creep forward. Loosen the outer nut, one turn, from that point. Tighten the inner nut. Test. Drive Spindle NOTE: The brake should adjust automatically with the clutch. If the clutch still works OK, but the brake does not, or vice-versa, follow steps on right side of this page. Business Card If kept adjusted, the clutch donut should last several years. To replace the donut: 1. Turn off the machine and unplug the battery. Remove the rear protective panel to have access to rear axle. 2. Remove the master link in the drive chain. This link is visibly different from the others. Removing the master link permits removal of the chain. 3. Remove clutch cable end from the clutch fork. 4. Remove the transmission from machine. (4 bolts from bottom). 5. Remove the clutch fork from the machine by removing the mounting pin. Adjusting Nut Location Brake Adjustment: 1. Adjust clutch first. 2. Test brake. 3. If brake does not hold, loosen the (4) bolts holding the brake shoe to the transmission body, and push shoe forward. 4. Re-tighten (4) bolts. 5. Retest. If you can not adjust succesfully, replace clutch donut. To Tighten Brake Shoe 6. Remove the clutch wheel from the fork. 7. Unbolt the three bolts that hold the clutch wheel together to remove the donut. 8. Install new donut on clutch wheel. Be sure you mount clutch wheel concentric on axle. 9. Hold-Down Bolts Reverse procedure to install. Front of Machine PAGE 12 TROUBLESHOOTING GUIDE Check for Cause of Problem in Order Shown: PROBLEM: MAIN MOTOR WILL NOT RUN. 1. 2. 3. 4. 5. 6. 7. Check that the hoods safety switch, (Page 4, Item 17), is firmly down. Check battery voltage. (When voltage is too low, circuit breaker will cut out). Check for loose circuit wiring. Check for defective on/off switch. Check for defective relay. Check for defective circuit breaker. Check and replace motor brushes. Check also for burnt motor armature. PROBLEM: SIDE BROOM MOTOR WILL NOT RUN; MAIN BROOM IS OK Can you rotate the broom by hand? If no, then: 1. Check In-Line fuse. (This is in the wiring harness on early machines, and mounts under the hood, on the left-hand under side lip of the body. Current machines use a circuit breaker, situated in the same location). 2. Check too see that the wiring harness on the side broom arm has not become disconnected. 3. Check the side broom switch. 4. Check broom motor. If you can rotate the side broom by hand, then: 1. Check that the drive connector, inside bearing tube, has not become disconnected. It will do this to save the motor and gear drive. 2. Check the side broom motor. Red Fuse Holder or Circuit Breaker is under this edge. PROBLEM: MAIN BROOM WORKS, BUT MAIN BROOM DOES NOT TURN. 1. Check to see if something is caught in main broom, such as strapping. This material will wind itself around the edges of the broom, locking it up and causing the belt to slip. 2. Check both drive belts for wear and adjustment. 3. Check the Main Broom Belt Tensioner. The belt tensioner moves constantly to take up slack in the belt as the broom moves up and down with floor irregularity. It should be greased with chassis grease every two years. To grease: Unscrew vertical Allen-head retaining screw (Item B) BEFORE unscrewing lateral Allen-head screw (Item A). Otherwise you can damage the main broom arm. Remove lateral screw (A) and insert grease in arm's Oilite bearing. Reassemble. Do not overtighten lateral screw (A) or arm will bind. Screw in (B) once position of (A) is correct. PROBLEM: MOTOR RUNS, BUT MACHINE WILL NOT SELF-PROPEL. 1. 2. 3. 4. Make sure belt between motor and transmission is adjusted properly. See if clutch slips. If so, adjust, following the procedure in this book. If adjustment cannot make clutch work properly. Replace the rubber clutch donut. Check chain and sprocket on differential axle. PAGE 13 B A TROUBLESHOOTING GUIDE PROBLEM: BROOMS ROTATE, BUT MACHINE DOES NOT SWEEP WELL. 1. 2. Main Broom may be worn out. While machine can sweep with as little as one half inch of main broom fiber, main broom should have 1.0" of fiber or more to sweep really well. Main Broom bounces. This will cause skipping over debris. If this occurs, broom must be replaced. Cause of broom bounce is generally bent fiber on one side, causing broom to become oval. This, in turn, is caused by leaving the broom on the ground for long periods of time without broom rotating, which will bend the fiber. A second cause is use of a mainbroom that is made incorrectly. For this reason, avoid "will-fit" main brooms made by other manufacturers to fit our machines. Our design requires brooms in perfect balance and perfectly round. 3. Check rubber flap on lip of the hopper. This piece is very important to good sweeping, and must be in good condition or machine will throw debris forward of machine. If flap is torn or missing, replace with a new part. Hopper's Rubber Flap PROBLEM: MACHINE SWEEPS UP DEBRIS FINE, BUT BLOWS DUST. 1. Filter is dirty. With power off, turn crank 20 times to clean filter. 2. Air is shut off. Open air shutoff control. 3. Filter is clogged from mud. Remove and inspect filter. Clean if necessary by shaking and vaccuuming the filter. 4. Air leaks. Check and replace neoprene floor seals as needed. 5. Is fan turning with main motor? (Has set screw come out of fan?). PROBLEM: MACHINE SWEEPS OK, DUST CONTROL PICKS UP DUST, BUT BLOWS IT INTO THE ENGINE COMPARTMENT. 1. Remove the black filter cover. (There are three screws at the rear. Cover fits into a slot at the front). Then check for improper seal between filter and body. Filter is taped to the filter element support grill (Part No. 4-505) with double-sided carpet tape. This seal must be tight. 2. Check filter for pinhole leaks and repair or replace as needed. (You can pull filter and its mounting grid straight out of the machine once the filter cover is removed. You can also inspect the filter from undeneath the machine). PAGE 14 Wiring Schematics For machines after Serial No. "BY-2220" with Side Broom Circuit Breaker B R1 M1 M2 F1 F2 S1 S2 S3 H C G P = Battery (12 Volt) = Main Relay = Main Broom Motor = Side Broom Motor = Side Broom Circuit Breaker (6 Amp) = Main Circuit Breaker (80 Amp) = Safety Switch = Master Switch = Side Broom Switch = Hour Meter = Battery Charger = Grey 50 Connector = Plug: Side Broom Harness M2 G R P B R B B B H W R1 W C W R B1 R R R + - F1 B G F2 M1 R B B B S1 S2 S3 B1 PAGE 16A Wire: R W B B1 = Red = White = Black = Blue Wiring Schematics For machines after Serial No. "CI-3200" with Single Electrical Switch for Main and Side Brooms B R1 M1 M2 F1 F2 S1 S2 H C G P L = Battery (12 Volt) = Main Relay = Main Broom Motor = Side Broom Motor = Side Broom Circuit Breaker (6 Amp) = Main Circuit Breaker (80 Amp) = Safety Switch = Main and Side Broom Switch = Hour Meter = Battery Charger = Grey 50 Connector = Plug: Side Broom Harness = Warning Light Unit + M2 - G R P B R B H B R1 W C W R B1 R R R + F1 B G F2 M1 R R B B B B S1 S2 R Wire: L B1 PAGE 16B R W B B1 = Red = White = Black = Blue