1
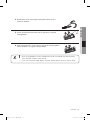
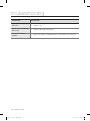
SS7500 Series
Vacuum Cleaner
user manual
✻ Before operating this unit, please read the instructions carefully.
✻ For indoor use only.
ENGLISH
imagine the possibilities
Thank you for purchasing a Samsung product.
To receive a more complete service,
please register your product at
www.samsung.com/register
DJ68-00611C (EN).indd 01
2011.8.8 3:28:40 PM
safety information
SAFETY INFORMATION
WARNING
• Before operating the appliance, please read this manual thoroughly and retain it for
your reference.
• Because these following operating instructions cover various models, the
characteristics of your vacuum cleaner may differ slightly from those described in this
WARNING
manual.
WARNING
• This vacuum cleaner is designed for household use only. Do not use this vacuum
cleaner to clean building waste or debris. Do not use this vacuum cleaner with any of
the filters removed as this could cause damage to the internal components and void
your warranty.
CAUTION/WARNING SYMBOLS USED
WARNING
CAUTION
Indicates that a danger of death or serious injury exists.
Indicates that a risk of personal injury or material damage exists.
OTHER SYMBOLS USED
Represents something you must NOT do.
Represents something you must NOT touch.
Represents something you must follow.
Indicates that you must disconnect the power plug from the socket.
02_ safety information
DJ68-00611C (EN).indd 02
2011.8.8 3:28:40 PM
safety information
IMPORTANT SAFETY INSTRUCTIONS
When using an electrical appliance, basic precautions should be observed, including the
following:
READ ALL INSTRUCTIONS BEFORE USING YOUR STICK VACUUM CLEANER.
Unplug from outlet when not in use and before conducting maintenance.
WARNING : to reduce the risk of fire, electric shock, or injury:
GENERAL
• Use only as described in this manual.
• Do not operate the STICK vacuum cleaner or charger if it has been damaged in any way.
• If the cleaner is not working as it should, has been dropped, damaged, left outdoors, or dropped in water,
return it to a customer care center.
• Do not handle the charger or STICK vacuum cleaner with wet hands.
• Use only on dry, indoor surfaces.
• This appliance is not intended for use by persons (including children) with reduced physical, sensory or
mental capabilities, or lack of experience and knowledge, unless they have been given supervision or
instruction concerning use of the appliance by a person responsible for their safety.
• Children should be supervised to ensure that they do not play with the appliance.
BATTERY CHARGER
• Do not modify the polarized plug to fit a non-polarized outlet or extension cord.
• Do not use outdoors or on wet surfaces.
• Unplug the charger from the outlet when not in use and before servicing.
• Use only the charger supplied by the manufacturer to recharge.
• Do not use with a damaged cord or plug.
• Do not pull or carry by the cord, use the cord as a handle, close the door on the cord, or pull the cord
around sharp edges or corners. Keep the cord away from heated surfaces.
• Do not use extension cords or outlets with inadequate current carrying capacity.
• Do not unplug by pulling on the cord. To unplug, grasp the plug, not the cord.
• Do not mutilate or incinerate batteries as they will explode at high temperatures.
• Do not attempt to open the charger. Repairs should only be carried out by a qualified customer care
centre.
• Do not expose the charger to high temperatures or allow moisture or humidity of any kind to come into
contact with the charger.
STICK VACUUM CLEANER
• Do not pick up hard or sharp objects such as glass, nails, screws, coins, and etc.
• Do not use without a filter in place. When servicing the unit, never put fingers or other objects into the fan
chamber in case the unit accidentally turns on.
• Do not put any objects into openings. Do not use with any openings blocked; keep openings free of dust,
lint, hair, and anything that may reduce air flow.
• Do not pick up toxic materials (chlorine bleach, ammonia, drain cleaner, etc.).
• Do not pick up anything that is burning or smoke, such as cigarettes, matches, or hot ashes.
• Do not use to pick up flammable or combustible liquids such as gasoline, nor use on areas where they
may be present.
• Do not use STICK vacuum cleaner in an enclosed space filled with vapours given off by oil based paint,
paint thinner, moth proofing substances, flammable dust, or other explosive or toxic vapours.
• Leaks from battery cells can occur under extreme usage or temperature conditions. If the liquid gets on
skin, wash quickly with water. If the liquid gets into the eyes, flush them immediately with clean water for a
minimum of 10 minutes. Seek medical attention.
safety information _03
DJ68-00611C (EN).indd 03
2011.8.8 3:28:40 PM
contents
ASSEMBLING THE CLEANER
05
OPERATING THE CLEANER
10
MAINTAIN TOOLS AND FILTER
13
05 Assembling the cleaner
07 Assembling the handle and the main body
07 Assembling the main body and the power
brush
07 Assembling the main body and the handy
cleaner
08 Charging
09 About the battery
10
10
10
11
11
Using the stick cleaner
Using the power brush
Using the handy cleaner
Using the crevice / dusting
Emptying the dust bin
13 Cleaning the filter
14 Countermeasure to remove anything
clogging the cleaner
TROUBLESHOOTING
16
04_ contents
DJ68-00611C (EN).indd 04
2011.8.8 3:28:40 PM
assembling the cleaner
ASSEMBLING THE CLEANER
Front view
Rear view
01 ASSEMBLING
Handle
Power button
The button to separate
the handy cleaner
Front vent
Rear vent
The button to separate
the dustbin
Dustbin
The button to separate
power brush
power brush
shutter
Charging pins
Power brush
Charger
crevice / dusting
Charging
terminals
Charging lamp
crevice / dusting
cradle
Handy cleaner
Dustbin cover
Hepa filter
Power button
Grill filter
The button to
separate the dustbin
Dustbin
assembling _05
DJ68-00611C (EN).indd 05
2011.8.8 3:28:40 PM
assembling the cleaner
Check the contents of the package.
Handle
Handy cleaner
Main body
Power brush
Charger
User manual
Crevice / Dusting
Screw
Guiding key
Sub items to assemble the
handle and the main body
06_ assembling
DJ68-00611C (EN).indd 06
2011.8.8 3:28:41 PM
ASSEMBLING THE HANDLE AND THE MAIN BODY
Insert the guiding parts of the handle as far as possible into the hole of the main body, insert the
guide key into the holes of the handle and then fasten the screw with the (+) screw driver.
2
3
Guiding parts
Guiding key
Handle
Main body
01 ASSEMBLING
1
Screw
Holes on the main body
ASSEMBLING THE MAIN BODY AND THE POWER BRUSH
Insert the connector of the power brush into the hole of the main
body until it clicks into place.
‘Click’
Power brush
holder
Pipe C/Brush
ASSEMBLING THE MAIN BODY AND THE HANDY CLEANER
Insert the air inlet of the handy cleaner into the air inlet of the main
body and then push the handy cleaner into the main body until it
clicks into place.
‘Click’
The air inlet
of the main
body
The air inlet of the
handy cleaner
assembling _07
DJ68-00611C (EN).indd 07
2011.8.8 3:28:42 PM
assembling the cleaner
CHARGING
1. Install the charger on a flat surface and then plug the power
cable.
2. Turn the power buttons of the main body and the handy
cleaner off.
• The battery does not charge when the power button is
on.
3. Connect the handy cleaner to the main body. (When the
main body and the handy cleaner are not assembled, the
stick cleaner does not work.)
4. Install the cleaner with the charger aligning the charge pins
of the cleaner with the charge terminals of the charger.
• The charging lamp is turned on and blink regularly.
5. While charging, the charge lamp is turned on. If the cleaner
is separated, the lamp is turned off.
• Even if charging is complete, the lamp does not turn off
or change to brighter blue color. This is not a problem
with the product.
• Make sure to turn both power buttons ‘Off’ and then
charge the battery.
Charging lamp
08_ assembling
DJ68-00611C (EN).indd 08
2011.8.8 3:28:43 PM
•
NOTE
•
•
01 ASSEMBLING
•
Charge the product in the following cases.
- When using the product for the first time after purchasing it or after not using it for a
long period.
- When the battery level is low and the suction power is weak.
When you charge the cleaner after purchasing or using it, charge the product for
approximately 4 hours before using it.
To charge the battery fully when the battery is discharged takes approximately 4 hours.
If you separate the cleaner from the charger, the battery is naturally discharged.
- It is recommended that you keep the cleaner connected to the charger. (However, if
you are going on a business trip or holiday, disconnect the power cord of the charger
from the wall outlet.)
ABOUT THE BATTERY
• The powerful Li-Ion battery has been used.
• The warranty for the battery is 6 months from the time of
purchase.
• To purchase a new battery, please contact the service center.
• Since this battery is only for this cleaner, do not use it for other
appliances or purposes.
• Do not disassemble or modify the product.
• Charge the product in a well-ventilated location.
• Do not expose the battery to heat or fire.
• Do not connect metal objects to the (+) or (-) terminal.
• Keep the product indoors (0°C~40°C).
• When the battery is not working correctly, do not disassemble it. Contact your nearest
Service Center.
• If the battery charge and usage time have decreased after the battery has been used a
few times, please replace the battery by contacting the Service center as the battery life
may have reached its end.
assembling _09
DJ68-00611C (EN).indd 09
2011.8.8 3:28:43 PM
operating the cleaner
USING THE STICK CLEANER
Using the stick cleaner allows you to clean the floor without bending over.
Stick Cleaner On / Off
• When the power button is pressed, the operation alternates
between
.
CAUTION
Power button
1. Only when the handy cleaner is assembled, does the stick
cleaner work. (For assemblying the handy cleaner: See
page 7).
2. When you use the stick cleaner, turn the handy cleaner
power off.
Countermeasure when the stick cleaner is not turned off.
• Check if the handy cleaner is on.
You can only turn the stick cleaner on or off when the handy cleaner power is turned off.
USING THE POWER BRUSH
• Since you can change the direction of the power brush
by moving the handle of the stick cleaner left or right,
cleaning is much easier.
• When you clean the floor right in front of the wall, the
front shutter is activated so that you can clean the dust
easily.
Normal operation
When the shutter
operates
USING THE HANDY CLEANER
1. Lift the button to separate the handy cleaner and
separate the handy cleaner from the main body by pulling
it in the direction of the arrow.
The button to
separate the
handy cleaner
10_ operating
DJ68-00611C (EN).indd 10
2011.8.8 3:28:43 PM
2. Handy Cleaner On / Off
• When the power button is pressed, the operation
.
alternates between
Power button
02 OPERATING
CAUTION
1. Connect the handy cleaner to the main body after
using it. (See page 7).
2. When you connect the handy cleaner to the main
body, make sure to turn the handy cleaner off.
USING THE CREVICE / DUSTING
Insert crevice/dusting into the end of the air inlet on the handy
cleaner to install it. To remove it, simply pull it out.
Dusting
Crevice
• After using it, please store it in the crevice/dusting cradle
of the charger so that you do not lose it. (See page 5).
• Crevice : Use this to clean the dust from the grooves of
window frames, corners or gaps.
• Dusting : Use this to clean the dust from the grooves of
windows, corners or gaps.
EMPTYING THE DUST BIN
1. If the dust bin is full or the sucking power decreases, empty
the dustbin.
2. Press the [buttons to separate the dustbin] with your thumb
and middle finger and then pull it out.
3. Lift the dust bin cover.
operating _11
DJ68-00611C (EN).indd 11
2011.8.8 3:28:44 PM
operating the cleaner
4. Empty the dust bin.
5. Close the dust bin cover.
6. Push the dust bin down until it “clicks” into place.
‘Click’
•
NOTE
Using a plastic bag
This method is recommended for people with allergies or asthma.
Cleaning the dustbin
with cold water is also
recommended.
12_ operating
DJ68-00611C (EN).indd 12
2011.8.8 3:28:44 PM
maintain tools and filter
CLEANING THE FILTER
1. Press the [buttons to separate the dustbin] with your thumb
and middle finger and then pull it out.
03 MAINTAIN
2. Lift the dustbin cover.
Hepa filter
3. Hold the dust bin cover and separate the grill filter and the
micro filter from the dust bin cover by pulling them and
pressing the grill filter fixing hook.
Grill filter fixing
hook
Grill filter
4. Shake the dust from the filters and then wash the hepa filter
until it is clean.
5. Dry the filter completely in a well-ventilated, shady location.
6. After assemblying the micro filter and the grill filter, hook one
side of the grill filter and push the fixing hook of the dust bin
cover down until it clicks into place.
‘Click’
7. Assemble the assembled dustbin cover and the dust bin.
NOTE
Add a neutral detergent and the filter into warm water and leave it for 30 minutes.
This will wash the filter more effectively.
maintain _13
DJ68-00611C (EN).indd 13
2011.8.8 3:28:45 PM
maintain tools and filter
Maintaining the filter
CAUTION
• Do not dry it near a microwave or fire.
• Do not clean it by putting it into a washer or using an unapproved detergent. (See
page 5).
• After cleaning, dry it completely in the shade.
- If you use the filter when it is not completely dried
- Moisture or water may enter the motor and cause a problem.
- The dust and moisture in the inlet solidifies and this drastically decreases the
sucking power.
- The filter may smell.
• Dry the part in the shade as drying it in the sun for a long time may deform or discolor
it.
COUNTERMEASURE TO REMOVE ANYTHING CLOGGING THE
CLEANER
•
•
•
•
To prevent clogging while using the cleaner, avoid vaccuuming big or sharp objects such as toothpicks,
blades, socks, etc.
If the cleaner is clogged while in use, the sucking power may decrease and a vibrating sound may be
heard. In this case, remove the item clogging the product.
If a foreign object is caught while you use the product, the drum will not rotate. In this case, turn the
power of the cleaner off and remove the object.
Since the safety device is activated in this case, please operate the product again after about 10
seconds.
1. Press the button to separate the air inlet and then separate
the air inlet from the main body.
2. Press the air inlet cover fixing hook and separate it.
3. Hold the end of the drum where there is no belt and lift it up.
14_ maintain
DJ68-00611C (EN).indd 14
2011.8.8 3:28:45 PM
4. Remove any hairs and threads around the drum with a
vaccuum cleaner.
03 MAINTAIN
5. Install the belt onto the drum and fix the drum using the
fixing grooves.
6. After fixing the drum, insert the air inlet cover into the groove
and assemble it by slightly sliding it down.
•
NOTE
•
Since an oil-papered or wood-covered floor may be scratched by the cleaner, please
check the type of wheels of the air inlet.
If you cannot remove foreign objects from the cleaner, please contact a service center.
maintain _15
DJ68-00611C (EN).indd 15
2011.8.8 3:28:45 PM
troubleshooting
PROBLEM
SOLUTION
Motor downs and does
not start.
•
•
Check cable, plug and socket.
Leave to cool.
Suction force is gradually
decreasing.
•
Check for blockage and remove.
Low or decreasing
suction.
•
Please check filters. If required clean it as illustrated in the instruction.
16_ troubleshooting
DJ68-00611C (EN).indd 16
2011.8.8 3:28:45 PM
memo
DJ68-00611C (EN).indd 17
2011.8.8 3:28:45 PM
If you have any questions or comments relating to Samsung products, please contact the
SAMSUNG customer care center.
COUNTRY
CALL
OR VISIT US ONLINE AT
AUSTRALIA
1300 362 603
www.samsung.com/au
HONG KONG
(852) 3698-4698
www.samsung.com/hk
www.samsung.com/hk_en
MALAYSIA
1800-88-9999
www.samsung.com/my
SINGAPORE
1800-SAMSUNG(7267864)
www.samsung.com/sg
DJ68-00611C (EN).indd 18
2011.8.8 3:28:46 PM