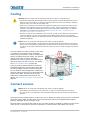
1
User Manual 020-100329-13 Christie MicroTiles User Manual 020-100329-13 Christie MicroTiles NOTICES COPYRIGHT AND TRADEMARKS © 2015 Christie Digital Systems USA Inc. All rights reserved. All brand names and product names are trademarks, registered trademarks or trade names of their respective holders. GENERAL Every effort has been made to ensure accuracy, however in some cases changes in the products or availability could occur which may not be reflected in this document. Christie reserves the right to make changes to specifications at any time without notice. Performance specifications are typical, but may vary depending on conditions beyond Christie's control such as maintenance of the product in proper working conditions. Performance specifications are based on information available at the time of printing. Christie makes no warranty of any kind with regard to this material, including, but not limited to, implied warranties of fitness for a particular purpose. Christie will not be liable for errors contained herein or for incidental or consequential damages in connection with the performance or use of this material. Canadian manufacturing facility is ISO 9001 and 14001 certified. WARRANTY Products are warranted under Christie’s standard limited warranty, the complete details of which are available by contacting your Christie dealer or Christie. In addition to the other limitations that may be specified in Christie’s standard limited warranty and, to the extent relevant or applicable to your product, the warranty does not cover: a. Problems or damage occurring during shipment, in either direction. b. Projector lamps (See Christie’s separate lamp program policy). c. Problems or damage caused by use of a projector lamp beyond the recommended lamp life, or use of a lamp other than a Christie lamp supplied by Christie or an authorized distributor of Christie lamps. d. Problems or damage caused by combination of a product with non-Christie equipment, such as distribution systems, cameras, DVD players, etc., or use of a product with any non-Christie interface device. e. Problems or damage caused by the use of any lamp, replacement part or component purchased or obtained from an unauthorized distributor of Christie lamps, replacement parts or components including, without limitation, any distributor offering Christie lamps, replacement parts or components through the internet (confirmation of authorized distributors may be obtained from Christie). f. Problems or damage caused by misuse, improper power source, accident, fire, flood, lightening, earthquake or other natural disaster. g. Problems or damage caused by improper installation/alignment, or by equipment modification, if by other than Christie service personnel or a Christie authorized repair service provider. h. Problems or damage caused by use of a product on a motion platform or other movable device where such product has not been designed, modified or approved by Christie for such use. i. Problems or damage caused by use of a projector in the presence of an oil-based fog machine or laser-based lighting that is unrelated to the projector. j. For LCD projectors, the warranty period specified in the warranty applies only where the LCD projector is in “normal use” which means the LCD projector is not used more than 8 hours a day, 5 days a week. k. Except where the product is designed for outdoor use, problems or damage caused by use of the product outdoors unless such product is protected from precipitation or other adverse weather or environmental conditions and the ambient temperature is within the recommended ambient temperature set forth in the specifications for such product. l. Image retention on LCD flat panels. m.Defects caused by normal wear and tear or otherwise due to normal aging of a product. The warranty does not apply to any product where the serial number has been removed or obliterated. The warranty also does not apply to any product sold by a reseller to an end user outside of the country where the reseller is located unless (i) Christie has an office in the country where the end user is located or (ii) the required international warranty fee has been paid. The warranty does not obligate Christie to provide any on site warranty service at the product site location. PREVENTATIVE MAINTENANCE Preventative maintenance is an important part of the continued and proper operation of your product. Please see the Maintenance section for specific maintenance items as they relate to your product. Failure to perform maintenance as required, and in accordance with the maintenance schedule specified by Christie, will void the warranty. REGULATORY The product has been tested and found to comply with the limits for a Class A digital device, pursuant to Part 15 of the FCC Rules. These limits are designed to provide reasonable protection against harmful interference when the product is operated in a commercial environment. The product generates, uses, and can radiate radio frequency energy and, if not installed and used in accordance with the instruction manual, may cause harmful interference to radio communications. Operation of the product in a residential area is likely to cause harmful interference in which case the user will be required to correct the interference at the user’s own expense. CAN ICES-3 (A) / NMB-3 (A) 이 기기는 업무용 (A 급 ) 으로 전자파적합등록을 한 기기이오니 판매자 또는 사용자는 이점을 주의하시기 바라며 , 가정 외의 지역에서 사용하는 것을 목적 으로 합니다 . Environmental means that electrical and The product is designed and manufactured with high‐quality materials and components that can be recycled and reused. This symbol electronic equipment, at their end‐of‐life, should be disposed of separately from regular waste. Please dispose of the product appropriately and according to local regulations. In the European Union, there are separate collection systems for used electrical and electronic products. Please help us to conserve the environment we live in! Addendum Translated copies of this document are provided on the CD in the back of this document. The CD may also contain additional product documentation. Read all instructions before using or servicing this product. 本 文 档 的 翻译副本在本文档背面的 C D 上提供。该 CD 中还可能包含其他产品文 档 。 使 用 或维修本产品之前请务必阅读所有说明。 文 件 背 面 的光碟提供了本文件的翻譯副本。這張光碟可能另外包含其他產品文 件 。 請 先 閱讀所有指示再使用或送修本產品。 Le CD au dos de ce document contient des traductions de celui‐ci dans différentes langues. Ce CD peut également contenir de la documentation supplémentaire sur le produit. Lisez toutes les instructions avant d'utiliser ou d'entretenir ce produit. Übersetzte Versionen dieses Dokuments werden auf der CD auf dem Vorsatzblatt dieses Dokuments bereitgestellt. Die CD kann auch zusätzliche Produktdokumentation enthalten. Bitte lesen Sie diese Anweisungen vor der Verwendung dieses Produkts oder vor der Ausführung von Wartungsarbeiten am Produkt. Le copie tradotte di questo documento sono fornite sul CD, sul retro di questo documento. Il CD potrebbe anche contenere altra documentazione sul prodotto. Si prega di leggere tutte le istruzioni prima di utilizzare questo prodotto o sottoporlo a manutenzione. このドキュメントの翻訳版がこのドキュメントの裏面の CD で提供されています。CD に は追加の製品マニュアルも収められています。この製品を使用したり、機能させたりす る前に、すべての指示をお読みください。 이 문서의 번역된 사본이 이 문서 후면의 CD 에서 제공됩니다 . 이 CD 에는 추가 제품 설명 서가 포함되어 있을 수 있습니다 . 이 제품을 사용하거나 수리하기 전에 모든 지침을 확인 하십시오 . Copias traduzidas deste documento são fornecida no CD contido na parte de trás deste documento. O CD pode conter documentação adicional do produto. Leia todas as instruções antes de usar ou prestar serviço com este produto. Перевод данного документа представлен на компакт-диске на оборотной стороне документа. Компакт-диск может также содержать дополнительную документацию по продукту. Перед использованием или обслуживанием продукта ознакомьтесь со всеми инструкциями. Las copias traducidas de este documento se proporcionan en el CD que se encuentra en la parte trasera. En el CD también puede encontrar documentación adicional del producto. Lea todas las instrucciones antes de utilizar o realizar el mantenimiento de este producto. Перекладені екземпляри цього документа містяться на компакт-диску, який додано до цього документа. На компакт-диску може також бути додаткова документація до виробу. Перш ніж користуватися виробом або його обслуговувати, прочитайте всі інструкції. Content Product Overview . . . . . . . . . . . . . . . . . . . . . . . . . . . . . . . . . . . . . . . . . . . 10 Terminology . . . . . . . . . . . . . . . . . . . . . . . . . . . . . . . . . . . . . . . . . . . . . . . . . . 10 Related documentation . . . . . . . . . . . . . . . . . . . . . . . . . . . . . . . . . . . . . . . . . . . 11 Safety warnings and guidelines . . . . . . . . . . . . . . . . . . . . . . . . . . . . . . . . . . . . . 11 System overview . . . . . . . . . . . . . . . . . . . . . . . . . . . . . . . . . . . . . . . . . . . . . . . 12 Mechanical housing . . . . . . . . . . . . . . . . . . . . . . . . . . . . . . . . . . . . . . . . . . . . . . 12 Rear projection screen External Control Unit . . . . . . . . . . . . . . . . . . . . . . . . . . . . . . . . . . . . . . . . . . . 13 . . . . . . . . . . . . . . . . . . . . . . . . . . . . . . . . . . . . . . . . . . . . 14 User interface overview . . . . . . . . . . . . . . . . . . . . . . . . . . . . . . . . . . . . . . . . . . . 14 Purchase record and service contacts . . . . . . . . . . . . . . . . . . . . . . . . . . . . . . . . . 14 Order guide . . . . . . . . . . . . . . . . . . . . . . . . . . . . . . . . . . . . . . . . . . . . . . . . . . . 15 Standard components . . . . . . . . . . . . . . . . . . . . . . . . . . . . . . . . . . . . . . . . . . 15 Regional acceptance for Y-cords . . . . . . . . . . . . . . . . . . . . . . . . . . . . . . . . . . . 15 Line cords for D100 and E100 . . . . . . . . . . . . . . . . . . . . . . . . . . . . . . . . . . . . 16 Optional accessories . . . . . . . . . . . . . . . . . . . . . . . . . . . . . . . . . . . . . . . . . . . 17 Discontinued parts . . . . . . . . . . . . . . . . . . . . . . . . . . . . . . . . . . . . . . . . . . . . 17 Sample ordering quantities for a 9x9 array . . . . . . . . . . . . . . . . . . . . . . . . . . . 17 Installation and Setup . . . . . . . . . . . . . . . . . . . . . . . . . . . . . . . . . . . . . . . . 19 Safety guidelines . . . . . . . . . . . . . . . . . . . . . . . . . . . . . . . . . . . . . . . . . . . . . . . 19 Before beginning an installation . . . . . . . . . . . . . . . . . . . . . . . . . . . . . . . . . . . . . 19 Installation guidelines . . . . . . . . . . . . . . . . . . . . . . . . . . . . . . . . . . . . . . . . . . 19 Cable and ECU layout and design . . . . . . . . . . . . . . . . . . . . . . . . . . . . . . . . . . 20 Required tools and hardware . . . . . . . . . . . . . . . . . . . . . . . . . . . . . . . . . . . . . . . 20 Install the MicroTiles canvas . . . . . . . . . . . . . . . . . . . . . . . . . . . . . . . . . . . . . . . 21 Apply the light seal trim . . . . . . . . . . . . . . . . . . . . . . . . . . . . . . . . . . . . . . . . 21 Mount leveling feet to the base structure (Optional) . . . . . . . . . . . . . . . . . . . . . 22 Assemble the first row of tiles . . . . . . . . . . . . . . . . . . . . . . . . . . . . . . . . . . . . 23 Add a second row of tiles . . . . . . . . . . . . . . . . . . . . . . . . . . . . . . . . . . . . . . . 25 Assemble the additional rows of tiles Unpack the screens . . . . . . . . . . . . . . . . . . . . . . . . . . . . . . . 27 . . . . . . . . . . . . . . . . . . . . . . . . . . . . . . . . . . . . . . . . . . . 27 Install the screens on the tiles . . . . . . . . . . . . . . . . . . . . . . . . . . . . . . . . . . . . 28 Remove the screens from the tile . . . . . . . . . . . . . . . . . . . . . . . . . . . . . . . . . . 29 Connect the cables between the ECUs and tiles Christie MicroTiles User Manual 020-100329-13 Rev. 1 (04-2015) . . . . . . . . . . . . . . . . . . . . . . . . 29 6 Cooling . . . . . . . . . . . . . . . . . . . . . . . . . . . . . . . . . . . . . . . . . . . . . . . . . . . . . . 31 Connect sources . . . . . . . . . . . . . . . . . . . . . . . . . . . . . . . . . . . . . . . . . . . . . . . . 31 Display content on the canvas . . . . . . . . . . . . . . . . . . . . . . . . . . . . . . . . . . . . 33 Power distribution . . . . . . . . . . . . . . . . . . . . . . . . . . . . . . . . . . . . . . . . . . . . . . 33 Connect to power . . . . . . . . . . . . . . . . . . . . . . . . . . . . . . . . . . . . . . . . . . . . . . . 33 Install the power connection security clips . . . . . . . . . . . . . . . . . . . . . . . . . . . . . . 35 Install Y-power cord retention clip Power on the MicroTiles array . . . . . . . . . . . . . . . . . . . . . . . . . . . . . . . . . . . 35 . . . . . . . . . . . . . . . . . . . . . . . . . . . . . . . . . . . . . . 36 Power off the MicroTiles array . . . . . . . . . . . . . . . . . . . . . . . . . . . . . . . . . . . . 36 LED status indicators . . . . . . . . . . . . . . . . . . . . . . . . . . . . . . . . . . . . . . . . . . . . 37 Disassemble a MicroTiles array . . . . . . . . . . . . . . . . . . . . . . . . . . . . . . . . . . . . . . 37 Configure the Array . . . . . . . . . . . . . . . . . . . . . . . . . . . . . . . . . . . . . . . . . . 38 System requirements for the WebUI . . . . . . . . . . . . . . . . . . . . . . . . . . . . . . . . . . 38 Automatically configure the array . . . . . . . . . . . . . . . . . . . . . . . . . . . . . . . . . . . . 38 Manually create a subarray . . . . . . . . . . . . . . . . . . . . . . . . . . . . . . . . . . . . . . . . 39 Manually add a subarray . . . . . . . . . . . . . . . . . . . . . . . . . . . . . . . . . . . . . . . . 39 Automatically add a subarray . . . . . . . . . . . . . . . . . . . . . . . . . . . . . . . . . . . . . 39 Edit a subarray . . . . . . . . . . . . . . . . . . . . . . . . . . . . . . . . . . . . . . . . . . . . . . 40 Prioritize the ECUs in the array . . . . . . . . . . . . . . . . . . . . . . . . . . . . . . . . . . . . . . 40 Configure the IP address of the ECU . . . . . . . . . . . . . . . . . . . . . . . . . . . . . . . . . . 40 Manually add tiles to the canvas . . . . . . . . . . . . . . . . . . . . . . . . . . . . . . . . . . . . . 41 View the array as a wire map . . . . . . . . . . . . . . . . . . . . . . . . . . . . . . . . . . . . . . . 41 Create a custom video resolution . . . . . . . . . . . . . . . . . . . . . . . . . . . . . . . . . . . . 42 Set date and time . . . . . . . . . . . . . . . . . . . . . . . . . . . . . . . . . . . . . . . . . . . . . . . 42 Select a display mode . . . . . . . . . . . . . . . . . . . . . . . . . . . . . . . . . . . . . . . . . . . . 43 Power ON/OFF all tiles through the WebUI . . . . . . . . . . . . . . . . . . . . . . . . . . . . . . 43 Save tile or ECU settings . . . . . . . . . . . . . . . . . . . . . . . . . . . . . . . . . . . . . . . . . . 43 Restore tile or ECU settings . . . . . . . . . . . . . . . . . . . . . . . . . . . . . . . . . . . . . . . . 43 Restore factory defaults . . . . . . . . . . . . . . . . . . . . . . . . . . . . . . . . . . . . . . . . . . 44 Adjust the Image Settings . . . . . . . . . . . . . . . . . . . . . . . . . . . . . . . . . . . . . 45 Change size and position of video content . . . . . . . . . . . . . . . . . . . . . . . . . . . . . . 45 Adjust image contrast and gamma . . . . . . . . . . . . . . . . . . . . . . . . . . . . . . . . . . . 46 Configure the color and brightness of the array . . . . . . . . . . . . . . . . . . . . . . . . . . 46 Configure the brightness threshold of the weakest tile . . . . . . . . . . . . . . . . . . . . 46 Set the brightness of the array . . . . . . . . . . . . . . . . . . . . . . . . . . . . . . . . . . . 46 Adjust the color correction and temperature . . . . . . . . . . . . . . . . . . . . . . . . . . 47 Adjust brightness levels at the edge of the tiles . . . . . . . . . . . . . . . . . . . . . . . . 48 Christie MicroTiles User Manual 020-100329-13 Rev. 1 (04-2015) 7 Adjust the color and luminance of individual tiles . . . . . . . . . . . . . . . . . . . . . . . 48 Modify tile uniformity . . . . . . . . . . . . . . . . . . . . . . . . . . . . . . . . . . . . . . . . . . 49 Sharpen the image . . . . . . . . . . . . . . . . . . . . . . . . . . . . . . . . . . . . . . . . . . . . . . 49 Correct the image alignment for individual tiles . . . . . . . . . . . . . . . . . . . . . . . . . . 49 Display a test pattern . . . . . . . . . . . . . . . . . . . . . . . . . . . . . . . . . . . . . . . . . . 50 Monitor and Maintain the Array . . . . . . . . . . . . . . . . . . . . . . . . . . . . . . . . 51 Monitor system information and log files . . . . . . . . . . . . . . . . . . . . . . . . . . . . . . . 51 View the ECU system information . . . . . . . . . . . . . . . . . . . . . . . . . . . . . . . . . . 51 View the ECU log files . . . . . . . . . . . . . . . . . . . . . . . . . . . . . . . . . . . . . . . . . . 51 View the tile system information View the tile log files . . . . . . . . . . . . . . . . . . . . . . . . . . . . . . . . . . 52 . . . . . . . . . . . . . . . . . . . . . . . . . . . . . . . . . . . . . . . . . . 52 Review the ECU video input and output quality . . . . . . . . . . . . . . . . . . . . . . . . . 53 Upgrade the main firmware . . . . . . . . . . . . . . . . . . . . . . . . . . . . . . . . . . . . . . . . 53 Check the current firmware version from WebUI . . . . . . . . . . . . . . . . . . . . . . . . 53 Upgrade the firmware . . . . . . . . . . . . . . . . . . . . . . . . . . . . . . . . . . . . . . . . . . 53 Correct a failed firmware upgrade . . . . . . . . . . . . . . . . . . . . . . . . . . . . . . . . . 54 Upgrade the Field Programmable Gate Array (FPGA) . . . . . . . . . . . . . . . . . . . . . 55 Reset selected tiles and ECUs . . . . . . . . . . . . . . . . . . . . . . . . . . . . . . . . . . . . 55 Reset all tiles and ECUs in the array . . . . . . . . . . . . . . . . . . . . . . . . . . . . . . . . 55 Monitor the MicroTiles array . . . . . . . . . . . . . . . . . . . . . . . . . . . . . . . . . . . . . . . . 56 View SNMP system information . . . . . . . . . . . . . . . . . . . . . . . . . . . . . . . . . . . 56 Specify what events create notifications . . . . . . . . . . . . . . . . . . . . . . . . . . . . . 56 Record event notification in an SNMP trap . . . . . . . . . . . . . . . . . . . . . . . . . . . . 57 Identify where notification emails are sent . . . . . . . . . . . . . . . . . . . . . . . . . . . . 57 Cleaning the tiles . . . . . . . . . . . . . . . . . . . . . . . . . . . . . . . . . . . . . . . . . . . . . . . 57 Clean the inside surface of the screen . . . . . . . . . . . . . . . . . . . . . . . . . . . . . . . 57 Clean the outside surface of the screen . . . . . . . . . . . . . . . . . . . . . . . . . . . . . . 58 Clean the lens . . . . . . . . . . . . . . . . . . . . . . . . . . . . . . . . . . . . . . . . . . . . . . . 58 Removing dust from the light engine heat sinks . . . . . . . . . . . . . . . . . . . . . . . . 58 Clean the air filter . . . . . . . . . . . . . . . . . . . . . . . . . . . . . . . . . . . . . . . . . . . . 59 Troubleshooting . . . . . . . . . . . . . . . . . . . . . . . . . . . . . . . . . . . . . . . . . . . . . 60 Image problems . . . . . . . . . . . . . . . . . . . . . . . . . . . . . . . . . . . . . . . . . . . . . . . . 60 Hardware errors . . . . . . . . . . . . . . . . . . . . . . . . . . . . . . . . . . . . . . . . . . . . . . . . 61 WebUI Errors . . . . . . . . . . . . . . . . . . . . . . . . . . . . . . . . . . . . . . . . . . . . . . . . . . 62 Specifications . . . . . . . . . . . . . . . . . . . . . . . . . . . . . . . . . . . . . . . . . . . . . . . 63 General Specifications . . . . . . . . . . . . . . . . . . . . . . . . . . . . . . . . . . . . . . . . . . . . 63 Christie MicroTiles User Manual 020-100329-13 Rev. 1 (04-2015) 8 Screen Specifications . . . . . . . . . . . . . . . . . . . . . . . . . . . . . . . . . . . . . . . . . . . . 65 Advanced Specifications . . . . . . . . . . . . . . . . . . . . . . . . . . . . . . . . . . . . . . . . . . 65 Appendix: WebUI Menu Tree . . . . . . . . . . . . . . . . . . . . . . . . . . . . . . . . . . 66 Source Management . . . . . . . . . . . . . . . . . . . . . . . . . . . . . . . . . . . . . . . . . . . . . 66 Canvas Management . . . . . . . . . . . . . . . . . . . . . . . . . . . . . . . . . . . . . . . . . . . . . 66 Configuration . . . . . . . . . . . . . . . . . . . . . . . . . . . . . . . . . . . . . . . . . . . . . . . . . . 67 Status . . . . . . . . . . . . . . . . . . . . . . . . . . . . . . . . . . . . . . . . . . . . . . . . . . . . . . . 67 Help . . . . . . . . . . . . . . . . . . . . . . . . . . . . . . . . . . . . . . . . . . . . . . . . . . . . . . . . 67 Christie MicroTiles User Manual 020-100329-13 Rev. 1 (04-2015) 9 Product Overview Christie MicroTiles (MicroTiles) are modular, high-quality image display units with related accessories which, when combined, form large display canvases of virtually any size and shape. The modular design uses rear projection, based on a single TI Digital Micromirror Device™ (DMD) and chipset. High-brightness LEDs provide the illumination source. MicroTiles can be quickly and easily deployed into small display configurations, while providing the additional features required for larger and more complex installations. The self-contained mechanical and optical design allows multiple tiles to be connected together into an array of any size or configuration. Custom electronics allow the array to be completely self-configuring without any external hardware. The video signal to be displayed is fed into the array through an External Control Unit (ECU). This signal is buffered and converted into a high speed (five Gbps) serial stream and relayed to every tile in the array. Each tile captures a portion of the image and applies scaling, as required, which results in a single picture. The ECU also acts as the main system controller and coordinates with all connected tiles to form a canvas. Terminology • MicroTiles: Refers to some tiles. • Tile(s): Consists of a display unit and a screen. • External Control Unit (ECU): Controls MicroTiles arrays, video input source. • Master ECU: Only one master ECU can be assigned to a canvas. This master supplies the global video source. • Slave ECU: Supplies local video sources in multiple ECU configurations. • Canvas: A group of tiles and ECUs that are connected together electronically. To constitute a canvas, tiles do not need to be physically adjacent to one another. The maximum number of tiles in a canvas is 200, and the maximum number of ECUs is 16. • Array: A group of tiles that are physically connected to each other. A canvas may include multiple arrays. Video sources are mapped to arrays of tiles. Each array represents a new source mapping. • Sub-array: A group of tiles within an array that are configured to display either the local or global video source. A single array may contain multiple subarrays. Christie MicroTiles User Manual 020-100329-13 Rev. 1 (04-2015) 10 Product Overview • Media Source: Provides the source for the input signal. • Global Source: The media source connected to the master ECU also functions as a “global source”. The global source can be displayed on any group of tiles connected to the local source input (HSSL-1) side of the master ECU. In a closed loop canvas, all tiles can display the global source. • Local Source: The media source connected to an ECU as a “local source”, feeding the local set of tiles connected to its local source output (HSSL-2). • Open/Closed Loop: An open loop canvas terminates with the last tile in the canvas, which is not connected back to the first ECU. In a closed loop canvas, the last tile in the canvas is connected back to the first ECU. There are no unused Display Port connections in a closed loop canvas. Related documentation • Christie® MicroTiles™ Specification and Application Guide (P/N: 020-100334-xx) • Christie® MicroTiles™ Serial Command Guide (P/N: 020-101547-xx) • Christie® MicroTiles™ Service Manual (P/N: 020-100332-xx) Safety warnings and guidelines When the screen is removed, directly viewing the beam with an optical instrument (for example, an eye loop, magnifier or microscope) from a distance of less than 100mm may pose an eye hazard. MicroTiles is a class 1M source of visible and invisible LED radiation with a maximum power rating of 3.61mW @ 400-700nM. Danger! Failure to comply with the following results in death or serious injury. • Electrical Hazard! Up to nine tiles may be connected per daisy chain when hooking up the power supply. This is the maximum power carrying capability of the line cord. • Always power down and disconnect/disengage all power sources to the MicroTiles before servicing or cleaning. • Read and understand all product safety labels before installing or operating this product. Christie MicroTiles User Manual 020-100329-13 Rev. 1 (04-2015) 11 Product Overview Caution! Failure to comply with the following could result in minor or moderate injury. • A sufficiently sized unobstructed space must be left at the back of all Christie MicroTiles arrays to allow for air flow and cooling, to make sure that the intake air of each tile is within the operating range of 5-40°C (41-104°F) for the display unit. • If the array is installed in an enclosed area, additional cooling may be required to make sure the maximum inlet temperature does not exceed 40°C (104°F). Consult an architect or mechanical engineer to calculate the required space, and to plan an adequate ventilation plan. For detailed information on ventilation requirements, see the Christie® MicroTiles™ Specification and Application Guide (P/N: 020-100334-xx). • The fans on each tile have a maximum inlet air flow of 70 CFM (33 L/s). Maximum cooling load is 110W (375 BTUs/hr) per tile, when operating when operating with all LEDs manually driven to the maximum levels; for example, without color matching. The inlet air temperature cannot exceed the maximum operating temperature. System overview MicroTiles consist of several subsystems, including the mechanical housing, screen and Fresnel lens, light engine, Front End Formatter Board (FEFB), IR sensor, internal Low Voltage Power Supply (LVPS) and cooling system. An array of MicroTiles requires at least one ECU (master ECU), acting as a main control unit and input interface for image content distribution through the array. Mechanical housing The mechanical housing comes equipped with internal supports, which are designed to support small arrays. For larger arrays, external supports are required. MicroTiles are optimized to operate in an upright, landscape orientation; however, they can be operated in many other orientations, as long as the cooling and support requirements are met. Product cooling and mechanical support is the responsibility of the end user. For information, see Christie® MicroTiles™ Specification and Application Guide (P/N: 020-100334-xx). Front of the tile (screen removed) Christie MicroTiles User Manual 020-100329-13 Rev. 1 (04-2015) Back of the tile 12 Product Overview Left side of the tile Right side of the tile Top of the tile Bottom of the tile Rear projection screen Notice. Failure to comply with the following may result in property damage. • Do not touch inside of the screen. Always handle the screen from the sides. Remove all jewelry from your hands before handling. The screen is designed to display high-quality images under a wide range of viewing angles and high ambient lighting conditions. The screen has a matte non-glare front surface that reduces specular reflections from adjacent light sources and maintains the contrast and luminance uniformity of the displayed image. The screen is designed to display a sharp image formed close to the screen edge to allow for image blending from screen to screen when tiled in an array. The screen material has expansion characteristics that are low and closely matched for the screen elements. This allows the screen to retain its dimensions in various operational environments and prevent separation between the screen elements that would induce unwanted image artifacts. The screen is attached magnetically to the housing. The screen can be easily removed by applying suction with a screen removal tool (supplied). In the event that the magnets fail to retain the screen, for instance due to extreme vibration of the housing, an integrated tether ensures the screen remains attached to the housing. For proper cleaning instructions, see Clean the outside surface of the screen on page 58. Christie MicroTiles User Manual 020-100329-13 Rev. 1 (04-2015) 13 Product Overview External Control Unit Notice. Failure to comply with the following may result in property damage. • The Web User Interface (WebUI) is only functional on a master ECU. It does not communicate with slave ECUs. A MicroTiles array requires an External Control unit (ECU) to display an image across the entire array. End users connect a PC or media player to the array using a DVI-D cable. The ECU then ensures the supplied video signal is properly displayed across the entire array. For more complex arrays, multiple ECUs can be used. The ECU is able to communicate with all tiles in the array and with any other ECU using Christie’s proprietary HSSL interface. Each tile and ECU has a unique IP address, allowing full communication between tiles and ECUs across the network. The address of each tile is assigned using DHCP. For more information, see Connect sources on page 31. In a multiple ECU array, one ECU acts as the master ECU, while all remaining ECUs act as slave ECUs. Multiple master ECUs can occur when an array is powered up with more than one ECU attached. On start-up, all ECUs assume they are the master ECU and begin the self-organization process. When two ECUs encounter each other, one of the ECUs is chosen to be the master ECU. If immediately prior to the last power down, one of the two ECUs had been acting as the master ECU and the other as slave ECU, then the unit last identified as the master ECU remains identified as such. If both ECUs (or neither) had been the master ECU, then the next level of priority is based on firmware revision, where the ECU with the newest firmware takes precedence. A sophisticated external software application is also available to clients, which provides a graphical method of viewing the installation where the on-screen layout of the MicroTiles matches the physical installation. Users are able to arrange and change the configuration and view the results through the on-screen layout of the software. For more information, go to www.microtiles.com and launch the MicroTiles Designer. User interface overview The WebUI requires an Ethernet connection, a PC with web browser and the Adobe® Flash Player™ Plug-in. The WebUI enables you to configure the array and update the firmware. For more information about the WebUI, see Configure the Array on page 38. Purchase record and service contacts Whether the MicroTiles are under warranty or the warranty has expired, Christie’s highly trained and extensive factory and dealer service network is always available to quickly diagnose and correct tile malfunctions. Complete service manuals and updates are available for the MicroTiles. Should a problem be encountered with any part of the MicroTiles, contact your dealer. In most cases, servicing is performed on-site. If you have purchased MicroTiles, keep a copy of the packing slip shipped with your purchase for your records. The packing slip contains the serial numbers for each tile. The serial number can also be found on the license label located on the back of the tiles, as well as on the front chassis. Christie MicroTiles User Manual 020-100329-13 Rev. 1 (04-2015) 14 Product Overview Order guide For a detailed overview of the kits and accessories visit www.microtiles.com. Standard components The items listed in this table will be ordered with every system. Item Part Number Part Description Details Display Unit 123-001102-xx MicroTiles Display Unit D100 Each display unit includes a one meter display port cable, three vertical screws, one power connection security clip (comes installed), light seal trim and two horizontal adjustment screws for fine optimization of screen gaps. Screen 123-124108-xx MicroTiles Screen S300 Ordered separately from display unit. or External Control Unit 123-128102-xx MicroTiles Screen S310 123-101103-xx MicroTiles ECU E100 Includes a three meter display port cable. 123-129103-xx User Kit 123-103105-xx MicroTiles User Kit Includes: screen removal tool, cleaning cloth, screen tape for sealing the corners of the array, Christie MicroTiles Quick Setup Guide and User Manual (with CD containing additional technical documentation). Y-cord Kit 123-122106-xx MicroTiles Y-cord Kit One kit supports up to nine MicroTiles. This kit includes nine Y-cords with retention clips. This kit does not include regional line cords for connecting a group of tiles to a power outlet. Some regions do not accept Y-cords, see Regional acceptance for Y-cords on page 15. Regional line cords will be shipped separately. See Line cords for D100 and E100 on page 16. Regional acceptance for Y-cords Notice. Failure to comply with the following may result in property damage. • Local or national regulations may not allow the use of Y-cords and may require an alternative method of power distribution, such as standard individual line cords for each tile, or power bars. This may include Japan, China, Korea and others. The Y-cord Kit (P/N: 123-122106-xx) can be used in the USA, Canada, Mexico, the European Union, and Russia. It does not include line cords. Suitable regional line cords will be shipped separately by Christie. For a list of line cords available from Christie, see Line cords for D100 and E100 on page 16. Christie MicroTiles User Manual 020-100329-13 Rev. 1 (04-2015) 15 Product Overview Line cords for D100 and E100 Regional line cords are shipped separately by Christie for the display unit (D100) and the ECU (E100), for the regions listed in the table. This list is subject to change and is for reference only. Country C13 Line Cords for D100 C5 Line Cords for E100 North America 108-383105-xx 108-384106-xx European Union 108-390103-xx 108-391104-xx United Kingdom 108-388100-xx 108-389101-xx Japan 108-371102-xx 108-376107-xx China 108-373104-xx 108-375106-xx Korea 108-390103-xx 108-391104-xx Australia 108-392105-xx 108-393106-xx Inlet Receptacle for D100 Receptacle for E100 For all other regions consult with local authorities. Locally approved line cords must be supplied for the tile and ECU. Christie MicroTiles User Manual 020-100329-13 Rev. 1 (04-2015) 16 Product Overview Optional accessories The items listed in this table are optional, but in many cases may be required or recommended. To order additional kits and hardware, go to www.microtiles.com. Item Part Number Part Description Details End Foot Kit 123-105107-xx MicroTiles Foot/Ends (includes left/right end feet and one grille) Leveling feet are recommended to help level the bottom row when building on a supporting structure. Order one end foot kit per array. Center Feet 123-106108-xx MicroTiles Foot/Center (three-pack includes three grilles) Order one center foot to place between each column. Mounting Bracket 123-107109-xx MicroTiles Mounting Bracket (two-pack) One required for every tile that is added to rows six and above in an array. Discontinued parts Part Number Part Description Date Notes Discontinued 123-102104-xx MicroTiles Screen S100* Sept. 30 2011 five year support policy 123-124108-xx MicroTiles Screen S200* Sept. 30 2011 five year support policy 123-104106-xx Setup Kit Dec. 1 2011 Replaced by Y-Cord Kit (P/N: 123-122106-xx) i It is possible to install S100, S200 and S300/S310 screens in the same array since the physical dimensions and attachment features are identical; however, in most applications the optical difference between the screens will be apparent, especially when viewed at a wide angle. It is strongly recommended that only one screen type is used in a single array. Sample ordering quantities for a 9x9 array The items in this table list a sample bill of materials for a floor mounted 9x9 Christie MicroTiles array, which in this example consists of 81 tiles and three ECUs. Part Number Part Description Qty. 123-001102-xx MicroTiles Display Unit D100 81 123-124108-xx MicroTiles Screen S300 81 One per display unit. 123-101103-xx MicroTiles ECU E100 3 The number of ECUs is a design choice and affects the maximum content resolution of the display. For help in determining the number of ECUs, access the online calculator at www.microtiles.com. 123-103105-xx MicroTiles User Kit 1 One per system. Christie MicroTiles User Manual 020-100329-13 Rev. 1 (04-2015) Calculation Notes 17 Product Overview Part Number Part Description Qty. Calculation Notes 123-105107-xx MicroTiles Foot/Ends (includes one grille) 1 One kit (includes left/right) per bottom row 123-106108-xx MicroTiles Foot/Center (three-pack/includes three grilles) 3 Count bottom row = 9 tiles 123-107109-xx MicroTiles Mount Bracket (two-pack) 18 Count above five high = 9 x 4 = 36 tiles 123-122106-xx MicroTiles Y-Cord Kit 9 Some regions do not accept Y-cords. See Regional acceptance for Y-cords on page 15 Subtract 1 = 8 joints = 8 feet required The appropriate regional line cords are shipped separately. The items listed below contain an example of a USA order, utilizing the Y-cord kits. Part Number Part Description Qty. Calculation Notes 108-383105-xx C13 Line Cord for tiles 9 One per Y-cord kit. For regions where the Ycord is not accepted, the quantity of line cords required is one per display unit. 108-384106-xx C5 Line Cord for ECUs 3 One per ECU Christie MicroTiles User Manual 020-100329-13 Rev. 1 (04-2015) 18 Installation and Setup Safety guidelines When the screen is removed, directly viewing the beam with an optical instrument (for example, an eye loupe, magnifier, or microscope) from a distance of less than 100mm may pose an eye hazard. MicroTiles are a class 1M source of visible and invisible LED radiation with a maximum power rating of 3.61mW @ 400-700nM. Danger! Failure to comply with the following results in death or serious injury. • Electrical Hazard! Up to nine tiles may be connected per daisy chain when hooking up the power supply. This is the maximum power carrying capability of the line cord. • Always power down and disconnect/disengage all power sources to the MicroTiles before servicing or cleaning. • Read and understand all product safety labels before installing or operating this product. Before beginning an installation The configuration of an array will vary on the installation; therefore, the following instructions are to be used as a guideline only. Before installing, it is important to fully understand all site requirements and characteristics. This document outlines installations which are no higher than five rows and no wider than 10 columns. For installations exceeding these specifications, see Christie® MicroTiles™ Specification and Application Guide (P/N: 020-100334-xx). Installation guidelines • When constructing any size array always complete the first row and ensure it is flat before continuing with the next row. Do not attempt to construct the array column by column. • Power up each tile to ensure it is functioning. Check the LED on the back of the tile. A green light indicates power is enabled. Should the tile fail to power up, see Troubleshooting on page 60 for more information. • Do not remove the lens guard from the MicroTiles or dust cap from the lens until the canvas construction is complete. Christie MicroTiles User Manual 020-100329-13 Rev. 1 (04-2015) 19 Installation and Setup Cable and ECU layout and design Before an array is constructed, it is important to plan the design layout of the canvas to make sure that ECU placement and the cabling layout supports the overall canvas design objectives. MicroTiles offers considerable flexibility in terms of the number of media sources that can be displayed and the overall resolution. For more information, see the Christie® MicroTiles™ Specification and Application Guide (P/N:020-100334-xx). Color and brightness matching, as well as certain other functions, may be performed across an entire canvas. For details, see Configure the color and brightness of the array on page 46. Required tools and hardware For every MicroTiles system you will need display units, screens (one per display unit), External Control Units (ECUs), a User Kit, a Y-cord Kit, and line cords. This combination provides some of the tools and hardware shown in the illustration below. For a complete overview of the available kits, see Order guide on page 15. Notice. Failure to comply with the following may result in property damage. • Local or national regulations may not allow the use of Y-cords and may require an alternative method of power distribution, such as standard individual line cords for each tile, or power bars. This may include Japan, China, Korea and others. For details, see Power distribution on page 33 and the Christie MicroTiles Specification and Application Guide (P/N: 020-100334-xx). 1 Assembly Tool 2 18mm-M6 Socket Head Cap Screw for Horizontal Alignment (two per tile) 3 Screen Removal Tool 4 321mm-M8 Vertical Alignment Rods (three per tile) 5 Screen Christie MicroTiles User Manual 020-100329-13 Rev. 1 (04-2015) 20 Installation and Setup 6 Display Port Cable, one per tile. A one meter cable is supplied with the tile and a three meter cable comes with the ECU 7 End and Center Leveling Feet (optional) 8 Y-Power Cord 9 ECU 10 Grille with Hardware - used in conjunction with End and Center Leveling Feet (optional) 11 Security Clip for Power Cord Connection to Tile 12 Retention Clip for Y-Power Cord Connections Not shown: • Display Unit (tile without screen) • Straight edge (not provided) • 5mm hex key (not provided) • Light seal trim • Line cords for Display Units • Line cords for ECU Install the MicroTiles canvas Perform these tasks when installing the MicroTiles canvas: 1. Apply the light seal trim on page 21. 2. Mount leveling feet to the base structure (Optional) on page 22. 3. Assemble the first row of tiles on page 23. 4. Add a second row of tiles on page 25. 5. Assemble the additional rows of tiles on page 27. 6. Unpack the screens on page 27. 7. Install the screens on the tiles on page 28. 8. Connect the cables between the ECUs and tiles on page 29. 9. Display content on the canvas on page 33. 10. Power on the MicroTiles array on page 36. Apply the light seal trim The light seal trim is supplied with the Display Unit kit (P/N: 123-001102-xx) and is used to prevent light leakage between the tiles in the array. It is typically used for applications where there is Christie MicroTiles User Manual 020-100329-13 Rev. 1 (04-2015) 21 Installation and Setup lighting in the space behind the tiles. If required, apply the light seal trim around the back of the outside perimeter of the tile before adding it to the array. Mount leveling feet to the base structure (Optional) Danger! Failure to comply with the following results in death or serious injury. • If the array is mounted to the leveling feet it is mandatory they are fastened to an adequately ballasted base structure anytime the array is two rows or higher to prevent tipping and provide stability. Notice. Failure to comply with the following may result in property damage. • Ensure the surface underneath the array is flat before installing the leveling feet. The leveling feet are used when constructing an array two rows or higher to bolt the array down to prevent tipping, and to level and tilt small arrays. The leveling feet come equipped with machined points for bolting the array down; however, fastening hardware is not supplied. Use either M6 or 1/ 4” hardware. Follow all local safety standard and regulations when bolting the array. A B C D D Christie MicroTiles User Manual 020-100329-13 Rev. 1 (04-2015) A Center leveling foot B Left leveling foot C Right leveling foot D Shim 22 Installation and Setup Assemble the first row of tiles i • When installing an array without leveling feet ensure the surface is flat. Do not install vertical screws in the bottom row of installations without leveling feet. • It is advised that when an array is set up near a wall to connect the cables row by row. When setting up an array where the back is exposed, first setup the entire array and then connect the wires. For details, see Connect the cables between the ECUs and tiles on page 29. • Ensure all latches are open before assembling the array. C B A ns. e le t th otec to pr tion alla inst en. scre ring : the e du ICE ling OT d in plac stal N ar to in ior e gu d pr Leav guar ove Rem ns. e le t th otec to pr tion alla inst en. scre ring the e du ling plac al in st ard to in ior e gu d pr Leav guar ove Rem E: TIC NO . lens the ect prot n to latio stal en. g in scre durin the ace ling in pl stal d in ar to ior e gu d pr Leav guar ove Rem E: E TIC NO F E D A Adjustment tool B Latch C Vertical Screws D Left foot E Center foot 1. Open the latch on the top of the first tile. 2. Attach the first tile in the array to a left and center leveling foot. 3. Insert the three vertical screws that are shipped with the MicroTiles into the three positions indicated in the image above (C). Christie MicroTiles User Manual 020-100329-13 Rev. 1 (04-2015) 23 Installation and Setup 4. Detach the assembly tool from the top of the tiles (A) and hand-tighten the three vertical screws to mount the tile to the feet. Do not completely tighten the screws at this point to allow for adjustments. i • Do not use power tools to tighten the vertical screws. • Do not use the vertical screws as anchors to hang the array 5. Assemble the next tile in the array to a center leveling foot only. 6. Using the assembly tool, hand-tighten the two vertical screws to attach the tile to the center foot. Do not completely tighten the screws to allow for adjustments. 7. Place the second tile inline with the previous tile. 8. Using the assembly tool, hand tighten the vertical screw on the second tile to attach it to the center foot of the previous tile. 9. Install a screen onto both tiles. For details, see Unpack the screens on page 27 and Install the screens on the tiles on page 28. 10. Use the screens to visually check the horizontal and vertical alignment between each tile. If needed, use the vertical and horizontal screws to make adjustments. Temporarily remove the screen from the last tile in order to allow another tile to be added to the row. 11. Repeat steps 5 to 10 for all remaining tiles that are to be used in the first row. 12. Assembly only a right leveling foot to the last tile in the row and secure it to the previous tile. 13. (Optional) Hand thread a horizontal adjustment screw into the mounting points between the first two tiles. To allow for adjustments, do not completely tighten until the entire row is complete. It is recommended that horizontal adjustment screws be installed on additional rows when assembling an array higher than three rows to ensure fine optimization of seams. For arrays that are three rows or less it is not necessary to install the horizontal adjustment screws. 14. Repeat step 13 for every tile added to the first row. Christie MicroTiles User Manual 020-100329-13 Rev. 1 (04-2015) 24 Installation and Setup 15. Once the first row is assembled, place a straight edge onto the interface pads (circled in the image below), along the top of each tile to ensure the row is flat. If needed, adjust the vertical screws (if mounted to leveling feet) and the horizontal adjustment screws. Poor alignment of the first row limits the size of the array that can be built. 16. Lock the latch (B) from one display unit onto the adjacent display unit. Repeat for every tile in the row. 17. If the array is mounted to leveling feet, use the assembly tool to completely tighten all vertical screws. 18. Use a 5mm hex key to completely tighten all horizontal adjustment screws. 19. For instructions on how to add additional rows, see Add a second row of tiles on page 25. 20. If the array is mounted to the leveling feet, insert shims into either the front or the back (or both) of each leveling foot to tilt the array or provide additional security. If necessary, fasten the leveling feet to the base structure. 21. (Optional) Fasten the grilles to the leveling feet. See Required tools and hardware on page 20. Add a second row of tiles Danger! Failure to comply with the following results in death or serious injury. • If the array is mounted to the leveling feet, they must be fastened to an adequately ballasted base structure anytime the array is two rows or higher to prevent tipping and provide stability. The leveling feet come equipped with machined points for bolting the array down to a base; however, the hardware is not supplied. Use M6 or 1/4” hardware and follow all local safety standards and regulations when bolting the array. 1. Open the latch on top of the first tile of the second row. Christie MicroTiles User Manual 020-100329-13 Rev. 1 (04-2015) 25 Installation and Setup 2. Place the tile on top of the first tile in the bottom row. Never build from the center out. 3. Push the tile back until the front edge aligns with the front edge of the tile below it. 4. Tighten the three vertical alignment rods with the assembly tool. Do not completely tighten at this point to allow for adjustments. 5. Continue to add the remaining tiles to the second row and repeat step 4 for every tile added to the second row. 6. Once the second row is in place, use the assembly tool to completely tighten the vertical screws. Failure to properly tighten the vertical screws and horizontal adjustment screws causes the tiles to be misaligned. Notice. Failure to comply with the following may result in property damage. • To avoid damaging the vertical screws, do not overtighten them. Do not use power tools to install the vertical screws. 7. It is recommended that horizontal adjustment screws be installed on all other rows when assembling an array higher than three rows. For arrays that are three rows or less it is not necessary; however, if you require fine seam optimization, horizontal adjustment screws are recommended on all rows. 8. Place a straight edge along the four interface pads on the side of the column to ensure the top and bottom tiles are straight. If needed, readjust the top tile or the first row. 9. Lock the latch from one tile onto the adjacent tile. 10. It is recommended that screens are installed during the installation in order to check seam gaps, rather than waiting till the array is completely constructed. See step 10 in Assemble the first row of tiles on page 23. Christie MicroTiles User Manual 020-100329-13 Rev. 1 (04-2015) 26 Installation and Setup Assemble the additional rows of tiles Danger! Failure to comply with the following results in death or serious injury. • If the array is mounted to the leveling feet, they must be fastened to an adequately ballasted base structure anytime the array is two rows or higher to prevent tipping and provide stability. The leveling feet come equipped with machined points for bolting the array; however, the hardware is not supplied. Use M6 or 1/4” hardware and follow all local safety standards and regulations. • TIP LOAD! If the array is two rows or higher, additional hardware for tip resistance must be used in order to comply with safety regulations and local codes. Either use the rear mounting points or bolt the leveling feet into the base structure in such a way that the weight of each tile is individually supported. To accomplish this, a mounting bracket can be purchased from Christie (P/N: 123-107109-xx). For details, see Christie® MicroTiles™ Specification and Application Guide (P/N: 020-100334-xx). 1. For each additional row added to the array, repeat the steps outlined in Add a second row of tiles on page 25. 2. For details on using the rear mounting points, see the Specification and Application Guide (P/ N: 020-100334-xx). Unpack the screens Notice. Failure to comply with the following may result in property damage. • Do not touch inside of the screen. • Always handle the screen from the sides. • Remove all jewelry and watches from your hands and wrists before handling. • Never use gloves that are dirty or have a rough texture as they can leave marks on the screen. • Never handle the screen without gloves once it has been removed from the plastic bag. • Avoid placing the screen on a hard surface. • Never set the screen on its corner or edge as they are fragile and can be easily damaged. 1. Open the box and, without removing it, examine the screen to ensure it has not been damaged during shipping. 2. Place one hand under the screen’s frame, between the front two foam corners. 3. Carefully lift the frame and screen until the front two foam corners are clear of the box. 4. Remove the front two foam corners. 5. Carefully lower the frame and screen back into the box. 6. With two hands, grasp the sides of the frame and lift the frame and screen together out of the box. 7. If the work surface is hard (for example, a table top), have another person close the lid of the box and place the screen on the lid. Otherwise, place the screen on the work surface. 8. Remove the remaining two foam corners. 9. Put on clean gloves. Christie MicroTiles User Manual 020-100329-13 Rev. 1 (04-2015) 27 Installation and Setup 10. Place one hand lightly on the screen and pull open the plastic bag. 11. Grip the bottom of the bag with one hand and the frame with the other and pull the screen out of the bag. 12. If you have lifted the screen and bag up while performing step 11, place the screen back on the work surface or box. Install the screens on the tiles Christie recommends the screens be installed starting from the bottom of the array. Notice. Failure to comply with the following may result in property damage. • Do not touch inside of the screen. Always handle from the sides. Remove all jewelry and watches from your hands and wrists before handling. • Ensure the surface of the screen removal tool is clean and free of debris to avoid damaging the screen. • In an array, the physical size of the gap between two adjacent screens is affected by temperature and humidity. Improper installation of the tiles also affects both the size and consistency of screen gaps. With proper installation, the average physical screen gap is typically 1.3mm at 25°C (77°F) ambient and 50% non condensing relative humidity, with a variance of ± 0.3mm. Feeler gauges should be used to measure screen gaps accurately. 1. Before installing the screens, remove the lens guard from the tiles and the dust cap from the lens. Replace the lens guard and the dust cap anytime the array is disassembled and shipped. 2. Open the handle on the screen removal tool and gently place it in the center of the screen. 3. Carefully, push the screen removal tool towards the screen using moderate pressure (no more than five lbs / 2.27 kg). 4. Close the handle on the screen removal tool to apply suction. 5. Carefully lift the screen from the work surface. 6. Pull the screen tether out from the top of the tile housing and hook it into the locking latch on the screen. Christie MicroTiles User Manual 020-100329-13 Rev. 1 (04-2015) 28 Installation and Setup The tether ensures the screen does not fall if subjected to excessive force or vibrations. Caution! Failure to comply with the following could result in minor or moderate injury. • Ensure the screen tether is secured before completely installing the screen. 7. Line up the two mounting holes on the screen with the two pins on the tile and carefully press onto the tile. Magnets on the housing secure the screen to the tile. Remove the screens from the tile Notice. Failure to comply with the following may result in property damage. • Excessive force and/or repeated screen removal may damage the screen. • Ensure the surface of the screen removal tool is clean and free of debris to avoid damaging the screen. 1. Open the handle on the screen removal tool and gently place it in the center of the screen. 2. Carefully, push the screen removal tool towards the screen using moderate pressure (no more than 5 lbs / 2.27 kg). 3. Close the handle on the screen removal tool to apply suction. 4. To remove the screen, carefully pull on the screen removal tool. Connect the cables between the ECUs and tiles Notice. Failure to comply with the following may result in property damage. • It is advised to connect the cables row by row when an array is set up near a wall. When setting up an array where the back is exposed, first set up the entire array and then connect the cables. • Ensure there is sufficient slack in the cable to allow servicing of the tile from the front. • Do not tie wrap or secure the cabling if the array is set up near a wall. 1. Plug the display port cables into either of the two ports on the back of the tiles. Christie MicroTiles User Manual 020-100329-13 Rev. 1 (04-2015) 29 Installation and Setup Either port is acceptable on both the ECU and the tile unless connecting multiple ECUs. When using multiple ECUs, HSSL-1 is the local source input and HSSL-2 is the local source output. For details, see Cable and ECU layout and design on page 20. 2. Daisy chain the cable from one tile to the next and plug the last one back into the ECU. It is not necessary to make a complete loop; however, communication to the entire array will not be lost if one tile fails. To remove the cable, press down on the cable tab. Christie MicroTiles User Manual 020-100329-13 Rev. 1 (04-2015) 30 Installation and Setup Cooling Caution! Failure to comply with the following could result in minor or moderate injury. • A sufficiently sized unobstructed space must be left at the back of all Christie MicroTiles arrays to allow for air flow and cooling, to make sure that the intake air of each tile is within the operating range of 5-40°C (41-104°F) for the display unit. • If the array is installed in an enclosed area, additional cooling may be required to make sure the maximum inlet temperature does not exceed 40°C (104°F). Consult an architect or mechanical engineer to calculate the required space, and to plan an adequate ventilation plan. For detailed information on ventilation requirements, see the Christie® MicroTiles™ Specification and Application Guide (P/N: 020-100334-xx). • The fans on each tile have a maximum inlet air flow of 70 CFM (33 L/s). Maximum cooling load is 110W (375 BTUs/hr) per tile, when operating with all LEDs manually driven to the maximum levels; for example, without color matching. The inlet air temperature cannot exceed the maximum operating temperature. Notice. Failure to comply with the following may result in property damage. • 99% of the heat generated is exhausted out the back and should be accounted for at the rear of the array. The surrounding air supply MUST be clean and free of excessive dirt, dust and particles in order to ensure proper functionality of the tiles. Failure to ensure a clean air supply may void the warranty. Tiles are cooled only from the back. If the array is installed in an enclosed area, additional cooling may be required in order to comply with safety regulations and local codes. The inlet air cannot exceed the maximum operating temperature of 40°C (104°F) for S300 screens and 35°C (95°F) for S310 screens. For details, see General Specifications on page 63. If any of the three LEDs reaches its maximum temperature tolerance, the LED drive levels dim the tiles gradually until the minimum LED drive level is reached. If the temperature remains hot, when the minimum drive level is reached the light engine shuts down. The tiles remain on and continues to communicate with the ECU. For details, see View the tile system information on page 52. Connect sources Notice. Failure to comply with the following may result in property damage. • The WebUI is only functional on the master ECU. It does not communicate with slave ECUs. • Up to 7m (20 ft.) of long distance communication between the ECU and the tiles is supported at this time. A MicroTiles array requires an ECU, to allow the user to display an image using a source, connected through a DVI-D cable. The ECU acts as the controller and ensures the supplied video signal is properly displayed across the entire array. Once the ECU is connected and powered up, the video content is enabled by default as long as the video source is connected to the DVI-D connection. It also monitors the health of the array. Christie MicroTiles User Manual 020-100329-13 Rev. 1 (04-2015) 31 Installation and Setup In a complex setup, multiple ECUs can be used. For details on controlling an array with multiple ECUs, see Power distribution on page 33. When multiple ECUs are connected into a single array, an arbitration scheme is used to ensure only one ECU acts as the main system controller (master ECU) and the video source connected to this ECU is always capable of playback on all tiles. Each slave ECU will playback its video source to the connected tiles; it cannot playback the local video from another ECU to its connected tiles. • Power Connector: Each ECU comes with a universal power supply (110V-240V, 50Hz/60Hz) power splitter cable, which forms a T-junction. One end of the ‘T’ plugs into the back of the ECU and the other two ends form a daisy chain with either another ECU or with a tile. • HSSL-1 and HSSL-2: These bidirectional ports are capable of carrying 5 Gbps of video and data in both directions, simultaneously. The ECU is connected through the HSSL interface directly to a tile. The order in which system elements are connected is not significant unless you are connecting multiple ECUs. When connecting multiple ECUs, HSSL-1 is the local source input and HSSL-2 is the local source output. • RS-232: Connect with a laptop or PC for access to all controls and all system status information. • USB Device 1/USB Device 2: Reserved for future use. • Ethernet: A host computer connected to this interface has full access to all controls and all system status information. All firmware can be updated through this port. This interface supports 10BaseT and 100BaseT. A web client interface is available through this port and is used as the primary human interface for remote PC based control of a MicroTiles installation. There are two methods of connecting through this port: • Direct Cable: The PC must be assigned a static IP Address 192.168.0.x where ‘x’ is any integer 2 through 254; at the factory, the IP of the ECU will be 192.168.0.1 • Router or Switch: Press and hold the Power button to display the IP Address to which the web browser will be connected. • USB Host: Reserved for future use. • DVI-D: Connect a variety of progressive video and graphics sources to the DVI-D port. The bandwidth of the input is limited to 25 -165 MHz. • Power Button: Press to switch the ECU and any attached MicroTiles array between ON and STANDBY. The bicolored LED flashes green when the system is in the ON state and red when the system is in STANDBY. If an error occurs the LED flashes red. Christie MicroTiles User Manual 020-100329-13 Rev. 1 (04-2015) 32 Installation and Setup Notice. Failure to comply with the following may result in property damage. • If the power button LED is red and the power connector cord is unplugged, the ECU remains in a standby state even when the line cord is reconnected. The Power button can also be used to display the WebUI IP address on the master ECU in multiple ECU configurations. Display content on the canvas 1. Connect the DVI-D output from the video source, for example a media player or computer, to the DVI-D input on the ECU. 2. Once the DVI-D is connected and the ECU is powered up, the video is enabled by default. Use the WebUI to control the video content. See Select a display mode on page 43 and Display a test pattern on page 50. Power distribution For each MicroTiles array, Christie provides the necessary line cords required for proper power distribution in your country of origin. For regions that accept Y-power cords, a Y-Cord Kit can be ordered. For details, see Order guide on page 15. For regions that do not accept Y-power cords an alternate solution is required. For details, see the Specification and Application Guide (P/N: 020-100334-xx). Connect to power Always check the firmware version installed on the tile(s) and ECU on initial power up against the version available at www.microtiles.com. Failure to install the latest firmware version can affect system performance. For details, see Restore factory defaults on page 44. Christie MicroTiles User Manual 020-100329-13 Rev. 1 (04-2015) 33 Installation and Setup Y-power cords Warning! Failure to comply with the following could result in death or serious injury. • Electrical Hazard! A maximum of nine tiles can be connected per daisy chain. This is the maximum power rating of the Y-power cord. In an array of 12 tiles, two outlets and two power bars should be used. Local or national regulations may not allow the use of Y-power cords and may require an alternative method of power distribution, such as standard individual line cords for each tile, or power bars. This may include Japan, China, Korea and others. The Y-cord Kit (P/N: 123-122106-xx) can be used in the USA, Canada, Mexico, the European Union and Russia. • The Y-cord Kit does not include line cords (i.e., the cords that connect the array to the wall outlet). Suitable regional line cords must be used. See Line cords for D100 and E100 on page 16. • A quantity of nine Y-cords are shipped with each kit. Multiple tiles are daisy chained to a single power feed. Up to nine tiles per chain can be supported. C Female Female Male Male Male Female Female A Male ale Mal e Fem Female Female Female Male Male Male B Female ale B Ma Fem Female le Male Male Female Female Female C Male Male A Christie MicroTiles User Manual 020-100329-13 Rev. 1 (04-2015) A Wall Outlets B Line cord (specific to country of origin) C Y-power cord (Y-cord Kit) 34 Installation and Setup Install the power connection security clips To ensure the power cord is secured to the power connection of the display unit, a security clip supplied with the Display Unit Kit (P/N: 123-001102-xx) must be installed. To install, insert the end of the clip into the two machined holes on the two posts. • If connecting the 90° connection to the tile, ensure the clip locks from the left side. • If using the standard connector, ensure the clip locks from the right side. Install Y-power cord retention clip To ensure the Y-power cords are secured between connections a retention clip, supplied with the YCord Kit (P/N: 123-122106-xx), must be installed. To install, snap the clip onto the two adjoining Ypower cords. Christie MicroTiles User Manual 020-100329-13 Rev. 1 (04-2015) 35 Installation and Setup Power on the MicroTiles array Warning! Failure to comply with the following could result in death or serious injury. • Make sure that you are using a power cable, power plug, and socket that meet the appropriate rating standards. Connect the power cable to the AC receptacle at the lower-left corner on the rear of the tiles and to a proper AC power source (outlet). The outlet must be near the equipment and easily accessible. Use the power cable provided with the MicroTiles or an appropriately rated power cable that complies with regional standards. For details, see Line cords for D100 and E100 on page 16. Do not attempt operation if the AC power source is not within the rated voltage range as specified on the license label (found on the back of the tile). Notice. Failure to comply with the following may result in property damage. • A maximum of nine tiles may be connected per daisy chain. In an array of 12 tiles, two outlets and two power bars should be used. 1. Connect the power plug from the ECU into an outlet or power bar. 2. Daisy chain the Y-power cords into each tile in the array and connect the standard power plug into an outlet or power bar. For more information on how to connect the power cords, see Power distribution on page 33. 3. Apply electrical tape or tie wraps to secure the inline connection between the Y-power cables. The LED status light on the ECU Power button is red during the power-up sequence, which takes approximately one minute. Notice. Failure to comply with the following may result in property damage. • It is recommended that a power bar with an in-line power switch be used to simplify switching the array ON and OFF. If any of the tiles fail to power up, check each connection. 4. Once the array (ECU and tiles) is powered up, the LED status light on the ECU Power button flashes green. For information on how to display content onto the MicroTiles array, see Connect sources on page 31. If a tile fails to power on • Check to ensure each cable is properly connected. • Cycle power to the failed tile(s) or the entire array using the switch on the power bar. • Check the LED on the back of each tile. A flashing green light indicates power is enabled. Power off the MicroTiles array 1. Push the Power button OFF at the ECU. 2. Move the power bar switch to the OFF position or disconnect the power plug from the outlet. Christie MicroTiles User Manual 020-100329-13 Rev. 1 (04-2015) 36 Installation and Setup LED status indicators ECU LED indicators The ECU is equipped with a status LED built into the Power button. LED Mode Description OFF No Power Green Slave ECU (NOTE: only one ECU can be the Master ECU) Green: Flashing Master ECU Red: Solid ECU in Standby mode or booting on power up Tile LED indicators Each tile is equipped with a tricolor LED, located on the back of the tile, which indicates power status. LED Mode Description OFF No Power Amber Power ON, Hardware is Good, No Firmware Green Power ON, Hardware is Good, Firmware is Good Green: Flashing Power ON, Hardware is Good, Firmware is Good, Communicating with ECU Red: Solid Power ON, No Hardware Disassemble a MicroTiles array 1. Power down the array and disconnect all power cables and display port cables. 2. Remove the screens. For details, see Remove the screens from the tile on page 29. 3. Replace the lens guard and dust cap. 4. Loosen the three vertical screws from each tile in the top row using the assembly tool. 5. Unlock all the latches from the top row. 6. Remove each of the tiles from the top row. 7. Repeat steps 2-6 for all remaining rows. 8. If the horizontal adjustment screws were used in building the array, make sure they are removed. 9. If necessary, remove the bottom row of tiles from the leveling feet. Christie MicroTiles User Manual 020-100329-13 Rev. 1 (04-2015) 37 Configure the Array MicroTiles can be controlled remotely, typically at a controller such as a PC, through a web user interface (WebUI) on an Ethernet network. If there are concerns about network security, run the WebUI on a local area network only and install a firewall. The WebUI is only functional on a master External Control Unit (ECU), and does not communicate with slave ECUs. In a browser, access the WebUI by going to the IP address of the master ECU. Users are prompted to login on start up using admin for both the user name and password. From the top toolbar of each screen in the WebUI, you can do the following: • Select and setup an active input source • Manipulate the appearance of video content (i.e., size, position, color, sharpness) • Perform firmware upgrades • Display a test pattern • Configure the array • View system information and alerts • View current time and date System requirements for the WebUI Requirements for accessing the WebUI include: • One of the following browsers: Mozilla Firefox, Safari, Microsoft® Internet Explorer, or Google Chrome • Adobe® Flash Player™ Plug-In version 10.0 or higher Automatically configure the array Array configuration is required to organize the display and to ensure each tile knows its physical arrangement within the array. MicroTiles are equipped with neighbor detection circuitry. When power is applied to the array, the ECU uses the neighbor detection circuitry to determine the configuration of the array. It then relays the total dimensions of the array and the exact physical location of the array back to each tile. Configuration is checked approximately every 10 seconds. By default, Automatic Array Configuration is enabled. Each tile, knowing its own position within the array and the video source characteristics, is required to crop the active input source, select its own sub-image portion, and scale the sub-image to display in full screen. Christie MicroTiles User Manual 020-100329-13 Rev. 1 (04-2015) 38 Configure the Array 1. Select Canvas Management > Layout > Configure. 2. In the Automatic Array Configuration list select Enabled. With this feature enabled, the software detects changes in the array’s setup and configures the array accordingly. For example, it detects and reconfigures the array when a tile is added or removed, tiles are moved, subarrays are changed, or manually mapped tiles are changed. 3. To update the array and ensure the most current information is displayed, click Refresh. 4. To force an array reconfiguration manually, click Reconfigure Array. Manually create a subarray A subarray can increase the input resolution by combining multiple inputs and display two images on an array. Multiple ECUs must be connected to the array and automatic array configuration must be enabled. For information on how to connect multiple ECUS, see Connect the cables between the ECUs and tiles on page 29. Manually add a subarray 1. Select Canvas Management > Layout > Subarray Configuration. 2. To get a reading of any subarray regions that have already been created click Refresh. 3. Ensure you are in Add Mode. 4. Click the top left or top right tile within the new subarray. 5. Press Shift and click the bottom right or bottom left tile in the subarray. You must select tiles in a diagonal configuration (opposite corners) to configure a subarray. 6. When the subarray region has been selected, click Add. All the subarrays saved on the master ECU are shown in the table. Automatically add a subarray Notice. Failure to comply with the following may impact the application. • Creating an automatic subarray erases all existing subarrays. 1. Select Canvas Management > Layout > Subarray Configuration. 2. To put all tiles between ECUS into separate subarrays, click Auto Subarray. For correct wiring see Cable and ECU layout and design on page 20. 3. In the warning dialog, click OK. Christie MicroTiles User Manual 020-100329-13 Rev. 1 (04-2015) 39 Configure the Array Edit a subarray i • Automatic array configuration must be enabled for changes to take affect. For details, see Automatically configure the array on page 38. • Edit Mode is grayed out if no subarray is selected in the table. 1. Select Canvas Management > Layout > Subarray Configuration. All the subarrays saved to the master ECU are shown in the table. 2. To edit an existing subarray, select it from the table and click Edit Mode. Once selected, the bottom portion of the window changes to display the subarray properties. 3. To change the width and height of the subarray use the scroll bars to adjust the X/Y Offsets. The display window changes as you make the adjustments. 4. To define the Video Source for the subarray, select No Video, Global, or Local (default). 5. When the changes are correct, click Apply. Prioritize the ECUs in the array Identify the ECUs in the array as a slave or master. All ECUs are shipped as slaves from the factory. In a multiple ECU array, one ECU acts as the master ECU, while all remaining ECUs act as slave ECUs. The master ECU sends configuration information to all slave ECUs. For more information, see External Control Unit on page 14. When replacing ECUs in the field, ensure at least one ECU is a master. If you have two masters, one of them must be set as a slave. 1. Select Canvas Management > Layout > ECU Priority. 2. To load the information from the ECUs connected to the array, click Refresh. 3. Select an ECU from the table. 4. Use the Priority scroll bar or the up and down arrow keys to manually set a priority to the ECU. The priorities are from 0-255 in descending order, where 0 is the highest priority. The master ECU has the highest priority. 5. Click Apply. Configure the IP address of the ECU 1. Select Configuration > Ethernet. 2. Select the ECU. 3. To manually enter an IP address for the ECU, disable DHCP and type the IP Address. 4. Click Apply. Christie MicroTiles User Manual 020-100329-13 Rev. 1 (04-2015) 40 Configure the Array Manually add tiles to the canvas When configuring a canvas that includes a group of tiles not physically connected, you must add the tile to the grid and specify the X and Y coordinates. 1. Ensure Automatic Array Configuration is enabled. For information, see Automatically configure the array on page 38. 2. Select Canvas Management > Layout > Physical Mapping. 3. In the Tile Schematic section click a tile. 4. Drag and drop the tile into the main grid to manually map it. Use the rows (y-coordinates) and columns (x-coordinates) of the grid to manually map tiles; the input image automatically stretches spanning across all manually mapped tiles. The top left is 0,0. Each array index corresponds to a unique mapping of the input image. The image on the array is automatically configured and mapped once the tile is dropped into the main grid. All blue colored tiles indicate they have been manually mapped and non-mapped tiles are gray. All manually mapped tiles are displayed in the Manually Mapped Tiles table. 5. To center the main grid on the currently selected manually mapped tile, click Center Tile. For example, if you want to manually map a tile to location x=20 and y=20, select a manual mapping from the table and click Center Tile to make the main grid reposition the tile to the center of the main grid. 6. To bring up the properties of each tile, click Info. Use the tile system information screen to see the number of each tile. For details, see View the tile system information on page 52. View the array as a wire map Display the wiring of the ECU and tiles as text. Use the wire map to verify the cabling between the ECU and the tiles, and to diagnose issues with the array. Christie MicroTiles User Manual 020-100329-13 Rev. 1 (04-2015) 41 Configure the Array 1. Select Canvas Management > Diagnostics and Calibration > Wire Map. 2. Read the wire map. The left column identifies the coordinates of the output tile and, and the right column is the input tile. 3. To save the wire map as a .cvs file, click Export. Create a custom video resolution Customize Extended Display Identification Data (EDID) allows you to create a custom video resolution to send to the graphics card for one or more ECUs. The default settings are 1920 horizontal pixels x 1200 vertical lines at a vertical frame rate of 59.94 Hz. i The maximum input resolution supported per ECU is 1920 x 1200 @60Hz. 1. From the top menu bar select Source Management > Customize EDID. 2. To select each ECU connected to the array click Select All, or click a specific ECU from the table. 3. If using an ASCII file provided by Christie, click Load File. 4. If the ECU cannot detect or display a good video source, to return to the default values click Restore. This can occur when connecting different types of input sources to the ECU, which can cause the EDID information to be incorrect. 5. Customize the EDID elements. Field Description Minimum Value Maximum Value Default Value Horizontal Size Adjust the horizontal size of the display. 64 4088 1920 Vertical Size Adjust the vertical size of the display. 64 4095 1200 Frame Rate Adjust the frame rate of the display. 1 75 60 6. Click Apply. Set date and time 1. Select Configuration > Date and Time. The date displayed in the MicroTiles System Date and Time field is processed from the ECU, while the date in the New Time field is updated to the time on the computer. 2. Set the date and time. Christie MicroTiles User Manual 020-100329-13 Rev. 1 (04-2015) 42 Configure the Array 3. To see changes take effect click Refresh. 4. Click Apply. Select a display mode Switch the display mode between Video, OSD, and OSD (Unscaled with Overscan) modes. Video is used for most applications. 1. Select Canvas Management > Display Mode. 2. To display the content on the tiles select from Video (All Tiles), OSD (All Tiles), and OSD (Unscaled with Overscan) (All Tiles). • Video (All Tiles): Displays video from the ECU input source (HSSL-1 or HSSL-2). One or both ports must be enabled. For details, see Connect sources on page 31. • OSD (All Tiles): Displays a 800 x 600 image, scaled to approximately 720 x 540, which is the viewable area of the screen. • OSD (Unscaled with Overscan) (All Tiles): Displays test patterns in overscan resolution (800 x 600). The display mode is applied as soon as it is selected from the menu. Power ON/OFF all tiles through the WebUI Selecting Power ON Canvas and Power OFF Canvas affects the entire array, regardless of how many tiles have been selected through the WebUI. 1. To turn on all tiles in the array, select Configuration > Power > Power On Canvas. To turn off all tiles in the array, select Configuration > Power > Power Off Canvas. Wait approximately ten seconds between powering the canvas off and on. Save tile or ECU settings 1. Select Configuration > Save & Restore > Save & Restore Settings. 2. To download and save the specific settings file, click Save. 3. Name the file, and navigate to a storage location. The settings are saved as a .mct file. All settings for the tiles or ECUs are included in the saved files. Restore tile or ECU settings 1. Select Configuration > Save & Restore > Save & Restore Settings. Christie MicroTiles User Manual 020-100329-13 Rev. 1 (04-2015) 43 Configure the Array 2. For ECUs, select the settings to be restored. Only the selected settings are restored. All tile settings are restored during this process. 3. To upload a saved settings file to the tiles or ECUs, click Restore. Restore factory defaults Reset the ECU(s) and tile(s) back to their default settings. This is typically done when setting up a new configuration or when swapping master ECUs from one configuration to another. Notice. Failure to comply with the following may impact the application. • Restoring factory settings applies to all ECUs and tiles in the array. Factory settings cannot be restored on an individual ECU or tile. 1. Select Configuration > Save & Restore > Restore Factory Settings. 2. Click Restore. 3. In the confirmation dialog, type CONFIRM in all capital letters and click OK. All defaults are restored. 4. Navigate to the .mct file and click Open. The settings are restored. Christie MicroTiles User Manual 020-100329-13 Rev. 1 (04-2015) 44 Adjust the Image Settings Ensure the content displayed on the MicroTiles canvas has a high quality appearance by manipulating the source and canvas settings. Change size and position of video content Manually adjust the X/Y offsets and the width and height of the display to accommodate the particular application. 1. Ensure Automatic Array Configuration is enabled. For information, see Automatically configure the array on page 38. 2. Select Source Management > Size and Position. 3. Verify the input source is recognized. If necessary, to scan the properties of the input source detected by the ECU click Refresh. The System Master Input Source Properties include: • DVI Clock Detected must state true to view video content on the tiles. When this input reads false, check the connection between the ECU(s) and the video source, and try again. • Input Stable indicates the stability of the input source. If this field states false, ensure the video source is operating and ensure the video file is not corrupt. • Active Resolution displays the width and height of the array in pixels. • Frame Rate displays the frames per second of the incoming video. 4. Adjust the display window settings. Notice. Failure to comply with the following may impact the application. • These settings are only applied to the global video source of the master ECU. Adjusting the display window settings changes the capture size of the active input window. The X-Offset, Y-Offset, Width, and Height values are expressed as a percentage of the active input, where the top left of the array represents 0,0. The sum of X-Offset and Width must be Christie MicroTiles User Manual 020-100329-13 Rev. 1 (04-2015) 45 Adjust the Image Settings ≥ to 0 and less than 100%. The sum of Y-Offset and Height must be ≥ to 0 and less than 100%. 5. Click Apply. Adjust image contrast and gamma Manually adjust the image contrast and gamma of the ECU video input. 1. Select Source Management > Image Settings. 2. Click Select All or select a specific ECU from the table. 3. If necessary, to update the table, click Refresh. 4. To manually change the Contrast and Gamma settings, use either the scroll bar or the up/ down arrow keys to change the value. 5. To send the changes to the ECU(s) and view the results on the tiles, click Apply. Configure the color and brightness of the array Notice. Failure to comply with the following may result in property damage. • The type of screen must first be specified from the Screen Selection list before adjusting any of the color and luminance features. The ECU periodically polls all attached tiles to determine the optimal colorimetry and brightness setting for the array as a whole. This optimal operating point is transmitted to all attached tiles. The individual tiles must meet the requested colorimetry. Manually adjust the nits of the entire array and to enable or disable color matching of the array. Configure the brightness threshold of the weakest tile The ECU calculates the maximum brightness of the weakest tile in the array, and uses that value as the overall brightness of the array. The Weakest Tile Limit is the percentage of the calculated maximum brightness that the weakest tile must be above for it to be used when setting the overall brightness of the array. If the brightness of the weakest tile drops below the Weakest Tile Limit percentage, the tile is ignored in the overall brightness of the array and the second-weakest tile is used to calculate the maximum brightness. The ignored tile appears dimmer than the rest of the tiles in the array. 1. Select Canvas Management > Canvas Settings > Color and Luminance. 2. Set the Weakest Tile Limit percentage. The default value is 30 percent. Set the brightness of the array 1. Select Canvas Management > Canvas Settings > Color and Luminance. Christie MicroTiles User Manual 020-100329-13 Rev. 1 (04-2015) 46 Adjust the Image Settings 2. Select the model of screen being used in the array. Selections include the S100, S200, and S300/S310. This setting must be specified before adjusting any of the color and luminance features to ensure the settings applied to the array are accurate. 3. Select the brightness intensity mode. The selections of this field change according to the Calibration Model selected. For Version 2, the options include Economy Brightness, Fixed Brightness and Maximum Brightness. • Fixed Brightness—The array displays the brightness specified in the Luminance (nits) field. If the tiles cannot display the nits specified, the tiles display their maximum brightness while maintaining the color and brightness matching. The value displayed in the Luminance field is the value set with the slider. • Maximum Brightness—The ECU calculates the maximum brightness of the weakest tile in the array. The tiles then display at the percentage specified as the Brightness Limit of the maximum brightness. The value displayed in the Luminance field is the real-time nits displayed by the array as the page is refreshed. • Economy Brightness—The ECU calculates the lowest brightness possible for the array, and runs as dim as possible while maintaining color and brightness matching. The value displayed in the Luminance field is the real-time nits displayed by the array as the page is refreshed. For Version 1, the options include Fixed Brightness and Off. 4. Set the specific brightness parameters for the array. Adjust the color correction and temperature 1. Select Canvas Management > Canvas Settings > Color and Luminance. 2. Select the model of screen being used in the array. Selections include the S100, S200, and S300/S310. This setting must be specified before adjusting any of the color and luminance features to ensure the settings applied to the array are accurate. 3. From the Calibration Model list, set Version 2 as the color correction model. Only select Version 1 in installations that are already configured for Version 1. 4. Select the Automatic Color Matching setting. • ON (Recommended)—The ECU reads the settings of each tile, calculates the average, and applies that reading to each tile in the array. • Tiles ONLY—Color matching is done at the tile level, meaning the tiles make their best attempt to meet user commanded color/brightness points. In this mode, the ECU is not actively maintaining color points across the array. 5. Manually adjust the color temperature of the array. Color temperature dictates how warm or cool the video output on the array appears. The higher the color temperature, the cooler and bluer the image. The lower the color temperature, the Christie MicroTiles User Manual 020-100329-13 Rev. 1 (04-2015) 47 Adjust the Image Settings warmer and redder the image. Color temperature settings for Version 2 (Recommended) range from 3200-9600K, and the settings for Version 1 range from 5500-8500K. A mode of color correction must be selected from the Mode list to adjust color temperature. 6. Select the Color Space. The selections of this field change according to the Calibration Model selected. For Version 2 (Recommended) the selections include: • Maximum Gamut (default)—Applies the maximum available RGB color spectrum. This option is not available when Tiles ONLY is selected from Automatic Color Matching. • sRGB—Applies the standard RGB color space to the array. • Custom Gamut—Manually adjusts the XY coordinates of the RGB color spectrum. For Version 1 the selections include sRGB and Custom Gamut. Adjust brightness levels at the edge of the tiles Mullion reduction adjusts the brightness level to the edges of the tiles until the edges appear smaller. Christie recommendeds playing video on the array when adjusting mullion to see the changes take effect. 1. Select Canvas Management > Canvas Settings > Canvas Image Settings. 2. Select between OFF, 0 to 12 Feet, 12 to 24 Feet, and More than 24 Feet. When a selection is made, the effect on the video content is displayed on the array. Feet refers to the recommended viewing distance. Adjust the color and luminance of individual tiles Notice. Failure to comply with the following may result in property damage. • MicroTiles are designed for automatic image alignment and color matching. Christie does not recommend overriding individual settings and only performing overrides after proper training. 1. Select Canvas Management > Canvas Settings > Advanced > Tile Color and Luminance. 2. Ensure tiles are selected. Click Select All, or select the tiles manually from the Tile Schematic section of the screen. To make multiple selections hold the Shift key down. 3. To turn the display white click Clear. 4. Ensure the tiles are in OSD mode. For details, refer to Select a display mode on page 43. 5. Click Identify. A black dot appears on each of the selected tiles. 6. Adjust the RGB and luminance settings as needed, using the scroll bars or the arrow keys. 7. Click Apply. Christie MicroTiles User Manual 020-100329-13 Rev. 1 (04-2015) 48 Adjust the Image Settings The first time you attempt to apply values to multiple tiles a confirmation alert message appears requiring you to enter text to confirm this action. This text confirmation is only required once. 8. Click OK. 9. To return the values to the default settings click Reset. Modify tile uniformity Uniformity correction is enabled by default and ensures the light source in the center of the tile, known as the hot spot, is dimmed to ensure the brightness is the same. Have a video playing on the array when adjusting the settings to see the changes take effect. 1. Select Canvas Management > Canvas Settings > Canvas Image Settings. 2. Turn the Tile Uniformity ON or OFF. When a selection is made, the effect on the video content is displayed on the array. Sharpen the image To see the changes take effect, Christie recommendeds playing a video on the array when adjusting the settings. 1. Select Canvas Management > Canvas Settings > Canvas Image Settings. 2. To adjust sharpness levels use the Sharpness scroll bar or the up/down arrows. When a selection is made, the effect on the video content is displayed on the array. Correct the image alignment for individual tiles Notice. Failure to comply with the following may result in property damage. • Applying extreme tile image alignment values may corrupt the video display in some MicroTiles. To resolve this issue, reduce the image alignment adjustment values. 1. Select Canvas Management > Canvas Settings > Advanced > Tile Image Alignment. 2. Select the specific tiles by clicking Select All or using the mouse to click individual tiles within the Tile Schematic section of the screen. To make multiple selections, hold the Shift key down. 3. To display the test pattern, click Grid. The array displays the selected and unselected tiles in the colors specified. 4. To adjust the XY offsets of the top-left, top-right, bottom-left and bottom-right values, click the arrow buttons or use keyboard controls. Customize the XY offsets with the Step Increments scroll bar. XY adjustment values are limited to -10 and +10. Christie MicroTiles User Manual 020-100329-13 Rev. 1 (04-2015) 49 Adjust the Image Settings 5. Click Apply. To immediately send value changes to the ECU use Instant Update, otherwise you must click Apply each time you make changes. 6. If you have selected multiple tiles, type the text confirmation the first time you attempt to apply values to multiple tiles. Any other changes applied still display the warning message. 7. Click OK. To return to the default settings click Reset. Display a test pattern While adjusting how content appears when displayed on the array, or troubleshooting an issue, a test pattern provides an image that can be used to compare the results across the tiles in the array. 1. Select Canvas Management > Diagnostics and Calibration > Test Pattern. 2. Click a tile in the Tile Schematic section. 3. From the Set Display Mode list, select from Video, OSD, or OSD (Unscaled with Overscan). To display internal test patterns, Display Mode must be set to OSD or OSD (Unscaled with Overscan). OSD is the preferred mode if checking mechanical alignment or electronic geometry alignment. 4. From the Set Test Pattern list, select which type of test pattern to display. Choices include: 13 Point Optical, Checkerboard, Checkerboard Inverted, Color Bars, Grayscale, Grid, and Solid Color. When using the Solid Color test pattern, select a specific color to use. 5. To adjust the width and height of the test pattern, click the up/down arrow keys or enter a specific value in the designated fields. Width and height values are only valid for the Checkerboard, Checkerboard Inverted, and Grid test patterns. 6. To return to displaying video content, from the Set Display Mode list select Video. Christie MicroTiles User Manual 020-100329-13 Rev. 1 (04-2015) 50 Monitor and Maintain the Array Installers and all other users must maintain a safe operating environment at all times. Read through this section in its entirety and understand all warnings and precautions before attempting to operate the Christie MicroTiles. For additional information, see the Christie® MicroTiles™ Service Manual (P/N: 020-100332-xx) and the Christie® MicroTiles™ Specification and Application Guide (P/N: 020-100334-xx). Monitor system information and log files Review the ECU and tile system information to ensure the components of the array are running properly. If issues are detected in the array, use the log files to identify the problem. View the ECU system information The ECU table lists information on all the ECUs connected to the master ECU. 1. Select Status > System Information. 2. From the available screen selections select External Control Unit. Each of the master and slave ECUs connected to the array are listed in the table. The master ECU always states true in the System Master column. The ECU you are currently logged into appears highlighted in the table. 3. To save the ECU table as a .cvs file, click Export. View the ECU log files 1. Select Status > System Information. 2. From the available screen selections select External Control Unit. 3. In the table, select the tiles to include in the log. 4. Click Generate Log(s). This opens a new window with the master ECU error logs, which are used for technical support to troubleshoot any problems occurring with the master ECU. 5. To open previously generated logs, click Log Viewer. Christie MicroTiles User Manual 020-100329-13 Rev. 1 (04-2015) 51 Monitor and Maintain the Array View the tile system information 1. Select Status > System Information. 2. Select Tiles from the available screen selections. The Tile table displays operating information for each tile in the array, including: • Tile #—Number of the tile in the array. This column appears at the left and right side of the table. • Array—Array number, where multiple arrays are controlled from one ECU. • XY—XY coordinates of the tile in the array. Arrays are counted in the XY-axis, starting from the top-left corner of the array. • Temperatures—Current temperature settings for the LEDs, the FEB, and formatter. If any of the three LEDs reaches its maximum temperature tolerance, the LED drive levels dim the tiles gradually until the minimum LED drive level is reached. If the LED temperature remains high, when the minimum drive level is reached the light engine shuts down. The tiles remain on and continues to communicate with the ECU. • Red/Green/Blue DAC—Drive levels of the LEDs. • Fan 0/Fan 1—Current speed for both fans. The lower the speed and quieter the fans are running. • Err—Number of errors associated with the tile. • Serial—Internal light engine serial number for the tile. • Tile RunTime—Number of runtime hours for the tile. • LED RunTime—Number of LED runtime hours. • Application Version—Current version of firmware installed. • FPGA/LE—Internal serial number for FPGA and light engine. • Dropped Status—Displays whether or not the tile has been ignored when determining overall canvas brightness. 3. To save the Tile table as a .cvs file, click Export. View the tile log files 1. Select Status > System Information. 2. From the available screen selections select Tiles. 3. In the table, select the tiles to include in the log. 4. Click Generate Log(s). This opens a new window with the tile logs, which are used for technical support to troubleshoot any problems occurring with the master ECU. 5. To open previously generated logs, click Log Viewer. Christie MicroTiles User Manual 020-100329-13 Rev. 1 (04-2015) 52 Monitor and Maintain the Array Review the ECU video input and output quality Display the video input and output quality between the ECU and the tiles over HSSL1 and HSSL2. Use the HSSL information to diagnose issues with the array. 1. Select Canvas Management > Diagnostics and Calibration > HSSL Info. 2. Review the HSSL results. 3. To save the HSSL info as a .cvs file, click Export. Upgrade the main firmware Read the following points before upgrading the main firmware: • Ensure the ECUs and MicroTiles have the same firmware version. • Firmware upgrades take approximately 35 minutes to complete. • Adobe® Flash Player™ Plug-In version 10.0 or higher must be installed to initiate the upgrades. • Christie recommends performing the FPGA hardware upgrade at the same time as a firmware upgrade. For more information, see Upgrade the Field Programmable Gate Array (FPGA) on page 55. • During a firmware upgrade, the web server becomes unresponsive for several minutes and video may be interrupted or temporarily disabled. • During a firmware upgrade do not attempt to use the WebUI or open another web browser. Check the current firmware version from WebUI 1. Select Status > System Information. 2. From the System Information screen, select to display either External Control Unit or Tiles. The current firmware version is displayed in the table under Firmware Version. 3. Go to www.christiedigital.com to view the latest available firmware version. If the version found on the website does not match the version on the product, complete the steps in Upgrade the firmware on page 53. Upgrade the firmware i • The ECU firmware upgrade takes approximately one hour for every 10 connected ECUs. • Begin with the firmware upgrade and then the FPGA upgrade. For details on the FPGA upgrade, see Upgrade the Field Programmable Gate Array (FPGA) on page 55. 1. Download the latest firmware from www.christiedigital.com and save it to a computer that will be connected to the array for the upgrade. 2. Open the MicroTiles WebUI. 3. Upgrade the ECU firmware: Christie MicroTiles User Manual 020-100329-13 Rev. 1 (04-2015) 53 Monitor and Maintain the Array a. Select Configuration > Firmware Upgrade > ECUs. b. Select an ECU from the table or click Select All. c. Click Firmware and locate the firmware upgrade file on the computer. d. When the upgrade is completed, reset the tiles to make sure the new upgrades are active. To reset the tiles select Configuration > Power > Reset > ECUs. If the web browser does not recognize the new WebUI application from the ECU, clear the web browser cache. 4. Upgrade the MicroTiles firmware: a. Select Configuration > Firmware Upgrade > Tiles. b. In the Tile Schematic area, select the tiles to upgrade or click Select All. c. Click Firmware and locate the firmware upgrade file on the computer. d. When the upgrade is completed, reset the tiles to ensure the new upgrades are active. To reset the tiles select Configuration > Power > Reset > Tiles. 5. Upgrade the Light Engine: a. Select Configuration > Firmware Upgrade > Tiles. b. To upgrade the firmware for the light engine in all of the selected tiles, select Light Engine. c. In the Tile Schematic area, select the tiles to upgrade or click Select All. d. Click Firmware and locate the firmware upgrade file on the computer. e. When the upgrade is completed, reset the tiles to make sure the new upgrades are active. To reset the tiles select Configuration > Power > Reset > Tiles. Correct a failed firmware upgrade On ECUs using firmware version 1.0.10 or older, when attempting to simultaneously upgrade the firmware for a MicroTiles canvas with a large number of ECUs the upgrade may fail. Complete the following steps to correct this issue. 1. Update the master ECU to the latest firmware version. 2. Reset all ECUs. 3. Upgrade the firmware on all other ECUs. 4. Upgrade the firmware on all MicroTiles. 5. Reset all ECUs. 6. Reset all MicroTiles. 7. Select Status > System Information. 8. Verify the Application Version field reflects the upgrade. The Reset All Tiles and ECUs selection is not available until all MicroTiles and ECU(s) are upgraded to the latest firmware version. During the initial upgrade, use Configuration > Power > Reset > ECUs. Christie MicroTiles User Manual 020-100329-13 Rev. 1 (04-2015) 54 Monitor and Maintain the Array Upgrade the Field Programmable Gate Array (FPGA) Christie recommendeds performing the FPGA hardware upgrade at the same time as a firmware upgrade. Notice. Failure to comply with the following may impact the application. • Adobe® Flash Player™ Plug-In version 10.0 or higher must be installed to initiate the upgrades. 1. Upgrade the MicroTiles FPGA: a. Select Configuration > Firmware Upgrade > Tiles. b. Select FPGA and then locate the firmware upgrade file on your PC. c. To initiate the upgrade click Open. FPGA hardware upgrades take approximately three minutes to complete for a single tile or 35 minutes for 100 connected tiles. d. When the upgrade is completed, reset the tiles to make sure the new upgrades are active. To reset the tiles select Configuration > Power > Reset > Tiles. 2. Upgrade the ECU FPGA: a. From the WebUI, select Configuration from the top menu bar and then Firmware Upgrade > ECUs. b. Select FPGA and locate the firmware upgrade file on your PC. c. To initiate the upgrade click Open. d. When the upgrade is completed, reset the tiles to make sure the new upgrades are active. To reset the tiles select Configuration > Power > Reset > ECUs. Reset selected tiles and ECUs The tiles and ECU(s) must be reset after a firmware upgrade for the changes to take effect. 1. Select Configuration > Power > Reset Tiles or Configuration > Power > Reset ECU. 2. Select the tiles or ECUs to reset. 3. Click Apply. Reset all tiles and ECUs in the array For the changes to take effect after a firmware upgrade, the tiles and ECU(s) must be reset. 1. Select Configuration > Power > Reset All Tiles and ECUs. 2. After the ECU has restarted refresh the WebUI. Christie MicroTiles User Manual 020-100329-13 Rev. 1 (04-2015) 55 Monitor and Maintain the Array Monitor the MicroTiles array Simple Network Management Protocol (SNMP) enables network administrators to monitor their network devices from a single location. The MicroTiles SNMP application enables you to monitor one or more MicroTiles installations. For information on the MicroTiles Object Identifiers (OIDs), refer to the MIB files. Events logged by SNMP can be recorded in SNMP Setting up SNMP communication includes specifying the SNMP community strings and trap IP addresses that the MicroTiles send traps to. Notification of SNMP events can also be sent to specified email addresses. View SNMP system information The System Information screen contains the system information settings, including Contact Information, System Name, and System Location. 1. Select Configuration > SNMP > System Information. 2. To query the system for the current settings, click Refresh. 3. Modify the system information. The Contact Information field can have a maximum of 128 characters, and the System Name and System Location fields can have a maximum of 32 characters. 4. Click Apply. Specify what events create notifications Events that require investigation and troubleshooting can be recorded in SNMP traps or emailed to select addresses. The action taken for each event can be configured to be recorded in a trap, emailed, both recorded in a trap and emailed, or ignored. 1. Select Configuration > SNMP > Notification Configuration. 2. For each event, identify what action should be taken. • Ignore the event (Disabled) • Record the event in the trap (Trap) See Record event notification in an SNMP trap on page 57. • Send the event details in an email (Email) See Identify where notification emails are sent on page 57. • Record the event in the trap and send an email (Trap+Email) 3. Click Apply. For information on how to troubleshoot the array should any of the events occur, see Troubleshooting on page 60. Christie MicroTiles User Manual 020-100329-13 Rev. 1 (04-2015) 56 Monitor and Maintain the Array Record event notification in an SNMP trap When the selected events occur within the MicroTiles array, the details of the event can be recorded in an SNMP trap. Traps are usually captured on a server outside of the array. Up to three trap IP addresses can be configured. For information about the events that can be selected to trigger SNMP traps, see Specify what events create notifications on page 56. 1. Select Configuration > SNMP > Communication Setup > Communities & Trap IPs. 2. Specify the access string for the SNMP Trap Community and the SNMP Read Community. The default setting for SNMP Read Community and SNMP Trap Community is private. 3. Type the IP address for the server where trapped events are to be recorded. 4. Click Apply. Identify where notification emails are sent To send event notifications by email, the IP address of the SMTP email server and up to three email addresses must be identified. For information on the events that can be selected to trigger email notifications, see Specify what events create notifications on page 56. 1. Select Configuration > SNMP > Communication Setup > Emails. 2. Type the IP address of the SMTP server. 3. Type the email addresses that should receive notification of events. 4. To verify the emails are correctly delivered to the specified recipients, click Test E-mail. 5. Click Apply. Cleaning the tiles Caution! Failure to comply with the following could result in minor or moderate injury. • The array must be powered off and disconnected from AC power before the lens or any of the covers are loosened or removed. Maintaining the cleanliness of all internal components during any service procedure is critical. A minimum amount of cleaning, if any, is required during and after servicing. Clean the inside surface of the screen To clean the interior of the S100, S200, and S300/S310 model screens use a dry, clean, soft cloth with a low lint count to remove any specks from the back of the Fresnel. You must use clean, filtered compressed air to remove any loose particles. i Typically, dirt on the back of the Fresnel appears as a defect on the screen. Christie MicroTiles User Manual 020-100329-13 Rev. 1 (04-2015) 57 Monitor and Maintain the Array Clean the outside surface of the screen The procedure for cleaning the exterior of the MicroTiles screen is different depending on the tile model. S100 and S300/S310 tiles 1. To clean the front surface of the S100, S300, or S310 screen, spray Windex™ or an equivalent window cleaner onto a clean cloth and gently wipe the screen surface. 2. Use a dry, clean, soft cloth to remove any streaks. Do not spray cleaner directly onto the screen surface. 3. If absolutely necessary, use clean, filtered compressed air to remove any loose particles. S200 tiles Notice. Failure to comply with the following may result in property damage. • Avoid using window cleaning sprays, kitchen scouring compounds, solvents such as acetone, gasoline, benzene, alcohol, carbon tetrachloride or lacquer thinner. These can scratch and deteriorate the screen surface. 1. To remove light dust from the front surface of the S200 screen use a feather duster or similar. 2. For heavier dirt, stains from fingers etc, wash the surface with a mild soap solution in lukewarm water, using a clean, soft cloth with a low lint count. 3. Use a dry, clean, soft cloth to remove any streaks. Clean the lens Caution! Failure to comply with the following could result in minor or moderate injury. • The projection lens should never be handled. Do not attempt to clean with commercial cleaners, such as Windex™ or equivalent cleaners. The projection lens should never need to be cleaned; however, you must use compressed air to remove any loose particles. Removing dust from the light engine heat sinks Notice. Failure to comply with the following may result in property damage. • If airflow to the heat sinks is restricted they begin to overheat. Firmware is designed to reduce the brightness of the tiles when this occurs to ensure the temperature remains level. If the LEDs continue to overheat, the firmware eventually turns the LEDs off to prevent damage. In dusty environments check the heat sinks regularly to ensure airflow is not restricted. If needed, blow off dust using filtered, compressed air. The light engine must be removed to access the heat sinks. For more information, see the Christie® MicroTiles™ Service Manual (P/N: 020-100332-xx). Christie MicroTiles User Manual 020-100329-13 Rev. 1 (04-2015) 58 Monitor and Maintain the Array Clean the air filter In dusty environments check the filters monthly, otherwise check them every three to four months. If needed, blow off dust using filtered, compressed air. For information on how to remove the air filter, see the Christie® MicroTiles™ Service Manual (P/N: 020-100332-xx). Notice. Failure to comply with the following may result in property damage. • When cleaning with compressed air, use 30 psi. Only use compressed air with appropriate guarding and protective equipment. Christie MicroTiles User Manual 020-100329-13 Rev. 1 (04-2015) 59 Troubleshooting If the firmware or the tiles themselves do not appear to be operating properly, note the symptoms and use the following section for assistance. If the problem cannot be resolved, contact your dealer/service representative. Image problems Problem Solution Video signal is lost Check the DVI connections for the following: • The DVI connection has been removed or is loose. • The ECU is defective. • The DIV source is powered off (no DVI sync). If the lost signal is due to a failed ECU, call technical support at 1-800-221-8025. Tiles are flickering Ensure the latest firmware is installed. For details see Restore factory defaults on page 44. Video is not displaying Possible causes: • The firmware version installed on the ECU and the tiles may not be the same. • The pixel limitations have been exceed. • There is a problem with the source. Solutions: • Ensure all tiles are selected • Ensure the array is operating in Video mode. To turn on Video mode, access the WebUI and select Canvas Management > Display Mode > Video (All Tiles). • Ensure the firmware on both the ECU and tiles match. For details, see Check the current firmware version from WebUI on page 53. • Change the resolution. For details, see Select a display mode on page 43. • Check to see if the ECU is registering a DVI source: 1. From the WebUI, select Source Management > Size and Position. 2. Under the System Master Input Source Properties section, the DVI Clock Detected input should state True. If the input is reading false, check the connection between the ECU and the video source and try again. Extra pixels/ghosting Christie MicroTiles User Manual 020-100329-13 Rev. 1 (04-2015) Sharpness setting is too high. Set sharpness to ~.50. For details, see Sharpen the image on page 49. 60 Troubleshooting Problem Solution Color matching is not working Possible causes: • Color matching is not enabled. • There is a problem with the version of firmware installed. • The light engine is defective. Solutions: • Enable color matching: 1. Select Canvas Management > Canvas Settings > Color and Luminance. 2. From the Automatic Color Matching list select ON (Recommended). • Update to the latest firmware version. Before updating the firmware, check online at www.microtiles.com to ensure the latest firmware version is installed. Failure to install the latest version can affect system performance. For more information, see Restore factory defaults on page 44. • Replace the light engine. For details on light engine replacement, see the Christie® MicroTiles™ Service Manual (P/N: 020-100332-xx). If light engine replacement still does not correct the problem the tile is defective and needs to be repaired. Contact technical support at 1-800-221-8025. Image Replicated on each MicroTiles in the Array Possible causes: • Automatic array configuration is not enabled. • The XY offsets of the array are not set correctly. Solutions: To enable the automatic array configuration 1. From the WebUI, select Canvas Management > Layout > Configure. 2. Ensure Automatic Array Configuration is set to Enabled. 3. To force an array reconfiguration manually, click Reconfigure Array. For details, see Automatically configure the array on page 38. To set the XY offsets 1. From the WebUI, select Source Management > Size and Position. 2. Set the X-Offset to 0, the Y-Offset to 0, the X-Width to 1, and the Y-Width to 1 (the default settings). 3. Ensure the display window is set correctly. For details, see Correct the image alignment for individual tiles on page 49. Hardware errors Problem Solution One or more tiles do not power up Power cycle the entire array using the switch on the power bar. If the power cabling is accessible, power cycle the failing tile (and any tiles downstream from it) by disconnecting the daisy train and try to power up the tile again. Fan failure A fan failure likely occurs if the fan is defective or degraded, or if the fan connector is loose. If the fan is defective or has degraded over time please contact technical support at 1-800-221-8025. Christie MicroTiles User Manual 020-100329-13 Rev. 1 (04-2015) 61 Troubleshooting Problem Solution LED over-temperature shutdown Caused by either insufficient cooling or a fan failure. Collect logs of the failed tiles and contact technical support at 1-800-221-8025. For more information on the LEDs, see LED status indicators on page 37. LED temperature warning If any of the three LEDs reaches its maximum temperature tolerance, the LED drive levels will dim the tiles gradually, until the minimum LED drive level is reached. If the temperature remains hot, upon reaching the minimum drive level, the light engine shuts down. The tiles remain ON and continue to communicate with the ECU. Tile/ECU added or removed Possible causes: • HSSL removed • Defective tile • Power loss or power regained Solution: Check to ensure the ECU display port cable is properly connected to the HSSL-1 and HSSL-2 ports on the back of the tile. If the tile is defective, contact technical support at 1-800-221-8025. WebUI Errors Problem Solution Cannot assign IP address using DHCP static IP assignment The IP address range 192.168.1.xxx is reserved and used internally by the ECU. Assign another IP address outside of this range; for example, 192.168.3.xxx. Cannot connect to WebUI • Ensure the network configuration on your computer is set up correctly. If it is and you still cannot connect, try a different computer. • Reset the ECU. If the problem still persists, the ECU is defective and needs to be repaired. Contact technical support at 1-800-221-8025. System not responding If the alert, “Web GUI timed out waiting for response. Please try again.” appears, it indicates the ECU is busy either handling input detection, handling active image inputs, or monitoring tiles, etc. Wait a few seconds and try again. Unmapped tiles found If the alert, “Warning, unmapped tiles were found” appears along the top of the window it indicates the ECUs detected unmapped tiles on initial start-up. Waiting a minute after seeing video should clear this error; however, if it remains, complete the following steps: 1. Select Canvas Management > Layout > Configure. 2. Ensure Automatic Array Configuration is Enabled. 3. Click Reconfigure Array. Christie MicroTiles User Manual 020-100329-13 Rev. 1 (04-2015) 62 Specifications Due to continuing research, specifications are subject to change without notice. General Specifications Specification Model numbers Display unit dimensions ECU dimensions Display Christie MicroTiles User Manual 020-100329-13 Rev. 1 (04-2015) Value Display unit D100 Screen S300/S310 External Control Unit (ECU) E100 Height 306 mm (12.05 in.) Width 408 mm (16.06 in.) Depth 260 mm (10.24 in.) Weight with S300/S310 screen 9.2 kg (20.3 lbs) Weight without S300/S310 screen 8.0 kg (18.7 lbs) Height 50 mm (1.97 in.) Width: 259 mm (10.20 in.) Depth 191 mm (7.52 in.) Weight 1.6 kg (3.5 lbs) Screen size (diagonal) 510 mm (20 in.) Native resolution per tile 720 x 540 Pixel pitch 0.567 mm x 0.567 mm Maximum calibrated brightness: 600 Nits (cd/m2) LED lifespan (50% brightness): 65,000 hours Peak white color temperature: 6500K Adjustable gamma Yes Color space (CIE 1931) 115% Optical system DLP® 0.55” SVGA 63 Specifications Specification Processing and control Power Value Input signal compatibility Single-link DVI Processor bit rate 165M pixels per second Data link bit rate 5 Gbps Maximum video bandwidth 165M pixels per second Color depth 24 bits per pixel Color processing 13 bits Refresh rate 47-63Hz frame-locked Control interface: Ethernet, USB 2.0, Serial Christie MicroTiles Display Unit D100 input rated 100-220V, 50/60Hz Maximum nine Christie MicroTiles on a single circuit (10A total) Operation Accessories Power consumption per tile 70W typical Heat load per tile 239 BTUs/hr typical, 375 BTUs/hr maximum ECU power consumption 8.5W typical/11.5W maximum Operating temperature with S300/S310 screen: S300: 5°C to 40°C (41°F to 104°F) Relative humidity with S300/S310 screen 35-85% non-condensing Minimum clearance for ventilation 50mm (2 in.) Altitude 0ft (0m) to 10,000ft (4000m) Vibration/motion limit 0.5G Sound pressure per tile: 35 dB at 25°C (77°F) ambient typical Runtime 24/7 S310: 5°C to 35°C (41°F to 95°F) Mounting brackets with each tile above five rows high (optional) Base feet for leveling the bottom row (optional) Regulatory approvals Directives (EC) 2002/95/EC (RoHS); 2002/96/EC (WEEE); Regulation (EC) No. 1907/2006 (REACH) CAN/CSA C22.2 No. 60950-1-03 2nd Edition UL 60950-1, 2nd Edition IEC 60950-1:2001, 2nd Edition FCC, Part 15, Subpart B, Class A EN55022/CISPR22 Class A EN55024/CISPR24 Limited Warranty Christie MicroTiles User Manual 020-100329-13 Rev. 1 (04-2015) Two years parts and labor. Contact an authorized Christie representative for full details. 64 Specifications Screen Specifications Specification S310 S300 S100 S200 (Discontinued) (Discontinued) Weight 1.2 kg 1.2 kg 1.2 kg 1.2 kg Maximum calibrated brightness 600 Nits 600 Nits 800 Nits 400 Nits Operating temperature 5°C (41°F) minimum 5°C (41°F) minimum 5°C (41°F) minimum 17°C (63°F) minimum 40°C (104°F) maximum 31°C (89°F) maximum 35°C (95°F) maximum Non-operating temperature 2°C (36°F) minimum 50°C (122°F) maximum 40°C (104°F) maximum 2°C (36°F) minimum 2°C (36°F) minimum 2°C (36°F) minimum 50°C (122°F) maximum 50°C (122°F) maximum 31°C (89°F) maximum Operating relative humidity 35 – 80% noncondensing 35 – 80% noncondensing 35 – 80% noncondensing 40 – 60% noncondensing Shipping (boxed) temperature -20°C (-4°F) minimum -20°C (-4°F) minimum -20°C (-4°F) minimum -20°C (-4°F) minimum 50°C (122°F) maximum 50°C (122°F) maximum 50°C (122°F) maximum 31°C (89°F) maximum Advanced Specifications In General Specifications on page 63, the specifications are based on a typical canvas of tiles operating at maximum brightness with color and brightness matching enabled. This is regarded as the default or typical operating condition for a MicroTiles canvas. The following table provides additional specifications under a broader range of operating conditions. Maximum power (110W) is the maximum power of a tile with all LEDs manually driven to the maximum levels (for example, no color matching). Operating Condition Item Specification Typical: At maximum brightness with color and brightness matched. Power Consumption per Tile 70W Heat Load per Tile 239 BTUs/hr Sound Pressure per Tile 35 dB at 25°C (77°F) ambient Power Consumption per Tile 110W Heat Load per Tile 375 BTUs/hr Sound Pressure per Tile 45 dB at 25°C (77°F) ambient Maximum: At maximum brightness, with every LED at maximum drive level, sacrificing color and brightness matching between tiles.* *A MicroTiles canvas is designed to achieve color and brightness matching between tiles by adjusting the drive levels of each LED in the canvas. Through this continuous process, the maximum brightness and color space of a complete canvas is lower than that of an individual tile. Operating a MicroTiles canvas without color and brightness matching enabled is not recommended. Christie MicroTiles User Manual 020-100329-13 Rev. 1 (04-2015) 65 Appendix: WebUI Menu Tree Source Management Source Management Image Settings Size and Position Customize EDID Canvas Management Canvas Management Video (All Tiles) Display Mode OSD (All Tiles) Layout OSD (Unscaled with Overscan)(All Tiles) Canvas Settings Diagnostics and Calibration Physical Mapping Subarray Configuration ECU Priority Test Pattern Configure Wire Map HSSL Info Color and Luminance Tile Color and Luminance Canvas Image Settings Tile Image Alignment Advanced Christie MicroTiles User Manual 020-100329-13 Rev. 1 (04-2015) 66 Appendix: WebUI Menu Tree Configuration Configuration Power On Canvas Tiles Power Power Off Canvas ECUs Reset All Tiles and ECUs Date and Time Reset Ethernet Firmware Upgrade Tiles Remote Control ECUs Save & Restore SNMP Restore Factory Settings System Information Communities & Trap IPs Communication Setup Emails Notification Configuration Save & Restore Settings Status Status System Information Temperature Log System Alerts Help Help Tool Tips About MicroTiles WebUI Christie MicroTiles User Manual 020-100329-13 Rev. 1 (04-2015) 67 *000-101825-13* ASSY TECH DOCS MicroTiles Corporate offices Worldwide offices USA – Cypress ph: 714-236-8610 Australia ph: +61 (0) 7 3624 4888 Canada – Kitchener ph: 519-744-8005 Brazil ph: +55 (11) 2548 4753 Consultant offices China (Beijing) ph: +86 10 6561 0240 Italy ph: +39 (0) 2 9902 1161 China (Shanghai) ph: +86 21 6278 7708 Eastern Europe and Russian Federation ph: +36 (0) 1 47 48 100 France ph: +33 (0) 1 41 21 44 04 Germany ph: +49 2161 664540 India ph: +91 (080) 6708 9999 Singapore ph: +65 6877-8737 Japan (Tokyo) ph: 81 3 3599 7481 Spain ph: + 34 91 633 9990 Korea (Seoul) ph: +82 2 702 1601 United Arab Emirates ph: +971 4 3206688 Republic of South Africa ph: +27 (0)11 510 0094 United Kingdom ph: +44 (0) 118 977 8000 For the most current technical documentation, please visit www.christiedigital.com