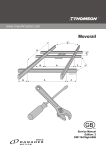
1
AIRPORTS AUTHORITY OF INDIA FIRE ORDER – 08 [Year: 2010] DRILL MANUAL 1 AFS – DRILL MANUAL DRILL MANUAL AMENDEMENTS From time to time amendments will be issued to this drill manual. To maintain a correct and up to date copy of the Drill Manual it is important that instructions given in amendment notices are carried out. The person carrying out the amending should complete the table below. Amendment No. Date Amended By whom amended 1 2 3 4 5 6 7 8 9 10 11 12 13 14 2 AFS – DRILL MANUAL TABLE OF CONTENTS SR.NO. 1 2 3 4 5 6 7 8 9 10 TOPICS Introduction Aim of Drill Basic Principles Squad Drill Appliance Drill - Hose drill - Hydrant drill - Pump drill - CFT drill - Ladder drill - Ambulance drill Miscellaneous Drill - Knots - Rescue Techniques Emergency Evacuation Drill Fitness Training - Yoga - Meditation - Physical training Emergency Communications Glossary of terms used in the fire service PAGE 4 4 5–9 10 – 22 23 – 26 27 – 31 32 – 34 35 – 38 39 – 42 43 – 49 50 - 52 52 – 55 56 - 62 62 – 70 72 – 76 77 – 78 79 – 86 87 – 96 97 – 110 3 AFS – DRILL MANUAL INTRODUCTION The standard drill set out in this drill manual are for the purpose of achieving uniformity in the basic training of personnel in the use of their appliances and equipment and ensuring that the appliances and equipment may be used with speed, efficiency, confidence and without confusion. It also important reference documents that provides comprehensive guidance on the implementation and management of all training and development activities at station level. In natural or technological disasters, people could be trapped in the wreckage of their homes or places of work. Many of them could die unless rescued quickly. Although specialized dog teams and sophisticated listening devices are available to help search for trapped people, the bulk of rescue work is done by local first responders: fire, ambulance and police personnel who are trained and certified. The use of drill within the fire service is as a foundation for good discipline, especially self – discipline. Good drill when exercised on a parade does much to ensure the corporate unity of the membership. Much of the drill done today is either ceremonial or implemented as a core part of training in the Fire Service. Fire Service discipline is enhanced by drill, as it requires instant obedience to commands. AIM OF DRILL • To produce a Fire Service member who is proud, alert and obedient. • Achieving uniformity in the basic training of personnel in the use of their appliance and equipment. • To aid in disciplinary training by instilling habits of precision and response to the leader’s orders. • To provide the basis of teamwork. 4 AFS – DRILL MANUAL BASIC PRINCIPLES PURPOSES OF DRILL (Kavayad ka nihitarth) Drill has many purposes, contrary to popular belief. Drill accustoms individuals to working as a member of a team- a team moving confidently together in unison. Drill is also used to move a unit from one place to another in a standard, orderly manner. Drill improves morale by developing team spirit. It also gives younger petty officers the confidence of command and experience in giving proper commands. METHOD OF INSTRUCTION (Nirdeshan Vidhi) Instruction is to be simple, concise and interesting so that it is easily learnt and remembered. Instruction should also be consistent, and the same instructor, if possible, should be used to carry out the complete sequence of training for a particular squad. Thus each person can receive the maximum amount of personal supervision. Periods of instruction are to be short, to avoid the instructor or trainee becoming over tired. The squad is always to be stood easy when the instructor is explaining the details of movement. A program of instruction is to be varied to avoid monotony and consequent loss of interest. The full value of drill depends on the way in which it is carried out. Drill is exacting. To teach it successfully on instructor must have the following qualities. • Patience • Enthusiasm - Motivate squad a will to learn • Consistency - Set yourself and the squad a standard • Humanity - Understand the squad’s problem, never humiliate individual members of the squad • Personality - As a drill instructor you must impress your squad with your personality and always control them fully • Application - Have a good systematic method of instruction based on common sense application • Be alert and smart- Characterized by sharp quick thought, energetic, quick in movement & prepared for emergency. - Never lose your temper 5 AFS – DRILL MANUAL Example:Members will always imitate their instruction. It is by example that they will learn most. Therefore:• When drilling a squad, stand at attention • When moving, march as you would wish your squad to march • When demonstrating do so accurately • Do not use bad language • Be faultless tuned out • Never exaggerate a movement of drill SEQUENCE OF TRAINING (Prashikshhan Anukram) The following sequence is to be adopted:a. The instructor is to name the exercise. b. The instructor is to demonstrate the movement. c. The instructor is to explain the movement stating in simple language the relevant details. d. The trainees are to carry out the exercise in slow time or by numbers. Individual faults are to be corrected by the instructor. e. The trainees are to practice the movement. After improvement they are to carry out the movement in quick time, Judging the time FALL –IN PROCEDURE (Khade hone ka tarika): a) 1 to 5 men b) 6 to 8 men c) 9 and more men single line two line three line. (Elbow Dressing) (Full Arm Dressing) (Full Arm Dressing) All movements on the parade will be performed smartly and correctly. When the members of Fire Service form up on parade for any purpose, they fall-in in three ranks unless the numbers are insufficient. Five men will fall-in in single rank. Six to eight men in two ranks and nine or more in three ranks. FILE AND RANKS- whenever squad will move in left and right there is always move in file and when in forward and rear word will always in Ranks. 6 AFS – DRILL MANUAL WORDS OF COMMAND (Aadesh shabdavalee) All words of command must be clear and powerful since the way in which they are given affects the reaction which they inspire. A word of command is divided into three parts:• Introductory (AARAMBHIK) - The introductory words of command serve to generally advise personnel of an intention, this is given in i.e. “MOVE TO THE RIGHT IN THREES” (TEENO TEEN DAHINE CHALEGA) • Cautionary (SATRATAKA) – This is to be given as a loud, extended call and for a large parade may need to be made to last several seconds - i.e. “RIGHT”…… (DAHINE) • Executive (Nishpadan) – Command which is to be given distinctly, high pitched and sharp command i.e. “TURN”….. (MUR) When issuing the command, vocal inflection is varied so that the preparatory command is given less emphasis, and the most emphasis is placed on the command of execution. Often there is no need for an introductory word of command i.e. SQUAD…….SHUN” and occasionally there is no cautionary i.e. “FORWARD” CAUTIONARY WORDS OF COMMAND (SATRAKATA AADESH) Before a squad is turned in any direction the instructor should indicate that direction by a word of command. The diagram below show how this is done. “SQUAD-- WILL ADVANCE” “Move to Left - in Threes “Move to Right - in Threes” “SQUAD-- WILL RETIRE” The Advance is the primary direction of movement, regardless of which direction the soldiers are actually facing (similar to a ship’s bow (front end)) The Retire is opposite the advance, against the primary direction of movement (similar to a ship’s stern (rear)) The Left is to the left of the Advance (similar to a ship’s port) The Right is to the right of the Advance (similar to a ship’s starboard) 7 AFS – DRILL MANUAL Four Directions Parades consist of four directions:1. 2. 3. 4. Will advance (Aage Badhega) Will retire (Pichhe Loutega) Turn to left (Bayen Chalega) Turn to right (Dahine Chalega) MOVING THE SQUAD IN FOUR DIRECTIONS: a) Squad will advance .. By the right (Squad aage badhega Dahine se) .. b) Squad will retire By the left (Squad pichhe lautega ... bayen se) c) Move to the right, in threes, by the left (Teeno teen Dahine chalega ..bayen se) d) Move to left, in threes, by the right (Teeno teen bayen chalega .. dahine se) APPLICATION OF WORDS OF COMMAND (Adesheeya shabdo ka prayog) Individuals should be tangent how to control a squad by the following method:• Form the squad and all words of command should be given at the halt. • Demonstrate to the squad all word of command at the halt. • Now “conduct” the squad while they give elementary words of command insisting on clarity and power from each person. When an order is given to personnel on the March, the executive word of command is to be given one pace before the movement is to be made, so as to give the individual time to control his forward momentum before carrying out the new order. This pace is known as the “Check Pace” and its use is shown in the following order. Dal “Squad Arambhik (Introductory) - Dahine Chalega Turn to right Satrakata (Cautionary) Dahine mudh -“Right TURN” Nishpadan (Executive) The Cautionary word “Turn to right” is to be given when the right fast is forward on the ground; the executive word “Right turn” is to be given when the right heel next strikes the ground. Individual then check their momentum on the next pace forward by the left foot and carry out the turn with the right foot and then start march with left foots. All words of command and particularly the words, squad halt or quick march must be given short, quick and loud. For uniformity, the pause between the introductory and the cautionary words of command is to be equivalent to 2 beats in the cadence (rhythm) of slow or quick time: the pause between the cautionary and executive words of command is to be the equivalent of one beat of slow or quick time (in each case depending upon whether the movements are to be made in quick or slow time). Thus when as squad is moving, the last word of the caution is to be given as one foot touches the ground, this is to be followed by a pause while the other four completes its pace and finally the executive words is to be given as the first foot again touches the ground. 8 AFS – DRILL MANUAL NOTE: - There is only one person in charge of a parade at a time. Changing this person is very ceremonious. This is to make it obvious to the squad who is currently in command and therefore to whom to pay attention. SEQUENCE OF INSTRUCTION (Anudesh Anukram) 1. Explanation (Batlana) – Explain what you are about to teach and why it is necessary. 2. Demonstration (Kar ke dikhana)– Break this down: • Complete demonstration, shouting out the words of command. • Demonstration by numbers, pointing out important details. • Another complete demonstration. Any doubt (Shanka samadhan) After giving the first demonstration by numbers, as the squad if they have any questions and do so after each successive demonstration by numbers. 3. 4. Practice (Abhyas) After each demonstration by numbers practice the squad in that movement, checking faults. Finally after demonstrating the whole movements practice the squad, judging the time. Bear two factors in mind • • The comfort of the squad – make sure that they are not looking in to the sun non into the teeth of a gale. The formation in which they will learn most quickly. Formation Straight Line Three ranks, open order, inclined Use Foot drill saluting at the halt. 9 AFS – DRILL MANUAL SQUAD DRILL (Pared abhyas) Squad drill must be considered from two aspects, firstly as a valuable training exercise and secondly as a means whereby groups of men may be moved about quickly and in an orderly manner. When members of the service form up on parade for any purpose they will fall in three ranks, unless the numbers are in sufficient. Five men will fall in single rank. Six to eight men will fall in two ranks, nine or more men in three ranks. Any command consisting of one word must be preceded by a cautionary word and the cautionary part of a command must be given slowly and distinctly, the final or executive part, which in general, should consists only of one word, must be given sharply and quickly as in the following examples ‘ Squad – Halt; Quick – March’. A pause of one second should be made between the cautionary word and the executive word. Men should frequently be practiced in giving words of command and care must be taken to acquire the correct timing. In the elementary stages of training open order should be adopted for all movements so that the instructor may observe each member of the squad. Whenever drill movements are executed when marching the command of execution (MARCH) is given as the left foot strikes the ground if the movement is to the left and as the right foot strikes the ground if the movement is to the right. All steps, marches and movement are to be executed in the quick time cadence of 120 steps per minute unless stated otherwise. a) Position of Attention (Sawadhan): ‘ATTENTION’- Heels together with feet at angle of 45 degrees; knees straight; body erect; head up, shoulders level and square to the front, down and moderately back; arms hanging easily from the shoulders. Palms of the hands turned towards the thighs, hands partially closed, backs of the fingers lightly touching the thigh, thumb close to the forefinger; eyes looking straight to the front. Breathing should not in any way be restricted. b) Stand at ease (Vishram): ‘Stand at - Ease’. Keeping the legs straight, the left foot is carried about 300 mm to the left, so that the weight of the body is rested equally on both feet. At the same time the hands are carried behind the back; the back of the right hand is placed in the palm of the left, the fingers and thumb being allowed to grasp it lightly and the arms being allowed to hand easily to their full extent. c) Stand easy (Aram se): ‘Stand – Easy’ Men are permitted to move their limbs but without quitting their ground, so that on coming to ‘Attention’, there is no loss of dressing. 10 AFS – DRILL MANUAL Note: The command ‘stand – Easy’ is only given to men standing ‘Ease’. Men ‘Standing Easy’ who receive a caution such as ‘Squad’ – will assume the position of ‘Stand at Ease’. The marker or right hand man is first placed by means of the command ‘Marker(s) Fall in’. On the order ‘Fall – in’ the remainder fall in one after the other on the left of the marker in three ranks in the ‘At Ease’ position, dressing by the right, with a distance of 750 mm between ranks; intervals between files is obtained by dressing with intervals. A file consists of three members of the squad, one in the front rank covered by two in the rear ranks. A blank or incomplete file will always be the second file from the left. If there are only two in the file, the centre rank will be left blank; if one man only, he will take up a position in the front rank. d) Right Dress (Dahine Saj): (If it is necessary to correct the dressing, the command ‘Right– Dress’ will be given). RIGHT DRESS- To align the crew, the command is (Dahine Saj) Right DRESS! The individual (except right marker) will take a long step (left) as 45 inches forward on by number shouting 1, on number 2 shouts, right step will join the same, again shouting 2 right foot of individual will take 15” short step to rearward. On shouting number 3, left foot of individual will take 45”long left step towards rear which will be the original position and on one the right foot will join the left at original position.(When alignment is correct the commander gives the command) similar action will followed by entire. EYES FRONT: At the command Eyes Front, everyone drops their arm smartly to their side, without slapping the leg and snaps head forward at same time. Each man in succession from the directing flank looks to his front as soon as he has his dressing; the men in the front rank at the same time cut their arms to the side. Close Order Dress. Where space is limited the order ‘Close Order’ – Dress to the Right (or Left)’ is given. The drill is as in ‘Right (or Left) – Dress’ above except the right or left arm is not used but a shoulder to shoulder dressing is taken. Each man in succession, from the directing flank, looks to his front as soon as he has his dressing. e) From the right number (Dahine se ginati kar) : The right hand man of the front rank calls ‘one’, the next ‘two and so on in succession to the left, the numbers being called out sharply and distinctly. Members in the middle and rear rank will note and adopt the number of the file in the front rank. f) Sizing (Kadwar) : Personnel parading in squads should, for formal parades or public displays, be arranged in height order, to render a smarter unit appearance. ‘Tallest on the flanks; shortest in the centre, in three ranks – Size’. The squad turns right, break off and arrange themselves, according to their height, in the same rank, the tallest 11 AFS – DRILL MANUAL on their nearest flank, and take up their dressing by the right, at the position of ‘Attention’. Note: the instructor will then number the squad and will correct any irregularities in sizing by order numbers to exchange position as necessary. When all necessary exchanges have been made, the instructor will again number the squad in order to identify individuals in their final positions. g) Dismiss (Visarjan): ‘Dis-miss’. The squad turns to the right, and after a brief pause, break of quietly. Note: Members of a parade which is dismissed by an officer will not salute. h) Step forward/backward March (..Kadam aage/pichhe badh): ‘Forward (or Step Back) ---March’. Each man steps forward (or backward) the number of paces ordered, commencing with the left foot. Length of pace to be 750 mm. Note: - this movement is restricted to not more four paces forward or backward. i) Opening and closing of squad (Khulee line/ nikat line chal): ‘Open Order - March’. The front rank takes one and half paces forward and the rear rank two paces backwards. As soon as the paces are completed, the squad will dress by the right. ‘Close order - March’. The action of the front and rear ranks is reversed and the squad will then dress by the right. Notes: 1. the order’ Open Order—March’ may be given to men in two ranks when the front rank will step forward two paces. 2. During drill in ‘Open Order’, markers and blank files will not alter their positions unless the ranks are changed. 3. Men moving forward or backward will keep the arms close to the side. j) Side step (Baju chal): Right (or left) step – ‘MARCH’- At the command MARCH the right ( left) foot is moved 12 inches to the right (left) then the left (right) foot is moved 12 inches to the right (left), left (right) knee straight. The cadence is continued at quick time. The side step is executed from the halt only and for short distances. k) March and pace (chal or kadam): Every instructor should know the rates of marching, lengths of pace and marching/timing of foot drill that are laid out below: Length of Pace:• • • • • (Tej chal) Quick march (Daur ke chal) Double march (Chhote kadam) Stepping Short (Baju kadam) Side way March (Kadam aage/pichhe) Stepping forward/backward 30 inches 40 inches 21 inches 12 inches 30 inches (75 cms.) (100 cms.) (53 cms.) (30 cms.) (75 cms.) 12 AFS – DRILL MANUAL RATES OF MARCHING The numbers of paces to the minute for marching are:• • • Slow Time Quick Time Double Time 70 paces to the minute 120 paces to the minute 180 paces to the minute A drummer using a metronome may be used to beat the correct time when drill instruction is being carried out. Trainees are to note the time carefully, after which they are to be marched to the time indicated; the drummer is to tap out the correct timing at intervals as a check. l) Turning by numbers (Ginti se mudna): ‘Turning to the Right— ‘One’: Keeping both knees straight, the body erect and the arms steady at their sides, the men turn to the right on the right heel and left toe, raising the left the left heel and right toe in doing so. ‘Two’: The left heel is brought smartly up to the right without stamping the foot on the ground. (Byeain mudega by number Ek) ‘Turning to the Left- by number One’. The men turn as the right but on the left heel and right toe. (By number Do) ‘By number Two’. The right heel is brought smartly up to the left without stamping the foot on the ground. ‘About turn - One’: The men turn fully about to the right to face in the opposite direction as described for turning to the right. ‘Two’. The left heel is brought smartly up to the right without stamping the foot on the ground. m) Mark Time (Kadam Tal): ‘Mark—Time’. The order ‘Mark Time’ is given as the left foot passes the right. The left foot completes its pace, after which the time is continued, without advancing by raising each foot alternately about 150 mm, the knees being raised to the front and arms steady at the sides. At the halt, the word of command is ‘Quick Mark- Time’. For – WARD (Aage Badh): The order ‘Forward’ is given as the left foot is coming to the ground. A check pace with the right foot is completed and men move off again with the left foot at the previous pace and time. n) The Halt (Tham): Squad - Halt’. The command ‘Halt’ is given as the left foot is being raised, and the ‘Halt’ is completed in two mark- time paces. To execute the halt take one more step after the command HALT then bring the heels together at the position of attention. o) Words of command on the march (Chalte Hue Aadesh): The following tables show when to give words of command to men on the move: ‘Right - Turn’ the Cautionary Order is given as the right foot passes the left. ‘Squad - Halt’ the Order is given the next time the right foot passes the left. ‘About – Turn’ the Cautionary Order is given as the left foot passes the right. ‘Left - Turn’ the Order is given bet time the left foot passes the right. ‘Mark - Time’ (kadam Tal) 13 AFS – DRILL MANUAL ‘For - ward’ The Cautionary Order is given as the left foot is coming to the ground. The Order is given the next time the left foot is coming to the ground. Note: the interval between the Cautionary Order and the Order given above is based on quick time. The instructor should bear words of command, so that the order is received by the squad on the correct foot. p) Marching in squad (Squad me chalna): Before a squad is ordered to march, the directing flank must be indicated by the caution, ‘by the Right (or Left)’. Each man preserves his position in the general alignment by an occasional glance towards the directing flank. The directing flank when in line will normally be the original right flank. ‘Quick--- March’. The squad step off together with a full pace of 750 mm, with the left foot, in quick time. The arms, which should be as straight as their natural bend will allow, should swing naturally from the shoulders, hands reaching as high as the waist line at front and rear. The hands should be kept closed but not clenched; thumbs always to the front pressing downwards with the thumb will tend to keep the elbows form bending. q) Quick March (Tez Chal): ‘Quick--- March’ (Tez Chal): The squad step off together with a full pace of 750 mm, with the left foot, in quick time. The arms, which should be as straight as their natural bend will allow, should swing naturally from the shoulders, hands reaching as high as the waist line at front and rear. The hands should be kept closed but not clenched, thumbs always to the front pressing downwards with the thumb will tend to keep the elbows form bending. r) The Halt (on the move) (THUM KAR Ke): ‘Squad---Halt’. The command ‘Halt’ is given as the right foot passes the left. The left foot completes its pace, and the right foot is brought smartly in line with it without stamping. s) ‘Right (or Left) ---Turn’ (Dahine / Bayeen Mur): Each man turns on the left (or right) foot without checking the pace. ‘About---- Turn’. Each man turns about on his own ground in three paces. The fourth pace will be a full pace of 750 mm to march away in the new direction. Note:- When turning on the march, the arms will be kept to the sides at the point of the turn. The proper execution of turning on the march depends entirely n the way in which the word of command is given, e.g. in turning to the right the caution ‘Right’ is given as the right foot passes the left, and the executive order’ Turn’ when the right foot passes the left the next time. The next pace(left foot ) will be in the original direction for the purpose of checking the forward movement of the body. The body is now turned and a full pace taken with the right foot in the new direction. 14 AFS – DRILL MANUAL In ‘Turning About’, the cautionary and executive orders are given on two successive beats as the left foot passes the right. The next pace will be a full pace t the old front with the right foot, the turn being made during the next three paces, the fourth pace being a full pace with the right foot in the new direction. Whilst the turn is being made the man will remain on the same ground, the knees being raised in ‘Marking Time’ and the arms kept by the side. In the case of a squad with a single blank file, marching in line, the blank file will make a check pace and two mark time paces on the word ‘ About’ thus gaining his position in the new front rank before the turn is completed. During drill in ‘Open Order’, guides and blank files will not alter their positions unless the ranks are changed. t) Changing direction by wheeling (Ghumate huaye Disha Badalana): (a) In file ‘Right (or Left) ---Wheel’.(dahine / bayee ghum) The inner man of the leading file moves round a quarter of the circumference of a circle having a radius of I m, stepping short to enable the two outer men of the file to wheel with him. When the quarter circle is completed the file will lead on in the new direction. The other files in succession will follow in the footsteps of the leading file. ‘Rear Files--- Cover’ (Picchala File - cover). If the squad is halted or ordered to mark time before the whole squad has wheeled into the new direction, the files which have not yet wheeled will cover off on those which have, moving to their places by the shortest route. If the order ‘For --- ward’ is given before the wheel is completed, the squad will lead on in the direction in which the leading file is facing. (b) In line A squad in line may change direction by wheeling, when the action of each rank will be as laid down in (a) above. u) Changing steps on the March (chalate huain kadam badal): ‘Change – Step’ (kadam badal) The advancing foot completes its pace, and the ball of the rear foot is brought up to the heel of the advanced one, which takes another step forward, so that the time is not lost, two successive steps being taken with the same foot. The arms are kept to the sides during the three change-step paces. This movement must be executed with precision to avoid the appearance of skipping. Note: The advancing foot is the opposite foot to that one which the executive order is given. 15 AFS – DRILL MANUAL v) Forming Single File from File (Teen line se ek line ban): ‘Advance in Single File, Quick – March’. The front-rank man of the leading file marches off, followed by his two rear-rank men who are followed by the front-rank man of the second file, and so on. Note: If the squad is marching in file, the command will be ‘Form Single File’ when the front-rank man of the leading file will lead on, the remainder marking time to get into their places and then following on as described above. w) Forming File from Single File (Ek line se teen line ban): ‘Form – Threes’. The leading man marks time, the remainder of the squad regain their positions in file, marking time as they reach their places. ‘For - ward’. The squad moves forward in file. i) ii) If is desired to halt on the completion of the movement, the command will be ‘At the Halt, Form – Threes’, when the leading man will halt, the remainder halting as they reach their original places in file. When the squad contains between 6 and 8 men, who were originally fallen in two ranks, the order for forming file from single file will be ‘Form – Twos’. 16 AFS – DRILL MANUAL INSPECTIONS (NIREEKSHANAN) When a unit parading in ranks is to be inspected, the ranks are to be opened for the inspection and closed on the completion. The inspecting officer is to start the inspection form the right flank, moving along the front rank to the left flank, after which the rear of the front rank is to be inspected from left to right flank. The inspection of the centre and rear ranks is to be carried out in the same manner; each individual is to be inspected from head to foot 60th front and rear. This is done by stopping 450 in front of the cadet being examined and looking at the cadets right hand side then moving one pace past and looking back at 450 at the cadet’s left hand side. ITEMS TO BE NOTED DURING INSPECTION OF PERSONNEL 1. 2. 3. 4. 5. 6. 7. 8. 9. 10. 11. Service Dress Cap – Cap is to be clean and is to be worn square on the head with the peak front down to a level just above the middle of the eyes, the cap badge and peak are to be clean. Beret - The Beret is to be clean and is to be worn so that the band is horizontally rood the head and 2.5cm above the eyebrows. Loose cap material is to be drawn down to the right so that the badge is clearly displayed in a position vertically above the left eye. Hair - The hair of the head is to be kept well – cut and trimmed. Beard or whiskers are not to be worn except by personnel with specific permission in writing on medical grounds. If a moustaches worn, the upper lip is to be entirely unshaven and the moustache trimmed neatly for length, exaggerated whiskers are not to be permitted. Shaving – Cadets are to be properly shaved. Cleanliness - The face, ears, neck and hand are to be clean. Buttons - All buttons are to be clean and are to be sewn on securely so that the crown is uppermost and the eagle horizontal. Badges - Rank and other authorized badge are to be worm is accordance with current dress regulations. Clothing - Clothing is to be of correct fitting, of official pattern, in good repair, neatly pressed and correctly worn. Pockets – All pockets are to be worn flat and buttoned where buttons are provided. Glasses – On parade glasses are not to be worn except by those with a medical certificate requiring them to be worn. In no circumstances are such personnel to take part in a full ceremonial parade (i.e. guard of honour, review, etc.) Foot Wear – Boots and shoes are to be clean and in good repair, laces straight across and neatly fastened. Note: - Remember you must not touch the cadets on parade. 17 AFS – DRILL MANUAL SALUTING (SALAMI ) 1. Saluting at the halt (Tham kar ke salami) • Salute To the front /The right arm is raised so the forearm is placed at a 90 degree angle, while pointing at the temple (flat part between forehead and ear). It is generally to a count of “Up, two, three, down!” • Salute To the Right: The right arm is raised so the forearm is placed at a 90 degree angle, while pointing at the temple. It is generally to a count of “Up, two, three, four, five, down!” 2. Saluting on the march (Chalte hue me salami) The following saluting on the march commands are ordered with a preparatory command of ‘Saluting on the march’ for example, ‘Saluting on the march, to the front Salute’ and always called on the left foot. • Salute To the front or Salute: The parade is halted and the right arm is raised so the forearm is placed at a 90 degree angle, while pointing the temple. This is lowered and then repeated again, followed by an about turn and a resume in marching (off the left foot). • Salute To the Right: The right arm is raised so the forearm is placed at a 90 degree angle, while pointing at the temple. It is generally to a count of “Up, two, three, four, five, down, swing!” This is done while looking to the right, except the right marker, who must stay looking to the front, to keep the squad staying straight. a) Saluting with the hand The right hand is raised smartly, but naturally to the front of the headgear, the palm of the hand being to the left but inclined slightly inwards, so that the eyes on glancing up can seen the inside of the palm, the thumb and fingers being close together, elbow in the line with the shoulder, hand and forearm in line, fingers touching the rim of the cap or helmet or front of headgear over the right eye. The salute should be completed by smartly dropping the right hand t the side. b) Saluting otherwise than with the hand When not wearing a cap or helmet or when carrying anything which prevents saluting with the right hand, the member will if standing still, stand to attention and face the officer as he passes. If walking, turn the head smartly towards the officer on passing. When passing an officer, the salute should be commenced just before meeting and continued until past. 18 AFS – DRILL MANUAL 1. Officers of Station Officer or Fire Control Officer Rank and above should receive this salute. 2. Members of the Service when on duty ( unless driving a vehicle) should salute in the following circumstances:When reporting to or addressing an officer of higher rank who is entitled to a salute. On being addressed or spoken to by an officer of higher rank who is entitled to a salute. On meeting for the first time in the day the officer in charge of the station, provided he is an officer entitled to a salute. i) ii) iii) 3. When a squad is passing an officer who is entitled to a salute only the member in charge of the squad will salute, at the same time giving the order ‘Eyes right’ or Eyes left’ to the squad. 4. When officers of different rank are walking together and are saluted, only the senior officer present will acknowledge the salute. 5. All members of the Fire Service should salute during the playing of the National Anthem, unless they are on parade, when the party should be called to attention and the officer in charge of the parade should salute. They should also salute on other occasions where it is generally customary for a salute to be given in a disciplined service. They are not required to salute officers of other services. 6. Officers should, on all occasions, return a salute smartly. 19 AFS – DRILL MANUAL FORMING SQUAD (SQUAD BANANA) FORMING SQUAD WHILE MARCHING IN FLANK (DAHINE / BAYEN DISHA ME CHALTE SAMAYA SQUAD BANANA) Forming Squad is a movement where by a squad, moving to the flank in three’s changes their direction of line, but does not change its direction of March. The movement is normally taught from the halt to the halt, by first dealing with the leading section of threes individually and the remaining sections in turn, once proficient the whole squad will move together. “AT THE HALT, ON THE LEFT, LEFT SQUAD FORM” (THAM KAR KE BAYEN SQUAD BANEGA – SQUAD BAN). The whole squad except the left (right) hand member of the leading section of threes (the pivot) make a left form (a half turn to the left) (TEJ CHAL) “QUICK……. MARCH” The pivot will march forward three or five paces and halt, at the same time the remainder of the squad march round to their correct places in the line and halt. Note: if the cautionary word of command “At the Halt” is not given, the squad will mark time at the new alignment, from which they will be given the command “Forward” or “squad….. Halt” The movement is the same, but in slow time. The pivot will be the right or left hand member of the leading section of threes dependent on which direction the squad will be formed. Forming squad – at the halt – on the left (right) 1 2 3 -- 4 5 6- 7 8 9- - 10 11 12 10 7 4 1 11 8 5 2 12 9 6 3 20 AFS – DRILL MANUAL CHANGING DIRECTION (Disha Badal) This movement is a means whereby a squad changes its direction of March without altering its formation. Changing direction is always used when there are more than six people in line. The movement is usually taught from the halt to the halt, in individual files in turn, before the whole squad is practiced together. The command for this movement is the only one receded by the cautionary words of command…. “Change Direction Right / left”. Executve Word of command ‘Right form’ Word of command “CHANG DIRECTION, RIGHT- RIGHT FORM” (DAHINE DISHA BADLEGA - DISHA BADAL) The right hand member (1) does a right turn, whilst the remainder of the front rank only, right form (i.e. a half turn to the right). The remainders of the Squad stand fast. “QUICK …….. MARCH” The pivot (1) marches three/ five paces forward and halts. The members in the file behind the pivot follow suit by wheeling and halting with a distance of one pace between each other, facing in the new direction. At the same time the other files wheel round into their new positions and dress off from the right files. Changing Direction – At the Halt on the Right (Or Left) • No.1 (pivot) will turn to the right, Nos. 4, 7, 10 right forms, remainder of Squad stand fast. • No.1 (pivot) marches three/ five paces forward and Halts. No.2, 3 , wheel and Halt in file. The three files wheel round into line. 1 4 7 4 5 6 7 8 9 10 11 12 3 6 9 12 2 5 8 11 1 4 7 10 Direction of March 21 AFS – DRILL MANUAL DETAILS OF CORRECT FOOT ON WHICH TO GIVE EXECUTIVE WORDS OF COMMAND Introductory Cautionary Executive Squad Squad Squad Turning at the halt Saluting to the front at the halt Stand at Open/Close Order Right/Left about EASE SHUN MARCH TURN To the front SALUTE Squad Officer on Parade DISMISS Squad Turning on the March Officer Passing your front Marking time on the March Squad Changing step on the March Saluting to the front Compliments on the March Intro quick time Step short on the March Paces Paces right/left Foot Timing Given One One One, One, Two One Pause, Two Right heel Up, Two, Three, Down Left/Right HALT TURN Right heel Right/Left One, Pause, Two, Pause, Up,-- Two, Three, Down , One, Two Check, turn, Forward To the left/right SALUTE Left foot Mark TIME Left heel Check, Up, Two, Three, down One, two, , Left, Right For Change WARD STEP Left foot Right heel Complete, Forward Left, Check, Left To the front SALUTE Left foot Eyes RIGHT/LEFT/ Left foot FRONT MARCH Left heel SHORT Left heel One, One, two, Pause, Up, Two, Three, Down, One, Two, Three, four, Up, Two, three, Down, Pause, One, Pause, Two, Pause, Away Check, Turn Quick Step Step –forward – backward Close Quick March Step short MARCH One, Two, Three, In MARCH One, Two, Three, 22 AFS – DRILL MANUAL APPLIANCES DRILL (Sadhan Kavayad) GENERAL NOTE:1. The wearing of personal jewellery can be hazardous such items should be removed before taking part in drills. Rings which cannot be removed should be covered with adhesive tape. 2. Necker chiefs, if worn, should not be knotted, they should just be folded around the neck and covered by the tonic collar. 3. Helmets must be worn by all personnel. 4. Fire gear, particularly tools, should be kept in good order and repair. 5. The officer in charge should ensure that any drill which is being carried out is performed in a safe manner, using accepted practices. 6. Each member taking part in a drill is responsible for carrying out his function in such a way that neither his own safety nor that of any other member is put at risk. 7. The officer in charge of the drill should ensure that each man gets understood importance of work/drill. 8. Every man should also fully understand the duties of other member of the crew- good teamwork is essential on the fire ground. The officer- in -charge should therefore use the ‘change- round’ command to ensure that members of the same crew occupy the various drill positions. 9. Men should be encouraged to use their initiative under varying conditions. Including the use of more than one appliance and several it items of equipment in combination. 10. All equipment needed for a drill should be available before starting. 11. Equipments on which the safety of life depends should be tested before carrying out drills involving them. 12. When taking drill, the officer in-charge should stand so that he can see and be seen and can bear and be beard whilst the whole drill is carried out. 13. On completion of any drill. No.1 will report to the officer in charge “Drill Complete”. 23 AFS – DRILL MANUAL Word of Command (Aadesh ke shabd):The following words of command are to be used in drills and who’s applicable, at fires. A dash indicates the pause between the cautionary and the executive posts of command. Command STILL! REST! As-You-Were Carry – On Change - round Crew –number Dis -mount Fall – in Fall- out Get –to – work Heel – in Heel –out House Knock –off Make - up Mount Pawls Pitch Slip Water – on Action or meaning Only to be used in an emergency (i.e. to present on accident) and then with maximum fire, the crew remain perfectly still exactly where they are. It may be given by any member of the crew as well as officers. To be used, it necessary, by the instructor when carrying out a drill to point out a mistake; the crew remain still. Cancel an order previously given; man resumes their previous positions. Given after ‘Rest’ or still the crew carry on with what they were doing As many members of the crew as necessary dismount and moving one place in an anti clock wise direction, take up their new riding positions. No. 1 of the first crew call ‘one’ No.1 of the second crew calls ‘two’ and so on until all crews are numbered The crew dismount from the appliance and return to ‘fall in’ position. The named crew turns smartly to the right, pause, and moving at the double, full in three paces to the rear of, and facing, the appliance and stand to attention. The crew turns to the right, pause, break away and fall in on the left of the squad in single rank and stand at case. The crews carry out the drill as detailed. To move the heel of a ladder in to the building To move the heel of a ladder away from a building. To reduce the overall length of ladder To close down the water supply at the pump delivery and or the hydrant. The crews make up and re-stow all gear. The crew mounts the appliance. The riding position of each member will depend on the design and other factors, but No. 2 will always be the driver and No. 1 will whenever possible, sit in the seat on his near side. To indicate when descending a ladder that the pawls are fitted on the next round below and the feet should be placed towards the centre of the round. To erect a ladder against a building, i.e. pith to the third flout. To remove a ladder from the appliance. To turn on the hydrant, open a delivery valve on the pump, etc, according to the drill being performed. 24 AFS – DRILL MANUAL SIGNALS (SANKET) It is a common practice in fire services to make use of visual, line or audible (whistle) signals to convey messages or directions to members of the fire services while at work when extinguishing fires or while at fire drills. VISUAL SIGNALS (Drishtigochar Sanket) Order Water on or Get to Work Knock off Increase pressure Arm Signal The arm is raised sideways over the head to its fullest extent and lowered smartly to the side. This signal should never be given until a branch is manned and the branch man is ready and prepared. The right arm is extended horizontally swung across the chest and back again. As for’ water on’ but repeated several times. Pump operators should increase pressure by 1 bar, unless otherwise Instructed. (raising right arm twice) Decrease pressure Water Off… Make of all gear All men report to the officer Acknowledgement of signals Cancel Repeat Signal On arm is extended horizontally from the shoulder and the other arm is raised vertically. The pressure should be reduced by 1 bar, unless otherwise instructed. Right arm extended to the right, swung across to left and back again. Both arms are extended out wards and dropped to the sides. The right arm is swung round the head and then the hand is placed flat on the head. All visuals signals should be acknowledged by repeating the signal. Both arms raised over head crossed and swung side – ways above the head. LINE SIGNALS (Dori Sanket): There may be occasions when a fireman has to be lowered down a shaft a well or over a cliff in order to affect a rescue or for other reasons. In the absence of other means communication i.e. breathing apparatus communication equipment, the fireman should be lowered on the one line and have a second line attached to him for signaling purposes. The Following Signals Should Be Used Signal on line 1 Pull 2 Pulls 2 Pulls – Pause-2 Pulls 3 Pulls Repeated sharp pulls Given by wearer I am all right Pay out more line Stop lowering Haul in slack live or Haul up Danger – help me out Given by attendant Are you all right I am paying out more line I am ceasing lowering I am hauling in slack line or I am hauling up Danger – I am hauling up as quickly as possible 25 AFS – DRILL MANUAL WHISTLE SIGNALS (Sity se Sanket): Signal Once short whistle Two short whistles Three short whistles Four short whistles Order Start first line of hose Start second line of hose Start third line of hose Start fourth line of hose One long whistle Two long whistles Three long whistles Four long whistles Shut off first line of hose Shut off second line of hose Shut off third line of hose Shut off fourth line of hose Continuous long blast Continuous irregular blast knock off & Make – up Danger Preliminary details to drill (Kavayad ki prathmiki): There are certain preliminaries which are common to all drills – they are covered at the start of this section. They apply to any modern appliance according to the number of men in the crew (and the particular drill). For each of these drill crews should be formed and numbered in the following way. Formation of crew (Toli Banana): ‘Formation of crews’ - Man fall in single rank and number from the right in twos/ threes/ fours or fives (depending on the particular drill),Each group of three, four or fire is crew. (Toli Sankhya) ‘Crews Number’ Number 1of the first crew calls ‘one’ Number 1of the second crew call ‘two’ and so on until all crews are numbered. A specific crew can now be ordered to ‘fall in taking up the positions as specified for each drill. In the descriptions of each drill it is assumed that. i. The crews have been formed and numbered. ii. The crews will ‘fall in’ at the double and iii. After falling in they will take up their dressing from number 1. 26 AFS – DRILL MANUAL HOSE DRILL Purpose Hose standard practices are designed to provide system of work, which will enable crews to acquire the skills, knowledge and attitude to move onto those standard practices which require the safe, effective co-ordination of more complex pump work. Hose drill practices are fundamental learning activities which should be conducted at a pace and practiced at a frequency, to suit the level of performance of individual or the crew as they endeavor to acquire or maintain competence. After a high degree of skill is achieved, refresher drills must be carried out to retain it. Notes on hose drill a. When rolled hose is being carried before it is run out, the male coupling should be allowed to hang down about 300 mm from the front of the roll b. Before running out the first length of rolled hose, the male coupling should be connected either to a pump delivery or to a standpipe or should be secured by a member of the crew putting his foot or it. If this is not possible, a short length sufficient to present dragging, before moving forward. c. To run out rolled hose, the lugs of the female coupling (which are at the centre of the roll) are taken one in each hand, the hose is held chest high and is allowed to revolve around the lugs and pay out on the right hand side of the body. d. A man who has already run out as length of hose should keep hold of the female coupling with his right and- be should then take hold of the male coupling of the next length in his left hand and make the connection. Safety Features A) The instructor should ensure that the crew understands the influence of pressure and of nozzle diameter on the reaction of the branch. B) As far as possible, the last 3m of the hose to a branch should be kept in a straight line. When working on an upper floor or flat roof/sufficient hose should be handed up to enable 1 or 2 m to be placed on the floor or on the roof. This will help to stop the weight on the charged line affecting the branch man. C) D) Hold a charged branch get out of control the order ‘knock off’ should be given immediately. Control of a charged branch can only be achieved by crawling along the line of hose towards to branch, slowly limiting the movements until control can be regained. 27 AFS – DRILL MANUAL E) If a branch becomes out of control from a ladder, an immediate warning should be given to personnel working in close proximity. F) In all drills where a line of hose is to be taken upwards, the hose coupling at the heel of the ladder or base of the building should be left un coupled until the branch man gives the order ‘water on’. This mean that, for example, the branch line cannot be charged before the branch man is in a secure position. Preliminary Drill Detail On ordered to “SINGLE LINE, FALL- IN” (EK LINE MAIN KAD WAR) the crew will form a single line standing at attention facing the officer. The crew is numbered from their right, and on the order “CREW – NUMBER” (GINATI KAR), the right hand marker (firefighter) will respond ‘ONE’ (EK), with the others following in reply with their numbers. The formation of crew depends on availability of hose. Command: - - - Crew attention, for hose drill three paces behind the hoses, crew fall-in. (CREW SAVDHAN, HOSE DRILL KE LIYE; HOSE SE TEEN KADAM PICHE, LINE BAN). Lifting &lowering of hose by number (HOSE UTHANA AUR RAKHANA, GINATI SE SOORU KAR ) Lifting Lowering by no. 1-Left leg one step forward 1- Vice versa left leg forward by no. 2- Stumping on hose with right 2- Hold hose with left hand hand by keeping left hand under the hose By no. 3- By making a turn, keep hose on 3- Leave hose on ground Shoulder. By no. 4- Stand up and left arms come 4- Stand up down Lay out the hose, crew get to work ( HOSE BICHHAO, CREW KARYA SOORU KAR) Make up hose by quile roll/ shoulder flap/ figure of eight/ donut roll (QUILE ROLL/SHOULDER FLAP/ FIGURE OF EIGHT/ DONUT ROLL, HOSE KO SAMETO ) Note:You may lift up hose directly (without making turn), if the male coupling facing you. - Lifting of hose by kneeling down can be used by a person having problem in his west - Pick –up the hose by no.1 (action: crew will hold hand on hose; right hand on top of hose near male coupling and left hand at bottom as well as left leg adjacent to hose), by no.2 (action: hose will be lifted and turned to place on shoulder), by no. 3 (action: back to the position with hose on shoulder as well as left hand and leg will be back to attention position & right hand will firm to the hose) 28 AFS – DRILL MANUAL - Lowering hose by no.1; 2; 3 (action: all action will be reversed as in pick up position) In this hose drill different command to be delivered for action have to do like laying hose, hose connection, under running and rolling of hose. Making up hose: hose male coupling lift one end high, from a loop by thrusting the rear position forward of the apex and walk the loop to the other end while holding it high. Stretch the hose straight and flat. Then roll the hose on the female coupling by rotating the coupling along the hose. Branchmanship The greater weight of water in the hose, there is a greater mass of water being discharged through a branch which means bigger jet reaction, and because of the bend in the hose behind the branch man, a tendency for the branch to thrust upwards. This is particularly pronounced when water first comes on. The branch man must place his hand on top of the branch to counteract this, with hose between his body and arm. Also, with feet spaced apart making a line in the direction of the flow. Other firefighter (No. 2) should support the hose to reduce the angle to the ground and also be well braced to prop branch man. Branch Holding Method of branch holding are as follows:1. 2. 3. 4. Standard Kneel down or crouching Sitting laying All position can be change simultaneously. Whenever possible there should be two men on the branch before the full flow is allowed to develop. The man standing on the left should allow the hose to come up under his right arm. His right hand should be under the coupling. His left hand should be on the top of the branch. The man on the right should place his right hand on the top of the branch and his left hand under the hose. 29 AFS – DRILL MANUAL Changing branch man a) to relieve the man on the left- (i) The relieving branch man will approach from left side. He should place his left hand on that of the original branch man, who will then draw his hand away. The relieving man should them turn to face the fire and place his right hand in position under the coupling the original man should them step to the rear clear of the branch (ii) b) To relieve the man on the right- (i) The relieving branch man approaches from the right placing his right hand on top of the original man’s hand, which then draw his hand away. The relieving man then turns to face the fire and should place his left hand under the hose and the original man will sep to the rear (ii) Disconnecting a delivery hose The crew should always face the pump or hydrant; take the hose between his knees near the male coupling thus facing the female coupling of the hose to be disconnected. Then the lugs of the female coupling should be pulled apart by hands, which will automatically disconnect the male end he is holding between his knees. Making up A hydrant must always be turned off slowly to prevent water hammer. When breaking couplings the source of supply should be faced with the male coupling held between the knees. This prevents it dropping to the ground and being damaged. Prior to under running, hose should be laid out flat, straight and free from knits which would trap water on level ground hose should be under run from the male end. Of the sloping ground it should be under run from the higher coupling. Hose should not walk along to get rid of water as this can cause severe damage to the fibers. After under running the hose should be rolled up starting with the female coupling the first turns little loosely to avoid hose cut on the edge of metal and after that few turn being made tightly. Then by pushing with both hands together and on top of the roll, the length should be completed, keeping the coil even and flat, when the male coupling is reached, the hose should be rolled over it so that the coupling comes out on the top coil of hose must not be dumped and jumped on to get the coil even, when making up bust length of hose/unserviceable hose the overhand knot should be removed and the hose rolled male coupling. 30 AFS – DRILL MANUAL Rolling up a delivery hose This should always be done from female end except for a burst or defective length of hose. The crew member should stand facing the female end. Right leg should be advanced, knees bent so as to stoop low. The left hand should be placed on the left lug, right hand on the hose just where the shank ends. Then first turn of the roll is given so that the female end now faces away from the crew member. Then he should move forward rolling on. The position of the roll should be in front of the crew member, equi–distant from both legs, and as the rolling is done, sufficient pressure is exerted by hands to make it reasonably tight. Special Purpose Rolls and Folds: Hose should be compactly rolled or folded in such a way that it can be placed in service quickly. Certain methods of rolling and folding hose are well suited for this use. Hose carried in these rolls and folds is also useful for extending lines or replacing burst lengths of hose. Often a carrying pack is employed which also contains wrenches, adapters to non- fire service threads on standpipes and other tools. 1. Coil Roll 2. Donut Roll - - To form a donut roll lay the hose out flat. Grasp pull the male coupling back so the hose is doubled back on itself, with the male coupling about 3 to 4 feet (approx. a meter) from, the female. Stand at the folded end and face the folded end with one foot on each side of the hose. Leave enough space in the fold to place one hand through the roll for carrying. Roll the doubled hose, keeping the top and bottom portions aliened with your feet as you back up. If a second man is available to help in forming the donut roll, he can keep the hose aliened and take up slack in the top portion by pulling on the hose behind the male coupling. The first man would then face the coupling end to make roll. 3. Flacking 4. Solder flap 5. Shoulder loop 6. Figure of eight 7. Double Donut Roll The double donut roll can be made up with two lengths of hose, and can also be used for a single length where carrying space makes a smaller but wider roll desirable. To roll a double donut with two lengths of hose, couple them together and lay the lengths flat, next to each other. Fold the loop that results at the coupled couplings back onto the hose. Leaving enough room for the hand hold, roll the hose toward the uncoupled couplings. 31 AFS – DRILL MANUAL HYDRANT DRILL General In the fire service, hydrant drill is a highly disciplined procedure because of the requirement for speed. All drills are based on a crew of four firefighters. An officer directs the crew, since adopting this drill, the fire service to be reduced crew numbers and modified their drills accordingly. Command - On ordered to “FALL IN”, the crew will form a single line standing at attention facing the officer. The crew is numbered from their right, and on the order “CREW – NUMBER”, the right hand marker (firefighter) will respond ‘ONE’, with the others following in reply with their numbers - Taking water from hydrant using one delivery, one length of hose/two lengths of hose with ordinary branch, crew gets to work - After detailing the drill, the officer will order the crew to “GET to WORK” upon which the crew will carry out the prescribed order. - Calls for “WATER ON” and “WATER OFF” are given by branchman, no.1 who should also specify the pressure required. No. 2 assist no.1; orders given by no.1 are relayed to hydrant operator / pump operator by no.2. - On completion of the given task, firefighters should fall in position by the appliance to await further orders. Normally, these will be no’s. 3 and 4. They will provide additional hose, replace burst hose, and provide any additional equipment. - If a second delivery is required, this will be run out by no.4, assisted if practical by no.3. No.4 will be the second branchman. Adding one length of hose - - No.1 sends no. 4 to obtain a length of hose. No.4 provides additional length and runs it out to the required position. When in position, orders no.3 “WATER OFF”, nominating the delivery. No.3 relays this to pump operator. When the water is turned off No. 1 disconnects branch, moves to new position. Reconnects. No. 3 connects added length. When all is ready No. 1 orders “WATER ON” to no.3 No. 3 relays the order to the hydrant operator/ pump operator. 32 AFS – DRILL MANUAL Removing of one length - No.1 sends back No. 4 to No.2 with the message knock off. Immediately the message is given No 4 double back to the branch (as soon as the flow ceases) No. 1 disconnect the branch. No. 3 doubles back to the first coupling behind the branch, breaks the joint and assist No. 1 to recouple the branch at its new position. On the advice of No.1; No. 4 ordered to No. 2 for “water on” No. 4 subsequently makes –up the surplus hose. Replacing a burst hose – - On the order of No. 1, No. 4 takes a length of hose and runs it out alongside the damaged length of hose; he them gives No.2 the order “knock off.” At the same time No. 3 doubles to the burst length (as soon as flow ceases) assist No. 4 to disconnect and inserts the new length. No. 3 doubles to the branch No 4 returns to No. 2 with the message “water on.” And then returns to tie overhand knot on end of damaged length nearest to pump. Dividing a line of hose in to two with dividing breaching (Five men) [Note: It is assumed that hose has been run out as in drill using four men. A fifth man must be added to the crew as two branches are involved and two men are needed for each branch in addition to the man at the hydrant.] - - ‘Get to Work’ No. 5 provides a dividing breaching and No. 4 a length of hose and branch. No.5 doubles to the coupling where the line is to be divided. No. 4 runs out his hose from the position where the breeching is to be inserted connects the branch and takes charge of it No.5 connects the male coupling in to the breeching before placing it on the ground. When all is ready No. 2 knocks off on the order of No. 5 breaks the hose line, inserts the breeching re- connects the hose and 33 AFS – DRILL MANUAL - Orders ‘water on’. He then assists No. 4 at the second branch. Removing a dividing breeching (Fiveman) - On the order ‘Get to Work’ No. 5 doubles to the breeching and orders No. 2 to ‘knock off’. As soon as the flow ceases he disconnects the breeching, reconnects the length which is to continue at work and Orders ‘water on’ No. 4 then disconnects and returns his branch, No. 5 returns his branching. Both numbers make up and return surplus hose. ‘Crew close up’ ‘Knock off and make up’ 34 AFS – DRILL MANUAL PUMP DRILL Purpose The pump drill detailed within this section provides systems of work, which will enable crews to work effectively and safely with fire and rescue service pumps. Fire personnel must be aware of the effects of uncontrolled release of high pressure water and the actions to be taken should such a release occur. Whenever possible there should be two firefighters on the branch before the full flow is allowed to develop. Crews must be aware of the influence of pressure and nozzle diameter on the reaction of the branch. Command Fire crew Attention, crew single line – fall-in. Right dress (elbow dressing), Eyes; front. From the right number, from the right in fire numbers, crew number (12345) By crew’s number, crews proof, For the pump drill number (13542) First crew stand fast, remainder stand at case. First crew, for the pimp drill, three paces behind the pump. Crew fall – in Change round in (fall –in position) Close – up Change round from open source/water tank using one/two hard suction, on/two delivery with ordinary branch, crew, Get to work. Crew make up - To work from open water with a crew of four (one delivery) On the order of ‘Get to work’ - No.2 engages the pump. - With two lengths of suction hose. No. 2 provides two wrenches and removes the blank cap. Nos. 1 & 3 take the first length of suction and connect it to the pump. Nos. 2 & 4 take the second length of suction, with strainer and connect it to the first length and tighten all joints. - No. 3 takes the first length of hose and runs it out from the pump. No. 1 takes second length of hose and branch and runs it out from the first length. No.3 connects the first and second lengths of hose and then joins no. 1 at the branch. No. 1 connects the branch. No.4 takes a line and secures the suction and strainer and assisted by no. 2 places the suction into the water supply. No. 4 then proceeds along the line of hose to the branch straightening out any kinks and ensuring that the hose is clear. - 35 AFS – DRILL MANUAL - - When no. 4 arrives at the branch no. 1 sends no. 4 to no. 2 with the message “WATER ON” starting the number of the delivery, the pump pressure required and the position where the branch is at work. After giving the message to no. 2, No. 4 returns to the branch. Knock off and make – up - No. 1 sends no. 4 to no. 2 with the message “ knock off and make – up No. 2 closes down the delivery. No. 2 disengages the pump No. 4 assists no. 2 to make up the suction side of the pump No. 1 returns the branch and assisted by no. 3 makes up all hose. When all gear is made up, no. 1 reports to the officer in charge. To work from open water with a crew of five (two deliveries) On the order ‘Get to work’; Number vise job No. 2 engages the pump With two lengths of suction - No. 2 provides two wrenches and removes the blank cap or collecting head. Nis. 1 & 3 take the first length of suction and connect it to the pump. Nos. 4 & 5 take the second length of suction, with strainer and connect it to the first length and tighten all joints. No. 2 takes a line and assisted by nos. 4 & 5 secures the suction and strainer and places the suction into the water supply. The delivery hose is laid as; no. 3 takes a length of hose and runs it out from no. 1 delivery. No. 1 takes a branch and a second length of hose and runs it out from the first length (no. 1 delivery), no.3 connects the first and second lengths together and no. 1 connects the branch. No. 5 takes of hose and runs it out from no. 2 delivery. No. 4 takes a branch and second length of hose and runs it out from the first length (no. 2 delivery). No. 5 connects the first and second lengths together and no. 4 connects the branch. 36 AFS – DRILL MANUAL Knock off and Make – up No. 1 sends back no. 3 (and/ or no. 4 sends back no. 5) with the message “knock off and make- up” No.2 shuts down the appropriate deliveries. Make - up No. 2 disengage the pump Nos. 2 & 5 make up the suction side of the pump Nos. 1 & 4 disconnect and return branches. Nos. 1, 3 & 4 make up delivery hose. When all the gear is made up then No. 1 reports to the Officer in charge. Exhibit: II 37 AFS – DRILL MANUAL Use of collecting breaching No.1 ordered no.3 and 5 to use collecting breaching, by informing no.2, No.5 takes collecting breaching and no.3 takes one hose and layout it by making a bite. Then no.5 inserts the layout hose with collecting breaching and ordered no.2 knock off. As ensuring that no. 1 is ready. Rest instruction will be given by the no. 3 Routine check before pump operation 1) Visual inspection 2) Functional Check a) b) c) d) e) f) g) Battery connection Fuel level Tyre Pressure Engine oil Water in radiator Panel light, spot light etc. Any leakage under TFT 38 AFS – DRILL MANUAL CFT DRILL General This drill will provide basic practical training for crews in the use and operation of CFT and associated equipments, time to time inducted in aviation fire service, having a wide variety of procedures and techniques. The practices in vogue are as followsCommand After breaking squad, order- All crew single line, “fall – in” is to be given. Crew makes fall-in in single line, as per their height as per their roll number or as instructed by instructor. On the command Right dress and eyes front, from the right markers all crew will be dressed Next is from the right,- number, from the right,- in four number/ from the right,- in five number. Crew starts numbering serially from the right, to be followed by number from the right in four / in five, 12345, and 12345 and so on. Each four men/five men are forming a crew.Next command is crew’s number, by crew’s number and crew’s proof. On command “CREW’S NUMBER” – No. 1 of the first crew calls out “one”, No.1 of a second crew calls out “two” and so on. Next, for CFT Drill crew,- number, number one of first crew shout “one”, last member shout “two” i.e. 13542,13542 and so on/ 1342,1342 and so on as the case may be. “NO…. CREW THREE PACES BEHIND THE CFT, CREW, FALL IN” – The numbers of the crew called out take one step forward turn smartly to the right and at the double, fall in, in single rank, three paces to the rear of and facing CFT. They pick up their dressings from number one. As soon as they reached their position they shout their number 13542and remain in shun position till next instruction. (On the command change round at fall-in position the action to be taken as number 2 will take one step back and take the position of number 1. All others will shift to cover the blank position of number 2.) “CLOSE – UP” – (ON Rosenbauer CFT) each member will double - up to their concerned position. (as shown in the diagram). Nos. 1 turns half left and double to the left side door and remains stand by there. Number 2, 4,5 and 3 will make half right turn and doubles to the off side door of CFT with No.2 in the front followed by No.4,No.5 in middle and number 3 in rear and remain stand by there. CHANGE ROUND” (ON Rosenbauer CFT, in close up position) - No.2 takes up the place of No. 1, No.1 runs round the rear of the engine/ CFT and takes up the place of No.3. No.3 takes up the place of No.5; number 5 takes the position of number 4 and No. 4 taken up the place of No.2. 39 AFS – DRILL MANUAL 2 4 2 5 5 3 4 3 5 3 4 2 1 1 1 ROSENBAUER CRASH FIRE TENDER “CLOSE – UP” – (ON AGNIVIJAY CFT) Each member will double - up to their concerned position. (as shown in the diagram). Nos. 1 and 3 turn half left and double to the near side with No.1 in front and No. 3 following him. Nos. 2, number 5 and 4 turn half right and doubles to the off side of CFT with No.2 in the front followed by number 5 and No.4. “CHANGE ROUND” (ON AGNIVIJAY CFT, IN CLOSE UP POSITION) – No.2 takes up the place of No. 1, number 1 takes the position of number 3. No. 3 runs round the rear of the engine/ CFT and takes up the place of No.5 number 5 takes the position of number 4. And No. 4 takes up the place of No. 2. NOTE- After every change round; the crew shouts their new number to identify them in their new positions. “MOUNT” – The crew will mount to get inside the CFT and takes seats. No.2 takes the driver seat and No. 1 by his side in the front seat, Nos. 3, 5 and 4 will get inside from the rear compartment. “DISMOUNT” – The crew will dismount from the CFT vehicles and take up their positions as for “Close- up”. “TAKING WATER FROM SERVICE TANK/ HYDRANT, USING MONITOR/ SINGLE/ DOUBLE DELIVERY, ONE / TWO LENGTH OF HOSE / EACH, WITH ORDINARY / DIFFUSER/ FOAM BRANCH, - CREW, GET TO WORK” No. 1 will be always a branch man, take away branch coupled with hose. No. 3 assist No. 1 give signals, layout first hose if two lengths and in use. If more hose is required then hose laied out 3, 1 and 3. No. 2 will operate pump, response signals given by crew member and act accordingly. 40 AFS – DRILL MANUAL No. 4 will operate monitor, after completion of monitor operation wear BA set/ proximity suit and start searching of causality / operate rescue tools as required. Number 5 always assist number 4, give signals and proceed for rescue in pair. “TAKING WATER FROM OPEN SOURCE OF SUPPLY; BY USING TWO HARD SUCTIONS, ONE DELIVERY TWO LENGTH OF HOSE, USING BRANCH, CREW GET TO WORK”. No. 1 will be branch man, pick up and connect first hard suction, inlet side if two hard suctions are in use. No. 3 assists number 1 in picking up and in connecting first hard suction inlet side by standing strainer side.No. 2 will operate pump, assist number 4 in connecting hard suction (If only four crew member is there) otherwise number 4 and 5 will pick up and connect next hard uction hose. (Delivery side procedure as mentioned above) Fall – in position Close – up position Change round Mount position 41 AFS – DRILL MANUAL Crew number wise ROSENBAUER CFT TRUSS LADDER DRILL On reaching safe place of Crash Fire Tender (CFT). On the command of “provide ladder”, No. 1 will shout standby to slip and dismount along with no. 3 and will take position behind the appliance (CFT) in fall – in position ( crew fall in three paces to the rear of and facing the appliance) Number 4 step up on roof through canopy opening of CFT keeps him ready to slip position by releasing fasters of trus ladder and start pushing on command of “slip”. As no. 4 slips the ladder, Nos. 1 & 3 holds the ladder and keeps the heel of the ladder on the ground and order ‘Well’. No. 4 dismounts from CFT and help No. 1. No. 3 will be on board on heel bar of the ladder to give stability. As soon as the ladder trused up No. 3 shout remove CFT and No. 2 remove CFT accordingly. Nos. 1 & 3 will be holding ladder from heel (side by side) and No. 4 from head (in middle) provide and pitch the ladder as desired place. 42 AFS – DRILL MANUAL LADDER DRILL These drills will provide basic practical training for crews in the use and operation of ladders and associated equipment, carrying out a wide Varity of procedures and techniques, and applying them to situations that will enable them when proficient to progress onto more advanced forms of practical training. Objectives:Prior to carrying out ladder drills, crews should be proficient in preliminary details, for each ladder drill objectives have been allocated that identify the specific training benefit relevant that drill. On completions of each ladder drill or period of training fire fighters should be able to carry out all the objectives individually. Notes on extension ladder drills:Safety:The following must be adhered to in order to en sure maximum safety when operating with extension ladders. 1) Helmets must be worn by all personnel. 2) A ladder should, as far as circumstances permit be pitched to the right hand side of a window or other opening with, where possible three rounds above the sill. 3) When a ladder is pitched and extended the pawls must be properly engaged with the rounds in line and the heel correctly footed before any attempt is made to climb or descend. 4) When stepping off a ladder, personnel should ascend to the level of or to the round above the parapet or window sill before stepping off with the outside foot i.e. with the left foot if to the left or with the right foot if to the right. 5) When getting out a window or from a parapet and stepping up on to a ladder pitched to the right, a convenient round should be grasped from the rear underside with the left hand palm uppermost. The right foot should be grasped with the right hand with the left hand has been moved and is grasping a convenient round (from the front). If no time should both hands be off the ladder and a step down should never be made on to a ladder except carrying down rescue operator. 6) As the overlap of extension is reached during the descent the warning ‘step in’ or ‘step out’ should be given according to the type of ladder. 7) On descent when the feet are one round above the pawls the warning ‘pawls’ should be given. 43 AFS – DRILL MANUAL 8) When working on a ladder and it is necessary to use both hands a leg lock should always be taken particularly prior to ‘water on’ being ordered when working with a branch. 9) Nos. 1 and 2 off the head of the ladder by grasping the top round and Nos. 3 and 4 left the heel of the ladder by grasping the jack beam ladders where fitted. 10) Before placing the heel of a extension ladder on the ground prior to the under running ensure that the correct side of the ladder is uppermost and the ladder heel firmly positioned. It is essential that both fire fighters remain in contact until they have completed the under running particularly when handling the heavier 13.5 m ladder. 11) When ladder is pitched into the building the ideal distance of the heel of the ladder from the base of the building is approximately one third of the working height of the ladder. 12) Before an extension ladder is extended it should be stable with the heel of each string or the jack pads steady on the ground. 13) Extension ladders must always be heel in such a manner that fingers will not be trapped by the extending steepens fingers should be kept outside the strings away from mounting guide brackets. When handles on fitted they should be used. 14) When an extension ladder is being extended the line must be pulled in as nearly a vertical position as possible with the hands as close to the ladder as the rounds permit. 15) When an extension ladder is housed the pawls should rest on the bottom or second round as appropriate. Bridging ladder:a) There should be not less than 650 mm of ladder on each side of the gap being bridged. b) Care should be taken to avoid under oscillation when moving across bridged ladders. c) When bridging a 10.5 m ladder the overall length when extended, should not exceed 8m, and the gap to be bridged should not exceed 6m, except in an emergency not more than one fire fighter should be allowed on the bridged position of the ladder. 44 AFS – DRILL MANUAL d) When bridging 13.5 m ladder the maximum bridging distance must not be more than 8M, when the bridging distance is more than 6 m only one fire fighter should be on the ladder no more than two fire fighters maybe on the ladder when the bridging distance is less than 6 m. e) The officer in-charge of bridging drill should consider the use of safety lines personnel must be made aware of the danger of losing balance when crossing a bridged ladder. f) It is common practice to permanently mask the strings of the main ladder to indicate the maximum permissible extension for bridging. To climb a Ladder Hold on to the rung, not the beam, unless you’re carrying something. Stand on the centre of the rungs. Look up, not down. If you must stand still on a ladder, lock yourself in place by passing one leg through the rungs, gripping the rung with knee Setting it Safely To determine how far the base of the ladder should be placed from the wall, divide the working height by four. For added safety, when working from a height such as a rooftop, ensure that at least three rungs extend beyond the working height. do not place ladder like this Soft Ground Hard Ground 45 AFS – DRILL MANUAL EXTENSION LADDER DRILL (Four men) Preliminary Men fall-in single rank and number serially from the right, to be followed by number from the right in fours, each four- men forming a crew “CREW NUMBER” No. 1 of the fire crew calls “one” No.1 of the second crew calls out “two” and so on. “No.... CREW- FALL-IN” The crew called out takes on step forward turns smartly to the right and at the double fall- in the single rank 3 paces to the rear of and fall- in the appliance. They pick up their dressing by the left hand man. “NUMBER”- the men call out their number, standing from the left. “CLOSE UP” Each member of the crew takes up position facing the front of the appliances No 1:&2 turn half left and No.1 doubles along the near- side of the fire appliances and takes his position opposite the near side door of the drivers’ compartment. No.2 takes his position at the ladder on the near side.No.3 and 4 turn half right and No.4 doubles along the off side of the fire appliance and take his position along the off side of the fire appliance and takes his position opposite the off side door of the drivers compartment. No.3 takes his position at the heel of the ladder on the off side. “CHANGE ROUND” No. 1 runs to the rear and takes place of: No.2, NO.2 moves to the place No.3, No. 3 runs along the off side of the fire appliance and takes place of the No.4 and No.4 runs round the front of the fire appliance and takes place of No.1. After the change round; the crew should be re-numbered to identify them in their new positions. “PITCH EXTENSION LADDER TO... FLOR GET TO WORK” No. 1 and No.4 release the front fastening and No.2 and 3 the rear fastening of ladder. No.2 and 3 then grip the heel of the ladder and pull the same to allow it to roll down from the gantry No.1 and 4 double up to the rear and receive the head of the ladder in time as it is about to run off the rear roller bracket. The ladder is then taken clear off the fire appliance by holding three feet from the ends on shoulders, No. 2 and 3 at the heel 46 AFS – DRILL MANUAL moving in the front and Nos. 1 and 4 at the heel moving in the near and carried to the place where it is required to be pitched. “PITCHING” The ladder should be placed on the ground near the wall and right angle to the wall with the heel towards the wall and trusses facing up. No’s 2 and 3 stands near the heel facing away from the wall and No.1 and 4 stands near the head facing the wall.No.2 and 3 hold the heel firmly to the ground by No.2 placing his right food and No.3 placing his left foot on their respective sides of heel. They bend down toward and hold the third round from the heel with their inner hands and holding the strings with their outer hands and help No’s 1 and 4 in raising the ladder. No. 1 and 4 pick up by the strings of the main section of the ladder and left up the their heights and thereafter under run the ladder by supporting the rounds with their inner hands and the strings with their outer hands till the ladder is vertical position and No.2operates the rope to extend the ladder to the required height and No.3 engages the pawls. The ladder is then gently lowered against the wall by all of them and the heel adjusted to give a safe working angle. No.4 takes up position at the heel of the ladder while it is in use. “MAKE UP” Nos. 1 and 4 take their positions in front of the ladder near the heels facing the wall and nos.2 and 3 take their positions at the near of and under the ladder near the heels and all four pull the ladder into a vertical position away from the wall. No.1 and 4 then hold the strings of the ladder and No. 2 operates the rope disengages the pawls and lowers the ladder, No 3 makes sure that the pawls rest on the lowest round of the main section of the ladder when fully lowered by engaging the pawls with his foot. The ladder then brought down from the vertical position by No’s 2 and 3 replacing Nos.1 and 4 at the strings and No. 1 and 4 slowly moving backwards and supporting the strings and rounds with their hands. When flat on the ground the ladder is carried to and shipped on as when; it was unshipped before. No’s 1 and 4 fasten the head and Nos.2 and 3 fasten the heel. All four mount the fire appliance and resume their positions as at start of the drill. No.1 then dismounts and reports to the officer-in-charge. “FALL OUT” The crew will smartly turn to the left, take a regulation pause (approx two seconds) and then break off. The ladder should always be pitched with the trussed side towards the building or wall 47 AFS – DRILL MANUAL EXTENSION LADDER DRILL (Three men) OBJECTIVES Demonstrate with a crew of three the correct method of under running to make up operations; 1) Operate the mechanism used to secure the ladder to the appliance. 2) Slip the ladder from the appliance. 3) Carry and position the ladder. 4) Pitch the ladder. 5) Give the appropriate words of command. 6) Under run the ladder. 7) Brace the ladder. 8) Foot the ladder. 9) Extend the ladder. 10) Pawl the ladder. 11) Make up the ladder 12) Climb and descend the ladder 13) Take a leg –lock on the ladder 14) Step of the ladder. 15) Step onto the ladder 16) Explain the terms ‘Head in’ and Head out’ 17) Stow the ladder on the appliance. On the order ‘GET TO WORK’ NO, 1 gives the order’ stand by to slip’ The crew dismount and no. 1 and 3 releases the fastening, when ready No.1 gives the order ‘slip’ No.3 grips the heel of the ladder and assisted by No, 1 and 2 at the rear of the appliance eases backwards until the head of the ladder is within a distance of about two rounds from the gantry. Nos.1 and 2 lift the ladder clear of the appliance. Nos.1 and 2 at the head and no. 3 at the heel carry the ladder to the required position at right angles to the face of the building with the heel at an appropriate distance from the building. 48 AFS – DRILL MANUAL Making certain that the correct side of the ladder is upper must the heel of the ladder is placed on the ground No.3 places both feet on the bottom round and pulls on a higher round. No. 1 gives the order ‘under-run’ and Nos.1 and 2 raise the ladder to the vertical position by under-running with both arms fully extended and working closely to gather. No.1 gives the order to ‘extend’ No.3 by means of the line extends the ladder to the required height. No. 1 giving the order ‘well’ followed by ‘lower’ and No.3 engages the pawls by pulling on the line. Nos.1 and 2 brace the ladder whist it is being extended the ladder is then carefully placed into the window or against the buildings and the heel adjusted to a safe working angle. The ladder is braced by nos. 1 & 2 and supported by No. 3 is raised to the vertical position. No.1 gives the order “Extend to lower”, No.3 raises the extension slightly to trip the pawls. No. 1 gives the order ‘Well’ followed by ‘Lower’. No. 3 houses the extension and engages the pawls at the bottom round, ensuring they are fully engaged. No. 3 places both feet on the bottom round, grasps a convenient round and leans back. No. 1 gives the order ‘Under-run’. Nos. 1 & 2 lower the head of the ladder by underrunning. The crews then carry the ladder to the rear of the appliance. No. 1 or No.2 secures the ladder and crew checks it for security. When the ladder is re-stowed, no. 1 reports to the Officer in charge. 49 AFS – DRILL MANUAL AMBULANCE DRILL Command Fire crew, single line – fall in , right dress (elbow dressing), eyes front From the right number, from the right in threes number Crew number, by crew’s number, crews proof. First crew three paces behind the ambulance; crew fall- in Attention Number “CLOSE- UP” – each member of the crew double up to the position as shown in diagram, No. 1 turn half left and double to the front side of ambulance. No.2 turn right and double to the driver seat side of ambulance and No.3 remains where he is. Mount – the crew will mount to get inside the ambulance and takes seat. No.2 takes the driver seat, No.1 takes driver side front seat and No. 3 takes rear compartment seat. Dismount – the crew will dismount from the ambulance and take up the position as for “close- up”. “Searching the causality at crash site, loading of casualty in ambulance, sent to the hospital and report back to the station, crews get to work.” – No. 1 run straight to casualty along with first aid box, raise his right hand and shout casualty frequently. No.3 runs towards No. 1 along with stretcher. No.3 keep stretcher on ground as heel of the stretcher near the head of the casualty / side by side of the casualty. No. 2 remains where ambulances parked and assist Nos. 1 and 3 for casualty in ambulance. Crew lift up the casualty: No. 1 lifts up head by his left hand, crunch with his right hand near the waist. No. 2 crunch with his left hand opposite to No.1 and leg with his right hand. Crew close up the stretcher, No.1 head side and No. 2 heel side and load the casualty in ambulance. 50 AFS – DRILL MANUAL CARRYING STRETCHER A stretcher should be carried by at least four people, normally facing the direction of travel, with the casualty feet first. They should carry head first if going uphill or upstairs and when loading into an ambulance or onto bed. Remind rescuers that someone should keep watching the casualty, while they are transporting uneven ground or obstacles. When crossing uneven ground, a stretcher should be carried by four people and kept as level as possible. The rescuer must adjust the height of the stretcher to compensate for dips and rises in the terrain. If the ground is unstable, the stretcher should be passed along a row of 6 – 8 people, rather than have bearers move over the rubble, especially when set down, since the lashing could tighten around the casualty. If going through a doorway, the front bearers should move to the middle of the stretcher and let the front part protrude through the door. One rescuer at a time moves through the doorway, and then re-grasps the stretcher. Avoid crossing a wall or high obstacle, even if it means a longer carry. Where a wall must be crossed, follow these steps: 1. Lift the stretcher so that the front handles are supported by the wall. The people in the rear hold the stretcher level, while the front person crosses the wall. 2. All bearers lift together and move the stretcher forward until the rear handles rest on the wall the people in the rear then cross the wall. 51 AFS – DRILL MANUAL MISCELLANEOUS DRILL A. FIRE SERVICE KNOTS Ropes form an essential part of the fire brigade equipment. There is hardly an operation in firefighting whether it be effecting a rescue getting a length of hose up a building, working on a ladder or marking fast the suction when working from open water which for most times call for the use of rope. The factor of safety employed should be considered together with the purpose for which the rope is used, the conditions of service and the condition of the rope. Standard terms There are a number of standard terms in us for describing parts of knot, etc and the following should be understood by every fire fighter: Bend To fasten a rope to another rope or to an object. Bight The looped or loose part of a rope between the two ends. Hitch A simple fastening of a rope to some object by passing the rope round the object and crossing one part over the other. End the short length of either end of line, which may be formed into an eye or used for making a bend or hitch with which it secure it. Line Cordage cut to a specific length for a particular purpose, eg. Lowering line, rescue line, belt line. The term derived from the use of ropes at sea and is commonly used to distinguish between the manufactures product in bulk. Rope The ultimate product when three or more strands are laid together to form a helix round a central axis. The term ‘rope’ should not be used when the ultimate product has a circumference of less than 4 mm; in this case cord or thread would be used. Running Part The moving part of a rope which is loose and used to hoist or lower. Running End The free end of a rope Seizing The binding together of two or more ropes Strand The product obtained by twisting together two or more yarns. 52 AFS – DRILL MANUAL Thread A slender cord made from two or more yarns or filaments twisted together. Twine A number of yarns twisted or laid to produce a balanced twisted structure of continuous length. Standing Part The part of a rope which is fixed Whipping The binding of the end of a rope with twine to prevent it unlaying Yarn The product of spinning together fibers of rectangular or irregular staple length so that they are bound together by twist to form a continuous length. Standard Knots A knot may be defined as the interlacement of cordage in specific patterns for the purpose of stopping ends, joining ends, forming bights, securing equipment etc. The following is the list of knots, bends and hitches with which every firefighter should be totally familiar. They are the basic knots for normal fire service purposes and will be used in standard fire service technique. To ensure security, every knot should be tied with sufficient length of running end or the running end should be secured with a stopper knot. Knot exihibit Application of knot Overhand Knot Sometimes known as Thumb knot. This knot used as simple stopper and tied at each end of a burst length of hose when laid out. Simple Figure Eight Knot This knot, from the figure eight family, is used mainly as a stop knot to prevent a free end of rope from running through a pulley or a block. Half Hitch Used for securing suction lengths at suction couplings in conjunction with other knots. Also for hoisting up a branch. 53 AFS – DRILL MANUAL Chair Knot The fireman’s chair knot is a rescue knot. There are two loops formed. One which goes under the arms; the other under the legs of person. Care should be taken when tying this knot. Rolling Hitch Used to secure a line to any round object so that the knot will not slip along the object when a sideways pull is applied. Reef-Knot A useful knot for general purposes. Used mainly for tying bandages. Used to join two lines of equal thickness. Clove Hitch A quickly tied hitch which forms the basis of many securing knots. Useful for anchoring a rope to an object. Sheet Bend A sheet bend is used for joining two ropes of different sizes. The double sheet bend is more secure than the single sheet bend and is used when there is a great difference in the size of the rope as shown here. In rescue work, a double sheet bend is used for tying all ropes together, and can be used for joining ropes with chains. Both knots have the advantage that they do not slip when the rope is wet. Bowline A non-slipping knot also known as the single bowline. Should only be used to secure a person where a purpose made harness or rescue strop is not available. The bowline makes a loop that won’t tighten. Round Turn and Two Half Hitches This knot is used for securing a rope to a spar, picket or anchorage. It is particularly useful where guy lines are secured to pickets and an adjusting knot is required. 54 AFS – DRILL MANUAL Timber Hitch This is a quickly made temporary knot used to secure a rope to a spar, plank or pole. When lifting spars, planks or poles this knot should be used in conjunction with a half hitch placed at the upper end of the object being raised. Figure Eight-on-a-Bight This is a widely used knot for tying/ attaching safety lines, persons on the rope, anchor lines, rescue devices and other equipment. Cats paw A hitch knot formed with two eyes for attaching, a line to a hook. The two eyes are brought together and slipped over the object to which the line is to be secured. CARE OF ROPE Ends of all cordage should be stopped with a whipping, splice or knot, in order of preference. Knots used only as temporary expedient. Splice limit the use ropes as in most cases they would prevent reeling through a block. When not in use ropes are kept in a coil or hank. Always coil with the lay ie. Right hand laid rope should be coiled clockwise. Chemical deterioration, particularly in natural fiber rope, may be caused by exposure to acid, alkalis or whether conditions or by submersion in water for any considerable time. Line should be stored as far as possible, in a cool dry place with plenty of ventilation. Rope like hose is more liable to damage when wet, therefore as far as it should be kept dry especially when in use. Mechanical deterioration can be caused either through external abrasion or breakdown of the external fibers as result of dragging along the ground, kinking and load of chaffing on sharp edges. If a line becomes dirty, it should be washed and allowed to dry in the same way as canvas home. 55 AFS – DRILL MANUAL B. RESCUE TECHNIQUE EMERGENCY HANDLING OF CASUALITIES The prime purpose of all rescue work is to get the injured people out of danger and to medical help as quickly as possible. When the number of causalities outnumbers the immediate help available the Aim becomes one of trying to ensure the best use of time to effectively help the most people. This decision – making process is called “triage”. In triage those responding to the incident are called upon to examine all casualties quickly and rank them according to the level of need for both first aid and transportation to medical help. In any rescue or multiple casualty situations, confusion may be evident. It is essential that individual; charged with helping injured people be able to remain calm and act quickly but carefully, always attentive to potential hazards to either themselves or other people in the area. In any situation where you suspect a possible head or spinal injury if the life of the casualty is not under immediate threat, seek the help of specialist. If it is essential to move the casualty and that your life is not danger, maintain normal anatomical alignment (nose, belly button, inside of ankles). If the person is not in this position, get the help of qualified personnel. Try to establish quickly how many casualties are involved in the incident go to the nearest casualty, provided it is safe and check for responsiveness. If the person does not answer you or respond to your attempts to wake him, check to see if he is breathing. You aim is to keep the casualty alive until medical help arrives. Do not waste time dealing with minor injuries until all casualties have been found and stabilized. If the person is not breathing, try to find someone nearby who is able to do artificial respiration until help gets there. If the casualty is bleeding severely, apply a pressure bandage before moving to the next casualty. Remember time is valuable. Give first aid for life threatening conditions quickly and go to the next casualty. ONE- RESCUER METHODS Never move the casualty any further than you have to. Scan the escape routes to determine the best method and route to carry the casualty. If you’re alone and must move the casualty quickly, try one of the following rescue carriers. Human Crutch This method is only for casualties who can help themselves. It is an easy way to move the less seriously injured. 56 AFS – DRILL MANUAL Drag Carry This carry is used to drag a casualty who is either lying on this back or in the sitting position. Ease your hands under the casualty’s shoulders and grasp the clothing each side, supporting the head between your forearms. Drag the casualty backward only as far as necessary for his / her safety. But be careful, make sure not to choke the casualties when pulling on their clothing Blanket Drag Alternate methods to the drag carry, the rescuer an use a blanket to support and pull the casualty. Pick – a – Back Simply lift the casualty from a standing or sitting position onto your back. Don’t try it if the casualty is unconscious , or has arm injuries Removal Downstairs Don’t try this if you suspect head / spinal injuries, or broken limbs. Use a mattress or rug under the person if one is available. Firefighter’s Crawl Use a triangular bandage, a torn shirt, etc. to tie the casualty’s hands together and place them around your neck. This way you can move a person much heavier than yourself. TWO RESCUER METHODS If there are two of you to do the carrying, try one of these emergency methods; 57 AFS – DRILL MANUAL Chair Lift The chair carry can be used for a conscious or unconscious casualty, but not for suspected head/spinal injuries. For protection, secure the casualty’s hand across his or her chest, and if the casualty is unconscious, secure the person to the chair. Two - hand Seat Carry This is another way to carry a conscious casualty who can neither walk nor support the upper body. Make a hook with your fingers by folding them towards your palm and grab onto your partner’s hook. If you don’t have any gloves, use a piece of cloth to protect your hand from other person’s nails. This is yet another good reason to wear gloves. Four – hand Seat Carry This is also a good carry for a conscious casualty who can use hands and arms for support. MULTI – RESCUER METHODS If there are more than two of you to do the job, there are number of different methods that can be used to carry casualties. Three Person Lift and Carry: This is an excellent way of lifting a badly hurt person without complicating most injuries. The casualty can be carried forward, sideway or lowered onto a stretcher. 58 AFS – DRILL MANUAL Blanket Lift Don’t use this if head/ spinal injuries are suspected. 1. Roll the blanket or rug lengthwise for half its width. Position bearers at the head and feet to keep the head, neck and body in line. 2. Kneel at the casualty’s shoulder and position a bearer at the waist to help logroll the casualty onto the uninjured side. Turn the casualty as a unit so that his/ her body is not twisted during the logroll. 3. Roll the casualty back over the blanket roll to lay face up on the blanket. Unroll the blanket and then roll the edges of the blanket to each side of the casualty. Get ready to lift the casualty have bearers grip the rolls at the head and shoulders and at the lips and legs. 4. Keep the blanket tight as the casualty is lifted and placed on the stretcher. 59 AFS – DRILL MANUAL EXTRICATION FROM A SITTING POSITION Sometimes in earthquakes or blasts, casualties are found sitting in their vehicles. When there is an immediate danger and you are alone and must move a seated casualty from vehicle, proceed as follows: 1. Disentangle the person’s feet from the wreckage and bring the feet forward to exit. Ease your forearm under the person’s armpit on the exit side, extending your hand to support the chin. 2. Ease the person’s head gently backward to rest on your shoulder while keeping the neck as rigid as possible. 3. Ease your other forearm under the armpit on the opposite side and hold the wrist of the casualty’s arm which is nearest to exit. 4. Establish a firm footing and swing around with the casualty, keeping as much rigidity in the neck as possible. Drag the casualty from the vehicle to a safe distance, with as little twisting as possible. FIVE STAGES OF RESCUE No hard and fast rules can be laid down for rescue work but, generally speaking , five stages of rescue are followed by trained rescue parties. Stage1 – Reconnaissance and Dealing with surface causalities Examine the site. Deal with surface causalities. Gather all possible information about other occupants of the building. Stage 2 – Location and Removal of Lightly Trapped Casualties Search immediately accessible areas for casualties who can be rescued with minimal effort. Maintain contact with casualties inside who can be seen or heard but who cannot be moved immediately. Note: The use of trained air scenting dogs can greatly increase the likelihood of finding trapped and unconscious casualties. Stage 3 – Exploration of Likely Survival Points Search the ruins and rescue all persons who can be seen or heard. This may include a calling and listening period. Stager 4 – Further Exploration and Selected Debris Removal 60 AFS – DRILL MANUAL Search farther into the ruins where the chances of trapped people remaining alive seem remote. This may include removing debris from the move likely places where casualties may be located. Stage 5 – Systematic Debris Removal Strip selected areas of debris until all supposed casualties are accounted for. This includes removal of the dead and body parts. Identify buildings that have already been searched by using spray paints or signs. This method can also be used to mark buildings that may contain bodies. MISCELLANEOUS DRILL PICKING- UP DRILL (TWO MEN) (To pick up an unconscious person) Preliminary: Men fall-in in single rank and number from the right in twos, each two men forming a section “FALL- IN: two men of a section fall in facing one another three paces apart.. “REMOVE HEAD GEAR” The man (No.2) who is to be picked up removes his cap and places it smartly clears of operations. “ONE” – No.2 (who acts as body” lies down on his back with his head pointing towards no. 1. “TWO” – No.1 steps forward and proceeds to adjust the dress of the body pulling clothing down and arranging arms close to and parallel with the body and after drawing legs out straight crossing the left leg over the right. “THREE” – Kneeling on his right knee at approximately shoulder level on the right side of the body (as it lies on its back) No.1 places his right hand well round the buttocks imprisoning the body’s left wrist. He then places his left hand under the body’s face and turns the body over on to its face. No.1 straightens our arms and legs turning the feet to an angle of 45 degrees. He then proceeds to the head. Note: - if the body is to be turned over on to its face in the reverse direction the body’s right leg will be placed over the left. No.1 kneels on his left knee on the left side of the body and guards the face with his right hand turning the body over with his left hand. “ FOUR” – No.1 moves forward, places his hand s under the armpits and lifts the body to a kneeling position ( being careful not to drag the knees along the ground). At the same time he advances the right foot, bends the knee allows the body to rest against it. He then 61 AFS – DRILL MANUAL stands with hands under the armpits and the left leg straight, a hallow back and head erect. “FIVE” – He brings his left foot up to the right, bend down and interlaces his finger low down behind the back, lifts the body on to its feet, takes the body’s right wrist in his left hand with the back of his hand on top extended in line with the shoulder, steps back with his left foot about one foots pace, slightly bends his right knee and allows the body to rest against him with the right arm around its waist. “SIX” – Slightly pushing the body away he bends down places his right arm between the legs and using the body’s right arm as a lever, pulls the body across his shoulders resumes an upright position, gets the body evenly balanced on his shoulder, and transfers the body’s right wrist to his right hand and picks up his dressing on the other sections doing the drill. TO LOWER AN UNCONSCIOUS PERSON TO THE GROUND “ONE” – No.1 right arm is withdrawn from between the body’s leg and passed round the legs at the same time the body’s right wrist is grasped with the left hand. “TWO” - No.1 drops on to his left knee swings the body’s legs clear of his own across the front of his body and lowers it to sitting position allowing his right hand to slide up the body to support the waist. “THREE” – No.1 places his right arm behind the body’s shoulders removes the body’s right arm from behind his neck and lowers the body gently into a prone position taking care that the head does not strike the ground. He then straightens out arms and legs and himself stands to attention at the body’s head. Note:1. Men should not be allowed to carry on the left shoulder unless special circumstances make this necessary. 2. The weight of the person being carried should be distributed evenly on both shoulders the head being bent forward to allow this. 62 AFS – DRILL MANUAL EMERGENCY EVACUATION DRILL Aim: To ensure, as far as practicable, that no person suffers injury or illness as result of a fire on land or in a building that is owned or occupied by the AAI. Each airport required to have a fully implemented emergency evacuation procedure. Purpose – The purpose of this plan is to enhance the airport level of preparedness of emergencies and disasters by establishing a program of emergency drills and exercise. This is accomplished by ensuring unobstructed exit paths, appropriate emergency lighting, prompt evacuation, allowing immediate access for emergency response personnel and identifying designated personnel to assist in the evacuation. Priorities of evacuation drill:1. 2. 3. 4. Protection of life Prevent spread of hazard Save assets in the affected area Eliminate the hazard Regular practice of emergency drills is essential to that responsibility and promotes calm, competent use of the plan in an emergency. The high turnover of passenger and staff makes frequent practice drills critical. So, the frequency of drill is once in a two years. Procedure and practices, including responsible person:Management is responsible for the development and implementation of emergency procedures at the airports. In emergency evacuation drill logbook every drill shall complete an entry. Any problems or errors occurring during each drill will be noted, addressed and corrected immediately. Fire Evacuation Plans Fire evacuation plans shall include the following: • Emergency egress or escape routes and whether evacuation of the building is to be complete or where approved by selected floors and areas only. • Procedures for employees who must remain to operate critical equipment before evacuating. • Procedures for accounting for employee and occupants after evacuation have been completed. • Identification and assignment of personnel responsible for recue or emergency medical aid. 63 AFS – DRILL MANUAL • The preferred and any alternative means of notifying occupants of a fire or emergency. • The preferred and any alternative means of reporting fires and other emergencies to the fire department and designated emergency response organization • Identification and assignment of personnel who can be contacted for further information or explanation of duties under the plan. • A description of emergency voice/ alarm communication system alert tone and preprogrammed voice message, where provided. Emergency Control Organization for a building:Emergency Control Organization (ECO) makes orderly implementation of the emergency procedures in a building, including the evacuation of the occupants from the building when appropriate. The ECO is a structured organization of people employed within a building who take command on the declaration of an emergency, pending the arrival of the fire brigade or other emergency service. The ECO comprises 1. 2. 3. 4. 5. HOD Fire Dept. ATM Manager Fire Safety Executive First Aid Personnel Other Specialist 1. HOD Fire Dept.:If an emergency is declared the HOD fire shall initiate the emergency procedures which should include the following actions • • • Ensure that appropriate emergency service has been notified Initiate evacuation of the building / workplace Brief emergency service personnel on their arrival and thereafter act on the instruction of the emergency services senior officer. 2. ATM Manager:ATM manager are responsible for individual workplaces or areas of a workplace. ATM manager on becoming aware of the emergency should implement the emergency procedures for their floor, which should include the following actions. • • • • • • Ascertain the extent of the emergency Assist people in immediate danger Raise alarm (break glass alarm, shout Fire, Fire, Fire) Attempt to extinguish fire of safe to do so Implement evaporation of their workplace Perform methodical search of their area to ensure that all persons have been notified of emergency and have or leaking, the workplace to the cluster point. 64 AFS – DRILL MANUAL • • • Assist mobility impaired persons. Prevent persons from entraining the building while the evacuation alarms are sounding by placing a staff member at their exit. Communicate with building in charge/ under / APD. A Deputy ATM Manager should be appointed for each area wonder/ in charge so to assume the warden/ Manager responsibilities when absent and otherwise assist as required. Dy. ATM Manager should be placed/ appointed for Zone of a building, to control the emergency procedures for that area, generally as directed by the ATM Manager / in charge. Deputy ATM Manager must be familiar with:• The operation of the fire alarms system, the emergency warning system and any other equipment used to assist in the operation of emergency procedures of the building. • It is important that an ATM Manager and Deputy ATM Manager be available for each area during periods of normal occupancy. 3. Fire Safety Executive:- Fire Safety Executive are responsible for immediately evacuating their areas as soon as the fire alarm sounds, directing occupants via the nearest safe exits to designated assembly area(s) and reporting status to the Building Evacuation Coordinator. As required, they are re-deployed to access routes to prevent re-entry. 3 First Aid Personnel:On hearing the alarm will make contact with the building ATM Manager and make his way to the building Assembly area with equipment to under first aid as required. 4 Other specialist:Depending on the area (building or otherwise) a specialist may be required in the case of special hazards that may arise in the event of a fire in the area. Security Security is available to assist the Emergency Responders once they are in Airport premises. During the times when there are limited fire personnel, security may play a greater role in building evacuation. Security also has a liaison role with the airport controller regarding evacuation of the building and re-entry. 65 AFS – DRILL MANUAL Evacuation Drills Evacuation drills are a most important part of the staff training associated with emergency evacuation procedures. Drills, complete with local alarms (activated by Central plant Personnel) should be carried out in all buildings at least once a year. It is the building Warden’s responsibility to ensure that at least on evacuation drill is conducted for their area every year. The following points should be noted by the building Warden in planning and implementing an evacuation drill: • If appropriate; coordinate the timing of the drill with Airport Director/ Airport Controller; • Invite Fire Safety & Rescue to attend, sound the alarm and assess the evacuation; • Make a special effort to organize the drill when the Airport Director/ Controller and other senior management are present in the building. The cooperation and active participation of senior management is essential to ensure the wholehearted support of staff. • if desired, prior warning of the drill (approximate date and time) can be sent to all staff to assist their understanding and cooperation; • Ensure that all staff recognize the Alert and Evacuation signals and know the relevant procedures, exit routes, and assembly area; • The building Warden should superintend the drill, record the time required to complete the evacuation, and note any problems and deficiencies; • After each drill a meeting of Wardens, the Fire Safety & Rescue and senior management (if available) should be held to evaluate the success of the drill and to solve any problems that may have arisen. Emergency Evacuation Procedures in the Case of Fire:1. Help people in immediate danger. 2. Warn others by shouting “Fire, Fire, Fire”, raise the alarm if not already sounding and telephone 3. Decide if you can put the fire out. If you are not sure, do not attempt to. 4. Don’t attempt to use a fire extinguisher if you have never been instructed on how to use one. 5. If you can put out the fire then do so, if not proceed to evacuate the building. You hear the fire alarm ringing; you must prepare to evacuate the building: 1. Switch off all computers, printers and electrical appliances. 2. Close all windows and doors. 3. Gather your personal belongings in preparation to immediately evacuate the building. 4. Organise/ help other people in the room. 66 AFS – DRILL MANUAL Evacuate the building and proceed to your Building Assembly Area: 1. Move at a quick walk, do not run. 2. If you have to move through a closed door that you cannot see through: A. B. C. D. Feel the door to see if it is hot; Look for smoke coming under the door; Open the door slowly and look around it to see if there is a fire behind it; If there is no fire on the other side, proceed through and close the door behind you; 3. Move to the Building assemble Areas quick as possible. 4. Report to your Warden that you/ your group is there and if you know of anyone trapped in the building. 5. Remain in the Assembly Area until you are informed that you may leave or move by either the Building Warden or a member of the emergency services. You notice someone on the verge of panic: 1. Give them a task or responsibility 2. The person will still require constant monitoring; 3. Do not hit them; 4. Take hold of one of their hands and guide them out of the building to the Assembly Area; 5. If they will not cooperate or start to grab hold of things. Leave them where they are; 6. Evacuate yourself and inform your Warden, the building Warden, one of the security personnel, or the police or fire and Rescue services immediately. Disability guidelines Prior planning and practicing of emergency evacuation routes are important to ensure a safe evacuation • Mobility Impaired (Wheelchair) Persons using wheelchairs should stay in place or move to an area of refuge with their assistant when they are notified of an emergency situation. If a building evacuation is required, the assistant should then proceed to the evacuation assembly point outside the building and tell emergency personnel the location of the person with the disability. If the person with the disability is alone, the person should dial 101 and tell the emergency operator their location and that they need assistance. Never attempt to use an elevator unless instructed to do so by emergency personnel. 67 AFS – DRILL MANUAL • Mobility Impaired (Non –wheelchair) Persons with mobility impairments, who are able to walk independently, may be able to negotiate stairs in an emergency with minor assistance. If danger is imminent, the individual should wait until the heavy traffic has cleared before attempting the stairs. If there is no immediate danger (detectable smoke, fire or unusual door) the person with the disability may choose to stay in the building, using the other options, until emergency personnel arrive. Never attempt to use an elevator unless instructed to do so by emergency personnel. • Visually Impaired Most buildings are equipped with fire horns/strobes that sound the alarm and /or flash strobe lights. The horn is for sight- impaired persons. Most people with a visual impairment will be familiar with their immediate surroundings and frequently traveled routes. Since the emergency evacuation route is likely different from the commonly traveled route, persons who are visually impaired may need assistance in evacuating. The assistance should offer help to the individual with visual impairment and guide him/her through the evacuation route. Never attempt to use an elevator unless instructed to do so by emergency personnel. Mobility impaired people:If you encounter a person with some form of physical disability that restricts their mobility. You may be required to assist them from the building. If you are unable to areas for mobility impaired persons. They can be left here, where they are shielded from the fire, and retrieved by emergency personnel on arrival. It is important to inform the emergency personnel or Building Warden of their location so that they can be retrieved as soon as possible. Leave the person, s mobility aids behind; they can always be claimed on insurance. If you are trapped in a room:1. 2. 3. 4. Exit through a window if you are on the ground floor; If you are not on the ground floor: Close the door; Go to the window; 5. If there is smoke in the room open the window a little so you can breathe fresh air. If not, do not open the window. This can assist in the spread of fire into your area from lower floors; 6. Attract people’s attention to your plight. This can be achieved by writing on a paper and sticking it to the window or calling out the window. If you open the window remember to close it again as this can be an entry point for fire. Do not open the window up fully; 7. If the room is filling with smoke, stay close to the ground. The air is cooler and oxygen is more plentiful in this region; 8. Wait for the Fire and Rescue Service to rescue you. 68 AFS – DRILL MANUAL Do no procrastinate: Remember 1. Fires spread rapidly; 2. Fires produce thick black smoke that is difficult to see through and causes suffocation; 3. 4. 5. 6. 7. The freshest air will always be near the floor; Move quickly. Do not run; Be decisive; Think for 10 to 30 seconds; Make a decision and follow that decision. Evacuation Procedures Each airport terminal building has a designated building manager who manages space and resources in building. Additionally, safety authorities notify each building manager when evacuation drills are planned. Fire or Evacuation In the event of a fire, an evacuation order, or the activation of the fire alarm signals: 1. Notify other occupants in the immediate vicinity. 2. Leave the building. 3. As you leave, help persons who can safely evacuate with assistance. Persons who cannot be safely assisted out of the building should remain in a safe area such as a stair enclosure. Stair enclosures are safer than other parts of the building and can be accessed by emergency responders who will be searching the building. 4. Close doors behind you as you leave; making sure the room has been evacuated. 5. Do not use the elevators. 6. If the alarm system is not activated, use a pull station to sound the alarm. 7. As you, exits announce the evacuation to other individuals to further ensure that everyone has been notified. 8. Notify occupants of modular facilities or other adjacent spaces affected by the emergency. 9. From a safe location, call 101 / emergency number. Stay on the line and tell the emergency dispatcher known information about the emergency. 10. Proceed to your designated meeting place (assembly point) at least 200 feet away from the building. 11. Count your co-workers and report to the emergency responders any missing person or persons remaining in the building. 12. Do not re-enter the building until emergency responders or officials say it is safe to do so. 69 AFS – DRILL MANUAL Bomb Threat: In the event of a bomb threat evacuation order or the activation of alarm signals: 1. Notify other occupants in the immediate vicinity. 2. Leave the building. 3. As you leave, help persons who can safely evacuate with assistance. Persons who cannot be safely assisted out of the building should remain in a safe area such as a stair enclosure. Stair enclosures are safer than other parts of the building and can be assessed by emergency responders who will be searching the building. 4. Leave office doors open. 5. Do not use the elevators. 6. As you exit, announce the evacuation to other individuals to further ensure that everyone has been notified. 7. Notify occupants of modular facilities or other adjacent spaces affected by the emergency. 8. From a safe location, call 101 or emergency number. Stay on the line and tell the emergency dispatcher known information about the emergency. 9. Proceed to your designated meeting place (assembly point) at least 400 feet away from the building. 10. Count your co-workers and report to the emergency responders any missing person or persons remaining in the building. 11. Do not re-enter the building until emergency responders or officials say it is safe to do so. Chemical Spill or Hazardous Materials Leak: In the event of a chemical spill, evacuation order, or the activation of alarm signals: 1. Notify other occupants in the immediate vicinity. 2. Leave the building. 3. As you leave, help persons who can safely evacuate with assistance. Persons who cannot be safely assisted out of the building should remain in a safe area such as a stair enclosure. Stair enclosures are safer than other parts of the building and can be assessed by emergency responders who will be searching the building. 4. Close doors behind you as you leave, making sure the room has been evacuated. 5. Do not use the elevators. 6. As you exit, announce the evacuation to other individuals to further ensure that everyone has been notified. 7. Notify occupants of modular facilities or other adjacent spaces affected by the emergency. 8. From a safe location, call 101 or emergency number. Stay on the line and tell the emergency dispatcher known information about the emergency. 9. Proceed to your designated meeting place (assembly point) at least 200 feet away from the building. 10. Count your co-workers and report to the emergency responders any missing person or persons remaining in the building. 11. Do not re-enter the building until emergency responders or officials say it is safe to do so. 70 AFS – DRILL MANUAL AIRPORTS AUTHORITY OF INDIA EVACUATION DRILL REPORT Building name: ………………………………………………………………………… Date of Drill……………………………………………………………………………… Time evacuation started :………………….. Did all occupants evacuate the building? [Y] Ended:……. Total Time:…………… [N] If not, explain: ________________________________________________________________________ ________________________________________________________________________ _______________________________________________________________________ Explain any difficulties during drill: ________________________________________________________________________ ________________________________________________________________________ ________________________________________________________________________ ________________________________________________________________________ ________________________________________________________________________ Was everyone able to hear the alarm? (If not give specific location) [Y] [N] ________________________________________________________________________ ________________________________________________________________________ ________________________________________________________________________ General Comments: ________________________________________________________________________ ________________________________________________________________________ ________________________________________________________________________ ________________________________________________________________________ ________________________________________________________________________ ________________________________________________________________________ Drill Rating: Excellent [ ] Good [ ] Poor [ ] Observed / Rated by: ………………………………………………………………………. Building Person in Charge: ……………………………………………………………… 71 AFS – DRILL MANUAL FITNESS TRAINING: YOGA AND MEDITATION Introduction: Meditation is a technique, or practice that usually involves focus on an object, perhaps a candle, a sound or our breath. As you meditate the number of random thoughts occurring diminishes, as does your attachment to these thoughts and your identification with them. Mindfulness is the energy of being aware and awake to the present moment. It is the continuous practice of touching life deeply in every moment of daily life. To be mindful is to be truly alive, present and at one with those around you and with what you are doing. In practicing together of mindfulness becomes more joyful, relaxed and steady. We are bells of mindfulness for each other, supporting and reminding each other along the path of practice. With the support of community/ team, we can practice to cultivate peace and joy within and around us. Breathing: The practice of meditation (Mindful breathing or mindful walking) is used as a means for becoming more mindful. Our breathing is a stable solid ground that we can take refuge in. We feel the flow of air coming in and going out of our nose. Feel the breath as it actually is. It may be long or short, deep or shallow. With our awareness it will naturally become slower and deeper. Conscious breathing is the key to uniting body and mind and bringing the energy of mindfulness into each moment of our life. Noble Silence: A period of deep silence is observed starting from the end of end the evening sitting meditation until after breakfast the next morning. This is very healing. We allow the silence and the calmness to penetrate our flesh and bones. We go back to our dormitories slowly, aware of every step. We breathe deeply and enjoy the stillness and the freshness. Lying on our back, we can practice deep relaxation until sleep comes. Living Together: Togetherness is a practice. At the practice center we have a unique opportunity to live closely with friends from many different places and backgrounds. Together we form one sangha body, connected by the practice of mindfulness. With our collective energy of calming and looking deeply, it is possible for us to support other on the path of transformation. This requires cooperation, skillfulness and acceptance. Sharing our daily life we can encourage each other with our practice and together build diligence and solidity. Sharing a room with others is an opportunity to develop understanding and compassion for our self and for those we can live with. By being mindful of the people we share a room with, we can identify and appreciate their positive qualities, creating an atmosphere of harmony. We know that when the other person is happy, we are also happy. 72 AFS – DRILL MANUAL YOGA Postures Sit/Easy Position - Sukhasana A starting position that helps focus awareness on breathing and the body; helps strengthen lower back and open the groin and hips. Sit cross-legged with hands on knees. Focus on your breath. Keep your spine straight and push the sit bones down into the floor. Allow the knees to gently lower. If the knees rise above your hips, sit on a cushion or block. This will help support your back and hips. Take 5-10 slow, deep breaths. On the next inhale, raise your arms over your head. Exhale and bring your arms down slowly. Repeat 5-7 times. Tadasana Improves posture, balance and self-awareness. A deceptive pose in that it appears so simple that some students may ask "why bother?" But just as there's more to breathing than meets the eye, there is more to standing, too. Stand with feet together, hands at your sides, eyes looking forward. Raise your toes, fan them open, then place them back down on the floor. Feel your heel, outside of your foot, toes and ball of your foot all in contact with the floor. Tilt your pubic bone slightly forward. Raise your chest up and out, but within reason - this isn't the army and you're not standing at attention. Raise your head up and lengthen the neck by lifting the base of your skull toward the ceiling. Stretch the pinky on each hand downward, then balance that movement by stretching your index fingers. Push into the floor with your feet and raise your legs, first the calves and then the thighs. Breathe. Hold the posture, but try not to tense up. Breathe. As you inhale, imagine the breath coming up through the floor, rising through your legs and torso and up into your head. Reverse the process on the exhale and watch your breath as it passes down from your head, through your chest and stomach, legs and feet. Hold for 5 to 10 breaths, relax and repeat. On your next inhale, raise your arms over head (Urdhava Hastasana) and hold for several breaths. Lower your arms on an exhale. As a warm up, try synchronizing the raising and lowering of your arms with your breath - raise, inhale; lower, exhale. Repeat 5 times. 73 AFS – DRILL MANUAL Forward Bend or Uttanasana II Stretches the legs and spine, rests the heart and neck, relaxes mind and body Begin standing straight in Mountain pose or Tadasana. Inhale and raise the arms overhead. Exhale, bend at the hips, bring the arms forward and down until you touch the floor. It's okay to bend your knees, especially if you're feeling stiff. Either grasp your ankles or just leave your hands on the floor and breathe several times. Repeat 3-5 times. On your last bend, hold the position for 5 or 10 breaths. To come out of the pose, curl upward as if pulling yourself up one vertebrae at a time, stacking one on top of another, and leaving the head hanging down until last. Variations 1. Follow the instructions for the basic pose described above, but instead of holding the pose for several breaths, come up on the inhale. Extend your arms forward as your rise until you are standing straight and your arms are overhead. Exhale and bend forward. Repeat the process 5 times. 2. Go into the pose and take 3 deep breaths. Inhale and raise your head, but keep your hands on the floor. Hook each index finger around each big toe, exhale and come down. Hold for several breaths 3. Inhale and raise your head, again keeping your hands on the floor. This time, slide your hands under your feet so that the tips of your toes are touching heel of your hands. Hold for several breaths. 4. After bending forward, fold your arms and hang for as long as is comfortable. A very relaxing pose. 5. To come out of the pose, curl upward as if pulling yourself up one vertebrae at a time, stacking one on top of another, and leaving the head hanging down until last. Trikonasana Stretches the spine, opens the torso, improves balance and concentration. Start with your spread 3-4 feet apart, feet parallel. Turn your left foot 90 degrees to the left and your right foot about 45 degrees inward. Inhale and raise both arms so they're parallel with the floor. Exhale, turn your head to the left and look down your left arm toward your outstretched fingers. Check that your left knee is aligned with your left ankle. Take a deep breath and stretch outward to the left, tilting the left hip down and the right hip up. When you've stretched as far as you can, pivot your arms, letting your left hand reach down and come to rest against the inside of your calf, while your right arms points straight up. Turn and look up at your right hand. Breathe deeply for several breaths. Inhale, and straighten up. Exhale, lower your arms. Put your hands on your hips and pivot on your heels, bringing your feet to face front. Repeat the posture on the other side. Virabhadrasana II Strengthens legs and arms; improves balance and concentration; builds confidence Begin in mountain pose with feet together and hands at side. Step your feet 45 feet apart. Turn your right foot about 45 degrees to the left. Turn your left foot 90 degrees to the left so that it is pointing straight out to the side. Slowly bend the left knee until the thigh is parallel with the floor, but keep the knee either behind or directly over your ankle. Raise your arms over head. Then slowly lower them until your left arm is pointing straight ahead and your right arm is pointing back. Concentrate on a spot in front of you and breathe. Take 4 or 5 deep breaths, lower your arms, bring your legs together. Reverse the position. 74 AFS – DRILL MANUAL Bhujangasana Stretches the spine, strengthens the back and arms, opens the chest and heart. Lie down on your stomach. Keep your legs together, arms at your side, close to your body, with your hands by your chest. Step 1: Inhaling, slowly raise your head and chest as high as it will go. Keep your buttocks muscles tight to protect your lower back. Keep your head up and chest and heart out. Breathe several times and then come down. Repeat as necessary. Step 2: Follow the steps above. When you've gone as high as you can, gently raise yourself on your arms, stretching the spine even more. Only go as far as you are comfortable. Your pelvis should always remain on the floor. Breathe several times and come down. Adho Mukha Svanasana Builds strength, flexibility and awareness; stretches the spine and hamstrings; rests the heart. Start on your hands and knees. Keep your legs about hip width apart and your arms shoulder width apart. Your middle fingers should be parallel, pointing straight ahead. Roll your elbows so that the eye or inner elbow is facing forward. Inhale and curl your toes under, as if getting ready to stand on your toes. Exhale and straighten your legs; push upward with your arms. The goal is to lengthen the spine while keeping your legs straight and your feet flat on the ground. However, in the beginning it's okay to bend the knees a bit and to keep your heels raised. The important thing is to work on lengthening the spine. Don't let your shoulders creep up by your ears -- keep them down. Weight should be evenly distributed between your hands and feet. Hold the position for a few breaths. Come down on and exhale. Repeat several times, synchronizing with your breath: up on the exhale and down on the inhale. Janu Shirshasana Stretches and opens back and hamstrings, improves flexibility Sit on the floor with legs extended in front of you. Bend one leg, bringing the heel of the foot as close to the groin as possible. You may want to place a pillow under the bent knee for comfort. Make sure your sitz bones are firmly grounded on the floor and that your spine is straight. Turn your body slightly so you face out over the extended leg. Inhale and raise your arms over head. Exhale and begin to move forward slowly. Try to keep the back as straight as possible. Instead of bending at the hips, focus on lifting the tailbone and rolling forward on your sitz bones. Inhale and lengthen and straighten the spine. Exhale and roll forward, however slightly. To get a bit more forward movement, engage your quadriceps (thigh muscles) as you move forward. This releases the hamstrings, giving you a bit more flexibility. When you've moved as far forward as you can, lower the arms and grasp your foot, or leg. Hold the position for a moment and breathe. Then on the next exhale gently pull yourself forward. Go slowly and remember to keep the back straight. When done, straighten up and do the other side. 75 AFS – DRILL MANUAL Ardha Sarvangasana Promotes proper thyroid function, strengthens abdomen, stretches upper back, improves blood circulation, induces relaxation You probably remember doing this as a kid. Lie on your back and lift your legs up into air. Place your hands on your lower back for support, resting your elbows and lower arms on the ground. Make sure your weight is on your shoulders and mid to upper back -- not your neck. Breathe deeply and hold for at the posture for at least 5-10 breaths, increasing the hold over time. To come down, slowly lower your legs, keeping them very straight -- a little workout for your abdominal muscles. Sethu Bandhasa Increases flexibility and suppleness; strengthens the lower back and abdominal muscles; opens the chest. Lie on your back with your knees up and hands at your side Your feet should be near your buttocks about six inches apart. To begin, gently raise and lower your tail. Then, slowly, raise the tailbone and continue lifting the spine, trying to move one vertebra at a time until your entire back is arched upward. Push firmly with your feet. Keep your knees straight and close together. Breathe deeply into your chest. Clasp your hands under your back and push against the floor. Take five slow, deep breaths. Come down slowly and repeat. Savasana Relaxes and refreshes the body and mind, relieves stress and anxiety, quiets the mind Possibly the most important posture, the Corpse, also known as the Sponge, is as deceptively simple as Tadasana, the Mountain pose. Usually performed at the end of a session, the goal is conscious relaxation. Many people find the "conscious" part the most difficult because it is very easy to drift off to sleep while doing Savasana. Begin by lying on your back, feet slightly apart, arms at your sides with palms facing up. Close your eyes and take several slow, deep breaths. Allow your body to sink into the ground. Try focusing on a specific part of the body and willing it to relax. For example, start with your feet, imagine the muscles and skin relaxing, letting go and slowly melting into the floor. From your feet, move on to your calves, thighs and so on up to your face and head. Then simply breathe and relax. Stay in the pose for at least 510 minutes. 76 AFS – DRILL MANUAL BASIC MEDITATION There are many forms of meditation, but understand you don’t need to explore beyond the very basic practice to achieve amazing results. In its simplest form, meditation can be described as the act of sitting still, being aware of the present moment, and focusing on your breathing. This is at the core of nearly all meditative practices. Consistent meditation will improve your ability to focus and think clearly, plus allow you to reduce stress and heavy emotions such as anger, guilt and resentment. You will be able to lower your blood pressure, improve heart and lung health and become a much more overall balanced human being through the practice of simple meditative concepts. Preparation before Meditation Before going into your actual meditations it’s good idea to stretch and relax your body. This will help you get the most out of the experience. You don’t need to spend a lot of time getting ready, but detailed example below of what a warm up session might be like. Stand up straight with your feet shoulder width apart and arms hanging relaxed at your side. Feel the tension leave your neck, shoulders and hips as your relax as completely as possible. Take a deep breath and then……. Raise your arms straight above your head as if trying to touch the sky. Feel your shoulders, arms and back stretch upward for a few seconds as you breathe out slowly and evenly. Breathe in slowly and then forgot about your breathing for now as you bend at the waist and try to lay the palms of your hands on the floor in front of your feet. Straighten your body back to the standing position and extend your arms in front of you, parallel to the floor with your palms facing down. Keep your feet flat and your toes pointed forward as you twist your upper body to the left as far as you can. Bring your arms back to the front and then repeat the twisting motion on your right side. Keep your palms down and arms parallel to the floor while twisting. Bring your arms back to the front again and then drop them loosely to your sides. Roll your neck slowly to the left. Then roll slowly back to the right. Now that you are feeling more relaxed and basically “loosened up” you can begin your meditation. 77 AFS – DRILL MANUAL Basic Meditation Exercise Sit down in either a relaxed cross – legged position or on the edge of a firm chair. Straighten your back completely, and place your hands on top of your knees with the palms facing upwards. Relax as completely as possible, feeling the tension fall away from your neck, shoulders, and hips. Feel your body weight sink beneath you for a few seconds and be aware that you are fully centered and rooted into your seated position You will now being your meditative breathing: • • • • • • • • • • • Begin by exhaling slowly and steadily. Allow your lungs to stop on their own when they are close to empty. Once you have finished breathing out, pause, and then breathe in through your nose. Imagine you are pulling the air in from the bottom of your lungs. Breathe deeply and slowly without straining and imagine your lungs filling up from the bottom to the top. When it feels natural to stop pulling the air in, do so. Hold the breath in your lungs without straining for a few seconds until it feels right to begin breathing out. Breathe out, slowly and evenly and allow your lungs to empty out from the top to the bottom. Don’t push all of the air out of your lungs, but stop exhaling when it feels natural to do so. Once you have completed your out breathe pause for a second or perhaps less and begin the cycle again with your inward breath. Focus all your attention on your breath. Continue this slow, steady process of breathing in deeply, holding the breath, then slowly pushing it out. Pause briefly after completing each exhalation and begin again. Find your own natural rhythm. Do not force the breathing at any time, but let it occur as it will with gentle guidance from you. Remain focused completely on your breathing process. Be completely in the present moment and allow your mind to be still. It might take some practice for you to become fully centered and clear in the present moment. The mind will try to wander and return to its “chatter” method of thinking. When you catch yourself thinking about anything other than your breathing, simply acknowledge this and return your attention to your breath. Do not become frustrated by these distractions; just relax and keep breathing. Patience and Discipline Patience and discipline are important value to keep peace and personal power. By practicing the above meditation each day for as little as three minutes you will begin to notice some amazing changes within yourself. Please do not discourage because you are not to solve all your problems and feel fully healthy and energetic after only a few meditation sessions. As with anything else, individual response will vary. You might notice dramatic improvements in your focus and stress levels after a few days; or it could take a few weeks to see the changes you create with regular meditation. 78 AFS – DRILL MANUAL PHYSICAL TRAINING General Firemen are from time to time called upon to undertake extremely arduous tasks, which occasionally demand exertion close to their limits of physical strength and endurance. By the nature of the job these physical demands vary in intensity and frequency to such an extent that in many cases they do not occur often enough to maintain a fireman at the peak of physical fitness. The sudden overstretching of a muscle or limb can, at beast, produce stiffness lasting several days, or, at worst, an injury which may have permanent effect. It is therefore in the personal interest of all operational members of the service to maintain themselves at a reasonable peak of physical fitness. Safety from injury not only depends upon fitness, but on agility, mental alertness, and speed of reaction. The exercises set out below are designed for use on stations. They require no special equipment or dress and are such as can be controlled by a junior officer who has no special training as a Fitness Training Instructor. In view of these officers are advised against exceeding the exercises outlined unless they are trained as Fitness Training Instructors and are conversant with the full effects of the exercise on each individual concerned. These exercises are designed to take into consideration the wide variation in age of members of any typical watch or group and the fact that often only small numbers of men are available at any one time. Frequency is relatively more important than length of time. Consequently, a few minutes fitness training several times each week is very much more beneficial than an hour of such training once a month. Where possible a short period of fitness training should precede the more formalized drill activity, thus ensuring that each member of the drill squad is ‘limbered up’ in preparation for the heavier physical demands. The training outlined is elastic enough to give progressive and interesting work of a purposeful character to men of almost any age and type, the varying conditions and facilities at fire stations will determine the appropriate method to be adopted in each particular circumstance. The value of physical training exercises will depend on the regularity with which they are done and on the spirit in which each man participates. Ideally training should be given at least twice and preferably three times each week. It must be remembered that in the performance of the exercise, a man achieves fitness only by his own effort. The leader cannot do it for him, he can only guide and encourage. Hygiene is also very important, a good rub down should follow a physical training session if shower are not available. 79 AFS – DRILL MANUAL Types of exercise Exercises are generally grouped into three types depending on the overall effect they have on the human body: • • • Flexibility exercises, such as stretching, improve the range of motion of muscles and joints. Aerobic exercises, such as cycling, swimming, walking, rowing, running, hiking or playing tennis, focus on increasing cardiovascular endurance. Anaerobic exercises, such as weight training, functional training or sprinting, increase short-term muscle strength. Categories of physical exercise • • • • Aerobic exercise Anaerobic exercise Strength training Agility training Sometimes the terms 'dynamic' and 'static' are used. 'Dynamic' exercises such as steady running tend to produce a lowering of the diastolic blood pressure during exercise, due to the improved blood flow. Conversely, static exercise (such as weight-lifting) can cause the systolic pressure to rise significantly (during the exercise). Benefits Physical exercise is important for maintaining physical fitness and can contribute positively to maintaining a healthy weight, building and maintaining healthy bone density, muscle strength, and joint mobility, promoting physiological well-being, reducing surgical risks, and strengthening the immune system. Exercise also reduces levels of cortisol, thereby benefiting health. Cortisol is a stress hormone that builds fat in the abdominal region, making weight loss difficult. Cortisol causes many health problems, both physical and mental. Frequent and regular aerobic exercise has been shown to help prevent or treat serious and life-threatening chronic conditions such as high blood pressure, obesity, heart disease, Type 2 diabetes, insomnia, and depression. Endurance exercise before meals lowers blood glucose more than the same exercise after meals. Both aerobic and anaerobic exercise also work to increase the mechanical efficiency of the heart by increasing cardiac volume (aerobic exercise), or myocardial thickness (strength training). Such changes are generally beneficial and healthy if they occur in response to exercise. 80 AFS – DRILL MANUAL Not everyone benefits equally from exercise. There is tremendous variation in individual response to training: where most people will see a moderate increase in endurance from aerobic exercise, some individuals will as much as double their oxygen uptake, while others will never get any benefit at all from the exercise. Similarly, only a minority of people will show significant muscle growth after prolonged weight training, while a larger fraction experience improvements in strength. This genetic variation in improvement from training is one of the key physiological differences between elite athletes and the larger population. Studies have shown that exercising in middle age leads to better physical ability later in life. Effect on the immune system The moderate exercise appears to have a beneficial effect on the human immune system while extreme exercise appears to impair it. Moderate exercise has been associated with a 29% decreased incidence of upper respiratory tract infections (URTI), but studies of marathon runners found that their prolonged high-intensity exercise was associated with an increased risk of an infection, although another study did not find the effect. Immune cell functions are impaired following acute sessions of prolonged, high-intensity exercise, and some studies have found that athletes are at a higher risk for infections. The immune systems of athletes and non athletes are generally similar. Effects on brain function In the long term, exercise is beneficial to the brain by: • • • increasing the blood and oxygen flow to the brain increasing growth factors that help create new nerve cells and promote synaptic plasticity increasing chemicals in the brain that help cognition, such as dopamine, glutamate, norepinephrine, and serotonin Physical activity is thought to have other beneficial effects related to cognition as it increases levels of nerve growth factors, which support the survival and growth of a number of neuronal cells. Effects on depression A number of factors can contribute to depression including low levels of circulating serotonin, low levels of endorphins, being overweight, low self esteem, stress and anxiety. Endorphins act as a natural pain reliever and antidepressant in the body. Exercise alone is a potential prevention method and treatment for some types of depression because it promotes a positive body image, provides a sense of accomplishment, comes at little to no cost, and is free of side effects, given that one does not overexert oneself. Exercise also has a great effect on the quality of sleep that a person will receive at night. When the body is physically exhausted it will slip into Rapid Eye Movement (REM) 81 AFS – DRILL MANUAL sleep easier and for a longer period during rest. A longer period of REM sleep provides lasting energy throughout the day and allows for proper recovery of the muscles used during exercise. It also provides the energy needed to combat stress and anxieties associated with depression. Warm – up Exercises The warm- up period should last 5 – 10 minutes. The whole set should be performed before each exercise session. If the strength and muscular endurance exercises are performed on different days or at different times of the day than the aerobic exercises, the warm – up should be performed before each separate exercise session. Each stretch should be performed in a slow, gentle manner. Move to the point that a stretch, not pain, is felt in the muscle. Hold that position for 10 – 20 seconds. Repeat each exercise 3 to 5 times. Running Running is a great way to improve your fitness and is a sure fire way to strip away excess body fat. Each of us has a different running style that affects our ‘foot strike’, or the way our feet hit the ground, which is called Pronation (Pronation is the movement of the foot during a step of a running motion). To reduce injuries is to run on grass which reduces the shock that your joints are exposed to, by softening the impact when compared to running on the road. Swimming Swimming is one of the best all round conditioning exercises and it widely accepted as an exercise that comes with little risk of injury as there is no impact, such as while running. swimming will exercise almost every muscle in the body, as you propel yourself through the water by kicking with your legs and pushing with your arms and shoulders. You can use swimming as a great substitute if you are carrying an injury from running such as an ankle problem as there is no impact. When you run, your body temperature rises because your muscles are working harder and use more energy by releasing it as heat. Even after you stop exercising, the body will still burn calories at an increased rate as your body slowly cools down. As you are obviously in water while swimming, your body never increases in temperature to a level that it would if you were doing land-based exercises as the water has a cooling effect and your body therefore doesn’t have to work as hard to keep itself cool. Exercise Description The following stretches are effective for improving in each muscle group. Begin your Warm-up periodically by performing light aerobic activity, such as marching or jogging in place and arm circles. 82 AFS – DRILL MANUAL 1. Side-to-Side Look Stretches the neck muscles. Slowly turn head and look to right. Then slowly turn head back to center and look to left. 2. Forward and Down Look Stretches the neck muscles. Slowly look downward. Do not put chin on chest. Repeat on other side. 3. Standing Cat Stretch Stretches the upper and lower back. Stand with feet slightly wider than shoulder-width apart. Keep knees bent. Hinge forward at hips and place hands just above knees. Do not bend at the waist. Begin with back straight and flat, arch back up pulling in with abdominals and curl chin towards chest. Return to flat back position. Do not arch back down past the flat back position. 4. Shoulder Turn Stretches the lower back. Stand with feet slightly wider than shoulder-width apart. Keep knees bent. Hinge forward at hips and place hands just above knees. Do not bend at the waist. With back straight and flat, gently press left shoulder downward and bring right shoulder upward with a smooth twisting motion. Repeat on other side 5. Chest Stretch Stretches chest muscles. Stand next to wall approximately 8 – 12 inches away. Extend arm back placing palm of hand on wall below shoulder level. Thumb faces the ceiling. Slowly rotate body away from wall. 6. Shoulder Stretch Stretches the shoulders and upper back muscles. Stand up straight with feet shoulder-width apart and knees slightly bent. Reach left hand across body to right shoulder. Use right hand to hold arm. Place right hand on back of left arm just above the elbow. Gently press the left arm with the right hand. Do not rotate torso. Repeat on the other side. 7. Arm Circles Stretches the chest and shoulder muscles. Standing with feet shoulder-width apart and knees slightly bent, perform slow, full-arm circles backward 5 to 10 times, then forward the same number of times. The thumbside of the hand should always lead and the arms should brush past the ears and the sides of the trunk. 83 AFS – DRILL MANUAL CALISTHENICS Calisthenics are an alternative method to increase strength. They are exercises that use body weight as the load or resistance. The exercises were selected in order to increase the strength and muscular endurance in the muscle groups that will be utilized in the physical performance test. 1. Push-ups For the chest, shoulder region and back of the upper arms. With hands outside the shoulders, push up while keeping the back straight. Push-ups can be performed with legs straight and your weight resting on toes, or with legs bent and weight resting on your knees. Return until the chest almost touches the floor. Aim at increasing by at least 1 push-up per week. 2. Chin-ups For the shoulder region and arm flexion. With an underhand grasp, pull up until the chin is over the bar. Let down as slowly as possible. Increase by at least 1 per week. 3. Dips For the muscles in the arms, shoulders and chest. Grasp the sides of a chair and let your feet slide forward while supporting your weight on your arms. Lower your body by bending the elbows to about 60 degrees and then push up to the starting position. Keep body close to the chair. Increase by at least 1 per week. 4. Chair Squats For the leg muscles. Stand about 6 inches in front of a chair, facing away from the chair. With feet slightly wider than shoulder-width, move hips back as you squat until the thighs are almost parallel to the ground, without sitting down on the chair. The kneecaps should be aligned towards the second toe and the knees should not travel beyond the mid-foot. Hold for 1-2 seconds. Return to the standing position. Increase the number of squats by at least 1 per week, up to a maximum of 25. As an advanced exercise, the exercise can be done with a weight secured to the back, for example, a backpack. 5. Lunges and Forward Traveling Lunges For the leg muscles. Stand with feet hip-width apart in a stride position and hands on hips. Lower the body directly between the feet by bending the knees to approximately 90-degree angles. Press back up to starting position. Perform the same number of lunges on the other side. Increase the number of lunges by at least 2 per week, up to a maximum of 25. Variation: Step forward with right foot and lower the body weight to a lunge position. Knees bent to approximately 90-degree angles. Push through the hips and thighs in order to bring the left foot forward to meet the right foot. Continue to lunge, walking forward, alternating feet. 84 AFS – DRILL MANUAL 6. Bench Steps For the leg muscles. Step up onto a bench that is 8-12” high, bringing up both feet and then down again, one at a time, for 30 seconds (up-updown- down). Switch the lead foot and repeat for 30 seconds. Increase the time for each lead foot by 10 seconds per week, up to a maximum of 60 seconds of stepping up and down with each lead foot. 7. Standing Side Leg lifts For the hip and outer thigh muscles. Stand with feet shoulder-width apart and hands on hips. Transfer body weight completely to the left leg. Lift a straight right leg directly to the side. Lower right leg just short of resting foot on the floor then lift again. Maintain erect posture. Perform the same number of lifts on the other side. Increase the number of lifts by at least 2 per week, up to a maximum of 25 per side. 8.Curl-ups For the abdominal region. Lie face up on the floor with legs bent and heels approximately 8-12 inches from buttocks. Using abdominal muscles, tilt hips towards ribcage as you raise head and shoulders off of floor pressing lower back towards floor. Eyes stay focused over knees. Hands and arms may be supporting head, crossed over chest, sliding up legs or resting on floor. Increase by least 2 per week. 9. Opposite Arm and Leg Lifts For the muscles of back, buttocks, and the back of the legs. Lie face down on the floor with forehead resting on a towel. Arms are stretched overhead with hands shoulder-width apart. Raise the left arm and the right leg approximately 4-8 inches from the floor. Lower to starting position. Repeat on other side. Increase by at least 1 per week, up to a maximum of 15 raises per side. Cool – Down The cool- down session should be performed for 5 to 10 minutes at the end of each exercise period. The purpose of this phase of the program is to gradually decrease the heart rate, to continue adequate blood circulation, and to decrease the chance that dizziness, nausea or other problems may follow the exercise session. Firefighter Physical Tests Physical tests which aim to assess level of fitness, strength and manual dexterity as well as firefighter level of confidence in simulated exercises. These tests are designed to reflect operational practice and may change from time to time. 85 AFS – DRILL MANUAL There are six tests that make up the Firefighter Physical Tests. These are: 1. 2. 3. 4. Enclosed Space. Ladder Climb. Casualty Evacuation. Equipment Carry. Enclosed Space This is a test of confidence, agility and possible claustrophobia whilst working in an enclosed space. Candidates in full PPE and wearing a Breathing Apparatus facemask will be required to negotiate a measured crawl-way within a set time. Half the route will be with clear vision and the other half with obscured vision. You will be required to perform specific tasks during the test. Full instructions will be given prior to the commencement of the test. Ladder Climb This is a test of confidence whilst working at height. Candidates must demonstrate the correct 'leg lock' at ground level before commencing the test. Wearing full Personal Protective Equipment, including a harness, candidates must ascend a fully extended 13.5 metre ladder to approximately second storey height and demonstrate a 'leg lock'. The candidate will then be required to lean back with arms outstretched and describe a symbol shown on the floor. The candidate will then descend. Casualty Evacuation This is a test of lower and upper body strength. Candidates in full Personal Protective Equipment will be required to drag a 55kg casualty walking backwards around a 30metre course. Equipment Carry This is a test of aerobic fitness, muscular strength and stamina. Candidates will be required to: • • • • Drag a hose reel from an appliance for 25 metres, then jog back 25 metres. Pick up and carry 2-coiled hoses for 100 metres. Carry 1-coiled hose at chest height for 25 metres, and then jog back 75 metres. Pick up and carry a 2.4 metre suction hose and basket strainer for 100 metres, then jog back 100 metres. In each of the above tests you will be required to complete them within a specified time. 86 AFS – DRILL MANUAL EMERGENCY COMMUNICATIONS Communications is the “transmitting and understanding of words” which underlies all fire service operations. And in this transmission, clarity is all important. Experts in information transfer have come up with a general principle: the smaller the selection of possible message, the higher the probability of the receipt of the intended message by given means in a given time or with the same probability of receipt, the fewer the possible messages, the shorter the time to get the message through. Voice Procedure Rhythm Any phrase spoken in ordinary has a natural rhythm which helps to make it understandable This rhythm must be preserved when the phrase is spoken on the radio. The message must be spoken in short complete phrases that make sense and not word by word. Care must be taken to say “er” after a word or insert it between phrases. Speed The user must speak steadily at medium speed. If spoken too quickly speech will be received as an unintelligible jumble of words. If spoken too slowly time will be wasted and the listener may be unable to maintain focus. The speed must be constant. If the message has to be written down the pauses between phrases must be longer. Volume The mouth must be constant distance from the microphone (5 cm). if the head is turned whilst speaking, the volume received will drop and words may be lost. Pitch High pitched voice often transmitted more successfully than those of a lower pitch. Conversation, the voice is allowed to drop in pitch of the last syllable of each word and word in phrase. This should be avoided by keeping a constant pitch. Words Short and easily recognizable words of one or two syllables should be used. Words like to cause confusion should be spelt e.g. weather, whether. When it is necessary to use letters, they should be spoken as set down in the phonetic alphabet. 87 AFS – DRILL MANUAL 1. Call signs The nature of call signs varies with organization. Call signs are frequently used when tracing interference, it is necessary for official scheme call signs to be frequently used, and the general rule is that it is always used in full by main control operators when they sign off by giving the general clearance at the end of each period of transmission. Except in the case of personal sets, the call sign identifies the unit or station – not a particular radio set, nor an individual. Hence, several sets on different channels working in the same station or control room normally carry the same call sign: the call sign of the station or control room. When pack or personal sets are used, the call signs allocated are usually the rank and surname of the individual to whom the set is allocated. When necessary, identification of the incident at which the set is being used should be added so that fire ground messages from two incidents in close proximity can be easily identified. Call sequence: Calling another station Always state the call sign of the other station and then identify yourself, e.g. “Mobile one this is Base over”. Receiving You will be responding to someone calling you (Base) “Base this is Mobile one over” You respond “Mobile one this is Base over” 2. Operating procedures In any radio scheme there must be one station responsible for the general conduct or signaling and this is normally the responsibility of main control operators. No station may transmit a message without first obtaining permission from the control by means of the standard ‘Preliminary Call’. Priority calls from outstations should, preferably be made while the main control is transmitting All mobile and other outstation radio equipment in Fire Service radio schemes operates in the ‘simplex’ mode ( it is not possible to transmit and receive simultaneously as with a telephone conversation); therefore the word ‘Over’ is used to indicate to the receiving station that the caller is about to switch from ‘transmit’ to ‘receive’. 88 AFS – DRILL MANUAL Most main controls of Fire Service radio schemes operate in the ‘duplex’ mode (Operators can hear incoming message while an outgoing transmission is in progress). Whilst this does not affect the need for strict usage of the ‘Over’ procedure, it enables outstation operators to call-in for priority attention while the control is transmitting. The control operator on any radio channel is responsible at all times for maintaining radio discipline and, by being firm, clear and concise, can do a great deal, especially during busy periods, to speed up radio traffic and achieve maximum use of air time. Out-station users must at all times accept the discipline imposed by main control operators and never proceed with transmission of a message without first making a preliminary call to main control for permission to proceed. Main control operators must always conclude each period of transmission by broadcasting what is known as the General Clearance’ which should include the full official call sign of the scheme. The general clearance indicates that previous users have finished for the time being and that the channel is now free for other callers who may be waiting to use it. The operative word in the general clearance is the word ‘Out’ transmitted in place of the word ‘Over’. When a number of portable or personal sets are being used (e.g. on a fire ground personal set channel) it is essential for one of the users to be nominated as the operator in charge of the channel if confusion is to be avoided. The procedure used by this operator to control traffic on the channel should be the same as that used by main scheme control operators. Congestion on radio channels is often aggravated by unnecessary repetition of call signs and procedural phrases as well as by failure to use standard messages and abbreviations. It the simple points of good practice referred to in this section are observed, and the standard message procedure adhered to, general efficiency is greatly improved and radio channel congestion minimized especially during busy periods. 3. Methods of signaling Both’ direct’ and ‘broadcast’ methods of signaling are used in the Fire Service and examples which illustrate the principles of these two signaling methods are given in the following paragraphs. A. Direct method: (For use when two stations are communicating with each other). I. II. Preliminary Call: which should normally precede a conversation with, or transmission of a message to another radio station Response: the station called replies with ‘Go ahead’ (or ‘wait’ as appropriate) followed by its own abbreviated call sign and the word ‘over’ B. Broadcast Method (Usually used by the Control for transmitting the same message to all or a number of outstations). The preliminary calling phrase is transmitted twice, followed by the message 89 AFS – DRILL MANUAL ( at dictation speed if to be written down) and then repeated at normal speed as a check, followed by ‘message ends’, thus: A. Transmission of text of message All messages sent by radio must be as brief as possible, and those to be written down by recipients must be transmitted at slow dictation speed. Where appropriate, the phrasing of messages should conform to the standard message procedures. Unless call signs is themselves are sufficient identification of the addressee and addressor, this must be made clear in the prefix to the message. B. Outstation to outstation calling When it is necessary for outstations to speak to each other direct (e.g. Mobile to mobile), permission to do so must first be obt6ained from the main control. If all radio transmission are kept as short as possible, there should rarely be any need for a priority caller to break into another stations transmission, but when this is necessary it should preferably be done when the main control operator is transmitting. C. Reporting on and off radio watch In order that the availability of stations on the air may be kept up to date by the control, outstation operators should always report ‘on watch’ when they first switch on their sets. Before switching off, operators should report that the station is closing down. This type of very brief message may be included in the preliminary call. D. Repetitions, corrections and checks When transmission is not understood, the recipient should reply with the work ‘repeat’, signifying that the transmission should be repeated in full. When part s only of transmissions are involved, the following phrases should be used: ‘Repeat’/ Correction / Check word after / before… ‘Repeat’/Correction/ Check all after / before…. ‘Repeat’ / Correction/ Check all between.. and… ‘Repeat’/Correction/ Check address to / from… E. Signal strength reports When reporting the quality of signals received, it should not normally be necessary to use phrases other than the following: ‘Loud and clear’ ‘Weak abut Readable’ ‘Unreadable’ When reporting noise or interference, operators should use their own plain language description which, in the case of interference from another radio station, should include 90 AFS – DRILL MANUAL any general information (especially call signs or names) which might assist in tracing its origin. 4. General hints for all radio users a) Remember that transmission on fire brigade radio networks are not secure against unauthorized monitoring by members of the public and others. Therefore messages of a confidential nature should not be transmitted by radio. b)Adhere strictly to authorized radio operating procedure and standard messages and accept without question requests and instructions given by the operator in charge of the channel. c) When drafting messages be brief and adhere to standard message phraseology and content. Decide what is to be said before commencing to transmit – hesitation confuses and wastes time. d) Make sure you know which channel you are supposed to be working on and check that your set is in fact switched to the correct one. Never switch to another channel without first informing the appropriate control. e) Messages should be read clearly and distinctly at such a speed that they may be easily read and if necessary written down. When broadcasting to a number of stations, the second reading may be at a slightly higher speed. f) Whenever you are called, indicate immediately that you have heard, even if you must give the instruction ‘Wait’. If a message addressed to you calls for a reply which may take time to prepare, answer at once, and reply later. g) Speak close to the microphone, keeping the voice at an even level. Do not operate the transmit switch until the microphone is close to the mouth, nor turn your head away whilst transmitting. Do not shout or gabble. Keep your voice pitched normally, emphasis your consonants, and avoid letting your voice drop at the end of sentences or phrases. h) When transmitting messages speak in convenient fairly short phrases with a slight pause between each phrase. i) After using a hand-microphone, replace it carefully in its holder and ensure that the transmit switch is not left depressed in storage. If a mobile transmitter is left permanently ‘On’ confusion is caused firstly because that mobile cannot receive calls and secondly it may either block or cause serious interference on the radio channel. j) Always observe the ‘Engaged’ signal (pip tones) unless your message is urgent, in which case use the ‘Priority’ Procedure. k) If you suspect for any reason that your equipment is not working correctly, report the facts to control as soon as possible. 91 AFS – DRILL MANUAL l) The loss of any item of fire brigade radio equipment should be reported to the Police without delay, quoting serial numbers wherever possible. Aids towards clearness of speech on telephone and radio a) When sending names or words: The vowel sounds should be given their ordinary value and the sound of consonants emphasized. The phonetic equivalents given below should be used by Fire Service Personnel when passing messages by telephone and radio whenever it is necessary to emphasize the identity of letters and numerals. When using the phonetic alphabet, particular attention should be given to the phonetic pronunciations, emphasis being laid upon the syllables which are underlined. Letter Word Spoken as A B C D E F G H I J K L M N O P Q R S T U V W X Y Z ALPHA BRAVO CHARLIE DELTA ECHO FOXTROT GOLF HOTEL INDIA JULIET KILI LIMA MIKE NOVEMBER OSCAR PAPA QUEBEC ROMEO SIERRA TANGO UNIFORM VICTOR WHISKEY X-RAY YANKEE ZULU (AL fah) (BRAH-VOH) (CHAR lee) (DELL tah) ( ECK oh) (FOKS trot) (GOLF) (hoh TELL) (IN dee ah ) (JUE lee ETT) (KEY loh ) (LEE mah) (MIKE) (no YEM ber) (OSS cah) (pah PAH ) (keh BECK) (ROH me oh ) (see AIR rah) (TANG go) (YOU nee form) (VIK tah ) (WISS key ) (ECKS ray ) (YANK key) (ZOO loo ) 92 AFS – DRILL MANUAL b) When sending Figures: Number Pronunciation 0 1 2 3 4 5 6 7 8 9 ZERO WUN TOO THUH – REE FO-WER FI-YIV SIX SEVEN ATE NINER c) Telephone numbers: When quoting telephone number it is the practice for Post Office telephone exchange operators to follow the guidance given in the following notes: i) Complete hundreds up to 900 and complete thousands upto and including 10 000 are pronounced in the ordinary manner, e.g. ‘seven hundred’, nine thousand’. ii) When pronouncing other numbers, including complete thousands above 10 000; a) Three and four figure numbers; a slight pause is made between the ‘hundreds’ and the ‘tens digits’; b) Five figure numbers; a slight pause is made after the first and third figures; c) Six figure numbers: a slight pause is made after the second and fourth figures. When the same figure occurs twice between the pauses, the word ‘double’ is used to combine the pair of figures, but where the pause occurs between the repeated figures, each figure is quoted separately. 0 1 2 3 4 5 6 7 8 9 Zero wun too three fower fife six sev-en ate niner Examples 10 25 79 100 108 1,000 1,100 20,000 20,804 wun zero too fife sev-en niner wun hundred wun zero ate wun tousend wun wun hundred too zero tousend too zero ate zero fower 93 AFS – DRILL MANUAL Effective Communications Message need to; be clear and concise – carefully consider what is to be said before transmitting and by limiting to essential information. Do not engage in lengthy conversations; other operators may be waiting to use the network include Prowords. “Prowords” are used to keep transmission clear and brief. Proword Meaning ACKNOWLEDGE Instruction to a station to acknowledge that it has heard a message AFFIRMATIVE Yes or Correct or I agree ALL AFTER ALL BEFORE Used for making repetitions ALL STATIONS General or collective call to all stations in the network CALL SIGN Station identification CANCEL Ignore my previous message. Cancel a message or part of a message or transmission CLEAR AIR Used by Base to instruct all stations on the Net to stop further transmissions until advised otherwise CLOSE DOWN Stations are to close down when indicated CLOSING DOWN This station is closing down CODE X Confidential message - don headphones CONFIRM Confirm message or portion indicated CORRECT You are correct or what you have transmitted is correct CORRECTION an error has been made in transmission. The correct version follows. DISREGARD Ignore the last transmission or specified part EMERGENCY EMERGENCY I am threatened by grave or immediate danger and require immediate assistance, or ................ is in grave danger etc. NOTE: This signal has absolute priority and over-rides all other transmissions. E.T.A. Estimated time of of arrival E.T.D. Estimated time of departure FETCH Used in conjunction with a name or appointment. FIGURES Used before every group of figures in spoken messages before sending figures digit by digit. Not used for Call sign, map square or grid references. GRID REF Used before every group of grid references I SAY AGAIN Used for repetitions or emphasis 94 AFS – DRILL MANUAL I SPELL Used when spelling out a word LONG MESSAGE I am about to relay a message, are you ready to receive it MESSAGE I am about to relay a message, are you ready to receive it NEGATIVE No or That is incorrect or Permission not granted NO DUFF Used in exercise situations when a message needs to be overriden NOTHING HEARD Indication that no signals have been heard from a particular station OUT This is the end of my transmission. No response required OUT TO YOU This is the end of my transmission to you and a call to another station follows immediately OVER This is the end of my transmission to you and a reply is expected. RADIO CHECK Report how you receive my transmission. READ BACK Repeat this entire transmission back to me exactly as you received it. RELAY TO Instruction to a station to relay a message. ROGER I have received your last transmission satisfactorily. SAY AGAIN Say again all or portion indicated of your last transmission STAND BY I am not ready to receive your transmission or I will call again shortly SEND I am ready to receive your message. THIS IS Transmission is from ................... THROUGH ME Your transmission can be relayed to the other station by me. (Can be used by base to inform the station that the net is being controlled by base.) URGENT MESSAGE I have a message requiring priority but I am not in any personal danger. VERIFY Verify portion indicated with originator and send correct version. WAIT I must pause for a few seconds. No other station to transmit even though I am not. WAIT OUT Your transmission is received. A further transmission on the same subject will follow later. Other stations may transmit as normal. WILCO Your last message (or message indicated) is understood and will be complied with. WORD AFTER WORD BEFORE Used to identify part of a message. WORDS TWICE Communication is difficult. Transmit (or I am transmitting) each phrase twice. (May be used as an order, request or for information purposes). WRONG What you have said is wrong. Correct version is ............ 95 AFS – DRILL MANUAL VEHICLE MOVEMENT PROWORDS MOBILE On way to incident ARRIVED Arrived at incident IN SERVICE Able to respond to another incident if required RETURNING Returning from an incident STATIONED Returned to station OUT IN AREA Vehicle on radio contact in own brigade area Sequence of messages Following routine ‘mobile’ and ‘in attendance’ messages (where used) the sequence of messages would normally be as follows. a) b) c) d) e) f) Assistance message Informative message Further assistance messages and informative messages, as necessary. Fire surrounded message Stop message Further informative messages as necessary. Radio Test procedures On the air radio tests when necessary should be short (not more than 10 seconds) do not interfere with other communications. The readability of signals may be reported in plain language but most often is reported according to the following scale REDABILITY PROWORDS Proword Signal Strength Readability Strength UNREADABLE Barely perceptible Unreadable 1 VERY WEAK Very Weak Reading Intermittently 2 WEAK Fair to Good Readable with difficulty 3 READABLE Good Signal Readable 4 LOUD AND CLEAR Very Good Signal Perfectly Readable 5 96 AFS – DRILL MANUAL GLOSSARY OF TERMS USED IN THE FIRE SERVICE A. Appliances and equipment Adaptors: A fitting used for connecting together two lengths of hose with different types of couplings. Air bags (Air Lifting Units) Reinforced inflatable cushions used for lifting when the use of conventional mechanical jacks is impracticable. Operate by compressed air. Applicator An extension tube to carry a spray nozzle to enable an operator to apply the spray to otherwise inaccessible places. Aqueous film forming foam (AFFF) Aqueous film forming foams (AFFF) are water-based and frequently contain hydrocarbon-based surfactant such as sodium alkyl sulfate, and fluorosurfactant—such as fluorotelomers, perfluorooctanoic acid (PFOA), or perfluorooctanesulfonic acid (PFOS). They have the ability to spread over the surface of hydrocarbon-based liquids. Axes: Large axe - Sometimes know as a felling axe used for breaking in or for cutting away heavy timber, etc. Fireman’s axe - A small axe used for cutting away. Blank cap A cover fitted to delivery, inlet and suction connections when not in use. Also used to protect threads on other equipment, e.g. on BA cylinders. Branches Branch- A tapering fitting employed at the end of a line of hose between the delivery coupling and the nozzle, in order to increase the velocity of the water and so assist the nozzle to provide a solid jet. Diffuser branch – A branch which can give a spray or a jet of variable size and which can be shut off at will . Foam making branch-pipe – A branch used for generating and discharge of mechanical foam in which the foam solution is aerated, expanded and discharged as a jet or spray. Foam branch – A similar device to foam making branch pipe, except that it does not induce the air. Hand- controlled branch – A branch with the capability to stop or reduce the flow of water. It may be capable of delivering a jet or spray or both simultaneously. Stream form branch – A short branch with an internal central tube and guide vanes to reduce turbulence in the water. 97 AFS – DRILL MANUAL Breathing Apparatus Apparatus which is provided with its own supply of oxygen or compressed air, designed to enable the wearer to breathe safety in irrespirable atmospheres. Breechings Collecting breeching – A fitting used to join two lines of hose to form one. Dividing breeching – A fitting used to divide one line of hose into two. Note: A breeching fitted with a valve to control the flow of water is known as controlled dividing breeching’ or a ‘controlled collecting breeching’. Ceiling hook A long wooden pole having, at one end, a steel point with a spur at right angles. Chemical protection suit A rubber or plastic suit which, in conjunction with self contained breathing apparatus, gloves and boots, affords protection to the skin from damage by aggressive solids or liquids through spillage or splash. Collecting head Or ‘suction collecting head’. Used to connect one or more lines of hose to the suction inlet of a pump. Collector pumping A method of increasing water supplies by stationing pumps at a number of sources and delivering water to the collecting head of a single pump from which it is pumped on to the fire. Control Unit A vehicle equipped as a mobile control room for use by the officer commanding at large fires. Usually equipped with radio and sometimes with field telephones. Normally identified by red and which chequered markings. Contamination Meter An instrument used to detect contamination by radioactive particles; usually measures in counts per second. Couplings Delivery hose – An instantaneous coupling – there is one standard size (62.5 mm) for all sizes of delivery hose. Suction hose – A round-thread screwed coupling, the standard sizes being for 75 mm, 100 mm and 140 mm bore hose. Crowbar Usually has a chisel edge at one end and a claw at the other. Delivery head A fitting used principally on fireboats by which water from the pump of pumps is made to feed a number of hose lines simultaneously. Each outlet is controlled by a valve. 98 AFS – DRILL MANUAL Distress signal unit A hand-operated device fitted to the harness of breathing a apparatus to enable a distress warning signal to be sounded when necessary. Door breaker A device for breaking in a door, or forcing it off its hinges, in order to effect an entry. Drill A “Drill” is an exercise in which predetermined response actions are implemented. Ejector pump A portable jet pump designed for removing water from depths beyond the maximum practical lift of pumps and/or in confined spaces. It can be used in basements, ships holds, etc. It is operated by water delivered from a pump through standard delivery hose. Emergency – Any natural or human – caused situation that results in or may result in substantial injury or harm to the population or substantial damage to or loss of property. Emergency Tender An appliance carrying specialized equipment, such as cutting and lighting equipment, breathing and resuscitation apparatus, etc. Exit – An exterior door that provides a safe means of egress from one building to outdoor space or to another separate building. Exercise An “Exercise” is a scenario – based event to train and prepare for implementing emergency actions and the evacuation plan Fire Alarm Signals – The audible sound or visual flash of fire alarm devices or speakers in a building. These signals may include voice messages. Fire beater A wooden shaft, usually at one end of which is fitted a piece of reinforced canvas. Used for beating out heath and grass fires. Fire boat A motor vessel, usually twin-screw, with pumps designed for fire fighting. Fire Extinguishers CO2 fire extinguishers – A fire extinguisher containing liquid carbon dioxide (CO2) Which is released as a gas on the actuation of the extinguisher. Dry powder fire extinguisher(gas cartridge) – A fire extinguisher containing dry powder which is expelled by pressure from a cartridge of compressed gas attached to or fitted into the extinguisher. Dry powder fire extinguisher (stored pressure) – A fire extinguisher containing dry powder which is expelled by pressure stored within the body of the extinguisher as a whole. 99 AFS – DRILL MANUAL Foam fire extinguisher ( mechanical – stored pressure) – A fire extinguisher from which mechanical foam is expelled by pressure stored within the body of the extinguisher as a whole. Vaporising liquid fire extinguisher (stored pressure) – A fire extinguisher containing a vaporizing liquid which is expelled by pressure stored within the body of the extinguisher as a whole. Water fire extinguisher (gas cartridge) – A fire extinguisher in which the water is expelled by pressure from a cartridge of compressed gas attached to or fitted into the extinguisher. Water fire extinguisher (stored pressure) – A fire extinguisher from which water is expelled by pressure stored within the body of the extinguisher as a whole. Fire Drill – A test of the evacuation process for a building. Fire drills usually involve testing the building’s fire alarm system as part of the drill Fire ground The area in which and on which fire-fighting operations are in progress. Fire hydrant A fitting attached to a water main below street or pavement level. The hydrant incorporates a control valve and an outlet connection to which a standpipe can be attached. (‘Double’ hydrants have two control valves and two outlets). Fire hydrant cover key A tool used to lift the cover of certain types of hydrant. Fire hydrant key and bar A tool used to open up a hydrant and to turn on the valve. Fire hydrant pit The recess below the road or pavement level in which a hydrant is located. First-aid box The medical first-aid box carried on appliances. Foam The product of a mixture of foam concentrate, water and air. Foam concentrate A liquid used in the production of mechanical foam. Foam container A container to carry foam concentrate. Foam (mechanical) Generator A device introduced into a line of hose for creating mechanical foam, which is discharged through a branch. 100 AFS – DRILL MANUAL Foam inlet adaptor An adaptor fitted on fixed foam inlets to enable foam branch pipes to feed into a fixed installation. Foam inductor A piece of equipment whereby the correct quantity of foam concentrate is induced into a water stream. Foam solution A solution of foam concentrate in water at an appropriate concentration. Foam Tender An appliance wholly or mainly used for carrying foam-producing equipment. Gantry A fitting at the rear of an appliance to carry a ladder. Gloves (Electrical protection) Gloves for use where live electrical wires or apparatus are involved. Headrest Fitting located at the front of a pump escape, turntable ladder, pump, etc. to take the weight of the head of the ladder. Hearth kit A kit of tools required for dealing with hearth fires and cutting away, includes floorboard saw, could and bolster chisels, club hammer, hacksaw, etc. Expansion Foam Generator A Piece of equipment for generating high expansion foam. It consists essentially of a fan which derives a spray of water and foam solution through a net gauze. The foam thus formed id delivered through a short trunking of large cross-sectional area as it can only operate a relatively small back pressure. Hose Delivery hose – Hose used on the delivery side of a pump the standard sizes are 45mm, 70mm, and 90mm. Suction hose – Hose specially constructed to withstand external pressure. For use on the suction side of a pump. Normally referred to simply as ‘suction’. The standard sizes are 75mm, 100m, 140mm bore. Hose ramp A device to enable vehicles to pass over delivery hose without damage to the hose. Hose Reel Equipment Carried on fire appliances and used to deal with small fires. Water is carried in a tank on a vehicle and pumped at high and / or low pressures through 20mm bore rubber hose which is carried on a revolving reel from which only the required length need be drawn off, small diameter nozzles or fog guns may be attached to the end of the hose. 101 AFS – DRILL MANUAL Hose strap A strap used for securing a length of hose when it is rolled. Hydraulic Platform An appliance consisting of two hydraulically-operated booms with a cage at the upper end. The larger sizes may also have hydraulically-operated arm provided to extend the length of the upper boom. Appliances range in size from a maximum height of 13.7m to 30.5m. The booms can be operated from the cage or from the turntable and can be rotated through 360 degrees. The cage is fitted with a monitor for use as a water tower, and can also be used for rescue purposes. Ladders Extension Ladder (9m or 10.5m). A two-section ladder, extended by means of a line. Extension Ladder (13.5 with props) : A three section ladder with jacks, plumbing gear and supporting props and extended by means of a line. Short Extension Ladder – A light ladder in two sections extending to approx. 4 metres. Triple Extension Ladder – A light ladder of three sections of push up type extending between 5.6 and 6m. Light water foam An extinguishing medium having the ability to assist water to float on the surface of flammable liquids and provide a seat to prevent reignition. Lines : Belt line – See ‘Pocket Line’. Bobbin line – A line would on to a bobbin and carried in a pouch on some types of safety belt. Used for hauling up small gear. May- also be used as a guy line or as a guide line. Escape line – A line between 4.5 m and 6m length secured to the top round of an escape or extension ladder to assist men to find their way back from a smoke laden room. It may also be used to secure the head of an extension ladder. Grass line – A line made of coir or manmade fire which will float on water. Ground control line – A line used to control a turntable ladder monitor from ground level. Guide line – A line 61m long used in certain circumstances to guide men in and out of a building when breathing apparatus is worn. Gay line – (i) A line (usually 40m long) attached to a turntable ladder to assist in maintaining stability in a high wind. (ii) A line bent on to an object (e.g. rescue sling, stretcher or ladder) to keep it clear of obstructions whilst being lowered. Long line – A 16mm diameter manila line, 30m long. Lowering line - A 16mm diameter polyester line 40m long, may have two legs one of which is spliced in 1.5m from one end of the line. Each leg is fitted with a running eye. 102 AFS – DRILL MANUAL Personal line – A line up to 6m long, secured at one end to a B.A. set and fitted at the other end with a snap hook for attaching to a guide line when breathing apparatus is worn. This line may be used at its full extent (6M ) for searching off a guide line or it may be used ‘short’ (1.25m) for traversing a guide line. Pocket line – A small diameter line carried in the fire tunic pocket and used for lashing branches etc. Rescue line – A special 16mm diameter polyester line (usually 70m long) used for rescue work with turntable ladders. Short line – A 16mm diameter manila line, 15m long. Tail line – A line not more than 6m long permanently attached to a turntable ladder rescue sling. Used to prevent undue swing of a person being rescued when the turntable ladder is trained away from a building. Line /round protector A device, preferably made of a suitable aluminum alloy, designed to fit over the rounds of all types of ladder and to readily be attached to whichever round it is desired to use in order to protect the lowering line and round from damage when carrying out lowering drills. Monitor A special type of branch with lateral and vertical travel mounted on an appliance, or one designed to operate unattended at ground level when it is known as ‘ground monitor’. Nozzles Plain nozzle – the piece of equipment which screws on to the end of the branch and which determines the size of the jet. Spray nozzle – A nozzle designed to discharge water in the form of a spray. Nozzle spanner A spanner used to tighten the joint between nozzle and branch. Padlock remover A lever fitted with slots into which a padlock is inserted. It is used to twist off a padlock when affecting an entry. Persuader A cigar-shaped cold chisel mounted in a holder and used in conjunction with a sledge hammer to force the hasp of a padlock. Pick-up tube A tube through which foam concentrate is drawn into foam-making equipment. Pocket line. A small diameter line carried in the fire tunic pocket and used for lashing branches etc. Rescue line. A special 16 mm diameter polyester line (usually 70 m long) used for rescue work with turntable ladders. 103 AFS – DRILL MANUAL Short line. A 16mmdiameter manila line, 15m ling. Tail line. A line not more than 6m long permanently attached to a turntable ladder rescue sling. Used to prevent undue swing of a person being rescued when the turntable ladder is trained away from a building. Line/round protector. A device, preferably made of a suitable aluminum alloy, designed to fit over the rounds of all types of ladder and to readily be attached to whichever round it is desired to use in order to protect the lowering line and round from damage when carrying out lowering drills. Monitor A special type of branch with lateral and vertical travel mounted on an appliance, or one designed to operate unattended at ground level when it is known as ‘ground monitor’. Nozzles: Plain nozzle. The piece of equipment which a screw on to the end of the branch and which determines the size of the jet. Spray nozzle. A nozzle designed to discharge water in the form of a spray. Nozzle spanner A spanner used to tighten the joint between nozzle and branch. Padlock remover A lever fitted with slots into which a padlock is inserted. It is used to twist off a padlock when effecting an entry. Persuader A cigar-shaped cold chisel mounted in a holder and used in conjunction with a sledge hammer to force the hasp of a padlock. Pick-up tube A tube through which foam concentrate is drawn into foam-making equipment. Portable pump A self- contained portable fire-fighting pumping unit. Pumps (appliance) A pump appliance having a built-in pump with a minimum capacity of 2270 1/min. Carries a 10.5m extension ladder and hose reel equipment with a minimum tank capacity of 364 liters of water. Pump ladder A pump (appliance) with a hose reel tank of 455 liters and carrying a 13.5 ladder. 104 AFS – DRILL MANUAL Rescue sling A special sling used for lowering persons. It has two loops connected to a steel ring by which it is attached to a turntable ladder rescue line. Sometimes used an alternative to spliced legs on a lowering line. Resuscitation apparatus Apparatus for supplying oxygen or a mixture of oxygen and air to a person needing artificial respiration. Safety belt-‘turntable ladder’ A special belt with a swivel type hook for use with turntable ladders. Safety device A mechanical device incorporating a line and belt. The device must be attached to the head of the turntable ladder or hydraulic platform or to the anchorage of a drill tower. Safety device belt The belt, attached to the of a safety device, which must be worn by the man being carried down. Slipper strainer A low level suction strainer, water can only enter via the bottom of the strainer which stands on four squat legs, facilitating pumping from shallow water. Standpipe used on a hydrant to bring the outlet above the ground level. The term ordinarily includes the bend at the top which when used separately is known as the standpipe head. Standpipes may have one or two outlets and are then known as single or double outlet respectively. Steel-shod lever A large wooden lever steel shod for lifting heavy objects and forcing doors, etc. Stirrup pump A small pump used in conjunction with a bucket of water, worked by hand and held steady by a foot stirrup, fitted with 12.5mm rubber tubing with 3mm nozzle and delivers up to 5.5 1/min. Strainers: Basket strainer. Used over the suction strainer to prevent the entry of dirt and leaves, etc. the canvas part is known as the ‘skirt’. Conical strainer. A removable wire strainer fitted in the suction inlet of a pump. Suction strainer. A metal strainer, connected to the end of suction hose, to prevent the entry into the suction of objects liable to choke or damage the pump. Suction: Hard suction. Suction hose designed to withstand both internal and external pressure. It is used between open water supplies and the pump. 105 AFS – DRILL MANUAL Soft suction. Delivery type hose used to connect a pup to a pressure fed source of water. Suction wrench. Used to tighten suction couplings. Turntable Ladder A sectional ladder mounted on a self-propelled chassis which can be extended to about 30m. it is operated hydraulically and can be rotated through a complete circle. It is usually fitted with a monitor at the head of the ladder. Water tender A self propelled appliance having a built in pump with a minimum capacity of 2270 1/min. caries a 10.5m extension ladder and hose reel equipment with a water tank capacity of not less than 1820 litres or more than 2270 litres. A portable fire- fighting pump may also be carried. Water tender escape A water tender carrying a wheeled escape. A water tender carrying a 13.5m ladder. Wheeled escape A wheeled extending ladder, usually mounted on a fire appliance from which it can be removed and maneuvered into position for rescue or fire-fighting purposes. B. Telecommunication terms 1. General Acceptance point: A place where fire calls are received. Central commercial alarm centre A point where automatic fire alarms, fire telephones, intruder alarms etc., from protected buildings may terminate. The centre accepts the responsibility for passing on calls to the appropriate emergency service control. Control room A permanently manned and fully equipped room in fire service premises in which emergency calls are received and subsequent action is taken to mobilise personnel, appliances and equipment. ‘Distress call’ A priority call over the public telephone system for sending urgent operational fire messages.(Used only to obtain rapid connection in cases involving the safety of life or property; the caller’s request to the Post office operator being prefixed by the phrase: ‘Distress call’ .) Fire alarm call point manual: A device for the manual operation of an electrical fire alarm system. Fire alarm system, manual : 106 AFS – DRILL MANUAL A fire alarm system in which the alarm is initiated manually. Fire alarm system, automatic A fire alarm system comprising components for automatically detecting a fire’ initiating an alarm of fire and initiating other action as arranged, the system may also include manual call points. Priority signaling facility. A facility for transmitting an urgent calling signal to the distant end of circuit. Private wire circuit. A dedicated telephone circuit permanently connected between two or more points for or more points for transmission and reception of speech and/or data. Public switched telephone network (PSTN). A switching system which allows public access to anyone connected to the national and international telephone network. PSTN standby line. Secondary means of operation a call-out system by dialed-up connection on PSTN. 2. Call-out systems Acknowledgement signal A signal transmitted back solely as a result of the reception of another signal, e.g., a signal received at the call-out point of a remote control system indicating that remote equipment has operated. It may not, however, indicate that other alerting systems linked to the remote equipment are in fact operating. Call-out point: The place from which a call-out installation is remotely controlled. Identification signal A signal received at the call-out point of a remote control system indicating that connection has been made with remote equipment. It does not indicate that the remote equipment is operating. Public address system A loudspeaker system which may be operated by remote control from a central control room or locally for both operational and administrative purposes. Running-call facility A facility at a station which enables a running caller to give an alarm of fire. Double - frequency scheme A scheme using one frequency for main station transmission and out-station reception, and another frequency for out station transmission and main station reception. Duplex working A communications technique in which it is possible to transmit and receive simultaneously; eg. as in ordinary telephone conversation. 107 AFS – DRILL MANUAL General clearance A radio operating procedure term used by main control operators to denote that a period of traffic is completed and that out-stations may call- in as necessary;. Main control The place where main transmitting and receiving equipment of a scheme is located. Sometimes, it also includes the main control equipment and operators. Out-stations All radio stations in a scheme, including two- way fixed and mobile sets, and fixed receivers, but excluding main stations, main and sub- controls. Hand- held set: A hand-held low- powered portable radio transmitter/receiver. Pocket Alerter System A call-out system utilizing radio pocket alerter carried by certain firemen which are triggered by a radio signal transmitted by a remotely-controlled alerter transmitter usually located at the fire station. Pocket Alerter transmitter A transmitter usually located at a fire station and remotely controlled from a central control room. It transmits either a ‘fire’ or ‘test’ signal to pocket alerter and operates from float-charged batteries. Simplex working A communication technique in which it is not possible to transmit and receive simultaneously; e.g., as in a radio scheme where’ Over’ procedure is necessary. Single frequency scheme A scheme using one common frequency for transmitting and receiving by all stations Single -station scheme: A small scheme served by one man station Sub control A point from which temporary control of a scheme can be exercised but only with the the co-operation of main control operators Transportable set A portable transmitter receiver of roughly the same power as a mobile set normally used on the loss of main station facilities or to enhance the power of hand held sets to cover a wider area Talk through A facility on double- frequency radio scheme interconnects incoming and outgoing channels. Used out-stations on a hear and talk to each out. VHF/UHF Mobile Repeater Unit A composite mobile radio installation comprising a VHF transmitter/receiver (on main scheme channels) interfaced with a UHF transmitter/receiver (on hand set channels). 108 AFS – DRILL MANUAL Can operate either: (a) On main scheme channel (b) On hand held set channel (with talk-through)to enhance range of hand held sets (c) Hand held set through to main scheme stations direct. 4. Computer Systems Bit: An abbreviation for binary digit which is the unit of information, presented as ;either a ‘0’or a ‘1’. Byte: A sequence of binary digits contained as a unit. Cell : A storage space in a computer memory for one item of data. Central processing unit (CPU): The unit of a computer in which processing of data takes place. Computer: A machine, controlled by a stored programme, which automatically inputs and processes data and outputs the results of processing. Data processing (DP): Storing, retrieving, sorting or selecting data, changing data from one form to another, doing calculations or making decisions based on data. Data transmission: The movement of information in coded form over a transmission system by breaking down letters and figures into codes in order to send messages by electronic means. Hard Copy: A permanent record obtained on paper through a printer. Hardware: The physical units of equipment which make up a computer. Line printer: An output device which prints out one complete line of information at a time. Modem : A device for converting digital information into voice frequency signals for transmission over a speech network or for converting signals back again into digital form the receiving and of the circuit. Peripheral: A piece of equipment linked to a computer. Program: A set of instruction to a computer. Software: An alternative term to program. Terminal: A device providing a direct link between a computer and person using it. Visual Display unit (VDU): A terminal where data is displayed on a screen rather like a television screen. 109 AFS – DRILL MANUAL Reference Books: 1. 2. 3. 4. 5. 6. 7. Drill Manual for the Fire Service of India Fire and Rescue service Manual, Volume 4; HM Fire Service Inspectorate Fire Fighter Handbook – Internet Fire Service Drill Book – HMSO, London Drill Manual – Author: Surjit Singh Chahal Guide to Mindfulness Meditation by Timothy Aaron Whitson Meditation – Sri Aurbindo Ashram (SUBHASH KUMAR) GENERAL MANAGER – (FS) 110 AFS – DRILL MANUAL