1
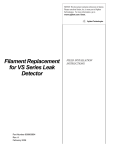
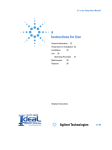
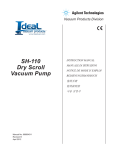
NOTICE: This document contains references to Varian.
Please note that Varian, Inc. is now part of Agilent
Technologies. For more information, go to
www.agilent.com/chem.
vacuum technologies
TPS Bench and Mini-IMG
Instruction Manual
This document is for users of Varian’s Turbo
Pumping Systems with Mini-IMG gauges
installed.
For systems with IM-500 gauges installed, see
the IM-100/IM-500 Gauge Tube Rebuild Kit
instructions (Varian P/N# 699908235).
Revision A
October 2009
FIELD SERVICE MANUAL
TPS Bench and Mini-IMG Instruction Manual
Mini-IMG is a trademark of Varian, Inc.
Copyright 2009
Varian, Inc.
TPS Bench and Mini-IMG Instruction Manual
Contents
Introduction .................................................................................................................................. v
Hazard and Safety Information .................................................................................................... v
Vacuum Equipment and Cleanliness ..................................................................................... v
Contacting Varian ........................................................................................................................vi
Section 2. TPS Bench Operation .................................................................................................... 2-1
2.1 Purpose ............................................................................................................................... 2-1
2.2 TPS Bench operation........................................................................................................... 2-1
2.3 Gauge Operation ................................................................................................................. 2-2
2.4 Proper Operation ................................................................................................................. 2-4
Section 3. Mini-IMG Cleaning ......................................................................................................... 3-1
3.1 Purpose ............................................................................................................................... 3-1
3.2 Overview .............................................................................................................................. 3-1
3.3 Procedure ............................................................................................................................ 3-1
iii
TPS Bench and Mini-IMG Instruction Manual
This page intentionally left blank.
TPS Bench and Mini-IMG Instruction Manual
Introduction
This manual covers two topics:
❑
Section 2 “TPS Bench Operation” on page 2-1, which describes a TPS bench startup
procedure to ensure long life for the Mini-IMG and proper operation of the TPS
bench.
❑
Section 3 “Mini-IMG Cleaning” on page 3-1, which discusses the cleaning
procedure for the Mini-IMG.
Hazard and Safety Information
This manual uses the following standard safety protocols:
WARNING
The warning messages are for attracting the attention of the
operator to a particular procedure or practice which, if not
followed correctly, could lead to serious injury.
CAUTION
The caution messages are displayed before procedures, which
if not followed, could cause damage to the equipment.
NOTE
The notes contain important information.
Vacuum Equipment and Cleanliness
Cleanliness is vital when servicing any vacuum equipment.
CAUTION
Do not use silicone oil or silicone grease.
Use powder-free butyl or polycarbonate gloves to prevent
skin oils from getting on vacuum surfaces.
Do not clean any aluminum parts with Alconox®. Alconox
is not compatible with aluminum and will cause damage.
NOTE
Normally, it is unnecessary to use vacuum grease.
However, if it must be used, avoid silicone types, and
use it sparingly. Apiezon® L grease is recommended
(Varian Part Number 695400004).
v
TPS Bench and Mini-IMG Instruction Manual
Contacting Varian
See the back cover of this manual for a listing of our sales and service offices.
Please contact Varian Customer Care for assistance:
In North America:
In Europe and other countries:
Toll-Free: 1-800-882-7426
Hours: 8:00 AM to 7:00 PM Eastern
U. S. time
Fax: 1-781-860-5405
[email protected]
[email protected]
Language: English
Toll-Free: 00 800 234 234 00
Fax: (39) 011 997 9 350
Hours: 08:00 to 18:00 Central European
time
[email protected]
[email protected]
Languages: French, German, Italian,
English
Product Return Authorizations
[email protected]
vi
In Japan:
Toll-Free: 0120 655 040
Fax: (81) 3 5232 1263
Hours: 08:00 to 18:00 Japan Standard
time
[email protected]
[email protected]
Languages: Japanese, English
In Korea:
Toll-Free: 080 222 2452
Fax: (82) 2 3452 2451
Hours: 08:00 to 18:00 Korea Standard
time
[email protected]
[email protected]
Languages: Korean, English
In Taiwan:
Toll-Free: 0 (800) 051 342
Fax: (886) 2 2698 9678
Hours: 08:00 to 18:00 Chinese Standard
time
[email protected]
[email protected]
Languages: Chinese, English
In China:
Toll-free: 800 820 6556
Fax: (86) 10 6310 0141
Hours: 08:00 to 18:00 Chinese Standard
time
[email protected]
Languages: Chinese, English
TPS Bench and Mini-IMG Instruction Manual
Section 2. TPS Bench Operation
2.1 Purpose
To describe a TPS bench startup procedure to ensure long life for the Mini-IMG gauge and
proper operation of the TPS bench.
2.2 TPS Bench operation
The system (Figure 2-1) is comprised of the following:
❑ SH-110 pump backing a V81 turbo pump.
❑ V81AG rack controller.
❑ Mini-IMG high vacuum gauge connected to the turbo through a tee at the inlet.
The gauge is controlled by the AG controller and connected to it for reading the pressure.
The system is controlled by two power switches:
❑ One switch powers on and initializes the system and also turns the 24 V supply to
the gauge, even when the pumping switch is on. This system then tries to start the
ionization and generate the plasma.
❑ The other switch (pumping) starts the pumps where 0 is off and 1 is on.
Figure 2-1
V81-AG Front
2-1
TPS Bench and Mini-IMG Instruction Manual
2.3 Gauge Operation
This cold cathode inverted magnetron gauge works by creating plasma around the anode
from the random release of electrons from the cathode. These electrons strike the gas
molecules and ionize them, generating a current for the cathode. This current is measured
and correlated to the pressure, and displayed by the controller.
The gauge is rated for high vacuum, from ~ 10-3 to 10-10 T range for pressure. There is no
direct downside of turning the gauge on at low vacuum, which is from atmosphere to 10-3;
however, the life of the gauge can be increased if the gauge is turned off when the system is
not in use or by not leaving it on for long durations at low vacuum.
The gauge generates high voltage of 2 kV from a 24 V supply using the flyback transformer.
This high voltage is completely contained within the gauge body and is of no risk as long as
the gauge cover is not removed or tampered with while the gauge is still powered.
The current in the gauge takes some time (when P is around the 10-3 T range) to stabilize
and provide consistent current for plasma generation. During this time there is a high
current fluctuation due to excessive collision with the gas molecules. If the gauge is left on
for long durations at atmospheric pressure, and the system contains highly contaminant
gases, then the ionization process deposits significant contamination on the gauge collector.
While contamination will occur at high vacuum, but because the number of collisions are
fewer, this slows contamination. The amount of contamination depends on the gas being
pumped (highly contaminating or not), duration of gauge operation, pressure inside the
chamber, condition of the collector etc.
Figure 2-2 shows images of the gauge found on the system which has slight contamination
on the collector.
Slight contamination in the plasma region
(With heavy contamination the surface is
completely discolored and burnt)
Figure 2-2
2-2
Contamination on both upper and lower
sides of the plasma chamber
Contaminated Gauge
TPS Bench and Mini-IMG Instruction Manual
Figure 2-3 shows the contaminated collector next to a new collector: not much
contamination, no need for replacement.
Figure 2-3
Contaminated Collector
Figure 2-4 shows the clean collector chamber. With heavy contamination, this region also
discolors.
Figure 2-4
Clean Collector Chamber
2-3
TPS Bench and Mini-IMG Instruction Manual
2.4 Proper Operation
To avoid the contamination that occurs when the gauge is turned on without the pumping
system, the best practice is to:
❑ Leave the pumping knob at 1 all the time, and
❑ Operate the system using the power switch only.
This ensures that the gauge turns off when the power is turned off and only turns on with the
pumping system when the power is turned on.
Another option is to use both the pumping and power switch to turn on or off at the same
time. In this situation, the gauge is only running for a few seconds while waiting for the
pumping to start and avoids any contamination or risk of failure.
Another benefit of using the power switch is that all system power is immediately removed
when the power switch is toggled. Additionally, the fan also turns off. If the pumping switch
is only used with the power switch on, the controller, gauge and fan stay on all the time.
2-4
TPS Bench and Mini-IMG Instruction Manual
Section 3. Mini-IMG Cleaning
3.1 Purpose
This section explains the cleaning procedure for the Mini-IMG gauge.
3.2 Overview
Over time it is normal for all Inverted Magnetron Gauges (IMG) to suffer from internal
deposits and erosion of the internal parts. How fast and to what extent this occurs depends
on the chemicals the gauge is exposed to during operation and the vacuum pressure. When
this happens, the gauge often exhibits reading stability problems or may not even start up.
This cleaning procedure tries to remove all possible contaminants from the gauge elements.
3.3 Procedure
Tools Required:
❑ Clean lint free cotton, nitrile gloves or finger cots
❑ Hex key or wrench - 1/16
❑ 3/16 hex nut driver
❑ Snap ring pliers for internal type - .047 tip size
❑ Scotch Brite
❑ Acetone
1. Mark the position of the inlet flange on the magnet so that you don't change the position
when re-assembling (Figure 3-1). This can cause a slight change of the calibration/
sensitivity.
Make marks on both ends
with a permanent marker
Figure 3-1
Mark the Magnet
3-1
TPS Bench and Mini-IMG Instruction Manual
2. Remove the electrical connector screws as shown in Figure 3-2.
Figure 3-2
Electrical Connector Screws
3. Remove the side screws from the metal cover as shown in Figure 3-3 and remove the
cover to reveal the electronics inside.
Figure 3-3
Electrical Connector Screws
4. Remove the screw which holds the magnet to the inlet flange as shown in Figure 3-4.
Ensure that the marker positions do not change.
Figure 3-4
3-2
Magnet Retention Screw
TPS Bench and Mini-IMG Instruction Manual
5. Use the small Allen wrench to loosen the screws holding the gauge body to the
electronics assembly (Figure 3-5). With these screws loosened, slide the gauge body out
of the groove with the magnet still attached, then slide the magnet out of the flange.
Figure 3-5
Gauge Body Retention Screws
6. Remove the snap ring inside the gauge inlet containing the pole pieces (Figure 3-6).
Figure 3-6
Snap Ring
3-3
TPS Bench and Mini-IMG Instruction Manual
7. Slide out the two pole pieces and the spacer (Figure 3-7). The inner pole piece has a
single center hole and the outer pole piece has five holes. Ensure that the large side of
tapered hole faces inward. The poles and spacer are around the long thin anode, which
is screwed into the gauge body (cannot remove this, special tool needed).
These pieces go on top of the anode inside the gauge body.
Figure 3-7
Pole Pieces and Spacer
8. Look for any contamination on the two pole pieces and also look inside the gauge body,
around the anode for any contamination (Figure 3-8).
Figure 3-8
Gauge body with Anode Indicated
9. To clean contaminated surfaces:
a. Soak some cleaning cloth with acetone.
b. Clean the pole pieces with acetone or alcohol. You can use Scotch Brite or other
similar abrasive material with Acetone to clean parts.
c. Air-dry the parts.
NOTE
If the anode tube is also contaminated, it must be removed and
replaced.
10. Re-assemble in the reverse order. Ensure that the marks created earlier on the magnet
and the body align.
3-4
Sales and Service Offices
Canada
Central coordination through:
Varian, Inc.
121 Hartwell Avenue
Lexington, MA 02421
USA
Tel.: +1 781 861 7200
Toll-Free: +1 800 882 7426
Fax: +1 781 860 5437
China
Varian Technologies China, Ltd.
Room 1648
Central Tower South Wing
Beijing Junefield Plaza
No. 10 XuanWuMenWai Street
Beijing 100052
P. R. China
Tel.: +86 (10) 6310 8550
Toll-Free: 800 820 6556
Fax: +86 (10) 6310 0141
France
Varian s.a.
7 avenue des Tropiques
Z.A. de Courtaboeuf - B.P. 12
91941 Les Ulis cedex
France
Tel.: +33 (0) 1 69 86 38 84
Fax: +33 (0) 1 69 86 29 88
Italy
Varian, Inc.
United States
Varian, Inc
via F.lli Varian 54
10040 Leini, (Torino)
Italy
Tel.: +39 011 997 9111
Toll-Free: 00 800 234 234 00
Fax: +39 011 997 9350
121 Hartwell Avenue
Lexington, MA 02421
USA
Tel.: +1 781 861 7200
Toll-Free: +1 800 882 7426
Fax: +1 781 860 5437
Japan
Varian Technologies Japan, Ltd.
Other Countries
Varian Vacuum Technologies
8th Floor
Sumitomo Shibaura Building
4-16-36 Shibaura Minato-ku
Tokyo 108
Japan
Tel.: +81 3 5232 1253
Toll-Free: 0120 655 040
Fax: +81 3 5232 1710
via F.lli Varian 54
10040 Leini, (Torino)
Italy
Tel: (39) 011 997 9 111
Fax: (39) 011 997 9 350
Korea
Varian Technologies Korea, Ltd.
North America
Shinsa 2nd Bldg. 2F
966-5 Daechi-dong
Kangnam-gu, Seoul
Korea 135-280
Tel.: +82 2 3452 2452
Toll-Free: 080 222 2452
Fax: +82 2 3452 2451
Customer Support and Service:
Tel: 1 (800) 882-7426 (toll-free)
[email protected]
Europe
Tel: 00 (800) 234 234 00 (toll-free)
[email protected]
Japan
Mexico
Varian, S. de R.L. de C.V.
Tel: (81) 3 5232 1253 (dedicated line)
[email protected]
Herculesweg 8
4338 PL Middelburg
The Netherlands
Tel.: +31 118 671570
Fax: +31 118 671569
Concepcion Beistegui No 109
Col Del Valle
C.P. 03100
Mexico, D.F.
Tel.: +52 5 523 9465
Fax: +52 5 523 9472
Korea
Germany & Austria
Varian Deutschland GmbH
Taiwan
Varian Technologies Asia, Ltd.
Alsfelder Strasse 6
Postfach 11 14 35
64289 Darmstadt
Germany
Tel.: +49 (0) 6151 703 353
Fax: +49 (0) 6151 703 302
14F-6, No. 77, Hsin Tai Wu Road, Sec. 1
Hsi chih, Taipei Hsien
Taiwan, R.O.C.
Tel.: +886 2 2698 9555
Toll Free: 0800 051 342
Fax: +886 2 2698 96782
India
Varian India Pvt. Ltd.
UK & Ireland
Varian Ltd.
205-A, "A" wing of Galleria
2nd floor, Hiranandani Gardens
Powai, Mumbai-400 076
India
Tel.: +91 22 2570 8595/8597
Fax: +91 22 2570 8599
Mobile: +91 98 679 55969
6 Mead Road
Oxford Industrial Park
Yarnton, Oxford OX5 1QU
UK
Tel.: +44 (0) 1865 291570
Fax: +44 (0) 1865 291571
Benelux
Varian Vacuum Technologies
04/08
Tel (82) 2 3452 2452 (dedicated line)
[email protected]
Taiwan
Tel: 0 (800) 051 342 (toll-free)
[email protected]
Worldwide Web Site,
Catalog and On-line Orders:
www.varianinc.com
Representatives in most countries