1
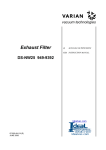
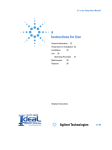
NOTICE: This document contains references to Varian.
Please note that Varian, Inc. is now part of Agilent
Technologies. For more information, go to
www.agilent.com/chem.
Filament Replacement
for VS Series Leak
Detector
Part Number 699909994
Rev. A
February 2006
FIELD INSTALLATION
INSTRUCTIONS
DRAFT 3/1/06
vacuum technologies
Varian Field Instruction Sheet
Filament Replacement for VS Series Leak Detector
Preface
Documentation Standards
This manual uses the following documentation standards:
NOTE
Notes contain important information.
CAUTION
Cautions appear before instructions, which if not followed, could cause damage to
the equipment or data loss.
WARNING
Warnings appear for a particular procedure or practice which, if not followed
correctly, could lead to serious injury or death.
Hazard and Safety Information
The common international symbols used in this manual and on the equipment are defined below.
°l
OFF Supply (Power)
Earth (Ground) Terminal
ON Supply (Power)
Caution, Hot Surface
AC – Alternating Current
Caution, Risk of Electrical
Shock
Warning, Risk of danger
Protective Conductor Terminal
Frame or chassis Terminal
Page 1 of 11
Filament Replacement for VS Series Leak Detector
Prepared by
Checked by
Approved by
Date
Date
Date
Document No.
699909994
Revision
A
Operators and service personnel must be aware of all hazards associated with this equipment. They must know how to
recognize hazardous and potentially hazardous conditions, and know how to avoid them. The consequences of
unskilled, improper, or careless operation of the equipment can be serious. Every operator or service person must read
and thoroughly understand operation/maintenance manuals and any additional information provided by Varian. All
warning and cautions must be read carefully and strictly observed. Consult local, state, and national agencies
regarding specific requirements and regulations. Address any safety, operation, and/or maintenance questions to your
nearest Varian office.
Solvents
WARNING
The mechanical components of leak detectors may be cleaned with one of the
recommended solvents. When heated, sprayed, or exposed to high-temperature
equipment, these solvents become flammable and explosive, causing serious
injury or death. Do not use these solvents near a high-temperature source. Ventilate
the working area with a blower and work in a large, well-ventilated room.
Solvents are irritants, narcotics, depressants and/or carcinogens. Their inhalation
and/or ingestion may produce serious side effects. Prolonged or continued contact
with the skin results in absorption through the skin and moderate toxicity. Always
ensure that cleaning operations are carried out in large, well-ventilated rooms, and
wear eye shields, gloves, and protective clothing.
Due to the effective cleaning nature of VacuSolv solvent and its residue-free
properties, Varian’ Component and Spectrometer Cleaning Kit (Part Number
670029096), used in accordance with the kit instructions, is recommended for
cleaning spectrometer components. The kit can also be used for fine cleaning of
other parts in the leak detector’s vacuum system such as valves and fittings. No
rinsing steps or high-temperature drying is required following cleaning with
VacuSolv. Although appropriate precautions are advised, VacuSolv is compatible
with most materials and does not contain toxic chemicals or CFCs
(chlorofluorocarbons). Other acceptable solvents are isopropyl alcohol (IPA) or
Dow Corning® OS-20.
To clean the leak detector plastic enclosure, the LCD display and Front Panel
buttons, use only a soft cloth slightly dampened with water or a mild soap.
Do NOT use excess water or cleaning solvents of any kind.
Avoid splashing any cleaning solvents into the unit through the ventilation
openings or Front Panel buttons. Wipe the surface with a dry lint-free cloth.
Vacuum Equipment and Cleanliness
Cleanliness is vital when servicing the leak detector or any vacuum equipment. There are some techniques that are
more important in leak detector servicing than in general vacuum work:
CAUTION
Wear non-powdered, ESD-safe Nitride or equivalent gloves to prevent skin oils from
getting on spectrometer internal components.
Page 2 of 11
Filament Replacement for VS Series Leak Detector
-
Document No.
Revision
699909994
A
O-ring Care
When removing, checking or replacing O-rings, keep in mind the following:
NOTE
Varian recommends replacing all O-rings during routine maintenance or during any
maintenance procedure requiring that O-rings be removed.
CAUTION
Remove O-rings carefully with your fingers. Do not use metal tools for this task; this
prevents scratching of any sealing surfaces.
•
•
•
•
Wipe all O-rings clean with a lint-free cloth before installation to ensure that no
foreign matter is present to impair the seal.
Do not use grease or any other substance on O-rings that will come in contact
with the vacuum surfaces.
Do not use alcohol, methanol or other solvents on O-rings. Doing so causes
deterioration and reduces their ability to hold a vacuum.
Varian does not recommend the use of vacuum grease. If applicable, apply a
small amount of Apiezon® L grease and wipe the O-rings shiny dry.
Metal Seal Care
CAUTION
Metal Seals must be replaced any time a spectrometer is opened. All fasteners must
be installed and torqued per assembly procedure specifications. Remove Metal
Seals carefully with your fingers or a soft tool. Metal tools scratch sealing surfaces.
•
•
Metal Seals are supplied in pre-cleaned condition. No cleaning is required. If
necessary, Metal Seals can be cleaned using the recommended solvents. Wipe
Metal Seals clean with a lint-free cloth before installation to ensure that no foreign matter impairs the seal.
Do not use grease or any other substance on Metal Seals that will come in contact with the spectrometer.
Spectrometer
CAUTION
Store the Ion Source/Preamplifier sub-assembly in a cool, dry area in a tightly
sealed, ESD protected container. Wear non-powdered, ESD-safe Nitride or
equivalent gloves when handling the spectrometer. Wash hands thoroughly after
handling the spectrometer filaments and especially before smoking or eating.
The spectrometer and PCB’s are static sensitive devices. Wear a grounding strap
when performing any maintenance on these units and especially when performing
maintenance of static sensitive parts.
CAUTION
The spectrometer operates at a very high vacuum produced by the high vacuum
turbomolecular pump. Service of the spectrometer requires that this vacuum be
vented to the atmosphere.
Page 3 of 11
Filament Replacement for VS Series Leak Detector
-
Document No.
Revision
699909994
A
Equipment Required
•
•
•
•
•
•
•
•
•
Filament Service Kit (PN: VSFLDFR)
Extended Length M5 Allen Wrench
Metric Allen Wrench Set
Needle nose pliers or tweezer
M3 Phillips Head Screw Driver
1.5 mm Hex Driver
5 mm Hex Driver
Torque Wrench (must be adjustable to 40 in-lbs (4.5 N-m) and 90 in-lbs (10.2 N-m))
Digital Multimeter (Fluke 187 or equivalent)
Installation Procedure
For clarity, some items have been omitted from views.
Figure 1: Rear Screws
1. Turn off the power switch located on the back of the unit and unplug.
2. Wait 30 seconds for the high voltage to dissipate.
3. Using an extended length M5 Allen wrench, remove the four screws holding the rear plastic cover (Figure 1: Rear
Screws).
4. Detach the rear plastic cover from the unit.
Page 4 of 11
Filament Replacement for VS Series Leak Detector
-
Document No.
Revision
699909994
A
Figure 2: Fan Assembly
5. Disconnect the fan cable and remove the fan assembly by unfastening two wing nuts and one M4 socket head cap
screw (Figure 2: Fan Assembly).
Figure 3: Cable Locations
CAUTION
Static sensitive device, ensure that personnel are properly grounded before
proceeding.
6. Disconnect the spectrometer ground cable, the preamp signal cable and the ion source cable from the spectrometer
(Figure 3: Cable Locations).
NOTE
Cables not shown for clarity.
Page 5 of 11
Filament Replacement for VS Series Leak Detector
-
Document No.
Revision
699909994
A
7. Using an M3 Phillips screw driver, remove the spectrometer cover.
Figure 4: Spectrometer Exploded View
CAUTION
Wear non-powdered, ESD-safe Nitride or equivalent gloves (not included in kit) to
prevent skin oils from getting on vacuum surfaces.
8. Loosen screws (item 1) and carefully remove the spectrometer header from the body. The vacuum system vents to
atmosphere as the screws are loosened. Retain the socket head cap screws (item 1) and the Belleville washers
(item 2). See line item 21 for correct orientation of the Belleville washers (Figure 10: Direction of Cone).
9. Remove the metal gasket (item 3) and discard. Do not scratch the mating surface when removing the gasket. Do
not attempt to reuse the gasket (Figure 4: Spectrometer Exploded View).
10.Examine the spectrometer cavity for discolored areas. If present, refer to the service manual for cleaning
instruction.
Figure 5: Coupler Screws
11. On a clean work surface, remove the defective filament(s) (item 4) from the spectrometer by loosening the two
coupler screws. Then loosen the M2 screw and washer and remove the defective filament (Figure 5: Coupler
Screws).
Page 6 of 11
Filament Replacement for VS Series Leak Detector
-
Document No.
Revision
699909994
A
Figure 6: Coupler and Filament Assembly
12.Inspect the new filament assembly for deformation, damage and flaking of the coating prior to installation. Do not
install if damaged.
13.Insert new filament assembly into the coupler.
14.Guide the ceramic against the bottom and side ribs of the ion source support block (Figure 6: Coupler and Filament
Assembly and Figure 7: Filament Position). Correct positioning of filament is critical for proper spectrometer
operation.
15.While holding the filament in position, insert the M2 screw and washer and tighten (Figure 7: Filament Position).
16.Tighten the coupler screws onto the filament posts (Figure 7: Filament Position).
17.Verify ceramic is tight against the bottom and right side ribs. Ensure that the filament is positioned in the slot of the
ion source as shown (Figure 7: Filament Position and Figure 8: Filament Alignment).
Figure 7: Filament Position
Page 7 of 11
Filament Replacement for VS Series Leak Detector
-
Document No.
Revision
699909994
A
Figure 8: Filament Alignment
18.Clean the mating surfaces of the spectrometer body and header with Isopropyl alcohol and a clean lint free wipe.
NOTE
Varian recommends that you use the Vac-u-solv spectrometer cleaning kit
(PN: 670029096).
19.Center replacement metal gasket inside the bolt pattern and outside of the body cavity. To prevent scratching of any
sealing surface do not use metal tools for this task.
Figure 9: Spectrometer Alignment
20.Guide the spectrometer header into pocket with the detector housing closest to the inlet (Figure 9: Spectrometer
Alignment).
Page 8 of 11
Filament Replacement for VS Series Leak Detector
-
Document No.
Revision
699909994
A
Figure 10: Direction of Cone
21.Insert a screw with three Belleville washers into each hole and finger tighten (Figure 10: Direction of Cone).
NOTE
The cones of the Belleville washers should all point to the head of the screw.
22.Following the pattern shown in Figure 10: Direction of Cone, torque screws to 40 in-lbs (4.5 N-m).
23.Re-torque screws to 90 in-lbs (10.2 N-m) following the same pattern. Go through the entire torque pattern twice to
ensure the metal gasket is firmly compressed.
24.Wait a minimum of five minutes then torque the screws shown in pattern (Figure 10: Direction of Cone) to 90 in-lbs
(10.2 N-m).
Figure 11: Ion Source Header Pin Schematic
25.On the PCB, use the resistance meter to verify an open circuit between any two of the six ion source header pins
(except FIL-1 to FIL-1 and FIL-2 to FIL-2 which should be 0.3 Ohms or less). Also verify an open circuit between the
body of the spectrometer and any of the ion source header pins (Figure 11: Ion Source Header Pin Schematic).
If there is continuity (short circuit) at any of the points, remove the header and inspect for shorting.
Page 9 of 11
Filament Replacement for VS Series Leak Detector
-
Document No.
Revision
699909994
A
Figure 12: Ion Source Header Pin Locations
26.Place the spectrometer cover over the header and align the holes (Figure 12: Ion Source Header Pin Locations).
27.Install screws and washers (items 5 & 6), then tighten using a M3 Phillips screw driver (Figure 12: Ion Source
Header Pin Locations).
28.Connect the spectrometer ground cable, the preamp signal cable and the ion source cable to the spectrometer
cover.
Figure 13: Vent Valve
29.Ensure that the vent valve on the turbo molecular pump (if installed) is tightened (Figure 13: Vent Valve).
NOTE
The vent valve is not installed on most turbo pumps.
Page 10 of 11
Filament Replacement for VS Series Leak Detector
-
Document No.
Revision
699909994
A
30.Attach the fan assembly (Figure 2: Fan Assembly) by fastening two wing nuts and one M4 socket head cap screw.
Then connect the fan cable to the unit.
31.Leak check the spectrometer to ensure a leak free joint.
32.Attach the rear cover and secure to the unit using existing hardware.
33.Power up the unit.
34.Watch the Home screen to verify that the Spectube Pressure Wait message progresses to Stabilization Wait and
System Ready within ten minutes. Refer to the user manual if the system fails to reach the System Ready mode.
The filament emission current normally operates at 0.8mA.
35.Use the display menus (MENUS, SET-UP, MANUAL TUNING, EMISSION) to set the emission to .8mA.
NOTE
Varian recommends that you wait a minimum of 30 minutes for the vacuum system
to clean up to obtain optimum calibration.
36.Calibrate the system per the user manual. For proper operation the system must be calibrated after opening the
spectrometer or changing a filament.
37.If the system fails calibration, adjust the filament emission current as follows:
• If gain is too low, there is too much signal; reduce emission current (by 0.1 - 0.2mA), then calibrate again.
• If gain is too high, there is too little signal; increase emission, then calibrate again.
The permitted emission current range is from 0.5 to 1.5 mA.
When calibration is successful, filament replacement is complete.
Page 11 of 11
Filament Replacement for VS Series Leak Detector
-
Document No.
Revision
699909994
A
Sales and Service Offices
Sales and Service Offices
Canada
Central coordination through:
Japan
Varian, Inc.
Other Countries
Varian, Inc.
Varian, Inc.
121 Hartwell Avenue
Lexington, MA 02421
USA
Tel: (781) 861 7200
Fax: (781) 860 5437
Toll Free: (800) 882 7426
Sumitomo Shibaura Building, 8th Floor
4-16-36 Shibaura
Minato-ku, Tokyo 108
Japan
Tel: (81) 3 5232 1253
Fax: (81) 3 5232 1263
Via F.lli Varian 54
10040 Leini, (Torino)
Italy
Tel: (39) 011 997 9 111
Fax: (39) 011 997 9 350
Korea
Varian Technologies Korea, Ltd.
Customer Support and Service:
China
Varian Technologies - Beijing
Room 1201, Jinyu Mansion
No. 129A, Xuanwumen Xidajie
Xicheng District
Beijing 1000031
P.R. China
Tel: (86) 10 6608 1031
Fax: (86) 10 6608 1541
France and Benelux
Varian s.a.
7 avenue des Tropiques
Z.A. de Courtaboeuf – B.P. 12
Les Ulis cedex (Orsay) 91941
France
Tel: (33) 1 69 86 38 13
Fax: (33) 1 69 28 23 08
Germany and Austria
Varian Deutschland GmbH
Alsfelder Strasse 6
Postfach 11 14 35
64289 Darmstadt
Germany
Tel: (49) 6151 703 353
Fax: (49) 6151 703 302
India
Varian India PVT LTD
101-108, 1st Floor
1010 Competent House
7, Nangal Raya Business Centre
New Delhi 110 046
India
Tel: (91) 11 5548444
Fax: (91) 11 5548445
Italy
Varian, Inc.
Via F.lli Varian, 54
10040 Leini, (Torino)
Italy
Tel (39) 011 997 9 111
Fax (39) 011 997 9 350
12/04
Shinsa 2nd Building 2F
966-5 Daechi-dong
Kangnam-gu, Seoul
Korea 135-280
Tel: (82) 2 3452 2452
Fax: (82) 2 3452 2451
Mexico
Varian S.A.
Concepcion Beistegui No 109
Col Del Valle
C.P. 03100
Mexico, D.F.
Tel: (52) 5 523 9465
Fax: (52) 5 523 9472
Russia
Central coordination through:
Varian, Inc.
via F.lli Varian 54
10040 Leini, (Torino)
Italy
Tel: (39) 011 997 9 252
Fax: (39) 011 997 9 316
Taiwan
Varian Technologies Asia Ltd.
18F-13 No.79, Hsin Tai Wu Road
Sec. 1, Hsi Chih, Taipei Hsien
Taiwan, R.O.C.
Tel: (886) 2 2698 9555
Fax: (886) 2 2698 9678
UK and Ireland
Varian Ltd.
28 Manor Road
Walton-On-Thames
Surrey KT 12 2QF
England
Tel: (44) 1932 89 8000
Fax: (44) 1932 22 8769
United States
Varian, Inc.
121 Hartwell Avenue
Lexington, MA 02421
USA
Tel: (781) 861 7200
Fax: (781) 860 5437
North America
Tel: 1 (800) 882-7426 (toll-free)
[email protected]
Europe
Tel: 00 (800) 234 234 00 (toll-free)
[email protected]
Japan
Tel: (81) 3 5232 1253 (dedicated line)
[email protected]
Korea
Tel (82) 2 3452 2452 (dedicated line)
[email protected]
Taiwan
Tel: 0 (800) 051 342 (toll-free)
[email protected]
Worldwide Web Site,
Catalog and On-line Orders:
www.varianinc.com
Representatives in most countries