1
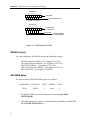
Section 3 – Video Switchers Performance & Setup Section 3 Video Switchers Introduction This section presents descriptions of various Video Switchers used with VPE Editors. Machine descriptions are given in the order listed below. Click topic to link! GVG Model 100/110 Without Keymem GVG Model 1680 MultiM/E Switcher GVG Model 100/110 With Keymem GVG Model 3000/4000 Switcher Ampex Century Switcher Ross Parallel Switcher Ampex Vista Switcher Ross/Encore 216A/504/514 Serial Switcher CDL Serial Switcher GVG Model 200 Switcher GVG Model 300 Switcher GVG Model 1000 Switcher GVG Model 1600-1x Switcher Abekas 8100/8150 Switcher GVG Model 200 Aux Bus Previews Sony Switchers GVG Model 1600 MultiM/E Switcher GVG Model 1680-10x Switcher 3-1 Section 3 – Video Switchers Performance & Setup General Information Preview Switching The following information explains preview switching terms and methods that apply to VPE editing systems when used with video switchers. Definitions When one of the editor preview modes is selected, the first letter of the acronym (for example VVV) indicates which video should appear on the preview monitor when the preview sequence starts at the beginning of preroll. For example, R-VTR - source - RVTR, or Black - Source - Black, etc. for all six previews. The shift-preview modes, VV, VB, and BV are the last 5 seconds of the associated full preview. If the preview is audio only, the source portion of the video preview is inactive and the video remains selected as shown below: MODE PREVIEW VIDEO DURING EDIT FOR AUDIO ONLY* VVV BVB VBV VV VB BV R-VTR BLACK R-VTR R-VTR BLACK R-VTR * The converse is true for Audio during Video Only. Where preview switching occurs depends on the type of preview system (i.e., preview switcher or E-E preview). With an E-E system, time accurate switching occurs in the RVTR for VVV and VBV modes (switch preset to Black), but it occurs in the switcher for BVB mode. With a preview switcher, time accurate switching occurs in the preview switcher for VVV and VBV modes, but it occurs in the switcher for BVB mode. BVB mode in the switcher is best accomplished by switching to a Black that will not affect the setup of the switcher for manual switcher mode (i.e., DSK Black in the Model 100 or PGM Black in the Model 300). When in the manual mode, the operator turns Video Off on the Editor (kills crosspoint selection, transitions and shift-reset operation) so he can manually set up the switcher for an edit. 2 Section 3 – Video Switchers Performance & Setup NOTE: BVB or VBV should be active (non-destructively) during the manual mode. Generally, if a video switcher or audio mixer must do previews on the program row (TEN-XL, 300 Audio, AMX-100), preview switching should not be done during video (audio) off. Thus, those functions would not be available. Editing With 4-Channel Audio With 4-channel audio on some video machines and editor control of multiple track audio machines, there is an increased interest in editor control, previewing, and documentation of all audio channels separately. With Version 4.1 (or greater) Super Edit software, it is possible to enter 4-channel audio record information in the list as well as control up to 4 channel previews with some configurations of the editor and peripheral equipment. Even though many mixers and VTRs are 2 channel, we will look at ways to use them in 4 channel applications. Four channel Super Edit programs allow the user to select any combination of 4 audio channels and video as the video-audio editing mode. The edit is then shown in the list. For example, A13V or A1234. The additional channels 3 and 4 activate channels on certain VTRs and control preview modes on the 4 channel (standard) AMX-170. Other 2 channel devices work normally with the editor, ignoring the new commands. 4-Channel Play and Record Devices Any device, regardless of channels, that can be controlled by the editor can be used as a source machine by the editor. Additionally, several 4-channel VTRs can be controlled in Record Mode. However, there are operational differences between machines as explained below. The Panasonic and SONY 1/2" machines with four audio channels include two FM channels that can only be recorded with video. Thus, 4-channel control is not used. It may be desirable to activate channels 3 and 4 in the list to indicate that 4-channel information has been recorded. A 4-channel mixer may be useful if different audio information is being laid down on the four tracks. This approach has added limitations because the audio information on the FM track is not audible at other than play speeds. The Sony BVH-2800 with PCM audio allows separate recording on any of the four tracks under editor control; two are PCM, and two are linear. 3 Section 3 – Video Switchers Performance & Setup The DVR-1000 and DVR-10 allow separate recording on any of four digital tracks. A separate cue track that can be used for listening at non-play speeds is also controllable by the editor by ganging it with one of the digital channels. Previewing Methods With Super Edit software version 4.1 (or greater) or Sabre Edit version 1.0 or greater, an E-E Preview option is available. Generally, E-E Audio Preview allows the machine to do audio previews when a multi-channel preview switcher is not available. The BVH2800 is limited in this respect in that E-E previews are not available for the PCM tracks. Another option is the 8466 Preview Switcher. It provides preview switching of four channels of audio and one channel of composite or component video. For expansion of existing systems using an 8465 preview switcher, a second 8465 can be paralleled with the first, allowing previews of two audio stereo pairs (and a second video channel). 4 Section 3 – Video Switchers Performance & Setup GVG Model 100/110 Without KeyMem™ Switcher Setup Connect the editing system to serial port J2 on the back of the switcher electronics frame using cable 054602. Editing system communication parameters are given in Section 1 of this manual. Set the switcher communication parameters to match the editing system as explained below. Model 100/110 Control Processor Module Set jumpers J5, J6, and J7 for RS-422 or RS-232. Set jumper J9 to E for 38.4K baud or position C for 9600 baud. Set DIP switches S1 and S2 as shown in Figure 3-1. Model 100CV/110CV SIA/Pulse Regen Module Set jumpers S3, S5, and S6 for RS-422 or RS-232. Set jumper S4 for 38.4K baud or 9600 baud. Set DIP switches S1 and S2 as shown in Figure 3-1. DIP SWITCH S1 1 2 3 4 O O C C 6 7 8 O O 5 O X DON'T CARE SELECT ADDRESS = 30H (O = OPEN, C = CLOSED) DIP SWITCH S2 1 2 3 O X X 4 X 5 6 7 8 X X X C O = EVEN PARITY C = ODD PARITY DON'T CARE O = PARITY ENABLED C = PARITY DISABLED Figure 3-1. DIP Switches S1 & S2 5 Section 3 – Video Switchers Performance & Setup Switcher PROM Versions The switcher PROMs must be the following versions: MODEL 100 100 Serial Interface PROM: -01 or higher (077617-01) 100 Control Processor PROM: -03 or higher (077615-03) MODEL 110 110 Serial Interface PROM: -01 or higher (077617-01) 110 Control Processor PROM: -00 or higher (077627-00) MODEL 100/CV 100CV/110CV MPU PROM: -01 or higher (077715-01) 100CV/110CV Serial Interface PROM: -01 or higher (077617-01) 6 Section 3 – Video Switchers Performance & Setup GVG Model 100/110 With KEYMEM™ Switcher Setup Connect the Editor to the Model 100 and KEY-MEM as shown in Figure 3-2. KEYMEM SERIAL INTERFACE (J2) EDITOR 054602 SERIAL INTERFACE (J2) 054003-10 GVG-100 SWITCHER VIDEO CTL Figure 3-2. Editor/Model100/KEY-MEM Connections Set the switcher communication parameters as listed below: Model 100 Control Processor Module Set jumpers J5, J6, and J7 for RS-422. Set jumper J9 to E for 38.4K baud. Set DIP switches S1 and S2 as shown in Figure 3-3. Model 100CV SIA/Pulse Regen Module Set jumpers S3, S5, and S6 for RS-422. Set jumper S4 for 38.4K baud. Set DIP switches S1 and S2 as shown in Figure 3-3. 7 Section 3 – Video Switchers Performance & Setup DIP SWITCH S1 1 2 3 4 O O C C 5 6 7 8 O O O X DON'T CARE SELECT ADDRESS = 30H (O = OPEN, C = CLOSED) DIP SWITCH S2 1 2 3 C X X 4 X 5 X 6 7 8 X X X O = EVEN PARITY C = ODD PARITY DON'T CARE O = PARITY ENABLED C = PARITY DISABLED Figure 3-3. DIP Switches S1 & S2 PROM Versions For correct operation, the PROMs must be the following versions: 100 Serial Interface PROM: -01 or higher (077617-01) 100 Control Processor PROM: -03 or higher (077615-03) 100CV MPU PROM: -01 or higher (077715-01) 100CV Serial Interface PROM: -01 or higher (077617-01) KEY-MEM Unit: -03 or higher (077660-03) KEY-MEM Setup The correct setup for the KEY-MEM system is as follows: BAUD RATE RS422/232 STOP PARITY DATA 38.4K RS422 1 none 8 1. On the KEY-MEM, access the Setup mode by pressing [LEARN] [SETUP][DSK]. 2. The initial parameter are parity. Scroll through the possibilities with the KEYMEM [FADE TO BLACK] key. 8 Section 3 – Video Switchers Performance & Setup 3. When the desired selection is displayed, press [ENTER]. The KEY-MEM display prompts for a baud rate. 4. Select the baud rate for your Editor in the same manner as for parity. KEY-MEM prompts for Bus Address. 5. Select 30H in the same manner as for Parity. When all selections have been made (i.e., after the final [ENTER]) INITIALIZING appears in the KEY-MEM display before returning you to the normal operations display. 6. On the back of the KEYMEM unit, adjacent to the serial interface connector (J2), locate the four small switches (S1 - S4) that select the communications format between the Editor and the KEYMEM. They should be set as listed in Table 3-1 to match the Editor: Table 3-1. EDITOR/KEY-MEM COMMUNICATIONS FORMAT Switches RS-232 RS-422 S1 Open Closed S2 Closed Open S3 Closed Open S4 Open Closed 9 Section 3 – Video Switchers Performance & Setup Ampex Century Video Switcher Switcher Setup To set up the Ampex Century video switcher: 1. Connect the editor to the EDITOR port on the rear of the Ampex switcher frame. 2. For 31, 41, and 51 editors, the I/O port of the editor must be set for RS-422, 38400 baud, ODD parity, 8-bit data, 1 stop bit. Refer to the editor service manual for details. The VPE-131, 141, 141L, 151, 241, 241L, and 251 systems are set correctly at the factory and cannot be changed. Refer to Section 1 of this manual. 3. On the Switcher Control Panel, set the address to 82AO. See Editor/Ampex Century Switcher Operation and Ampex Century Video Switcher Control Via PEGS in the Super Edit™ Operator’s Guide for operational information. 10 Section 3 – Video Switchers Performance & Setup Ampex Vista Video Switcher Switcher Setup A number of parameters must be set up in the GPSI function menu for operation with Super Edit. On the switcher, simultaneously press CANCEL and ENTER and then press the GPSI soft key. Set up the serial interface parameters as follows: Protocol: Address: Parity: Baud Rate: Stop Bits: VSI Ø x 82A0 Odd 38,400 1 The Vista switcher can be set up to act on either field 1 or field 2 in the system configuration menu. Due to the interface between the switcher and Super Edit, no single timing adjustment will suffice for field accurate operation in both modes. Super Edit is set up to be accurate when the switcher action field is set for Field 1. If it is set to Field 2, some operations will take place one frame early. This can be compensated for using the Adjust Edits part of the initialization dialogue. For proper Field 2 operation: BVB VIDEO START change from Ø to 1 BVB STOP change from Ø to 1 E-MEM timing change from -2 to -1 See Editor/Vista Switcher Operation and Ampex Vista Switcher Control Via PEGS in the Super Edit Operator’s Guide for operational information. 11 Section 3 – Video Switchers Performance & Setup CDL Serial Video Switcher Editor Setup For 31, 41, and 51 editors, set the I/O port of the VPE editing computer to RS-422, 38.4K baud, ODD parity, 8 bit data. I/O board jumper configurations can be found in the Videotape Editing System Service Manual. Refer to Section 1 of this manual for editor description. Switcher Setup The CDL Serial Video Switcher setup is as follows: 1. Connect the CDL Switcher to the Editing System using VPE control cable number 054518-00. The cable connects to switcher serial input J3 on the rear of the Serial Interface. 2. Set the CDL serial interface for 38.4K baud. Remove the top circuit board from the chassis and verify that jumper block FEØØ has a shorting block on the 38.4K location. 3. Set the control switch inside the Serial Interface to FULL CONTROL for editor control. Establishing Communications To establish communications between the Editor and the CDL: 1. Press [SHIFT][RESET] at the Editor Keyboard to establish communications with the Switcher Interface. 2. Check the selected state of the communications in the interface by looking at the LEDs located on the left side of the Serial Switcher I/F PCB. The third yellow LED from the left should be ON when communication is established with the Editor. The red LEDs indicate possible transmission errors. Refer to the CDL Serial I/F manual for a description of error codes. 12 Section 3 – Video Switchers Performance & Setup 13 Section 3 – Video Switchers Performance & Setup GVG Model 200 Video Switcher Preview Switcher Setup If your system includes an 8465 Preview Switcher, its baud rate is fixed at 9600, but you must set an internal DIP switch for ODD parity and LOW true (switches 3 & 4 OPEN/OFF). Refer to Section 1. If you have an 8466 Preview Switcher, you must set the internal DIP switches and jumpers to match the editor baud rate and communication standard. See Section 1 for details. Switcher Setup Model 200 setup is as follows: 1. Connect the control cable supplied with the editing system to the Model 200 EDITOR port at the back of the electronics frame. 2. Use the Model 200 Diagnostic Pod to set the switcher's communica-tions parameters: Install the diagnostic pod cable into the top connector (J10 Diagnostic Port) on the right-most board (521 Control Module) in the Model 200 switcher frame. After several seconds the diagnostic pod will automatically reset to display changing but intelligible messages. 3. Press [SETUP]. The display will read SETUP XX. 4. Press [4] and then [ENT]. The display will read ED PROTO (last entered selection). 5. Using [•], select ED PROTO 100/300. 6. Press [NEXT] to go to the next item. The display will read ED ADDR (last entered selection). 7. Using [•] or [Ø], select ED ADDR 30. 8. Press [NEXT]. The display will read ED TIMEOUT (last entered selection). 9. Using [•], select ED TIMEOUT OFF. 14 Section 3 – Video Switchers Performance & Setup 10. Press [NEXT]. The display will read ED BAUD (last entered selection). 11. Using [•] or [Ø], set the baud rate to the rate listed for your editing system in Section 1 of this manual. 12. Press [NEXT]. The display will read ED PARITY (last entered selection). 13. Using [•], select ED PARITY ODD. 14. Press [NEXT]. The display will read ED STDRD (last entered selection). 15. Use [•] or [Ø] to select either ED STDRD RS-422 or ED STDRD RS-232. Your selection should match your editing system as described in Section 1 of this manual. 16. Press [NEXT]. 17. Press [SETUP], [3], [0], [ENTER]. This enters the Save Default Setup Mode, which saves the settings in the switcher's memory. The display will read ENT = SETUP SAVE. 18. Press [ENTER] to begin the save operation. The display will indicate WRITING! WAIT! for several seconds while the write operation progresses. 19. Leave the Pod in a safe setting by pressing [SETUP]. The display will read SETUP XX. Establishing Communications To establish communications with the Editor: 1. Press the [EDIT ENABLE] push button on the Model 200 control panel. The push button is lit when active. 2. Run the editing application and set up the video crosspoints. Refer to your Operator's Guide. Note that BLACK is crosspoint 1 and is selected when [R-VTR] on the Editor is pushed. 3. Press [SHIFT] [RESET]. This establishes communication with all peripheral equipment. The Model 200 should select M/E 1 and you should be able to switch crosspoints on a different M/E. 15 Section 3 – Video Switchers Performance & Setup NOTE: See The Operator’s Guide, Section 4, Operation for information about operating with VPE Editor products. 16 Section 3 – Video Switchers Performance & Setup GVG Model 300 Video Switcher Preview Switcher Setup If your system includes an 8465 Preview Switcher, its baud rate is fixed at 9600, but you must set an internal DIP switch for ODD parity and LOW true (switches 3 &4 OPEN/OFF). Refer to Section 1. If you have an 8466 Preview Switcher, you must set the internal DIP switches and jumpers to match the Editor communication parameters. See Section 1 for details. Switcher Setup Model 300 setup is as follows: 1. Connect the Editor cable to port 1 (JS1) on the rear of the Model 300 Options Frame. Either port 1 or port 2 will work if strapping is set properly. However, port 1 is recommended for Editor and port 2 for E-Disk. Port 1 is controlled by the Editor ON/OFF push button on the control panel; port 2 is not. 2. Remove the 388 Serial Interface Adapter Module from the 300 SIA Frame. (Remember to release the board connector by rotating the locking screw.) 3. Set the four jumpers for CH-1 (located near the module's rear edge connector). The jumpers for CH-1 should be parallel to the long edge of the board and should cover the dotted lines. 4. Set the three standards jumpers for CH-1 to RS-232 or RS-422 to match the editing system (see Section 1). There is one jumper near R2 and two more between IC1 and IC4. Be careful to move only the jumpers for CH-1. 5. Set the baud rate jumper for CH-1 to position C (9600) or position E (38400) to match the editing system. 6. Re-install the 388 board and press the reset button on the adjacent 380 board. This resets the microprocessor. 7. Remove the 361 board from the 300 F/F frame. 8. Set the Field Select jumper according to user preference. NOTE: The Kaleidoscope requires this jumper to be in the ALL position. 17 Section 3 – Video Switchers Performance & Setup 9. Replace the 361 board in the frame. Establishing Communications To establish communications with the Editor: 1. At the 300 Control Panel, select EDITOR ENABLE on the SIA Control Panel. The button should illuminate. If the EDITOR ENABLE light will not come on, open the control panel and check the jumper or switch on the SIA control panel to ensure it is in the DISABLE position. (See the 300 SIA Manual.) 2. From the editing application, set the switcher crosspoints as described in your editor’s Operator’s Guide. 3. At the Editor Keyboard, press [SHIFT][RESET] to establish communication with the switcher. The green VTR keys should now allow crosspoint selection. PROM Version Verify that switcher M/E 1 is selected and you are able to switch cross-points with the green keys on the Editor Keyboard. (If you wish to select crosspoints on another M/E, perform the selection via Super Edit.) NOTE: For more detailed information regarding editing functions see your Editor’s Operator’s Guide. 18 Section 3 – Video Switchers Performance & Setup GVG Model 1000 Switcher Introduction This describes the preliminary interface between VPE editing systems and the GVG Model 1000 Video Switcher. The following are discussed in the order given: • Crosspoint selection • Wipe patterns • AUX Bus previewing • E-MEM™ transfers • Learn E-MEM™ • PEGS Commands Crosspoint Selection Crosspoints are selectable in the range of Ø to 18 where XPTs Ø - 9 are selected as usual and pressing the rightmost XPT plus Ø - 9 selects XPTs 10 - 18. Note that XPTs Ø and 1 share the same (leftmost) position on the panel. Wipe Patterns There are 20 Wipe patterns available (1 - 20). Select the desired pattern based on the numbering scheme on the Model 1000 panel. Wipe number 1 gives you Model 1000 Wipe number 1. To reverse a Wipe direction, add 100 to the Wipe number. AUX Bus Previewing There are two AUX buses on the Model 1000 and this interface allows use of either bus as a preview switcher. Note however, that if a DVE is connected to the switcher, both AUX Buses are dedicated to the DVE and AUX Bus previewing is disabled. To enable AUX Bus previewing, access Initialization Page #3 and select Init #73. You will be prompted to enter which AUX Bus to preview on (i.e., 1 or 2). Note that entering a Ø disables the function. Ø, 1, or 2 are the only valid entries at the prompt; all others are ignored. 19 Section 3 – Video Switchers Performance & Setup Once enabled, the selected AUX Bus behaves as a video only preview switcher (i.e., switching between the R-VTR XPT and the PGM OUT XPT). Note that the Model 1000 does not have an explicit PGM OUTPUT XPT. Init page item #74 allows the user to enter PGM OUT crosspoint selection. Valid entries are between 1 and 18. The default setting is 9. The SWAP VTR feature of Super Edit will interact with the AUX Bus as a preview preselector. The R-VTR crosspoint assignment on the AUX Bus will follow any changes made with the SWAP function. E-MEM Transfers The E-MEM transfer function with the Model 1000 Switcher is the same as with all other GVG switchers. Note however that the EDL display is different in that there are three entries for each E-MEM saved in the list. Learn E-MEM The Learn E-MEM function with the Model 1000 Switcher is the same as with the GVG Model 100 Switcher. That is, the user may tell the Model 1000 to learn an E-MEM register and pressing [SHIFT][L] prompts the user for the register number to learn. 20 Section 3 – Video Switchers Performance & Setup PEGS Commands A table of PEGS command codes is shown below. Note that PEGS command codes 58 and 68 are uniquely defined for the Model 1000. Also note that E-MEM™ Recall register Ø serves a special function. MODEL 1000 PEGS COMMAND CODES Code Ø 1 - 20 Function E-MEM RECALL (special use - reset switcher to default startup state) E-MEM RECALL (digit specifies register number) 21 AUTO TRANS 22 DSK MIX 23 FADE-TO-BLACK 50 MIX/AUTO TRANS 51 MIX/KEY 1/AUTO TRANS 52 MIX/KEY 2/AUTO TRANS 53 MIX/KEY 1 & 2/AUTO TRANS 54 MIX/BKGD/AUTO TRANS 55 MIX/BKGD/KEY 1/AUTO TRANS 56 MIX/BKGD/KEY 2/AUTO TRANS 57 MIX/BKGD/KEY 1 & 2/AUTO TRANS 58 EFFECTS SEND ON 60 WIPE 61 WIPE/KEY 1/AUTO TRANS 62 WIPE/KEY 2/AUTO TRANS 63 WIPE/KEY 1 & 2/AUTO TRANS 64 WIPE/BKGD/AUTO TRANS 65 WIPE/BKGD/KEY 1/AUTO TRANS 66 WIPE/BKGD/KEY 2/AUTO TRANS 21 Section 3 – Video Switchers Performance & Setup 22 67 WIPE/BKGD/KEY 1 & 2/AUTO TRANS 68 EFFECTS SEND OFF Section 3 – Video Switchers Performance & Setup GVG 1600-1X Video Switcher Preview Switcher Setup If your system includes an 8465 Preview Switcher, its baud rate is fixed at 9600, but you must set an internal DIP switch for EVEN parity and HIGH true (switches 3 &4 CLOSED/ON). Refer to Section 1. If you have an 8466 Preview Switcher, you must set the internal DIP switches and jumpers to match the Editor communication parameters with EVEN parity. See Section 1 for additional details. Switcher Setup The 1600-1X setup is as follows: 1. Connect the supplied cable (054519-00) from the editing system to the 1600 switcher E-MEM frame connector J62 (EDITOR 1). 2. Remove the E-MEM microcomputer board (065039) from the switcher's lower card cage. 3. Locate the solder turrets near IC25 and connect a jumper either from Ø to F3 for 9600 baud operation or from Ø to F1 for 38.4K baud operation. Section 1 lists the baud rate for your Editor. 4. Remove the E-MEM J9 Serial Data Switch (065009) to the right of the E-MEM microcomputer board. Strap the turrets near the serial port drivers on this board to match the RS-232 or RS-422 standard used by your Editor. Refer either to the following or the E-MEM Serial Data Switch (065009) manual for strapping instructions. RS-232 RS-422 Turret 4 to 5 Turret 10 to 11 Turret 20 to 21 Turret 2 to 3 Turret 5 to 6 Turret 11 to 12 Turret 19 to 20 Turret 25 to 26 Turret 3 through 10K• to +5VDC Turret 15 through 10K• to +5VDC 23 Section 3 – Video Switchers Performance & Setup Turret 6 through 10K• to GND Turret 18 through 10K• to GND 6. Re-install the board. 7. Press and hold the RESET switch on the front of the E-MEM microcomputer board. Hold it in until the green LEDs on the boards to the left of the microcomputer board go out and then release the switch. Operational Prerequisites Version -05 or later PROMs are required in the 1600-1X for proper operation with the VPE Editing System. The READY/SAFE switch on the switcher control panel must be in the READY position so the red LED comes ON, otherwise the switcher is disabled. For proper operation sync, blanking and subcarrier must be connected to the switcher. Crosspoints will not switch unless sync is present. Establishing Communications To establish communications between the Editor and the 1600-1X: 1. From the editing application, set the switcher crosspoints as described in your editor’s Operator’s Guide. 2. At the Editor Keyboard, press [SHIFT][RESET] to establish communication with the switcher. The green VTR keys should now allow crosspoint selection. 24 Section 3 – Video Switchers Performance & Setup GVG 1600 Multi-M/E Video Switcher Preview Switcher Setup If your system includes an 8465 Preview Switcher, its baud rate is fixed at 9600, but you must set an internal DIP switch for EVEN parity and HIGH true (switches 3 &4 OPEN/OFF). Refer to Section 1. If you have an 8466 Preview Switcher, you must set the internal DIP switches and jumpers to match the Editor communication parameters as described in Section 1. Switcher Setup The 1600 Multi M/E setup is as follows: 1. Connect the supplied cable (054519-00) from the editing system to the 1600 switcher E-MEM frame connector J62 (EDITOR 1). 2. Reconfigure the E-MEM microcomputer board (065008) from each E-MEM A and B unit as follows: Locate the solder turrets near IC25 and match the editor baud rate by connecting a jumper either from turret Ø to turret F3 for 9600 baud or from turret Ø to turret F1 for 38.4K baud. 3. Reconfigure each E-MEM J9 Serial Data Switch (065009) to the right of the EMEM microcomputer boards as follows: Serial Strap the turrets near the serial port drivers to match the RS-232 or RS-422 standard used by your editor. Refer to the following table or the E-MEM Data Switch (065009) manual for strapping instructions. RS-232 RS-422 Turret 4 to 5 Turret 10 to 11 Turret 20 to 21 Turret 2 to 3 Turret 5 to 6 Turret 11 to 12 Turret 19 to 20 25 Section 3 – Video Switchers Performance & Setup Turret 25 to 26 Turret 3 through 10K• to +5VDC Turret 15 through 10K• to +5VDC Turret 6 through 10K• to GND Turret 18 through 10K• to GND 4. Re-install the board. 5. Press and hold the RESET switch on the front of the E-MEM microcomputer board. Hold it in until the green LEDs on the boards to the left of the microcomputer board go out and then release the switch. 6. Reset each microcomputer board in the same manner. Establishing Communications To establish communications between the Editor and the 1600 Multi M/E: 1. From the editing application, set the switcher crosspoints as described in your editor’s Operator’s Guide. 2. At the Editor Keyboard, press [SHIFT][RESET] to establish communication with the switcher. The green VTR keys should now allow crosspoint selection. The READY/SAFE switch on the switcher control panel must be in the READY position so the red LED comes ON, otherwise the switcher is disabled. For proper operation sync, blanking and subcarrier must be connected to the switcher. Crosspoints will not switch unless sync is present. PROM Version Required 1600 E-MEM-II A-System (ME) 075026-01 B-System (FF/DSK) 075027-03 PROMS with lower version numbers (last two digits) must be replaced; Call Editware Customer Service. 26 Section 3 – Video Switchers Performance & Setup Setup Notes In the event of difficulty with the edit system's ability to set crosspoints, check the switch settings on the J7 board. The settings for NTSC and PAL systems are shown on GVG drawing number D10-065007-00/10, rev E1, found in the 1600 E-MEM Service Manual. 27 Section 3 – Video Switchers Performance & Setup GVG 1680-10X Video Switcher Preview Switcher Setup If your system includes an 8465 Preview Switcher, its baud rate is fixed at 9600, but you must set an internal DIP switch for EVEN parity and HIGH true (switches 3 &4 CLOSED/ON). Refer to Section 1. If you have an 8466 Preview Switcher, you must set the internal DIP switches and jumpers to match the Editor communication parameters as described in Section 1. Switcher Setup The 1680-10X setup is as follows: 1. Connect the control cable supplied with the editor to the 1680-10X frame connector J62 (EDITOR 1). 2. Remove the E-MEM microcomputer board (065039) from the lower set of cards in the 1680-10X frame (11th board from the left). 3. Set the switcher baud rate on the microcomputer board to match the editing system. To do so, locate the solder turrets behind the RESET switch. Connect a jumper either from turret F3 to turret Ø for 9600 baud operation or from turret F1 to turret Ø for 38.4K baud operation. 4. Return the microcomputer board to the frame. 5. Remove the next board to the right of the E-MEM microcomputer board. This is the E-MEM Serial Data Switch (065009). This board must be jumpered for RS232 or RS-422 on port J62 to match the standard used by the editing system. See the Table 3-2 and set the jumpers accordingly. Table 3-2. E-MEM SERIAL DATA SWITCH JUMPER SETTINGS FOR PORT J62 28 Jumper Location RS-232 RS-422 Port 3 (J62) Receive 1-2 2-3 Port 3 (J62) Receive 4-5 5-6 Port 3 (J62) Transmit 1-2 2-3 Section 3 – Video Switchers Performance & Setup Port 3 (J62) Transmit 4-5 5-6 6. When finished, re-install the board. 7. Hold the RESET button on the microcomputer for at least five seconds. Note that the green LEDs on the boards to the far left of the microcomputer go out. 8. Release the button. Establishing Communications To establish communications between the Editor and the 1600 Multi M/E: 1. From the editing application, set the switcher crosspoints as described in your editor’s Operator’s Guide. 2. At the Editor Keyboard, press [SHIFT][RESET] to establish communication with the switcher. The green VTR keys should now allow crosspoint selection. The READY/SAFE switch on the switcher control panel must be in the READY position so the red LED comes ON, otherwise the switcher is disabled. For proper operation sync, blanking and subcarrier must be connected to the switcher. Crosspoints will not switch unless sync is present. PROM Version Required Version 073917-06 or later PROMs are necessary in the 1680-10X for proper operation with a VPE Editing System. These are located on the E-MEM microcomputer board (J7). PROMS with lower version numbers must be replaced. Contact GVG/Tektronix Customer Service for replacement PROMS. Setup Notes Verify that vertical timing switches on A-system (PGM-PST) and B-system (M/E) boards are set as follows: NTSC A/B-System PAL A/B-System 8192 4096 16384 4096 29 Section 3 – Video Switchers Performance & Setup 256 128 64 32 30 2048 1024 512 128 64 32 Section 3 – Video Switchers Performance & Setup GVG 1680 Multi-M/E Video Switcher Preview Switcher Setup If your system includes an 8465 Preview Switcher, its baud rate is fixed at 9600, but you must set an internal DIP switch for EVEN parity and HIGH true (switches 3 &4 CLOSED/ON). Refer to Section 1. If you have an 8466 Preview Switcher, you must set the internal DIP switches and jumpers to match the Editor communication parameters as described in Section 1. Switcher Setup The 1680 Multi M/E setup is as follows: 1. Connect the control cable supplied with the editor to the switcher frame connector J62 (EDITOR 1). 2. Reconfigure each microcomputer board (065039) in each E-MEM A and B system to match the editor baud rate. To do so, locate the solder turrets near IC25. Connect a jumper either from turret Ø to turret F3 for 9600 baud operation or from turret Ø to turret F1 for 38.4K baud operation. 3. Reconfigure each E-MEM A and B system Serial Data Switch Board (065009) to the right of each microcomputer board as follows: Set the four PORT 3 (J62) jumpers for RS-232 or RS-422 communication to match the standard used by the editing system. See Table 3-3for the jumper settings. Table 3-3. E-MEM SERIAL DATA SWITCH JUMPER SETTINGS FOR PORT J62 Jumper Location RS-232 RS-422 Port 3 (J62) Receive 1-2 2-3 Port 3 (J62) Receive 4-5 5-6 Port 3 (J62) Transmit 1-2 2-3 31 Section 3 – Video Switchers Performance & Setup Port 3 (J62) Transmit 4-5 5-6 4. When finished, re-install the board. 5. Hold the RESET button on the microcomputer for at least five seconds. Note that the green LEDs on the boards to the far left of the microcomputer go out and then release the button. 6. Reset each microcomputer board in the same manner. Establishing Communications To establish communications between the Editor and the 1600 Multi M/E: 1. From the edditng application, set the switcher crosspoints as described in your editor’s Operator’s Guide. 2. At the Editor Keyboard, press [SHIFT][RESET] to establish communication with the switcher. The green VTR keys should now allow crosspoint selection. The READY/SAFE switch on the switcher control panel must be in the READY position so the red LED comes ON, otherwise the switcher is disabled. For proper operation sync, blanking and subcarrier must be connected to the switcher. Crosspoints will not switch unless sync is present. PROM Version Required 1680-F and K, E-MEM-IIIw/065007-00 or 02 version (J7) board: A-System (PGM-PST) B-System (M/E) PROM 073918-07 PROM 073919-07 These are located on the E-MEM microcomputer board (J7). PROMS with lower version numbers (last two digits) must be replaced; call GVG/Tektronix Customer Service for replacement PROMS. Setup Notes In the event of difficulty with the edit system's ability to set crosspoints, check the switch settings on the J7 board. Switch settings may vary with PROM version. Verify settings with GVG/Tektronix Customer Service if other than -06 or -07 PROMS are used. Also verify that vertical timing switches on A-system (PGM-PST) and B-system (M/E) boards are set as follows: 32 Section 3 – Video Switchers Performance & Setup 065007-00 J7 Board NTSC A/B-System PAL A/B-System 8192 4096 256 64 32 16384 4096 2048 512 128 64 32 065007-02 J7 Board NTSC A/B-System PAL A/B-System 8192 4096 048 512 16384 1024 512 256 32 All boards in a system must be set correctly. For example, an incorrect setting on a BSystem board will prevent the A-System board from operating properly, etc. 33 Section 3 – Video Switchers Performance & Setup GVG Model 3000/4000 Switcher Interface The interface for the Model 3000/4000/Editor is based on the Model 200/300 Editor interface. The command set is essentially the same as the Model 200/300 protocol command set with the two exceptions noted below. One exception is that the addressing of pushbuttons (as opposed to crosspoints) has been changed from a one (1) byte address to a two (2) byte address. For example, the commands for the Auto Transition pushbutton on each Switcher are: Model 200 Model 300 Model 3000/4000 = 03 xx FB 1B = 03 xx FB 1B = 04 xx FB 02 02 The other exception is that although selection of crosspoints uses identical messages, the Model 3000/4000 (and the Model 200) starts addressing from crosspoint one (1) while other GVG Switchers start from crosspoint zero (Ø). NOTE: The Model 3000/4000 has an internal delay of five (5) frames which is compensated for by the Editor. Switcher-To-Editor Connections The Editor controls the Switcher through a cable with a 9-pin D connector attached to the Editor Serial port, J6, on the back of the Model 3000 electronics frame. On the Model 4000, the Editor interface is through a 9-pin D connector attached to the Editor Serial port, J3, on the back of the electronics frame. Switcher Setup Requirements The Model 3000/4000 setup requirements, discussed below, consist of: 34 • Protocol Selection • Status of the Editor Enable push button Section 3 – Video Switchers Performance & Setup • Crosspoint mapping Protocol Selection The Model 3000/4000 may be controlled using RS-422 protocol at 38.4K baud or RS232 protocol at 9600 baud. Most VPE editing applications run at RS-422. However, older systems (41/51) using an 8465 Preview Switcher must communicate using RS-232. On those systems, the Switcher port is shared with the 8465, which restricts communication to RS-232. Model 3000 Protocol Selection Protocol selection is accomplished by jumpers on the Control Processor Board (see Figure 1). To set up the Model 3000 for the appropriate protocol, perform the following: Figure 1. Model 3000 Protocol Selection Jumpers 1. Remove the Control Processor Board from the frame and place on a flat, level, static free surface. (This board is the one on the right in the middle row of three rows of vertically mounted boards.) 2. Referring to Figure 1, jumper the upper two pins of both EDITOR jumpers for RS-422 or the lower two pins for RS-232 Protocol. 3. Replace the Board and proceed to Switcher Setup. 35 Section 3 – Video Switchers Performance & Setup Model 4000 Protocol Selection 1. Remove the Control Processor II Board from the electronics frame and place on a flat, level, static free surface. (There are two Control Processor Boards in the Signal Frame. The Control Processor II board is the second module from the far left in the top row of modules.) 2. Referring to Figure 2, jumper the upper two pins of both EDITOR jumpers for RS-422 protocol or the lower two pins for RS-232 protocol. 3. Replace the Board and proceed to Switcher Setup. Connector (Ref) J15 Protocol Selection Jumper Mezzanine Board Figure 2. Model 4000 Protocol Selection Jumpers Switcher Setup 1. On the Menu Display of the Switcher’s Control Panel, push the 2. [CONFIG] menu selection (left of the display). 36 Section 3 – Video Switchers Performance & Setup 3. From the function buttons below the display, push [EXTERNAL I/F] , then push [EDITOR I/F]. Selections for Baud rate, [BAUD], and [PARITY], appear. (Parity for both RS-422 and RS-232 is ODD.) 4. Select 38.4K baud for RS-422 or 9600 for RS-232. 5. Press [RESET] on the Control Processor Board. Editor Enable Pushbutton The EDIT pus button is used to enable/disable control of the Switcher from the Editor. It is in the External I/F section on the Model 3000/4000 Control Panel. The pushbutton is On when enabled and Off when disabled. Crosspoint Mapping Crosspoint mapping assigns each crosspoint to recieve the signal from a particular input jack. Assignment is from the Main Menu on the Control Panel as follows: 1. Press the [CONFIG] pushbutton (left of the display). The Configuration menu appears. 2. Press [INPUTS]. The Inputs Selection menu appears. 3. Press [MAP INPUTS]. A box appears in the center of the screen showing the currently selected XPT. To change the selection, press the desired XPT on the Preset Bus. 4. Using the top three (3) knobs to the right of the display, adjust the Video Input, Key Input, and Chroma Key Input values associated with the selected XPT. Assignments are taken immediately by the Model 3000; resetting the Switcher is not necessary. Note that the user must assign BLACK to crosspoint 1. Editor Setup Requirements Editor setup requirements, discussed below, consist of crosspoint assignments and transition delay adjustments. 37 Section 3 – Video Switchers Performance & Setup Crosspoint Assignment Crosspoint assignments are made the same as with other Grass Valley Switchers; through either the Start Up dialogue (for Super Edit v6.0 and previous) or the Assignment Page (Super Edit v7.0). Note again that the 3000/4000 begins crosspoint assignments with one (1) instead of zero (Ø). The user may assign M/E re-entry crosspoints to a VTR by entering: 101 for M/E 1; 102 for M/E 2; and 103 for M/E 3. Transition Delay Adjustments For Super Edit™ v7.0 and later, these adjustments are made during the Initialization Pages dialog INIT item #72. Default is -5 frames. Additionally, the default values for two (2) other delay adjustments have been changed. The defaults, listed below, are for E-MEM™ triggers and transition start times for dissolves and wipes. WAS IS E-MEM triggers Diss/Wipes -2 -2 -4 -5 NOTE: A new Configuration question has been added to Super Edit v6.0. This new question allows the user to adjust the transition start time for this type of PEGS. Editor/Switcher Control Operations Operating control of the Model 3000/4000 by the Editor consists of the following: 38 • Shift/Reset - Allstop • Switcher Black • Crosspoint Selection • Transition Mode Selection • Dissolve/Wipe Rate Selection • Programming Auto Transitions via PEGS • Programming E-MEM™ trigger via PEGS Section 3 – Video Switchers Performance & Setup Shift/Reset - Allstop Sequence The Allstop Sequence is a string of commands sent to wake up the 3000/4000 and/or put it into a fixed known state. This occurs with a [SHIFT][RESET], anytime [SPACE BAR] (Allstop) is pressed at the end of an edit, and after completion of data initialization through the Init Pages or Configuration dialogs. Depending on previous conditions, the result of sending this string of commands is one of the following: Select the current M/E re-entry pushbutton on the PGM bus. On the M/E, select the crosspoint assigned to the currently selected VTR on the Edit Screen. the On the M/E, select background as the transition mode and the Mix push button as transition type. Any titles on-air are taken off-air (M/E only). NOTE: This string of commands will have no effect on the Down Stream Keyer portion of the Control Panel (e.g., DSK1 and/or DSK2 ON AIR remain that way after an Allstop or [SHIFT][RESET]. Switcher Black BLACK for BVB and VBV previews is assumed to be on the first crosspoint of the M/E. To use this feature properly, the user must assign BLACK to that crosspoint (i.e., it is not done automatically in the Video Switcher). Black in previews is from the PGM/PST bus (until Preview Switching is moved onto the AUX bus). Crosspoint Selection Either M/E 1 or 2 can be selected in the normal way. Super Edit will not currently select the M/E 2 crosspoint on M/E 1 or the M/E 1 crosspoint on M/E 2. On the Assignment page, enter into the Video XPT column any of these three items: 101 102 103 = M/E 1 = M/E 2 = M/E 3 Subsequent selection of a Green key with one of these numbers assigned as the Video XPT will select the associated reentry XPT on the current switcher bank. Crosspoints are automatically selected for edits and previews. 39 Section 3 – Video Switchers Performance & Setup Transition Mode Selection This is functional and works similar to other Grass Valley Video Switchers. There are no known problems with Wipes or Mixes in Super Edit™. Dissolve/Wipe Rates This is functional and works similar to other Grass Valley Video Switchers. There are no known problems with specifying a Dissolve/Wipe rate. Programming Auto-Transitions Via PEGS To specify other than E-MEM™ transitions on the 3000/4000, specify FUNCTION = X instead of FUNCTION = V (as on other Grass Valley Video Switchers.) The PEGS code is similar to that used on the Model 200 series Video Switchers. However, Background B and Key Priority keys have not been implemented at this time. The buttons on the 3000/4000 M/E and Downstream Keyer panels are assigned numeric values. These values are used in combinations at the COMMAND = ? prompt of the PEGS dialog to select areas and/or functions of the Video Switcher when programming an Auto-Transition via PEGS. The first digit of the 3-digit PEGS command code designates the area of the Video Switcher which is to be used in the Auto-Transition. The values and corresponding areas are listed in Table 1. Table 1. PEGS CODE - 1st DIGIT Code No. Description ø PGM/PST Bus 1 M/E 1 2 M/E 2 3 M/E 3 4 DSK A new feature has been added to the Model 3000/4000 Switcher interface. The Key Priority button is now available through the PEGS dialogue. The PEGS numbers X59 (Mix) or X69 (Wipe), where X indicates either M/E1 or M/E2, will now select the [KEY PRIORITY] button with an Autotrans. 40 Section 3 – Video Switchers Performance & Setup The second digit selects the type of Auto-Transition. The values and corresponding types listed in Table 2. Table 2. PEGS CODE - 2ND DIGIT Code No. Description 50 Mix 60 Wipe (M/E 2 & M/E 2) The third digit selects the source(s) of the transition (Key, Bkgd, etc.). The values and corresponding sources are listed in Table 3. Table 3. PEGS CODE - 3rd DIGIT M/E 1 & M/E 2 Code No. Description DSK* Code No. Description 1 KEY 1 1 DSK 1 2 KEY 2 2 DSK 2 4 BKGD A 4 BKGD 8 PST BLK 9 KEY PRIOR * The Transition Panel between PGM/PST & DSK The following are examples of how the PEGS Command codes may be used. Code Command 153 M/E 1, MIX, KEY 1 & KEY 2 265 M/E 2, WIPE, BKGD & KEY 1 Note that command x58, Enable Fade-to-Black/PST Black, is always done as a Mix. Also note that the 3000/4000 has another type of transition mode, Background B. However, this mode cannot be controlled by the Editor. Also note that when attempting to control the transition mode on the DSKs, bank 4 must be used instead of bank Ø. For example, to enable Key 1 on the DSK, use X-PEG command 451 instead of Ø51. This also applies to command x58 (Enable PST Black). 41 Section 3 – Video Switchers Performance & Setup Programming E-MEM™ Triggers Via PEGS To specify E-MEM™ triggers on the 3000/4000, press [VIDEO][ENTER] at the FUNCTION = ? prompt. At the COMMAND = ? prompt, specify the E-MEM™ register. These registers are identified according to the area of the Video Switcher (similar to Auto-Transitions). The first digit of the 3-digit PEGS command identifies the area of the Video Switcher. The second and third digits specify the register (ØØ through 99). There are 100 E-MEM registers assigned to each bank in the Model 3000 and there are no shifted registers. The values and corresponding areas of the Video Switcher are: Ø = PGM/PST Bus 1 = M/E 1 2 = M/E 2 3 = M/E 3 4 = DSK - DSK 1 & DSK 2 + DSK Panel (including PST BLK,) 5 = BKGD & MATTES 6 = Misc - PVW + MASK + PREVIEW. 7 = DPM-1 8 = DPM-2 9 = DPM-3 10 = DPM-4 11 = M.E-MEM NOTE: Master E-MEM has not been implemented at this time. Examples of PEGS command codes for E-MEM™ triggers: 105 - triggers the M/E 1 portion of E-MEM 05 (Bank 0 register 5) 210 - triggers the M/E 2 portion of E-MEM 10 (Bank 1 register 0) 499 - triggers the DSK portion of E-MEM 99 (Bank 9 register 9) Note the following items: 42 • The Master E-MEM function is not addressed by Super Edit™ at this time. • E-MEM data is not stored in the EDL at this time. • E-MEM data is not sent from the Editor to the Video Switcher at this time. Section 3 – Video Switchers Performance & Setup • Only the selected register in the Video Switcher is triggered. With the above in mind, there are no known problems with E-MEM triggers from the Editor. AUX Bus Previewing One of the features of the 3000/4000 is the capability of previewing on its AUX Buses. This feature is supported by Super Edit™ and discussed as listed below. • AUX Bus & E-E/8465 Previewing • AUX Bus Selection • Preview Pre-Selection • AUX Bus Control • Configuration File Handling AUX Bus & E-E/8465 Previewing When enabled, previewing video on the AUX Bus of the 3000/4000 replaces the Super Edit type of previewing. Audio previewing continues to take place at the Audio Mixer through the interface built into the program (e.g., AMX-170, Graham-Patten, etc.) Because the user can disable previewing on the AUX Bus, subsequent previews would be handled by whichever method is built into the program. Super Edit™ with E-E previewing and 8465/8466 Previewing are discussed below. Super Edit™ & E-E Previewing E-E previewing is disabled when previewing on the AUX Bus. Thus, the output of the R-VTR remains locked to its off-tape video during green key (source) selection on the Editor. When AUX Bus previewing is disabled, green key selection forces the R-VTR into the E-E preview mode and the output of the 3000/4000 can be seen on the monitor. When AUX Bus previewing is enabled, the user must select Audio Mixer preview in the Init Page/Control-B dialog to hear the audio switch during preview. 43 Section 3 – Video Switchers Performance & Setup Super Edit™ & 8465/8466 Previewing This type of previewing remains unchanged. But the user must connect the Editor to the Preview Switcher instead of to the 3000/4000. Not doing so prevents the [SHIFT] [RESET] sequence from waking up the 3000/4000. AUX Bus Selection For AUX Bus selection, there are setups on both the Model 3000/4000 and the Editor. Model 3000 - AUX Bus Selection Setup The Model 3000 has delegation buttons on the Control Panel for AUX Bus 1 through 6 and a row of AUX Bus crosspoints. (AUX Bus 7 is intended to be controlled from a remote location and is not included in Front Panel delegation.) The delegation buttons are used to assign control of an AUX Bus (AUX Bus 1 through AUX Bus 6) to the row of AUX Bus crosspoints. Note however, that they are not involved in selection of AUX Bus control by the Editor. Model 4000 – AUX Bus Selection Setup The Model 4000 has delegation buttons on the Control Panel for AUX Bus 1 through 9 and a row of AUX Bus crosspoints. However, you may only delegate Aux bus 1 through 6 from the Control Panel (same as the Model 3000). The delegation buttons are used to assign control of an AUX Bus (AUX Bus 1 through AUX Bus 9) to the row of AUX Bus crosspoints. Note however, that they are not involved in selection of AUX Bus control by the Editor. Editor - AUX Bus Selection Setup There are 14 possible AUX Buses available for use as preview switchers; 1A through 7A (video bus only); and 1B through 7B (video or key bus). Selection is made through the Init Pages which accepts only the following: Ø 44 Disable previewing on the AUX Bus and enable E-E or 8465/8466 previewing. 1-7 A side of selected AUX Bus 11 - 17 B side of selected AUX Bus Section 3 – Video Switchers Performance & Setup NOTE: All other values are illegal and will not be accepted. Preview Pre-Selection This feature is handled the same as a 10 x 1 Switcher (i.e., the user may choose a source machine as the record machine. Changing the record machine to a different source machine is accomplished with the SWAP function of the Editor. AUX Bus Control AUX Bus control, as discussed below, consists of green key selection and previewing. Green Key Selection Selecting the R-VTR (green key) on the Editor switches the AUX Bus to the crosspoint (XPT) assigned to that VTR. Selecting any other green key except the RVTR switches the AUX Bus to the PGM OUT button. (The actual XPT associated with any given green key is switched on the currently selected M/E.) Previewing Crosspoint (XPT) selection on the AUX Bus during video previews follows the sequences for the given types as listed in Table 4. Table 4. VIDEO PREVIEWS SEQUENCE XPT Selected Preview Type Cue Point In Point Outr Point VVV R-VTR PGM OUT R-VTR BVB Black PGM OUT Black VBV R-VTR Black R-VTR Crosspoint (XPT) selection on the AUX Bus during audio only pre-views follows the sequences for the given types as listed in Table 5. Table 5. AUDIO PREVIEWS SEQUENCE XPT Selected 45 Section 3 – Video Switchers Performance & Setup Preview Type Cue Point In Point Out Point VVV R-VTR R-VTR R-VTR BVB Black Black Black VBV R-VTR R-VTR R-VTR Note that when previewing with R-VTRs that have confidence heads, such as the Sony BVH-2000, the output signal of the confidence head does not meet the input specification for the 3000/4000. When the 3000/4000 re-inserts its internal sync at its output, the preview monitor has a bar across the video approximately 1/3 of the way down from the top of the screen. Configuration File Handling Saving a Super Edit setup to a Configuration file preserves two new features of the interface. The first is the current AUX Bus selection. The second is the type of previewing associated with that selection. When the saved selection is zero, previewing takes place through the method in the program (i.e., E-E or 8465/8466). With any other selection, previewing takes place on the AUX Bus. As with other versions of Super Edit™, the Configuration file also saves the start time adjustments associated with the PEGS registers and Dissolves and Wipes. Note the following limitation. Because the internal timing of the 3000/4000 differs from other Grass Valley Switchers, Configuration files created with the Super Edit/Model 3000 interface will not be compatible with Super Edit for other Grass Valley Switchers. The addition of the X-PEG feature is the deciding factor for this limitation. However, Configuration files created with the Super Edit/Model 3000/4000 interface are compatible with other Super Edits that contain the Model 3000/4000 interface. 46 Section 3 – Video Switchers Performance & Setup Ross Parallel Video Switcher Preview Switcher Setup The ROSS parallel video switcher connects to the Videotape Editing System through an 8465 Preview Switcher. For correct operation with the Ross switcher you must set an internal DIP switch on the 8465 for ODD parity and parallel LOW = true. Refer to Section 1 of this manual for details. Switcher Setup To set up the Ross parallel video switcher: 1. Connect the parallel control cable from the 8465 PARALLEL CONTROL OUT port to J25 on the switcher control panel. A wiring diagram for building the control cable is given in the Drawings volume of the Editing System Service Manual. 2. Locate the ENCORE/PARALLEL switch on the back of the switcher control panel. Verify that the switch is set in the PARALLEL position. Establishing Communications While running the Super Edit program, press [SHIFT][RESET] at the Editor Keyboard to establish communications with the switcher. If this fails to establish control, press the reset button on the Parallel Interface PC board in the switcher control panel and try [SHIFT][RESET] again. 47 Section 3 – Video Switchers Performance & Setup Ross/Encore 216A/504/514 Video Switcher Editor Setup For the 31, 41, and 51 editors, set the editor's I/O port 1 for RS-422, 9600 baud, ODD parity, 8-bit data. Power down the editor computer and configure the I/O port using the instructions in the I/O board section of the Videotape Editing System Service Manual. For the VPE-131, 141, 141L, 151, 241, 241L, and 251 systems refer to Section 1 of this manual. Switcher Setup To set up the Ross/Encore 216A, 504 & 514 video switchers: 1. Connect the editor to the Ross/Encore using the supplied VPE control cable (054518-00). 2. On the Ross/Encore control panel, set the Editor Enable switch to ON. Establishing Communications To establish communications between the Editor and the switcher: 1. From the editing application, set the switcher crosspoints as described in your editor’s Operator’s Guide. 2. At the Editor Keyboard, press [SHIFT][RESET] to establish communication with the switcher. The green VTR keys should now allow crosspoint selection. Note that BLACK is crosspoint Ø, and is selected when [R-VTR] at the Editor Keyboard is pressed. NOTES: Editware Super Edit software is designed for use with Ross/Encore software versions later than Nov. 1985 and Ross models equipped with Encore and the Key-Learn feature. Super Edit™ supports 16 crossppoints for the 216A. 48 Section 3 – Video Switchers Performance & Setup Abekas 8100/8150 Video Switcher Introduction This document describes the interface between Super Edit and the Abekas A8100 and A8150 switchers: Detailed operations instructions for Super Edit are given in the Super Edit Operator’s Guide. The Abekas Switcher Operations Manual provides excellent information for the switcher. This Setup Guide discusses only those features which are unique to the Super Edit/Abekas switcher interface. The following are discussed in the order given: • • • • • • • • • • • Connection Crosspoint Selection BVB and VBV Previews Aux bus Previewing Learn EMEM EMEM Recall STORE EMEM PEGS Commands - Auto Trans. PEGS Commands - Aux bus Crosspoints Other INIT Page Options Timeline Control Connection a. Connect an RS422 cable from the designated switcher port on the editor to one of the Serial ports on the switcher. 49 Section 3 – Video Switchers Performance & Setup b. Set up the selected port on the switcher as follows: In the Engineering Menu select “Communications” then set the communications parameters as follows: Protocol GVG Baud 38400 Parity Odd Crosspoint Selection Crosspoint selections are made as described in the Operator’s Guide. In the Abekas switcher Black is normally crosspoint 1, and crosspoint 2 is input 1. On the Super Edit Assignment page either ‘0’ or ‘1’ will select Black. BVB and VBV Previews For non-Aux bus Previews Super Edit uses the DSK as the source of the Black for a BVB or VBV Preview. Because this is a toggle on/off transition, the user must ensure that the DSK FTB is Off prior to the start of a Preview operation. Aux Bus Previewing and Preselector Aux bus previews can be accomplished on the Abekas switchers. Operation is similar to that described in the Super Edit Operator’s Guide. In Super Edit, to enable Aux bus previewing, access Initialization Page #3. INIT #73. PVW AUX BUS : 1 thru 5 - Enables previewing on the selected Aux bus. Aux bus 5 is the default and is recommended. 0 - Disables previewing on the Aux bus. Previewing will be done on the alternate preview device (i.e. E-E, 8466, Performer, etc. depending on the Super Edit software configuration). INIT #74. PGM OUT XPT: When this feature is enabled the selected Aux bus behaves as a video only preview switcher (i.e. switching between the R-VTR crosspoint and the PGM OUT crosspoint. INIT page item #74 in Super Edit allows the user to enter a PGM OUT crosspoint selection. Set this to the Aux bus crosspoint number assigned to Program Out. The default crosspoint is 23. 50 Section 3 – Video Switchers Performance & Setup The SWAP VTR feature of Super Edit will interact with the Aux bus as a preview preselector. The R-VTR crosspoint assignment on the Aux bus will follow any changes made with the SWAP function. In the switcher: assign the same Aux bus for preview control Select “Communications” from the ENGINEERING MENU, and set “Preview Cmds Routed From” to the same Aux bus as designated in Init #73 on Super Edit (Aux bus 5 recommended). Learn Snapshot Effects to A8100 / A8150 Memory from Super Edit The Learn EMEM function with the Abekas switchers saves Snapshot Effects (SAVE KEYFRAME). That is: the user may tell the Abekas Switcher to save a Snapshot Effect by pressing [SHIFT][L] on the editor keyboard. The user is then prompted for the register number to learn: LEARN EMEM nnn ? nnn can be any number from 0 through 24. Then press [ENTER] to accept the selection. Snapshot Effects Recall from A8100 / A8150 Memory The Snapshot Effects Recall function with the Abekas switcher recalls the selected Snapshot Effect (RECALL KEYFRAME). Super Edit accesses effects registers 0 through 24. To specify the Recall function, first select PEGS entry by pressing the [PEGS] key. Answer the prompts as follows: REGISTER # ? Enter any PEGS register 1 through 16, then press [ENTER] FUNCTION= ? Press [VIDEO], then [ENTER] COMMAND= ? Enter the Effects Register (0 through 24 as described above), then press [ENTER] TIME= Enter the offset from the RECORD IN point, then press [ENTER] 51 Section 3 – Video Switchers Performance & Setup STORE Snapshot Effects to A8100 / A8150 Hard Disk from Super Edit (Abekas V3.1 software required) A unique feature of the Abekas interface allows Super Edit to store selected Snapshot Effects to the switcher’s Hard Disk when an event is put into the EDL. Subsequently recalling that event from the EDL to the Mark Table automatically transfers the data from the switcher’s Hard Disk back into the switcher’s Effects Register. Only the register number (EMEM nnn) is stored in the EDL. Otherwise, the large amount of data from the Abekas switcher would quickly fill up the EDL in V7. Before the switcher data can be stored on the switcher’s Hard Disk, it must first be saved into the switcher memory by pressing [SHIFT][L] (see Learn EMEM earlier in this document) at the editor keyboard or by entering the Snapshot number on the switchers numeric keypad and pressing [SAVE KEYFRAME] on the switcher. The operation is the same as described in the Super Edit operations manual for INIT 22 STORE EMEM and INIT 23 - AUTO-EMEM. Example: Saving and restoring switcher data to/from Hard Disk using switcher Effects Register 7 (any free register may be used). Saving Snapshot to the switcher Hard Disk 1. In Super Edit, select INIT 23 and turn AUTO-EMEM ON. 2. Set up the switcher as desired. 3. Save the Snapshot in Effects Register 7: In the switcher, press [7], then [SAVE KEYFRAME] or In Super Edit, simultaneously press [SHIFT] [L] and specify register ‘7’. 4. Select [PEGS] and enter the EMEM PEG as follows: REGISTER #? FUNCTION=? COMMAND= ? TIME= [ENTER]. 1 V 007 0 (any free register will do) (press the [VIDEO] key) (this is the number of the switcher’s Effects Register) (Enter the offset from the RECORD IN point, then press A negative time not to exceed the pre-roll time may also be used) 52 Section 3 – Video Switchers Performance & Setup The PEGS register will now show: 01 V 007 00:00:00 5. The status line on the Super Edit display should show that “ PEGS” and “AUTO-EMEM” are enabled. 6. Perform the edit. The switcher data is automatically stored on the switcher’s hard disk and the EDL indicates “EMEM 007”. Recalling a Setup from the Switcher’s Hard Disk. 1. In Super Edit, use the UP and DOWN arrow keys to select the EDL event that has EMEM 007. 2. Press [RECAL] to recall that event into the Mark Table. The switcher setup is automatically moved from the switcher’s Hard Disk into the switcher’s Effects Memory 7. PEGS Commands - Auto Trans. Some of the buttons on the switcher panel are assigned numeric values. Table 1 and Table 2 below show these values. The hundreds digit indicates either the PGM/PST buses (0 or 2) or M/E 1 (1). In all cases, the Auto Trans. function is started when the PEGS function is executed. To select these functions on the Abekas switchers, select PEGS in Super Edit and answer the prompts as follows: REGISTER # ? Enter any PEGS register 1 through 16, then press [ENTER]. FUNCTION= ? Press [VIDEO] then [ENTER]. COMMAND= ? Enter the Command code from the table below then press [ENTER]. TIME= Enter the offset from the RECORD IN point, then press [ENTER]. 53 Section 3 – Video Switchers Performance & Setup The following may be helpful in remembering the codes: Hundreds digit 0 or 2 = 1 = Bus PGM/PST M/E 1 Tens digit 5 6 Function Mix Wipe = = Units Digit On M/E 1 Key1 = 1 Key2 = 2 Bkgd = 4 Multiple functions are selected by adding the numbers. For example, to select both Key1 and Key2, use the number 3. On PGM/PST DSK = 1 PGM/PST = 4. For example, to select both, use the number 5. 54 Section 3 – Video Switchers Performance & Setup A table of PEGS command codes for PGM/PST is shown below. Table 1 - PGM/PST Codes Code Function 050 051 052 053 054 055 056 057 058 059 Auto Trans, Mix mode DSK, Mix mode & Auto Trans N/A. N/A. PGM/PST, Mix mode & Auto Trans DSK, PGM/PST, Mix mode & Auto Trans N/A N/A. FTB Toggle N/A 060 061 062 063 064 065 066 067 068 069 Auto Trans, Wipe mode DSK, Wipe mode & Auto Trans N/A. N/A. PGM/PST, Wipe mode & Auto Trans DSK, PGM/PST, Wipe mode & Auto Trans N/A N/A. FTB Toggle N/A. 55 Section 3 – Video Switchers Performance & Setup A table of PEGS command codes for M/E 1 is shown below. Table 2 - M/E 1 Codes Code 56 Function 150 151 152 153 154 155 156 157 158 159 Auto Trans, Mix mode Key1, Mix mode & Auto Trans Key2, Mix mode & Auto Trans Key1, Key2, Mix mode & Auto Trans Bkgd, Mix mode & Auto Trans Key1, Bkgd, Mix mode & Auto Trans Bkgd, Key2, Mix mode & Auto Trans Key1, Key2, Bkgd, Mix mode & Auto Trans N/A N/A 160 161 162 163 164 165 166 167 168 169 Auto Trans, Wipe mode Key1, Wipe mode & Auto Trans Key2, Wipe mode & Auto Trans Key1, Key2, Wipe mode & Auto Trans Bkgd, Wipe mode & Auto Trans Key1, Bkgd, Wipe mode & Auto Trans Bkgd, Key2, Wipe mode & Auto Trans Key1, Key2, Bkgd, Wipe mode & Auto Trans N/A N/A. Section 3 – Video Switchers Performance & Setup PEGS Commands - Aux Bus Crosspoints Crosspoints on Aux busses 1 thru 5 may be selected through an extended function of PEGS. The hundreds digit specifies the Aux bus and the tens and units digits specify the crosspoint. That is; 100 = Aux bus 1, 200 = Aux bus 2, etc. For example, 307 is crosspoint 7 on Aux bus 3. To select the Aux busses, specify FUNCTION= X instead of FUNCTION= V (VIDEO) when entering the PEGS command. i.e. Select PEGS and answer the prompts as follows: REGISTER # ? Enter any PEGS register 1 through 16, then press [ENTER]. FUNCTION= ? Press [X], then [ENTER]. COMMAND= ? Enter the crosspoint ( as described above), then press [ENTER]. TIME= Enter the offset from the RECORD IN point, then press [ENTER]. Other Init Page Options There are two other options on the Super Edit INIT Page that directly affect the switcher operation: INIT #39 - SWITCHER BANK (0,2, or 1) This option selects which bank the editor controls for both manual ‘Green Key’ operation and for previews. 0 or 2 - Selects the PGM/PST bus 1Selects M/E 1. INIT #42 - SWR RE-ENTRY (On or Off) When On, this allows Super Edit to automatically select M/E re-entry on the PGM/PST bus so that automatic crosspoint selections on M/E 1 will be seen on the Program Output during previews. SHIFT/RESET will also select the re-entry. When Off, Super Edit never selects the M/E re-entry on the PGM/PST bus. 57 Section 3 – Video Switchers Performance & Setup Timeline Control In addition to normal switcher type control, Super Edit can control the Timeline effects on the Abekas switcher similar to the way it controls a VTR. Connect the cable as described below and assign the timeline to a port just as you would a VTR. Pressing the Play, Stop, Rewind, Fast Forward keys and the jogger now controls the timeline just like a VTR. Select the timeline source for an edit, or slave it to other VTR sources for automatic control. Connection a. Connect an RS422 cable from any machine control port on the editor to one of the Serial ports on the switcher. b. Set up that serial port on the switcher as follows: In the Engineering Menu select “Communications” then set the communications parameters as follows: Protocol Baud Parity SMPTE 38400 Odd VTR Assignment on Super Edit Assign the timeline in the same way as a VTR (Shift/Assign) on most keyboards: Reel - Any 6 character Reel ID (i.e. TIMELN) Port Any available machine control port. Model Select any Abekas Disk or Ampex VTR protocol. QC 3 VIDX 0 AUDX 0 58 Section 3 – Video Switchers Performance & Setup GVG Model 200 Video Switcher Aux Bus Preview/Preselector Introduction This document describes the interface between Super Edit and the Grass Valley 200 Switcher Aux Bus Preview/PreSelector. Detailed operations instructions for Super Edit are given in the Super Edit Operator’s Guide. The GV200 Switcher Operations Manual provides excellent information for the switcher. This note discusses only the new Aux Bus Preview/PreSelector features. Aux Bus Previewing and PreSelector In Super Edit, to enable Aux bus previewing, access Initialization Page #3 INIT #73. PVW AUX BUS: 1 thru 6 - Enables previewing on the selected Aux bus. Aux bus 1 is the default. 0- Disables previewing on the Aux bus. Previewing will be done on the alternate preview device ( E-E, 8466, Performer, etc. depending on the Super Edit software configuration). INIT #74. PGM OUT XPT: When Aux Bus Previewing is enabled, the selected Aux bus behaves as a video only preview switcher switching between the R-VTR and PGM OUT crosspoints. INIT page item #74 on Super Edit allows the user to enter a PGM OUT crosspoint selection. Set this to the Aux bus crosspoint number assigned to Program Out. The default crosspoint is 24. The SWAP VTR feature of Super Edit will interact with the Aux bus as a preview PreSelector. The R-VTR crosspoint assignment on the Aux bus will follow any changes made with the SWAP function. In the switcher, ensure that the required options are installed for the Aux Bus selected. 59 Section 3 – Video Switchers Performance & Setup SONY Switchers Introduction This describes the interface between Super Edit and the following Sony switchers: Sony DVS-2000 Digital Switcher Sony BVS-3000 Analog Switcher Sony DVS-7000 Digital Switcher Sony DVS-8000 Digital Switcher Detailed operations instructions for Super Edit are given in the Operator’s Guide. This Setup Guide discusses only those features which are unique to the Sony switchers. The following are discussed in the order given: • • • • • • • Connection Cross-point Selection BVB and VBV Previews AUX Bus Previewing Learn E-MEM E-MEM Transfers PEGS Commands Connection a. Connect the RS422 cable from the designated port on the editor to the "EDITOR A" port on the switcher. b. Select "STANDARD SONY PROTOCOL" on the switcher. c. Set the configuration for 38.4 k baud, Odd parity. 60 Section 3 – Video Switchers Performance & Setup Cross-point Selection Cross-point selections are made as described in the Operator’s Guide except for the Black crosspoint. Sony Switchers have a "special" cross-point number for Black that may be used - number 65. On the Super Edit Assignment page ([SHIFT][ASGN]), enter 65 in the VIDX field for the BLK source. BVB and VBV Previews Super Edit uses the DSK as the source of the Black for a BVB or VBV Preview. Because this is a toggle on/off transition, the user must ensure that DSK FTB is Off prior to the start of a Preview or Record operation. AUX Bus Previewing and Pre-selector Aux bus previews can be accomplished on the Sony switchers. Operation is similar to that described in the Super Edit Operator’s Guide. To enable AUX Bus previewing, access Initialization Page #3 on Super Edit. Init #73. PVW AUX BUS : ON - Enables previewing on the Aux Bus. This is the default condition. OFF - Disables previewing on the Aux Bus. Previewing will be done on the alternate preview device (i.e. E-E, 8466, Performer, etc. depending on the system. Init #74. PGM OUT XPT: Once Enabled the selected AUX Bus behaves as a video only preview switcher (i.e. switching between the R-VTR cross-point and the PGM OUT cross-point. INIT page item #74 on Super Edit allows the user to enter PGM OUT cross-point selection. Set this to the Aux Bus cross-point number assigned to Program Out. The default value is crosspoint 45. The SWAP VTR feature of Super Edit will interact with the AUX Bus as a preview pre-selector. The R-VTR cross-point assignment on the AUX bus will follow any changes made with the SWAP function. Learn E-MEM 61 Section 3 – Video Switchers Performance & Setup The Learn E-MEM function with the Sony switchers is similar to the operation described in the Operator’s Guide. That is; the user may tell the Sony Switcher to learn a memory register by pressing [SHIFT][L]. The user is then prompted for the register number to learn: LEARN EMEM nnn ? nnn can be any number from 001 through 255. The hundreds digit is the M/E. So, for example, to learn register 10 of M/E 1, enter “110”. Then press [ENTER] to accept the selection. E-MEM Transfers The E-MEM transfer function with the Sony switcher is similar to the operation described in the Operator’s Guide. Super Edit accesses Memory System Registers 1 through 99 for each M/E. To specify Memory System Commands, first select PEGS entry by pressing the [PEGS] key. Answer the prompts as follows: REGISTER # ? Enter any PEGS register 1 through 16, then press [ENTER]. FUNCTION= ? Press [VIDEO], then [ENTER]. COMMAND= ? Enter the Memory Register (001 through 255 as described above), then press [ENTER]. TIME= Enter the offset from the IN point, then press [ENTER]. When stored to EDL, each Memory System Command register may take up to 16 EDL lines. The transfer of Memory System Command Data is initiated in the same manner that GV switchers transfer EMEM data. PEGS Commands Some of the buttons on the M/E and the DSK panel are assigned numeric values. Table 1, below, shows these values. The hundreds digit indicates the M/E, with the DSK being indicated as M/E 0. To select these functions on the Sony switchers, specify FUNCTION= X instead of FUNCTION= V (VIDEO) when entering the PEGS command. i.e. Select [PEGS] and answer the prompts as follows: 62 REGISTER # ? Enter any PEGS register 1 through 16, then press [ENTER]. FUNCTION= ? Press [X], then [ENTER]. Section 3 – Video Switchers Performance & Setup COMMAND= ? Enter the Memory Register (001 through 255 as described above), then press [ENTER]. TIME= Enter the offset from the IN point, then press [ENTER]. A table of PEGS command codes is shown below. Code Function 050-057 058 059-067 N/A DSK FTB Transition. N/A 150/250/350 151/251/351 152/252/352 153/253/353 154/254/354 155/255/355 156/256/356 157/257/357 158/258/358 159/259/359 Auto Trans Start. Key1, Mix mode & Auto Trans. Key2, Mix mode & Auto Trans. Key1, Key2, Mix mode & Auto Trans. BKGD, Mix mode & Auto Trans. Key1, BKGD, Mix mode & Auto Trans. Key2, BKGD, Mix mode & Auto Trans. Key1, Key2, BKGD, Mix mode & Auto Trans. DSK FTB Transition (Same as 058) Pst Pgm Mix On & Auto Trans 160/260/360 161/261/361 162/262/362 163/263/363 164/264/364 165/265/365 166/266/366 167/267/367 Pst Pgm Mix Off Key1, Wipe mode & Auto Trans. Key2, Wipe mode & Auto Trans. Key1, Key2, Wipe mode & Auto Trans. BKGD, Wipe mode & Auto Trans. Key1, BKGD, Wipe mode & Auto Trans. Key2, BKGD, Wipe mode & Auto Trans. Key1, Key2, BKGD, Wipe mode & Auto Trans. Note: To operate the Preset Black Mix Special Transition mode (which fades the Program source to black then fades the Preset source from black), two PEGS are required: Use a PEG 159/259/359 to initiate the Fade to Black (of the Program source) and use a PEG 150/250/350 to initiate the Fade From Black of the Preset source. 63