1
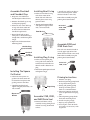
Complete Kit Includes
1
5
8
Pump Plunger
Check Ball Cap
O-ring
2
Square Cut
Gasket
6
9
Check Ball
Plunger Support
3
Vent Plug
Drain Seal
(215R, 230R,
and 245R)
7
4
10
Probe Plug
O-ring
Bowl O-ring
To Install The Vent Plug
1.L
ubricate new vent plug
o-ring with clean motor
oil or diesel fuel.
2. Thread into vent port
tighten snugly.
Vent Plug
Drain Seal
(220R and 225R)
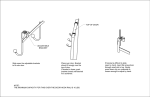
4. Remove existing pump plunger
and plunger support ring. (see
image below).
Note: Be careful not to nick
or damage other component
surfaces.
5. Remove existing pump knob
and shaft.
6. Using a straight slot
screwdriver, remove existing
checkball cap from port.
7. Remove existing checkball and
dispose properly.
6. Clean entire head and primer
pump area free of dirt and
debris. Ideally, the head
should be cleaned in a solvent
bath and dried.
Disassemble Primer Pump
1. Drain filter assembly.
2. Remove spin-on filter and bowl
from mounting head, discard
old bowl and filter gaskets
dispose properly.
3. I f possible, un-mount head for
ease of service.
1
Check Ball Cap O-ring
(all models)
2
Check Ball
(all models)
3
Vent Plug
(all models)
4
Probe Plug O-ring
(all models)
5
Pump Plunger
(all models)
6
Plunger Support
(all models)
7
Bowl O-ring
(all models)
8
Square Cut Gasket
(all models)
9
Drain Seal
(215R, 230R, and 245R)
10
Drain Seal
(220R and 225R)
3. Turn head over then drop
plunger support onto primer
knob shaft with cup facing
upward.
4. Apply a coating of clean oil or
diesel fuel to pump plunger.
5. Press pump plunger onto
primer knob shaft with cup
facing upwards until it snaps
into place behind pump knob
shaft retaining edge as shown.
6. Remount head, if applicable.
Pump
Plunger
Plunger
Support
Re-assemble Primer
Pump
1. Guide primer knob shaft into
pump port.
2. Tighten primer knob snugly
(hand tight only -do not use
tools).
Knob