1
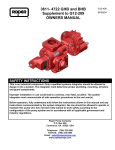
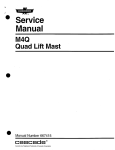
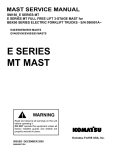
Service
Manual
35D/40D/50D/55D/55ND/60D
Full Free Lift 2-Stage Mast - MD
Manual Part Number 689225 R5
Lift Technologies, Inc. 2007
Contents
INTRODUCTION, Section 1
Introduction
Special Definitions
Tool Requirements
INSTALLATION INSTRUCTIONS, Section 2
Truck System Requirements
Mounting Bracket Installation
Mast Installation
Inspection and Adjustments
Chain Inspection and Tension
Free Lift Chain Adjustment
Upright Rail Lubrication
Cylinder Bleeding
Mast Skewing
Internal Reeving Installation
PERIODIC MAINTENANCE, Section 3
TROUBLESHOOTING, Section 4
SERVICE, Section 5
Mast Removal
Cylinders
Main Lift Cylinder Description
Free Lift Cylinder Description
Cylinder Operation
Main Lift Cylinder Removal- Mast on Floor
Free Lift Cylinder Removal- Mast on Floor
Free Lift Cylinder Removal- Mast on Truck
Main Lift Cylinder Service
Free Lift Cylinder Service
Piston Removal
Cylinder Bleeding
Valve
Valve Cartridge Service
Carriage
Description
Carriage Removal- Mast on Truck
Carriage Removal- Mast on Floor
Carriage Inspection
Mast Uprights
Upright Description
Upright Operation
Upright Disassembly
Upright Inspection
Upright Reassembly
Mast Skewing
Chains
Inspection and Tension
Measuring Chain Stretch
Free Lift Chain Adjustment
Free Lift Chain Service
3
Page
4
4
4
4
5
5
5
6
7
7
7
7
8
8
9
10
11
12
12
13
13
14
15
17
18
19
20
21
22
22
22
23
24
24
25
26
27
28
28
29
30
30
31
32
33
33
34
34
35
689225 R5
Section
1.1
1Introduction
Introduction
This manual Provides the installation Instruction, periodic
maintenance, troubleshooting and service procedures for
the Lift Tek Series roller masts.
In any communication about the mast, refer to the mast
serial number stamped in the nameplate. If the nameplate
is missing, these numbers are also stamped on the
left-hand upper cheekplate. See Figure 1.
WARNING: Do not install a Lift Tek Mast
on a truck with a capacity greater than the
truck rated capacities shown below
XXXXXX
XXXX
OR
XXXXXX
XXXXXX
XXXX
Stamped
Serial
Numbers
XXXXXX
XXXX
MA2779.eps
35D
3500 lbs.
(1585 kg)
40D
4000 lbs.
(1812 kg)
50D
5000 lbs.
(2268 kg)
55D
5500 lbs.
(2491kg)
60D
6000 lbs.
(2718 kg)
Example:
55D–MT–001–00025–M
Figure 1. Serial Mast Number Location
Modifications and additions which affect capacity or safe
operation shall not be performed without prior written
approval from Lift Technologies per ANSI B56. 1.
1.2
Special Definitions
WARNING
WARNING is information
A statement preceded by
that should be acted upon to prevent bodily injury. A
WARNING is always inside a ruled box.
CAUTION
A statement preceded by CAUTION is information that
should be acted upon to prevent machine damage.
IMPORTANT
A statement preceded by IMPORTANT that
possesses special significance.
NOTE
A statement preceded by NOTE is information that is handy
1.3
Tool Requirements
Listed below are the minimum tools needed to work on a.
METRIC
17, 19, 24 mm Open End or Socket Wrench
INCH
3/4, 13/16, 7/8, 15/16, 1.0, 1-1/16 in Open End or
Socket Wrench.
1/8 in. Allen Wrench
Snap Ring Pliers
Claw Type Spanner Wrench
Strap Wrench
Torque Wrench
2 lb. Dead Blow Hammer
4
689225 R5
Section
2.1
2 Installation Instructions
Truck System
Requirements
To achieve maximum lifting capacity of the mast, the
truck relief valve should be set to relieve at the pressure
indicated in the chart below. This chart also indicates the
hose fitting size to use between the truck control valve
and masts valve.
Lift Tek
Mast
30D/35D/40D
30D/35D/40D
50D/55D/60D
Relief
Hose
Fitting*
Pressure
Size
Size
2000 psi No. 8 min.
No. 8 min.
2600 psi No. 6 min.
No. 6 min.
2600 psi No. 8 min. 13/32 in. Orfice
* Valve inlet port is 3/4 in. SAE O-ring. See Figure 2.
MA0022.eps
WARNING: For proper truck stability or to
prevent interference, tilt restriction may be
required. Contact the truck manufacturer.
IMPORTANT: Lift Tek Masts are compatible with SAE 10W
petroleum base oil per Mil. Spec. MIL-0-5606 or MIL-0-2104
B only. Use of synthetic or aqueous base hydraulic oil is not
recommended. If fire resistant hydraulic oil must be used,
contact Lift Tek.
2.2
Mounting Bracket
Installation
Valve Inlet Port
3/4 in. SAE O-ring
FigFigure 2. Valve inlet Port.
Truck Cowl
A
B
If it is1necessary to install mounting brackets and crossmembers to fit your lift truck, consult with the nearest
Lift Tek Service Department listed on the back cover.
You must supply dimensions A through F shown in
Figure 3. Failure to install the correct brackets and crossmembers can result in mast structural failure, bodily injury
and loss of warranty.
C
D
Front View
Tilt Cylinders
WARNING: Failure to install the correct
brackets and crossmembers can result in
mast structural failure, bodily injury and
loss of warranty.
E
F
Side View
MA0031.eps
Figure 3. Determining Mounting Bracket Location.
5
689225 R5
Section
2.3
2 Installation Instructions
Mast Installation
1
The following instructions and illustrations are typical
for most trucks. If your truck does not match,
contact lift-Tek support.
1. Raise and block the front end of the truck 1ft. (30 cm) per
ANSI B56.1 or drive the truck over a service pit.
2. Install the bearings to lower the axle mounts.
3. Lubricate the bearing surfaces of the lower axle and tilt
cylinder mounting brackets with chassis grease.
4
4. Lift the mast using an overhead hoist with a lifting strap
attached under all of the upper crossmembers. Position the mast
by lowering the axle mounts on the truck axle. Install the mount
caps and capscrews. Tighten the capscrews to the truck
manufacturer’s torque specifications.
IMPORTANT: Prior to connecting the tilt cylinders to the
mast, make sure the cylinders “bottom” evenly. Adjust the tilt
cylinders to prevent the mast from “racking” during tilting.
Refer to your truck service manual for procedures.
5. Connect the lift truck hose to the mast valve.
6. Connect the tilt cylinders to the mast anchor brackets.
Tighten the pin capscrews to the truck manufacturer’s
torque specifications.
NOTE: Use as few fittings as possible and always use
45o fittings instead of 90o fittings. Keep the hose lengths
to a minimum. Avoid sharp bends or pinch points when
routing the hose.
6
5
Contact Lift Tek if
additional fittings are
required. See back cover.
4
MA2141.eps
2 3
FiFigure 6. Mast Installation.
6
689225 R5
Section
2.4
2.4-1
2 Installation Instructions
Inspection and Adjustments
Chain Inspection and
Tension
*3 in.
Underclearance
*5 in.
Underclearance
The hoist Chains have been factory lubricated using heat and
pressure to force the lubricant thoroughly into the chain links.
Avoid removal or contamination of this factory applied
lubricant. Do not wash, sand blast, etch, steam clean, or
paint the chains for internal mast installation.
The chains must be adjusted with equal tension to ensure
proper load distribution and mast operation. To determine
equal tension, extend the unload mast to put the chains
under tension. Press the center of a strand of chain with your
thumb, then press at the same place on the other chain of the
pair. Each chain in a pair should have equal “give”. If they
do not have equal tension, preform the hoist chain adjustments described below.
2.4-2
Outer Upright
and Carriage
Flush
Outer
Upright
Carriage 2 in.
Below Outer
Upright
MA2777.eps
NOTE: Underclearance is based on mast
production series, actual mast
underclearance may vary by truck
model.
Figure 4. Upright and Carriage Position.
Free Lift Chain adjustment
The free lift chains should be adjusted so that when the
unloaded mast is fully lowered, the carriage is positioned as
shown in Figure 7.
1. Locate the threaded chain anchors on the front side of the
inner upright crossmember on each side of the cylinder.
2. Adjust one chain to achieve the correct carriage position
when fully lowered, as shown in Figure 7 and 9.
Free Lift
Cylinder
Cylinder
Strap
Free Lift
Adjusting
Nuts
MA0387.ill
3. Adjust the other chain to achieve equal chain tension.
Tighten the nuts together to a torque of 50-70 ft.-lbs.
(68-95 Nm).
Figure 6. Free Lift Chains.
Upright
Rails
4. Raise and lower several times to confirm the adjustments.
2.4-3
Upright Rail Lubrication
Lubricate the full length of each upright rail with chassis lube
or Kendall SR-12X as shown in Figure 11.
MA0389.ill
LUBRICATE ONLY WHERE INDICATED
BY THE HEAVY LINE FOR THE FULL
LENGTH OF EACH UPRIGHT
Figure 8. Channel lubrication.
7
689225 R5
Section
2.4-4
2 Installation Instructions
Cylinder Bleeding
WARNING: The cylinders must be bled to
remove air. Air in the cylinders will compress
on the first extension which could rupture the
cylinders causing serious bodily injury and
property damage.
When new or after repair, the cylinders may have air trapped
in them that must be removed. To bleed air do the following:
1. Without a load extend the free lift cylinder and continue
to extend the main lift cylinders to 90% of full stroke.
Retract all cylinders completely. Repeat three times.
2. Extend the cylinders without a load at 50% full engine
speed then build full system pressure at the end of the
main lift cylinder stroke. Electric trucks-limit the control
valve movement to achieve 50% speed. Retract all
cylinders. Repeat four times.
3. Cycle the mast with a half load (50% mast rated
capacity) through full cylinder extension several times.
The cylinders should extend smoothly. Repeat the
steps if cylinder extension is not smooth.
2.4-5
Mast Skewing
Check for mast skewing as described in Section 5.5-6.
8
689225 R5
Section
2.5
2 Installation Instructions
Internal Reeving Installation
1. Install the fittings on the carriage bracket.
2. Install the front hose guide bracket to the
back side of the inner upright crossmember.
Tighten the capscrews to a torque of 48-52 ft.
-lbs (65-70 Nm).
4
Hoses must not
contact bottom of
chain anchor mount.
3
3. Install the rear hose bracket to the outer
upright by inserting the round bar at the end
of the bracket into the hole in the upper outer.
9
4. Attach the lower end of the bracket to the inside of the outer
upright chain anchor mounting leaving a gap between the top
of the bracket and the chain anchor mount. The bracket should
be parallel with the upright. Tighten the capscrew to a torque
of 48-52 ft. lbs. (65-70 Nm).
Rear Hose
Guide Bracket
5. Remove the existing capscrew and guard from one side
of the cylinder crosshead. Install the hose sheave and
guard with the hardware supplied. Tighten the capscrew to a torque of 48-52 ft.lbs. (65-70 Nm).
7
10
6. Install the hoses to the carriage fittings with the white line
facing outward.
4
5
2
8
7. Feed the hoses between the crosshead guard and sheave.
Raise the carriage just above freelift. Route the hoses under
the front hose guide bracket. Install the hose clamp. Pull on
the hoses to remove slack. Tighten the capscrew to a
torque of 25-30 ft. lbs. (35-40 Nm). Completely lower the
carriage.
11
8. Route the hoses to the rear guide bracket. The loop in
the hoses should be 4 in. (101 mm) +/_ 1 in. (25mm)
below the bottom of the rear bracket.
9. Install the hose clamps at the top of the rear guide
bracket. Make sure the loop is the same for both hoses.
Tighten the capscrews to a torque of 25-30 ft. lbs. (3540 Nm). Check and adjust hose clearances.
10. Install the bulkhead fittings to the bracket with the securing
nuts located on the top side. Install the hose ends to the fittings.
1
6
11. Move the lowering control valve and bracket to the back
side of the center crossmember. Tighten the capscrews to a
torque of 25-30 ft. lbs. (35-40 Nm). Check and adjust hose
clearances.
12. Raise and lower the mast several times to make sure the
hoses are tracking correctly in the guide brackets.
Use the white line on the hoses to detect twisting. Adjusting
the hose ends with a slight amount of twist may
improve hose tracking in the guides.
MA2146.eps
11
DETAIL A
Left Hand
Guide Spacer
DETAIL C
For Double IHR or Left Hand IHR
Left Hand IHR Installs the same as Right Hand IHR with an added spacer on the Left Hand Rear Guide on
30D,35D and 40D Masts when only Left Hand IHR is used.
9
689225 R5
Section
3.1
3 Periodic Maintenance
Periodic Maintenance
For proper operation and an extended service of life, your
Lift Tek Mast should be inspected and serviced regularly
as part of your normal lift truck maintenance schedule according to the following outlines and ANSI B56.1 procedures.
The recommended intervals are for masts operating under
normal conditions. If the mast is operating in severe conditions
or corrosive atmospheres, the inspections should be performed more frequently.
WARNING: Never work on the mast with a load
on the forks or attachment, in the raised position
without supports or while anyone is near the lift
truck control handles per ANSI B56.1
3.1-1
Daily Inspection
Perform the following at the beginning of each work shift:
1. Extend the carriage a few inches off the ground and make
sure the chains are under equal tension. Refer to Section
5.6-3 and 5.6-4 for chain adjustment.
2. Extend the mast to its fullest height to make sure the mast rails
and carriage extend freely without binding.
3. While the mast is extended, inspect the upright rails for
proper lubrication. Refer to Section 5.5-5 Step for rail
lubrication.
4. Make sure the internal reeving hoses (if equipped) travel
evenly in the hose guides. Adjust the hose ends if required. Tighten the fittings making sure they do not twist.
100 Hour Inspection
After each 100 hours of lift truck operation, and in addition to
the daily inspection:
1. Inspect and lubricate the full length of the chains with SAE
40 wt. oil or Bowman Heavy Load Red Grease.
CAUTION: The chains must be coated with a film of lubricant
at all times.
500 Hour Inspection
After each 500 hours of lift truck operation, and in addition to
the Daily and 100 Hour Inspection:
1. Each pair of load rollers on the uprights and carriage
should be shimmed so that a total side to side clearance
no greater than 1/16 in. (1.5 mm) occurs at the tightest
point throughout the travel of the member. Pry between
the upright and load roller so that the opposite load roller
is tight against the upright. Measure the clearance for the
pair of rollers at XXX shown. See Figure 13.
2. Check the chains for wear and stretch. Refer to Section
5.6-1 for complete chain inspection.
10
Figure 13. Load Roller Clearances.
689225 R5
Section
4 Troubleshooting
The following table lis is problems that may be encountered on your Lift Tek Mast, the probable causes and
recommended corrective action that should be taken to restore the mast to normal operating condition.
PROBLEM
PROBABLE CAUSE
Cylinders don’t lift load or
won't move
Empty
a) Plugged inlet hose
b) Insufficient oil.
SOLUTION
a) Unplug hose or replace.
b) Check the truck hydraulic system for
correct oil level in tank, defective pump or
pump drive, leaks in the lines or
disconnect control valve linkage. Repair
or replace as necessary.
c) Bent or jammed plunger.
c) Repair or replace as necessary.
WARNING: Extreme care should be used when working on a unit
when the carriage (with or without a load) is in the raised position.
Loaded
a) Plugged piston check valve.
a) Unplug check valve or replace.
b) Truck relief valve setting low.
b) Raise truck relief setting to specified level.
c) Over capacity.
c) Reduce load to specified capacity.
d) Mechanical bind due to bent plunger d) Remove mechanical bind by
or bad rollers.
replacing/freeing plunger and rollers.
WARNING: Extreme care should be used when working on a unit
when the carriage (with or without a load) is in the raised position.
Cylinders drifta) External leak in pressure line.
a) Tighten or replace as necessary.
b) Truck valve defective-cycle to full
b) Repair or replace truck valve.
lift height to verify.
c) External leaks at retainer.
c) Replace all cylinder seals.
d) Piston check valve leaking.
d) Replace check valve.
Spongy or jerky action- a) Sticky or defective truck relief valve. a) remove and check the truck relief valve. If
contaminated oil caused the malfunction,
drain and flush the system, change the
filter and refill with fresh oil.
WARNING: Extreme care should be used when working on a unit
when the carriage (with or without a load) is in the raised position.
b) Bent or damaged cylinder plunger. b) Disassemble, check and repair cylinder
assembly.
WARNING: Extreme care should be used when working on a unit
when the carriage (with or without a load) is in the raised position.
c) Load rollers not properly adjusted
c) Adjust or repair as necessary.
or defective.
WARNING: Extreme care should be used when working on a unit
when the carriage (with or without a load) is in the raised position.
d) Mast channels improperly lubricated. d) Lubricate mast.
WARNING: Extreme care should be used when working on a unit
when the carriage (with or without a load) is in the raised position.
e) Low Battery charge.
e) Charge battery.
f) Low pump volume.
f) Install accumulator.
g) Low oil level.
g) Fill oil reservoir.
h) Insufficient hydraulic tank capacity h) Install larger tank baffles
or baffles.
Other.
Contact Lift Technologies
11
689225 R5
Section
5.1
5 Service
Mast Removal
1. Raise and block the front end of the truck 1ft. (30cm) or
drive the truck over a service pit.
2. Disconnect the lift truck supply hose from the mast
valve. Plug the hose end and cap the valve fitting.
WARNING: Do not stand on or near the mast
while suspended by the hoist.
3. Attach overhead hoist chain hooks to the cheekplate
lifting holes. Take up slack in the chain.
3 6
4. Disconnect the tilt cylinders from the mast anchor
brackets. For reassembly, tighten the pin capscrews to
the truck manufacturer’s torque specifications.
5. Disconnect the mast lower mounts. For reassembly,
tighten the capscrews to the truck manufacturer’s torque
specifications.
6. Lift away the mast.
7. For mast installation, refer to Section 2.1.
WARNING: Do not stand the mast upright
unless it is chained to a support.
4
2
5
MA2142.eps
Figure 14. Mast Removal
12
689225 R5
Section
5.2
5.2-1
5 Service
Cylinders
Main Lift Description
The main lift cylinders are single stage piston type cylinders. They consist of a shell and a telescoping plunger/
piston assembly. During extension oil pressure is acting
against the full piston area. The truck hoist control valve
holds the cylinder in place once extension has stopped.
The shell is internally threaded at the top end to hold the
retainer. The retainer seals provide a high-pressure
hydraulic seal against the plunger. The retainer also limits
the upward stroke of the plunger.
A piston is attached to the bottom end of the plunger. The
piston seal provides a high-pressure hydraulic seal against
the shell. A check valve is located in the bottom of the
piston. The check valve allows residual oil between the
shell and plunger to escape when the cylinder is extending.
A hydraulic fuse valve is located in the cylinder
port. In case of a hose failure between the lowering control
valve and cylinders, the fuse limits the lowering speed of the
cylinder. The valve also cushions the piston when the
cylinder nears the fully lowered position.
Retainer
Shell
Piston/Plunger
Assembly
Hydraulic Fuse
Assembly
MA0746.eps
Figure 13. Main Lift Cylinder
13
689225 R5
Section
5.2-2
5 Service
Free Lift Cylinder Description
The free lift cylinders are single stage piston type cylinders.
They consist of a shell and a plunger/piston assembly.
During extension the oil pressure is acting
against the full piston area. The truck hoist control valve
holds the cylinder in place once extension has stopped.
The shell is internally threaded at the top end to hold the retainer. The retainer seal provide a high-pressure hydraulic
seal against the plunger. The retainer also limits the upward
stroke of the plunger.
A piston is attached to the bottom end of the plunger. The
piston seal provides a high-pressure hydraulic seal against
the shell. A check valve is located in the bottom on the piston. The check valve allows residual oil between the shell
and plunger to escape when the cylinder is extending.
Retainer
A hydraulic fuse valve is located in the cylinder port.
In case of a hose failure between the lowering control valve
and cylinder, the fuse limits the lowering speed of the cylinder.
Shell
Piston/Plunger
Assembly
Check Valve
(free flow in
direction of arrow)
Hydraulic Fuse
Assembly
MA0747.eps
Figure 14. Free Lift Cylinder
14
689225 R5
Section
5.2-3
5 Service
Cylinder Operation
Cylinders Raising
1. When the truck hoist control valve is actuated, oil
enters the lowering control valve through the inlet
port and flows unrestricted through the lowering
control cartridge.
2. Oil flows to the Main Lift cylinder inlet ports. Oil
enters the main lift cylinder hydraulic fuse valves
then travels up through the center of the plunger
to the jumper hose, then through the free lift hose
to the free lift cylinder inlet port.
3. Due to the larger diameter of the free lift cylinder
compared to both main lift cylinders, the free lift
cylinder will raise completely before the main lift
cylinders raise.
4. Oil flows through the free lift cylinder hydraulic
fuse valve to the bottom of the piston. Lifting
force is created against the bottom of the
piston causing the plunger to raise. Oil in the
area between the plunger and shell is allowed
to escape through the check valve in the piston
as the plunger raises to the end of its stroke.
5. After the freelift cylinder is fully extended the
main lift cylinders begin to extend. The main
lift cylinder piston is internally ported to allow
oil flow to the area between the plunger and
shell. Lifting force is created that acts on the
diameter of the plunger causing the plunger
to raise.
6. When oil flow from the truck hoist control
valve is discontinued, the cylinders are held
in position by the closed center spool of the
truck valve.
Dual Mast (MD) Hydraulic Schematic
Full Free Lift
Main Lift Cylinder
Main Lift Cylinder
Hose
Tube
Free Lift Cylinder
Shell
Shell
Plunger
Plunger
Ckeck
Valve
Piston
Piston
Hydraulic Fuse/
Cushion Valve
Lowering
Control Valve
Figure 15. Cylinder Operation-Raising
Inlet Port
To Truck Valve
15
689225 R5
Section
5.2-3
5 Service
Cylinder Operation (Continued)
Cylinders Lowering
1. When the truck hoist control valve is actuated, oil
enters the mainlift cylinder plungers lower, forcing
oil out through the hydraulic fuse valves.
3. As the mainlift cylinder pistons lower over the
spear in the bottom of the shell, a high pressure
area is developed between the piston and shell
which engages the cushion valve to restrict flow.
This slows the piston/plunger just prior to
bottoming providing a smooth transition to the
free lift cylinder lowering.
4. The free lift cylinder lowers to the bottom of its
stroke.
Note: The restriction setting of each hydraulic fuse
is lower (allows more oil flow) than the setting of the
lowering control valve. The hydraulic fuses restrict
flow only in the instance of a lowering control valve
or hose failure.
2. Oil flows to the lowering control valve where it is
restricted at a controlled speed determined by the
load being handled.
Dual Mast (MD) Hydraulic Schematic
Full Free Lift
Main Lift Cylinder
Main Lift Cylinder
Hose
Tube
Free Lift Cylinder
Shell
Shell
Plunger
Plunger
Ckeck
Valve
Piston
Piston
Hydraulic Fuse/
Cushion Valve
Lowering
Control Valve
Figure 16. Cylinder Operation-Lowering
Inlet Port
To Truck Valve
16
689225 R5
Section
5.2-4
5 Service
Mast Main Lift Cylinder Removal-Mast on Floor
1. Remove the mast from the truck as described in
Section 5.1.
2. Lay the mast down on wooden blocks as shown. Block
under the outer upright so the inner upright will be free
to move. The carriage must be positioned between the
blocks and free to move.
3. Disconnect the cylinder supply hoses from the cylinder inlet ports. Remove the special long fittings from
the cylinder ports and install plugs
4. Disconnect the hose and tube from the cylinder
plungers.
5. Remove the snap rings fastening the cylinder rods to
the inner upright.
6. Pull the inner upright outward 2 ft. (50cm).
7. Lift the cylinder from the base mount and angle inward
to remove through the gap at the top of the uprights.
8. Note the number of shims (if equipped) on each
cylinder rod.
9. For reassembly, reverse the above procedures except
as follows:
WARNING: Main Lift Cylinders must be bled to
remove trapped air prior to returning the mast
to operation. Refer to Section 5.3-10
Figure 17. Cylinder Removal
17
689225 R5
Section
5.2-5
5 Service
Mast Free Lift Cylinder Removal-Mast on Floor
1. Remove the mast from the truck as described in
Section 5.1.
2. Lay the mast down as shown.
3. Roll the carriage toward the center of the cylinder to
slacken the chains and internal reeving hoses (if
equipped).
4. Disconnect the tube or hose from the cylinder fitting.
Cap the fitting and plug the tube.
5. Remove the snap rings fastening the crosshead to the
cylinder rod.
6. Pull the crosshead with chains and hoses (if
equipped) off the cylinder rod.
7. Remove the cylinder strap and nylon segments (if
equipped).
8. Remove the cylinder from the mast.
9. For reassembly, reverse the above procedures.
Figure 18. Cylinder Removal
MA0923.eps
18
689225 R5
Section
5.2-6
5 Service
Mast Free Lift Cylinder Removal-Mast on Truck
1. Completely lower the carriage. Attach an overhead
hoist to the top carriage bar.
WARNING: The carriage must be supported
by a block while removing the cylinder to
avoid possible injury.
2. Raise the carriage to the center of the cylinder to
slacken the chains and internal reeving hoses (if
equipped). Block the carriage in place using a 4 X 4
in. (10cm X 10cm) wood block between the lower
carriage bar and the floor.
3. Disconnect the tube from the cylinder fitting. Cap the
fitting and plug the tube.
4. Remove the snap rings fastening the crosshead to the
cylinder rod.
5. Pull the crosshead with chains and hoses (if
equipped) off the cylinder rod.
6. Remove the cylinder strap and nylon segments (if
equipped).
7. Remove the cylinder from the mast.
8. For reassembly, reverse the above procedures.
MA0924.eps
Figure 19. Cylinder Removal
19
689225 R5
Section
5.2-7
5 Service
Main Lift Cylinder Service
1. Remove the cylinder from the mast as described in
Section 5.2-4.
MA0071.eps
Figure 20. Claw Type Spanner Wrench
2. Use a claw type spanner wrench to remove the
retainer. See figure 20.
3. Remove the plunger/piston assembly from the shell.
2
Retainer
4. Remove the hydraulic fuse components.
Inspect all components for nicks or burrs. Minor nicks
5. or burrs can be removed with 400 grit emery cloth.
NOTE: Minor nicks are those that will not bypass oil
when under pressure. If they cannot be removed with
emery cloth, replace the part. If the piston requires
replacing, refer to Section 5.2-9.
Shell
Replace the retainer and piston seals, back-up rings,
6. o-ring and bearing. Lubricate the new seals with
petroleum jelly prior to installation. Note the correct
seal directions. The cylinder will not operate correctly
if the seals are installed backwards.
Install the plunger retainer on the plunger. Install the
7. plunger/piston assembly into the cylinder shell.
Tighten the retainer to a torque of 225-250 ft. lbs.
(305-340 Nm) using a claw spanner wrench and a
strap wrench.
3
Piston/Plunger
Assembly
4
Hydraulic Fuse
Assembly
MA0753.eps
Figure 21. Cylinder Service
20
689225 R5
Section
5.2-8
5 Service
Free Lift Cylinder Service
1. Remove the cylinder from the mast as described in
Section 5.2-5 or 5.2-6.
2. Use a claw type spanner wrench to remove the
retainer. See figure 22.
MA0071.eps
Figure 22. Claw Type Spanner Wrench
3. Remove the plunger/piston assembly from the shell.
2
Retainer
4. Remove the hydraulic fuse components.
Inspect all components for nicks or burrs. Minor nicks
5. or burrs can be removed with 400 grit emery cloth.
NOTE: Minor nicks are those that will not bypass oil
when under pressure. If they cannot be removed with
emery cloth, replace the part. If the piston requires
replacing, refer to Section 5.2-9.
Replace the retainer and piston seals, back-up rings,
6. o-ring and bearing. Lubricate the new seals with
petroleum jelly prior to installation. Note the correct
seal directions. The cylinder will not operate correctly
if the seals are installed backwards.
Shell
3
When replacing the piston check valve o-ring, make Piston/Plunger
Assembly
7. sure the check valve is reinstalled with the arrow
pointed in the correct direction.
Install the plunger retainer on the plunger. Install the
8. plunger/piston assembly into the cylinder shell. Pour 1/
2 cup (120 ml) hydraulic oil into the cylinder cavity
between the shell and the plunger. Tighten the retainer
to a torque of 225-250 ft. lbs. (305-340 Nm) using a
claw spanner wrench and a strap wrench.
7
Check Valve
(free flow in
direction of arrow)
4
Hydraulic Fuse
Assembly
MA0754.eps
Figure 23. Cylinder Service
21
689225 R5
Section
5 Service
Piston Removal
5.2-9
1. Remove the plunger/piston assembly from the cylinder
shell as described in Section 5.2-7 or 5.2-8.
3
2. Using a strap wrench and 400 grit emery cloth to
secure the plunger while turning the piston with a pin
type spanner wrench. See figure 24.
3.Turn the piston until the snap wire end is visible
through the hole. Using a screwdriver to start the wire
end out the hole. Turn the piston to feed the wire out.
2
2
MA0069.eps
Figure 24. Piston Removal
4. Pull the piston from the plunger.
5. For reassembly, reverse the above procedures except
as follows:
* Install a new snap wire when installing
piston.
5.2-10
Cylinder Bleeding
WARNING: The cylinders must be bled to
remove air. Air in the cylinders will compress
on the first extension which could rupture the
cylinders causing serious bodily injury and property damage.
After repair, the cylinders may have air trapped in them
that must be removed. To bleed air do the following:
1. Without a load extend the free lift cylinder
and continue to extend the main lift cylinders
to 90% of full stroke. Retract all cylinders
completely. Repeat three times.
2. Extend the cylinders without a load at 50% fill
engine speed then build to full system pres
sure at the end of the main lift cylinder stroke.
Electric trucks - limit the control valve move
ment to achieve the 50% speed. Retract all
cylinders completely. Repeat four times.
3. Cycle the mast with a half load (50% mast
rated capacity) through full cylinder extension
several times. The cylinders should extend
smoothly. Repeat the steps if cylinder exten
sion is not smooth.
5.3
Lowering Control Valve
22
689225 R5
Section
5.3-1
5 Service
Lowering Control Valve Cartridge Service
1. Completely lower the mast.
2. Remove the truck supply hose from the valve cartridge. See figure 25. Plug the hoses.
3
3. Remove the valve cartridge from the valve. Note the
stamped part no. on the cartridge for ordering a
replacement.
WARNING: Replacing the valve cartridge with a
different part no. cartridge may cause the mast to
malfunction.
2
4. For reassembly, reverse the above procedures.
MA0238.eps
Figure 25. Valve Cartridge Service
23
689225 R5
Section
5.4
5.4-1
5 Service
Carriage
Description
The carriage shown below is the structure that hook
type forks or attachments are attached to. The carriage travels within the rails of the mast inner upright
on four (or six optional) shim adjustable rollers*. The
rollers are help in place by the inner rails when the
carriage is assembled in the uprights*. All load rollers
are interchangeable. There are four side thrust rollers
to transfer carriage side loading to the inner rails.
These rollers are eccentrically adjustable. A pair of
chain anchors are used to connect the carriage chains
to the carriage.
*Except on 6 roller carriages where the top roller
extends past the top of the mast inner upright at
full extention and are held in place by a retainer
plate.
Figure 26. Carriage Upper Roller Detail for 6 - roller carriage
Carriage
Weldment
Side
Thrusr
Roller
Shim
Load
Roller
Chain
Pin
Cotter
Pins
Chain
Anchor
Thin Jam
Nut
Full Nut
MA0925.eps
Figure 27. Carriage
IMPORTANT: The chain anchor
nuts must be assembled as shown
for correct operation.
Roller Stub
Shaft
24
689225 R5
Section
5.4-2
5 Service
Carriage Removal - Mast on Truck
Snap Ring
1. Raise the mast high enough to place a 6 in. (15 cm) long 2 X 2 in. (5
X 5 cm) angle iron between the top of the main lift cylinder and the
upper inner crossmember. Avoid contacting the cylinder rod seal.
Lower the carriage to be even with the bottom of the inner upright.
Shim
3
2. Attach an overhead hoist to the carriage. Raise the carriage to
slacken the carriage chains. Block the carriage in place using a 4 X 4
in. (10 X 10 cm) wood block between the lower carriage bar and the
floor.
2
Angle Iron
3. Remove the cotter pins fastening the chains to the chain anchors.
4. Disconnect the internal reeving hoses from the carriage fittings (if
equipped). Plug the hose ends.
5. Lower the carriage to the bottom of the mast to remove.
MA0926.eps
6. Note the number os shims behind each load roller for reassembly.
7. For reassembly, reverse the above procedures except as follows:
* Inspect the carriage as described in Section 5.4-4.
* Lubricate the inner upright rails with chassis lube or Kendall SR12X. See figure 28.
* Assemble shims and load rollers on the stub shafts. The shims
should be installed to provide a total side clearance no looser than 1/
16 in. (1.5 mm) at the tightest point throughout the travel of the
carriage. Use an equal number of shims side to side.
* Adjust the carriage side thrust rollers for unrestricted clearance
along the travel of the carriage. The rollers have eccentric mount
bases. Turn the rollers toward the upright rail to decrease clearance.
See figure 28. Tighten the capscrews to a torque of 63070 ft. lbs.
(85-95 Nm).
WARNING: The inner upright and carriage (while
removing chain pins) must be supported by blocks
to avoid possible injury..
Figure 28. Rail Lubrication and Carriage Side
Thrust Rollers
25
Figure 29. Carriage Removal
689225 R5
Section
5.4-3
5 Service
Carriage Removal - Mast on Floor
Upright
Rails
1. Remove the mast from the truck as described in Section 5.1.
2. Remove the cotter pins and pins fastening the chains to the chain
anchors.
3. Disconnect the internal reeving hoses from the carriage fittings (if
equipped). Plug all hose ends.
4. Roll the carriage to the bottom of the mast.
5. Attach an overhead hoist to the carriage fork bars. Remove the
carriage through the bottom of the mast.
6. Note the number of shims located behind each load roller for reassembly.
MA0389.ill
LUBRICATE ONLY WHERE INDICATED
BY THE HEAVY LINE FOR THE FULL
LENGTH OF EACH UPRIGHT
Figure 30. Rail Lubrication
Figure 31. Carriage Removal
7. For reassembly, reverse the above procedures except as follows:
* Inspect the carriage as described in Section 5.4-4.
* Lubricate the inner upright rails with chassis lube or Kendall SR12X. See Figure 30.
* Assemble shims and load rollers on the carriage stub shafts. Shims
should be installed to provide a total side to side clearance no looser
than 1/16 in. (1.5 mm) at the tightest point throughout the travel of the
carriage. Use equal amount of shims side to side.
Adjust the carriage side thrust rollers for unrestricted clearance along
the travel of the carriage. The rollers have eccentric mount bases.
Turn the rollers toward the upright rail to decrease clearance. See
Figure 32. Tighten the capscrews to a torque of 63-70 ft. lbs. (85-95
Nm).
* Check and adjust the free lift chains as described in Section 5.6-3.
Left
Roller
Carriage Side
Thrust Rollers
Important:
Adjust roller
toward rail in
Direction shown.
Right
Roller
MA0927.eps
Figure 32. Carriage Side Thrust Rollers
26
689225 R5
Section
5.4-4
5 Service
Carriage Inspection
1. Inspect the rollers for excessive wear or damage. Rollers with visible
flat spots or cracks should be replaced.
2. Inspect the roller bearings by turning the rollers on their shafts.
Rollers with roughness or noticeable restrictions to turning should be
replaced.
3. Inspect all welds between the carriage side plates and the carriage
fork bars. If any welds are cracked, replace the carriage.
4. Inspect the roller stub shafts. If they are damaged or if there are
cracks at the base of the stub shafts, the carriage must be replaced or
repaired. Contact Lift-Tek for repair procedures.
Figure 33. Carriage Upper Roller Detail - for 6 roller carriage
Carriage
Weldment
Side
Thrusr
Roller
Shim
Load
Roller
Chain
Pin
Cotter
Pins
Chain
Anchor
Thin Jam
Nut
Full Nut
MA0925.eps
Figure 34. Carriage
Roller Stub
Shaft
IMPORTANT: The chain anchor
nuts must be assembled as shown
for correct operation.
27
689225 R5
Section
5.5
5.5-1
5 Service
Mast Uprights
Upright Description
Outer Upright Assembly
The outer upright assembly is mounted to the truck. A
pair of shim adjustable load rollers are attached to the
stub shafts located near the top of the upright.
Inner Upright Assembly
The inner upright assembly telescopes within the
outer upright assembly. A pair of shim adjustable load
rollers are attached to stub shafts located at the
bottom of the upright. The free lift chain anchors are
attached to the center crossmember. The free lift
cylinder rests on a cradle which is integral with the
lower crossmember.
Snap
Ring
Shim
Thrust
Plug
Shim
Load
Roller
Outer
Upright
Inner
Upright
Chain Anchor
Jam Nut
Full Nut
MA0928.eps
Shim
Load Roller
Figure 35. Mast Uprights
28
689225 R5
Section
5.5-2
5 Service
Upright Operation
Inner
Upright
Hoist
Cylinder
Chain
Sheave
Fully Lowered
The free lift chains are anchored to the inner upright
center crossmember then travel over the free lift
cylinder chain sheaves and attach to the carriage
chain anchors.
Outer
Upright
Hoist
Chains
Carriage
Free Lift
Actuating the truck hoist valve causes the free lift
cylinder to raise which draws the carriage to the top of
the inner upright.
Full Extension
When the free lift cylinder reaches the end of its
stroke the main lift cylinders begin to raise. The
extension of the cylinders causes the inner upright to
raise.
Lowering
Lowering of the mast is a reversal of extension.
MA2143.eps
Figure 36. Upright Operation
29
689225 R5
Section
5 Service
Upright Disassembly
5.5-3
1. Remove the mast assembly from the truck as described in Section
5.1.
2. Remove the main lift cylinders from the mast as described in Section
5.2-4.
3.Turn the mast over and position as shown.
4. Remove internal reeving hoses (if equipped).
5. Remove the free lift cylinder from the mast as described in Section
5.2-5.
6. Remove the carriage from the mast as described in Section 5.4-3.
7. Remove the cotter pins and pins fastening the free lift chains to the
inner upright chain anchors.
8. Attach an overhead hoist to the inner upright crossmember as shown.
9. Roll the inner upright downward to expose the upper and lower load
rollers. Remove the load rollers. Note the number of shims behind
each load roller.
10. Slide the inner upright out of the top of the outer upright.
Figure 37. Upright Disassembly
Upright Inspection
5.5-4
1. Inspect the load rollers for excessive wear or damage. Rollers with
visible flat spots or cracks should be replaced.
2. Inspect the load roller bearings by turning the rollers on theirs shafts.
Rollers with roughness or noticeable restrictions to turning should be
replaced.
3.
Inspect the load roller stub shafts. If they are damaged or have cracks
at the base, the upright must be replaced or repaired.
4. Inspect the outer upright thrust plugs. If the wear surface is worn less
than 1.16 in. (1.5mm), they should be replaced.
5. Inspect the hoist chains as described in Section 5.6-1.
30
689225 R5
Section
5.5-5
5 Service
Upright Reassembly
1. Lubricate the outer rails with chassis lube or Kendall SR-12X. See
Figure 38.
Upright
Rails
2. Attach an overhead hoist to the inner upright. Install the inner upright
through the top of the outer upright.
3.Assemble the load rollers on the stub shafts using the appropriate
number of shims. The shims should be installed to provide a total side
to side clearance no looser than 1/16 in. (1.5mm) at the tightest point
throughout the travel in the upright. Use an equal amount of shims
side to side. Note: Roll the inner upright past the thrust plugs before
checking roller clearances.
4. Install the free lift chains to the inner upright crossmember chain
anchors.
5. Install the freelift cylinder as described in Section 5.2-5.
6. Install the carriage as described in Section 5.4-3.
MA0389.ill
LUBRICATE ONLY WHERE INDICATED
BY THE HEAVY LINE FOR THE FULL
LENGTH OF EACH UPRIGHT
7. Turn the mast over.
8. Install the main lift cylinders as described in Section 5.2-4.
Figure 38. Rail Luberication
9. Install the mast to the truck as described in Section 5.1.
10. Install the internal hose reeving hoses (if equipped) as described in
Section 2.5.
11. Adjust the free lift chains as described in Section 5.6-3.
12. Check for mast skewing as described in Section 5.5-6.
Figure 39. Upright Reassembly
31
689225 R5
Section
5.5-6
5 Service
Mast Skewing
1. Extend the mast to full height. See Figure 40.
* If the mast bends to the right at full extension, a shim(s) is need(s)
to be installed to the right hand main lift cylinder rod.
* If the masts bends to the left at full extension, a shim(s) need(s) to
be installed to the left hand main lift cylinder rod.
WARNING: The inner upright must be supported
by angle iron to avoid possible injury.
2. Place a 6 in. (15cm) long, 2 X 2in. (5 X 5cm) angle iron between the
top on the main lift cylinder and the upper inner crossmember. Avoid
contacting the cylinder rod seal. Lower the crossmember onto the
angle iron.
3. Install shim(s) part number 683797 to the main lift cylinder rod below
the inner upright crossmember. See Figure 41.
4. Repeat steps 1 through 3 until skewing has been removed.
Snap Ring
Shim
3
2
Angle Iron
Figure 40. Extending Upright
MA0926.eps
Figure 41. Cylinder Shim Installation
32
689225 R5
Section
5.6
5.6-1
5 Service
Chains
Inspection and Tension
Each pair of chains has been factory-lubricated using heat and
pressure to force the lubrication thoroughly into the chain links. Avoid
removal or contamination of this factory applied lubrication. Do not
wash, sand blast, etch, steam clean, or paint the chains on initial
mast installation.
The chains must be adjusted with equal tension to ensure proper load
distribution and mast operation. To determine equal tension, extend
the unloaded mast to put the chains under tension. Press the center
of a strand of chain with your thumb, then press the same place on
the other chain of the pair. Each chain in a pair should have equal
“give”. If tension is not equal, adjust the chains as described in
Section 5.6-3.
Inspect the chains. If inspection reveals that one of a pair of chains
requires replacement, both strands of the pair should be replaced.
* Check for rust and corrosion.
* check for cracked side plates. If you find cracked side plates, replace
both strands of chain.
* Check for protruding or turned pins. Replace both strand of chain.
* Check for chain side wear. If pins and outside plates show signs of
wear, check for misalignment of sheaves, anchors or other components. Correct the misalignment. If wear is excessive, replace both
strands of chain.
* Check for worn, broken or misaligned chain anchors. Replace or
adjust as required.
* Lubricate the full length of the chains with SAE 40 wt. oil or Bowman
Heavy Load Red Grease.
Figure 42. Chain Inspection
33
689225 R5
Section
Regular inspection and lubrication of the chains will increase their
service life and reduce downtime.
A
Measuring Chain Stretch
A
5.6-2
5 Service
Chain
Wear
Scale
If the chains stretch beyond the recommended amount, they should
be replaced in pairs. Chain stretch can be measured with a chain
wear scale. Measure the chains according to the instructions on the
chain wear scale, without a load on the carriage.
A
A
* To check the free lift chains, raise the carriage 1ft. (10 cm) off the
ground to put tension on the chains.
New Chain
MA0634.eps
Stretched Chain
Figure 43. Measuring Chain Stretch
5.6-3
Free Lift Chain Adjustment
The free lift chains should be adjusted so that when the unloaded
mast is fully lowered, the upright channels and carriage are positioned as shown in Figure 44.
1. Locate the threaded chain anchors on the front side of the
inner upright crossmember on each side of the cylinder.
Adjust one chain to achieve the correct upright position
fully lowered. See Figure 45.
when
2.
Adjust the other chain to achieve equal chain tension.
Tighten the nuts together to a torque of 50-70 ft. lbs. (68-95
Nm).
3. Raise and lower the mast several times to confirm the
adjustments.
*3 in.
Underclearance
Free Lift
Cylinder
*5 in.
Underclearance
Cylinder
Strap
Outer Upright
and Carriage
Flush
Free Lift
Adjusting
Nuts
Outer
Upright
MA0387.ill
Carriage 2 in.
Below Outer
Upright
MA2778.eps
Figure 45. Free Lift Chains
*NOTE: Underclearance is based on mast
production series, actual mast
underclearance may vary by truck model.
Figure 44. Upright and Carriage Position
34
689225 R5
Section
5.6-4
5 Service
Free Lift Chain Service
1. Raise the carriage 12 in. (30 cm). Place a 12 in. (30 cm) block under
the carriage, then lower the carriage onto the block. The free lift
chains should be slack. See Figure 46.
2. Remove the cotter pins and pins from the chain anchors. Remove the
chains.
3. Inspect the chain anchors for cracks. Replace as required.
4. For reassembly, reverse the above procedure. Adjust the chains as
described in Section 5.6-3.
Figure 46. Free Lift Chains
35
689225 R5
Manual Change Summary
R3 - 07/22/05
Remove description “cushion” and “pneumatic” from figures 4 and 44.
Add note to page 24.
Add nameplate to figure 1.
R4 - 11/28/05
Page 24 - Revise first sentence. Add 6-Roller note reference to third sentence “*”. Add
“assembled” to note at bottom of page.
R5 - 03/02/07
Add 55ND to cover page.
Do you have any questions that need to be answered right now?
Lift Technologies, Inc.
7040 South Highway 11
Westminster, SC 29693
USA
Tel: +1(864) 647-1119
Fax: +1(864) 647-5406
Customer Service
(North America Toll Free)
1-888-946-3330
Other Lift Technologies Locations
Lift -Tek Elecar Srl
29015 Castel. San. Giovanni (PC)
Via G. Galilei
Italy
Lift Technologies Inc.
Corporate Head Office
251 Woodlawn Road W., Unit 217
Guelph, ON N1H 8J1 Canada
Tel: +1-519-823-4545
© Lift Technoloies Inc.
02-2007
www.lift-tekelecar.com