1
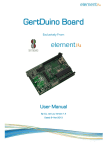
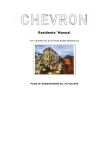
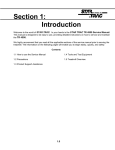
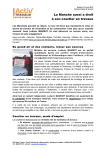
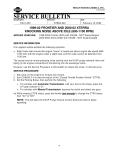
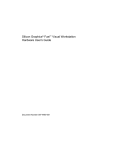
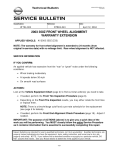
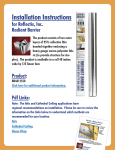
Classification:
Reference:
EL02-015a
Date:
NTB02-071a
November 4, 2002
ENGINE WILL NOT START
NVIS/NATS SYSTEM DESCRIPTION
KEY REGISTRATION
IMPORTANT: This bulletin has been revised.
The Applied Vehicle, Service Information, and Service Procedure sections of this bulletin were
revised to include the 2003 Murano. Please refer to this bulletin (NTB02-071a) for complete
information. Discard any paper copies of NTB02-071 that you may have.
APPLIED VEHICLES:
2003 350Z (Z33)
2003 Murano (Z50)
SERVICE INFORMATION
•
This bulletin covers a new version of the Nissan Vehicle Immobilizer System/Nissan
Anti-Theft System (NVIS/NATS). This system, referred to as “NATS”, is standard
equipment on the 2003 350Z and 2003 Murano.
•
NATS uses advanced anti-theft functions which are “password protected”. This helps
prevent “unauthorized access” into the NATS registration procedure.
•
Unlike earlier Systems, if the ECM is replaced for the 350Z/Murano, NATS DOES NOT
need to be Re-Initialized.
NOTE: For the 350Z/Murano ONLY: The ECM and BCM do work together, but the BCM
now controls the information necessary to “tell” the ECM to start the vehicle.
IMPORTANT: The New NATS “C/U Initialization and Key Registration” Procedure in
this bulletin is unique for the 350Z and Murano. Do not use this procedure on any
other NATS-equipped vehicles.
1/8
Special Service Notes:
Key Registration Required
• NATS will not allow the engine to start without the use of a registered ignition key.
Previous and current Nissan models with NATS have a “transponder chip” in the ignition
key head.
Previous Models NATS Ignition Key
2003 350Z / Murano Ignition Key
Maxima BLUE
transponder chip holder
BLACK
transponder chip holder
TP020275a
•
If a vehicle will not start and the Dash Security lamp is ON solid, it is possible that the
ignition keys were not properly registered into the vehicle's Body Control Module (BCM).
•
When the NATS ignition key or BCM are replaced, C/U Initialization and Key
Registration MUST BE PERFORMED or THE VEHICLE WILL NOT START. This same
procedure is also needed when registering new keys. It is part of many NATS Service
Manual diagnostic procedures.
•
If any ignition keys need to be added or if any ignition key needs to be re-registered,
ALL other ignition keys must be re-registered at the same time or they will no longer
start the vehicle.
Other Important Information
• The NATS key code is permanently encoded to the NATS key ID chip at the time of its
manufacture and cannot be changed. Recommend only using Nissan service parts
(key blanks).
• NATS does not activate the vehicle theft warning system.
• Each vehicle is supplied with three registered keys.
• A maximum of five ignition keys can be registered to the NATS.
Transponders
• If a NATS-equipped vehicle experiences an intermittent no start incident, interference
from another transponder could also be the cause.
•
Other vehicle ignition keys that have transponders or
transponders such as the Mobil Speedpass® (see right)
may be a source of interference. They may be too close
(3/4 to 1 inch) to the registered key being used to start the
vehicle.
®
TP990654
•
In these cases, there will be a "DIFFERENCE OF KEY" code stored in the Engine
Control Module (ECM). The MIL will not turn "ON" for this.
•
Once the vehicle is started, transponder interference will not cause the engine to stall.
•
To avoid transponder interference occurrences, advise the customer to keep all
other transponders on separate key rings.
2/8
System Components (see Figure 1)
•
NATS ignition key (with transponder chip).
•
NATS antenna amplifier, located around the ignition key cylinder.
•
Body Control Module (BCM), located behind the driver’s side left kick panel for 350Z
and behind the driver’s side lower knee panel for Murano.
•
Engine Control Module (ECM), located under the console, below the instrument panel.
•
Security indicator (Light Emitting Diode, or LED), located on the dash.
Security indicator (LED)
NATS
antenna amp.
NATS
ignition key
BCM
ECM
TP020079
Figure 1
System Operation
•
The NATS uses a digital radio frequency (RF) to transmit a key code between the NATS
key ID chip (which is “embedded” in the NATS ignition key) and the BCM. When a
registered NATS key transmits a valid code, the ECM will allow the engine to start.
•
If the correct code is not received, the BCM will not transmit a valid code to the ECM. In
which case the ECM will not let the engine start.
SERVICE PROCEDURE
NATS C/U Initialization With 4-Digit PIN Code and Key Registration
•
It is highly recommended that you read through the entire service procedure before
doing it for the first time.
1st step; Prepare
1. Collect all existing ignition keys from the customer.
Note: ANY KEYS THAT ARE NOT REGISTERED AT THIS TIME WILL NO LONGER
START THE VEHICLE.
2. Separate all NATS ignition keys and other transponders away from each other (take
them off the key ring). Keep them separate during the whole key registration process.
3/8
2nd step; Get the “BCM-specific” 5-Digit Number Code
350Z
1a. Locate the Body Control Module (BCM). The BCM is located behind driver’s side left
kick panel (see Figure 2a).
Label on BCM
This device complies with Part 15 of the FCC Rules.
Operation is subject to the following two
conditions:(1) This device may not cause harmful
interference, and(2) This device must accept any
interference received. Including interference that
may cause undesired operation.
RECIEVER
FCC ID:KBRTSTC15
MODEL ID: TSTC15
Canada:2111104396A
IMMOBILIZER
FCC ID:KBRBSVU17
MODEL ID: BSVU17
Canada:2111104633A
PART NO 284B1 AM600
CONT BCM
1Z25
LOT NO
FLN001
SAE J1690
*****
NO
DOT
CalsonicKansei Corp.
MADE IN JAPAN
*****
Remove
access panel
Location of
BCM-specific
5-Digit Number code.
To be entered in ASIST.
TP020277
Figure 2a
Murano
1b. Locate the Body Control Module (BCM). The BCM is located behind driver’s side lower
knee panel (see Figure 2b).
Front
BCM
Steering
column
shaft
.
Rules
FCC
of the
ful
two e harm y
rt 15
ing
an
us
h Pa
s wit follownot ca accept t
mplie to thee may must nce tha
e co bject
vic
vice erfere
devic is su
int
is de is de
ing
Th
This tion (1). Th
(2) Includ n.
:
7
R
d
ns
tio
Opera
U1
.
IZE
itio
ed
era
SV
e, an
BIL
RB
17
cond erenc receiv red op
e
IMMO ID: KB: BSVU 33A
interf erenc undersi
FCC L ID 111046
interfcuase
DE
000
MO da: 21
CA
C15
may
1
VER RTST 15
Cana
284B
RECIEID: KB TSTC 96A
NO
2619
FCC L ID: 111043
PART
DE
NO
MO da: 21
T
0
LO
020E PAN
Cana
BCM
NO
NT
IN JA
CO 01
DE
MA
FLN0J1690
corp.
SAE
nsei
T
DO nicKa
Calso
This device complies with Part 15 of the FCC Rules.
Operation is subject to the following two
conditions: (1). This device may not cause harmful
interference, and (2) This device must accept any
interference received. Including interference that
may cuase undersired operation.
RECIEVER
FCC ID: KBRTSTC15
MODEL ID: TSTC15
Canada: 2111104396A
IMMOBILIZER
FCC ID: KBRBSVU17
MODEL ID: BSVU17
Canada: 2111104633A
CONT BCM
PART NO 284B1 CA000
FLN001
LOT NO
2619
SAE J1690
NO *****
DOT
CalsonicKansei corp.
MADE IN JAPAN
BCM-specific
5-digit number code
TP020524
Figure 2b
2. Write down the BCM-specific 5-digit number code (see Figure 2a & 2b). The letter “O”
is not used in the 5-digit number code. Anything that looks like an “O” is really
the number zero “0”.
3. Go to an ASIST terminal.
4/8
3rd step; Decode the number
1. From the ASIST Main Menu screen,
click on “Information Tool Box.”
2. From the “Information Tool Box”
screen, click on “NATS Decoder”
button. (see Figure 3).
Search by Ref. No
NEW
Latest Updates
Back
Up
Dial Update
Click on
"NATS
Decoder"
button
CONSULT Utilities
Main
Menu
NATS Decoder
Campaigns
Copy Utility
Help
SM Amendments
Tool & Equipment
TP020069
Figure 3
3. Follow the steps in Figure 4, below.
IVIS/ NVIS (NATS)
Please enter the 5-digit number from the BCM
label (or IMMU label for '03 Q45 & M45) and
press the Generate Code button.
NEW Code
Generate
Code
Enter the IMMU-specific
5-digit number you wrote
down earlier from IMMU.
2
Click "Generate Code"
button
3
Write down the 4-Digit
Pin Code Number for
use in CONSULT-II
NATS Key Registration
Clear
*****
Quit
1
****
TP020070b
Figure 4
NOTES:
• If you need help while in the IVIS/NVIS (NATS) screen, you may click the “HELP” (?)
button to view an example of the BCM label (see Figure 5).
•
The letter “O” is not used in the 5-digit number code. Anything that looks like an
“O” is really the number zero “0”.
5/8
This device complies with Part 15 of the FCC Rules.
Operation is subject to the following two
conditions:(1) This device may not cause harmful
interference, and(2) This device must accept any
interference received. Including interference that
may cause undesired operation.
IVIS/ NVIS (NATS)
Please enter the 5-digit number from the BCM
RECIEVER
FCC ID:KBRTSTC15
MODEL ID: TSTC15
Canada:2111104396A
label (or IMMU label for '03 Q45 & M45) and
Clear
press the Generate Code button.
Quit
Generate
Code
IMMOBILIZER
FCC ID:KBRBSVU17
MODEL ID: BSVU17
Canada:2111104633A
PART NO 284B1 AM600
CONT BCM
LOT NO
FLN001
1Z25
SAE J1690
*****
NO
DOT
CalsonicKansei Corp.
MADE IN JAPAN
NEW Code
Info.
Click "Help" (?) button to view an
example of the BCM label
TP020072b
Figure 5
4th step; C/U Initialization Procedure
1. Insert the NATS (Purple) Software Card into Slot A of the CONSULT-II unit.
2. Connect CONSULT-II and CONSULT-II converter to the data link connector under the
dash.
3. Insert the ignition key into the ignition and turn it to the "ON" position.
Do not start the engine.
CONSULT-II will load the NATS software automatically. Wait for the START box to
appear on CONSULT-II before proceeding.
4. Touch “START” on the CONSULT-II screen.
5. Touch “NATS V 5.0”.
6. Touch “C/U INTIALIZATION” to perform C/U INITIALIZATION mode.
7. On the CONSULT-II “IMMU INITIALIZATION” touch screen;
Type in the 4-digit PIN Code Number that you wrote down from ASIST’s IVIS/NVIS
(NATS) screen (step 3, page 5).
8. Touch “START” on CONSULT-II to perform the C/U INITIALIZATION program.
9. When C/U INITIALIZATION is complete for the BCM;
a. “INITIALIZATION COMPLETED” will be “displayed” on the IMMU INITIALIZATION
screen.
b. Turn key to "OFF/LOCK" position and pull it out.
c. WAIT AT LEAST 5 SECONDS
d. Go to 5th step; Key Registration.
NOTE: The key that you just used is NOT registered yet.
6/8
5th step; Key Registration
1. Insert the first key to be registered into the ignition and turn the key to the "ON" position.
Do not start the engine.
2. Wait at least 5 seconds (the Security Lamp will flash 5 times, then it will stop).
•
Turn the key to "OFF/LOCK", remove it and set it aside, separate from all the
other keys.
•
IMPORTANT: This key will be used later in step 4 (below).
•
Keep this first REGISTERED key separate from ALL the other UNREGISTERED
keys for right now. DO NOT MIX UP KEYS! (see NOTE, below)
NOTE:
• During this process do not mix up the "registered" keys and the "unregistered" keys.
•
Keep them in different “piles” during this process.
•
Accidentally inserting an already “registered” key at this point will drop the system
out of the registration mode.
•
If this happens you will have to start all over again. Go back to #3 of 4th step;
C/U Initialization and restart from there.
3. Repeat steps 1 and 2 (above) for all remaining "unregistered" keys.
Remember, a maximum of five keys can be registered into the system.
4. After registering and removing the last key;
•
Re-insert the first registered key and
•
turn the key to the “ON” position for 5 seconds.
•
This will take the system out of the key registration mode.
NOTE: the Security Lamp will not flash during this 5 second period
5. Turn the key to the "OFF" position.
7/8
6. Wait for the Security Lamp to start blinking (approximately 5 seconds).
This indicates the completion of the Key ID Registration and “C/U Initialization.”
Proceed to Key Confirmation (Step 6 below).
NOTE: On the CONSULT screen: if “INITIALIZATION STOPPED” or “INITIALIZATION FAIL” is
displayed on CONSULT-II during the above procedure:
A. Repeat 2nd step: “Get the BCM-specific 5-Digit Number Code”
B. Repeat 3rd step: “Decode the Number”
• This is to confirm that you wrote down the correct BCM-specific 5-digit number code and
“generated”/wrote down the correct 4-digit PIN Code Number.
C. Turn the ignition switch “OFF”, then “ON”.
D. Confirm “SELF-DIAG RESULTS” and refer to the “BL” section in the Electronic Service Manual
(ESM).
E. Once “NO SELF DIAGNOSIS FAILURE INDICATED” is displayed:
• Repeat 4th step; “C/U Initialization” AND 5th step; “Key Registration” again.
• Then, proceed to 6th step; “Key Confirmation” (below).
6th step; Key Confirmation
1. Confirm that the Security Indicator Lamp on the dash is blinking. This verifies the
completion of the Key ID Registration sequence.
2. Insert each key that was initialized during the Key Registration process:
•
Confirm that ALL the keys will successfully start the vehicle.
•
Watch for the Security Indicator Lamp to begin blinking (approximately 5 seconds)
between each confirmation of key operation, indicating the system has reset.
•
Wait for the system to reset in between each key check. You must wait for the
system to reset between key checks or key operation will not be confirmed.
3. Press BACK on the CONSULT-II screen.
4. Press BACK on the CONSULT-II screen again.
5. Put any registered key into the ignition and turn it to the "ON" position.
6. Select SELF-DIAGNOSIS RESULTS to check for DTC's.
7. In rare cases "CHAIN OF ECM-IMMU" is stored during the Key Registration process.
Press the ERASE box if it appears in SELF DIAG RESULTS to clear this code or any
DTC's that may have been stored prior to repairs.
8. Turn ignition key to "OFF/LOCK" and remove it.
9. Turn the CONSULT-II OFF, disconnect the Data Link Connector and remove
CONSULT-II and CONSULT-II converter from the vehicle.
8/8