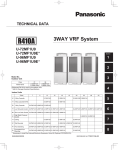
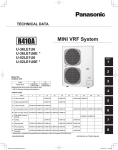
1
TECHNICAL DATA &
SERVICE MANUAL
Air Conditioning
Intelligent Management System
P-AIMS
Service Technical Information is a supplement to
the operation manuals supplied with the software.
For any information not included in this Service
Technical Information, refer to the operation manuals supplied with the software.
Applicable Software:
Basic Software
Distribution Ratio Software
Layout Display Software
Issued: April 16, 2012
Contents
1.
2.
3.
Before Use .....................................................................................................................1
P-AIMS System Setup Procedure................................................................................1
Required Equipment and Software Configuration ....................................................3
3-1.
P-AIMS system specs ..................................................................................................................3
3-2.
P-AIMS system software configuration ....................................................................................3
3-3.
Hardware required for P-AIMS system ......................................................................................3
3-3-1.
Selection method for communication converters ...........................................................3
3-3-2.
Personal computer specs and recommended equipment ..............................................4
4.
Hardware Configuration ..............................................................................................4
4-1.
4-2.
4-3.
5.
Personal Computer Setup ...........................................................................................6
5-1.
5-2.
5-3.
5-4.
6.
Connection method for power supply line ...............................................................................4
Connection method for signal line ............................................................................................5
Function list .................................................................................................................................6
Personal computer setup ...........................................................................................................6
Disabling system standby and system hibernation .................................................................7
Screen resolution setting............................................................................................................8
Setting for auto-hiding taskbar ..................................................................................................9
Peripheral Devices ...................................................................................................... 10
6-1.
Selection of communication converters ................................................................................. 10
6-1-1.
About communication converters .................................................................................. 10
6-1-2.
Installation of communication converter........................................................................ 10
6-1-3.
Confirmation method for COM port number of communication converter .............. 10
6-2.
Uninterruptible power supply ..................................................................................................13
6-2-1.
Connecting uninterruptible power supply .....................................................................13
6-2-2.
UPS power failure settings ..............................................................................................13
6-2-3.
Recovery method settings of personal computer..........................................................16
6-2-3-1.
[Recovery setting] (Dell OPTIPLEX GX620) ................................................................ 17
6-3.
Operation test of UPS and personal computer ......................................................................18
7.
8.
License Certification...................................................................................................19
P-AIMS System Installation .......................................................................................22
8-1.
8-2.
9.
Installing Basic Software of P-AIMS system ...........................................................................22
Displaying Help files .................................................................................................................24
Optional Software Installation ..................................................................................25
9-1.
Installing optional software ......................................................................................................25
9-1-1.
Installing Distribution Ratio Software .............................................................................25
9-1-2.
Menus when restarted after installing Distribution Ratio Software .............................27
9-2.
Checking installation status of options ...................................................................................27
10. Procedure for Replacing Personal Computer ...........................................................28
11. Master Registration and Special Operating Procedures of Basic Software ..........29
11-1. Auxiliary settings ......................................................................................................................29
11-1-1.
Editing passwords ............................................................................................................30
11-1-1-1.
Registering passwords ...............................................................................................30
11-1-2. Line settings ......................................................................................................................30
11-1-2-1.
Setting connections ....................................................................................................30
11-1-2-2.
Setting adapter names ...............................................................................................30
11-1-2-3.
Setting adapter numbers ............................................................................................30
11-1-2-4.
Setting communication parameters ...........................................................................31
11-1-2-5.
Saving settings ...........................................................................................................31
11-2. Outdoor unit master .................................................................................................................31
11-2-1.
Display method.................................................................................................................32
11-2-1-1.
Specifying line ............................................................................................................32
11-2-1-2.
Specifying address .....................................................................................................32
11-2-1-3.
Displaying enabled registrations .................................................................................32
11-2-1-4.
3WAY indication..........................................................................................................32
11-2-2. Change method for outdoor units ..................................................................................32
11-2-2-1.
Changing outdoor unit names (outdoor units) ............................................................32
11-2-2-2.
Registering and changing outdoor units .....................................................................32
11-2-2-3.
Enabling/disabling registrations ..................................................................................32
11-2-2-4.
Registering and changing display order ......................................................................33
11-2-2-5.
Registering changed data ...........................................................................................33
11-2-2-6.
Canceling settings ......................................................................................................33
11-2-3. Confirming changes .........................................................................................................33
11-3. Indoor unit master ....................................................................................................................33
11-3-1.
Display method.................................................................................................................34
11-3-1-1.
Specifying line ............................................................................................................34
11-3-1-2.
Specifying address .....................................................................................................34
11-3-1-3.
Displaying enabled connections .................................................................................34
11-3-1-4.
Displaying enabled registrations .................................................................................34
11-3-1-5.
Fixing name column ...................................................................................................34
11-3-1-6.
Address indication ......................................................................................................34
11-3-1-7.
Connection indication .................................................................................................34
11-3-2. Change method for indoor units .....................................................................................35
11-3-2-1.
Changing indoor unit names.......................................................................................35
11-3-2-2.
Changing outdoor unit AD ..........................................................................................35
11-3-2-3.
Changing indoor unit AD.............................................................................................35
11-3-2-4.
Registering and changing indoor units .......................................................................35
11-3-2-5.
Enabling/disabling registrations ..................................................................................35
11-3-2-6.
Registering and changing display order ......................................................................35
11-3-2-7.
Specifying and changing floors ...................................................................................35
11-3-2-8.
Specifying and registering schedule groups ...............................................................35
11-3-2-9.
Specifying and changing control groups .....................................................................36
11-3-2-10. Registering changed data ...........................................................................................36
11-3-2-11. Canceling settings ......................................................................................................36
11-3-3. Confirming changes .........................................................................................................36
11-4. Resetting adapters ....................................................................................................................36
11-4-1.
Reset method ....................................................................................................................37
11-5. System maintenance mode .....................................................................................................37
11-6. Ending system ...........................................................................................................................38
12. Master Registration of Layout Display Software ....................................................38
12-1.
12-2.
Dedicated folders for Layout Display Software ......................................................................38
Registering parts .......................................................................................................................39
13. Master Registration of Distribution Ratio Software ...............................................41
13-1. Registering accumulated value master ...................................................................................41
13-1-1. Display method.................................................................................................................42
13-1-1-1.
Displaying enabled registrations .................................................................................42
13-1-2. Change Method for accumulated value master.............................................................42
13-1-2-1.
Changing names.........................................................................................................42
13-1-2-2.
Setting multiplying factor ............................................................................................42
13-1-2-3.
Setting number of decimal places ..............................................................................42
13-1-2-4.
Enabling/disabling registrations ..................................................................................42
13-1-2-5.
Registering and changing display order ......................................................................42
13-1-2-6.
Setting types ..............................................................................................................43
13-1-2-7.
Setting distribution group ...........................................................................................43
13-1-2-8.
Registering changed data ...........................................................................................43
13-1-2-9.
Canceling settings ......................................................................................................43
13-1-3. Confirming changes .........................................................................................................43
14. Menu List ....................................................................................................................44
15. Explanation of Functions of Each Menu...................................................................45
15-1. Layout display (optional layout display software is required) ..................................................45
15-1-1. Layout display...................................................................................................................45
15-1-2. Maintenance (for layout display) ....................................................................................45
15-1-2-1.
Layout master.............................................................................................................45
15-1-2-2.
Settings ......................................................................................................................45
15-1-2-3.
Layout Backup ............................................................................................................45
15-1-2-4.
Layout Restore ...........................................................................................................45
15-2. List display .................................................................................................................................46
15-2-1. Status/Operation...............................................................................................................46
15-2-2. Filter sign & I/D unit information.....................................................................................46
15-2-3. O/D unit information ........................................................................................................46
15-2-4. Operation/Status change log ...........................................................................................47
15-2-5. Alarm list & alarm log ......................................................................................................47
15-3. Schedule ....................................................................................................................................48
15-3-1. Schedule/results ...............................................................................................................48
15-3-2. Mode settings (Calendar).................................................................................................48
15-3-3. Schedule operation time settings....................................................................................48
15-3-4. Update schedule ...............................................................................................................48
15-4. Print ............................................................................................................................................49
15-4-1. Print screen .......................................................................................................................49
15-4-2. Excel output ......................................................................................................................49
15-4-3. Auto EXCEL output setting ..............................................................................................49
15-4-4. Print list .............................................................................................................................49
15-4-5. List print preview ..............................................................................................................49
15-5. Distribution ratio (optional Layout Display Software is required) ........................................50
15-5-1. T/S ON operation time .....................................................................................................50
15-5-2. Distribution ratio calculation ...........................................................................................50
15-5-3. Accumulated value ...........................................................................................................50
15-5-4. Maintenance (for distribution ratios) ..............................................................................50
15-5-4-1.
Distribution ratio settings ...........................................................................................50
15-5-4-2.
Register distribution group name ...............................................................................51
15-5-4-3.
Register tenant name .................................................................................................51
15-5-4-4.
Accumulated value master data .................................................................................51
15-5-4-5.
I/D unit settings ..........................................................................................................51
15-6. Maintenance (Basic Software) .................................................................................................52
15-6-1. Register maintenance information .................................................................................52
15-6-2. Register floor name ..........................................................................................................52
15-6-3. Register control group name...........................................................................................53
15-6-4. Register schedule group name........................................................................................53
15-6-5. Register operator information .........................................................................................53
15-6-6. R/C prohibition settings ...................................................................................................53
15-6-7. Clock settings ....................................................................................................................53
15-6-8. Data backup/restore..........................................................................................................54
15-6-8-1.
Data backup ................................................................................................................54
15-6-8-2.
Restore data ...............................................................................................................54
15-6-8-3.
Cancel data restore ....................................................................................................54
15-6-8-4.
Auto backup settings ..................................................................................................54
15-6-9. Register event ...................................................................................................................54
15-6-10. Register I/D unit upper/lower limit temperature ............................................................54
15-6-11. Auxiliary settings ..............................................................................................................55
15-6-12. O/D unit master data settings ..........................................................................................55
15-6-13. I/D unit master data settings ............................................................................................55
15-6-14. Reset adapter ....................................................................................................................55
15-6-15. System maintenance mode .............................................................................................56
15-6-16. Exit .....................................................................................................................................56
16. About Adapters...........................................................................................................56
17. Troubleshooting..........................................................................................................57
17-1. Communication error related ...................................................................................................57
17-1-1. "Disconnected" error is displayed for some air-conditioning equipment ....................57
17-1-2. "Disconnected" error is displayed for all air-conditioning equipment
connected to communication adapter........................58
17-1-3. "Communication error" is displayed for all communication adapters
connected to communication converter, and "Disconnected"
is displayed for air-conditioning equipment..................59
17-2. Screen display related ..............................................................................................................59
17-2-1. Screen operations are not possible (mouse and keyboard do not work .....................59
17-2-2. Nothing is displayed on screen .......................................................................................60
17-2-3. Not even one indoor unit or only small number of
indoor units is displayed on screen.............................60
17-2-4. Cannot enter screen selected in menu ...........................................................................60
17-2-5. Distribution ratio and usage amount are indicated as 0 ...............................................60
17-2-6. Pulse count is not input normally ...................................................................................61
17-2-7.
Accumulated operation time (or distribution ratio)
is counted even though operation is not being performed.........62
17-2-8. Cannot back up or restore data to hard disk of personal computer.............................62
17-3. Unit operation related...............................................................................................................63
17-3-1. Schedule timer does not work correctly .........................................................................63
17-3-2. I want to start or stop operation for all indoor units by external contact input ..........63
17-3-3. I want unit alarm to be detected and then external alarm output turned ON .............63
17-3-4. Prohibit remote control use is set but setting returns to permit individual ................64
17-3-5. Cannot print with printer .................................................................................................64
1.
Before Use
• License authentication needs to be performed for the P-AIMS system.You can use the system
for a period of 30 days without performing license authentication.Please perform the license
authentication referring to "7. License authentication."
• The P-AIMS system uses Microsoft Excel in order to output files in an editable format.
Therefore, we recommend that you install Microsoft Excel on the personal computer on which
you will use the P-AIMS system.(Microsoft Excel is part of Microsoft Office.)
• Operation manuals are available as help for the P-AIMS system. However, they are in the PDF
file format, so you need to install Adobe Reader.If it is not installed, an error will appear when
you attempt to view the Help files.
• The specifications of this software and the content of this manual are subject to change
without notice.
• Microsoft, Windows XP, Microsoft Excel, and Microsoft Office are registered trademarks of
Microsoft Corporation in the United States and other countries.
• Adobe Reader is a registered trademark or trademark of Adobe System Incorporated in the
United States and other countries.
Other product and company names are trademarks or registered trademarks of the
corresponding companies.
Other products are copyrights of the corresponding companies.
• The adapter names included in the operation manuals and P-AIMS software may be the
model names for the Japanese market.In such a case, replace the adapter names with those
shown in the table below.
Communication
adapter
Local adapter
2.
For Japan
For Overseas in General
For North America
CZ-10APB3
CZ-CFNC2
CZ-CFUNC1U
SHA-KL4U
CZ-CAPC2
—
P-AIMS System Setup Procedure
The following is an overview of the P-AIMS system setup procedure.
1 Complete Test Run of Air Conditioning System
Complete Test Run of Communication Adapters
(1)
(2)
Sufficiently test the operation of the air conditioning system, and make sure the test
run completes properly.
Complete the installation and setup of the communication adapters (p.30).
2 Set Up Personal Computer
Set Up Peripheral Devices
(1)
(2)
(3)
(4)
(5)
Set up the personal computer (p.6).
Configure UPS automatic shutdown (p.13).
Configure automatic startup of the personal computer (p.16).
Install a USB-232C converter or USB-485 converter (p.10).
Install Microsoft Office and Adobe Reader.
3 Install Software
(1)
(2)
Install Basic Software (p.19).
License authentication needs to be performed for the P-AIMS system.The Product
ID on the "Product ID Issuance Certificate" (supplied with the purchased CD) is required
to install the software.
Note: Perform license authentication for all software (including optional software).If
you do not perform license authentication, you will no longer be able to use the
software after the 30-day trial period elapses.
If you have any optional software, install that software as well (p.25).
1
4 Configure Master Data Settings
(1)
Configure the master settings.
1. Configure the auxiliary settings (communication line) (p.29).
2. Register master data such as room names, indoor unit names, outdoor unit
names, floor names, control group names, and schedule groups.
3. Register master data related to optional software.
If you have installed various optional software, you also need to configure the
settings of each software.When Layout Display Software is installed, you need
to create layout diagrams separately (p.38).
5 Perform Operation Check
(1)
(2)
Perform an operation check.
1. Check the air-conditioning equipment status indication.
2. Perform checks such as turning on and off the equipment, and check that the
corresponding devices are correct.
About distribution
1. Check whether the corresponding devices are correct.
2. Check whether the pulse meter is correct.
3. Check whether the distribution group and tenant are correct.
4. Perform a test run, and check whether distribution is performed properly.
6 Back Up Data
Configure Automatic Backup Settings
(1)
(2)
(3)
Back up the master data (p.54).
The P-AIMS system includes various backup functions as a countermeasure in the
event that the personal computer goes down, so configure the following settings in
case the system goes down.
We recommend connecting an external hard disk to the personal computer, and
backing up the data to that hard disk. The same applies for automatic backups.
1. Back up the database.
2. If Layout Display Software is installed, back up the layouts.
Configure the automatic backup settings (p.54).
The backup of (1) is only performed once.If you configure the automatic backup
settings, the data will be backed up once every day.
Configure the automatic Excel output settings (p.49).
If you configure the automatic Excel output settings, the data will be output as Excel
data once every day.
With regards to distribution related data, one month's worth of distribution data will be
output as Excel data the day after the cut-off date.
2
3.
Required Equipment and Software
Configuration
3-1.
P-AIMS system specs
Number of connectable indoor units
:Maximum of 1,024
Number of connectable outdoor units
:Maximum of 960
Number of lines (for air conditioning equipment) :4 lines (maximum of 512 indoor units per line)
CZ-10APB3 and DDR-3550 can be connected to any and all lines.
However, make sure all of the adapters used on one line are the same device.
CZ-10APB3 (communication adapter)
:G/H/J/K Type GHP, T/V/A/B Type PAC, total wire length
within 1 km (RS-485)
Maximum of 8 units per line
Indoor units :Maximum of 64 per link, and 2 links per adapter
Outdoor units :Maximum of 30 per link, and 2 links per adapter
3-2.
P-AIMS system software configuration
CZ-CSWKC2 (Basic Software :This basic software is mandatory and must be installed)
CZ-CSWAC2 (Distribution Ratio Software
:Accumulated indoor unit thermostat on/off times, distribution
calculation, air conditioning usage calculation, and lighting and
other usage charge calculations)
CZ-CSWGC2 (Layout Display Software
:Allows display operations to be performed in a layout display
screen)
CZ-CSWBC2 (BACnet Communication Software
:BACnet communication with central monitoring devices, support
for IPv4 and IPv6)
CZ-CSWWC2 (Web software :Web viewing compatible software)
3-3.
Hardware required for P-AIMS system
Personal computer
UPS (uninterruptible power supply) (including dedicated cable)
External hard disk (for data backup)
Communication converter (USB-485)
Communication converter (USB-232C)
Printer (including printer cable)
3-3-1.
:1
:1
:1
: Required number
: Required number
:1
Selection method for communication converters
The communication method depends on the adapters
CZ-10APB3 (communication adapter) => RS-485 (for new monitoring system)
Number of ports required for communication on the personal computer (including USB)
RS-232C for UPS: 1
Adapter related communication devices (CZ-10APB3): Same as number of ines
For External HDD and USB printer: 2 (USB)
For example, if you use CZ-10APB3 and insert three lines into the personal computer, the
number of communication lines required is one for the UPS (one RS-232C), and three for the
communication adapters (RS-485).Also, in the case RS-485, three for USB-485 for using the USB485 converters, one for the external hard disk, one for the USB printer, and one for the external
hard disk needed when maintenance is performed, so a total of at least six USB are required.(If
there is no RS-232C on the personal computer, seven USB ports, one USB-232C converter, and
three USB-485 converters are required.)
3
3-3-2.
Personal computer specs and recommended equipment
Personal computer specs
Operating system
:Windows XP Professional
CPU
:Intel Pentium 4 processor
Memory
:2 GB or more
CPU clock
:3.0 GHz or faster (However, a PC for factory automation is
recommended for BACnet.)
CRT
:1,024 x 768
External HDD
:100 GB or more (An external power supply type is preferable because
the HDD will be used for backing up data.)
UPS
:A type that supports the UPS service included with Windows XP by
default is recommended.
4.
Hardware Configuration
4-1.
Connection method for power supply line
External HDD
Personal Computer
Printer
UPS
To AC Outlet
*1 This connection method is for when the recommended equipment is used. If different
equipment is used, refer to the operation manuals supplied with the equipment and then
connect the power line.
*2 For a newly purchased personal computer, connect the CRT, keyboard, mouse, and other
peripheral devices while referring to the operator's manual supplied with the personal
computer.
4
4-2.
Connection method for signal line
External HDD
Procured by User
Host Personal
Computer
Printer
Converter
*1 For the specifications of the wires of communication
lines, refer to the installation work instruction manual
supplied with the communication adapter CZ-10APB3.
*2 Make sure the wire length for RS-232C is no more
than 15 m, and use a dedicate line.
*3 The total wire length (total length of segments) for
RS-485 is up to 1,000 m. Connect a termination
resistor (100 to 120 W) to the first device and the last
device of the RS-485 line.
Also, be sure to use 2-core shielded cables (MVVS or
CPEVS) with a wire thickness of 0.5 to 2.0 mm.
The shield must always be properly grounded on only
one side.
*4 Make sure the wire length for USB is no more than
10m, and use a dedicated line.
for Air Conditioning
Communication
Outdoor
Unit
Indoor
Unit
Procured by Panasonic
(Air Conditioning Standard
Communication Wires)
5
Note: About Termination Resistors for RS-485 Wiring
B
CN32
A
Termination resistors are always required at the equipment (two) at both ends when equipment
is wired in a daisy chain with RS-485.
Check the installation instruction manual for each piece of equipment, and make sure you attach
the termination resistors to the equipment properly.
• In the case of a communication adapter (CZ-10APB3):
(1) On the communication adapter at the end of an RS-485 daisy chain, switch the
termination resistor plug for the communication adapter operation line on the top
right of the power supply terminal block to the B side.In the check list, write the
number of the communication adapter for which the termination resistor was turned
on.
A
13
3
12
B
(Factory default)
Termination resistor “A”
2
1
0
CN1
Termination resistor plug for the
communication adapter operation line B
11
S1
10
FG AC100~240V
A
Termination resistor “B”
(At the time of shipment from the factory, the termination resistor is set to the A side.)
4-3.
Function list
A maximum of 1,024 indoor units can be connected.
A maximum of 960 outdoor units can be connected.
Operation Display Functions
On/Off
Cooling/Heating Modes
Temperature Display
Fan Speed
Airflow Direction
Central Control
Alarms
Room Temperature
Thermostat On Time
Type of Air Conditioner
{
{
{
{
{
{
{
{
{
{
—
—
—
—
—
{
—
{
Required Adapter
PAC : B, A, U, and T Types
CZ-10APB3
GHP : K, J, H, and G Types
CZ-10APB3
Other Models
SHA-KL4U
Display
*1: GHP: Not possible for F and E types.
*2: Connection of existing communication lines possible.
5.
Personal Computer Setup
5-1.
Personal computer setup
Windows setup work is required the first
time you turn on the power of the personal
computer.
The name of the operator who will use the
personal computer needs to be entered
during the Windows setup.Decide the name
to register.
The setup varies depending on the
personal computer purchased, so refer to
the "Windows Setup" instruction manual
supplied with the personal computer.
Cautions for Windows Setup
· Do not connect the peripheral devices.
· Do not connect the LAN cable.
· Do not change the system settings.
· Do not turn off the power part way through.
· Do not leave the setup unattended.
6
5-2.
Disabling system standby and system hibernation
When the P-AIMS system is running, mouse and keyboard operations are not normally
performed.However, if the mouse or keyboard is not operated, the personal computer stops or
hibernates in order to save power and protect the devices.In such a state, the operating system
is stopped, and the P-AIMS system is also stopped.The primary functions of the P-AIMS system
are to monitor and manage the air conditioning equipment 24 hours per day, so it is necessary
to disable the system standby and system hibernation functions because the P-AIMS system is
unable to fulfill its purpose while they are enabled.
The applicable operating system is Windows XP Professional.
If you set the items of [At the Same Time] when configuring the UPS for a power failure, skip the
following settings.
(1) Click
in the bottom left of the screen.
Click "Control Panel" in the menu that appears.
(2) The Control Panel window appears.
If the display is as shown in the figure on
the right, click "Switch to Classic View" to
change the display method.If the display
is as shown in (3), it does not need to be
clicked.
7
(3) The classic view type of the Control Panel
appears.
Double-click "Power Options."
(4) The Power Options Properties dialog box appears.
Set "Turn off monitor," "Turn off hard disks,"
"System standby," and "System hibernates" (this
setting is not available on some personal
computers) to "Never."
(5) Click
.
The system standby and system hibernates
settings are disabled.
Close the Control Panel window.
5-3.
Screen resolution setting
The P-AIMS system uses a screen size of 1,024 by 768.The
resolution may differ depending on the personal computer, so
check the resolution and change it if necessary as described
below.
(1) Move the mouse pointer over the screen, and right-click to
display the sub menu shown on the right. Click Properties
(figure on the right).
8
(2) The Display Properties dialog box appears.
Click the Settings tab.
5-4.
(3) The window for changing the screen
resolution appears. Use the slider indicated
by the red circle to adjust the resolution
to 1024 by 768.After you finish adjusting
the resolution, click
to complete
the setting.
Setting for auto-hiding taskbar
The P-AIMS system is designed to be used with
the taskbar at the bottom of the screen set to be
hidden.There is no problem with operation when the
taskbar is displayed, but the visual appearance and
operability may be slightly worse.
(1) Move the mouse pointer over the taskbar, and
right-click to display the sub menu.
Click Properties.
(2) The Taskbar and Start Menu Properties dialog box
appears.
Select both of the "Lock the taskbar" and "Autohide the taskbar" checkboxes.
Click
to complete the setting.
9
* When this setting is set, the taskbar disappears from the
screen, but the taskbar can be displayed by moving the
mouse pointer to the very bottom of the screen.
However, if you are still unable to display the taskbar,
press the Windows key, The Start menu of Windows
opens.
6.
Windows key
Peripheral Devices
6-1.
Selection of communication converters
The communication method to use depends on the adapters to be used.Refer to the following
when selecting the communication converter to use.
CZ-10APB3 (communication adapter) => RS-485 (for new monitoring system)
The quantity is the same as the number of lines to be input to the personal computer.(However,
this is when no consideration is given to RS-232C for UPS.)
6-1-1.
About communication converters
(1) With the P-AIMS system, connections with adapters or UPS are made via RS-485 and RS-232C
communication ports.However, a personal computer is generally equipped with one RS-232C
port, and no RS-485 ports.That is why it is necessary to use communication converters (USB232C converter, USB-485 converter, etc.).
A communication converter is equipment that enables equipment connected to the
communication converter to use it as RS-232C or RS-485 ports when its connector is inserted
into a USB port. The driver supplied with the equipment needs to be installed.
(2) To prevent a malfunction, be sure to use a USB-232C converter, USB-485 converter, or other
converter that is an insulation type communication converter.
Also, a type whose COM number does not change when inserted in a different USB port is
recommended for a USB-232C or USB-485 converter.
6-1-2.
Installation of communication converter
If you insert the communication converter into a USB port, the Found New Hardware Wizard
dialog box appears.
Install the driver of the communication converter.
6-1-3.
Confirmation method for COM port number of communication converter
When you install a communication converter as described in the section above, it is necessary to
confirm the COM port number that has been assigned to that equipment.
The assignment is generally as shown below.
COM1: (Assigned for the personal computer by default even if no other device is installed.)
COM2: (Assigned for the personal computer by default even if no other device is installed.)
COM3: (Assignment is possible from this port number.)
Note down this assigned port number in order to specify it for the P-AIMS system.
10
[COM number confirmation]
(1) Click
in the bottom left of the screen.
Click "Control Panel" in the menu that appears.
(2) The Control Panel window appears.
If the display is as shown in the figure on the right, click
"Switch to Classic View" to change the display method.
If the display is as shown in (3), it does not need to be
clicked.
(3) The classic view type of the Control Panel
appears.
Double-click "System."
(4) The System Properties dialog box appears.
Click the Hardware tab.
These properties also allow you to see the version of
the operating system, specs of the personal computer,
and other information.
11
(5) The Hardware tab appears.
Click "Device Manager."
(6) The Device Manager window appears.
Click "Ports (COM & LPT)" to see setting values such as COM numbers.
In the case of the screen above:
Communication port (COM1) :COM1 port for the personal computer by default
USB Serial Port (COM4)
:COM4 Port for communication converter (the COM number of
the device installed this time)
Note that this name is the same for both a USB-232C converter and USB-485 converter.
Note that the COM number down because it will be used for subsequent settings.
12
6-2.
Uninterruptible power supply
6-2-1.
Connecting uninterruptible power supply
The P-AIMS system uses a personal computer.Therefore, a power failure or the like will be a big
problem.We recommend installing an uninterruptible power supply (UPS).
The UPS introduced here has a function for sending a shutdown signal to the personal computer
in the event of a power failure and a function that always resets the power when there is a
recovery from a power failure. You can set the stopping and automatic startup of the personal
computer.
Connecting a UPS
External HDD
Personal Computer
Dedicated Cable for
UPS
Connect the COM port of the UPS
and the COM port of the personal
computer. Check the COM port
number of the personal computer.
6-2-2.
To AC Outlet
UPS power failure settings
When the power is turned off, the personal computer saves the current state and then shuts
down.However, if there is a sudden power failure, the current state may not be able to be saved
or the writing of data may not be possible, which may result in an error with the personal
computer or a failure of the hard disk drive.Install a UPS as a countermeasure against a sudden
power failure.If a power failure occurs, electric power is supplied from the UPS in order to
maintain the power supply of the personal computer, and give the personal computer time to
shut down normally.
Therefore, a UPS is an extremely effective device for a personal computer system.
The following describes the setting procedure for stopping and starting a personal computer
using a UPS.
The applicable operating system is Windows XP Professional.
This setting is for shutting down a personal computer in the event of a power failure.
(1) Click
in the bottom
left of the screen.
Click "Control Panel" in the
menu that appears.
(2) The Control Panel window
appears.
If the display is as shown in
the figure on the right, click
"Switch to Classic View" to
change the display method.If
the display is as shown in (3), it
does not need to be clicked.
13
(3) The classic view type of the Control Panel appears.
Double-click "Power Options."
(4) The Power Options Properties dialog box appears.
[At the Same Time]
Set "Turn off monitor," "Turn off hard disks," "System
standby," and "System hibernates" (this setting is not
available on some personal computers) to "Never."
Click the UPS tab.
(5) Click
.
(6) The UPS Selection dialog box appears.
14
(7) Select the UPS.
Select "Generic" for "Select manufacturer," "Custom" for
"Select model," and "COM1" for "On port," and then click
.
(8) The UPS Interface Configuration : COM1 dialog box
appears.
without changing any of the settings.
Click
(9) The Power Options Properties dialog box reappears.
, which is now available.
Click
(10) The UPS Configuration dialog box appears.
Click "Minutes on battery before critical alarm" to
select the checkbox.
15
(11) Check that the time until shutdown, which could not
be selected until now, is 2 minutes, and "Next, instruct
the computer to" is set to "Shut down."
.
If there is no problem, click
(12) The Power Options Properties dialog box reappears.
Click
.
Confirm the UPS connection to complete the
procedure.
Close the Control Panel window.
, make sure again that
Note :Before clicking
the cable connecting the PC and UPS is a dedicated
cable, and that it is connected properly.If the wrong
cable is connected or the cable is not connected
properly, the PC may shut down unexpectedly.
6-2-3.
Recovery method settings of personal computer
This method is the setting of the BIOS (Basic Input Output System) of the personal computer
to enable recovery from a power failure.With this method, if you remove the power plug of the
personal computer from the outlet and then reinsert it into the outlet, the personal computer will
start automatically.In cases in which the personal computer being on will be a problem after you
configure this setting, do not insert the power plug of the personal computer until you need to
start the personal computer.
For reference, we will describe the BIOS recovery setting procedure on a DELL (OPTIPLEX
GX620) personal computer.When configuring this setting on a model other than this, contact the
manufacturer if you are unsure of what to do.
16
6-2-3-1. [Recovery setting] (Dell OPTIPLEX GX620)
(1) Turn on the power of the personal
computer, and press the [F2]key
several times when the maker's logo
appears.If the timing for pressing
the [F2] key is late, the Dell System
GX620 screen is not displayed.If it is
not displayed, turn the power off and
then on again, and change the interval
with which you press the [F2] key.
The Dell System GX620 screen
appears.
(2) Press the È key to change the
menu from "System Info" to "Power
Management."
Press the Æ key to add the items with
the [*] mark on the right to the menu
on the left side.
(3) Press the È key to change the menu
from "Power Management" to "AC
Recovery."
Press the [Enter] key to move the
focus from the menu side to inside the
red frame in the figure on the right.
When the focus is moved, [Off] of AC
Recovery is in a highlighted state.
Pressing the Æ key changes the item
in the order of [Off], [On], and [Last].
Select [On].
Press the [Esc] key twice.
(4) Pressing the Æ key changes the item
in the order of [Remain in Setup],
[Save/Exit], and [Discard/Exit]. Select
[Save/Exit].
Press the [Enter] key to save the
changes to the BIOS, and start the
operating system.
To check if the settings are configured
properly, turn the power of the
personal computer off, remove the
power plug from the outlet, wait a
while, and then insert the power plug
into the outlet.If the personal
computer starts automatically, the
settings are configured properly.
17
6-3.
Operation test of UPS and personal computer
When you finish configuring the UPS settings and BIOS settings, conduct a test to check whether
operation is performed properly.However, before you perform a test, turn on the UPS for a whole
day to charge the battery in order to ensure the battery of the UPS has a sufficient amount of
charge.
The following is the test result for a UPS made by Sanken Electric Co., Ltd.
Preparation
(1) Shut down the personal computer.
(2) Press the power button of the UPS to turn off the UPS.
(3) Check the connections of the RS-232C dedicated cable between the UPS and personal
computer.
(4) Connect the personal computer, display, and external HDD so that they are supplied
power from the UPS.
(5) Connect the power plug of the UPS to an outlet.
Test
(1)
(2)
(3)
(4)
(5)
(6)
(7)
(8)
(9)
(10)
(11)
(12)
(13)
Press the power button of the UPS to turn on the UPS.
A buzzer sounds and the output power supply of the UPS turns on, and the personal
computer starts up.
Wait until the startup of the P-AIMS system is complete.(There is no need to wait if the
P-AIMS system is not installed.)
Remove the power plug of the UPS from the outlet.A buzzer sounds on the UPS, so
press the BUZZ OFF button to stop the buzzer.
After approximately 1 minute 45 seconds, the buzzer sounds again on the UPS, so
press the BUZZ OFF button to stop the buzzer.
After approximately 2 minute 10 seconds, the personal computer performs the
shutdown operation and the buzzer sounds on the UPS, so press the BUZZ OFF button
to stop the buzzer.
After approximately 2 minutes 30 seconds, the personal computer shuts down.
However, the output power supply of the UPS still remains on at that time.
There are two patterns for the subsequent operation. The following describes pattern 1.
After 1 minute has elapsed since (6) (3 minutes 30 seconds since the start of the test),
insert the power plug of the UPS in the outlet.
After approximately 2 minutes, the output power supply of the UPS turns off, and the
lamp on the front panel flashes in order for a UPS check to be performed.
After 10 seconds, the output power supply of the UPS turns on, and the power of the
personal computer is recovered.
Pattern 2
If the power plug of the UPS remains disconnected, the output power supply of the
UPS turns off after approximately 5 minutes 30 seconds has elapsed since (1).
Insert the power plug of the UPS after the power turns off. The output power supply of
the UPS turns on and the personal computer starts.
Pattern 1
UPS Power
UPS OUT
PC ON
Ԙ
Ԛ
Ԝ
ԟ
Ԡԡ
Pattern 2
UPS Power
UPS OUT
PC ON
Ԙ
Ԛ
Ԝ
Ԣ
ԣ
The UPS test is now finished.The pattern indicated with (12) is assumed to be the most
likely to occur in the event of an actual power failure.
18
7.
License Certification
Before you can use the P-AIMS system, you need to first perform a work procedure called
"license certification."
To perform license certification, make an inquiry by sending the inquiry key to the inquiry e-mail
address below. You will be registered as a user and issued a release key, and then receive a
reply.
<Contact Information>
Product ID Issuance Desk
E-mail address: [email protected]
When you make an inquiry, send the following information together with the inquiry in order to
be registered as a user and issued a release key.
(1) Product name
(2) Company name/contact person
(3) Phone number
(4) E-mail address
(5) Inquiry key
* If you do not input a release key, you will no longer be able to use the system after 30 days
elapses. Obtain a release key and perform license certification as soon as possible.
* Make an inquiry as soon as possible because it may sometimes take several days to be
issued a release key.
License Certification Procedure
The procedure from after the P-AIMS system is installed up until the end of license
certification is described below.
(1)
Check the inquiry key from the License Certification screen.
(2)
Send the inquiry key to the Issuance Desk ([email protected]).
Also notify us of the product name, company name/contact person, phone number,
and e-mail address.
(3)
A release key is issued.
You are registered as a user and a release key is issued. A reply is sent to the
registered mail address.
(4)
Input the release key from the License Certification screen.
(5)
The license certification procedure is finished.
19
Performing License Certification
(1) A License Certification screen such as the following appears when you start a P-AIMS systems
for which license certification is not finished.
"Basic Software (25)" means that the number
of remaining days that you can use the Basic
Software is "25." It is not displayed after you
finish license certification.
* After you start a P-AIMS system for which license certification is not finished, the License
Certification screen will appear at 9:00 a.m. and 3.p.m. This screen is not displayed after you
finish license certification.
If you install optional software, the License Certification screen will appear until license
certification is finished for all of the software.
(2) If you click the
button in the License Certification
screen, the Inquiry Key display
screen appears, and the inquiry key is
displayed in the screen.
Send the key displayed in this screen
to the Issuance Desk (cmc_productid_
[email protected]) by e-mail.
At the same time, also notify us of the
following items.
(1) Product name (required)
(2) Company name/contact person
(3) Phone number
(4) E-mail address (required)
You will be registered as a user and
issued a release key.
:Clicking this button saves the inquiry key as a text file. Follow the instructions
on the screen to save the text file. Enter the product name, company name/
contact person, phone number, and e-mail address in this saved text file, and
send the text file to the Issuance Desk by e-mail.
:Clicking this button copies the inquiry key to the Windows clipboard. Paste the
inquiry key into your mail.
:Clicking this button closes the Inquiry Key display screen.
20
(3) When you receive the release key,
restart the P-AIMS system. See “2.
Startup and shutdown“ for how to
restart the P-AIMS system, and then
restart the system.
If license certification is not finished
for the P-AIMS system, the License
Certification screen on the right appears
before the P-AIMS system restarts.
button to
Click the
display the Release Key input screen,
and enter the release key.
* If you install multiple P-AIMS system software, the same number of license certifications is
required. In such a case, the number of release keys sent will be the same as the number of
inquiry keys.
Enter all of the received release keys sequentially, and perform license certification. (There is
no set order for entering release keys, so they can be entered in any order.)
License certification is finished once all of the release keys have been entered.
Click the
button. The License Certification screen closes, and the P-AIMS
system starts.
* The P-AIMS system will start even if you click the
button without entering
the release key. You can use the system as is until license certification is finished. (The
system can be used for a period of 30 days.)
21
8.
P-AIMS System Installation
8-1.
Installing Basic Software of P-AIMS system
(1) Insert the Basic Software CZ-CSWKC2
CD of the P-AIMS system you
purchased into the CD-ROM drive.
Installation starts automatically when
you insert the CD. If installation does
not start, double-click “Setup.exe“ on
the CD-ROM drive to start it.
Enter the Product ID in the Input Product
ID screen that appears.
For the Product ID, see the “Product ID
Issuance Certificate“ supplied with the
software.
* Keep the “Product ID Issuance
Certificate“ in a safe place. The Product
ID is required to install the P-AIMS
system. The “Product ID Issuance
Certificate“ will not be reissued.
P-AIMS
Basic software
Product ID: ABCDEF
(2) The InstallShield(R) Wizard prepares to
install the P-AIMS system.
(3) After a short while, the "The
InstallShield(R) Wizard will install
P-AIMS on your computer. To continue,
click Next. " message appears. Click the
button.
22
(4) Next, the License Agreement screen
appears. Carefully read the license
agreement, and click "I accept the terms
in the license agreement" if you agree
to the terms of the license agreement.
button becomes active.
The
button. (The
Click the
software cannot be installed if you do
not agree to the terms of the license
agreement.)
(5) A screen for changing the folder to
install the P-AIMS system in appears.
• If you want to change the folder,
click the
button. A screen
for selecting the installation folder
appears.
• If you do not want to change the
folder, click the
button.
To change the folder, specify a folder
button. The
and click the
specified folder is displayed and the
previous screen is redisplayed.
button to begin the
(6) Click the
installation of the P-AIMS system.
23
Please wait a while.
(7) When the P-AIMS system setup is
finished, the installation complete
screen appears. If you click the
button, the initial settings of
the P-AIMS system are configured.
(8) When the initial settings are finished,
click the
button in the
”Completed installation of P-AIMS”
screen that appears.
The installation is now finished.
(9) When the installation is finished,
registration of the P-AIMS shortcut to
the desktop and registration to the Start
menu take place.
(10)From now on, you can start the
P-AIMS system by double-clicking this
shortcut.
8-2.
Displaying Help files
From the menu bar, click Help menu - Basic software manual to display the instruction manual
for the P-AIMS system.Since the Help files of the P-AIMS system are pdf files, you need Adobe
Reader to read them.
Install Adobe Reader to view the Help files. Adobe Reader is a trademark of Adobe Systems
Incorporated. Use Adobe Reader in accordance with the instructions provided by Adobe Systems
Incorporated.
* Download Adobe Reader from the Adobe (http://www.adobe.com) site, and then install it.
24
9.
Optional Software Installation
The following shows the optional software of the P-AIMS system.
Distribution Ratio Software Symbol A
Layout Display Software Symbol G
BACnet Control Software Symbol B
Web Software Symbol W
9-1.
Installing optional software
The installation procedures for all optional software are the same.The following explanation
describes the procedure for installing Distribution Ratio Software.Installation is the same for all
other optional software, so use the same procedure to install other optional software.
9-1-1.
Installing Distribution Ratio Software
(1) First, stop the P-AIMS system.
Insert the Distribution Ratio Software CZ-CSWAC2
CD of the air-conditioning integrated system
(P-AIMS system) you purchased into the CD-ROM
drive.
Installation starts automatically when you insert the
CD.
If installation does not start, double-click “Setup.exe“
on the CD-ROM drive to start it.
Enter the Product ID in the Input Product ID screen that appears.
For the Product ID, see the "Product ID Issuance Certificate" supplied
with the software.
P-AIMS
(option Name)
Product ID: ABCDEF
(2) The InstallShield Wizard prepares to install the P-AIMS
system.
25
(3) After a short while, the message "The InstallShield(R)
Wizard will install P-AIMS Distribution Ratio Option on
your computer. To continue, click Next.” appears. Click
the [Next] button.
(4) Next, the License Agreement screen appears.Carefully
read the license agreement, and click "I accept the terms
in the license agreement" if you agree to the terms of
the license agreement.The [Next] button becomes
active.Click the [Next] button.(The software cannot be
installed if you do not agree to the terms of the license
agreement.)
(5) The message “The wizard is ready to begin installation.
Click Install to begin the installation.” appears. Click the
[Install] button.
(6) The installation of the P-AIMS system begins.
Please wait a while.
(7) When the P-AIMS system setup is finished, the
installation complete screen appears.
Click the [Finish] button to complete the installation.
* When installing the Distribution Ratio software, it
is possible to install this system without stopping
the P-AIMS system, but the functions of the
Distribution Ratio software will not be added.
Restart the P-AIMS system.
26
9-1-2.
Menus when restarted after installing Distribution Ratio Software
After the system restarts, the fee calculation functions are enabled and the menu item
Distribution ratio is selectable.
In the same way, if other optional software is installed, the installed optional functions are
selectable.If all optional software is installed, the display is as follows.
9-2.
Checking installation status of options
From the menu bar, click Help - Version information
to display the version information screen shown in
the figure on the right.
The symbols in the figure on the right indicate the
installed options.The following shows the meanings
of the symbols.
A : Distribution Ratio Software
G : Layout Display Software
B : BACnet Control Software
W : Web Software
Therefore, if only A is displayed, only the Distribution
Ratio software is installed.The same applies for the other options.The screen in the figure on the
right is when all of the optional software is installed.
27
10. Procedure for Replacing Personal
Computer
This section describes the procedure for migrating a P-AIMS system running on an old personal
computer to a new personal computer.
This explanation is for a new personal computer with an environment capable of running the
P-AIMS system (all of the adapters, external HDD, UPS, and other devices are installed and the
P-AIMS system including optional software is installed).Also, copy a backup of the latest files
of the old personal computer to the new personal computer so that they can be read whenever
necessary.
(This method enables the data obtained using the new personal computer to be the same as
when obtained with the old personal computer.)
Start P-AIMS
* Most recent backup data of old personal
computer
Data recovered?
Perform data recovery
Restart P-AIMS
Communication ports
normal?
Change communication
ports, stop P-AIMS, and
then restart P-AIMS after 20
seconds
Wait at least 30 minutes, and
then perform start and stop
check.
Perform distribution
data check
Normal operation
* Compare the data of the previous day and
the data of the current day, and check that
there is no big difference.
End
The procedure is now finished.
28
Finally, set the following.
(1) Automatic backup file save destination
The initial setting for the save destination
of the STAIM system backup files is the
installation folder as shown in the figure on
the right.If this setting is left as is, there will
be nothing you can do if the hard disk of the
personal computer crashes, so set the
backup files to be saved to the external hard
disk you added.
(2) Automatic Excel file output destination
The automatic Excel file output destination
is not set as shown in the figure on the
right.Specify a save destination.For the save
destination, set the automatic Excel files to
be saved to the external hard disk you
added.
* The CSV files for Excel also include files for
calculating distribution ratios. The figure
above is for when only Basic Software is
installed.
11. Master Registration and Special
Operating Procedures of Basic Software
This section describes master registration and special operating procedures that are not included
in the operation manual for the Basic Software.
11-1. Auxiliary settings
[Procedure]
On the menu bar, select Maintenance - Auxiliary settings.
<Password: Level 3>
Configure the password settings, RS-485 settings for the communication lines, and adapter
settings.
Password
Line Number Adapter Name
Port Number
Transmission Speed
Password
29
11-1-1. Editing passwords
11-1-1-1. Registering passwords
To prevent the settings of important items from being edited easily, a password screen is
displayed when a menu is selected. When you enter the password, the functions corresponding
to the level of that menu can be performed.
This section describes the password of each level.
Level 1 :Enables the operation and changing of the names of devices protected by the
password.
Level 2 :Enables operations such as system settings and shutdown.
Level 3 :Enables all operations including system maintenance.
The initial values are "1" for Level 1, "2" for Level 2, and "3" for Level 3.
The restrictions are also cancelled if a password for a level higher than the one displayed in the
password input screen is entered.
11-1-2. Line settings
11-1-2-1. Setting connections
Click to select the Connect checkbox of the line you want to
connect.Lines with a check mark are enabled.Click to select the
checkbox, and click again to clear the checkbox.)
11-1-2-2. Setting adapter names
Select the adapter name to use with this line.Clicking the
adapter name item displays a pull-down list like the one shown
in the figure on the left.
11-1-2-3. Setting adapter numbers
Click to select the Adapter Number checkbox of the adapter you want to connect.Adapter
numbers with a check mark are enabled.(Click to select the checkbox, and click again to clear the
checkbox.)
* The following describes the relation between the communication adapter numbers and links
1 and 2, and the adapter numbers of P-AIMS.
(Adapter number of P-AIMS) = (communication adapter number) x 2 + (link number) - 1
Where the communication adapter number is set to "0," the adapter number of P-AIMS is
"0" for link 1 and "1" for link 2.Therefore, link 1 which has the adapter number of P-AIMS "0"
cannot be used.
* When using a communication adapter (CZ-10APB3) to use an accumulated value, only use
an even number for the adapter number (adapter number of P-AIMS corresponding to link
1).
where the communication adapter number is set to "0" when obtaining an accumulated
value, the value cannot be obtained because the adapter number of link 1 cannot be used.In
such a case, use a communication adapter number from "1."(The adapter number of P-AIMS
becomes "2.")
* Even if there are absolutely no indoor or outdoor units connected to link 1 of the
communication adapter (CZ-10APB3) for obtaining the accumulated value, make sure
you select the checkbox for the adapter number of P-AIMS corresponding to link 1 of the
communication adapter (CZ-10APB3).If the checkbox is not selected, P-AIMS will be unable
to obtain an accumulated value.
30
11-1-2-4. Setting communication parameters
Use RS-485 (for communication adapter) for communication between
the personal computer and adapter.For the communication parameters,
set the communication port number of the personal computer and the
transmission speed (baud rate).
* Select 9600 bps for the transmission speed. However,
when using a communication adapter (CZ-10APB3), you
can also use 19200 bps.
* Even is set for the parity, and 8 bit for the data length.
(These values cannot be changed.)
11-1-2-5. Saving settings
The two buttons in the top right of the screen are a button that is initially disabled and the
button.Clicking the
button closes the screen.
If the auxiliary setting items are changed, the disabled button and the
button change to the
and
buttons.
Clicking the
button returns to the state before the settings were made, and the buttons
change to a disabled button and the
button.
Clicking the
button displays the next message, and
you are asked whether to continue with the registration.
Clicking the
button registers the settings, and the
buttons change to a disabled button and the [Close] button.
* If a communication line is changed, the settings will not be enabled unless P-AIMS is
restarted.When you perform a restart, leave at least 20 seconds after stopping P-AIMS
before restarting it.
11-2. Outdoor unit master
[Procedure]
On the menu bar, select Maintenance - O/D unit master data settings.
<Password: Level 3>
Configure the settings of each outdoor unit.
Line Number
Adapter Address
Display Enabled Registrations
Register/Cancel
31
:Specify the line number.
:Specify the adapter address.
:Displays only items with a check mark in the Registered column.
:Registers the changes.
:Returns to the state before the changes.
Explanation of column titles
Address
:Indicates the address of the outdoor unit.
Name
:Indicates the name of the outdoor unit.
Outdoor Unit :Indicates the outdoor unit code.
3WAY
:Indicates the outdoor unit is 3WAY.
Register
:Enables registration.
Display Order :Specify the display order.
11-2-1. Display method
11-2-1-1. Specifying line
Selecting a line number from the Line combo box displays only the selected line.
Clicking
on the right of the combo box displays a drop-down list containing "1,
2, 3, and 4."
11-2-1-2. Specifying address
Selecting an address from the Adapter Address combo box displays only
the indoor unit of the selected address.Clicking
on the right of the
combo box displays a drop-down list containing "1 to 31."
11-2-1-3. Displaying enabled registrations
Clicking
so that the button is pressed in like this
displays only
outdoor units with a check mark in the Registered column.Clicking the button again returns the
button to its original state and displays all of the outdoor units.
11-2-1-4. 3WAY indication
The P-AIMS system recognizes an outdoor unit, determines whether it is 2WAY or 3WAY, and
then adds the "{" mark to the 3WAY column if the outdoor unit is 3WAY.
11-2-2. Change method for outdoor units
11-2-2-1. Changing outdoor unit names (outdoor units)
To change the name of the outdoor unit, double-click the Name column.It is possible to change
part of the name of a previously registered outdoor unit.However, to change the entire name, just
type in the name.The existing name will be deleted and only the new name will be displayed.
11-2-2-2. Registering and changing outdoor units
To change the outdoor unit, double-click the Outdoor Unit column.It is possible to change part
of a previously registered outdoor code.However, if you want to change the entire outdoor unit
code, just type in the information.The existing outdoor unit will be deleted and only the new
outdoor unit will be displayed.
* Enter the outdoor unit code in the outdoor unit column.
11-2-2-3. Enabling/disabling registrations
To make a registration after changing the name and other information, click this
registration frame, and select the checkbox.Selecting the checkbox enables the
registration.Clicking the checkbox again clears the check mark and disables the
registration.
32
11-2-2-4. Registering and changing display order
Enter the display order to use when displaying outdoor unit information and the like.In this
system, "0" is handled as being at the bottom in the display order.The display order indication is
4 digits of only numbers.
11-2-2-5. Registering changed data
Click
to register the changed data.All of the changed data is registered.
11-2-2-6. Canceling settings
Click
to return to the previously registered state.
11-2-3. Confirming changes
If you change the information of the outdoor unit master
and then attempt to switch to another screen without
saving the changes, a change confirmation message
appears.
to switch to the other screen without
Click
registering the changes.
Click
to repeat the operation of this screen.
11-3. Indoor unit master
[Procedure]
On the menu bar, select Maintenance - I/D unit master data settings.
<Password: Level 3>
Configure the settings of each indoor unit.
Line Number
Adapter Address
Display Enabled
Connections
Display Enabled
Registrations
Fix Name Column
Register/Cancel
:Specify the line number.
:Specify the adapter address.
:Displays only items with "Enable" in the Connection column.
:Displays only items with a check mark in the Registered column.
:Sets the name column as a fixed frame.
:Registers the changes.
:Returns to the state before the changes.
33
Explanation of column titles
Address
: Indicates the address of the indoor unit.
Connection
: Indicates the indoor units connected to the P-AIMS system.
Capacity
: Indicates the capacity of the indoor unit.
Name
: Indicates the name of the indoor unit.
Outdoor Unit AD : Indicates the outdoor unit (system) address.
Indoor AD
: Indicates the indoor unit address.
Indoor Unit
: Indicates the indoor unit code.
Main Unit
: Sets the main unit indication of the indoor unit.
Register
: Enables registration.
Display Order
: Specify the display order.
Floor
: Sets the floor name.
Schedule Group : Sets the schedule group.
Control Group
: Sets the control group.
11-3-1. Display method
11-3-1-1. Specifying line
Selecting a line number from the Line combo box displays only the selected line.
Clicking
on the right of the combo box displays a drop-down list containing "1,
2, 3, and 4."
11-3-1-2. Specifying address
Selecting an address from the Adapter Address combo box displays only
on the right of the
the indoor unit of the selected address.Clicking
combo box displays a drop-down list containing "1 to 31."
11-3-1-3. Displaying enabled connections
Clicking
so that the button is pressed in like this
displays only indoor
units indicated with "Enabled" in the Connection column.Clicking the button again returns the
button to its original state and displays all of the indoor units.
11-3-1-4. Displaying enabled registrations
Clicking
so that the button is pressed in like this
displays only indoor
units with a check mark in the Registered column.Clicking the button again returns the button to
its original state and displays all of the indoor units.
11-3-1-5. Fixing name column
Clicking
so that the button is pressed in like this
sets the Name column as a fixed frame (becomes gray)
as shown in the figure on the left.When the column becomes a fixed
frame, it cannot be scrolled horizontally and edited.This is convenient
when entering an item on the right of "Tennant," as you can make
changes while checking the name.If you click the button again, it returns
to its original state and the fixed frame disappears so that you can edit
the names.
11-3-1-6. Address indication
This indicates the addresses of the indoor units.The address consists of 8 digits, and there are
two digits for each of (line number) + (adapter address) + (outdoor unit address) + (indoor unit
address).However, when the Connection column becomes "Enabled," the (outdoor unit address)
+ (indoor unit address) are confirmed.
11-3-1-7. Connection indication
"Enabled" is indicated for indoor units for which a connection has been confirmed.
34
11-3-2. Change method for indoor units
11-3-2-1. Changing indoor unit names
Double-click Indoor Unit column to change the name of the indoor unit.It is possible to change
part of the name of a previously registered indoor unit.However, to change the entire name, just
type in the name.The existing name will be deleted and only the new name will be displayed.
11-3-2-2. Changing outdoor unit AD
Move the cursor to the frame to edit, and enter the outdoor unit (system) address.Enter only
numbers.The applicable address is the number of the outdoor unit registered to the same adapter
(same link in the case of a communication adapter) that is registered on the outdoor unit.
11-3-2-3. Changing indoor unit AD
Move the cursor to the frame to edit, and enter the indoor unit address.Enter only numbers.
11-3-2-4. Registering and changing indoor units
To change an indoor unit, double-click the corresponding field.It is possible to change part of
a previously registered indoor unit code.However, if you want to change the entire indoor unit
code, just type in the information.The existing name will be deleted and only the new indoor unit
will be displayed.
* Enter the indoor unit code in the indoor unit column.
11-3-2-5. Enabling/disabling registrations
To make a registration after changing the name and other information, click this
registration frame, and select the checkbox.Selecting the checkbox enables the
registration.Clicking the checkbox again clears the check mark and disables the
registration.
11-3-2-6. Registering and changing display order
Enter the display order to use when displaying status monitoring, operations, and the like.In this
system, "0" is handled as being at the bottom in the display order.The display order indication is
4 digits of only numbers.
11-3-2-7. Specifying and changing floors
When segmenting indoor units by floor, specify the floor.Click the frame
you want to specify in order to display
and then click
.Select a floor
name from the names of registered floors displayed in the drop-down
list.
To register a floor name, select Maintenance - Register floor name.
* It is convenient to register floor names in units of floors displayed on the screen.
11-3-2-8. Specifying and registering schedule groups
When segmenting indoor units by schedule group, specify the schedule
group.Click the frame you want to specify or change in order to display
and then click
.
Select a schedule group name from the names of registered schedule
groups displayed in the drop-down list.To register a schedule group
name, select Maintenance - Register schedule group name.
* Even if you register a schedule group name, it will not be possible to configure the schedule
operation time settings (Schedule - Schedule operation time settings) unless the indoor
units are assigned on the indoor unit master.
35
11-3-2-9. Specifying and changing control groups
When segmenting indoor units by control group, specify the control
group.Click the frame you want to specify in order to display
and then
click
.Select a control group name from the names of control groups
displayed in the drop-down list.
To register a control group name, select Maintenance - Register control
group name.
* It is convenient to register control group names by units of group for when a start and stop
is performed.
[Convenient Tip on Use]
One convenient way of using the drop-down list is to enter a number displayed on the left
of the list. This has the same effect as clicking the item with the mouse.Select a two-digit
number as shown below.
"1" => Press [1] once, "10" => Press [1] twice, "11" => Press [1] three times..."19"=> Press [1]
eleven times
"2" => Press [2] once, "20" => Press [2] twice, "21" => Press [2] three times..."29" => Press [2]
eleven times
"3" => Press [3] once, "30" => Press [3] twice, "31" => Press [3] three times... "39" => Press [2]
eleven times
11-3-2-10. Registering changed data
Click
to register the changed data.All of the changed data is registered.
11-3-2-11. Canceling settings
Click
to return to the previously registered state.
11-3-3. Confirming changes
If you change the information of the indoor unit master
and then attempt to switch to another screen without
saving the changes, a change confirmation message
appears.
Click
to switch to the other screen without
registering the changes.
Click
to repeat the operation of this screen.
11-4. Resetting adapters
[Procedure]
On the menu bar, select Maintenance - Reset adapter.
<Password: Level 3>
Perform a software reset of the adapter.This is the
same as turning the power of the adapter off and
on.Resetting the adapter results in the adapter
information being re-obtained.
If the model setting information of indoor units has
changed, you can perform the reset operation from
this screen without operating the adapter on site
directly.
If the checkbox for re-reading the air conditioning
configuration is selected, a re-read instruction is
output to the adapter.
36
11-4-1. Reset method
Click each
Click
Click
to select the line number and adapter address for the adapter you want to reset.
to reset the adapter and close the screen.
to close the screen without performing any operation.
* The indoor unit state is displayed soon after the reset, it may not be correct. Wait for about 5
to 20 minutes before you perform an operation to give the adapter time to stabilize.
* When resetting an adapter, take care that the schedule control time and data collection time
(0, 15, 30, and 45 minutes) do not overlap.
11-5. System maintenance mode
[Procedure]
On the menu bar, select Maintenance - System maintenance mode.
<Password: Level 3>
Minimize the P-AIMS system screen in order to display the communication programs running
in the background of the P-AIMS system.When minimization is finished, the communication
programs running in the background are displayed and arranged automatically.
* The figure indicates the case where three lines are used.The number of windows displayed
varies depending on the system configuration.
To return to the P-AIMS system, move the mouse pointer to the bottom of the screen or press the
Windows key to display the taskbar, and then click the P-AIMS icon (indicated by the red circle
below) in the taskbar.When the P-AIMS system returns, the communication programs and the
like disappear.
37
11-6. Ending system
[Procedure]
On the menu bar, select Maintenance - Exit.
<Password: Level 2>
The P-AIMS system must be ended before the power of the personal computer is turned off.Be
sure to follow the procedure below.
Select the menu item.
(1) Enter the Level 2 password.
(2) The Exit P-AIMS screen appears if you enter the correct password.
.
Click
The P-AIMS system ends.
12. Master Registration of Layout Display
Software
The operation manual of the Layout Display Software includes all of the function registration and
operation procedures. Refer to the manual.
12-1. Dedicated folders for Layout Display Software
When you install the Layout Display Software, the folders indicated
by the circle in the figure on the right are created.
Place and use the bitmaps of the layout diagrams in the IMG folder,
and place and use the bitmaps of the part diagrams in the Buhin
folder.
The size of the bitmaps of layout diagrams is 1,010 by 596.
38
12-2. Registering parts
The standard parts for use with the P-AIMS system are pre-registered.
The following shows the parts that are registered as standard parts.
Indoor units: The numbers enclosed in parenthesis are part numbers.
Unidirectional
4-directional ceiling
ceiling cassette
cassette
(000)
(001)
Ceiling built-in
Built-in, all ducts
cassette
(005)
(004)
Ceiling suspended
Wall mounted
(007)
(008)
Perimeter, floor
standing
(011)
Floor standing
(PAC Espa)
(013)
Outdoor units: The numbers enclosed in parenthesis are part numbers.
ESPA
ESPA
(000)
(001)
GHP
(011)
Bidirectional ceiling
cassette
(002)
Ceiling-embedded,
high static pressure
(006)
For kitchen use
(009)
GHP
(010)
MULTI
(020)
Accumulated value : The numbers enclosed in parenthesis are part numbers (optional
Distribution Ratio Software is required).
Wattmeter
Gas meter
Water meter
(000)
(001)
(002)
Digital point : The numbers enclosed in parenthesis are part numbers (optional Facility Control
Software is required).
Fan
Pump
(000)
(001)
Analog point : The numbers enclosed in parenthesis are part numbers (optional Facility Control
Software is required).
Celsius temp
percentage
Current
(000)
(001)
(002)
Voltage
(003)
Fahrenheit temp
(004)
Large, medium, and small size parts of these part diagrams are registered.Use part diagrams of
the size that matches the size of the layout diagram
39
The following describes the registration of parts other
than standard parts.
6[RGQHRCTVU(KNGPCOG
The file names of parts are configured as [Part Type
6;2' +&WPKV
Name][Part Number][Part State Number][Part Size].bmp.
6;2' &KIKVCNRQKPV
Therefore, the file name of a part indicates the role of the
6;2' 1&WPKV
part.For example, “01_0000101.bmp” indicates “indoor
6;2' #PCNQIRQKPV
unit/unidirectional ceiling cassette/stop/large.”
6;2' 0QP
[Part Type Name] is included in a file under the file name
6;2' 2WNUG
of “BuhinSyurui.dat” in the Buhin folder.
6[RGQHRCTVU(KNGPCOG
The figure on the right shows the content of
“BuhinSyurui.dat.” The lines with “;” on the very left are
6[RGQHRCTVU(KNGPCOG
remarks.They have no meaning to the P-AIMS system.
Therefore, the lines up until “;Filename,Type No.” have
A
no meaning because they are just remarks.
A
The following content is registered from “;Filename,Type
A
No.”
A
The meaning of “01_,1” is that the part with the file name
A
beginning with “01_” is a part that has the function of
A
“1.”Function “1” is an ID unit (indoor unit).
The meaning of “02_,2” is that the part with the file name
beginning with “02_” is a part that has the function of “2.”Function “2” is a Digital point.
Therefore, the names used for registering the parts are “01_******.bmp” for the indoor unit,
“02_******.bmp” for the sequencer, and “03_******.bmp” for the outdoor unit.
In addition to part names, there are also rules for indicating the
operation states.
[Part Type Name][Part Number][Part State Number][Part Size].
bmp
[Part Type Name]
:”01” and the like indicated in
“BuhinSyurui.dat.”
[Part Number]
:Any 3-digit number from 000 to 999.
[Part State Number] :2-digit number. See the figure on the
rightand the figure below.
[Part Size]
:1: Large, 2: Medium, 3: Small
When parts have the sameshape, use
this when distinguishing them by size.
[Part State Number] for Indoor Unit
01 Stop
02 Heating
03 Cooling
04 Blowing
05 Dry
06 Auto
07 Alarm
08 Installation
09 Operating
For local adapter
: (Green)
: (Red)
: (Blue)
: (Gray)
: (Light Blue)
: (Red/Blue)
: (Yellow)
: (Brown)
: (Red)
A portion of a part for use in a layout display can be made
[Part State Number] for Facility Control
transparent.
01 Stop
: (Green)
The pink portion of
becomes transparent in the layout display. 02 Operating
: (Red)
The color code for the transparent color is RGB (255, 0, 255).
Finally, when a layout is to be displayed on the Web, it is necessary
07 Alarm
: (Yellow)
to register the parts with the same files name and the “gif”
08 Installation
: (Brown)
extension so that they can become parts for the Web.
For example, if the file name of a part for a P-AIMS layout is
“01_000011.bmp,” a GIF file with the file name “01_000011.gif” is required for Web use.Save the
parts to the same Bushin folder.
Use 24-bit bitmaps for the colors for handling BMPs of parts.Take care because tone reduction
may cause colors to change.
40
13. Master Registration of Distribution Ratio
Software
This section describes the procedure for master registration, which is not included in the
operation manual for the Distribution Ratio Software.
13-1. Registering accumulated value master
[Procedure]
On the menu bar, select Distribution ratio - Maintenance - Accumulated value
master.
<Password: Level 3>
Configure the settings for input of the pulse counter of the adapter.
Display Enabled
Registrations
Register/
Cancel
:Displays only items with a check mark in the Registered column.
:Registers the changes.
:Returns to the state before the changes.
Explanation of column titles
Address
Name
Unit Name
Multiplying Factor
Number of decimal places
Register
Display Order
Type
Distribution Group
:Indicates the address of the adapter.
:Indicates the name of the adapter.
:Indicates the unit for the usage counter (indicated automatically
according to type).
:Specify the multiplying factor for the number of input pulses.
:Specify the number of decimal places for when displaying the
accumulated value.
:Enables registration.
:Specify the display order.
:Specify the input pulse type.
:Specify the distribution group.
41
13-1-1. Display method
13-1-1-1. Displaying enabled registrations
Clicking
so that the button is pressed in like this
displays
only pulse counters with a check mark in the Registered column.Clicking the button again returns
the button to its original state and displays all of the pulse counters.
13-1-2. Change Method for accumulated value master
13-1-2-1. Changing names
To change the name of the pulse counter, double-click the Name column.It is possible to change
part of the name of a previously registered pulse counter.However, to change the entire name,
just type in the name.The existing name will be deleted and only the new name will be displayed.
13-1-2-2. Setting multiplying factor
Specify the pulse counter pulse multiplying factor.Click the corresponding column
to display
as shown in the figure on the right, and then click
to display the pulldown menu.Select the required multiplying factor.Select the multiplying factor from
"0.001," "0.01," "0.1," "0.5," "1," "10," "100," and "1000."For example, if you select "0.1,"
the display becomes 1 when the number of input pulses becomes 10.
13-1-2-3. Setting number of decimal places
Specify the number of decimal places for displaying the accumulated value.Click
the corresponding column to display
as shown in the figure on the right, and
to display the pull-down menu.Select the required number of decimal
then click
places.Select the number of decimal places from "0," "1," "2," "3," "4," and "5."For
example, if you select "1," the display becomes "0.0."Use this in combination with
the multiplying factor in the section above.
* If the number of decimal places is 0 for a multiplying factor of "1," 1 for a multiplying factor
of "0.1," 2 for a multiplying factor of "0.01," and so on, the indication becomes easy to read.
13-1-2-4. Enabling/disabling registrations
To make a registration after changing the name and other information, click this
registration frame, and select the checkbox.Selecting the checkbox enables the
registration.Clicking the checkbox again clears the check mark and disables the
registration.
13-1-2-5. Registering and changing display order
Enter the display order for when displaying accumulated values.In this system, "0" is handled as
being at the bottom in the display order.The display order indication is 4 digits of only numbers.
42
13-1-2-6. Setting types
Set the type input for the pulse counter of an adapter.
Specifying the type in this column displays the unit corresponding to the Unit
Name column.
"Electric Power" => "kWh" "Gas" => "m3" =>"Power Generation" => "m3" "Ice"
=> "kWh"
"Water" => "m3". The distribution calculation is in accordance with this type.
13-1-2-7. Setting distribution group
Specify what the distribution group data is for the pulse data
input for the pulse counter of the adapter.Even if multiple pulse
counters are specified, the accumulated total is calculated and
distribution is performed.
13-1-2-8. Registering changed data
Click
to register the changed data.All of the changed data is registered.
13-1-2-9. Canceling settings
Click
to return to the previously registered state.
13-1-3. Confirming changes
If you change the information of the accumulated value
master and then attempt to switch to another screen
without saving the changes, a change confirmation
message appears.
Click
to switch to the other screen without
registering the changes.
Click
to repeat the operation of this screen.
43
Sub menu
14. Menu List
*
*
*
*
1. Layout
(optional)
Status/Operation
Filter sign & I/D unit information
O/D unit information
Operation/Status change log
Alarm list & alarm log
2. List display
Schedule/results
Mode settings (Calendar)
Schedule operation time settings
Update schedule
3. Schedule
*
Print screen
EXCEL output
Auto EXCEL output setting
Print list
List Print preview
*
*
T/S ON operation time
Distribution ratio calculation
Accumulated value
Maintenance
· Distribution ratio settings
· Register distribution group
name
· Register tenant name
· Accumulated value
master data
· I/D unit settings
4. Print
Main menu
1. Layout
2. List display
3. Schedule
4. Print
5. Distribution ratio
6. Demand
6. BACnet
8. Facility Control
9. Web
10.Maintenance
Layout
Initial settings & maintenance
· Layout master data
· Settings
· Layout Backup
· Layout Restore
5. Distribution ratio
(optional)
*
*
*
6. Demand
)p41
Demand (optional)
7. BACnet
BACnet (optional)
8. Facility Control
Facility Control (optional)
9. Web
Web (optional)
10.Maintenance
*
*
*
*
*
*
*
*
*
*
*
*
* indicates the security code protection
screen.
44
*
*
*
*
*
*
Register maintenance information
Register floor name
Register control group name
Register schedule group name
Register operator information
R/C prohibition settings
Clock settings
Data backup/restore
xData backup
xRestore data
xCancel data restore
xAuto backup settings
Register event
Register I/D unit upper/low-limit
temperature
Auxiliary settings
O/D unit master data settings
I/D unit master data settings
Reset adapter
System maintenance mode
Exit
)p29
)p31
)p33
)p36
)p37
)p38
15. Explanation of Functions of Each Menu
15-1. Layout display (optional layout display software is required)
15-1-1. Layout display
This allows you to monitor the current start/stop,
heating/cooling mode, and temperature setting
statuses of each device for status monitoring on
the layout.If the optional Facility Control Software
is installed, digital inputs/outputs and analog data
are also monitored.
Monitoring of alarms (failures)
If an alarm (failure) is generated, the status of the
applicable device is indicated in yellow and the
mode flashes.
If the optional Facility Control Software is installed
and the alarm setting is configured, alarms are
displayed.
This allows you to select each device and then
perform start/stop, cooling/heating mode, temperature setting, fan speed, airflow direction,
and central control operations.If the optional Facility Control Software is installed, you can
perform start/stop operations.
15-1-2. Maintenance (for layout display)
15-1-2-1. Layout master
This arranges the indoor units, outdoor units,
facility devices, and the like on the layout screen.
15-1-2-2. Settings
If the alarm layout diagram display is set, when
an alarm is generated, the layout screen for
displaying that device is displayed.
Set the temperature setting, room temperature,
analog data, and other display method for indoor
units, facility devices, and accumulated values.
15-1-2-3. Layout Backup
This backs up the layout display data.When the
layout changes, perform a backup.Store the backup data on
the personal computer running the P-AIMS system and the
external hard disk.This allows you to recover the data in the
event of a failure of the personal computer.
The initial setting for the folder of the backup destination is
the folder ¥Layout_Backup¥ in which the P-AIMS system is
installed. For example, in the case of the C drive, the folder
is "C:¥P-AIMS¥Layout_Backup¥."
15-1-2-4. Layout Restore
This restores backed up layout display data.If you restore
data, the P-AIMS system needs to be restarted.The restore
takes effect after the system has been restarted.
45
15-2. List display
15-2-1. Status/Operation
Monitoring of status
This allows you to always monitor the current
start/stop, heating/cooling mode, temperature
setting, room temperature, fan speed, airflow
direction, and central control statuses of each
device.
If the optional Facility Control Software is
installed, the digital inputs/outputs are also
displayed.
Monitoring of alarms (failures)
If an alarm (failure) is generated, you are notified
by an alarm generation message and the
sounding of a buzzer.
If the optional Facility Control Software is installed
and the alarm setting is configured, alarms are displayed.
Operation output
This allows you to perform start/stop, cooling/heating mode, temperature setting, fan speed,
airflow direction, and central control operations for each device in the list.Furthermore, if the
operation output is the same, multiple devices can be operated simultaneously.Start/stop
operations are also possible for each control group.
If the optional Facility Control Software is installed, you can perform start/stop operations.
15-2-2. Filter sign & I/D unit information
This allows you to always monitor the filter sign of
the indoor units monitored.If a filter sign occurs,
the filter indication appears on the indoor unit
information screen.
There is no alarm log display and alarm
generation message.Furthermore, the buzzer
does not sound.If the maintenance setting is
made, a filter indication appears in the indoor unit
information screen, but the reset operation cannot
be performed.
Monitoring of indoor unit information
The operation count, fan status, intake
temperature, and blow-out temperature are
displayed for each indoor unit (CZ-10APB3
connection).
15-2-3. O/D unit information
This displays the operation time, operation count,
and oil inspection sign for outdoor units. Demand
setting can be configured for an outdoor unit of
an electric-type air conditioner which supports the
demand setting.
Monitoring of engine oil inspections
This sets engine oil inspections of each outdoor
unit (GHP only) to be always monitored.If an
engine oil inspection is needed, the oil inspection
sign is indicated on the outdoor unit information
screen.It is displayed in the alarm log, and an
alarm generation message is displayed and a
buzzer sounds.The status monitoring screen alarm
column displays the alarm code in a case in which
this is handled as an alarm code.
Monitoring of outdoor unit information
The outdoor unit demand setting can be configured.For the electric type only, the outdoor unit
engine operation time and the operation time after an oil change are displayed. For GHP only,
the amount of electric power generated by High Power Excel is also displayed.
46
15-2-4. Operation/Status change log
This displays a list of the current start/stop,
heating/cooling mode, temperature setting,
room temperature, fan speed, airflow direction,
central control, and alarms statuses of each
device monitored.Furthermore, if those values are
changed, the changes are displayed in real time.
Status change/operation log display
The status changes of each device up until now
and logs of operations performed by the P-AIMS
system are output (automatic Excel output) in oneday units.The log list can contain up to 400,000
items (60,000 items per file).
Log operation
The past 200,000 items of operation data are
stored, and all the items for one day are stored even if that number of items is exceeded.
At the point in time the next day starts, the data that exceeds 200,000 items is deleted
sequentially from the oldest data.Furthermore, you can also specify a period for which to
search and display data.The logs of the indoor units for which the status change of each
device occurred are displayed.You can specify a period in order to display the logs for a
certain period.Furthermore, by setting extraction conditions, you can also apply filters to the
display in order to display only specific logs.
15-2-5. Alarm list & alarm log
If alarms are generated, you can display only those
alarms that are currently activate in order to make it
easy to check them.
Alarm generation message display
The Alarm Display Area at the top of the screen
displays the newest alarm (failures) that was
generated.If multiple alarms were generated, the
most recent alarm is displayed.Furthermore, you
are also notified at the same time by the buzzer
sounding.The buzzer of the personal computer is
used as the buzzer.
Alarm generation continuous status display
With regards to alarms that continue to be currently
activate, they are displayed sequentially from the most recent one in a list.When an alarm is
recovered, it is deleted from the list.Up to 2,000 alarms can be displayed in the list.
Alarm log display
This displays a list of generated and recovered
alarms, including alarms (failures) that continue
to be currently active.Up to 2,000 alarms can be
displayed in the list.The past 10,000 items of alarm
log data are stored, and the data that exceeds
that number is deleted sequentially from the
oldest data.Furthermore, you can also specify a
period for which to search and display data.The
generated alarms are output (automatic Excel
output) in one-month units.The log list can contain
up to 10,000 items.
Unconfirmed alarm display
This displays a log of alarms that have not been
confirmed by the operator, including alarms
(failures) that are still active.It is also possible to register the operator who confirmed an alarm.
Up to 2,000 alarms can be displayed in the list.
47
15-3. Schedule
15-3-1. Schedule/results
This displays the schedule and results of indoor
units in bar graph form.
The displayed term can be specified in order to
check the presetting status, the working status
of a device relative to its schedule, or other
information.
If the optional Facility Control Software is
installed, the instructions of facility control devices
can also be checked.
However, in the case of facility control devices,
even if operation instructions are output, the
operation status cannot be monitored if the digital
inputs that can be checked are not specified.
15-3-2. Mode settings (Calendar)
Start/stop by schedule pattern modes
There are 30 mode (comment input is possible)
settings that can be configured for the start/stop
pattern by schedule, and a mode can be specified
daily or for day of the week on a calendar.With
each mode, any operation time (ON/OFF) can be
set up to 20 times for each device.The calendar
schedule can be set for up to one year in advance
including the current month.
15-3-3. Schedule operation time settings
Setting range
The settable range is start, stop, cooling/heating
mode, temperature setting, fan speed, airflow
direction, and central control.If the settings are
changed, you can select whether the settings are
reflected the same day, next day, or the day after
the next day.
If a schedule group is registered, the table
becomes for the schedule group (figure on
the right).However, if a schedule group is not
registered, the schedule group name column in
the figure on the right becomes the indoor unit
name column.In such a case, specify settings by
individual indoor unit.
15-3-4. Update schedule
Changing settings immediately before
Schedule registration of time changes for only the
same day, next day, or the day after the next day
is possible.
If a schedule group is registered, the table
becomes for the schedule group (figure on the
right).
However, if a schedule group is not registered,
the schedule group name column in the figure on
the right becomes the indoor unit name column.In
such a case, specify settings by individual indoor
unit.
48
15-4. Print
15-4-1. Print screen
This allows you to print a hard copy of the screen displayed in each screen.
15-4-2. Excel output
Saving alarm log and operation/status log data
This allows you to save alarm log and operation/status log data to external storage media in
CSV format.
Saving air conditioning energy data (Distribution Ratio Software is required)
This allows you to save air conditioning energy data to external storage media in CSV format.
The saved data can be used with general-purpose software (Microsoft Excel).
15-4-3. Auto EXCEL output setting
Saving alarm log and operation/status log data
This allows you to automatically save alarm log and
operation/status log data every day to external storage
media in CSV format.
Saving air conditioning energy data (Distribution Ratio
Software is required)
This allows you to automatically save air conditioning
energy data every day to external storage media in CSV
format.
Set a specified file to be saved as a CSV file to a specified folder every day.
15-4-4. Print list
When the indoor unit distribution ratio calculation screen (Distribution Ratio Software is
required) is displayed, clicking this menu item prints the distribution ratio calculation list table.
This menu item cannot be selected if no printer is installed.
15-4-5. List print preview
When the indoor unit distribution ratio calculation
screen (Distribution Ratio Software is required)
is displayed, clicking this menu item displays a
preview of the distribution ratio calculation list
table.
This is convenient for confirming the calculation
screen.You can also specify the pages to print in
order to print only the required parts.
This menu item cannot be selected if no printer is
installed.
49
15-5. Distribution ratio (optional Layout Display Software is
required)
15-5-1. T/S ON operation time
This displays items such as “Adapter Value,”
which indicates the thermostat data held by
the adapter or indoor unit, or thermostat on/
off times for the air conditioner, “Balance total,”
which indicates the time for each fan speed
with the thermostat on balanced in units of xx
minutes, and the cumulative total of those balance
values, and “Weight factor balance total,” which
indicates the results of multiplying the values set
for thermostat on time conversion coefficients
of various settings by the fan speed conversion
values.
[Adapter Value]: Directly displays the adapter
values.
[Balance total]: Displays the total when the specified term and time zone (all hours, regular
hours. out of hours, and specified days) have been specified.
[Weight factor balance total]: Displays the total obtained by multiplying the total calculated in
[Balance total] by a factor taking into account the capacity of the indoor unit.
15-5-2. Distribution ratio calculation
Air conditioning energy distribution data display
This displays the simple distribution and load
distribution separately.
With simple distribution, the outdoor unit
electricity and indoor unit electricity can be
calculated as separate distribution groups.
The distribution method needs to be specified in
advance.
If the electricity and gas price rates are specified,
the charges are calculated.
The accumulated data is read at intervals of 15
minutes.
15-5-3. Accumulated value
Accumulated value display
This displays a list of the accumulated values from
the electricity and gas meters.
[Adapter value]: Displays the adapter value.
[Term total value]: Calculates and displays
the accumulated values of the specified term
separately for all hours, regular hours, out of
hours, and specified days.
15-5-4. Maintenance (for distribution ratios)
15-5-4-1. Distribution ratio settings
Set the distribution method (simple distribution,
load distribution), specified day setting, regular
hour range setting, cut-off days of accumulated
data, conversion factor by individual fan speeds
for weighting, and electricity and gas price rates.
This is for when specifying the distribution
method.
50
15-5-4-2. Register distribution group name
This is for changing, adding, and deleting
distribution group names.In order to select a
distribution group for the accumulated points
settings and indoor unit master registration, a
distribution group needs to be registered in this
screen first.
A list of registered indoor units is also displayed.
15-5-4-3. Register tenant name
This is for changing, adding, and deleting tenant
names.In order to select a tenant for indoor
unit master registration, a tenant needs to be
registered in this screen first.
A list of registered indoor units is also displayed.
15-5-4-4. Accumulated value master data
This is for registering the unit, multiplying
factor, type, and distribution group of the point
connected to the pulse counter of the adapter.
Assigning a name to the point improves ease of
understanding.
This data is the accumulated values for electricity
and gas that form the basis of distribution.
For the registration method, see "13-1 Registering
the Accumulated Value Master."
15-5-4-5. I/D unit settings
This is for registering the information for
calculating the distribution ratio, such as tenant,
outdoor distribution group, indoor distribution
group, electric heater capacity, indoor fan
coefficient, and fixed indoor unit capacity.
51
15-6. Maintenance (Basic Software)
15-6-1. Register maintenance information
Registering maintenance information
This allows equipment and devices under
maintenance to be registered for maintenance.
For equipment and devices that are registered
for maintenance, operation is prohibited from the
P-AIMS system and alert (failure) monitoring is
stopped.If maintenance registration is performed
while an alarm is active, the indication in the
alarm column of the status monitoring screen
becomes maintenance, and the status in the
alarm log becomes recovered.There is no alarm
generation message and sounding of a buzzer.
The alarm indication in the alarm column of the
maintenance setting screen becomes recovered.If
an alarm is generated after maintenance registration, the indication in the alarm column of the
status monitoring screen becomes maintenance, and an alarm indication is not displayed in
both the alarm log and the alarm column of the maintenance setting screen.Event control and
schedule control cannot be performed while the maintenance setting is configured.
15-6-2. Register floor name
Set the floor levels for selecting floors in screens
such as the status monitoring/operation screen.
The registered devices are displayed.
15-6-3. Register control group name
Control groups
For each indoor unit registered to the control
group, you can change the operations and
settings for start/stop, cooling/heating mode,
temperature setting, fan speed, airflow direction,
central control performed by control group in the
status monitoring/operation screen.
Control group selection is performed when events
are set.
The registered devices are displayed.
52
15-6-4. Register schedule group name
Schedule control
For each indoor unit registered to the schedule
group, automatic start/stop operation in
accordance with the schedule can be set.
1) There are 30 mode (comment input is
possible) settings available for start/stop
patterns by schedule, and a mode can be
specified daily or for day of the week on a
calendar.
2) With each mode, any operation time (ON/
OFF) can be set up to 20 times for each
device.
3) The calendar schedule can be set for up to
one year in advance including the current
month.
4) The settable range is start/stop, cooling/heating mode, temperature setting, fan speed,
airflow direction, and central control.
5) Schedule registration of time changes for only the same day, next day, or the day after
the next day is possible.
6) The registered devices are displayed.
15-6-5. Register operator information
This allows you to register the name of the
operator.In order to confirm the alarm logs, the
name of the operator needs to be registered in
this screen first.
15-6-6. R/C prohibition settings
Remote control prohibition/permission operations
The items that can be prohibited are start/stop,
cooling/heating mode, temperature setting, fan
speed, and airflow direction.
The central control settings 5 to 7 below can be
set for the E and F type GHP, and the S and R type
PAC.
The central control settings 1 to 4 can be set for
the B, A, U, and T type PAC and the K, J, H, and
G type GHP.Any combination of the prohibition
items of central control 1 to 4 is possible.
15-6-7. Clock settings
Set the time of the personal computer.
In the P-AIMS system, the time needs to be corrected
gradually because problems occur with the thermostat
ON time and the obtaining of accumulated values if an
extreme change is made to the time.
53
15-6-8. Data backup/restore
15-6-8-1. Data backup
This allows you to back up the P-AIMS system.
However, the CSV files output with Excel output or automatic Excel output are not backed up.
15-6-8-2. Restore data
This allows you to use a backup created with the P-AIMS system or files created with an
automatic backup to restore data.
15-6-8-3. Cancel data restore
This function is for returning to the original state when "Restore data" in the previous section
has been executed.
(* The "Cancel data restore" menu item becomes available for selection after "Restore data" is
executed.)
15-6-8-4. Auto backup settings
This sets backups to be made automatically every
day.
(Considering the likelihood of trouble occurring
with the personal computer, we recommend
connecting an external hard disk drive to the
personal computer and saving the backup data
to that drive. This will make restoring the system
easy.)
15-6-9. Register event
Event control
For equipment and devices registered to the
event group, linked start and stop operations
can be performed in accordance with set input
conditions.
Batch output is also possible.
If the Facility Control Software is installed,
operations such as stopping the operation of
lighting linked to the air conditioner are possible.
15-6-10. Register I/D unit upper/lower limit temperature
This allows you to set the temperature setting range
of indoor units individually for each indoor unit.This
enables a temperature setting within an appropriate
range.
54
15-6-11. Auxiliary settings
This configures the settings of the RS-485
communication conditions of adapters.Even if
the communication conditions of adapters are
changed, the conditions of the system are not
changed.Restart P-AIMS.
Adapter selection, address of the communication
port, communication speed, adapter address, etc.
Register a password for each level.The passwords
are enabled at the point in time that they are
registered.
For the registration procedure, see "11-1. Auxiliary
Settings."
15-6-12. O/D unit master data settings
For each line and adapter, register the outdoor
unit names, outdoor unit codes, and display order
of the outdoor units.
For the registration procedure, see "11-2. Outdoor
Unit Master."
15-6-13. I/D unit master data settings
For each line and adapter, register the indoor
unit names, outdoor unit AD (outdoor unit
(system) address), indoor unit AD (indoor unit
address), display order, floor, tenant, distribution
group, schedule group, control group, and other
information of the indoor units.
For the registration procedure, see "11-3. Indoor
Unit Master."
15-6-14. Reset adapter
This resets an adapter.
55
15-6-15. System maintenance mode
This sets the P-AIMS system to maintenance
mode.A DOS window for displaying the
communication status and other information is
displayed.A DOS window is displayed for each
job, so the number of DOS windows displayed
varies depending on the system configuration.
15-6-16. Exit
This ends the P-AIMS system.
16. About Adapters
The P-AIMS system allows you to register adapter numbers 1 to 31.
When you use communication adapters (CZ-10APB3), there are links 1 and 2 per adapter of
the communication adapters.The P-AIMS system also recognizes the link numbers as adapter
numbers, so the relation between the adapter numbers of P-AIMS and the communication
adapter numbers and link numbers when communication adapters are used is as described
below.
(Adapter number of P-AIMS) = (communication adapter number) x 2 + (link number) - 1
Therefore, be careful of the following points.Where a communication adapter is set to "0,"
the adapter numbers of P-AIMS become "0" for link 1 and "1" for link 2.Therefore, the adapter
number "0" cannot be used in P-AIMS, so link 1, which becomes "0," cannot be used.
56
17. Troubleshooting
17-1. Communication error related
* Note : The following shows the meanings of indications.
· Adapter
: Communication adapter (CZ-10APB3)
· P-AIMS
: Total air-conditioning controller (CZ-CSWKC2)
· Main board : CZ-10APB3 main board of communication adapter.
17-1-1. "Disconnected" error is displayed for some air-conditioning equipment
(1) Detection method
The state above occurs when the adapter was unable to receive the data from the unit side
within the specified time or longer or an error was detected with the received data.
Here, "unit" refers to the following equipment.
· Indoor units, outdoor units, and local adapters (for on/off and for communication conversion)
(2) Troubleshooting
1
Units
1-1 Is there any unit for which the power is turned off?
Is there any looseness, disconnection, break,
1-2 or short at the connection parts of the indoor/
outdoor operation line?
Yes Turn on the power.
No 1-2
Yes Fix the wiring.
No 1-3
Is there any of the following problems with the
Remedy the problem
Yes
installation of the indoor/outdoor operation line?
with the installation.
· The line runs together with the power line
· There are branches in more than 16 points
· The total length exceeds 1 km
· Another branch is installed after a branch
· There is a "star-like branch" (multiple connection
1-3
branch)
No 2-1
· The distance between one branch point and
another is within 2 m
· There is a termination resistor setup problem
(too many or too few)
· If a shielded cable is used, the shield is grounded
at both ends or not grounded
2
Communication
adapter
Is there any looseness, disconnection, break, or
short of the wires of numbers 0 and 1 (LINK1) or
2-1
numbers 3 and 4 (LINK2) of the 20-pin terminal
block on the main board?
3
Replace the main board of the adapter for which the alarm is displayed.
57
Yes Fix the wiring.
No 3
17-1-2. "Disconnected" error is displayed for all air-conditioning equipment
connected to communication adapter
(1) Detection method
The state above occurs when P-AIMS was unable to receive the data within the specified time
or longer or an error was detected with the received data.
(2) Troubleshooting
1
Communication
adapter
(power system)
For which adapter number is an error displayed?
Is something indicated on the 7-segment LED
1-1
(6 LEDs) on the main board?
1-2 Is the power switch on the main board turned on?
Are the connectors on the main board
1-3 disconnected, broken, or the like?
· CN012 (white, 4-pin) (Adapter only)
(Adapter only) Are the connectors on the power
board disconnected, broken, or the like?
1-4
· CN1 (white, 5-pin)
· CN2 (white, 4-pin)
1-5 Has the fuse (F401) of the main board blown?
2
Communication
adapter
(communication
system)
Is there any looseness, disconnection, break, or
short of the wires of numbers 11 and 12 "ADAPT"
2-1
(RS-485) of the 20-pin terminal block on the main
board?
Is the polarity correct for the wires of 11 and 12
2-2 "ADAPT" (RS-485) of the 20-pin terminal block on
the main board? (There is a + and a -.)
3
Installation and setup
related
Yes
No
Yes
No
2-1
1-2
1-3
Turn on the power.
Yes Fix the wiring.
No 1-4
Yes Fix the wiring.
No 1-5
Yes Replace the fuse.
No 2-1
Yes Fix the wiring.
No 2-2
Yes 3-1
No Fix the wiring.
Restore the setting
Was the adapter number setting of the main board Yes or check the
3-1
configuration.
changed after P-AIMS was started once?
No 3-2
Is the "LINK Connection Yes/No" setting of the
Yes 3-3
main board correct?
3-2
(See the “Communication adapter installation
No Correct the setting.
instruction manual.”)
For the main board of the adapter of a bus
terminator, is the jumper plug CN032 set to "B"
(termination resistor exists)?
3-3
*If the communication converter connected to the
personal computer is set as the terminator of the
wiring, set this to termination resistor exists.
For the main board of an adapter of other than a
3-4 bus terminator, is the jumper plug CN032 set to
"A" (termination resistor does not exist)?
Is there any of the following problems with
the installation of the communication adapter
operation line?
· The line is bundled together with or runs
together with the power line
3-5 · The total length exceeds 1 km
· The line is not in a bus configuration (a branch
exists)
· A shielded cable is not used
· The shield is grounded at both ends or not
grounded
Yes 3-4
No Set "B."
Yes 3-5
No Set "A."
Yes
Remedy the problem
with the installation.
No 4
4
Recheck the board(s) of the adapter for which the alarm is displayed (main board or power board, or both
boards)
58
17-1-3. "Communication error" is displayed for all communication adapters
connected to communication converter, and "Disconnected" is displayed for
air-conditioning equipment
(1) Detection method
The state above occurs when P-AIMS was unable to receive the data from all communication
adapters connected to the communication converter within the specified time or longer.
(2) Troubleshooting
1
P-AIMS
communication
converter
1-1
1-2
1-3
1-4
1-5
1-6
1-7
Yes 1-2
No Install the software.
Is the number of the COM port displayed in Device Yes 1-3
Manager of Windows XP correct?
If it is difficult to check the number, check it by
Take a note of the
disconnecting and the re-connecting the USB
No COM number and
cable of the communication converter.Check the
proceed to 1-3.
COM port by showing and hiding the COM port.
Yes 1-4
Are the adapter name, COM port number, and
baud rate of the Auxiliary settings of Maintenance
configured correctly?
Reconfigure the
Set the number confirmed in 1-2 as the COM port No settings.
number.
Is the communication converter connected
Yes (End)
correctly, including the ground wire, in
accordance with the instruction manual supplied
No 1-5
with the communication converter?
Yes 1-6
Has the COM port number not changed?
Depending on the maker of the communication
converter, the COM port number may sometimes
change when the USB connector of the PC is
disconnected and then re-connected or a different
Reconfigure the
USB connector is connected.
No
settings.
We recommend to avoid disconnecting and
re-connecting the connector of the COM port
unnecessarily after the settings have been
configured correctly.
Is the communication converter not locked?
Yes (End)
Disconnect the USB connector of the
communication converter, turn the power off, reconnect the USB connector, and check the number No 1-7
of the COM port.
Check the USB cable connections, and restart the personal computer.Recheck
in accordance with the instruction manual supplied with the communication
converter.
Is the software supplied with the communication
converter installed correctly?
17-2. Screen display related
17-2-1. Screen operations are not possible (mouse and keyboard do not work)
(1) Troubleshooting
1
P-AIMS
1-1
Are the connectors of the mouse and keyboard
disconnected?
Is one of the following processes being
performed?
1-2
· Backup
· Restore
Restart the personal computer on which P-AIMS
1-3 is installed. When the personal computer restarts,
does the mouse and keyboard work?
1-4
Connect the
connectors.
No 1-2
Wait for the process
Yes
to end.
Yes
No 1-3
Yes (End)
No 1-4
Recheck the operation of the personal computer referring to the instruction
manual supplied with the personal computer.
59
17-2-2. Nothing is displayed on screen
(1) Troubleshooting
1
P-AIMS
Yes 1-7
No 1-2
Yes 1-3
1-2 Is the power turned off?
No Turn on the power.
Recheck the operation of the personal computer referring to the instruction
1-3
manual supplied with the personal computer.
1-1
Are the power switches of the personal computer
and display turned on?
17-2-3. Not even one indoor unit or only small number of indoor units is displayed
on screen
(1) Troubleshooting
1
P-AIMS
Is the setting of the adapter board set to "Airconditioning equipment connected: No"?
1-1
(See the “Communication adapter installation
instruction manual.”)
Set "Yes" and
Yes perform a
configuration check.
No 1-2
Reduce the number
Yes
of links to within 16.
Does the air-conditioning equipment have 17 or
more links connected?
1-2 Is 9 or more communication adapters connected
to each communication converter?
No 1-3
(Use with 8 or less communication adapters.)
Change the adapter
Is the adapter number of the communication
Yes
number.
adapter 0?
1-3
If the adapter number is 0, the air-conditioning
No 1-4
equipment connected to link 1 is not displayed.
1-4 See the "Unconnected" items, and check all content that is the same.
17-2-4. Cannot enter screen selected in menu
(1) Troubleshooting
1
P-AIMS
Is any optional software installed?
Yes (End)
1-1 Optional software need to be purchased (sold
No 1-2
separately).
Yes (End)
Is a password registered?
(Maintenance – Auxiliary settings)
1-2
*For password-protected screens, refer to the
No
instruction manual and technical documentation.
17-2-5. Distribution ratio and usage amount are indicated as 0
If the distribution ratio is "0%, start from "1-1."
If the distribution ratio is displayed but the usage amount is "0," start from "1-7."
(1) Troubleshooting
1
P-AIMS
When time zone accumulation is performed, is the Yes 1-2
1-1 displayed time zone selection correct ?
Select the correct
No
(All hour/Regular hour/Out of hour/Specified day)
time zone.
Yes 1-3
When the operation times of indoor units
belonging to that tenant (Distribution ratio/T/S ON
1-2
operation) are checked on the screen, are they all
No 1-4
"0:00"?
If the operation time is 0 hours, 0 is indicated for all of the distribution ratio,
1-3
price rate, and usage amount.(End)
Yes 1-5
Is tenant registration complete in the screen
1-4 of Distribution ratio – Maintenance – I/D unit
settings?
Is distribution group registration complete in the
1-5 screen of Distribution ratio – Maintenance – I/D
unit settings?
60
No 1-7
Yes 1-6
No 1-7
1-6
1-7
1-8
1-9
Yes 1-8
In the case of a tenant that is configured from
the local adapter, is a capacity fixed value set?
(Distribution ratio – Maintenance – I/D unit
No 1-7
settings)
Are the settings of 1-4, 1-5, and 1-6 configured correctly?(*)
Furthermore, if 0 is indicated for the usage amount, proceed to 1-8.
Is the count input from the pulse meter?
Yes 1-9
(Check this from the screen of Distribution ratio
No *1
– Accumulated value.)
Yes
Is the setting of the pulse unit amount complete?
(Screen of Distribution ratio – Accumulated value
Configure the
No
master data)
setting.
*1 Perform the troubleshooting in the section "18-2-6. Pulse count is not input normally."
17-2-6. Pulse count is not input normally
(1) Troubleshooting
1
P-AIMS
2
Communication
adapter
Yes 1-2
Configure the
No
setting.
View the display of
If you specify a term in the screen of Distribution
Yes data currently being
1-2 ratio – Accumulated value, can you view the
accumulated.
display of data currently being accumulated?
No 1-3
When time zone accumulation is performed, is the Yes 2-1
displayed time zone selection correct ?
1-3 (All hour/Regular hour/Out of hour/Specified
Select the correct
No
day) (Screen of Distribution ratio – Maintenance
time zone.
– Distribution ratio settings)
Yes 2-2
Is the cable from the pulse meter connected
Is the distribution group configured correctly
1-1 in the screen of Screen of Distribution ratio
– Maintenance – Accumulated value master data?
correctly?
Is there any incorrectly connected terminal,
disconnection, break, or short?
(Pins 1 to 3 of the 20-pin terminal block on the
2-1 main board)
For pins 1 to 3, gas or electricity pulse meters can
be assigned freely.
Pin 1 (Nos. 6 and 7)
Pin 2 (Nos. 6 and 8)
Pin 3 (Nos. 6 and 9)
Disconnect all of the wires of the pulse meter
from the terminal board, and then look at the
Distribution ratio – Accumulated values creen of
P-AIMS while using an appropriate piece of wire
2-2 or lead wire, or the like to short the inputs(pins 1
to 3) of the termina lblock several times. Does the
number of pulses in crease normally?
(The display may sometimes take 15 minutes to
be updated.)
3
Pulse meter
No Fix the wiring.
Yes 3-1
No 2-32-4
2-3 Replace the main board.
If the distance between the pulse meter and communication adapter is 20 m
2-4 or more, install a relay.Even if the distance is within 20 m, install a relay if you
are worried about the influence of noise.
Is the wiring of the communication adapter
Yes 3-2
correct?
3-1
Is there not a disconnection, break, or short at the No Fix the wiring.
terminals on the meter side?
Is the signal line from the pulse meter definitely
Yes 3-3
wired to the non-voltage a contact (relay contact)?
*In the case of open collector output, there is
3-2
polarity.
No Fix the wiring.
(No. 6 is the plus, and Nos. 7, 8, and 9 are
minus.)
61
Disconnect the wires from the terminals, and then Yes 3-4
look at the screen of "2-4 Pulse meter" of P-AIMS
while shorting those wires several times. Does the
3-3
number of pulses increase normally?
No Perform 2-1 again.
(The display may sometimes take 15 minutes to
be updated.)
Is there not a mistake with the connections of the
3-4 electricity meter and power supply line and the
gas flowmeter and fuel gas pipe?
Yes 3-5
No Fix the connections.
Yes 3-6
Is not the meter model or setting larger than that
Change the meter
3-5 required for the electricity amount or gas flow rate
No
model or correct the
per pulse?
setting.
3-6 Inspect the pulse meter side.
17-2-7. Accumulated operation time (or distribution ratio) is counted even though
operation is not being performed
(1) Troubleshooting
1
P-AIMS
1-1
Is the accumulation time zero? (The distribution
ratio is counted.)
Did you not start operation but rather forget to
stop operation?
1-2 The operation log can be checked on the screen
displayed by clicking List display – Operation /
Status change log.
Did the program timer operate?
1-3 (Remote control, other centralized control device,
external input, etc.)
Are there any signs that an indoor unit was
1-4 forcefully operated from a personal computer or
other device during a service or maintenance?
Yes *1
No 1-2
Yes (End)
No 1-3
Yes (End)
No 1-4
Yes (End)
No 1-5
When time zone accumulation is performed, is the Yes 1-6
1-5 displayed time zone selection correct ?
Select the correct
No
(All hour/Regular hour/Out of hour/Specified day)
time zone.
(When using time zone distribution)
Yes 1-7
1-6 Is the time zone setting or distribution specified
No Correct the setting.
day setting correct?
Correct the
(When using time zone distribution)
Yes
settings.*2
1-7 Is the off timer set to the same time or a time
close to that for switching the time zone?
No
*1 With the load distribution method, the standby power portion is distributed even if operation
is not performed.
*2 Avoid setting the off timer to a time within approximately 10 minutes before the time for
switching the time zone.
17-2-8. Cannot back up or restore data to hard disk of personal computer
(1) Troubleshooting
1
Hard disk
Yes 1-2
No Install the hard disk.
Yes
1-3
Is the drive number of the external hard disk
correct?
Do not connect USB
1-2 In the case of a USB external hard disk, the drive
memory or the like
No
number may sometimes change if other USB
or another external
memory is used at the same time.
drive.
Yes
1-4
Does the problem still occur when a different
1-3
external hard disk drive is used?
No (End)
1-4 Recheck the instruction manuals for the personal computer and hard disk.
1-1 Is the hard disk installed correctly?
62
17-3. Unit operation related
17-3-1. Schedule timer does not work correctly
(1) Troubleshooting
1
P-AIMS
1-1
Were the Mode settings (Calendar) and Schedule
operation time settings configured correctly?
Is the schedule operation time setting selected for
the indoor unit?
1-2
(Screen of Schedule – Schedule operation time
settings)
1-3
Is the schedule for the indoor unit registered on
the Schedule/results screen?
Is the timer operation mode of that indoor unit
1-4 configured correctly for that day?
(Screen of Schedule – Mode settings)
1-5 Are the current date and time settings correct?
Did any of the following occur at the timer time?
· Indoor unit power failure
· P-AIMS power failure
1-6
· Communication adapter power failure
· Error communicating with air-conditioning
equipment caused by some other reason
Yes 1-2
Configure the
No
settings.
Yes 1-3
No
Configure the
settings.
Yes 1-4
Configure the
No
settings.
Yes (End)
No 1-5
Yes 1-6
Reconfigure the
No
settings.
Yes (End)
No 1-7
Are the settings configured so that units within
Correct the timer
Yes
one outdoor unit system will be in different
settings.
1-7 cooling/heating modes?
(The timer does not work because the cooling and No 1-8
heating modes do not match.)
Correct the timer
Is a setting invalid for a model set?
Yes
settings.
1-8 (Example: heating operation is started for a model
designed specifically for cooling only)
No 1-9
Are the settings configured so that the mode is
Yes 1-11
1-9 changed directly from cooling (dry) to heating (or
No 1-10
vice versa)?
Check for conflicting
Is the timer of other equipment (remote control,
Yes
settings.
1-10 weekly timer, etc.) being used in conjunction with
the timer?
No
Set the timer so that the equipment is stopped or blowing is performed once
1-11
one minute (example) before the switching of cooling and heating modes.
17-3-2. I want to start or stop operation for all indoor units by external contact
input
This can be achieved by registering an event.You can specify the input of a communication
adapter as an input point, and all indoor units, control groups, and individual indoor units as
output points. (Maintenance – Register event)
17-3-3. I want unit alarm to be detected and then external alarm output turned ON
This can be achieved by registering an event.You can specify all air-conditioning alarms as input
points, and the output of all indoor unit adapters as output points. (Maintenance – Register event)
Note that the engine cleaning sign, engine oil inspection sign, and remote control inspection sign
are not output as unit alarms.
63
17-3-4. Prohibit remote control use is set but setting returns to permit individual
(1) Troubleshooting
1
P-AIMS
2
ON/OFF controller
Is a central addresses set?
Confirm and set the address using the remote
1-1 control, system controller, or the like.
(The P-AIMS unit does not have a function for
confirming and setting the central addresses.)
Yes 2-1
Is "Switch ON/OFF controller main/sub" of the
2-1 ON/OFF controller that is also installed set to OFF
(main).
Is "Switch centralized control main/sub" of the
2-2 ON/OFF controller that is also installed set to OFF
(main).
2-3 Re-check the ON/OFF controller.
Yes Set ON (sub).
No
Configure the
setting.
No 2-2
Yes Set ON (sub).
No 2-3
17-3-5. Cannot print with printer
(1) Troubleshooting
Printer
Are you using a recommended printer?
Are you using a printer for Windows XP?
1-1
Check the instruction manual supplied with the
printer.
1-2 Is the power of the printer turned on?
1-3 Is the printer in the online state?
1-4 Is paper loaded in the printer?
Refer to the instruction manual of the printer and
check whether the cause is other than the above.
1-5 Is it still not possible to print after checking the
instruction manual and taking the appropriate
measures?
Is the printer cable connected correctly?
1-6 · P-AIMS side
· Printer side
1-7
Is printing still not possible after replacing the
printer cable?
Yes 1-2
No
Use a recommended
printer.
Yes 1-3
No Turn on the power.
Yes 1-4
Set the printer to the
No
online state.
Yes 1-5
Load paper in the
No
printer.
Yes 1-6
No (End)
Yes 1-7
No Connect the cable.
Yes 2
No (End)
2
Try using the printer to print a document from Notepad that is supplied with Windows.If printing is still not
performed correctly, re-check the instruction manuals supplied with the printer and personal computer.
64