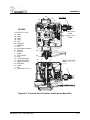
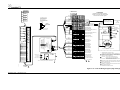
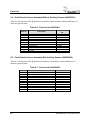
1
1000 Technology Drive, Pittsburgh, PA 15219
645 Russell Street, Batesburg, SC 29006
SM 6263A
Electronic Circuit Controller (ECC)
Upgrade Kit
Installed in Existing M-3 and M-23 Style Switch Machines
©
Copyright 2010
Ansaldo STS USA, Inc.
SM 6263A, Rev. 3
November 2010
Notices
Proprietary Notice
This document and its contents are the property of Ansaldo STS USA,
Inc. (formerly known as Union Switch & Signal Inc., and hereinafter
referred to as "ASTS USA"). This document is furnished to you on the
following conditions: 1.) That no proprietary or intellectual property
right or interest of ASTS USA is given or waived in supplying this
document and its contents to you; and, 2.) That this document and its
contents are not to be used or treated in any manner inconsistent with
the rights of ASTS USA, or to its detriment, and are not to be copied,
reproduced, disclosed or transferred to others, or improperly disposed
of without the prior written consent of ASTS USA.
Important Notice
ASTS USA constantly strives to improve our products and keep our customers apprised of
changes in technology. Following the recommendations contained in the attached service manual
will provide our customers with optimum operational reliability. The data contained herein
purports solely to describe the product, and does not create any warranties.
Within the scope of the attached manual, it is impossible to take into account every eventuality
that may arise with technical equipment in service. Please consult an ASTS USA local sales
representative in the event of any irregularities with our product.
ASTS USA expressly disclaims liability resulting from any improper handling or use of our
equipment, even if these instructions contain no specific indication in this respect. We strongly
recommend that only approved ASTS USA spare parts are used as replacements.
SM 6263A, Rev. 3, November 2010
i
Revision History
Revision History
Rev.
Date
Nature of Revision
Original
February 2002
Initial Issue
1
April 2005
2
April 2006
Incorporated ECO EM-1771 - Update Internal Wiring Diagrams
Incorporated ECO EM-1813 - Updated Motor Compartment parts
list and drawing
Incorporated ECO EM-1852 - Update Internal Wiring Diagrams
Incorporated ECO EM-2075 - Updated Internal Wiring Diagrams
Incorporated ECO 139565-277A - Changed the value of the
resistor between Terminals 33 and 34 of the WAGO terminal
block.
Incorporated ECO 139712-155 - Updated Internal Wiring
Diagrams, the PCB for the junction box, and the parts lists.
Incorporated ECO EE-2013; added note on Figures 4-11 and 4-12
that deals with motor control wiring.
Incorporated ECO 140050-4; Revised figures 4-10, 4-11, and 4-12
to remove the two arrestors on the AAR terminal block in the
motor control compartment and replaced them with arrestor
PCBs.
Incorporated CRS01346 – Placed revised drawing into Figure 6-2.
Changed the resistor value between WAGO terminals 33 and 34
from 820 to 750 on Figures 4-10, 4-11, and 4-12.
3
November 2010
Incorporated ECO 139712-391 and ECO 139712-392; revised
Figure 4-10, Figure 4-11, Figure 4-12, and Figure 4-13.
Incorporated ECO EM-2339; revised Table 6-3, Figure 6-2, Table
6-6, Figure 6-4, Table 6-8, Figure 6-5. Added Table 6-7, Table
6-8, Table 6-9, Figure 6-6, Table 6-10, Figure 6-7, and Table 6-11.
Copyright© 2010, Ansaldo STS USA, Inc.
1000 Technology Drive, Pittsburgh, PA USA 15219-3120
645 Russell Street, Batesburg, SC 29006
www.ansaldo-sts.com
All rights reserved.
ii
SM 6263A, Rev. 3, November 2010
Table of Contents
Table of Contents
1.
2.
3.
4.
INTRODUCTION ............................................................................................................................... 1-1
1.1. Introduction ...............................................................................................................................1-1
1.2. Applications ...............................................................................................................................1-1
1.2.1. ASTS USA Electronic Circuit Controller ....................................................................... 1-1
1.3. Purpose of Manual ....................................................................................................................1-2
1.4. Abbreviations, Acronyms, and Definitions ................................................................................1-2
1.5. Safety ........................................................................................................................................1-4
EQUIPMENT DESCRIPTION ........................................................................................................... 2-1
2.1. Junction Box ..............................................................................................................................2-1
2.2. WAGO Terminal Strip ...............................................................................................................2-1
2.3. Motor Compartment ..................................................................................................................2-1
FUNCTIONAL DESCRIPTION ......................................................................................................... 3-1
3.1. Functional Overview..................................................................................................................3-1
3.1.1. Latch-Out...................................................................................................................... 3-1
3.1.1.1. Manual Restoration ........................................................................................ 3-2
3.1.1.2. Automatic Restoration ....................................................................................3-3
3.2. ECC Diagnostic Information ......................................................................................................3-3
3.2.1. Diagnostic Modes of Dual-Colored LEDs .................................................................... 3-4
INSTALLATION ................................................................................................................................ 4-1
4.1. Junction Box Jumper Configuration ..........................................................................................4-1
4.1.1. RHPC/LHPC Jumpers.................................................................................................. 4-1
4.1.2. Latch-Out Jumpers ....................................................................................................... 4-1
4.1.3. Changing the Jumper Configuration ............................................................................ 4-1
4.2. ECC Power and Indication Input Setup ....................................................................................4-2
4.2.1. Single Machine Setup .................................................................................................. 4-2
4.2.2. Multiple Machine Setup ................................................................................................ 4-3
4.3. Point Detector and Auxiliary Sensor Adjustment ......................................................................4-5
4.3.1. Point Detector Sensor Gap .......................................................................................... 4-5
4.3.2. Point Detector Sensor Adjustment ............................................................................... 4-6
4.3.2.1. Initial Set-Up ................................................................................................... 4-6
4.3.3. Auxiliary Sensor (Non-Vital) ......................................................................................... 4-7
4.4. Wiring and Motor Control ..........................................................................................................4-8
4.4.1. WAGO Terminal Strip Connections ............................................................................. 4-8
4.4.2. Motor Control ............................................................................................................. 4-11
4.5. AREMA Terminal Post Connections .......................................................................................4-11
4.6. Sensor Identification and Termination in the Junction Box .....................................................4-12
4.7. 3- and 5-Wire Conversion to 2-Wire Control ...........................................................................4-12
4.8. Right-Hand to Left-Hand Conversion (and Vice Versa) ..........................................................4-12
4.8.1. Conversion of Gearbox .............................................................................................. 4-12
4.8.1.1. Dismantling (Refer to Figure 4-4, Figure 4-5, and Figure 4-6) .....................4-12
4.8.1.2. Reassembling ...............................................................................................4-16
SM 6263A, Rev. 3, November 2010
iii
Table of Contents
7.
4.8.2. Lever Assembly .......................................................................................................... 4-20
4.8.2.1. Disassembly .................................................................................................4-20
4.8.2.2. Reassembly ..................................................................................................4-20
4.8.3. Other Mechanical Changes........................................................................................ 4-21
4.8.3.1. Operating Bar ...............................................................................................4-21
4.8.4. Selector Clutch Adjustment ........................................................................................ 4-22
4.8.5. Jumper Configuration Changeover ............................................................................ 4-22
4.9. Final Inspection and Testing after Installation ........................................................................4-23
TROUBLESHOOTING ...................................................................................................................... 5-1
PARTS LISTS ................................................................................................................................... 6-1
6.1. Circuit Controller Compartment ................................................................................................6-2
6.2. Circuit Controller ECC Assembly (N422529-XX) ...................................................................... 6-4
6.3. Junction Box Assembly (N42252701) .......................................................................................6-6
6.4. Point Detector Sensor Assembly Without Auxiliary Sensors (N42252401) ..............................6-8
6.5. Point Detector Sensor Assembly With Auxiliary Sensors (N42252402) ...................................6-8
6.6. Motor Compartment Assembly ...............................................................................................6-10
6.7. Terminal Assembly (N42270301) ...........................................................................................6-12
6.8. WAGO Assembly (N42270401) ..............................................................................................6-12
6.9. Sensor Use .............................................................................................................................6-15
RAIL TEAM AND TECHNICAL SUPPORT...................................................................................... 7-1
iv
SM 6263A, Rev. 3, November 2010
5.
6.
Table of Contents
List of Figures
Figure 1-1 - Left-Hand and Right-Hand Switch Machines........................................................................1-4
Figure 2-1 - ECC System Block Diagram .................................................................................................2-2
Figure 3-1 - View Standing at Controller End of Machine ........................................................................3-2
Figure 4-1 - Jumper Locations on the Junction Board .............................................................................4-4
Figure 4-2 - Sensor Gap Definition ...........................................................................................................4-5
Figure 4-3 - Initial Point Detector Bar Setup ............................................................................................4-7
Figure 4-4 - Friction Clutch Assembly ....................................................................................................4-13
Figure 4-5 - Sectional View of M-23 Gearbox – From Motor End ..........................................................4-13
Figure 4-6 - Sectional View of Gearbox Looking from Motor End ..........................................................4-15
Figure 4-7 - Standard Lever Interlock Assemblies for M-23 Switch Machine ........................................4-19
Figure 4-8 - Sectional Views of M-23 Dual Control Mechanism ............................................................4-24
Figure 4-9 - Wiring Changes from 3-Wire and 5-Wire to 2-Wire Motor Control .....................................4-25
Figure 4-10 - Internal Wiring Diagram ....................................................................................................4-27
Figure 4-11 - Internal Wiring Diagram (Low Voltage Control Unit with Permanent Magnet Motor) ......4-29
Figure 4-12 - Internal Wiring Diagram (Low Voltage Control Unit with Wound Field Motor) .................4-31
Figure 6-1 - Circuit Controller ECC Assembly ..........................................................................................6-5
Figure 6-2 - Circuit Controller Compartment ............................................................................................6-3
Figure 6-3 - Junction Box Assembly.........................................................................................................6-7
Figure 6-4 - Point Detector Sensor Assembly ..........................................................................................6-9
Figure 6-5 - Motor Compartment Assembly ...........................................................................................6-11
SM 6263A, Rev. 3, November 2010
v
Table of Contents
List of Tables
Table 3-1 - LED Diagnostics ....................................................................................................................3-5
Table 5-1 - ECC Troubleshooting .............................................................................................................5-1
Table 6-1 - Various Available ECC Configurations ..................................................................................6-1
Table 6-2 - Parts List for the Circuit Controller Assembly (N422529-XX) ................................................6-4
Table 6-3 - Parts List for the Circuit Controller Compartment ..................................................................6-2
Table 6-4 - Parts List for the Junction Box Assembly ..............................................................................6-6
Table 6-5 - Wiring Chart for the Junction Box Assembly Harness ...........................................................6-6
Table 6-6 - Parts List for the Point Detector Assembly ............................................................................6-8
Table 6-7 - Parts List for the Motor Compartment Assembly .................................................................6-10
vi
SM 6263A, Rev. 3, November 2010
Introduction
1.
INTRODUCTION
1.1. Introduction
This service manual describes the integration of the Electronic Circuit Controller (ECC) into
existing M-3 and M-23 switch machines. For detailed information on the installation, operation,
maintenance, and adjustment of the “M” style machines, please refer to Service Manual 6263.
1.2. Applications
1.2.1. ASTS USA Electronic Circuit Controller
The ASTS USA Electronic Circuit Controller (ECC) is designed to be applied to both the new
ASTS USA M-23E style switch machine and existing “M” style machines. The ECC is designed
to fit into both the M-3 and M-23 (A or B) style switch machines with permanent magnet motors.
The (ECC) uses four vital proximity sensors: two to detect the position of the switch points
(normal or reverse) and two to detect that the machine is fully locked (normal or reverse).
The ECC is a microprocessor-based controller that vitally monitors the state of the four vital
proximity sensors and can identify each possible sensor state (on, off, shorted, or open). In
addition to the four vital proximity sensors, the ECC can be equipped with an optional auxiliary
point detection system. This system provides a normally ON bipolar output to warn maintenance
personnel of marginal switch machine operation. The sensing threshold of each auxiliary sensor
is offset from the vital point detector sensors by approximately 1/8” to detect switch point
displacement before the vital sensors indicate point detector bar movement. With the auxiliary
system, switch point displacement that is caused by debris build-up or expansion and contraction
of the rail can be detected before a switch failure occurs.
The M-23 with ECC proximity sensor system is a true linear detection device with no moving
parts to wear. The system requires no adjustment of the point detector bar but provides internal
adjustment capability of the proximity sensors, with respect to the point detector bar with the use
of serrated linear slides. The point detection system provides a combination point detector bar
and target that accurately reports the true displacement of the switch points. The serrated linear
slide assemblies provide simple and dependable proximity sensor adjustment with respect to the
target.
The ECC provides advanced diagnostics for identifying the current state of the machine and the
indication state of an adjacent (daisy-chained) machine. LEDs on the ECC indicate the delivery
of indication power and auxiliary indication power to the wayside, as well as provide
information on motor power availability and the state of the latch-out function.
SM 6263A, Rev. 3, November 2010
1-1
Introduction
WARNING
To avoid severe personal injury, open the gold nut test link in the
motor compartment prior to performing any internal machine
maintenance. Always keep hands and feet clear of switch points
and the internal moving parts of the machine. Ensure that loose
clothing is properly secured prior to working on the switch
machine.
1.3. Purpose of Manual
This service manual provides descriptive information, specifications, and installation and
maintenance procedures for the ASTS USA Electronic Circuit Controller which is installed on
the M-3 and M-23 Switch Machines.
1.4. Abbreviations, Acronyms, and Definitions
ac
alternating current
AAR
Association of American Railroads - Communication and Signal Section
(currently known as AREMA)
AREA
American Railway Engineering Association
AREMA
American Railway and Maintenance of Way Association (formerly known
as AAR)
AWG
American wire gauge
CAUTION
Caution statements indicate conditions that could cause damage to
equipment.
dc
direct current
ECC
Electronic Circuit Controller
Front of Machine
The physical area of the switch machine closest to the motor.
FRA
Federal Railroad Administration
Latch-Out
A device that does not allow switch point indication to restore if the switch
point moves away from the stock rail (point detection is momentarily lost).
This function will be activated if the point sensors are actuated before their
corresponding locking sensors are actuated.
1-2
SM 6263A, Rev. 3, November 2010
Introduction
Latch-Out
Restoration
The term latch-out restoration refers to resetting the machine to an operable
switch machine indication state from a latched-out condition.
LED
Light-emitting diode
Left-Hand Switch
The position of a switch machine designated when the machine is located
on the left-hand side of the track, looking into the switch points in the
direction of the arrow as shown in Figure 1-1.
LHPC
“Left-hand point closed,” which refers to the switch point position when
the point is normally closed to the left-hand side, looking into the switch
points in the direction of the arrow as shown in Figure 1-1.
PD
Point detector or point detection (as in “PD bar”).
Point Detection
The positive indication achieved when the switch points are closed
adequately against the stock rail.
Locking
Locking is achieved when the lock box, connected to the slide bar, enters
the narrow locking notch of the lock rods and extends a minimum of 1/2”
into the locking rod.
MCU
Motor control unit - a high-current, solid-state device used to control motor
power.
MOV
Metal oxide varistor (protection device for electronic components).
Non-Vital Circuit
Any circuit with a function that does not affect the safety of train operation.
PCB
Printed circuit board
Rear of Machine
The physical area of the switch machine furthest from the motor.
Reference
Designator
An abbreviation assigned to designate an electrical component. It
generally consists of a capital letter and a number. Each letter designates a
particular type of component. For example, “L” identifies an inductor and
“R” identifies a resistor.
Right-Hand Switch The position of a switch machine designated when the machine is located
on the right-hand side of the track, looking into the switch points in the
direction of the arrow shown in Figure 1-1.
SM 6263A, Rev. 3, November 2010
1-3
Introduction
RHPC
“Right-hand point closed,” which refers to the switch point position when
the point is normally closed to the right-hand side of the track, looking into
the switch points in the direction of the arrow shown in Figure 1-1.
rms
root-mean-square (method for expressing ac voltage rating)
Switch Machine
Indication
A vital determination of a safe switch configuration, due to positive
indication that the switch machine has properly thrown, locked and
detected switch point closure.
Switch and Lock
Movement and/or
Mainline Switch
Machine
A device which performs the three operations of unlocking, operating, and
locking a switch, movable point frog, or derail.
Vital Circuit
Any circuit with a function that affects the safety of train operation.
WAGO®
Registered trademark for WAGO Corporation.
WARNING
Warning statements indicate conditions that could cause physical harm,
serious injury, or loss of life.
LEFT- HAND
RIGHT- HAND
Figure 1-1. Left-Hand and Right-Hand Switch Machines
1.5. Safety
Read and thoroughly understand this manual before attempting any of the procedures listed. Pay
particular attention to the WARNING and CAUTION statements that appear throughout this
manual. Always observe standard precautions familiar to trained electrical technicians. Always
adhere to all safety regulations stipulated by the railroad.
1-4
SM 6263A, Rev. 3, November 2010
Equipment Description
2.
EQUIPMENT DESCRIPTION
Please refer to
Figure 2-1 for a block diagram of the ECC System.
2.1. Junction Box
The ECC box is connected to the junction box via cable JB1. The junction box is the junction
point where the four vital sensors (two for point detection and two for locking detection) and two
optional auxiliary (non-vital) sensors are terminated via a six-way cable grip. This termination
method allows for convenient replacement of any individual sensor in the system.
The junction box also has two jumper sets that provide the ECC box with the configuration
information for determining which point is normally closed [left-hand point closed (LHPC) or
right-hand point closed (RHPC)] and which type of latch-out configuration has been selected
(manual restoration, automatic restoration, or latch-out disabled completely).
2.2. WAGO Terminal Strip
The ECC box is connected to the WAGO terminal strip in the motor compartment with two plugconnected cables, TB1 and TB2. Both plug connectors are keyed differently so they cannot be
interchanged on the ECC box. The WAGO terminal strip is the integration point of the ECC
system where all field wires for switch indication and the wayside battery feed to the ECC
system.
The WAGO terminal strip is also the termination point for the machine’s cycle counter and the
optional local/remote request switch. In addition, it is equipped with a series of 14 gas tube
lightning arrestors for lightning protection.
2.3. Motor Compartment
The motor compartment is equipped with an eight-way AAR binding post strip for field, motor
power cable wires and motor control unit termination. Two of the AAR posts are strapped with a
“gold nut” to open motor power to the machine.
The motor control unit (MCU) houses the high-powered FET electronic motor control circuitry.
The FET circuitry turns OFF motor power at the end of each stroke (only after the machine is
fully locked). This feature eliminates the need for a large motor with high armature inertia to
complete the machine’s stroke in adverse weather conditions.
The local/remote request switches are used to locally operate the machine similar to a wayside
local control panel. One toggle switch is used to take local or remote control, and the other
toggle switch is used to cycle the machine from normal to reverse and vise versa.
SM 6263A, Rev. 3, November 2010
2-1
Functional Description
The cycle counter tallies each complete cycle of the switch machine (i.e., the counter increments
each time the machine completes a cycle from normal to reverse and back to normal again). The
counter cannot be reset so the operational history of the machine is preserved.
CIRCUIT CONTROLLER COMPARTMENT
ECC BOX
MICROPROCESSOR & POWER SUPPLY,
DIAGNOSTIC LED DISPLAY + LATCH OUT
RESTORATION PUSHBUTTON
JUNCTION BOX
SENSOR TERMINALS +
LHPC/RHPC & LATCH OUT OPTION
JUMPER CONFIGURATIONS
LATCH OUT RESTORATION
TB1
TB2
P
S
1
JB1
LOCAL REMOTE
REQUEST
SWITCHES
P
S
2
VITAL POINT
SENSORS
L
S
1
L
2
VITAL LOCKING
SENSORS
A
U
X
1
A
U
X
2
AUXILIARY POINT
SENSORS
CYCLE
COUNTER
EXISTING MOTOR CUTOUT
CONTACT
TERMINAL
BOARD &
BINDING
POSTS
MOTOR CONTROL UNIT
(MCU)
MOTOR
HIGH POWER FET SWITCHES
FIELD CABLE AND WAYSIDE
BATTERY FOR ECC
MOTOR COMPARTMENT
Figure 2-1. ECC System Block Diagram
2-2
SM 6263A, Rev. 3, November 2010
Functional Description
3.
FUNCTIONAL DESCRIPTION
3.1. Functional Overview
The ECC system is functionally equivalent to the ASTS USA N285638 circuit controller
mechanism. Being electronic, it has no mechanical contacts or cam arrangements. The motor
control unit (MCU) emulates the motor cutout contacts from the mechanical controller in that it
is continuously set up to move the machine to the opposite direction when in the full normal or
reverse positions. This MCU provides the same “make-before-break” motor control circuitry as
in the existing M-3/M-23 controllers.
All proximity sensors used in the ECC system, vital and auxiliary (non-vital), are used under
normally ON conditions. In other words, no logic condition of the ECC is dependent upon the
point detection, locking, or auxiliary sensors being OFF to make a decision. The only time the
OFF state of the sensors is relevant is when determining the locked and detected position of the
machine. For example, for the switch indication to be energized in the Normal position, both the
normal point and lock sensors must be ON and the reverse point and lock sensors must be OFF.
The vital point and lock sensors work in predetermined pairs and each of the two-paired sensors,
one point and one lock, are “ANDed” (linked) together. To receive a normal switch indication
output from the ECC, both the point and lock sensors for the normal position must both be
energized or ON. The same is true for both point and lock sensors for the reverse position. If
either one of the two paired sensors is OFF, in either switch position, the switch indication output
is OFF for that position. The paired sensors are labeled PS1 and LS1 and PS2 and LS2. Which
pair of sensors corresponds to the normal position is dependent upon the position of the
LHPC/RHPC jumper position in the junction box (refer to Figure 3-1).
When the machine is locked and the points are detected in either the normal or reverse positions
(illustrated by the point detected and point locked LEDs) and the corresponding indication input
is present or energized, the indication output LED for that switch position will be illuminated on
the ECC. This is a direct confirmation that indication power (approximately 12 VDC) is leaving
the machine.
3.1.1. Latch-Out
If the machine is locked and detected in either the normal or reverse positions and the points
move away from the stock rail, the ECC will electronically latch-out, turning OFF the indication
output for that position and holding it out (in a manner depending on the latch-out jumper
position in the junction box). A latch-out condition is indicated by the illumination of the RED
Latch-out LED on the ECC. The latch-out can be restored either manually or automatically.
SM 6263A, Rev. 3, November 2010
3-1
Functional Description
Figure 3-1. View Standing at Controller End of Machine
with ECC Box Removed (Aux Sensors Shown Are Optional)
3.1.1.1. Manual Restoration
NOTE
In the manual restoration mode, the latch-out cannot be restored in
either the hand throw or power mode of operation. Maintenance
personnel must depress the latch-out restoration pushbutton to
restore a latched-out condition.
The latch-out can be restored manually by pressing the momentary latch-out restoration
pushbutton on the ECC for one second and releasing (this can be done in either the manual or
automatic restoration modes but will only occur if the point and lock sensors are properly
indicating).
3-2
SM 6263A, Rev. 3, November 2010
Functional Description
3.1.1.2. Automatic Restoration
The latch-out can be restored by moving the machine toward the opposite position, until all four
vital sensors are OFF, and then returning to the original position (this will occur only in the
automatic latch-out jumper mode and only if the point and lock sensors are properly indicating).
The latch-out feature can also be completely disabled by placing the junction box jumper in the
“disabled” latch-out position.
The ECC also continuously monitors the states of the two auxiliary sensors mounted on the
linear slides above the two vital point detector sensors. The auxiliary sensors offset from the vital
sensor by a 1/8” sensing range differential. This means that if the vital sensor is adjusted to
detect a 1/4” linear displacement of the point detector bar (i.e., turn OFF), the auxiliary sensor
will turn OFF after the bar has displaced only 1/8”. Similarly, if the vital sensor is adjusted to
sense 3/8” point detector rod movement, the auxiliary sensor will turn OFF after the bar has
moved 1/4”. This 1/8” differential provides the ability to predict a switch failure caused by sand
or ice building up in the switch points or switch point movement resulting from extreme
temperature changes, etc. The auxiliary sensors indicate that while the machine is still within the
FRA guidelines for maintaining switches, the machine is on the verge of being obstructed. A
normally energized bipolar output is provided on the WAGO terminal strip to be utilized on the
wayside to notify operators or maintenance personnel that a problem is developing.
The mechanical motor cutout contact in the existing “M” style machine is still utilized to both
remove motor power and de-energize indication circuits when opened. The existing contact
arrangement is terminated on the WAGO terminal strip in the motor compartment and is placed
in series with an 750-ohm resistor. When the contact is opened the series resistive circuit to the
ECC is opened and the MCU is disabled. When this occurs, the RED motor disabled LED
illuminates on the ECC. Motor power is now disabled while ECC power still remains for
troubleshooting capability.
Both the normal and reverse indication outputs are shunted when not in use. When the machine
is fully locked and detected in the normal position, for example, the reverse indication output is
shunted. This is identical to using the shunt bar on existing “M” style circuit controllers.
A continuous wayside battery feed to the ECC is required to power the unit. The ECC will
operate over a range of 10 to 16 VDC; however, it is recommended that the unit has a minimum
voltage level of 12 VDC measured between Terminals 17 and 20 on the WAGO terminal strip in
the motor compartment (refer to Step 5 of Section 4.4.1).
3.2. ECC Diagnostic Information
The ECC is equipped with a series of LEDs to indicate the current state of the switch machine.
Dual-colored LEDs are provided to indicate the state of each vital point and lock sensor. Green
LEDs are provided for indication input, indication output and auxiliary sensor state definition.
SM 6263A, Rev. 3, November 2010
3-3
Functional Description
Red LEDs are provided to determine when the motor is disabled and when the ECC is in a
latched out state.
Table 3-1 describes what the ECC diagnostics represent.
3.2.1. Diagnostic Modes of Dual-Colored LEDs
The dual-colored LEDs that represent the states of the vital point and lock sensors have three
possible diagnostic modes: red, or flashing red as illustrated in Table 3-1. Green simply means
the sensor is ON and is detecting its specified target. Red means the sensor is OFF and not
sensing the target. Flashing red indicates an indeterminate state (i.e., not ON or OFF). In order to
definitively distinguish between an ON and an OFF sensor state, an indeterminate operating
window is used between the two states. As the target approaches the sensor, the sensor will
change from the OFF state to an indeterminate state and then to the ON state. The LED will
represent this by changing from red to flashing red and then to green. The ECC will also produce
a flashing red LED if the vital sensors are shorted, open, or wired incorrectly. During normal
switch operation, the flashing red transition through the indeterminate state will not be
noticeable.
The green LEDs for indication input and indication output are powered from the actual working
voltages in the machine and not energized based on the microprocessor interpretation of the
machine state. The indication input LEDs are powered by the voltage present on WAGO
Terminals 13 and 15 for normal and 10 and 12 for reverse. The indication output LEDs are
powered by the ECC power supply delivering the 12-volt indication output potential to the
terminals on the WAGO strip (Terminals 1and 3 for bipolar and Terminals 4, 6, 7, and 9 for
four-wire indication circuits).
3-4
SM 6263A, Rev. 3, November 2010
Functional Description
Table 3-1. LED Diagnostics
Switch
Condition
Point
Detected
Point Locked
Indication
Input
Indication
Output
Auxiliary Point
Detected
LED Condition
Indication
Green
Sensor On
Red
Sensor Off
Flashing Red
Indeterminate
Green
Sensor On
Red
Sensor Off
Flashing Red
Indeterminate
Green
Indication input power present from adjacent machine
Dark
No indication power present
Green
Switch is locked and detected/indication output is on
Dark
Switch is not locked and detected/indication output is off
Green
Aux. sensor on/aux. bipolar output is on
DARK
Aux. sensor off/aux. bipolar output is off
RED
Latched out
DARK
Not latched out
RED
Motor power disabled
DARK
Motor power enabled
Latch-out
Motor
Disabled
SM 6263A, Rev. 3, November 2010
3-5
Functional Description
3-6
SM 6263A, Rev. 3, November 2010
Installation
4.
INSTALLATION
WARNING
To avoid severe personal injury, open the gold nut test link in the
motor compartment prior to performing any internal machine
maintenance. Always keep hands and feet clear of switch points
and the internal moving parts of the machine. Ensure that loose
clothing is properly secured prior to working on the switch
machine.
4.1. Junction Box Jumper Configuration
4.1.1. RHPC/LHPC Jumpers
All right-hand and left-hand M-23 switch machines are configured from ASTS USA with the
switch point closest to the machine designated as the “normally closed” or normal point.
Therefore, all right-hand machines are shipped with the jumper in the RHPC position and all lefthand machines are shipped with the jumper in the LHPC position. Because the same terminals on
the WAGO terminal strip are always used for normal and reverse indication, regardless of the
RHPC/LHPC jumper position, it is necessary to move the jumper to the opposite position if the
normally closed switch point is furthest from the machine installation.
4.1.2. Latch-Out Jumpers
The latchout jumper for all ASTS USA “M-style” switch machines is set for either the automatic,
manual, or disable function. This configuration is set at the factory based on customer preference
at the time the order was placed. To change this configuration, remove the junction box cover
and reposition the jumper. See Section 3.1.1 for a detailed explanation of each jumper function.
See also Figure 4-1 for the various jumper positions.
4.1.3. Changing the Jumper Configuration
1. Disconnect plug connectors TB1, TB2, and JB1 from the ECC by rotating the coupler
collar counterclockwise and extracting the male end.
2. Ensure that the machine is in the full locked position with the lock box extended toward
the gearbox.
3. Remove the internal point detector bar target by removing the Allen head set screw and
socket head cap screws securing the target and sliding the bar out of the machine.
SM 6263A, Rev. 3, November 2010
4-1
Installation
4. Remove the two Allen head countersink screws securing the PD target guard underneath
the PD bar area.
5. Remove the two hex bolts securing the circuit controller frame near the gearbox.
6. Unfasten the cable/wire restraint holding ECC cables TB1 and TB2.
7. Remove the controller frame assembly to access the junction box (located on the left side
of the controller frame looking into the gearbox).
8. Remove the junction box cover by removing the four screws at the corners of the cover.
9. Change the jumpers to the desired configuration (RHPC/LHPC and/or Latch-Out
jumpers). Figure 4-1 shows the location of the jumpers on the junction board in the
junction box.
10. Replace the junction box cover and resecure the controller frame assembly.
11. Insert the point detector bar and secure the target using the hardware removed in Step 3.
12. Reconnect TB1, TB2, and JB1 plug connectors.
4.2. ECC Power and Indication Input Setup
The ECC requires a continuous wayside battery feed of 12 VDC, connected to WAGO
Terminals 17 (N12) and 20 (B12).
Indication input can be set up either for a single machine (such as an end-of-siding application)
or multiple machines (such as a daisy-chained crossover).
4.2.1. Single Machine Setup
The indication input to the ECC must be jumpered on the WAGO terminal strip to receive
continuous battery feed. The ECC is shipped from ASTS USA with these jumpers installed and
must be removed for multiple machine applications.
Referring to the wiring diagrams in Figure 4-10, Figure 4-11, and Figure 4-12 four jumpers must
be installed. Terminal 16 for N12 is connected to Terminal 13 (normal input -), which is also
jumpered to Terminal 10 (reverse input -). Terminal 19 for B12 is connected to Terminal 15
(normal input +) which is also jumpered to Terminal 12 (reverse input +).
With the above jumper configuration in place, both green LEDs for indication input will always
be illuminated in the ECC box to indicate continuous power is being supplied to the indication
input circuits.
4-2
SM 6263A, Rev. 3, November 2010
Installation
4.2.2. Multiple Machine Setup
If the machine is the first machine in the crossover (i.e., the indication output is not dependent
upon the indication input from an adjacent machine), the indication input circuits are to be
jumpered as described in the above paragraph for a single machine application.
If the machine is the second machine in a crossover application (i.e., requires indication input
from the first machine to properly deliver indication output to the wayside), indication input
jumpers are not used. The indication input circuits of the second machine are to be fed from the
indication output of the first machine to ensure that both machines in the crossover are locked
and detected in the correct position.
SM 6263A, Rev. 3, November 2010
4-3
Installation
RIGHT HAND/
LEFT HAND
OPERATION
JUMPER
LOCATIONS
D497027
LATCH - OUT
CONFIGURATION
JUMPER
LOCATIONS
Figure 4-1. Jumper Locations on the Junction Board
4-4
SM 6263A, Rev. 3, November 2010
Installation
4.3. Point Detector and Auxiliary Sensor Adjustment
NOTE
Auxiliary sensors are optional, non-vital sensors and are only
supplied when required by the customer.
4.3.1. Point Detector Sensor Gap
The vital and auxiliary (non-vital) point detector sensors (Figure 4-2) must be located at a fixed
dimension to optimize sensor response and performance. The vital sensors are to be gapped to
0.075” from the face of the PD target and the auxiliary (non-vital) sensors are to be gapped at
0.040” from the face of the target. The tightness of the feeler gage between the head of the
sensors and the target is not critical regarding the performance of the sensors.
Auxiliary
Sensor
Gap = 0.040”
Vital
Sensor
Gap = 0.075”
Figure 4-2. Sensor Gap Definition (Non-Vital Sensor Shown is Optional)
SM 6263A, Rev. 3, November 2010
4-5
Installation
4.3.2. Point Detector Sensor Adjustment
The vital point detector sensors (Figure 4-3) are mounted on serrated adjusting brackets, which
can be adjusted in 1/16” linear increments.
4.3.2.1. Initial Set-Up
Adjust the point detector bar so that the PD target is centered or equally balanced in the machine
(see Figure 4-3) when the points are in the mid-stroke position. The point detector bar should
travel equidistant from the center of the controller compartment when the switch travels from
one extreme position to the other.
1. Move the switch machine to one extreme position (N or R, it is not critical) and ensure
that the switch point is closed and up against the stock rail.
2. Loosen the PD bracket AAR nuts. Lift the serrated bracket and slide the sensor toward
the PD target, keeping the bracket elevated so as not to engage the serrations.
3. Move the sensor to the target’s edge until the corresponding Point Detected LED just
turns Green on the ECC box.
4. Lower the serrated bracket to determine the ON/OFF threshold location in the serrations.
Lift and move the sensor bracket three (3) additional serration positions (3/16”) toward
the center of the machine to assure that the sensor is not adjusted right on the ON/OFF
threshold. This will ensure that a 1/4” point obstructed will be detected, however the
points will be allowed some movement (up to 3/16”) so as not to cause intermittent
indication failures under shock and vibration conditions.
5. The sensitivity of the vital sensors can be adjusted in 1/16” increments to accommodate
for excessive lost motion in the external point detection connections.
6. Tighten the AAR hardware to properly secure the sensor bracket.
7. Place a 1/4” obstruction in the switch point, 6” back from tip of point. It may be
necessary at this time to “float” the lock rods to allow the switch machine’s slide bar to
travel full stroke to properly check the point detection settings. This is accomplished by
loosening the hardware on the lock rod assembly and moving the lock rods so that the
lock dog of the machine can enter the narrow notch.
8. With the obstruction placed in the switch point, the corresponding normal or reverse
point detected LED should be RED. If not, repeat the serrated bracket adjustment
procedure (Steps 1 through 4), moving the bracket only two serrations into the target
instead of three.
4-6
SM 6263A, Rev. 3, November 2010
Installation
Figure 4-3. Initial Point Detector Bar Setup
9. If the machine has been equipped with the optional auxiliary sensors, their position is
fixed and no adjustment is required.
4.3.3. Auxiliary Sensor (Non-Vital)
NOTE
Auxiliary sensors are optional, non-vital sensors and are only
supplied when required by the customer.
1. Place the switch machine in the Normal position (operating bar based on RH or LH
configuration).
2. Move the point detector bar to the Normal position matching the machine in Step 1.
SM 6263A, Rev. 3, November 2010
4-7
Installation
3. Starting with the sensor holding bracket outside the target area (at the extreme position of
the bracket mounting plate), slide the sensor holding bracket toward the target until the
LED for Point Detected Normal just turns green on the ECC. This is the starting point for
the Vital Sensor (18mm).
4. Slide the sensor holding bracket two more serrations into the target corresponding to the
1/8” point movement differential (each serration is 1/16” on center) and hand tighten to
prevent movement.
5. Slide the auxiliary sensor toward the target until the LED for Auxiliary Point Detected
just turns green. After ensuring a gap of 0.040” between the target and sensor face, secure
the hardware for the sensor. Tightness of the feeler gauge between the sensor head and
the target is not critical.
6. For the Reserve position (operating bar out based on RH or LH configuration), repeat
Steps 1 through 5 above. This time look at the LED’s that correspond to the Reverse
Position on the ECC.
4.4. Wiring and Motor Control
4.4.1. WAGO Terminal Strip Connections
WAGO Terminal strip connections are as follows (Figure 4-10, Figure 4-11, and Figure 4-12
illustrate the internal wiring diagram of the ECC system).
1. Terminals 2, 5, 8, 11, 14, 18, and 22 are internally connected to the DIN rail and serve as
a means by which the 14 gas tube lightning arrestors make contact with the base of the
machine. No other wires should be terminated to these points.
2. Terminals 1 and 3 are for field connections to a two-wire, bipolar indication output
circuit.
a. Normal indication is defined as (+) on Terminal 3 and (-) on Terminal 1.
b. Reverse indication is defined as (-) on Terminal 3 and (+) on Terminal 1.
c. If there is no output, Terminals 1 and 3 are shunted.
3. Terminals 4, 6, 7, and 9 are for field connections to a four-wire indication output circuit.
a. Normal indication is defined between Terminals 7 and 9, (9 being positive and 7
being negative).
b. Reverse indication is defined between Terminals 4 and 6, (6 being positive and 4
being negative).
4-8
SM 6263A, Rev. 3, November 2010
Installation
c. If there is no output on the paired terminals, they are shunted.
CAUTION
When connecting the ECC Indication Outputs to the drive switch
correspondence relays, ensure the relay controls are properly
snubbed with a resistor to minimize the possible inductive
kickback to the ECC when the field in the relay coil collapses.
Ensure that no external source is applied across any of the outputs.
4. Terminals 10, 12, 13, and 15 are for indication input field connections from an adjacent
machine’s indication output circuit or can be jumpered in the application of a single
machine.
a. Normal indication input is defined between Terminals 13 and 15, (15 being positive
and 13 being negative).
b. Reverse indication input is defined between Terminals 10 and 12, (12 being positive
and 10 being negative).
c. If the machine is used in a single machine application, battery must be fed to the
Indication Input circuits to provide indication output. Refer to Section 4.2 for proper
jumper configuration.
SM 6263A, Rev. 3, November 2010
4-9
Installation
NOTE
Four indication input jumpers are factory installed on the WAGO
terminal strip and must be removed for multiple machine
applications.
5. Terminal 17 is used for connecting wayside battery N12. Terminal 20 is used for
connecting wayside battery B12. Note that there are factory installed jumpers between
paired Terminals 16 and 17 and between paired Terminals 19 and 20. Wayside battery
can be fed to either available terminal of each pair.
6. Terminals 21 and 23 are for field connections to the two-wire, bipolar auxiliary sensor
output.
a. Normal auxiliary indication is defined as (+) on Terminal 23 and (-) on Terminal 21.
b. Reverse auxiliary indication is defined as (-) on Terminal 23 and (+) on Terminal 21.
WARNING
The maintenance output is not vital and should never be used to clear signals.
7. Terminals 24, 25, and 26 are for field connections to utilize the local/remote request
switch option. This function will be particularly useful when conducting monthly
inspections. In order for this function to work, however, the wayside must be so
configured. Basically the two toggle switches in the machine (L/R and N/R) interface
with the local control panel providing the ability to control the machine as though
operating directly from the local control panel. The local/remote (L/R) switch normally is
to be in the remote position. When placed in the local position, battery + is routed to
Terminal 26. The local control panel is thus activated to receive commands from
maintenance personnel at the machine. The second switch (N/R) is a center OFF spring
return toggle. When held in the N position, the machine is electrically driven from the
wayside controller to the normal position. If the switch is released before the stroke is
complete, the motor will coast to a stop.
4-10
SM 6263A, Rev. 3, November 2010
Installation
CAUTION
The LOCAL REQUEST position will override the dispatches’
control of the machine. It, therefore, is important to return the L/R
switch to the Remote position upon completion of maintenance.
8. Terminals 27 through 31 are for termination of the MCU and are also used to terminate
the cycle counter.
4.4.2. Motor Control
ON MOTOR FRONT and ON MOTOR REAR are used to turn off motor current at the end of
the stroke. For example, if the motor is turning to produce motion of the lock box toward the
motor compartment (front end of the machine), both ON MOTOR FRONT and ON MOTOR
REAR are + relative to GND. When lock sensor LS2 turns ON, the ON MOTOR FRONT line
switches to GND. In response, the motor controller opens the motor to the polarity of current that
would continue motion in the same direction. Additionally, the counter is energized momentarily
and one count is registered. Operation in the opposite direction is the same with ON MOTOR
REAR switching to stop the motor; however, the counter does not respond.
Terminals 32 through 34 are the termination points for the motor cutout circuits. In an M-23
upgraded with an ECC, the existing motor cutout contact in the circuit controller compartment is
to be connected to Terminals 32 and 33. An 750-ohm resistor is series connected in the circuit to
disable motor power when the selector lever is actuated for hand throw operation.
4.5. AREMA Terminal Post Connections
There are eight (8) AREMA binding post terminals, labeled 1 through 8, accordingly.
1. Terminal 1 is the termination point for the red MCU control wire, one of the two field
motor control wires. It also serves as a terminal for the surge suppressor PCB used for
lightning protection.
2. Terminals 2 and 3 are common terminals used for grounding purposes. They are also
terminals for the surge suppressor PCBs connected to Terminals 1 and 4.
3. Terminal 4 is the termination point for the second field motor control wire and for
Terminal 52 from the hand throw contacts. It also serves as a terminal for the surge
suppressor PCB used for lightning protection.
4. Terminal 5 is the termination point for Terminal 51 from the hand throw contacts;
Terminal 6 is the termination point for the negative internal permanent magnet motor
wire. A “gold nut” test link is provided between these two terminals to disconnect
motor power when performing maintenance on the machine.
SM 6263A, Rev. 3, November 2010
4-11
Installation
5. Terminals 7 and 8 are designated for motor compartment, heater wire termination.
4.6. Sensor Identification and Termination in the Junction Box
The vital point detector sensors are designated PS1 and PS2. The vital locking sensors are
designated LS1 and LS2. The auxiliary point detector sensors are designated Aux1 and Aux2. It
is important to note that PS1 and LS1 always work in combination together and PS2 and LS2
always work together as well. Refer to Figure 3-1.
The four vital and two optional auxiliary (non-vital) sensors are all terminated inside the Junction
Box (Figure 4-1) located underneath the circuit controller frame. All six sensor wires are brought
into the junction box through a six-way cable grip and their brown and blue wires are terminated
in WAGO cage clamp connectors. The PC board inside the Junction Box identifies which
sensors connect to each terminal and the color designation of each sensor wire (BR for brown
and BU for blue). If any of the four vital sensors are wired incorrectly, the corresponding LEDs
on the ECC will be Flashing Red. If the auxiliary sensors are wired incorrectly, they simply will
not operate. There is a yellow LED on the back end of each auxiliary sensor to determine if it is
operating properly.
4.7. 3- and 5-Wire Conversion to 2-Wire Control
Figure 4-9 illustrates a typical 3- and 5-wire relay control scheme converted to the recommended
2-wire control system. Conversion from a 5- to 2-wire configuration is best suited for changes in
the wayside house or bungalow. A 3- to 2-wire conversion can be performed at the wayside
location or in the machine by connecting two of the three wires together as shown.
4.8. Right-Hand to Left-Hand Conversion (and Vice Versa)
4.8.1. Conversion of Gearbox
NOTE
Although this procedure can be done in the field, ASTS USA
recommends this procedure be done in the shop.
4.8.1.1. Dismantling (Refer to Figure 4-4, Figure 4-5, and Figure 4-6)
1. Remove the two 5/8-11 x 2” hex head bolts securing the gearbox cover to the gearbox
and lift the cover; retain the cover to use as a receptacle for the parts which will be
removed in future steps.
2. Place the hand-throw lever in the Normal position and the selector lever in the Motor
position. The machine must be in its full stroke position. Insert a 1/2” drive into the
adjusting nut on the friction clutch assembly (R) and turn it to drive the mechanism to its
complete full stop (Figure 4-4).
4-12
SM 6263A, Rev. 3, November 2010
Installation
3. Remove the four 1/2 -13 bolts (A1) and lock washers securing the top bearing (C). (One
of these bolts will be 3/4” longer than the others.)
ADJUSTING NUT (R)
CLUTCH HOUSING
CLUTCH SPRING
GEAR
FELT WASHER
OIL SEAL
FABRIC DISC
CLUTCH PLATE
Figure 4-4. Friction Clutch Assembly
F
SEE FIGURE
4-6 FOR
LEGEND
P
B2
B1
C2
C
H
D
E
G1
G
N
A3
K
M
Figure 4-5. Sectional View of M-23 Gearbox – From Motor End
(Right-Hand Assembly)
SM 6263A, Rev. 3, November 2010
4-13
Installation
4. Remove the cotter pin at the top of the main crank. Remove the 1/2” castle nut (B1) and
washer (B2) from the top of the main crank and lift the top bearing (C) from the dowel
pins being careful not to bend the bearing plate.
NOTE
The rectangular key (C1) may come out with the top bearing.
Check under the top bearing to see if the key has been removed
and, if so, place the key in a safe spot for reinstallation.
5. Remove the rectangular key (C1) from the top bearing bushing (C2). Remove the top
bearing bushing, the hand-throw pinion (D), and the spacing collar (E) from the top end
of the crank.
6. Lift the hand-throw lever to the vertical position and loosen the set screw (F1) on the
hand-throw bevel gear (F).
7. Remove the two 1/2-13 x 4-3/4” bolts (A3) and lock washers that secure the lever support
(K) to the gearbox. Remove the two 1/2-13 x 1-1/2” bolts (A4) and washers that secure
the lever shaft bearing (M) to the gearbox.
8. Holding the levers securely and guiding the shafts from the gearbox, carefully remove the
lever assembly from the gearbox. Hold the hand throw bevel gear so that as the lever
shafts are removed, the bevel gear doesn’t fall onto the bottom of the gearbox.
CAUTION
Removal of the lever assembly requires two persons to perform the
procedure; one to remove the lever assembly and one to hold the
hand throw bevel gear to prevent it from falling into the gearbox as
the lever assembly is removed.
NOTE
There is a paper gasket between the lever shaft bearing and the
gearbox case. Check it after removal of the lever assembly. If it is
torn, it must be replaced. If it is intact on one of the two mating
surfaces, it may be reused.
4-14
SM 6263A, Rev. 3, November 2010
Installation
A2
G1
G
LEGEND
R
A1
FOR FIGS. 4-5 & 4-6
A1 - BOLT
A2 - BOLT
A3 - BOLT
A4 - BOLT
B1 - NUT
B2 - WASHER
C - BEARING
C1 - KEY
C2 - BEARING BUSHING
D - PINION
E - COLLAR
F - GEAR
F1 - SET SCREW
G - BOLT
G1 - YOKE BUSHING
H - YOKE SUPPORT
K - LEVER SUPPORT
M - BEARING
N - YOKE
P - PIN
R - FRICTION CLUTCH
TOP VIEW
G1
2 ND REDUCTION
GEAR
1ST REDUCTION
GEAR
B2
B1
A1
F
F1
C
A4
A4
A3
A1
N
C1
RIGHT HAND SIDE
VIEW
C
A1
R
Figure 4-6. Sectional View of Gearbox Looking from Motor End
SM 6263A, Rev. 3, November 2010
4-15
Installation
9.
Lift the hand-throw bevel gear (F) from the gearbox.
10. Remove the 1/2-13 x 6” bolt (G), 1/2” nut, and two lock washers securing the yoke
eccentric bushings (G1) to the yoke support (H). The positions of the eccentric bushings
should be noted, and care should be taken to avoid changing their position when
removing the bolt.
11. Remove the four 1/2-13 x 1-1/2” bolts and lock washers which secure the yoke support
(H) to the gearbox and remove the yoke support.
NOTE
There is a paper gasket between the lever shaft bearing and the
gearbox case. Check it after removal of the lever assembly. If it is
torn, it must be replaced. If it is intact on one of the two mating
surfaces, it may be reused.
4.8.1.2. Reassembling
1. With the gearbox disassembled per Section 4.8.1.1, grasp the yoke (N) firmly and, lifting
upward, rotate the yoke 180º. Be sure the yoke assembly seats firmly on the main shaft
after it is moved.
2. Transfer the yoke support (H) to the other side of the gearbox. Insert it into the gearbox
and secure it with the four 1/2-13 x 1-1/2” bolts and lock washers removed in Step 11 of
Section 4.8.1.1. When inserting the yoke support into the gearbox, be careful not to
disturb the position of the eccentric bushings.
NOTE
There is a paper gasket between the lever shaft bearing and the
gearbox case. Check it after removal of the lever assembly. If it is
torn, it must be replaced. If it is intact on one of the two mating
surfaces, it may be reused.
3. Secure the yoke to the yoke support using the 1/2-13 x 6” bolt (G), 1/2” nut, and two lock
washers removed in Step 10 of Section 4.8.1.1.
4. Insert the lever assembly into the hub on the opposite side of the gearbox. As the shaft
enters the gearbox, position the hand-throw bevel gear (F) so that the gear slides onto the
keyed shaft. Position eccentric pin (P) on the selector shaft of the lever assembly so that it
enters the slot on the end of the yoke. Ensure the gear is firmly against its seat on the
shaft.
4-16
SM 6263A, Rev. 3, November 2010
Installation
CAUTION
Insertion of the lever assembly requires two persons to perform the
procedure; one to insert the lever assembly and one hold and guide
the hand throw bevel gear onto the lever assembly shaft.
5. With the hand-throw lever vertical, and the bevel gear firmly seated against the lever
shaft, tighten the set screw (F1) in the hand-throw bevel gear (F).
6. Secure the lever shaft bearing (M) to the gearbox with the two 1/2-13 x 1-1/2” bolts (A4)
and washers removed in Step 7 of Section 4.8.1.1.
7. In order that the motor position of the selector lever will be toward the motor end of the
machine (as indicated for standard assemblies in Diagrams A, B, C, or D Figure 4-7), the
selector lever and lever interlock must be reassembled 180º from the original position on
the shaft, as follows:
a. Remove the 7/8” hex nut, lock washer, and flat washers from the end of the selector
lever shaft and slide the selector lever and lever support (K) from the shaft. Be careful
not to lose the steel ball in the lever support.
NOTE
If the stop screw is used in the hub instead of the hand-throw lever,
it will be necessary to also remove this lever and interchange the
stop screw and cap screw (refer to Figure 4-7). Replace the handthrow lever and fasten it in place with the clamping bolt.
b. Reassemble the lever support (K) with the hole for the steel ball on the motor side of
the shaft. Insert the steel ball and reassemble the selector lever on the shaft so that the
lever is 180º from its original position. (The stop screw, if used, may require
positioning the hand-throw lever to align the recess with the hole in the lever support
so that the steel ball will not interfere when the selector lever is applied.)
c. Replace the hex nut and washers on the end of the shaft to hold the selector lever in
place, then secure the lever support (K) with the two 1/2-13 x 4-3/4” bolts (A3) and
lock washers removed in Step 7 of Section 4.8.1.1. These bolts also secure the bottom
of the lever shaft bearing.
8. Move the selector lever to the Motor position (i.e., toward the motor end of the machine)
and check to make sure that it moves the yoke (N) down.
9. Interchange the Motor and Hand nameplates on the selector lever to correspond with the
new lever positions.
SM 6263A, Rev. 3, November 2010
4-17
Installation
10. With the hand-throw lever vertical, place the collar (E) (with the chamfer down) on top of
the main crank end. Install the hand-throw bevel pinion (D), engaging the tooth marked R
(for right-hand assembly) or L (for left-hand assembly) with the punched marked master
tooth space in the center of the hand-thrown bevel gear (F).
11. Carefully place the hand-throw lever in the Normal position. Be sure that the hand-throw
bevel pinion (D) remains in the proper position relative to the hand-thrown bevel gear
(F).
12. With the selector lever in the Motor position, rotate the friction clutch housing so that the
motor clutch teeth are fully engaged.
13. Place the top bearing assembly (C) on the gearbox using the dowel pins as guides, and
secure it with the four 1/2-13 hex head bolts (A1) and lock washers removed in Step 3 of
Section 4.8.1.1. (The motor cutout push rod should be held back to clear the adjusting rod
until bearing is down).
14. Install the top bearing bushing (C2), rectangular key (C1), washer (B2) on the top of the
main crank. Tighten castle nut (B1) firmly, then back it off to the nearest cotter hole and
insert a cotter pin after operating the machine manually with the hand throw lever to be
sure that the mechanism does not bind. Flare the end of the cotter pin per usual
installation practice.
15. Check the adjustment of the motor cutout push rod. Contacts should open when the end
of the selector lever has been raised approximately 6" from the horizontal motor position.
16. Readjust both yoke eccentric bushings as described in Section 4.8.4, then secure it by
tightening bolt (G) firmly.
17. Check that the machine can be operated by power and also that it shifts to hand-throw
operation from both Normal and Reverse positions.
18. Check that all bolts are drawn down tightly on their lock washers and that all cotter pins
are in place.
19. Replace the gearbox cover and secure it to the gearbox with the two 5/8-11 x 2” hex head
bolts removed in Step 1 of Section 4.8.1.1.
4-18
SM 6263A, Rev. 3, November 2010
Installation
LEVER
INTERLOCK
ASSEMBLY
STEEL
BALL
STOP SCREW
(WHEN USED)
DIAGRAM “A”- L.H. LAYOUT
L.H. POINT NORMALLY CLOSED
LEVER
INTERLOCK
ASSEMBLY
STEEL
BALL
STOP SCREW
(WHEN USED)
DIAGRAM “C”- L.H. LAYOUT
L.H. POINT NORMALLY CLOSED
LEVER
INTERLOCK
ASSEMBLY
STEEL
BALL
STOP SCREW
(WHEN USED)
DIAGRAM “B” -R.H. LAYOUT
R.H. POINT NORMALLY CLOSED
LEVER
INTERLOCK
ASSEMBLY
STEEL
BALL
STOP SCREW
(WHEN USED)
DIAGRAM “D”- R.H. LAYOUT
R.H. POINT NORMALLY OPEN
Figure 4-7. Standard Lever Interlock Assemblies for M-23 Switch Machine
SM 6263A, Rev. 3, November 2010
4-19
Installation
4.8.2. Lever Assembly
For the removal and insertion of the lever assembly ASTS USA recommends that two men
perform the procedure; one to insert the lever assembly and one to hold and guide the hand throw
bevel gear onto the lever assembly shaft. If only one person is available, ASTS USA
recommends dismantling the lever assembly to move it to the other side of the gearbox.
4.8.2.1. Disassembly
1. Remove the 7/8” hex nut, lock washer, and flat washers from the end of the selector lever
shaft and slide the selector lever from the shaft. Be careful not to lose the steel ball in the
lever support.
2. Lift the hand-throw lever to the vertical position and loosen the set screw (F1) on the
hand-throw bevel gear (F). Remove the hand throw lever from the lever shaft.
3. Remove the two 1/2-13 x 4-3/4” bolts (A3) and lock washers that secure the lever support
(K) to the gearbox and slide the lever support from the shaft. It may be necessary to lift
on the yoke (N) to free the eccentric pin (P) on the selector shaft.
4. Remove the two 1/2-13 x 1-1/2” bolts (A4) and washers that secure the lever shaft
bearing (M) to the gearbox.
5. Grasp the hand throw bevel gear and remove the shaft assembly from the gearbox case.
The shaft will pull free of the bevel gear as it is pulled from the gearbox case. Be sure
that the bevel gear does not fall into the case as the shaft is removed.
NOTE
There is a paper gasket between the lever shaft bearing and the
gearbox case. Check it after removal of the lever assembly. If it is
torn, it must be replaced. If it is intact on one of the two mating
surfaces, it may be reused.
4.8.2.2. Reassembly
1. The lever assembly is to be installed on the opposite side of the gearbox case after the
yoke support has been removed.
2. Place the bevel gear inside the gearbox case on the side where the lever shaft will be
installed.
3. Insert the lever shaft into the opening on the gearbox case. As the shaft enters the case,
position the bevel gear so that the shaft slides through the center of the bevel gear and
that the keyways match. It may be necessary to lift the yoke a bit to facilitate the
eccentric pin (P) on the lever shaft assembly entering the slot on the end of the yoke.
4-20
SM 6263A, Rev. 3, November 2010
Installation
NOTE
A paper gasket is located between the lever shaft bearing and the
gearbox case. Check it after removal of the lever assembly. If it is
torn, it must be replaced. If it is intact on one of the two mating
surfaces, it may be reused.
4. Secure the lever shaft bearing (M) to the gearbox case using the two 1/2-13 x 1-1/2” bolts
(A4) that were removed in Step 4 of Section 4.8.2.1.
5. Put the hand throw lever on the lever shaft. The lever is keyed to the shaft and can be put
on in either direction. Be sure it is positioned on the shaft so that it moves in the proper
direction.
6. Slide the lever support (K) onto the lever shaft. Secure it to the gearbox case with the two
1/2-13 x 4-3/4” bolts (A3) and lock washers removed in Step 3 of Section 4.8.2.1.
7. Put the selector lever onto the lever shaft. The lever is keyed to the shaft and can be put
on in either direction. Be sure it is positioned on the shaft so that it moves in the proper
direction.
8. Secure the selector lever to the shaft with the 7/8” hex nut, lock washer, and flat washers
removed in Step 1 of Section 4.8.2.1.
4.8.3. Other Mechanical Changes
4.8.3.1. Operating Bar
1. Remove the two operating bar covers from either side of the switch machine by removing
the 1/2” bolts and washers that secure it to the machine. These have to be installed on the
other side of the switch machine when the lug is installed.
2. Remove the cotter pin, the 7/8” nut, washer, and 7/8-9 hex head bolt which secure the
operating bar lug to the operating bar.
3. Remove the operating bar lug and place it on the operating bar on the other side of the
switch machine.
4. Secure the operating bar lug with the cotter pin, the 7/8” nut, washer, and 7/8-9 hex head
bolt removed in Step 2.
5. Install the operating bar covers on the sides of the switch machine. One of the covers is
designed to fit over the operating bar lug and can only be installed over the lug. Secure
the covers with the 1/2” bolts and washers removed in Step 1.
SM 6263A, Rev. 3, November 2010
4-21
Installation
4.8.4. Selector Clutch Adjustment
Selector clutch adjustment should be checked annually. When the selector lever is in the Motor
position and the selector clutch teeth are in full engagement with the teeth on top of the worm
gear so the motor drives the crank, the top rollers on the operating yoke should be just clear of
the upper spring cup.
This relation can be varied by adjusting the eccentric bushings (G1). As shown in Figure 4-5 and
Figure 4-6, the selector clutch yoke has one end supported on and driven by the finger on the
selector lever shaft, and its other end pivots on the eccentric bushings that are fixed by G. When
this bolt is loosened, the eccentric bushings may be rotated to raise or lower the center line for
the pivot holes in the yoke arms, affecting the elevation of the yoke rollers.
The eccentric bushings have hexagonal heads; one flat is stenciled “N” and the flats on either
side of the “N” flat are marked “+” and “-”. The “N” will be on top when the eccentric bearing is
in its mean position. When the eccentric bushings are turned to bring the “+” mark up, the yoke
and its rollers will lift. Alternately when the “-“ mark is up, the yoke and its rollers are lowered.
To avoid twisting the yoke, these marks should be kept turned to a like degree “+” or “-”.
Tightening bolt G holds the adjustment of the eccentric bearings. When it is necessary to adjust
the eccentric bushings, check that the top rollers are free from the bearing on the upper spring
cup while the selector clutch is fully down, and in addition, check that the rollers are not too high
as follows:
1. Place the selector lever in the Motor position when the worm gear is not in position to
receive the selector clutch, so that the teeth of “Clutch for Motor Operation,” (Figure
4-8), ride on top of the corresponding teeth of the worm gear.
2. Insert a 1/8” length of a #14 soft copper wire between the opposed teeth. The eccentric
bushings should be adjusted the same degree “+” or “-” so that (with the bolt tight) the
force between the opposed teeth will crush the wire to not more than 1/32” thick when
the selector lever is thrown to the horizontal position for motor operation.
3. Check that the upper rollers are free to turn when the selector clutch is fully engaged with
the worm gear.
4.8.5. Jumper Configuration Changeover
When the switch machine is converted from right to left-hand operation, the RHPC/LHPC
jumper has to be inserted in the proper location on the junction board in the Junction Box. (Refer
to Section 4.1.3 for this procedure.
4-22
SM 6263A, Rev. 3, November 2010
Installation
4.9. Final Inspection and Testing after Installation
WARNING
To avoid severe personal injury, open the gold nut test link in
the motor compartment prior to performing any internal
machine maintenance. Always keep hands and feet clear of
switch points and the internal moving parts of the machine Ensure
that loose clothing is properly secured prior to working on the
switch machine.
1. Ensure that all switch connecting rods are square to the switch point prior to fastening the
switch mechanism to the ties.
2. Ensure that all rods operate without binding and properly clear the base of the stock rail.
3. Nothing is gained by excessive point pressure. Adjust the switch adjust (basket) until the
switch points just close in either position.
4. Ensure the switch machine is installed per the applicable installation drawings and that all
fasteners are properly secured.
5. Final adjustment of the lock rods and point detector system should be performed in
accordance with standard railroad operating practices, AREMA recommended practices,
and FRA Rules and Regulations.
6. Independent breakdown testing of the switch machine circuitry should be performed in
accordance with standard railroad operating practices, AREMA recommended practices,
and FRA Rules and Regulations.
7. If the machine is equipped with a local/remote feature, ensure the local/remote toggle
switch is in the “Remote” position prior to leaving the installation site.
8. Ensure all covers are properly installed and locked prior to leaving the installation site.
SM 6263A, Rev. 3, November 2010
4-23
Installation
* CLUTCH FOR HAND OPERATION
ROLLER
UPPER ROLLER
* SELECTOR CLUTCH SPRING
SELECTOR LEVER SHAFT
* UPPER SPRING CUR
SELECTOR CLUTCH YOKE
* LOWER SPRING CUP
WORM GEAR
* CLUTCH FOR MOTOR OPERATION
MAIN CRANK
LOWER ROLLER
NOTE
* SELECTOR CLUTCH ASSEMBLY
COMPRISES PARTS MARKED
BEARING CUP
UPPER SPRING CUP
HAND THROW BEVEL GEAR
HAND THROW LEVER SHAFT
HAND THROW PINION
SELECTOR
LEVER SHAFT
CLUTCH FOR HAND OPERATION
ECCENTRIC BUSHING
SELECTOR CLUTCH SPRING
SELECTOR CLUTCH YOKE
CLUTCH FOR MOTOR OPERATION
LOWER SPRING CUP
WORM GEAR
MAIN CRANK SHAFT
Figure 4-8. Sectional Views of M-23 Dual Control Mechanism
4-24
SM 6263A, Rev. 3, November 2010
Installation
3 Wire PM Motor
Connect Together
for 2 wire control
N
N24
R
N24
N
B24
R
1
2
FROM
3
M23 with ECC Retrofit
B24
N
N24
R
N24
N
1
2
Observe Polarity Convention
Consistent with Gear
Ratio and
Retrofit of M23 with ECC
For 3 Wire to 2 Wire Conversion
B24
TO
B24
R
5 Wire Wound Field Motor
B24
1
N
R
2
B24
R
Connect together
and return to N24
for 2 Wire Control
FROM
3
4
Field
N24
N
5
R
Eliminate for 2 Wire Control
M23 with ECC Retrofit
B24
N
1
R
N
B24
2
For 5 Wire to 2 Wire Conversion
N
Observe Polarity Convention
Consistent with Gear
Ratio and
Retrofit of M23 with ECC
TO
R
Normal & Reverse
Motor Cut-Out
Symbols
Hand Throw
Motor Cut-Off
N24
Figure 4-9. Wiring Changes from 3-Wire and 5-Wire to 2-Wire Motor Control
SM 6263A, Rev. 3, November 2010
4-25
Installation
4-26
SM 6263A, Rev. 3, November 2010
Installation
Auxiliary Sensor 1
Motor Cutout
Contacts 49 and 50
Auxiliary Sensor 2
Point
Sensor 1
49
50
Tape lead to harness
(only for 115V. source)
for field applications
with 115V source,
disconnect 7 for 230V
and connect this lead to
terminal 7.
Blue
31
Violet
30
White
RED / WHITE
ORANGE / WHITE
13
14
JUNCTION BOX
N42400801
3
OR
N42400802
28
27
26
To WAGO
Ground Stud
Motor Cutout
Contacts
51
Machine
Frame 5
52
+
4
19
18
17
Heater
Terminals
16
8
D10
D9
D8
D6
8
Ground Terminal
Normal Output -
WHT
C USSI
D1
SURGE SUPPRESS OR BD.
N4 97031
J7766161112
D2
10
Normal Output +
RED
TO RED
WIRE
FROM MCU
MO UNTACROSS 110V
MOTOR TERMINALS
D5
11
Ground Terminal
Reverse Input -
D7
Motor 110V
D3
Reverse Input +
Red
D4
15
14
13
Normal Input -
7
Orange
MOTOR
TERMINAL
WITH WHITE
WIRE FROM
MCU
Black
White
Permanent Magnet Motor Configuration
6
Blue
Reverse Output +
Ground Terminal
Reverse Output Bi-Polar (Normal +)
Ground Terminal
Bi-Polar (Normal -)
1. ASSEMBLE AND TEST PER EU-8557.
Red
Green
WAGO Ground Stud
Lock Sensor 2
View A- Proximity Sensor Layout & Identification
Auxiliary Sensor
Ground Terminal
Yellow
Auxiliary Sensor
Lock Sensor 1
15
Normal Input +
5
Point Sensor 2
2
Battery Input - (N12)
4
1
Point Sensor 1
Ground Terminal
3
12
Battery Input + (B12)
9
TB2
Violet
Right
YELLOW / WHITE
11
Maintenance Bi-Polar (Normal -)
2
BROWN / WHITE
Ground Terminal
1
Red
Slate
Motor End
UNION SWITCH & SIGNAL ECC
10
BLACK / WHITE
Maintenance Bi-Polar (Normal +)
12
JB1
Brown
White
9
WHITE
Reverse Request
Black
TB1
LED Diagnostics
UNION SWITCH & SIGNAL ECC
N47303401
8
GRAY
UG0106.0037.01
Yellow
Latch Out Restoration
(Press for 1 Second and Release)
7
VIOLET
Normal Request
1
Point Detected
Point Locked
Indication Input
Indication Output
Auxiliary Point Detected
4
6
BLUE
Local Request
Gold Nut
5
GREEN
AAR Terminal Block
Black
Point Detected
Point Locked
Indication Input
Indication Output
Auxiliary Point Detected
Latch Out
Motor Disabled
YELLOW
Retrofit Machine
189:1
gear ratio
Counter
25
4
3
ORANGE
Red
Red
Green
2
RED
Connnect lead
to terminal #7
3
4
24
BU BR BU BR BU BR BU BR BU BR BU BR
LOCK POINT AUX
LOCK POINT AUX
1
1
1
2
2
2
2
Remote
3
23
Normal
Reverse
Local
J1
1
BROWN
2
2
22
1
J2
Heater
(Top View)
Motor Control Unit
N473039-01(high voltage)
1
Black
Combine
leads
and connect
to terminal #8
BLACK
29
Brown
Green/Yellow
21
Lock
Sensor 2
20
Lock
Sensor 1
32
33
0
82
34
Slate
Point
Sensor 2
WARNING
Maintenance Bi-Polar Terminals
21 and 23 are Non-Vital and should
never be used to clear signals
2
3
To AAR Terminal #2
Earth Ground
6
CONNECTIONS AS SHOWN TO WAGO TERMINALS 29 & 30 ARE
CORRECT WITH 189:1 GEAR RATIO. FOR MACHINES WITH 360:1
GEAR RATIO, CONNECT WIRE #1 TO WAGO TERMINAL 29 &
WIRE #2 TO WAGO TERMINAL 30.
N42400801 - JCT BOX W/O SEALING PLUGS TO
BE USED WITH AUXILIARY SENSORS.
N42400802 - JCT BOX W/SEALING PLUGS TO
BE USED WITHOUT AUXILIARY SENSORS.
4 INDICATED POLARITY DRIVES POINTS RIGHT (SEE VIEW A).
5
REMOVE GROUND WIRE IF MACHINE IS INSTALLED IN
ELECTRIFIED TERRITORY
6
CONNECT TO GROUND ROD IF MACHINE IS INSTALLED IN
ELECTRIFIED TERRITORY.
REFERENCE DRAWING F422152
Figure 4-10. Internal Wiring Diagram (High Voltage)
SM 6263A, Rev. 3, November 2010
4-27/28
Installation
Auxiliary Sensor 1
Auxiliary Sensor 2
Point
Sensor 1
Motor Cutout
Contacts 49 and 50
Tape lead to harness
(only for 115V. source)
for field applications
with 115V source,
disconnect 7 for 230V
and connect this lead to
terminal 7.
49
50
34
Slate
32
Combine
leads
and connect
to terminal #8
Blue
31
Violet
J2
2
Remote
28
27
Red
Local Request
Normal Request
21
20
23
22
Ground Terminal
Maintenance Bi-Polar (Normal -)
Battery Input + (B12)
17
Battery Input - (N12)
51
Machine
Frame 6
52
Motor
Gold Nut
20V
13
15
14
Ground Terminal
Normal Input -
12
TB2
Brown
Heater
Terminals
Reverse Input +
White
8
Permanent Magnet Motor
Configuration
11
Ground Terminal
10
Reverse Input -
9
Violet
Normal Output +
8
TB1
Slate
Ground Terminal
7
Orange
Normal Output -
6
Motor End
Reverse Output +
Ground Terminal
Blue
White
Reverse Output Bi-Polar (Normal +)
Ground Terminal
Bi-Polar (Normal -)
Red
Lock Sensor 1
4
To WAGO
Ground Stud
Motor Cutout
Contacts
Normal Input +
5
Point Sensor 2
Auxiliary Sensor 2
+
No
Black Connection
Black
14
Lock Sensor 2
View A- Proximity Sensor Layout & Identification
Right
15
1
Red
19
18
Ground Terminal
4
YELLOW / WHITE
13
AAR Terminal Block
Maintenance Bi-Polar (Normal +)
3
ORANGE / WHITE
12
Auxiliary Sensor 1
Point Sensor 1
Retrofit
Machine
360:1 and
528:1
gear ratio
Counter
Reverse Request
2
RED / WHITE
Motor Control Unit
N473039-02 (low voltage)
or
N473039-06 (low voltage)
1
UNION SWITCH & SIGNAL ECC
BROWN / WHITE
11
2
4
Yellow
10
BLACK / WHITE
2
3
9
WHITE
2
16
JB1
Yellow
8
GRAY
1
Black
UNION SWITCH & SIGNAL ECC
4
7
VIOLET
4
N47303401
6
BLUE
3
Green
5
GREEN
Yellow/Green
Red
Latch Out Restoration
(Press for 1 Second and Release)
YELLOW
29
Local
3
ORANGE
5
26
Normal
Reverse
2
RED
5
Black
1
Point Detected
Point Detected
Point Locked
Point Locked
Indication Input
Indication Input
Indication Output
Indication Output
Auxiliary Point Detected
Auxiliary Point Detected
Latch Out
Motor Disabled
LED Diagnostics
BROWN
5
Connnect lead
to terminal #7
24
BU BR BU BR BU BR BU BR BU BR BU BR
LOCK POINT AUX
LOCK POINT AUX
1
1
1
2
2
2
Brown
J1
1
BLACK
30
White
Heater
(Top View)
6
33
82
Lock
Sensor 2
WARNING
Maintenance Bi-Polar Terminals
21 and 23 are Non-Vital and should
never be used to clear signals
25
Lock
Sensor 1
0
Point
Sensor 2
Green
1. ASSEMBLE AND TEST PER EU-8557.
2
CONNECTIONS AS SHOWN TO WAGO TERMINALS 29 & 30 ARE
CORRECT WITH 360:1 & 528:1 GEAR RATIOS, CONNECT WIRE #1
TO WAGO TERMINAL 30, & WIRE #2 TO WAGO TERMINAL 29
FOR 189:1 GEAR RATIO.
3
N42400801 - JCT BOX W/O SEALING PLUGS TO
BE USED WITH AUXILIARY SENSORS.
N42400802 - JCT BOX W/SEALING PLUGS TO
BE USED WITHOUT AUXILIARY SENSORS.
4
INDICATED POLARITY DRIVES POINTS RIGHT (SEE VIEW A).
5
FOR MOTOR CONTROL UNIT SUFFIX -06, CONNECT WIRES #5 & #6
TO WAGO TERMINALS #32 AND #34 AS SHOWN. CONNECTIONS
PROVIDE ACCESS TO RELAY INDICATION CONTACT INSIDE MCU.
REMOVE GROUND WIRE IF MACHINE IS INSTALLED IN
ELECTRIFIED TERRITORY
CONNECT
TO GROUND ROD IF MACHINE IS INSTALLED IN
7 ELECTRIFIED
TERRITORY.
6
UG0106.0038.01
WAGO Ground Stud
JUNCTION BOX
N42400801
3
OR
N42400802
To AAR Terminal #2
Earth Ground
REFERENCE DRAWING F422152A
7
Figure 4-11. Internal Wiring Diagram (Low Voltage Control Unit with Permanent Magnet Motor)
SM-6263A, Rev. 3, November 2010
4-29/30
Installation
Auxiliary Sensor 1
Auxiliary Sensor 2
Tape lead to harness
(only for 115V. source)
for field applications
with 115V source,
disconnect 7 for 230V
and connect this lead to
terminal 7.
Lock
Sensor 1
Motor Cutout
Contacts 49 and 50
WARNING
Combine
leads
and connect
to terminal #8
Maintenance Bi-Polar Terminals
21 and 23 are Non-Vital and should
never be used to clear signals
50
Slate
6
5
5
5
32
33
82
Lock
Sensor 2
49
34
Point
Sensor 2
0
Point
Sensor 1
Blue
White
BU BR BU BR BU BR BU BR BU BR BU BR
LOCK POINT AUX
LOCK POINT AUX
1
1
1
2
2
2
J2
4
Point Sensor 2
Auxiliary Sensor 2
28
27
26
25
24
12
Reverse Input +
11
Ground Terminal
10
Reverse Input -
9
Normal Output +
8
Ground Terminal
7
Motor End
White
Normal Output Reverse Output +
Ground Terminal
Reverse Output Bi-Polar (Normal +)
Ground Terminal
Bi-Polar (Normal -)
Red
Green
Lock Sensor 1
Lock Sensor 2
View A- Proximity Sensor Layout & Identification
WAGO Ground Stud
7
UG0106.0039.01
Left
20V
Black
Y
+
Right
Machine
6
Frame
X
Wound Field Motor
D V W A
To WAGO
Ground Stud
White
+
Red
Wound Field Motor
Configuration
4
Heater
Terminals
8
1. ASSEMBLE AND TEST PER EU-8557.
2
3
CONNECTIONS AS SHOWN TO WAGO TERMINALS 29 & 30 ARE
CORRECT WITH 189:1 GEAR RATIOS, CONNECT WIRE #1
TO WAGO TERMINAL 29, & WIRE #2 TO WAGO TERMINAL 30
FOR 360:1 & 528:1 GEAR RATIO.
N42400801 - JCT BOX W/O SEALING PLUGS TO
BE USED WITH AUXILIARY SENSORS.
N42400802 - JCT BOX W/SEALING PLUGS TO
BE USED WITHOUT AUXILIARY SENSORS.
4 INDICATED POLARITY DRIVES POINTS RIGHT (SEE VIEW A).
5
To AAR Terminal #5
Earth Ground
JUNCTION BOX
N42400801
3
OR
N42400802
52
19
18
17
15
14
13
Normal Input -
Yellow
14
15
Ground Terminal
6
Auxiliary Sensor 1
Point Sensor 1
51
1
16
JB1
Violet
Right
YELLOW / WHITE
13
Normal Input +
4
ORANGE / WHITE
Battery Input - (N12)
3
RED / WHITE
12
Ground Terminal
2
UNION SWITCH & SIGNAL ECC
BROWN / WHITE
11
Motor Cutout
Contacts
Battery Input + (B12)
Blue
10
BLACK / WHITE
Maintenance Bi-Polar (Normal -)
Slate
TB2
UNION SWITCH & SIGNAL ECC
Brown
Orange
9
WHITE
Ground Terminal
AAR Terminal
Block
Black
8
GRAY
Maintenance Bi-Polar (Normal +)
1
VIOLET
Reverse Request
5
7
Yellow
TB1
6
BLUE
N47303401
Latch Out Restoration
(Press for 1 Second and Release)
5
GREEN
Normal Request
Black
Point Detected
Point Locked
Indication Input
Indication Output
Auxiliary Point Detected
4
Counter
Local Request
20
Green
Point Detected
Point Locked
Indication Input
Indication Output
Auxiliary Point Detected
Latch Out
Motor Disabled
YELLOW
Red
Red
3
ORANGE
3
4
23
2
Remote
3
22
Local
2
RED
2
21
Normal
Reverse
LED Diagnostics
BROWN
2
Black
1
J1
1
BLACK
N473039-02(low voltage)
or
N473039-06(low voltage)
1
29
Brown
Retrofit
Machine
360:1 and
528:1
gear ratios
Motor Control Unit
Green/Yellow
31
Violet
Connnect lead
to terminal #7
30
Heater
(Top View)
6
FOR MOTOR CONTROL UNIT SUFFIX -06, CONNECT WIRES #5 & #6
TO WAGO TERMINALS #32 AND #34 AS SHOWN. CONNECTIONS
PROVIDE ACCESS TO RELAY INDICATION CONTACT INSIDE MCU.
REMOVE GROUND WIRE IF MACHINE IS INSTALLED IN
ELECTRIFIED TERRITORY
7 CONNECT TO GROUND ROD IF MACHINE IS INSTALLED IN
ELECTRIFIED TERRITORY.
REFERENCE DRAWING F422152B
Figure 4-12. Internal Wiring Diagram (Low Voltage Control Unit with Wound Field Motor)
SM-6263A, Rev. 3, November 2010
4-31/32
Installation
Auxiliary Sensor 2
Motor Cutout
Contacts 49 and 50
Auxiliary Sensor 1
Point
Sensor 2
49
50
Tape lead to harness
(only for 115V. source)
for field applications
with 115V source,
disconnect 7 for 230V
and connect this lead to
terminal 7.
Blue
31
Violet
30
White
RED / WHITE
ORANGE / WHITE
13
28
27
26
25
Ground Terminal
Maintenance Bi-Polar (Normal -)
Battery Input + (B12)
To WAGO
Ground Stud
Motor Cutout
Contacts
51
+
18
17
Lock Sensor 1
JUNCTION BOX
N42400801
3
OR
N42400802
4
Heater
Terminals
D6
8
Ground Terminal
Normal Output -
D1
D2
MOTOR
TE RMINAL
WITH WHITE
WIRE FROM
MCU
Black
White
Permanent Magnet Motor Configuration
6
Reverse Output +
5
Ground Terminal
4
Reverse Output -
3
Bi-Polar (Normal +)
2
Blue
Ground Terminal
Bi-Polar (Normal -)
1. ASSEMBLE AND TEST PER EU-8557.
Red
Green
WAGO Ground Stud
Lock Sensor 2
View A- Proximity Sensor Layout & Identification
D3
Normal Output +
WHT
C USSI
D4
10
Reverse Input -
MO UNT ACROSS 110V
MOTOR TERMINALS
SURGE SUPP RES SOR BD.
N497031
J7766161112
D5
11
Ground Terminal
7
TB1
Orange
RED
TO RED
W IRE
FROM MCU
9
TB2
Violet
D10
Reverse Input +
Motor 110V
D9
13
Normal Input -
8
D8
14
Ground Terminal
Red
D7
15
Normal Input +
1
Point Sensor 2
Auxiliary Sensor 2
Battery Input - (N12)
Yellow
White
Auxiliary Sensor 1
Point Sensor 1
Ground Terminal
2
Earth Ground
6
CONNECTIONS AS SHOWN TO WAGO TERMINALS 29 & 30 ARE
CORRECT WITH 189:1 GEAR RATIO. FOR MACHINES WITH 360:1
GEAR RATIO, CONNECT WIRE #1 TO WAGO TERMINAL 29 &
WIRE #2 TO WAGO TERMINAL 30.
3
N42400801 - JCT BOX W/O SEALING PLUGS TO
BE USED WITH AUXILIARY SENSORS.
N42400802 - JCT BOX W/SEALING PLUGS TO
BE USED WITHOUT AUXILIARY SENSORS.
4
INDICATED POLARITY DRIVES POINTS RIGHT (SEE VIEW A).
5
REMOVE GROUND WIRE IF MACHINE IS INSTALLED IN
ELECTRIFIED TERRITORY
6
CONNECT TO GROUND ROD IF MACHINE IS INSTALLED IN
ELECTRIFIED TERRITORY.
To AAR Terminal #2
14
15
Machine
Frame 5
52
Slate
Right
YELLOW / WHITE
12
Maintenance Bi-Polar (Normal +)
12
JB1
Brown
Motor End
UNION SWITCH & SIGNAL ECC
BROWN / WHITE
11
Reverse Request
Black
UNION SWITCH & SIGNAL ECC
4
10
BLACK / WHITE
Normal Request
1
Red
19
N47303401
9
WHITE
AAR Terminal Block
Local Request
16
Yellow
8
GRAY
Counter
Gold Nut
7
VIOLET
Retrofit Machine
189:1
gear ratio
Black
6
BLUE
Red
24
4
5
GREEN
4
Red
Latch Out Restoration
(Press for 1 Second and Release)
YELLOW
3
Green
3
ORANGE
Connnect lead
to terminal #7
Point Detected
Point Detected
Point Locked
Point Locked
Indication Input
Indication Input
Indication Output
Indication Output
Auxiliary Point Detected
Auxiliary Point Detected
Latch Out
Motor Disabled
LED Diagnostics
BU BR BU BR BU BR BU BR BU BR BU BR
LOCK POINT AUX
LOCK POINT AUX
1
1
1
2
2
2
Remote
2
RED
UG0106.0040.01
2
3
23
Normal
Reverse
Local
J1
1
BROWN
2
2
22
1
J2
Heater
(Top View)
Motor Control Unit
N473039-01(high voltage)
1
Black
Combine
leads
and connect
to terminal #8
BLACK
29
Brown
Green/Yellow
21
Lock
Sensor 2
20
Lock
Sensor 1
32
33
0
82
34
Slate
Point
Sensor 1
WARNING
Maintenance Bi-Polar Terminals
21 and 23 are Non-Vital and should
never be used to clear signals
REFERENCE DRAWING F422152C
Figure 4-13. Internal Wiring Diagram (High Voltage, Derail Machine)
SM-6263A, Rev. 3, November 2010
4-33/34
Troubleshooting
5.
TROUBLESHOOTING
Table 5-1 is a troubleshooting matrix that covers ECC failure modes (problems), the possible
cause(s) of the problem, and the possible solutions to the problem.
To use the troubleshooting table, identify the problem being experienced from the left-hand
“problem” category column. The possible “causes” of the problem are listed in the center column
and the possible “solutions” to the problem are in the right column of the table.
Table 5-1. ECC Troubleshooting
Problem
1. Motor power is present
from the wayside but
motor does not run.
Cause
A. MCU wired incorrectly.
B. Motor is DISABLED by
ECC (Red Motor
Disabled LED is ON).
2. Motor runs but not in
proper direction (causing
friction clutch to slip).
3. A single dual-colored
LED is flashing RED.
C. Gold Nut circuit link on
AAR terminal posts is
open.
A. Incorrect motor polarity.
A. Corresponding sensor
wire is shorted, open, or
not properly connected.
B. Sensor is adjusted
marginally (between ON
and OFF) with respect
to it’s target.
4. Latch-out LED is Flashing
RED.
5. All four dual-colored
LEDs are flashing RED.
A. Missing configuration
jumper.
A. Incorrect configuration
jumper installation in
junction box.
SM 6263A, Rev. 3, November 2010
Solution
1. Confirm proper connections of MCU wires 1 and 2 in
WAGO Terminals 29 and 30 per the internal wiring
diagram shown in Figure 4-10, Figure 4-11, and
Figure 4-12.
2. Check terminations of white, black, and red MCU
wires on AAR terminal posts.
1. In M-23 with ECC, ensure motor cutout proximity
sensors in gearbox and on transmission box are
adjusted properly and both indicate ON by the
illumination of the sensor’s yellow LED.
2. In an M-23 switch machine equipped with an ECC,
ensure two wires connecting motor cutout contact to
WAGO terminal strip are connected properly and that
the 750-ohm resistor is properly installed between
WAGO Terminals 33 and 34.
1. Ensure that the Gold Nut connection is closed and
properly secured with an AAR jam nut.
1. Reverse motor wires on motor terminals (not on AAR
terminal posts).
1. Ensure proper termination of the brown and blue
sensor wires to the corresponding spring terminals in
the Junction Box (terminals are labeled on the PC
board BR for brown and BL for blue).
1. For point detection sensors - adjust the linear sensor
location away from the ON/OFF threshold as
described in the Initial Setup section of the
corresponding product service manual.
2. For locking sensors - ensure that the machine is in the
fully locked position and the machine has completed
its stroke. Note – linear position of the locking sensors
is not adjustable.
1. Ensure that the configuration jumper is installed in
latch-out jumper slots in Junction Box.
1. Ensure that one jumper is installed in the latch-out
jumper slots and one jumper is installed in the
LHPC/RHPC jumper slots. The ECC will not work if
either jumper is absent or if multiple jumpers are
installed in any one configuration.
5-1
Troubleshooting
Problem
6. All LEDs on the ECC
drop out and the
controller may or may not
reset.
7. All diagnostic LEDs are
properly lit on the ECC (a
continuous vertical row of
GREEN LEDs is
observed) yet no
Indication Output is
present on WAGO
terminal strip (no voltage
is present between
Terminals 1 and 3).
8. Sensors do not turn ON
when target or lock box is
in front of more than 50%
of the sensor face.
9. Point Detected and Point
Cause
Solution
B. Junction box cable JB1
is not properly
connected to ECC box.
A Insufficient/low battery
feed level to the ECC.
1. Ensure JB1 cable keys are aligned properly, the
connector is fully inserted and the locking ring is
turned clockwise until it locks in place.
Ensure a continuous battery feed of at least 10 VDC (with
proper polarity) is present on WAGO Terminals 17
(N12) and 20 (B12). Ensure all wires on cables TB1
and TB2 are properly terminated on the WAGO
terminal strip and that the cable plug connectors are
properly secured to the ECC box.
Bypass the resistor so that the ECC gets the proper inline voltage.
Resistor may be in series
with the battery supply
voltage.
A. Cable TB2 is improperly
connected, terminated,
or is defective.
B. Defective ECC or
improper software
execution by the ECC
processor.
A. Sensor not properly
connected to junction
box.
B.
Sensor air gap not
properly adjusted.
A.
Indication Input is not
energized.
B.
The ECC is in a
latched-out state.
C.
Motor is DISABLED by
ECC (Red Motor
Disabled LED is ON).
1. In M-23 with ECC, rotate the selector lever to
the Motor position. The light should go dark on
the motor cutout and the indication output LED
should come on.
D.
Point and/or Locking
sensor for opposite
switch machine
position are ON.
1. In an M-23 equipped with an ECC, ensure the
two wires connecting motor cutout contact to
WAGO terminal strip are connected properly
and that the 750-ohm resistor is properly
installed between WAGO Terminals 33 and 34.
Locked LEDs are
GREEN but Indication
Output LED is dark.
5-2
1. Ensure TB2 plug connector is properly secured and
locked to the ECC box. Ensure all 10 color-coded
wires are properly terminated on the WAGO terminal
strip and that all crimped wire ferrules are properly
secured to the end of each wire.
1. Remove cable TB1 and reconnect, initiating an ECC
processor reset. If the unit resets and the LEDs
restore, re-check for presence of voltage output on
WAGO Terminals 1 and 3.
2. Even if output restores, replace the ECC box as an
entire unit and return to ASTS USA for analysis.
1. Ensure proper termination of the brown and blue
sensor wires to the corresponding terminals in the
Junction Box (terminals are labeled on the PC board
BR for brown and BL for blue).
1. For vital (large diameter) sensors, ensure gap
between sensor face and PD target/lock box is
adjusted to 0.075” and the gap from the sensor to the
lock box target is 0.075”.
2. For auxiliary (non-vital - small diameter) sensors,
ensure that the air gap between sensor face and
target is adjusted to 0.040”.
1. Ensure Indication Input voltage (with proper polarity) is
present on WAGO Terminals 13 and 15 for Normal
and Terminals 10 and 12 for Reverse. Voltage should
be obtained from an adjacent machine or jumper
connected per Section 4 of this manual.
1. Reset the latch-out by depressing the latch-out
restoration button on the front of the ECC, holding for
one second and releasing.
SM 6263A, Rev. 3, November 2010
Troubleshooting
Problem
10. The ECC does not latchout when point detector
target is removed from
in front of target face
and restored.
Cause
Solution
2.
Verify proper linear adjustment of the PD sensor and
verify proper 0.075” vital sensor air gap to obtain
proper sensor response. Remove any loose, metallic
objects or obstructions from the vicinity of the
sensors.
3.
Ensure that LS1 and PS1 and LS2 and PS2 are
terminated correctly in the Junction Box. They must
work as a unit.
1. Ensure machine is fully locked. A latched out condition
will only occur if the machine is fully locked and the
switch point moves away from the stock rail.
1. Move latch-out configuration jumper in the junction
box from the disable to the manual or automatic
jumper positions.
A.
Machine is not fully
locked.
B.
ECC is configured to
disable the latch-out
feature.
C.
Point detected and
point locked sensors
for that corresponding
position are not ON,
(i.e., the machine is
not fully thrown and
locked or the PD
sensors are out of
adjustment.
1. Ensure proper linear adjustment of the PD sensors to
indicate the presence of the point detector bar target
and ensure that the machine is in the full locked
position prior to restoring the latched-out condition.
D.
Defective latch-out
restoration pushbutton
on ECC.
1. To verify, move latch-out configuration jumper to the
automatic position in the junction box and manually
cycle the machine to the opposite position and back.
2. If the latched-out condition restores the pushbutton is
defective, replace the ECC unit at your earliest
convenience and return to ASTS USA for repair.
3. If the latched-out condition does not restore and all
vital sensors are properly functioning, replace the ECC
unit and return to ASTS USA for repair.
SM 6263A, Rev. 3, November 2010
5-3
Troubleshooting
5-4
SM 6263A, Rev. 3, November 2010
Parts List
6.
PARTS LIST
Table 6-1. Various Available ECC Configurations
Part Number
N42252901
N42252902
N42252903
N42252904
SM 6263A, Rev. 3, November 2010
Description
M-23 – M-3 w/ECC without Auxiliary Sensors
M-23 – M-3 w/ECC with Auxiliary Sensors
M-23 – M-3 w/ECC without Auxiliary Sensors, without
Local Remote Switch
M-23 – M-3 w/ECC with Auxiliary Sensors,
without Local Remote Switch
6-1
Parts List
6.1. Circuit Controller Compartment
Table 6-2 list the parts of the circuit controller compartment and Figure 6-1 shows the parts
location.
Table 6-2. Parts List for the Circuit Controller Compartment
Item No.
5
10
15
20
25
30
35
40
50
55
60
65
70
75
80
85
90
6-2
Description
ECC Assembly w/o Aux Sensor
ECC Assembly w Aux Sensor
Target
Point Detector Bar, Clevis Style
Point Detector Bar, Threaded
Screw, 1/4-20 x ¾”, Skt Cap
Set Screw, 1/2-20 x 1/2”, Cup Point
Point detector Bushing
Screw, Flat Head, 1/2-13 x 1.5”
Rotational Stop Block
Screw, 3/8-16 x 1/4”, Hex Hd
Washer, Lock, 3/8 Steel
Lock Box Target
Screw, 1/4-20 x 1.5” , Skt Cap
Spring, Pin 3/16” Dia., 1.5” L
Washer, Lock, No. 1/4, SS
HRNSS, M-23 Upgrade SM, 5-key, TB1
HRNSS, M-23 Upgrade SM, 4-key, TB2
ASTS USA Part No.
N42252901
N42252902
M42322803
M42373201
M42371701
J5001240158
J5001240149
M42370901
J5001240164
M42371401
J507372
J047768
M42370502
J5001240163
J0680140009
J4751210111
N42215103
N42215104
SM 6263A, Rev. 3, November 2010
DETAIL A
1
75
60
35
15 OR 20
30
25 80
50
10
70
40
80
80
60
55
90
85
65
5
55
65
75
80
80
70
A
4.00
Parts List
E422698 A
Figure 6-1. Circuit Controller Compartment
SM 6263A, Rev. 3, November 2010
6-3
Parts List
6.2. Circuit Controller ECC Assembly (N422529-XX)
Table 6-3 lists the parts of the circuit controller ECC assembly and Figure 6-2 shows the parts
location.
Table 6-3. Parts List for the Circuit Controller Assembly (N422529-XX)
Item No.
1
2
3
4
5
6
7
8
9
10
11
12
13
14
15*
16 – 19
20*
21*
22
23 –24
25
26
Description
Controller Frame
Lock Box Sensor Bracket
Lock Sensor (LS1)
Lock Washer, M18
Dowel Pin, 3/8” x 3/4”
Screw, Head Cap, 3/8”-16 x 1”
Washer 3/8” Lock
Junction Box Assembly
(M-23 Upgrade with Plugs)
Not Used
Washer, Spring Lock, 5/16”
Harness Clamp
Point Detector Sensor Assembly with
Auxiliary Sensors
Pin, 1” x 0.250” dia.
Sensor Bracket Insulator
Local/Remote Switch Assembly
(M-23 Upgrade)
Not Used
Screw, Skt Cap, 1/4”-20 x 3/4”
High Collar Lock Washer, 1/4”
Screw, Skt Head Cap, 5/16”-18 x 1
Not Used
ECC Box Upgrade Assembly
Lock Sensor (LS2)
ASTS USA Part No.
M42370002
M-2370602
N42307001
J4751210138
J0487220009
J5001240141
J047779
N42252701
NA
J4751380112
J703005
N42252401
M42371801
M42370301
N42252801
NA
J5001240158
J047521
J5001240153
NA
N42252101
N42307002
* When Used
6-4
SM 6263A, Rev. 3, November 2010
Parts List
22
25
22
10
10
11
22
10
22
22
10
11
10
12
13
6
14
7
13
15
7
6
1
5
8
2
4
26
21
UG0106.0049.00
3
4
21
20
20
Figure 6-2. Circuit Controller ECC Assembly
SM 6263A, Rev. 3, November 2010
6-5
Parts List
6.3. Junction Box Assembly (N42252701)
Table 6-4 lists the parts of the junction box assembly and Figure 6-3 shows the parts location.
Table 6-4. Parts List for the Junction Box Assembly
Item No.
1
2
3
4
5
6
7
8
9
10
11
12
13
14 – 15
16
17
18
19
20
21
22
23
24
Description
Junction Box - M-23/M-3 Upgrade
Switch Machine Junction Box PCB
Seal Ring, Altech PG21-PE
Strain Relief, PG21, Black
OVC Multi-conductor Insert
Locknut, PG-21, 32 mm wide
Strain Relief, PG13.5, Black
Seal Ring, Altech PG13.5-PE
Locknut, Nickel Plated Brass
Screw, 6-32 x 5/16, Pan Head SS
Harness, M-23 Upgrade, J-Box
Washer, No. 6, Lock SS
Nameplate
Not Used
Screw, 6-32 x 5/8” Pan Head
Washer, Nylon 6/6 Retaining, No. 4
Gasket, M-23 Upgrade J-Box
Cover, M-23 Upgrade J-Box
Not Used
Washer, 0.144 ID Flat SS
Screw, 4-40 x 5/16, Pan Head SS
Washer, No. 4 Flat SS
Washer, No. 4, Split Lock
ASTS USA Part No.
M42372402
N49702701
J7002160012
J7002160014
J7002160016
J7002160011
J7002160015
J7002160013
J7002160006
J5072980105
N42400202
J4751200156
M21036902
NA
O0135331
J4751200170
M42372601
M42372701
NA
J4751210128
J5072970105
J4751200106
00335025
The wiring chart for connecting the wiring harness (Item 11) to the PCB (Item 2) is given in
Table 6-5.
Table 6-5. Wiring Chart for the Junction Box Assembly Harness
6-6
Wire Color
(from Harness)
To J1 Connector
on the J-Box PCB
Black
Brown
Red
Orange
Yellow
Green
Blue
Violet
Gray
White
Black/White
Brown/White
Red/white
Orange/White
Yellow/white
J1-1
J1-2
J1-3
J1-4
J1-5
J1-6
J1-7
J1-8
J1-9
J1-10
J1-11
J1-12
J1-13
J1-14
J1-15
SM 6263A, Rev. 3, November 2010
7
1
11
15
3
16
2
6
10
14
11
SM 6263A, Rev. 3, November 2010
18
19
8
9
6
3
4
17
DETAIL A
16
12
21
1
XXXXXXXXX
P/N
13
XXXXXXXXX
S/N
MADE IN USA
2
VIEW WITH GASKET (IT.18) AND COVER (IT.19) REMOVED 1012 21
(4 CORNERS)
19
18
22 23 24
SEE ENLARGED
DETAIL A
7
5
Parts List
Figure 6-3. Junction Box Assembly
6-7
Parts List
6.4. Point Detector Sensor Assembly Without Auxiliary Sensors (N42252401)
Table 6-6 lists the parts of the point detector assembly without auxiliary sensors and Figure 6-4
shows the parts location.
Table 6-6. Parts List for N42252401
Item No.
1
2
3
4
5
6
7
8
9
10
11
Description
Nut, AAR, Binding14-24, Hex, Brass
Insulator, 5/16” Bolt
Not Used
Point Sensor PS1
Lock Washer, M18, Internal Tooth
Sensor Holder
Sensor Bracket Plate
Terminal Post
Not Used
Point Sensor PS2
Not Used
ASTS USA Part
No.
J480301
M42370801
N42307008
J4751210138
M42370202
M42370102
M130593
N42307009
6.5. Point Detector Sensor Assembly With Auxiliary Sensors (N42252402)
Table 6-7 lists the parts of the point detector assembly with auxiliary sensors and Figure 6-4
shows the parts location.
Table 6-7. Parts List for N42252402
Item No.
1
2
3
4
5
6
7
8
9
10
11
6-8
Description
Nut, AAR, Binding14-24, Hex, Brass
Insulator, 5/16” Bolt
Auxiliary Sensor AUX1
Point Sensor PS1
Lock Washer, M18, Internal Tooth
Sensor Holder
Sensor Bracket Plate
Terminal Post
Belleville Washer, Serrated, 5/16”
Point Sensor PS2
Auxiliary Sensor AUX 2
ASTS USA Part No.
J480301
M42370801
N42307007
N42307008
J4751210138
M42370202
M42370102
M130593
J4751200169
N42307009
N42307004
SM 6263A, Rev. 3, November 2010
Parts List
3
9
4
2
10
5
1
11
6
UG0106.0047.00
7
8
Figure 6-4. Point Detector Sensor Assembly
SM 6263A, Rev. 3, November 2010
6-9
Parts List
6.6. Motor Compartment Assembly
Table 6-8 lists the parts of the motor compartment assembly and Figure 6-5 shows the parts
location.
Table 6-8. Parts List for the Motor Compartment Assembly
Item No.
60
115
120
140
145
165
180
195
200
205
210
215
220
225
230
340
350
605
610
615
620
625
740
745
2010
3600
3605
3610
6-10
Description
Washer, Lock, 3/8” Steel
Screw, 1/2-13 x 1/2, Hex Hd
Washer, Lock, 1/2 Steel
Screw, 10-32 x 1”, Skt Hd Cap
Washer, Lock No. 10, SS
Washer, No 10, SS
Screw, 3/8 x 6 ½” long, Skt Cap
Upgraded Motor Controller Unit
Upgraded Motor Controller Unit
Gasket, MCU
Sleeve, AAR Mounting
Screw, 3/8 x 1 Fl Hd SS
Plate, FET Box Insulator
Side Plate, WAGO
Washer, 3/8” Lock, Extended Countersink
PCB, Surge Suppressor
Terminal Assembly
Resistor, 800 ohms, 30 watt
Tag
Clamp, Cable Burndy HP 8N
Screw, 8-32 x 1- 1/4, Rd Hd, Steel
Screw, 8-32 x ½ Fil Hd
Spacer, 3/8” Rd Brass
Cover Plate
Motor Assembly
Heater Switch
Screw, 8-32 x ½, Pan, SS
Washer, Lock, No. 8, SS
ASTS USA Part No.
J047768
J050092
J047769
J5001240196
J4751210109
J4751200110
J5001240195
N47303901
N47303901
M42371901
M42371101
J5001240002
M42371001
M42371301
J4751430002
N49703101
N42270301
N294241
S000333
J700590
J525111
J052256
J725920
M4516112401
PN4511611701
N45116114602
J5072950108
J4751210108
SM 6263A, Rev. 3, November 2010
Parts List
VIEW OF SURGE SUPPRESSOR PCB
POST #8
POST #1
330
305
3600 3605 3610
310
295
340
290
285
285
175
180
140
320
145
60
165
290
295
140
285
145
165
205
190
210
280
165
200 OR 195
300
205
170
215
2010
230
220
225
A
EXISTING BASE
620
350
745
UG0106.0048.00
740
115 120
605
625
610 615
Figure 6-5. Motor Compartment Assembly
SM 6263A, Rev. 3, November 2010
6-11
Parts List
6.7. Terminal Assembly (N42270301)
Table 6-9 lists the parts of the terminal assembly and Figure 6-6 shows the parts location.
Table 6-9. Parts List for N42270301
Item No.
95
100
110
125
130
135
160
265
310
315
325
Description
Assembly, 8-Way, AAR Terminal,
Permanent Magnet Motor
Screw, 10-32 X 3/4 Stainless Steel
Nut, 1/4-20 Stainless Steel, Elastic Stop Nut
AAR Mounting Bracket Complete
Screw, 4 X 3/8, Round Head, Type Z
Counter, 6-Digit, 24v, E6B628GM
Nut ¼ In. Hex, Steel
Nut, Molded
Insulation, Terminal Sleeve
Cap, Molded Insulated
Terminal Ring Tongue 324047
ASTS USA Part No.
N42252501
J5001240014
J480260
R42252001
J525054
J6209210051
J480109
J048300
M281182002
J078147
J7313990160
6.8. WAGO Assembly (N42270401)
Table 6-10 lists the parts of the WAGO assembly and Figure 6-7 shows the parts location.
Table 6-10. Parts List for N42270401
Item No.
140
145
165
170
175
190
280
285
290
295
300
305
310
320
6-12
Description
Screw, 10-32 x 3/4 Stainless Steel
Washer, Lock No 10, Stainless Steel
Washer, Lock No 12, Stainless Steel
Nut,10-32, Hex, Steel Elastic Stop
Terminal Block
Plate, M-23 ECC WAGO Delrin
Terminal Strap,M-23 ECC
Flat Washer, 5/16" Stainless Steel
Washer, Lock, 5/16", .322" Inside Diameter
Nut, 5/16-18 Hex, Stainless Steel
Screw, Hex Head Cap, 5/16-18 x 2"
Cap Molded, 5/16-18 T Head
Insulation, Terminal Sleeve
Terminal Ring Tongue, 5/16", #6
ASTS USA Part No.
J5001240014
J4751210109
J4751210110
J048145
N42290102
M42373001
M42373101
J4751200149
J4751210141
J4802120104
J5001240194
M42316901
M281182002
J7313990174
SM 6263A, Rev. 3, November 2010
Parts List
100
POST #1
265
315
310
325
95
150
155
130
160
110
135
UG0106.0042.00
125
Figure 6-6. Terminal Assembly
SM 6263A, Rev. 3, November 2010
6-13
Parts List
305
175
310
295
290
285
320
140
145
190
280
UG0106.0041.00
165
300
170
Figure 6-7. WAGO Assembly
6-14
SM 6263A, Rev. 3, November 2010
Parts List
6.9. Sensor Use
Table 6-11 lists the sensors that are used with each switch machine. See Figure 3-1 for the sensor locations.
Table 6-11. Sensor and Switch Machine List
MACHINE
TYPE
LOCK 1
LOCK 2
POINT 1
POINT 2
AUX 1
AUX 2
N42250001
N42250002
N42250003
N42250004
N42250005
N42250006
N42250007
N42250008
N42250009
N42250010
N42250011
N42250012
N42250017
N42250018
N42250019
N42250020
M-3 ECC
M-3 ECC
M-3 ECC
M-3 ECC
M-3 ECC
M-3 ECC
M-3 ECC
M-3 ECC
M-3 ECC
M-3 ECC
M-3 ECC
M-3 ECC
M-3 ECC
M-3 ECC
M-3 ECC
M-3 ECC
N42307001
N42307001
N42307001
N42307001
N42307001
N42307001
N42307001
N42307001
N42307001
N42307001
N42307001
N42307001
N42307001
N42307001
N42307001
N42307001
N42307002
N42307002
N42307002
N42307002
N42307002
N42307002
N42307002
N42307002
N42307002
N42307002
N42307002
N42307002
N42307002
N42307002
N42307002
N42307002
N42307008
N42307008
N42307008
N42307008
N42307008
N42307008
N42307008
N42307008
N42307008
N42307008
N42307008
N42307008
N42307008
N42307008
N42307008
N42307008
N42307009
N42307009
N42307009
N42307009
N42307009
N42307009
N42307009
N42307009
N42307009
N42307009
N42307009
N42307009
N42307009
N42307009
N42307009
N42307009
N42307007
N42307007
N42307007
N42307007
N42307007
N42307007
N42307007
N42307007
x
x
N42307007
N42307007
N42307007
N42307007
N42307007
N42307007
N42307004
N42307004
N42307004
N42307004
N42307004
N42307004
N42307004
N42307004
X
X
N42307004
N42307004
N42307004
N42307004
N42307004
N42307004
N42307001
N42307001
N42307001
N42307001
N42307001
N42307001
N42307001
N42307001
N42307001
N42307001
N42307001
N42307001
N42307001
N42307001
N42307002
N42307002
N42307002
N42307002
N42307002
N42307002
N42307002
N42307002
N42307002
N42307002
N42307002
N42307002
N42307002
N42307002
N42307008
N42307008
N42307008
N42307008
N42307008
N42307008
N42307008
N42307008
N42307008
N42307008
N42307008
N42307008
N42307008
N42307008
N42307009
N42307009
N42307009
N42307009
N42307009
N42307009
N42307009
N42307009
N42307009
N42307009
N42307009
N42307009
N42307009
N42307009
N42307007
N42307007
N42307007
N42307007
N42307007
N42307007
N42307007
N42307007
X
X
N42307007
N42307007
X
X
N42307004
N42307004
N42307004
N42307004
N42307004
N42307004
N42307004
N42307004
X
X
N42307004
N42307004
X
X
N42250101
N42250102
N42250103
N42250104
N42250105
N42250106
N42250107
N42250108
N42250109
N42250110
N42250111
N42250112
N42250115
N42250116
M-23A
M-23A
M-23A
M-23A
M-23A
M-23A
M-23A
M-23A
M-23A
M-23A
M-23A
M-23A
M-23A
M-23A
ECC
ECC
ECC
ECC
ECC
ECC
ECC
ECC
ECC
ECC
ECC
ECC
ECC
ECC
SM-6263A, Rev. 3, November 2010
6-15
Parts List
MACHINE
6-16
LOCK 1
LOCK 2
POINT 1
POINT 2
AUX 1
AUX 2
N42250117
N42250118
N42250119
N42250120
N42250123
N42250124
N42250125
N42250126
M-23A
M-23A
M-23A
M-23A
M-23A
M-23A
M-23A
M-23A
TYPE
ECC
ECC
ECC
ECC
ECC
ECC
ECC
ECC
N42307001
N42307001
N42307001
N42307001
N42307001
N42307001
N42307001
N42307001
N42307002
N42307002
N42307002
N42307002
N42307002
N42307002
N42307002
N42307002
N42307008
N42307008
N42307008
N42307008
N42307008
N42307008
N42307008
N42307008
N42307009
N42307009
N42307009
N42307009
N42307009
N42307009
N42307009
N42307009
N42307007
N42307007
X
X
N42307007
N42307007
N42307007
N42307007
N42307004
N42307004
X
X
N42307004
N42307004
N42307004
N42307004
N42250201
N42250202
N42250207
N42250208
N42250209
N42250210
N42250217
N42250218
N42250219
N42250220
M-23B
M-23B
M-23B
M-23B
M-23B
M-23B
M-23B
M-23B
M-23B
M-23B
ECC
ECC
ECC
ECC
ECC
ECC
ECC
ECC
ECC
ECC
N42307001
N42307001
N42307001
N42307001
N42307001
N42307001
N42307001
N42307001
N42307001
N42307001
N42307002
N42307002
N42307002
N42307002
N42307002
N42307002
N42307002
N42307002
N42307002
N42307002
N42307008
N42307008
N42307008
N42307008
N42307008
N42307008
N42307008
N42307008
N42307008
N42307008
N42307009
N42307009
N42307009
N42307009
N42307009
N42307009
N42307009
N42307009
N42307009
N42307009
N42307007
N42307007
N42307007
N42307007
N42307007
N42307007
X
X
X
X
N42307004
N42307004
N42307004
N42307004
N42307004
N42307004
X
X
X
X
X42270001
X42270002
X42270003
X42270004
X42270005
X42270006
X42270007
X42270008
X42270011
X42270012
X42270013
X42270014
X42270015
X42270016
X42270017
X42270018
ECC Retro
ECC Retro
ECC Retro
ECC Retro
ECC Retro
ECC Retro
ECC Retro
ECC Retro
ECC Retro
ECC Retro
ECC Retro
ECC Retro
ECC Retro
ECC Retro
ECC Retro
ECC Retro
N42307001
N42307001
N42307001
N42307001
N42307001
N42307001
N42307001
N42307001
N42307001
N42307001
N42307001
N42307001
N42307001
N42307001
N42307001
N42307001
N42307002
N42307002
N42307002
N42307002
N42307002
N42307002
N42307002
N42307002
N42307002
N42307002
N42307002
N42307002
N42307002
N42307002
N42307002
N42307002
N42307008
N42307008
N42307008
N42307008
N42307008
N42307008
N42307008
N42307008
N42307008
N42307008
N42307008
N42307008
N42307008
N42307008
N42307008
N42307008
N42307009
N42307009
N42307009
N42307009
N42307009
N42307009
N42307009
N42307009
N42307009
N42307009
N42307009
N42307009
N42307009
N42307009
N42307009
N42307009
X
X
X
X
N42307007
N42307007
N42307007
N42307007
X
X
X
X
N42307007
N42307007
N42307007
N42307007
X
X
X
X
N42307004
N42307004
N42307004
N42307004
X
X
X
X
N42307004
N42307004
N42307004
N42307004
SM-6263A, Rev. 3, November 2010
RAIL Team and Technical Support
7.
RAIL TEAM AND TECHNICAL SUPPORT
The Rapid Action Information Link Team (RAIL Team) is a group of experienced product and
application engineers ready to assist you to resolve any technical issues concerning this product.
Contact the RAIL Team in the United States at 1-800-652-7276 or by e-mail at
[email protected].
SM-6263A, Rev. 3, November 2010
7-1
RAIL Team and Technical Support
End of Manual
7-2
SM-6263A, Rev. 3, November 2010