1
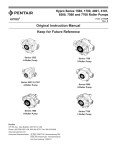
HYPRO
Hypro Series 1502, 1700, 4001, 4101,
6500, 7560 and 7700 Roller Pumps
®
L-0100R
Rev. C
Original Instruction Manual
IN
OUT
Keep for Future Reference
®
Series 1700
5-Roller Pump
®
OUT
IN
Series 1502
6-Roller Pump
®
Series 4001 & 4101
4-Roller Pump
Series 6500
6-Roller Pump
¤
Series 7560
8-Roller Pump
Pentair
375 5th Ave., New Brighton, MN 55112 USA
Phone: (651)766-6300 -OR- 800-424-9776 Fax: 800-323-6496
www.hypropumps.com
Authorized Representative: EC REP QNET BV Hommerterweg 286
6436 AM Amstenrade, The Netherlands
KvK Zuid-Limburg 14091511
Series 7700
7-Roller Pump
Contents
EU Language Manuals . . . . . . . . . . . . . . . . . . . . . . . . . . . . . . . . . . . . . . . . . . . . . . . . . . . . . . . . . . . . . . . .3
Introduction . . . . . . . . . . . . . . . . . . . . . . . . . . . . . . . . . . . . . . . . . . . . . . . . . . . . . . . . . . . . . . . . . . . . . . . . .4
Description . . . . . . . . . . . . . . . . . . . . . . . . . . . . . . . . . . . . . . . . . . . . . . . . . . . . . . . . . . . . . . . . . . . . . .4
Intended Use(s) . . . . . . . . . . . . . . . . . . . . . . . . . . . . . . . . . . . . . . . . . . . . . . . . . . . . . . . . . . . . . . . . . .4
Purpose of Manual . . . . . . . . . . . . . . . . . . . . . . . . . . . . . . . . . . . . . . . . . . . . . . . . . . . . . . . . . . . . . . .4
Misuses . . . . . . . . . . . . . . . . . . . . . . . . . . . . . . . . . . . . . . . . . . . . . . . . . . . . . . . . . . . . . . . . . . . . . . . .5
Pump Identification . . . . . . . . . . . . . . . . . . . . . . . . . . . . . . . . . . . . . . . . . . . . . . . . . . . . . . . . . . . . . . .5
Pump Technical Data . . . . . . . . . . . . . . . . . . . . . . . . . . . . . . . . . . . . . . . . . . . . . . . . . . . . . . . . . . . . . . . . .6
1502
1700
4001
4101
6500
7560
7700
Series
Series
Series
Series
Series
Series
Series
. . . . . . . . . . . . . . . . . . . . . . . . . . . . . . . . . . . . . . . . . . . . . . . . . . . . . . . . . . . . . . . . . .6
. . . . . . . . . . . . . . . . . . . . . . . . . . . . . . . . . . . . . . . . . . . . . . . . . . . . . . . . . . . . . . . . . .7
. . . . . . . . . . . . . . . . . . . . . . . . . . . . . . . . . . . . . . . . . . . . . . . . . . . . . . . . . . . . . . . . .8-9
. . . . . . . . . . . . . . . . . . . . . . . . . . . . . . . . . . . . . . . . . . . . . . . . . . . . . . . . . . . . . . .10-12
. . . . . . . . . . . . . . . . . . . . . . . . . . . . . . . . . . . . . . . . . . . . . . . . . . . . . . . . . . . . . . . . .13
. . . . . . . . . . . . . . . . . . . . . . . . . . . . . . . . . . . . . . . . . . . . . . . . . . . . . . . . . . . . . . .14-16
. . . . . . . . . . . . . . . . . . . . . . . . . . . . . . . . . . . . . . . . . . . . . . . . . . . . . . . . . . . . . . . . .17
Fluid Pumping Applications . . . . . . . . . . . . . . . . . . . . . . . . . . . . . . . . . . . . . . . . . . . . . . . . . . . . . . . .18
Tools . . . . . . . . . . . . . . . . . . . . . . . . . . . . . . . . . . . . . . . . . . . . . . . . . . . . . . . . . . . . . . . . . . . . . . . . .18
Lifting, Transport, and Intermediate Storage . . . . . . . . . . . . . . . . . . . . . . . . . . . . . . . . . . . . . . . .18-19
Assembly and Installation . . . . . . . . . . . . . . . . . . . . . . . . . . . . . . . . . . . . . . . . . . . . . . . . . . . . . . . . . . . . .19
Assembly . . . . . . . . . . . . . . . . . . . . . . . . . . . . . . . . . . . . . . . . . . . . . . . . . . . . . . . . . . . . . . . . . . . . . .19
Installation . . . . . . . . . . . . . . . . . . . . . . . . . . . . . . . . . . . . . . . . . . . . . . . . . . . . . . . . . . . . . . . . . .20-23
Control System(s) . . . . . . . . . . . . . . . . . . . . . . . . . . . . . . . . . . . . . . . . . . . . . . . . . . . . . . . . . . . . . . .23
Commissioning Start-Up, Operation, Shutdown . . . . . . . . . . . . . . . . . . . . . . . . . . . . . . . . . . . . . . . . . . . .23
Information . . . . . . . . . . . . . . . . . . . . . . . . . . . . . . . . . . . . . . . . . . . . . . . . . . . . . . . . . . . . . . . . . . . . .23
Start-Up, Operation, Shutdown . . . . . . . . . . . . . . . . . . . . . . . . . . . . . . . . . . . . . . . . . . . . . . . .24-25
Pumps Equipped with Only DC Motor . . . . . . . . . . . . . . . . . . . . . . . . . . . . . . . . . . . . . . . . . . . . .24
Pumps Equipped with Hydraulic Motor . . . . . . . . . . . . . . . . . . . . . . . . . . . . . . . . . . . . . . . . . . . .25
PTO/Belt Drive/Flexible Coupling . . . . . . . . . . . . . . . . . . . . . . . . . . . . . . . . . . . . . . . . . . . . . . . . .25
Maintenance and Servicing . . . . . . . . . . . . . . . . . . . . . . . . . . . . . . . . . . . . . . . . . . . . . . . . . . . . . . . . . . . .26
Information . . . . . . . . . . . . . . . . . . . . . . . . . . . . . . . . . . . . . . . . . . . . . . . . . . . . . . . . . . . . . . . . . . . . .26
Disposal . . . . . . . . . . . . . . . . . . . . . . . . . . . . . . . . . . . . . . . . . . . . . . . . . . . . . . . . . . . . . . . . . . . . . . .26
Cleaning . . . . . . . . . . . . . . . . . . . . . . . . . . . . . . . . . . . . . . . . . . . . . . . . . . . . . . . . . . . . . . . . . . . . . . .26
Maintenance, Routine Servicing, and Inspection . . . . . . . . . . . . . . . . . . . . . . . . . . . . . . . . . . . . . . .26
Replacement Parts . . . . . . . . . . . . . . . . . . . . . . . . . . . . . . . . . . . . . . . . . . . . . . . . . . . . . . . . . . . .26-35
Series 4001 and 4101 Electric Motor-Driven Pumps . . . . . . . . . . . . . . . . . . . . . . . . . . . . . . . . . .31
Troubleshooting . . . . . . . . . . . . . . . . . . . . . . . . . . . . . . . . . . . . . . . . . . . . . . . . . . . . . . . . . . . . . . . . .36
Repair Instructions . . . . . . . . . . . . . . . . . . . . . . . . . . . . . . . . . . . . . . . . . . . . . . . . . . . . . . . . . . . . . . . .37-38
Declaration of Incorporation . . . . . . . . . . . . . . . . . . . . . . . . . . . . . . . . . . . . . . . . . . . . . . . . . . . . . . . . . . .39
Warranty . . . . . . . . . . . . . . . . . . . . . . . . . . . . . . . . . . . . . . . . . . . . . . . . . . . . . . . . . . . . . . . . . . . .back cover
-2-
EU Language Manuals
DO NOT attempt to install or operate your pump before reading the manual. Original copies of the manual for Hypro
pumps are provided in English. To find a copy in your native language, go to www.hypropumps.com.
Vor dem Ablesen des Handbuches versuchen Sie NICHT, Ihre Pumpe zu installieren. Originale des Handbuches für
Hypro-Pumpen werden auf englisch zur Verfügung gestellt. Zu eine Kopie in Ihrer Muttersprache finden, zu
www.hypropumps.com zu gehen (German)
N'essayez pas d'installer votre pompe avant de lire le manuel. Des exemplaires originaux du manuel pour des pompes
de Hypro sont fournis en anglais. Pour trouver une copie dans votre langue maternelle pour aller à
www.hypropumps.com (French)
NON tentare di installare la vostra pompa prima di leggere il manuale. Esemplare originale del manuale per Hypro
pompe sono in inglese. Per trovare una copia nella vostra lingua andare a www.hypropumps.com (Italian)
Не пытайтесь установить ваш насос до чтения руководства. Оригинальные копии этого руководства для насосы
Hypro на английском языке. Найти копию на ваш родной язык перейти к www.hypropumps.com (Russian)
NO intente instalar su bomba antes de leer el manual. Copias originales del manual para Hypro se provee de bombas
en inglés. Para encontrar una copia en tu idioma nativo ir a www.hypropumps.com (Spanish)
NIE próbować instalować pompy przed jej odczytaniem instrukcji. Oryginalne kopie instrukcji obsługi pomp Hypro są
dostarczane w języku angielskim. Aby uzyskać kopię w twoim ojczystym języku przejdź do www.hypropumps.com
(Polish)
Takmaya çalışmayın okumadan önce pompanın manuel. Orijinal kopyalarını Hypro pompaları için Ingilizce olarak
sunulmuştur. Bir kopyasını bulmak için yerel dil git www.hypropumps.com (Turkish)
Não tente instalar a bomba antes de ler o manual. As cópias originais dos manuais para Hypro bombas são
fornecidos em Inglês. Para encontrar uma cópia em sua língua nativa ir para www.hypropumps.com (Portuguese)
VERGEET NIET uw pomp vóór het lezen van het handboek. Exemplaren van de handleiding voor Hypro pompen zijn
beschikbaar in het Engels. Op zoek naar een exemplaar in uw eigen taal ga naar www.hypropumps.com (Dutch)
-3-
Introduction
Description
Hypro roller pumps are designed for creating and boosting pressure in fluid circuits. The economical rotary-action roller
principle requires no check valves, while providing positive displacement characteristics with less friction and lower
starting torque than other pumps. The pump operates by receiving a fluid through the inlet port where it is captured and
transported by the rollers, and then expelled through the outlet port. Construction features include housings and rollers,
which are made in a variety of materials in order to be resistant to a wide range of chemicals. Standard models of roller
pumps rotate counterclockwise, when looking at the shaft end of the pump. Reverse rotation pumps are available.
Intended Use(s)
Hypro roller pumps are intended for creating or booting dynamic pressure and, depending on the type of body, rotor
and rollers used, will work with a variety of fluids. Hypro roller pumps will work in a variety of environments but they
should never be used to pump liquids above 140°F (60°C) or below 34°F (1°C), or when the ambient air temperature
is above 140°F (60°C). Any uses outside of those specified in this manual are considered misuses and are prohibited.
Contact Hypro technical service about any questions regarding specific acceptable uses.
Purpose of Manual
Hypro has provided this manual to provide instructions and requirements that must be met when installing, using and
maintaining the product(s) identified on the cover.
If the product is sold, the seller must pass this manual on to the new owner.
The following special attention notices are used to notify and advise the user of this product of procedures that may be
dangerous to the user or result in damage to the product.
Attention is used to notify of installation, operation, or maintenance information that is important but not safety related.
This symbol is used to denote the presence of an electrical hazard that may result in personal injury, death, or property
damage.
This symbol is used to denote the presence of a hazard that may result in personal injury, death, or property damage.
California Proposition 65 Warning -- This product and related accessories contain chemicals known to the
State of California to cause cancer, birth defects or other reproductive harm.
-4-
Introduction - cont’d.
Misuses
Hypro roller pumps are designed to operate effectively within the specified speed, pressure and environmental ranges.
Going outside of these ranges will void the warranty and could cause damage to property, serious injury or death.
•
DO NOT run the pump faster than the maximum recommended speed.
•
DO NOT run pumps when the liquid, or ambient air, has exceeded the maximum or minimum temperature limit.
(See Intended Uses)
•
•
•
•
•
•
•
•
DO NOT run the pump higher than the maximum recommended pressure.
DO NOT pump non-approved liquids.
DO NOT pump water or other liquids for human consumption.
DO NOT operate any Hypro pump under the influence of drugs or alcohol.
DO NOT run the pump dry.
DO NOT pump abrasive fluids.
DO NOT exceed the duty cycle for pumps with electric motors.
DO NOT run the pump with a higher than recommended voltage.
Pump Identification
Hypro uses serialized labeling to enable users to precisely identify the pump’s manufacturing date.
Serial Number:
First and second digits: year (12 = 2012)
Third through fifth digits: consecutive day of the year the pump was manufactured.
-5-
Pump Technical Data
(All specifications and performance data are based on water as a carrier fluid.)
1502 Series Pump Only
A
B
K
D
C
Pressure
0 PSI
25 PSI
50 PSI
100 PSI
150 PSI
J
F
I
H
E
G
Performance Data 1502C, 1502N, 1502XL (Imperial)
GPM
HP
GPM
HP
GPM
HP
@540 RPM
@600RPM
@1000RPM
33.1
0.5
36.8
0.7
62.1
2.0
29.7
1.0
33.6
1.2
58.5
3.0
27.8
1.5
31.7
1.7
56.9
3.7
24.3
2.5
28.3
2.8
53.9
5.3
21.0
3.5
25.0
4.0
50.9
7.1
Pressure
0 BAR
1.7 BAR
3.4 BAR
6.9 BAR
10.3 BAR
-6-
Performance Data 1502C, 1502N, 1502XL (Metric)
LPM
HP
LPM
HP
LPM
HP
@540 RPM
@600RPM
@1000RPM
125.3
0.5
139.3
0.7
235.1
2.0
112.4
1.0
127.2
1.2
221.4
3.0
105.2
1.5
120.0
1.7
215.4
3.7
92.0
2.5
107.1
2.8
204.0
5.3
79.5
3.5
94.6
4.0
192.7
7.1
Pump Technical Data
1700 Series Pump Only
A
D
B
K
C
J
F
I
H
G
-7-
E
Pump Technical Data
4001 Series Pump Only
A
D
K
Pump Dimensions
B
E
C
J
F
I
H
G
Pressure
0 PSI
25 PSI
50 PSI
75 PSI
100 PSI
125 PSI
150 PSI
Performance Data 4001C, 4001N, 4001X (Imperial)
GPM
HP
GPM
HP
GPM
HP
@1100 RPM
@1400RPM
@1800RPM
5.5
0.1
7.1
0.1
9.1
0.1
4.9
0.1
6.4
0.2
8.5
0.3
4.4
0.2
5.9
0.3
8.0
0.5
4.1
0.3
5.6
0.4
7.6
0.6
3.8
0.4
5.3
0.6
7.3
0.8
3.5
0.5
5.0
0.7
7.0
1.0
3.3
0.6
4.8
0.8
6.7
1.1
Pressure
0 BAR
1.7 BAR
3.4 BAR
5.2 BAR
6.9 BAR
8.6 BAR
10.3 BAR
-8-
Dim.
Inch
mm
A
4.75
121
B
2.38
61
C
1.67
42
D
3.03
77
E
5.39
137
F
3.34
85
G
1.00
25
H
0.49
13
I
1.43
36
J
2.96
75
K
1.75
45
Performance Data 4001C, 4001N, 4001XL (Metric)
LPM
HP
LPM
HP
LPM
HP
@1100 RPM
@1400RPM
@1800RPM
20.8
0.1
26.9
0.1
34.4
0.1
18.5
0.1
24.2
0.2
32.2
0.3
16.6
0.2
22.3
0.3
30.3
0.5
15.5
0.3
21.2
0.4
28.7
0.6
14.4
0.4
20.1
0.6
27.6
0.8
13.2
0.5
18.9
0.7
26.5
1.0
12.5
0.6
18.2
0.8
25.4
1.1
Pump Technical Data
Motorized
F
A
D
Pump Dimensions
H
G
B
Dim.
Inch
mm
A
5.12
130
B
2.56
65
C
2.54
64
D
5.17 (5.15)
131 (130)
E
3.8
97
E
K C
I
J
F
13.24 (11.91)
336 (302)
G
4.45
113
H
8.79 (7.45)
223 (189)
I
1.5
38
J
2
51
K
2.63
67
Dimensions in ( ) are for 4001-EH
series pumps.
12.0 (Battery)
Engine Off
PSI
0
5
10
15
20
25
30
35
Model 4001N-EH & 4001XL-EH (Imperial)
GPM
AMPS
Volts
PSI
9.4
14.8
0
9.0
16.4
5
13.5
8.6
18.0
10
(Alternator)
8.1
20.1
15
Engine
7.5
23.1
20
Running
6.9
25.3
25
6.1
28.5*
30
5.8
30.3*
---
GPM
10.4
10.3
9.9
9.4
8.9
8.4
7.8
---
AMPS
17.1
17.5
19.0
21.5
23.8
26.8
29.6*
---
Volts
PSI
Model 4001N-E2H & 4001XL-E2H (Imperial)
GPM
AMPS
Volts
PSI
GPM
AMPS
12.0 (Battery)
Engine Off
0
10
20
30
35
40
50
60
9.8
9.1
8.2
7.3
6.8
6.3
5.6
4.9
11.6
14.5
19.5
23.2
25.6
27.8
31.8
36.2**
Volts
8.6
8.0
7.2
6.0
5.6
5.3
4.7
3.9
10.9
13.3
17.5
22.0
24.4
36.1
30.7
35.5
13.5
(Alternator)
Engine
Running
0
10
20
30
35
40
50
60
12.0 (Battery)
Engine Off
BAR
0
0.3
0.7
1.0
1.4
1.7
2.1
2.4
Model 4001N-EH & 4001XL-EH (Metric)
LPM
AMPS
Volts
BAR
35.6
14.8
0
34.1
16.4
0.3
13.5
32.6
18.0
0.7
(Alternator)
30.7
20.1
1.0
Engine
28.4
23.1
1.4
Running
26.1
25.3
1.7
23.1
28.5*
2.1
22.0
30.3*
---
LPM
39.4
39.0
37.5
35.6
33.7
31.8
29.5
---
AMPS
17.1
17.5
19.0
21.5
23.8
26.8
29.6*
---
Volts
BAR
Model 4001N-E2H & 4001XL-E2H (Metric)
LPM
AMPS
Volts
BAR
LPM
AMPS
12.0 (Battery)
Engine Off
0
0.7
1.4
2.1
2.4
2.8
3.5
4.1
37.2
34.3
30.9
27.6
25.6
24.0
21.3
18.7
11.6
14.5
19.5
23.2
25.6
27.8
31.8
36.2**
Volts
*denotes a duty cycle of 66% (40 minutes on, 20 minutes off)
**denotes a duty cycle of 50% (30 minutes on, 30 minutes off)
-9-
32.6
30.2
27.1
22.6
21.0
19.9
17.6
14.8
10.9
13.3
17.5
22.0
24.4
36.1
30.7
35.5
13.5
(Alternator)
Engine
Running
0
0.7
1.4
2.1
2.4
2.8
3.5
4.1
Pump Technical Data
4101 Series Pump Only
A
D
K
Pump Dimensions
B
E
C
J
F
I
H
G
Pressure
0 PSI
25 PSI
50 PSI
75 PSI
100 PSI
125 PSI
150 PSI
Performance Data 4101C, 4101N, 4101XL (Imperial)
GPM
HP
GPM
HP
GPM
HP
@1800 RPM
@2200RPM
@2600RPM
5.0
0.1
6.2
0.1
7.2
0.2
4.8
0.2
5.8
0.3
6.9
0.3
4.5
0.3
5.6
0.4
6.6
0.5
4.2
0.5
5.4
0.6
6.4
0.6
3.9
0.6
5.0
0.7
6.0
0.8
3.7
0.7
4.7
0.8
5.7
0.9
3.4
0.8
4.4
1.0
5.4
1.1
Pressure
0 BAR
1.7 BAR
3.4 BAR
5.2 BAR
6.9 BAR
8.6 BAR
10.3 BAR
- 10 -
Dim.
Inch
mm
A
4.75
121
B
2.38
61
C
1.67
42
D
3.03
77
E
5.39
137
F
3.34
85
G
1.00
25
H
0.49
13
I
1.43
36
J
2.96
75
K
1.75
45
Performance Data 4101C, 4101N, 4101XL (Metric)
LPM
HP
LPM
HP
LPM
HP
@1800 RPM
@2200RPM
@2600RPM
18.9
0.1
23.5
0.1
27.3
0.2
18.2
0.2
22.0
0.3
26.1
0.3
17.0
0.3
21.2
0.4
25.0
0.5
15.9
0.5
20.4
0.6
24.2
0.6
14.8
0.6
18.9
0.7
22.7
0.8
14.0
0.7
17.8
0.8
21.6
0.9
12.9
0.8
16.7
1.0
20.4
1.1
Pump Technical Data
Motorized
F
A
D
K C
Pump Dimensions
H
G
B
E
I
J
Dim.
Inch
mm
A
5.12
130
B
2.56
65
C
2.54
64
D
5.17 (5.15)
131 (130)
E
3.8
97
F
13.24 (11.91)
336 (302)
G
4.45
113
H
8.79 (7.45)
223 (189)
I
1.5
38
J
2
51
K
2.63
67
Dimensions in ( ) are for 4101-EH
series pumps.
**denotes a duty cycle of 50% (30 minutes on, 30 minutes off).
- 11 -
Pump Technical Data
Gas Engine
4101C-25, 4101XL-25 Pump Specifications
Rollers:
4
Max. Flow
Max. Pressure
Rate
(PSI [BAR]):
(GPM [LPM]):
8.9 [33.7]
150 [10.3]
Max RPM
2600
Ports:
” NPT Inlet
& Outlet
Shaft:
Continuous
Operation
(PSI [BAR]):
Intermittent
Operation
(PSI [BAR]):
Dry Weight
(LBS [KG])
Engine
Mounting
Bolts
5/8” Dia.
(Solid)
100 [6.9]
150 [BAR]
29 [13.1]
2.5 HP
4 X 5/1618 UNC
- 12 -
Pump Technical Data
6500 Series Pump Only
A
B
D
C
E
J
F
I
H
Pressure
0 PSI
50 PSI
100 PSI
150 PSI
200 PSI
250PSI
300PSI
G
Performance Data 6500C, 6500N, 6500XL (Imperial)
GPM
HP
GPM
HP
GPM
HP
@540 RPM
@1000RPM
@1200RPM
9.7
0.1
18.2
0.2
21.8
0.3
8.0
0.4
16.5
0.7
20.1
0.9
7.2
0.7
15.4
1.3
19.1
1.5
6.6
1.0
14.7
1.8
18.2
2.1
5.6
1.3
14.0
2.3
17.3
2.8
4.9
1.7
13.4
2.9
16.5
3.5
4.3
1.9
12.7
3.5
15.7
4.2
Pressure
0 BAR
3.4 BAR
6.9 BAR
10.3 BAR
13.8 BAR
17.2 BAR
20.7 BAR
- 13 -
Performance Data 6500C, 6500N, 6500XL (Metric)
LPM
HP
LPM
HP
LPM
HP
@540 RPM
@1000RPM
@1200RPM
36.7
0.1
68.9
0.2
82.5
0.3
30.3
0.4
62.5
0.7
76.1
0.9
27.3
0.7
58.3
1.3
72.3
1.5
25.0
1.0
55.6
1.8
68.9
2.1
21.2
1.3
53.0
2.3
65.5
2.8
18.5
1.7
50.7
2.9
62.5
3.5
16.3
1.9
48.1
3.5
59.4
4.2
Pump Technical Data
7560 Series Pump Only
A
B
D
C
E
J
F
I
H
G
- 14 -
Pump Technical Data
Hydraulic
G
E
H
F
A
C D
I
B
7560C-GM30, 7560N-GM30, 7560XL-GM30 Pump Specifications
Rollers:
Max. Pump
Flow Rate
(GPM [LPM]):
Max. Pump
Pressure
(PSI [BAR]):
Max RPM
8
20.1 [76.1]
300 [20.7]
1000
Ports:
Continuous
Intermittent
Max .
Max. Hydraulic
Hydraulic
Dry Weight
Operation (PSI Operation (PSI
Hydraulic Flow
Pressure
Motor Ports
(LBS [KG])
[BAR]):
(GPM [LPM])
(PSI [BAR]
[BAR]):
- ” NPT Inlet
& Outlet
-10 SAE (7/8"14 UNF)
-1” Hose Barb
included
100 [6.9]
300 [20.7]
13 [5.89]
7560C-GM30, 7560N-GM30, 7560XL-GM30 Performance Data (Imperial)
GPM @ 0 GPM @ GPM @ GPM @ GPM @ GPM @ GPM @ GPM @
Hyd. GPM
PSI
25 PSI
50 PSI
75 PSI
100 PSI 125 PSI 150 PSI 200 PSI
5
9.0
8.5
7.8
7.3
6.7
6.1
5.5
4.4
6
10.5
10.0
9.5
8.9
8.4
7.8
7.3
6.2
7
11.9
11.5
11.0
10.4
9.9
9.4
8.9
7.8
8
13.7
13.1
12.5
12.0
11.5
10.9
10.4
9.4
9
15.2
14.6
14.1
13.6
13.1
12.6
12.1
11.1
10
16.9
16.5
15.9
15.4
14.9
14.3
13.9
12.9
11
18.6
18.2
17.6
17.1
16.6
16.1
15.6
14.7
12
20.1
19.6
19.1
18.6
18.1
17.6
17.1
16.3
Hyd. LPM
20
25
30
35
40
45
LPM @
0 BAR
35.8
42.8
51.8
58.1
67.6
75.3
12 [45.4]
2400 [165.5]
GPM @
250 PSI
3.3
5.2
6.8
8.4
10.0
11.9
13.8
15.3
GPM @
300 PSI
2.2
4.1
5.7
7.3
9.1
11.0
12.9
14.5
7560C-GM30, 7560N-GM30, 7560XL-GM30 Performance Data (Metric)
LPM @
LPM @
LPM @
LPM @
LPM @
LPM @
LPM @
LPM @
2 BAR
4 BAR
6 BAR
8 BAR
10 BAR 12 BAR 14 BAR
16 BAR
33.2
30.5
28.1
25.6
23.4
20.9
18.5
15.8
39.5
36.8
34.0
31.8
29.2
26.2
23.7
21.6
49.0
45.8
43.0
40.3
37.9
35.3
33.3
31.1
55.8
52.7
50.1
47.7
45.5
43.1
40.9
38.8
64.8
62.4
60.0
57.7
55.8
53.4
51.3
48.8
72.7
70.4
68.1
66.0
63.8
61.8
59.8
57.8
- 15 -
Mounting
Bolts
4 X 3/8 or
M10
LPM @ LPM @ 20
18 BAR
BAR
12.6
10.0
18.9
16.4
28.9
26.2
36.3
33.5
46.6
44.1
55.7
53.3
Pump Technical Data
Hydraulic - cont’d.
7560C-GM15, 7560N-GM15, 7560XL-GM15 Pump Specifications
Rollers:
Max. Pump
Flow Rate
(GPM [LPM]):
Max. Pump
Pressure
(PSI [BAR]):
Max RPM
8
20.1 [76.1]
300 [20.7]
1000
Ports:
Continuous
Intermittent
Max.
Max. Hydraulic
Hydraulic
Dry Weight
Operation (PSI Operation (PSI
Hydraulic Flow
Pressure
Motor Ports
(LBS [KG])
[BAR]):
(GPM [LPM])
(PSI [BAR]
[BAR]):
- ” NPT Inlet
& Outlet
-10 SAE (7/8"14 UNF)
-1” Hose Barb
included
100 [6.9]
- 16 -
300 [20.7]
13 [5.89]
6 [22.7]
2400 [165.5]
Mounting
Bolts
4 X 3/8 or
M10
Pump Technical Data
7700 Series Pump Only
A
D
B
K
C
J
H
Pressure
0 PSI
50 PSI
100 PSI
150 PSI
200 PSI
F
II
E
G
Performance Data 7700C, 7700N, 7700XL (Imperial)
GPM
HP
GPM
HP
GPM
HP
@540 RPM
@600RPM
@800RPM
14.2
0.2
15.3
0.3
22.1
0.4
12.9
0.6
14.0
0.6
20.7
0.9
11.9
1.1
13.0
1.2
19.5
1.7
11.2
1.6
12.3
1.8
18.6
2.4
10.3
2.2
11.6
2.4
17.8
3.3
Pressure
0 BAR
3.4 BAR
6.9 BAR
10.3 BAR
13.8 BAR
- 17 -
Performance Data 7700C, 7700N, 7700XL (Metric)
LPM
HP
LPM
HP
LPM
HP
@540 RPM
@600RPM
@800RPM
53.8
0.2
57.9
0.3
83.7
0.4
48.8
0.6
53.0
0.6
78.4
0.9
45.0
1.1
49.2
1.2
73.8
1.7
42.4
1.6
46.6
1.8
70.4
2.4
39.0
2.2
43.9
2.4
67.4
3.3
Fluid Pumping Applications
Pump Materials Compatibility
Application
Weed Control Chemicals
Ni-Resist
Silver Series XL
x
x
x
x
x
x
x
x
x
Insect Control
Brush Control
Pest Control Chemical
and Fumigants
Liquid Fertilizers
Powdered Fertilizers
Fluid Transfer
Acids
x
x - Pump approved for application
The
•
•
•
•
•
•
•
Cast Iron
x
x
x
x
x
Comments
Use with super rollers and viton seals.
When using with Roundup, use super
or polypropylene rollers and Viton
seals. Teflon rollers may be used with
Roundup up to 100 PSI. Only NiResist and Silver series pumps
should be used with Roundup.
All pump, roller and seal combinations
Use super rollers and Viton seals
Use polypropylene rollers and Buna-N seals
Use super rollers or polypropylene
rollers with Buna-N or Viton seals
Use polypropylene or Teflon rollers
with Viton seals. Limit pressure to 100
PSI when using Teflon rollers. DO
NOT use super rollers with acids.
Table 1
following chemicals should never be put through any Hypro pump:
Gasoline (Petrol)
Kerosene/Kerosine (paraffin)
Diesel fuel
Ceramic slurries
Sewage
Potable water
Abrasive fluids
Tools
The Hypro roller pumps and mounting assemblies are designed with Imperial (inch) bolts, however, there are many
metric (mm) sizes which will work with these bolts. In most cases, an adjustable spanner (crescent) wrench can also
be used.
Lifting, Transport and Intermediate Storage
Packaging Descriptions and Unpacking Instructions
• Hypro roller pumps are shipped in cardboard boxes for safe transporting.
• When pumps are shipped in large quantities, they may be put on a pallet to allow for easy storage, lifting and
handling.
• Before lifting any pump or pallet, determine the weight of the item by looking at the attached packing slips to
establish what lifting equipment or method should be used.
• Once the pump is unpacked, dispose of all the packaging in a manner compliant with local and national
regulations.
Lifting Instructions
• Before attempting to lift a Hypro pump, ensure that the surrounding working area is free of hazards which could
cause injury or damage to property.
• During lifting operations, any personnel not involved in the lift should not enter the working area.
• If lifting hooks, rope or chains are being used for a lift, they must be free of damage and be rated to carry 150%
of the weight of the load to be lifted.
- 18 -
Lifting, Transport and Intermediate Storage - cont’d.
•
Always wear steel-toed shoes and cut-resistant gloves when attempting to lift.
• When lifting and carrying, always keep the pump close to your body. (See Figure 1.)
• When starting the lift, bend your knees and keep your back straight. (See Figure 1.) Tightening the stomach
muscles will help keep your back straight.
• During the lift, use your legs to do the work. Never use your back, and make sure your legs are at least shoulderwidth apart. (See Figure 1.)
Figure 1
Transport
• All Hypro pumps are capable of being transported by air, sea, rail or motor vehicle. When the pump is shipped,
ensure that the pump is moved in accordance with local and national laws and is properly secured to prevent
unwanted movement which could cause damage to person or property. Prior to shipping, all fluids should be
removed from the pump.
Storage
• New pumps in their boxes can be stored several years as long as the port plugs are not removed. Once the plugs
have been removed, if the pump is not to be used for an extended period of time (i.e. more than 30 days), the
pump must be winterized as described in the Cleaning section of this manual.
Assembly and Installation
This pump comes completely assembled.
Assembly
Installation
Before attempting to install your Hypro roller pump, it is imperative to read and understand the following:
•
•
•
•
•
•
•
Installation of a Hypro pump should only be performed by a technician having the knowledge and skills
necessary to install the pump without the risk of property damage or personal injury.
When handling Hypro pumps, one should wear steel-toed shoes and protective gloves in order to protect the
feet in the event the pump is dropped and protect the hands from any sharp surfaces on the pump or chemicals.
Pumping systems must be installed in accordance with Hypro installation instructions. Failure to do so will
void your warranty and could cause damage to property, serious personal injury, or death.
Electrical power cables and pump hoses must be routed where there is no risk of personnel tripping, walking
into, or falling because they have been routed in areas where personnel are expected to move. Electrical power
cables and pump hoses should be routed according to local and national standards.
It is the installer’s responsibility that AC electric-drive motors, Hypro pumps, and metalwork of support
structures are bonded to earth (ground), per local and national standards, to prevent a buildup of static electricity.
It is the installer’s responsibility to conduct earth continuity tests between AC electric-drive motors, Hypro
pumps, and metalwork of support structures and earth according to EN60204-1:2006/A1:2009, or its superseding
standard, to confirm that all components that need to be connected to earth are satisfactorily bonded.
It is the installer’s responsibility to conduct electrical tests in accordance with EN60204-1:2006/A1:2009, or
its superseding standard, on finished pump assemblies.
- 19 -
Assembly and Installation - cont’d.
• All connections to electrical components must be number, symbol, or color coded generally as recommended by
EN60204-1:2006/A1:2009, or its superseding standard.
•
•
•
Installers must provide hydraulic components that are capable of withstanding maximum source pressure.
The working pressure must be controlled by a pressure relief valve that is adjusted to operate at a maximum
pressure of the hydraulic motor.
For pumps with gas engines, the exhaust must be directed away from operator and anyone standing nearby
to ensure that exhaust fumes do not enter their breathing zone.
• If a rigid plumbing system is to be used on a Hypro roller pump, the system must be properly aligned with the
inlet and outlet ports.
•
•
•
•
•
The working pressure must be controlled by a pressure relief valve that is adjusted to operate at 10% of the
maximum system pressure.
When installing, adjusting or removing a Hypro roller pump, ensure that there are no objects which can fall
on the installer and make certain that all machinery to which the pump is to be attached is turned off.
Pumps must be installed in a location where they are accessible for any necessary maintenance.
When a main electrical supply is needed to power electric-drive motors, installers are responsible for
ensuring that a supply disconnect device, capable of isolating the machine from its electricity supply, be provided.
When hydraulic power is used, the system should contain a quick disconnect coupling that can be broken to
isolate the pump.
Standard Mounting
In order to prevent injury or damage to property, all Hypro pumps should be properly mounted to a solid base where
there is no danger of the pump falling or breaking loose. All Hypro pumps come with mounting holes, which allow bolts
to be put into the pump so it can be secured to a sturdy base. When mounting your Hypro roller pump, be sure to use
bolts and nuts which are compatible with any chemicals that may come into contact with them as well as choosing the
correct grade of bolt based on the pump weight and any expected loads.
Tractor PTO Installation
The preferred method for mounting the torque arm (3430-0540) and pump to a tractor is with the chains going up to
provide support for the pump (see Figure 2).
1.
2.
3.
4.
Attach the torque arm to the pump with the long side of the arm on the inlet side of the pump for mounting.
Mount the pump and torque arm to the PTO shaft using a Hypro series 1320, 1321 or 1323 coupler.
Attach the torque chain to the tractor frame with arm in horizontal position.
Attach the tensioning chain to the tractor frame while applying tension to the spring.
Do not attach torque arm to movable linkages.
Personnel should never be within 3 meters (9 ft.) of the pump while in operation.
Figure 2
- 20 -
Assembly and Installation - cont’d.
Belt/Pulley Drive Installation
Belt and pulley drive systems are typically used to reduce pump speed. For determining proper pulley sizes, use the
formula below as a guideline and use “A” or “B” section belts.
MOTOR RPM
PUMP RPM
=
FLOW (@ RATED SPEED)
FLOW (DESIRED)
=
PUMP PULLEY DIA.
MOTOR PULLEY DIA.
Example:
Use a 1725 RPM electric motor to drive a pump at 950 RPM.
Typically, a pulley diameter on the motor is 3.4 inches. The pump pulley diameter can be determined from the formula
above:
1725 RPM
Pump Pulley Diameter
=
950 RPM
3.4 inches
Solving this equation for the Pump Pulley diameter yields:
1725 RPM x 3.4 inches = 6.2 inches
950 RPM
(1 inch = 2.54cm)
1. Install pulley or bushing/sheave combination onto pump and motor shaft. Mount pump next to the motor making
sure pulleys are lined up properly. (See Figure 3 for proper pump and motor orientation.) Use a straight edge as
shown (Figure 4). Rotate to check for run-out and bent shafts and replace if found.
Figure 4
Figure 3
2. Make sure belts have proper tension - belts too tight will cause bearing wear and belts too loose will cause
slipping (See Figure 5).
Push the belt midway between the pulleys,
check the deflection (d) and adjust:
d = 0.016 x L
Figure 5
Direct Drive-Flexible Coupling
When direct driving Hypro roller pumps with flexible couplings, make sure that the speed (rpm) of the gas engine or
electric motor is within the maximum rated rpm of your pump (see performance tables). Also make sure that shaft
rotation is correct between the pump and the motor or gas engine (see Figure 6).
1. Mount motor or engine into position on base.
2. Line up pump shaft with straight edge as shown in Figure 6 to assure they are aligned. Shim pump, if
necessary, to match shaft height of engine or motor. Shaft ends should not touch.
3. Mark exact position of pump on base - remove and install coupling halves on both shafts. Place coupling center
disc into one of the coupling halves.
4. Reposition pump, sliding coupling halves together.
ATTENTION: No end thrust should be applied to pump when coupling is connected.
5. Tighten pump mounting; then tighten the set screws on each coupling.
- 21 -
Assembly and Installation - cont’d.
Figure 6
System Installation
ATTENTION: Use only pipe, fittings, accessories, hose, etc. rated for the maximum pressure rating of the pump.
1. Select adequate size drive unit to avoid overloading. Avoid unnecessary restrictions in the line such as elbows,
check valves, and all extraneous curves and bends.
2. Avoid using looped sections of tubing or pipe which might permit air to become trapped.
3. Use pipe joint sealant on pipe threads to assure watertight connections, and ensure that the sealant used is
compatible with any chemicals which will be pumped.
4. Selection of the right size and type of hose is vital for good performance. Be sure to hook up to the proper
ports on the pump (note markings “IN” and “OUT” on pump label).
a. Always use a suction hose compatible with the fluids being pumped and at least the same inside diameter
as pump ports. If the suction hose is over 5 feet long, use one size larger hose. Keep the suction hose as
short as possible and restrictions such as elbows, check valves, etc. at a minimum.
Attention: Suction lift not to exceed 3 feet.
b. High pressure pumps require the use of special high pressure discharge hose. Use a hose rated at least
50% greater than the highest operating pressure of pump. Example: If required pump pressure is 300 psi
[20.7 Bar], use hose rated at minimum of 450 psi [31.0 Bar] working pressure.
5. Use a suction line strainer with at least 3 to 5 times the suction port area in open screen area. Be sure the
screen is suitable for the liquid being pumped. The mesh should be appropriate for the nozzle tip to be used,
to avoid clogging.
Never attach an agitator or any restriction to a bypass line of a pressure relief device because system damage
may occur.
Figure 7
Typical System Installation
Bypass Line
Pump
Pressure
Relief
Valve
Strainer
Pressure Regulator
ELECTRICAL HOOK-UP FOR UNITS SUPPLIED WITH DC MOTOR
The motor must be fused to protect the electrical system. Use a 35-amp slow-blow fuse or circuit breaker for -EH
pumps and a 45-amp slow-blow fuse or circuit breaker for -E2H pumps.
The motor lead wires are identified by color with (+) being red and (-) being negative. For proper pump rotation, the
connections should be made as follows:
• Positive Motor Lead (+) to Positive Power Lead (Red, +).
• Negative Motor Lead (-) to Negative Power Lead (Black, -).
- 22 -
Assembly and Installation - cont’d.
ON/OFF TOGGLE SWITCH INSTALLATION
ON/OFF Toggle Switch
See Figure 8.
1. The ON/OFF switch must be rated at or above 40 amps
for -EH pumps and at or above 50 amps for -E2H pumps.
2. If additional lead wire is required, use 10 gauge or larger
wire.
3. Performance may be improved by shortening the motor
lead wires. Minimize wire length where possible.
Slow-blow Fuse
or circuit breaker
12-volt
Battery
Figure 8
Hooking up the Hydraulic Motor to the Tractor Hydraulic System
Hypro Series 7560 hydraulic motor-driven pumps can be mounted on either the tractor or sprayer. When hooking up,
make sure that no dirt or liquid gets into the hydraulic motor. Keep all hydraulic connections clean. Series 7560
pumps utilize gear motor technology for high torque capacity and premium efficiency. Be sure to connect the hydraulic
motor into the system correctly by putting the pressure line to the (IN) port and return line to the (OUT) port. For
maximum performance, hose should be at least 1/2” (12.7mm). Be sure return line is appropriately sized and free of
restrictions.
Control System(s)
• All pump systems with electric or hydraulic power sources are required to have a control system which meets all
local and national standards.
•
Overload and short-circuit protection devices should open at a current that is 10% higher than the normal
load current.
• For more detail on a typical system installation, see the preceding subsections of the “Assembly and Installation”
section of this manual.
Commissioning Start-Up, Operation, Shutdown
Before attempting to start your pump, the following must be understood and followed to ensure safe operation.
•
•
•
•
•
•
•
•
•
Information
Only authorized operators having the knowledge and skill necessary to safely use a Hypro pump, or any
equipment the pump is connected to, may run the pump.
When running Hypro roller pumps, it is essential that operators use hearing protection as the sound levels
can reach levels of 80 decibels.
When handling Hypro pumps, wear steel-toed shoes and protective gloves in order to protect the feet in the
event the pump is dropped and protect the hands from chemcials or any sharp surfaces on the pump.
When spraying manually, chemical-resistant facemasks and clothing should be worn to prevent any
chemicals from coming into contact with the skin or being inhaled.
When spraying manually, always spray downwind of yourself as long as the sprayed chemical will not drift
into the vicinity of other people.
•
When installing, adjusting or removing a Hypro roller pump, ensure that there are no objects which can fall
onthe installer, and make certain that all machinery to which the pump is to be attached is turned off.
Hypro roller pumps should only be used on tractors or tow-behind spray platforms which have electricallyconductive tires, in order to reduce the risk of electrocution.
Never operate a Hypro roller pump outside while there is a chance of getting struck by lightning.
•
Never leave electrical wires or plumbing components where they can be a tripping hazard or become
entangled in a moving component. Ideally, electrical cables, hoses, pipes and fittings should be routed overhead.
In the event electrical wiring must be routed over, the ground operators are required to use rubber ramps if they
cross a gangway.
- 23 -
Commissioning Start-Up, Operation, Shutdown - cont’d.
• If users of a Hypro roller pump are using a PTO shaft, flexible coupling or belt drive, they are required to use CEapproved PTO shafts and guards.
•
Hypro roller pumps should not be used if the ambient light is below 200lux.
•
For roller pumps which use gas engines, the user should always ensure the exhaust is properly attached to
the engine and is not leaking.
Only use approved chemicals in your pump. For a complete list of approved chemicals, see the “Fluid
Pumping Applications” section. Failure to follow this warning will void your warranty and could lead to
property damage, serious injury or death.
Before Starting the Pump
Start-Up, Operation, Shutdown
• Ensure all unnecessary personnel are clear of the area.
• For initial setup and test of your system, it is recommended to start with clean water instead of chemicals, and
confirm the system and plumbing connections are leak free.
• Ensure that there is fluid in the source tank or supply line. Do not run dry.
• Check line strainer for debris or clogs. Remove any found.
• Check all plumbing connections to make sure they are tight.
• Check power source and connections.
• Check that all valves and regulators are set to the desired setting and are functioning properly.
• Ensure all hoses are properly positioned and are not damaged in any way.
• Ensure PTO shaft shields are in place and are not loose.
Priming the Pump
To help prime the pump, keep the inlet or suction line as short as possible with a minimum of bends, elbows and kinks.
Make sure all connections are tight and do not leak air. Make sure line strainer is free of debris. If pump does not selfprime, disconnect suction hose, fill with water and reconnect to liquid source. Often a squirt of oil into the ports of the
pump will seal clearances and help with priming.
Pumps Equipped with Only DC Motor
Startup and Operation
Prior to operation, make sure all discharge lines and hoses are secure, and not frayed, and there are no personnel
close to the pump. Make sure the tank valve / inlet line to the pump is open.
To start the pump, turn on main power switch to start the motor. Make sure pump is primed before proceeding. Adjust
pressure to reach desired spray output.
Duty Cycle
Duty cycle is the ratio of motor-on time to total cycle time in one hour. It is used to determine the acceptable level of
running time so that the thermal limits of the motor are not exceeded. Use the following equation and example to
determine Duty Cycle:
Duty Cycle = ON TIME / [Cycle ON TIME + (60 Minutes - Cycle ON TIME)] * 100.
(ON TIME cannot exceed 60 minutes.)
An example of a 75% Duty Cycle Motor is = 45/ [45+ (60-45)]*100 = 75% or 45 minutes on time per hour of operation
at maximum rated pressure and flow. ON TIME can be extended by reducing the maximum pressure the pump
operates at.
Duty cycle is affected by ambient temperature. If operating in extremely hot environments, duty cycles will decrease.
Do not run DC electric motors to an external operating temperature over 175º F (80º C), or the motor life will be
compromised.
Shutdown
To shut down the unit, first turn the switch or power supply off, then close all valves. If the pump will not be used for
several hours, it must be cleaned in accordance with the “Cleaning” section of this manual.
- 24 -
Start-Up, Operation, Shutdown - cont’d.
Pumps Equipped with Hydraulic Motor
Startup and Operation
Open Center Systems
The 7560 series pump hydraulic motors are not equipped, from the factory, with a bypass for excess hydraulic flow in a
given system. In situations where the hydraulic system has more flow than the motor is rated for, an external bypass
must be mounted to the hydraulic lines. Failure to restrict the pump to these levels may result in leaks and premature
pump failure. To plumb the hydraulic motor into an open center hydraulic system that is not sized to the 7560 pump
requirements, follow these installation instructions:
1. Ensure there is a bypass valve in the high pressure hydraulic line. Route bypass flow either to the return line or
directly back to tank.
2. Prime the pump as above with all valves open.
3. Open hydraulic bypass all the way. Start hydraulic system and allow oil to circulate for approximately 10 to 15
minutes or until adequately warmed to 135°F (57°C).
When operating a Hypro pump with a hydraulic motor, the maximum allowable temperature of the hydraulic fluid
passing through the motor is 135°F (57°C).
4. Gradually close the hydraulic bypass valve until the pump reaches the desired pressure or flow.
5. Lock down the system hydraulic bypass valve in this position. DO NOT let the pump exceed its maximum
pressure or flow. Failure to restrict the pump to these levels may result in leaks and premature failure.
Closed Center (Load Sensing) Systems
1. Set the system hydraulic flow control valve for minimum hydraulic oil flow to the remote outlet (Tortoise position).
2. Prime the pump as above with all valves open.
3. Start the hydraulic system and allow the hydraulic oil to circulate for approximately 10 to 15 minutes or until
adequately warmed to 135°F (57°C).
When operating a Hypro pump with a hydraulic motor, the maximum allowable temperature of the hydraulic fluid
passing through the motor is 135°F (57°C).
4. Increase system hydraulic flow until pump reaches desired pressure or flow.
5. Lock down the system hydraulic bypass valve in this position. DO NOT let the pump exceed its maximum
pressure or flow. Failure to restrict the pump to these levels may result in leaks and premature failure.
Shutdown
Standard spool valves, which are found on all tractor hydraulic systems, may cause potentially damaging high peak
pressures in the hydraulic system when closed because of abrupt shut-off of oil flow in both the supply and return lines.
When shutting off the pump, move the selector to the FLOAT position to allow the pump to come to a stop gradually. If
pump will not be used for several hours, it must be cleaned in accordance with the “Cleaning” section of this manual.
PTO/Belt Drive/Flexible Coupling
Startup and Operation
1. Prime the pump as described above with all valves open.
2. Start PTO/ Gas Engine/or Flexible coupling. If possible, slowly increase the RPM until the desired flow or
pressure is reached. DO NOT let the pump exceed its maximum pressure or flow. Failure to restrict the pump to
these levels may result in leaks and premature failure.
Shutdown
Slowly decrease RPM until the pump comes to a stop, and then close all valves in the system. If pump will not be used
for several hours, it must be cleaned in accordance with the “Cleaning” section of this manual.
- 25 -
Maintenance and Servicing
•
•
•
•
•
•
Information
All maintenance should be done when machinery is stationary and has been isolated from its energy
sources. It is dangerous to perform maintenance while machinery is still connected to its power source. Machinery
should be isolated from its electrical, hydraulic, shaft driven, or gas engine power source.
Be sure to release all pressure from the system before performing any sort of maintenance on a Hypro pump.
DO NOT perform service or maintenance to the pump, or attached components, until the pump unit is
below 109°F (43°C).
The lubrication of this pump unit has been done at the factory prior to shipping.
When handling Hypro pumps, wear steel-toed shoes and protective gloves in order to protect your feet in the
event the pump is dropped and protect yours hands from chemicals or any sharp surfaces on the pump. If the
pump is being repaired while the pump is in service, eye protection should also be worn.
Any hazardous liquids should be disposed of in a manner which complies with local and national regulations.
Never dump fluids onto the ground.
Disposal
When disposing of a Hypro pump, be sure to remove all fluids from the pump before scrapping. These fluids should be
disposed of in a manner which complies with local and national regulations. Never dump fluids onto the ground. Once
the pump is free of all fluids, it must be scrapped in accordance with local and national laws.
Cleaning
Your pump will last longer and give best performance when properly taken care of. Proper pump care depends on the
liquid being pumped and when the pump will be used again. After each use, flush pump with a neutralizing solution for
the liquid just pumped. Follow with a clean water rinse. This is especially important for corrosive chemicals. It is good
practice to clean the pump after each use to prevent deposits from forming and damaging the pump. For infrequent
use and before long periods of storage, drain pump thoroughly. Open any drain plugs, remove suction hose from
liquid, and blow pump dry with air. An antifreeze/rust inhibitor should be injected into the pump before both ports are
plugged and the pump is stored. Plug all ports to keep out air until pump is used again.
Maintenance, Routine Servicing, and Inspection
Preventative Maintenance Checklist
Check
Belt Tension
Clean Filters
Water Leaks
Plumbing
Daily
X
X
X
Weekly
X
• Each system’s maintenance cycle will be exclusive. If system performance decreases, check immediately.
• Duty cycle, temperature, quality and type of fluid being pumped, and inlet feed conditions all affect the life of
pump, motor components, and service cycle.
Replacement Parts
The following drawings show the pumps and their replacement parts.
Only genuine replacement parts should be used. Failure to follow this warning can result in damage to
property, serious injury or death. If the pump malfunctions or is defective, it should be sent back to Hypro for
service.
- 26 -
Parts Illustration
Series 1502
9
8
3
11
1
4
2
1
12
7
6
5
2
6A
10
7
IMPORTANT:
When ordering parts, give PART
NUMBER and PART DESCRIPTION.
Reference Numbers are used ONLY
to point out parts in the drawing and
are NOT to be used as ordering
numbers.
Ref. Qty. Part
No. Req'd. Number
1
2
2
3
4
4
4
5
6
6
6
6A
6A
6A
2
2
2
6
1
1
1
1
1
1
1
1
1
1
2008-0001
2112-0001
2112-0003
2210-0026
0200-1500C
0200-1500N
0200-1500X
1720-0003
0300-1502C
0300-1502N
0300-1502X
0301-1502C
0301-1502N
0301-1502X
Description
Sealed Ball Bearing
Buna-N Seal (Standard)
Viton Seal (Optional) (Std. for SilverCast)
Bolt
Endplate (Cast Iron) with Seal
Endplate (Ni-Resist) with Seal
Endplate (SilverCast) with Seal
O-ring Gasket for Endplate
Rotor (Cast Iron) with shaft (Std. Rotation)
Rotor (Ni-Resist) with shaft (Std. Rotation)
Rotor (SilverCast) with shaft (Std. Rotation)
Rotor (Cast Iron) w/shaft (Reverse Rot.)
Rotor (Ni-Resist) w/shaft (Reverse Rot.)
Rotor (SilverCast) w/shaft (Reverse Rot.)
Repair Parts Kit No. 3430-0383 (Universal) Consists of: (6) Ref. 8
Super Rollers, (1) Ref. 5 O-Ring Gasket, (1) O-ring Gasket (not shown),
and (2) Ref. 2 Viton Seals.
Repair Parts Kit No. 3430-0386 Consists of: (6) Ref. 8 Super Rollers,
(1) Ref. 5 O-Ring Gasket, and (2) Ref. 2 Viton Seals.
Repair Parts Kit No. 3430-0387 Consists of: (6) Ref. 8 Super Rollers,
(1) Ref. 5 O-Ring Gasket, and (2) Ref. 2 Buna-N Seals.
Repair Parts Kit No. 3430-0162 Consists of: (6) Ref. 8 Polypropylene
Rollers and (1) Ref. 5 O-Ring Gasket.
Ref. Qty. Part
No. Req'd. Number
7
8
8
8
9
9
9
1
6
6
6
1
1
1
1610-0005
1005-0005
1002-0005
1055-0005
0100-1500C
0100-1500N
0100-1500X
10
1 kit
3420-0004
11
12
1
1
2300-0020
2300-0022
Description
Key
Super Roller (Standard)
Polypropylene Roller (Optional)
Teflon Roller (Optional)
Body (Cast Iron) with Seal
Body (Ni-Resist) with Seal
Body (SilverCast) with Seal
Base Kit — Sold Separately
Includes: (1) Base, (4) Bolts and
(4) Lockwashers
Bearing Cover
Shaft Bearing Cover
Repair Parts Kit No. 3430-0164 Consists of: (6) Ref. 8 Polypropylene
Rollers, (1) Ref. 5 O-Ring Gasket, and (2) Ref. 2 Viton Seals.
Repair Parts Kit No. 3430-0163 Consists of: (6) Ref. 8 Polypropylene
Rollers, (1) Ref. 5 O-Ring Gasket, and (2) Ref. 2 Buna-N Seals.
Repair Parts Kit No. 3430-0406 Consists of: (6) Ref. 8 Super Rollers,
(1) Ref. 5 O-Ring Gasket, (2) Ref. 2 Viton Seals and (2) Ref. 1 Sealed
Ball Bearing.
- 27 -
Parts Illustration
Series 1700
9
8
3
11
1
4
5
2
1
12
7
6
2
6A
10
7
IMPORTANT:
When ordering parts, give PART
NUMBER and PART DESCRIPTION.
Reference Numbers are used ONLY
to point out parts in the drawing and
are NOT to be used as ordering
numbers.
Ref. Qty. Part
No. Req'd. Number
1
2
2008-0001
Sealed Ball Bearing
4
4
4
5
1
1
1
1
0200-1700C
0200-1700N
0200-1700X
1720-0099
Endplate (Cast Iron) with Seal
Endplate (Ni-Resist) with Seal
Endplate (SilverCast) with Seal
O-ring Gasket for Endplate
2
2
3
6
6
6
6A
6A
6A
2
2
6
1
1
1
1
1
1
2112-0003
2112-0001
2210-0005
0300-1700C
0300-1700N
0300-1700X
0301-1700C
0301-1700N
0301-1700X
Ref. Qty. Part
No. Req'd. Number
Description
7
8
8
8
9
9
9
Viton Seal (Standard)
Buna-N Seal (Optional)
Bolt
Rotor (Cast Iron) with shaft (Std. Rotation)
Rotor (Ni-Resist) with shaft (Std. Rotation)
Rotor (SilverCast) with shaft (Std. Rotation)
Rotor (Cast Iron) w/shaft (Reverse Rot.)
Rotor (Ni-Resist) w/shaft (Reverse Rot.)
Rotor (SilverCast) w/shaft (Reverse Rot.)
Repair Parts Kit No. 3430-0437 Consists of: (5) Ref. 8 Super Rollers,
(1) Ref. 5 O-Ring Gasket, and (2) Ref. 2 Viton Seals.
Repair Parts Kit No. 3430-0383 (Universal) Consists of: (6) Ref. 8
Super Rollers, (1) Ref. 5 O-Ring Gasket, (1) O-ring Gasket (not shown),
and (2) Ref. 2 Viton Seals.
Repair Parts Kit No. 3430-0160 Consists of: (5) Ref. 8 Polypropylene
Rollers and (1) Ref. 5 O-Ring Gasket, and (2) Ref. 2 Buna-N Seals.
10
11
12
1
5
5
5
1
1
1
1 kit
1
1
1610-0005
1005-0005
1002-0005
1055-0005
0100-1700C
0100-1700N
0100-1700X
3420-0010
2300-0020
2300-0022
Description
Key
Super Roller (Standard)
Polypropylene Roller (Optional)
Teflon Roller (Optional)
Body (Cast Iron) with Seal
Body (Ni-Resist) with Seal
Body (SilverCast) with Seal
Base Kit — Sold Separately
Includes: (1) Base and (4) Bolts
Bearing Cover
Shaft Bearing Cover
Repair Parts Kit No. 3430-0161 Consists of: (5) Ref. 8 Polypropylene
Rollers and (1) Ref. 5 O-Ring Gasket, and (2) Ref. 2 Viton Seals.
Repair Parts Kit No. 3430-0407 Consists of: (5) Ref. 8 Super Rollers,
(1) Ref. 5 O-Ring Gasket, (2) Ref. 2 Viton Seals and (2) Ref. 1 Sealed
Ball Bearing.
- 28 -
Parts Illustration
Series 4001 and 4101
15 16
5
3A
8
1
18
20
19
14
9
8
2
17
6
13
9
5
12
3
10
7
Ref. Qty. Part
No. Req'd. Number
1
1
1
1
1
1
2
2
2
2
2
2
3
3
3
3
1
1
1
1
1
1
1
1
1
1
1
1
1
1
1
1
3A
1
5
5
5
6
7
4
4
4
1
4
3A
1
0100-4001C
0100-4101C
0100-4001N
0100-4101N
0100-4001X
0100-4101X
0200-4001C
0200-4101C
0200-4001N
0200-4101N
0200-4001X
0200-4101X
0300-4001C
0300-4101C
3430-0765
3430-0766
3430-0780
3430-0781
1005-0002
1002-0002
1055-0002
1720-0104
2220-0018
11
Ref. Qty. Part
No. Req'd. Number
Description
Body (Cast Iron) with Std. Seal (4001)
Body (Cast Iron) with Std. Seal (4101)
Body (Ni-Resist) with Std. Seal (4001)
Body (Ni-Resist) with Std. Seal (4101)
Body(SilverCast) with Std. Seal (4001)
Body(SilverCast) with Std. Seal (4101)
8
8
8
9
Endplate (Cast Iron) with Std. Seal (4001)
Endplate (Cast Iron) with Std. Seal (4101)
Endplate (Ni-Resist) with Std. Seal (4001)
Endplate (Ni-Resist) with Std. Seal (4101)
Endplate (SilverCast) with Std. Seal (4001)
Endplate (SilverCast) with Std. Seal (4101)
Rotor (Cast Iron) & Shaft Assembly (4001)
Rotor (Cast Iron) & Shaft Assembly (4101)
Rotor Assembly (Std. 4001 Ni-Resist & XL)
Rotor Assembly (Std. 4101 Ni-Resist & XL)
Rotor Assembly (Hollow Shaft 4001
Ni-Resist & XL)
Rotor Assembly (Hollow Shaft 4101
Ni-Resist & XL)
Repair Parts Kit No. 3430-0390 Consists of: (4) Ref. 5 Super Rollers,
(1) Ref. 6 O-Ring Gasket, (2) Ref. 8 Viton Seals.
2107-0002
2102-0001
2102-0001T
2000-0010
10
1
3420-0024
11
1
3420-0025
12
1 kit
1320-0016
When ordering parts, give PART
NUMBER and PART DESCRIPTION.
Reference Numbers are used ONLY
to point out parts in the drawing and
are NOT to be used as ordering
numbers.
Description
Viton Seal (Std.)
Buna-N Seal (Optional)
Teflon Coated Buna-N Seal (Optional)
Ball Bearing (High temp. grease)
Base Kit — Sold Separately
Includes: 1 Base, 2 Bolts, and 2 Lock
washers for mounting pump to electric
motors with 3-1/2" shaft centerline
Base Kit — Sold Separately
Includes: 1 Base, 2 Bolts, and 2 Lock
washers for mounting pump to electric
motors/gas engines with 4-3/16" shaft
centerlines
12
1 kit
1320-0015
Adapter with 4 set screws for gas engine
mount (5/8" x 5/8") — Sold Separately
Adapter (5/8" x 3/4") — Sold Separately
17
18
19
20
1
2
2
2
1510-0054
1450-0003
2210-0003
2260-0002
Base — Sold Separately
Bumper — Sold Separately
Bolt — Sold Separately
Lock Washer — Sold Separately
13
14
15
16
Super Rollers (Std.)
Polypropylene Rollers (Optional)
Teflon Rollers (Optional)
O-Ring Gasket for Endplate
Endplate Screw
2
2
2
2
IMPORTANT:
1
1
1
1
2300-0023
2300-0021
1420-0001
2230-0001
Shaft Bearing Cover
Bearing Cover
Locking Collar
Set Screw
Repair Parts Kit No. 3430-0158 Consists of: (4) Ref. 5 Polypropylene
Rollers, (1) Ref. 6 O-Ring Gasket, (2) Ref. 8 Viton Seals.
- 29 -
Parts Illustration
Models 4101C-25 and 4101XL-25
6
3
2
4
5
1
10
7
15
Ref. Qty. Part
No. Req'd. Number
1
1
2
2
1
1
1320-0016
19209
2210-0166
2270-0041
2549-0043
2840-0084
Adapter and Kit
Key 3/16 x 1-1/2”
Hed Head Capscrew
Washer
Engine: 2.5 HP PowerPro
Shield
10
11
12
13
14
15
4
1
2
2
4
1
1005-0002
1720-0104
2000-0010
2107-0002
2220-0018
2300-0021
Super Rollers
O-ring Gasket for Endplate
Ball Bearing
Viton Seal
Socket Head Screw
Bearing Cover
16
1
1
1
1
1
1
1
0100-4101C
0100-4101X
0200-4101C
0200-4101X
0300-4101C
3430-0766
2300-0023
13
14
11
IMPORTANT:
Description
1
2
3
4
5
6
7
7
8
8
9
9
12
8
9
When ordering parts, give PART
NUMBER and PART DESCRIPTION.
Reference Numbers are used ONLY to
point out parts in the drawing and are
NOT to be used as ordering numbers.
Repair Parts Kit No. 3430-0390 Consists of: (4) Ref. 10 Super Rollers,
(1) Ref. 11 O-Ring Gasket, (2) Ref. 13 Viton Seals.
Body (Cast Iron) with Seal
Body (SilverCast) with Seal
Endplate (Cast Iron) with Seal
Endplate (SilverCast) with Seal
Rotor & Shaft Assembly (Cast Iron)
Rotor Assembly (SilverCast)
Bearing Cover w/Hole
- 30 -
Parts Illustration
Series 4001 and 4101 Electric Motor-Driven Pumps
When ordering parts, give QUANTITY, PART
NUMBER, DESCRIPTION and COMPLETE
MODEL NUMBER. Reference numbers are used
ONLY to identify parts in the drawing and are
NOT to be used as order numbers.
9
5
1
15
14
16
2
8
10
11
4
Ref.
No.
Qty.
Req'd
2
2
1
1
1
1
1
1
3
3
3
3
4
5
5
5
6
7
8
1
1
1
1
1
1
1
1
1
2
2
2
4
1
1
1
5
6
3
7
Part
Number
Description
2570-0013
2570-0015
Electric Motor (12 vdc, .33 hp) (gold)
Electric Motor (12 vdc, .39 hp) (black)
0100-4001N
0100-4101N
0100-4001X
0100-4101X
0200-4001N
0200-4101N
0200-4001X
0200-4101X
2300-0021
2107-0002
2102-0001
2102-0001T
2220-0018
1720-0104
3430-0780
3430-0781
Ref.
No.
Qty.
Req'd
10
11
12
13
1
2
2
2
9
9
9
Body (Ni-Resist) with Std. Seal (4001)
Body (Ni-Resist) with Std. Seal (4101)
Body (Silvercast) with Std. Seal (4001)
Body (Silvercast) with Std. Seal (4101)
Endplate (Ni-Resist) Std. Seal (4001)
Endplate (Ni-Resist) Std. Seal (4101)
Endplate (Silvercast) Std. Seal (4001)
Endplate (Silvercast) Std. Seal (4101)
Bearing Cover
Viton Seal (Standard)
Buna-N Seal (Optional)
Teflon-Coated Buna-N Seal (Optional)
13
12
14
15
16
Endplate Screw
O-ring Gasket for Endplate
Rotor Assembly (Std. 4001 Ni-Resist & XL)
Contains: rotor, shaft and pin
Rotor Assembly (Std. 4101 Ni-Resist & XL)
Contains: rotor, shaft and pin
4
4
4
2
1
1
1
1
1
1
Part
Number
Description
1510-0054
2260-0002
2210-0003
1450-0003
Base
Lock Washer
Bolt
Bumper
1005-0002
1002-0002
1055-0002
2000-0010
1420-0001
2230-0001
4001N-H
4001XL-H
4101N-H
4101XL-H
Super Rollers (Standard)
Polypropylene Rollers (Optional)
Teflon Rollers (Optional)
Ball Bearing
Locking Collar
Set Screw
Complete Roller Pump Assy (Not Shown)
Complete Roller Pump Assy (Not Shown)
Complete Roller Pump Assy (Not Shown)
Complete Roller Pump Assy (Not Shown)
Repair Parts Kit No. 3430-0390 Consists of: (4) Ref. 9 Super Rollers,
(1) Ref. 7 O-Ring Gasket, (2) Ref. 5 Viton Seals.
Repair Parts Kit No. 3430-0158 Consists of: (4) Ref. 9 Polypropylene
Rollers, (1) Ref. 7 O-Ring Gasket, (2) Ref. 5 Viton Seals.
- 31 -
Parts Illustration
Series 6500
2
3
10
9
11
2
1
3
4
5
6
7
Repair Parts Kits:
No. 3430-0380 Consists of (6) Ref. 7
Super Rollers, (1) Ref. 6 O-ring, and
(2) Ref. 3 Viton seals.
IMPORTANT:
When ordering parts, give PART
NUMBER and PART DESCRIPTION.
Reference Numbers are used ONLY to
point out parts in the drawing and are
NOT to be used as ordering numbers.
Ref. Qty. Part
No. Req'd. Number
1
2
3
3
3
4
5
5
5
6
7
7
7
1
2
2
2
2
4
1
1
1
1
6
6
6
2300-0021
2000-0010
2107-0002
2102-0001
2102-0001T
2210-0004
0200-6600C
0200-6600N
0200-6600X
1720-0008
1005-0004
1002-0004
1055-0004
8
No. 3430-0175 Consists of (6) Ref. 7
Polypropylene Rollers, (1) Ref. 6 O-ring,
and (2) Ref. 3 Viton seals.
Description
Bearing Cover
Sealed Ball Bearing
Viton Seal (Standard)
Buna-N Seal (Optional)
Teflon-coated Buna-N Seal (Optional)
Bolts
Endplate (Cast Iron) with Seal
Endplate (Ni-Resist) with Seal
Endplate (SilverCast) with Seal
O-ring Gasket for Endplate
Super Roller (Standard)
Polypropylene Roller (Optional)
Teflon Roller (Optional)
- 32 -
Ref. Qty. Part
No. Req'd. Number
8
9
9
9
10
11
11
1 kit 3420-0023
1
1
1
1
1
1
0100-6600C
0100-6600N
0100-6600X
2300-0023
0300-6600C
3430-0767
Description
Base Kit - Sold Separately
Includes: (1) Base, (2) Bolts and
(2) Washers
Body (Cast Iron) with Seal
Body (Ni-Resist) with Seal
Body (SilverCast) with Seal
Shaft Bearing Cover
Rotor Assembly (Cast Iron)
Rotor Assembly (Std. Ni-Resist & XL)
Parts Illustration
Series 7560
13
8
3
2
12
11
10
7
1
2
3
4
5
6
Repair Parts Kits:
No. 3430-0381 Consists of (8) Ref. 7
Super Rollers, (1) Ref. 6 O-ring, and
(2) Ref. 3 Viton seals
IMPORTANT:
When ordering parts, give PART
NUMBER and PART DESCRIPTION.
Reference Numbers are used ONLY to
point out parts in the drawing and are
NOT to be used as ordering numbers.
Ref. Qty. Part
No. Req'd. Number
1
2
3
3
4
5
5
5
6
7
7
7
1
2
2
2
6
1
1
1
1
8
8
8
2300-0020
2008-0001
2112-0003
2112-0001
2210-0004
0204-7500C
0204-7500N
0204-7500X
1720-0014
1005-0004
1002-0004
1055-0004
No. 3430-0167 Consists of (8) Ref. 7
Polypropylene Rollers, (1) Ref. 6 O-ring,
and (2) Ref. 3 Viton seals
Ref. Qty. Part
No. Req'd. Number
Description
8
8
10
Bearing Cover
Sealed Ball Bearing
Viton Seal (Standard)
Buna-N Seal (Optional)
Bolts
Endplate (Cast Iron) with Seal
Endplate (Ni-Resist) with Seal
Endplate (SilverCast) with Seal
O-ring Gasket for Endplate
Super Roller (Standard)
Polypropylene Roller (Optional)
Teflon Roller (Optional)
11
11
11
12
13
- 33 -
1 3430-0745
1 0308-7560C
1 kit 3420-0003
1
1
1
1
1
1
0104-7500C
0104-7500N
0104-7500X
2300-0022
1610-0005
1610-0059
Description
Rotor Assembly (Std. Ni-Resist & XL)
Rotor Assembly (Cast Iron only)
Base Kit - Sold Separately
Includes: (1) Base, (3) Bolts and
(3) Washers
Body (Cast Iron) with Seal
Body (Ni-Resist) with Seal
Body (SilverCast) with Seal
Shaft Bearing Cover
Key
Key (Stainless Steel)
Parts Illustration
Models 7560C-GM30, 7560N-GM30, and 7560XL-GM30
Models 7560C-GM15, 7560N-GM15, and 7560XL-GM15
7A
9
4
5
2
11
8
7
2
3
10
19
6
3
18
17
1
14
Qty.
Part
No. Req'd. Number
1
2
3
3
1
2
2
2
2300-0020
2008-0001
2112-0003
2112-0001
Bearing Cover
Seated Ball Bearing
Viton Seal (Standard)
Buna-N Seal (Optional)
5
6
6
6
6
1
8
8
8
8
1720-0014
1005-0004
1002-0004
1052-0004
1055-0004
O-ring
Super Roller (Standard)
Polypropylene Roller (Optional)
Buna-N Roller (Optional)
Teflon Roller (Optional)
4
4
4
7
7A
8
1
1
1
1
1
1
0104-7500C
0104-7500N
0104-7500X
3430-0745
0308-7560C
1610-0005
Ref.
Description
Qty.
Part
No. Req'd. Number
9
9
9
Body (Cast Iron) with Seal
Body (Ni-Resist) with Seal
Body (SilverCast) with Seal
0204-7500C
0204-7500N
0204-7500X
Description
Endplate (Cast Iron) with Seal
Endplate (Ni-Resist) with Seal
Endplate (SilverCast) with Seal
10
11
12
13
14
1
1
1
1
2
2300-0022
1410-0111
0524-2500
0750-7500C
18044
Shaft Bearing Cover
Spacer
Coupler
Mounting Flange
Bolt
16
17
18
19
2
3
3
3
2250-0082
1410-0120
11621
2210-0004
Nut
Spacer
Bolt
Bolt
15
15
Rotor Assembly (Ni-Resist and SilverCast)
Rotor Assembly (Cast Iron)
Key
1
1
1
1
1
2500-0028
2500-0042
Hydraulic Motor (GM30)
Hydraulic Motor (GM15)
Repair Parts Kit No. 3430-0381 Consists of: (8) Ref. 6 Super Rollers, (1) Ref. 5 O-Ring and (2) Ref. 3 Viton Seals.
Repair Parts Kit No. 3430-0167 Consists of: (8) Ref. 6 Polypropylene Rollers, (1) Ref. 5 O-Ring and (2) Ref. 3 Viton Seals.
Flange Kit No. 3430-0636 Consists of: (1) Ref. 13 Mounting Flange, (1) Ref. 12 Coupler, (1) Ref. 11 Spacer, (2) Ref. 14 Bolts,
(2) Ref. 16 Nuts, (3) Ref. 18 Bolts and (1) Ref. 8 Key.
- 34 -
16
13
12
Ref.
15
Parts Illustration
Series 7700
11
3
12
2
10
9
8
1
2
3
4
5
6
7
Repair Parts Kits:
No. 3430-0384 Consists of (7) Ref. 7
Super Rollers, (1) Ref. 6 O-ring, and
(2) Ref. 3 Viton seals
IMPORTANT:
When ordering parts, give PART
NUMBER and PART DESCRIPTION.
Reference Numbers are used ONLY to
point out parts in the drawing and are
NOT to be used as ordering numbers.
Ref. Qty. Part
No. Req'd. Number
1
2
3
3
4
5
5
5
6
7
7
7
8
1
2
2
2
6
1
1
1
1
7
7
7
1 kit
2300-0020
2008-0001
2112-0003
2112-0001
2210-0004
0200-7700C
0200-7700N
0200-7700X
1720-0014
1005-0004
1002-0004
1055-0004
3420-0010
No. 3430-0167 Consists of (7) Ref. 7
Polypropylene Rollers, (1) Ref. 6 O-ring,
and (2) Ref. 3 Viton seals
Description
Bearing Cover
Sealed Ball Bearing
Viton Seal (Standard)
Buna-N Seal (Optional)
Bolts
Endplate (Cast Iron) with Seal
Endplate (Ni-Resist) with Seal
Endplate (SilverCast) with Seal
O-ring Gasket for Endplate
Super Roller (Standard)
Polypropylene Roller (Optional)
Teflon Roller (Optional)
Base Kit - Sold Separately
Includes: (1) Base and (4) Bolts
Ref. Qty. Part
No. Req'd. Number
9
9
9
10
11
12
12
12
12
12
12
- 35 -
1
1
1
1
1
1
1
1
1
1
1
0100-7700C
0100-7700N
0100-7700X
2300-0022
1610-0005
0300-7700C
0300-7700N
0300-7700X
0301-7700C
0301-7700N
0301-7700X
Description
Body (Cast Iron) with Seal
Body (Ni-Resist) with Seal
Body (SilverCast) with Seal
Shaft Bearing Cover
Key
Rotor Assembly (Cast Iron)
Rotor Assembly (Ni-Resist)
Rotor Assembly (SilverCast)
Rotor Assembly (Cast Iron) Rev. Rot.
Rotor Assembly (Ni-Resist) Rev. Rot.
Rotor Assembly (SilverCast) Rev.Rot.
Troubleshooting
Troubleshooting Guide
Before attempting to service your pump, be sure that it is disconnected from all energy sources.
Symptom
Pump does
not prime
Loss of pressure
Probable Cause(s)
Corrective Action
Leak in suction line
Obstruction in suction line
Check hose and fittings for leaks and correct
Inspect hose for obstructions such as debris or loose
inner liner and remove from the line
Cut a notch or “V” in end of suction hose
Suction hose sucked to bottom
or side of tank
Rollers stuck in pump
Pump seals leaking air
Pump turning in wrong direction
Clogged suction strainer
Kinked or blocked suction hose
Air leak in inlet side plumbing
Relief valve setting too low
or weakened spring
Faulty gauge
Pump seals leak air
Nozzle orifices worn
Pump worn
Pump will not turn Corrosion (rust), scale or residue
Solid object lodged in pump
Hydraulic system Improper hydraulic motor size
overheating
Insufficient hydraulic hose size
Table 2
- 36 -
Disassemble pump and inspect rollers
Replace seals
Correct rotation of pump
Check strainer and clean regularly
Inspect suction hose and repair as necessary
Check hose and connections for leaks. Use pipe
joint sealant and retighten connections
Check relief valve and correct setting or replace
spring
Replace gauge
Replace seals
Replace Nozzles
Repair pump (See Repair Instructions)
Replace pump
Disassemble pump and remove objects
Refer to Pump Selection Guide to determine proper
size for your hydraulic system.
Check hydraulic hose size. Hose should be at least
1/2” (12.7mm). For large open-center systems, hose
should be 3/4” (19.05mm).
To Take the Pump Apart
1.
2.
3.
4.
5.
6.
7.
8.
9.
Repair Instructions
Remove the adapter from the pump shaft, if equipped.
File off any burrs on the pump shaft.
Using a screwdriver, pry off the bearing cover on the endplate and pump body.
Remove the endplate bolts.
Support the pump at its ports in a support fixture with the endplate down. Wood blocks may be used. Place on
press bed. Center press on pump shaft and apply pressure to press the pump apart (See Figure 9).
Figure 9
With the rollers exposed, remove them. When replacing damaged rollers, always replace the full set.
To remove the rotor with shaft from the endplate, support the endplate in a support fixture with the rotor down. Center a
3/8" bolt on pump shaft. Apply pressure to press shaft out of ball bearing (See Figure 9).
To remove the ball bearing, place the endplate in a support fixture with the front of the endplate down (See Figure 10).
Center bearing support tool, and slowly press bearing out of casting. Repeat procedure to remove bearing from pump body
(See Figure 10).
After removing the ball bearing, check the seals in both endplate and pump body. If wear is evident or leakage has been
noticed, punch the seals out with a screwdriver and hammer. Seals cannot be removed without damaging them.
Figure 10
10. To press the shaft out of the rotor, first carefully wash the rotor and shaft - removing all traces of rust and other foreign
matter. Use steel wool or emery cloth, rinsing parts afterward to wash off all emery dust. Remove the Allen set screw.
Support the rotor in the press through the slot in the base and press shaft through.
While the Pump is Apart
Carefully inspect all parts for wear, such as:
•
Undersize or swollen rollers in both length and diameter.
•
Worn seals.
•
Worn shaft at drive end, and pitted or grooved at the seal area.
•
Rough bearings and loss of grease from the bearings.
•
Undersize rotor and/or worn roller slots.
•
Excessive wear in body - both on inside diameter and at back face.
•
Body cracks at the bolt holes and at the o-ring sealing area.
•
End wear (body, endplate and rotor).
•
Damaged o-ring in the endplate.
After the above parts have been checked and the various points have been considered, decide if the pump is repairable. If repairing
the pump, be sure to inspect inside of endplate. If a groove is noticeable, the endplate should be replaced.
ATTENTION: If an attempt has been made to pry the pump apart with a screwdriver, be sure to file off all nicks, burrs and
other damage marks around the bolt holes.
Re-Assembly
Replace Seals and Bearings
Carefully place the seal in the pump body with crimped side down. Press the seal to the bottom of the
cavity. Then put the bearing in position in the pump body and press into place (Figure 11). Repeat the above
procedure with the endplate. Seat the o-ring in the groove. If necessary, make sure the o-ring stays in
place by stretching it.
Figure 11
- 37 -
Repair Instructions - cont’d.
Assemble Rotor and Shaft to Endplate
1. Install the shaft rotor assembly by carefully pushing the short end of the shaft rotor assembly through the shaft seal into the
endplate. Place in the arbor press with the drive end of the shaft pointed down and press the assembly together (Figure
12). Leave just enough clearance between the rotor and endplate so that rotor can be turned by hand. If it turns too freely,
sand a little more off the body end that faces the endplate. You should notice a slight drag, but be able to turn shaft with an
adapter on it, by hand. The “slight drag” will wear off after the pump has been used a short time. Installing new rollers,
seals, bearings and shafts will not prove entirely satisfactory for volume and pressure unless end clearance is taken up.
Figure 12
ATTENTION: Before new parts are installed, all burrs should be removed, particularly in the rotor slots and body. Do not
machine clean the body casting. A more satisfactory job can be done by hand cleaning with an emery cloth.
2. Remove the assembled portion from the arbor press and invert it on the press table. Then place rollers in the roller slots as
close to center of rotor as possible. Place the pump body over rotor and shaft, and carefully ease the end of the shaft past
the lips of the seal in pump body (Figure 12). Slowly press the pump body down to fit the endplate (Figure 13).
3. Turn pump over; line up bolt holes and replace assembly bolts. Alternately and evenly tighten the bolts as shown
(Figure 13).
ATTENTION: After bolts have been tightened, check to see if rotor is centered in pump case. Try to turn the pump shaft, using a
crescent wrench on the shaft as a lever.
Figure 13
Center Rotor in Pump Case
If pump turns hard:
1. Place short brass rod (or hardwood dowel) against end of shaft (Figure 14). Center rod on shaft (not on bearing). Tap
lightly with hammer. Try turning shaft again.
Figure 14
2.
If this fails to center the rotor to where it can be turned freely, tap other end of shaft, protecting it as above. When the shaft
can be turned by hand, using wrench as above, it is not binding.
- 38 -
EC Declaration of Incorporation
Manufacturers Name:
Manufacturers’ Address:
Pentair Flow Technologies, LLC
375 Fifth Avenue NW,
New Brighton, MN 55112, USA
Declare that the partially complete machinery described below conforms to applicable health and safety
requirements of Parts 1 of Annex I of Machinery Directive 2006/42/EC. This partly completed machinery must not
be put into service until the equipment into which it is to be incorporated has been declared in conformity with
the provisions of this directive. Confidential technical documentation has been compiled as described in Annex
VII Part B of Machinery Directive 2006/42/EC and is available to European national authorities on written request.
If a request is received, documentation will be transmitted either electronically or by post. Clauses 1.1.4, 1.1.7,
1.1.8 Section 1.2, Clauses 1.3.5, 1.3.6, 1.3.7, 1.3.8.1, 1.3.8.2, 1.3.9, 1.4.1, 1.4.2.1, 1.4.2.2 1.4.2.3, 1.4.3, 1.5.2, 1.5.7,
1.5.12, 1.5.14, 1.5.16, 1.6.2, 1.7.1.1, 1.7.1.2, 1.7.2, and 1.7.4.2 are clauses of Machinery Directive 2006/42/EC that
have not been met, but could be applicable and must be addressed during installation by a third party.
Description:
PENTAIR Pump
Series Numbers:
1502, 1700, 4001, 4101, 6500, 7560, 7700
Type:
Roller Pumps
The following standards have either been referred to or been complied with in part or in full as relevant:
ENISO 12100
Machinery Safety
-
General principles for design - Risk assessment and risk reduction
EN ISO 13732-1
Machinery Safety
-
Ergonomics of the thermal environment
EN809-1998 + A1 2009
EN ISO 3744:2010
EN ISO 11202/A1 1997
Machinery Safety
Acoustics
Machinery Safety
EN 12162:2001+A1:2009 Machinery Safety
EN ISO 4254-6:2009
Machinery Safety
-
Pumps and pump units for liquids - Common safety requirements
-
Determination of sound power levels and sound energy levels of
noise sources using sound pressure
-
Liquid pumps - Safety requirements -Procedure for hydrostatic
testing
-
-
Noise emitted by machinery and equipment
Sprayers and liquid fertilizer distributors
Name .LLLLL...LLLLLLLLLLLLLLL......
Position L..LLLLLLLLL.LLLL
Signature LLLLLLLLLLLLLLLL..LLL.....
Date L..LL..LLLLLLLLL.LLL.
Place of SigningLLLLLLLLLLLLLLLLLLLLLLLLLLLLLLLLLLLLL..
EC REP
QNET BV
Hommerterweg 286
6436 AM Amstenrade
The Netherlands
- 39 -
Limited Warranty on Hypro/SHURflo Agricultural Pumps & Accessories
Hypro/SHURflo (hereafter, “Hypro”) agricultural products are warranted to be free of defects in material and workmanship under
normal use for the time periods listed below, with proof of purchase.
- Pumps: one (1) year from the date of manufacture, or one (1) year of use. This limited warranty will not
exceed two (2) years, in any event.
- Accessories: ninety (90) days of use.
This limited warranty will not apply to products that were improperly installed, misapplied, damaged, altered, or incompatible with
fluids or components not manufactured by Hypro. All warranty considerations are governed by Hypro’s written return policy.
Hypro’s obligation under this limited warranty policy is limited to the repair or replacement of the product. All returns will be tested
per Hypro’s factory criteria. Products found not defective (under the terms of this limited warranty) are subject to charges paid by the
returnee for the testing and packaging of “tested good” non-warranty returns.
No credit or labor allowances will be given for products returned as defective. Warranty replacement will be shipped on a freight allowed
basis. Hypro reserves the right to choose the method of transportation.
This limited warranty is in lieu of all other warranties, expressed or implied, and no other person is authorized to give any other
warranty or assume obligation or liability on Hypro’s behalf. Hypro shall not be liable for any labor, damage or other expense, nor shall
Hypro be liable for any indirect, incidental or consequential damages of any kind incurred by the reason of the use or sale of
any defective product. This limited warranty covers agricultural products distributed within the United States of America. Other world market
areas should consult with the actual distributor for any deviation from this document.
Return Procedures
All products must be flushed of any chemical (ref. OSHA section 1910.1200 (d) (e) (f) (g) (h)) and hazardous chemicals must be
labeled/tagged before being shipped* to Hypro for service or warranty consideration. Hypro reserves the right to request a Material Safety
Data Sheet from the returnee for any pump/product it deems necessary. Hypro reserves the right to “disposition as scrap” products
returned which contain unknown fluids. Hypro reserves the right to charge the returnee for any and all costs incurred for chemical testing,
and proper disposal of components containing unknown fluids. Hypro requests this in order to protect the environment and personnel from
the hazards of handling unknown fluids.
Be prepared to give Hypro full details of the problem, including the model number, date of purchase, and from whom you purchased your
product. Hypro may request additional information, and may require a sketch to illustrate the problem.
Contact Hypro Service Department at 800-468-3428 to receive a Return Merchandise Authorization number (RMA#).
Returns are to be shipped with the RMA number clearly marked on the outside of the package. Hypro shall not be liable for freight damage
incurred during shipping. Please package all returns carefully. All products returned for warranty work should be sent shipping charges
prepaid to:
HYPRO / PENTAIR
Attention: Service Department
375 Fifth Avenue NW
New Brighton, MN 55112 USA
For technical or application assistance, call the Hypro Technical/Application number: 800-445-8360, or send an email to:
[email protected]. To obtain service or warranty assistance, call the Hypro Service and Warranty number: 800-468-3428;
or send a fax to the Hypro Service and Warranty FAX: 651-766-6618.
*Carriers, including U.S.P.S., airlines, UPS, ground freight, etc., require specific identification of any hazardous material being shipped. Failure to do so may
result in a substantial fine and/or prison term. Check with your shipping company for specific instructions.
Visit www.hypropumps.com/register today to register
your product and stay up-to-date on new products
and promotional offers.
The following information is required:
Model # _______________ Serial # _______________
Hypro (05/13)
Printed in USA
375 Fifth Avenue NW • New Brighton, MN 55112 USA
Phone: (651) 766-6300 • 800-424-9776 • Fax: 800-323-6496
w w w. h y p r o p u m p s . c o m