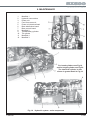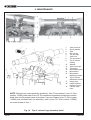
1
RX500
O P E R AT I O N TA B L E
Service Manual
698265
T-SM13h
Eschmann After Sales Service Department
Preliminary Information
Technical Data
Safety Notes
The Eschmann After Sales Service Department is staffed and equipped to provide advice and assistance
during normal office hours. To avoid delays when making enquires, please quote the Model and Serial
Number of your Operation Table which is shown on the Serial Number plate, the location of which is
shown below. Please ensure you include all alpha and numeric digits of the Serial Number.
Introduction
Description
Maintenance
The Serial Number Plate
is on the inside of the
long trunk section here.
For further information visit www.eschmann.co.uk
All correspondence relating to the after sales service of Eschmann Equipment to be addressed to :
UK Customers
Eschmann Equipment, Peter Road, Lancing, West Sussex BN15 8TJ, England.
Tel: +44 (0) 1903 765040. Fax: +44 (0) 1903 762006.
Overseas Customers
Contact your local distributor. In case of doubt contact Eschmann Equipment.
Service Manual
Patents and Trade marks
The ESCHMANN name and logo are registered trade marks of Eschmann Holdings Limited.
“Eschmann Equipment” is a trading name of Eschmann Holdings Limited.
“RX600” is a trade mark of Eschmann Holdings Limited.
Patents:
GB 2260075 & GB 2242624; France 536922 & 450836; US5116032;
Germany P69206378.1 & P69104883.5; Italy 536922 & 450836.
Patents pending in Japan, application numbers 263630/92 & 97990/91.
Copyright © 2002
All rights reserved. This booklet is protected by copyright. No part of it may be reproduced, stored in a retrieval
system or transmitted in any form or by any means, electronic, mechanical, photocopying, recording or otherwise
without written permission from Eschmann Holdings Limited.
The information in this publication was correct at the time of going to print.The Company, however, reserves the
right to modify or improve the equipment referred to.
If the CE mark is affixed to the product, it indicates compliance with Council Directive
93/42/EEC of 14 June 1993 concerning medical devices.
T-SM13h October 2002
RX500
OPERATION TABLE
READ THESE INSTRUCTIONS BEFORE USE
Keep these Instructions in a safe convenient place for future reference. Read in conjunction
with the relevant Publications detailed in the preliminary information section.
CONTENTS
Section
1.
2.
3.
4.
Contents
Page
PRELIMINARY INFORMATION ..................... 4
TECHNICAL DATA .......................................... 4
SAFETY NOTES ............................................ 5
INTRODUCTION ............................................ 6
General ....................................................... 7
Electrical System ........................................ 7
Main Control Board ................................. 7
Height Opto Board .................................. 7
Tilt Opto Board ........................................ 7
Base Distribution Board .......................... 8
Top-Of-Column Distribution Board .......... 8
Top-Of-Column Solenoids Board ............ 8
Power Circuits ......................................... 8
Hand Control ........................................... 8
Footswitch ............................................... 8
Table-Base ON/OFF Control ................... 8
Built-in Battery Charger ........................... 9
External Battery Charger ........................ 9
Standby System Connections ................. 9
5. DESCRIPTION ............................................. 10
6. MAINTENANCE ........................................... 14
General ..................................................... 14
Cleaning and Storage ............................... 14
General Care and Lubrication ................... 14
Gas Springs .......................................... 14
Head, Leg, & Infill Sections ................... 14
Head, Leg, & Infill-Locking Mech. ......... 14
Long and Short Trunk Sections ............. 14
Radiographic Tops ................................. 14
Underside of the Table Base ................. 14
Access to Fuses .................................... 15
Hand control .......................................... 15
After Maintenance ................................. 15
Functional Checks .................................... 15
General ................................................. 15
Hydraulic System ...................................... 18
General ................................................. 18
Topping-Up Reservoir ........................... 18
Adjustments .............................................. 18
Trendelenburg Microswitch ................... 18
Lateral Tilt Opto ..................................... 18
Break Microswitch ................................. 19
Tilt Switch .............................................. 20
Removal and Installation ........................... 20
General ................................................. 20
Remove Table Base Covers .................. 20
Install Table End Base Covers .............. 20
Remove Top-Of-Column Covers ........... 21
Install Top-Of-Column Covers ............... 21
Releasing Telescopic Cover & Upstand 21
Refixing Telescopic Cover & Upstand ... 21
Removing the Telescopic Cover ............ 21
Replacing the Telescopic Cover ............ 21
T-SM13h
Section
Contents
Page
Remove Long & Short Trunk Assemblies . 23
Install Long & Short Trunk Assemblies . 23
Remove Break Cylinder ........................ 26
Install Break Cylinder ............................ 26
Remove Lateral Tilt Cylinder ................. 27
Install Lateral Tilt Cylinder.. ................... 27
Remove Trendelenburg Cylinder ........... 27
Install Trendelenburg Cylinder ............... 28
Remove Height Cylinder ....................... 28
Install Height Cylinder ........................... 28
Gas Spring Replacement ...................... 29
Remove Batteries .................................. 29
Install Batteries ..................................... 29
Remove the Base Feet ......................... 29
Install the Base Feet ............................. 30
Infill interlocking mechanism replacement .............. 30
Push button replacement and adjustment .............. 30
Remove/Install Hydraulic Components .. 30
Remove/Install Electrical Components ... 30
Fault Diagnosis ......................................... 31
Table 1: Fault Diagnosis ........................ 31
Circuit Diagram Index ............................ 30
Table 2: Codes for 2-Digit Display ......... 34
FIGURES
1 RX500 Operation Table .................................. 6
2 RX500 Operation Table: Base Details .......... 10
3 RX500 Operation Table: Column/Trunk Detail 12
4 RX500 Operation Table: Base (short trunk end) .... 13
5 RX500 Operation Table: Base (long trunk end) ..... 13
6 Table Tilted for Access .................................. 15
7 Base Detail Table Tilted ................................ 15
8 Main Control Board....................................... 15
9 Hydraulic System - Schematic Diagram ....... 16
10 Hydraulic System - Main Components ......... 17
11 Trendelenburg Microswitch ........................... 19
12 Lateral Tilt Opto ............................................ 19
13 Break Microswitch ........................................ 19
14 Tilt Switch ..................................................... 20
15 Cover Retaining Push Rivets ........................ 21
16 Top of Column Hinge Assembly Detail ......... 22
17 Top of Trendelenburg Cylinder ...................... 23
18 Break Cylinders ............................................ 24
19 Lateral Tilt Cylinder ....................................... 25
20 Trendelenburg Cylinder ................................ 27
21 Top of Column Detail .................................... 28
22 Bottom of Height Cylinder Detail .................. 28
23 Gas Spring Detail ......................................... 29
24 Base Feet Detail ........................................... 29
25 Infill interlocking mechanism......................... 30
26 Catch mechanism ......................................... 30
27 Hand Control Functions ................................ 34
28-35Circuit Diagrams* ................................. 35-40
(* also see Circuit Diagram Index on page 33)
3/40
1. PRELIMINARY INFORMATION
1.1
This Service Manual should be referred to for details of the RX500 Powered Operation Table,
REF 80-600-29 (series) and REF 80-600-61 (series) having Serial Number R5BC8J0000 or above.
Related Technical Publications, available on request from Eschmann Equipment :Instructions for Use - T-IM28 - RX500 Powered Operation Table
Illustrated Parts List - T-IPL11- RX500 Powered Operation Table
1.2
Instruction and Service Manuals should be readily accessible for reference prior to and when operating,
cleaning and servicing the Operation Table.
2. TECHNICAL DATA
DIMENSION
MOVEMENTS
Table with standard table-top (Fig. 1) :
Width including sidebars ............................. 560mm
Sidebars ...................................... (31.75 x 6.35)mm
Overall length (with infill section) ............... 2000mm
Minimum table height (without mattresses) ....... 700mm
Maximum table height (without mattresses) .... 1040mm
Maximum Trendelenburg ....................................35°
Maximum Reverse Trendelenburg......................35°
Maximum Lateral Tilt (left and right)...................15°
Maximum Extension .........................................220°
Maximum Flexion .............................................130°
Head section adjustment ................................ ±45°
Leg section adjustment ......................... (-100+10)°
SAFETY
The table is built to comply with BS5724 Part 1,
BS5724 Par t 2 Section 2.22, IEC601-1,
IEC601-1-2:1993 and BS6859 Part 1. The mattresses
comply with BS2891.
Note: With the table at minimum height, maximum
Trendelenburg, and maximum head and leg section
movements are reduced due to physical restrictions
(i.e. proximity of floor)..
TABLE LOADING
The standard table (Fig. 1) satisfies a static load test
in accordance with the requirements of BS5724
WEIGHT (nominal)
Table with standard table-top (Fig. 1) ............ 300kg
SYMBOLS & SAFETY CLASSIFICATIONS
Caution Refer to the accompanying
documents, the “Instructions for Use”.
or IPX 4 indicates that the equipment will
withstand a moderate quantity of fluid spilled
from above.
Safety Category
Indicates that the equipment is in safety
category BF, i.e. it is manufactured to a
safety standard which agrees with
international regulations for medical electrical
equipment, and provides a high degree of protection
against electric shock. The symbol also indicates that
the equipment will not be damaged by defibrillator
discharge.
Indicates that the equipment is in safety
category B, i.e. it is manufactured to a safety
standard which agrees with international regulations
for medical electrical equipment, and provides a
minimum degree of protection against electric shock.
Class 2
Indicates that the built-in battery
charger is designed to electrical protection Class 2.
4/40
Anaesthetic Proof
Indicates that the parts of the equipment marked
AP are designed for use within a distance of (5
to 25cm) of a part of an enclosed medical gas
system. BS5724 Part 1, 1989 refers.
Indicates that the parts of the equipment
marked APG are designed for use within a
distance of 5cm of a part of an enclosed medical
gas system. BS5724 Part 1,1989 refers.
WARNING
The head section of this operation table is
classified as ‘EQUIPMENT not suitable for use in
the presence of a flammable anaesthetic mixture
with air or with Oxygen or Nitrous Oxide’ and is
NOT classified as ‘Category AP Equipment’ or
‘Category APG Equipment’ when it (the head
section) is in its lowest position and the table top
is in full Trendelenburg position.
Inspection
The table must be inspected at regular intervals, and
if necessary, serviced, to ensure that it complies with
all AP and APG requirements relevant to physical
deterioration or breakage of electrical components,
connections and cable insulation.
T-SM13h
RX500
OPERATION TABLE
2. TECHNICAL DATA
MISCELLANEOUS
Antistatic requirements
The table has an antistatic pathway from the tabletop, through an internal resistor to the castors, which
are held in contact with the floor at all times.
CAUTION
1.
To complete the antistatic pathway, the table
must be used on an electrically conductive, or
on an antistatic floor.
2.
Always use purpose-designed Eschmann
mattresses to maintain the antistatic pathway.
Electrical data
System Power
Batteries:
Type ....................................... Two sealed lead-acid
Output (each) ......................................... 12V 24Ah
Built-In Battery Charger:
Input ...................................... 200-240Vac 50/60Hz
Output .............................. 27.6Vdc (nom) 3A (max)
System Fuses:
Motor ....................................... 30A 1.5in. (AGU 30)
Base Control Board: (1) ........ F6.3A 250V 20mm
(1) ........ T2.5A 250V 20mm
(1) ........... T2A 250V 20mm
CAUTION
This equipment contains environmentally
hazardous lead-acid batteries. If the batteries fail,
or if the equipment is to be disposed of, it is
recommended that the batteries are taken to a
disposal site designated for the disposal of leadacid batteries, or that the batteries are collected
by an agent who specialises in the collection of
lead-acid batteries.
Hydraulic Oil
Type ..................... Eschmann RX (Part No. 699408)
3. SAFETY NOTES
Attention to the following points will prolong the life and efficiency of the RX500 Powered
Operation Table and will help to avoid the risk of accidents, or damage.
DO:
♦
♦
♦
♦
♦
♦
♦
♦
DO NOT:
Keep the Instruction Manual close-to-hand.
Read the instructions carefully before using table.
Check that the head and leg sections are secure,
and put the table base in the braked position
before use.
Disconnect the built-in battery charger from the
power supply and switch table off before washing.
Read and follow the instructions for cleaning, and
for the care of the mattresses.
Use the correct mattresses and accessories.
Remove table accessories and their clamps (in
particular rotary clamps) from sidebars, when
they are not being used.
Ensure that the table is serviced at regular intervals
(every 6 months is the recommended frequency)
by Eschmann personnel only, or accredited agents.
♦
♦
♦
♦
♦
Lift the table by its table-top.
Push the table over rough surfaces, use a trolley.
Drop the table (or individual sections).
Put heavy weights on the table sections.
Put sharp objects on, or against, mattresses,
pads, or the radiographic table-tops.
♦ Drop heavy objects onto the radiographic table-tops.
♦ Spill oil, ether, or other fluids onto the
mattresses or the pads.
♦ Pull the table by any of the table-top sections,
always push it.
♦ Hold or support the leg section by its black
radiographic top, as this is a removable item and
might come off.
Note: The table cannot be used (under normal
circumstances) with table base standby door open.
WARNING
The RX500 Powered Operation Table has been designed to minimise the possibility of accidental
electrosurgery burns. Contact with any metal surfaces (e.g. table side bars, or other equipment
etc.) can cause burns during electrosurgery and must be avoided.
With the table in (or during transition into) the castor position, the centre of gravity of the patient
(normally the perineum) should lie no more than 200mm away from the centre of the column (i.e. no
more than the length of the short trunk section). Whenever this is not practical the overhanging
weight of the patient and table should be adequately supported (e.g. by at least two able people).
Also see Warnings in Instruction for Use and within the text of this publication.
T-SM13h
5/40
4. INTRODUCTION
View on ‘A’
1.
2.
3.
4.
5
6.
7.
8.
9.
10.
11.
12.
13.
14.
15.
16.
Head section
Infill section
Short trunk section
Long trunk section
Leg section
Release bar
Gas springs
Release button (leg section removal)
Release button (Infill section removal)
Hand control
Release button (head section removal)
Release bar
Telescopic column
Table base
Hand control or footswitch socket
Hand control or footswitch socket
View on base short trunk end
Fig. 1
6/40
17.
18.
19.
20.
21.
22.
23.
24.
25.
26.
27.
28.
29.
30.
31.
Hand control plug
(on/off) switch
Table
Push button switches to engage standby
hydraulic connectors
Standby hydraulic connectors
Quick-charge external battery charge socket
High current 30A fuse
Standby door microswitch
Standby power pack connector
Standby door
Built-in battery charger socket
Battery charger ‘on’ indicator (green)
Battery charger door
Removable mains lead
Cover retaining screws
Top of column covers
View on base long trunk end
RX500 Powered Operation Table
T-SM13h
RX500
OPERATION TABLE
4. INTRODUCTION
GENERAL
4.1
This Service Manual contains a technical
description and maintenance procedures for the
RX500 Powered Operation Table.
4.2
The RX500 Powered Operation Table is a fully
mobile table with a five section top comprising short
and long trunk sections, an interchangeable infill
section and head and leg sections.
4.3
The table enables a full range of surgical and
radiographic procedures to be done including: general,
urological, gynaecological, cardiothoracic, ophthalmic,
ENT and neurosurgical. Certain procedures require
the addition of specific accessories, information about
which is available on request.
4.4
The RX500 Powered Operation Table is an
electro-hydraulically operated, battery powered unit,
remotely operated from a touch-button hand control, or
a footswitch, both plug into the top of the table column
4.5
Power is provided by two 12V sealed lead-acid
batteries in the table base. The 12V batteries are
connected in series to give an output voltage of 24V.
Trickle charging for the batteries is provided by an inbuilt
battery charger, provision is also made for connection
of an external battery charger for quick battery charging.
4.6
All table top trunk movements are electrically
controlled using either the hand control or, as an
optional accessory the four function footswitch (height
and Trendelenburg only) which is used by the surgeon
during certain procedures.
4.7
G
G
G
G
G
The operation table has these main sections:
Base.
Central column.
Long trunk.
Short trunk.
Interchangeable head, leg and infill sections.
NOTE: Instruction and Service manuals should be
readily accessible for reference prior to, and when
operating, cleaning, and servicing the table.
ELECTRICAL SYSTEM
NOTE: Electrical/electronic circuit diagrams are
provided at the end of this Manual in section 6 (see
index page 33).
Main Control Board
4.8
The main control board receives signals from
the hand control via an RS485 serial communication
link. The board also receives signals from the
footswitch, base cover switches, levelling
microswitches, tilt switch, opto boards, standby unit
socket, door switch and table on/off controls.
T-SM13h
4.9
Outputs from the main control board pass
to the hand control via an RS485 serial
communication link, to the hydraulic solenoids via the
top-of-column distribution and solenoid boards, and
to the base distribution board, motor on/off control
and motor direction control. The main control board
is supplied with 24V d.c. from the batteries and
generates its own 12V d.c. and 5V d.c. supplies.
4.10 The principal functional areas of the main
control board are:
- Input buffering (pull-up and pull-down resistors
and capacitors).
- The microcontroller, which uses software to
implement table control functions.
- Output buffering (current drivers and level shifters).
- Motor direction drive and on/off control.
Height Opto Board
4.11 The height opto board is fitted at the base of
the column in a fixed position relative to the baseplate.
It responds to a metal reflector plate which moves up
and down with the column chassis and hence with
the table top. When the reflector moves in front of the
three reflective opto sensors (only two are used)
electrical signals are generated to signal to the main
control board that the table is at or above ‘minimum
height’, or in the ‘castor’ position.
4.12 When the reflector plate is in front of reflective
opto coupler 01 and at the correct distance from it, a
signal is produced which passes via J1 on the opto
board and the 10-way ribbon cable to J22 on the main
control board.
4.13 When the reflector plate is in front of both
reflective opto couplers 01 and 03 signals from both
pass to the main control board which stops the table
movement at the correct position.
Tilt Opto Board
4.14 The tilt opto board is fitted at the top of the
column in a fixed position relative to the yoke. It responds
to a metal plate which moves with the yoke and hence
with the table top. When the reflector moves in front of
the opto sensors electrical signals are generated to
signal the main control board that the table is level.
4.15 When the reflector plate moves in front of the
opto sensor, a logic signal 0 is produced which passes
via J1 on the opto board to the top of column
distribution board and then via a 10-way ribbon cable
to J2-4 on the main control board.
4.16 When the reflector plate is not in front of the
opto sensor, a logic signal 1 is produced which is
passed to the main control board as above.
7/40
4. INTRODUCTION
Base Distribution Board
Hand control
4.17 This board receives signals from the main
control board for the height (extend) solenoid, the
height (contract) solenoid, the pump-isolate (forward)
solenoid and the pump-isolate (reverse) solenoid.
4.24 The RX500 hand control communicates with
the main control board via an RS485 serial
communication link. The hand control contains a
microcontroller which receives inputs from the hand
control buttons and generates outputs which go to
the hand control LED’s and the hand control audible
warning device. The microcontroller uses software to
implement hand control, control functions.
4.18 The board also passes signals to the main
control board from the cover microswitches .
4.19 Any inductive overswings from the solenoids
are blocked by diodes Dl to D4. PL7 on the base
distribution board is connected via a 14-way ribbon
cable to J4 on the main control board.
Top-of-Column Distribution Board
4.20 This board connects to J2 on the main control
board via a 34-way retractable ribbon cable which
terminates on PL1 of this board. It distributes signals
to 10-way hand control/footswitch sockets PL2 and
PL3, and to:
G the tilt switch via PL7
G the Trendelenburg level position microswitch
G
G
G
G
via PL5
the lateral tilt opto board via PL4
the break level position microswitch via PL6
top-of-column solenoids board via PL8
table ON/OFF switch via PL9
Top-of-Column Solenoids Board
4.21 This board receives signals on J7 via a 10way ribbon cable from J8 on the top-of-column
distribution board to drive the top-of-column solenoids
via cage clamp connectors J1 to J6. It also blocks
inductive overswings from solenoids using diodes D1
to D6.
Power Circuits
4.22 The power source for the table are two 12V,
24Ah sealed lead acid batteries connected in series.
A 30A in-line, high current fuse protects the batteries,
motor, FET’s, relay and interconnections. The fuse is
fitted on a panel in the table base.
4.23 Current from the batteries passes via the
reversing relay, where it is switched by the FET’s, and
then passes to the pump motor and returns to the
batteries. The 24V d.c. supply is also routed to the
hydraulic solenoids and the main control board.
8/40
4.25 The hand-control incorporates a 2-digit display
that indicates a code if a problem should occur. Such
problems could be the result of the user pushing a
button in the wrong sequence or at the wrong time or
of a system failure (see Table 1 - Fault Diagnosis,
Table 2 - Codes for 2-Digit display and Fig. 27)
Footswitch (Optional Accessory)
4.26 The footswitch plugs into either of the two 10way sockets used by the hand control. It uses the
same +5V d.c. and 0V pins, but the signal lines are
different from those of the hand control. The footswitch
does not use a serial communication link.
4.27
There are four functions on the footswitch:
G
G
G
G
Height up
Height down
Trendelenburg
Reverse Trendelenburg.
4.28 Each of these four functions is associated with
two microswitches mounted inside the body of the
footswitch, one normally open and the other normally
closed. The normally open microswitch for each
function is connected on one side to the +5V d.c. line
and on the other side to a common ‘alarm’ line. The
normally closed microswitch for each function is
connected on one side to the 0V line and on the other
side to an individual input line on the main control
board. If, for any function of the footswitch, e.g. height
up, the normally open microswitch operates and the
normally closed microswitch does not, or vice versa,
the main control board will recognise a fault and freeze
the table. The likelihood of two microswitches failing
at the same time is very remote.
Table Base ON/OFF Control
4.29 An ‘on/off’ toggle switch, fitted on the top of
the table column, switches 24V d.c. on the main
control board. To isolate the system the 30Amp fuse
should be removed.
T-SM13h
RX500
OPERATION TABLE
4. INTRODUCTION
Built-in Battery Charger
Standby System Connections
4.30 This is a low current output ‘trickle’ charger
which replenishes an average day’s table use of the
batteries with an overnight charge.
4.33 An RX Standby Unit (optional accessory)
which provides standby hydraulic and electrical
services, can be connected to the RX500 table via
hydraulic connectors and an electrical socket behind
the door on the table base (short trunk section end).
4.31 The mains input comes via the mains lead,
which should be fitted with a fused plug. The output
of the charger is regulated to provide 27.6V d.c. to
the batteries for float charging. This voltage will fall
when the batteries are not completely charged and
hence are drawing a significant current. The charger
has short-circuit and thermal protection. There is an
output from the board which supplies current to the
batteries, an output to the ‘trickle’ charger indicator
LED and an input from the external charger. Current
from either the internal or the external charger is
routed to the batteries via the ‘trickle’ charger board.
External Battery Charger (Optional Accessory)
4.32 The external battery charger plugs into the
external battery charger socket in the table base and
supplies current via the ‘trickle’ charger board to the
batteries.
T-SM13h
4.34 Next to the hydraulic connectors are two pushbuttons which release stored hydraulic pressure when
the standby hydraulic connections are made. This is
done by energizing the pump forward and reverse
solenoids with power from the standby unit.
4.35 To connect the standby unit to the table it is
necessary to open the base door. This operates a
microswitch which disconnects the main control board
solenoid control circuits from the solenoids so that
they can be controlled by the standby unit, also the
pump motor is hydraulically isolated from the hydraulic
solenoids. The electrical signals from the standby
socket pass to J1 on the main control board (15-way
D-connector).
9/40
5. DESCRIPTION
For greater detail of
the table base ends also
refer to Fig. 4 and 5
Fig. 2
10/40
RX500 Operation Table : Base details, covers on and off
T-SM13h
RX500
OPERATION TABLE
5. DESCRIPTION
Key to Figs 2 and 3
1. Short trunk assembly
2. Long trunk assembly
3. Lateral tilt cylinder
4. Wrap around
5. Trunk assembly plastic covers
6. Wedge
7. Outer column
8. Battery
9. Manifold block No 1
10. Castor plate guide pillar
11. Hydraulic power unit
12. High current fuse, 30A
13. Mains socket
14. Battery charging LED (green)
15. Cover retaining screw location
16. External battery charger socket
17. Drip gutter
18. Opto reflector plate
19. Inner column
20. Manifold block No 4
21. Manifold block No 3
22. Upper bezel
23. Cable from hand control
24. Trendelenburg cylinder
25. Break cylinders
26. Main control PCB
T-SM13h
27. Base distribution PCB
28. Castor frame assembly
29. Manifold block No 2
30. Door microswitch
31. Standby power pack connector
32. Standby hydraulic connectors
33. Push buttons to engage standby
hydraulic connectors
34. Hydraulic reservoir
35. Ribbon cable reel assembly
36. Top-of-column distribution PCB
37. Hinge
38. Lateral tilt opto board
39. Yoke
40. Cover microswitch
41. Table ‘on/off’ switch
42 Base seal
43. Column seal
44. Long trunk base cover
45. Short trunk base cover
46. Telescopic column cover
47. Column upstand
48. Antistatic discharge path resistor
49. Base cover spring support
50. Base foot
51. Base skirt
11/40
5. DESCRIPTION
Fig. 3
12/40
RX500 Operation Table : Column and trunk section detail
T-SM13h
RX500
OPERATION TABLE
5. DESCRIPTION
1
2
3
4
5
6
7
8
9
Fig. 4
RX500 Operation Table Base Detail (Short trunk end)
1
2
3
4
5
Fig. 5
T-SM13h
Standby hydraulic push buttons
Base cover microswitch
Standby hydraulic connectors
High current (30A) fuse
Door Microswitch
Standby power pack connector
Base cover microswitch
External battery charger socket
Fixing for cover retaining screw
Base cover microswitch
Base cover microswitch
Mains charging LED
Mains connection socket
Fixing for cover retaining screw
RX500 Operation Table Base Detail (Long trunk end)
13/40
6. MAINTENANCE
GENERAL
ii
6.1
Maintenance of the RX500 Powered
Operation Table falls into the following categories:
G
G
G
G
G
G
G
Cleaning and storage.
Adjustments.
General care and lubrication.
Removal and Installation.
Functional checks.
Fault diagnosis.
Hydraulic system.
CLEANING AND STORAGE
WARNING
Always switch off table at table ‘ON/OFF’
switch (item 18, Fig. 1) prior to cleaning.
iii
iv
v
vi
6.2
For cleaning and storage instructions of the
table refer to the RX500 Powered Operation Table
Instructions for Use (Publication No. T-IM28).
6.3
For cleaning and storage instructions of the
table accessories refer to the Accessory Instructions
for Use (Publication No. T-IM56).
Note: If the table is to be stored for any length of time
the head and leg sections should be fully lowered.
This is necessary to ensure that the gas spring seals
and pistons are kept lubricated.
GENERAL CARE AND LUBRICATION
6.4
Once a week proceed as follows:
Gas Springs
WARNING
The gas springs are filled with high pressure
gas. Do not attempt to open them.
CAUTION
Gas springs MUST NOT be additionally
lubricated.
6.5
The gas spring supports for the head and leg
sections are sealed units which require no routine
maintenance. Malfunction of a gas spring makes it
impossible to lock the head or leg sections in position.
Seepage of fluid indicates a failing unit.
6.6
If a gas spring is faulty, the complete unit must
be renewed; gas springs are non-repairable items
(see section 6.42).
Head, Leg and Infill Sections
6.7
Service the head, leg and infill sections as
follows:
i
Apply a smear of light machine oil to the guide
pins of the head, leg and infill sections, and to
the pivot pins of the head and leg sections.
14/40
Examine the head, leg, and infill sections for
signs of damage, particularly for scoring or
bending of the attachment guide pins. On the
head and leg sections only, examine the release
handles for signs of damage.
Check the guide pin retaining screws for tightness.
On the head and leg sections only, check the
hinge pivots, and particularly all pivot pin grubscrews, for security. (Note that the grub screw
for the main hinge pivot pin is underneath the
radiographic top.)
Check the side bars for security.
On the infill section, examine the guide pin
locking button devices for damage and ensure
that the mechanism which prevents removal of
the infill section before any attached section has
been removed, functions correctly (refer to
sections 6.48 and 6.49). Apply a smear of light
machine oil to all moving parts.
Head, Leg & Infill Sections Locking Mechanisms
6.8
Remove the head, leg and infill sections from
the table and clean out any collected fluff or other debris
from guide pin sockets in the ends of the trunk sections.
Spray a little aerosol lubricant into each socket. Check
the operation of locking mechanisms when re-attaching
the sections (for adjustment refer to section 6.48).
Long and Short Trunk Sections
6.9
Service the long, and short trunk sections as follows:
i
Apply a smear of light machine oil to the pivot
pins on the long and short trunk sections.
ii
Examine the guide pin button locking devices for damage (for
adjustment refer to section 6.48).Apply a smear of light machine
oil to all moving parts.
Radiographic Tops
6.10 Examine the radiographic tops for cracks, chips
and scoring. Significant damage will necessitate
replacement of the damaged section. Make sure that
the radiographic tops are securely attached (not
applicable to leg section).
Underside of the Table Base
6.11 To maintain the underside of the table base,
it is necessary to tilt the table onto its side as follows:
i
ii
iii
If necessary, remove head, leg and infill sections.
Using the hand control, raise the table to its
maximum height and make sure that the long
and short trunk sections are level.
Using the hand control, set the table top to the
maximum lateral tilt position corresponding to
the direction in which the table is to be tilted.
T-SM13h
RX500
OPERATION TABLE
6. MAINTENANCE
Access to Fuses
6.13 The mains fuse is found in the table base on the
standby panel (item 4, Fig.4). The other three fuses are
fitted on the main control PCB (see Fig. 8) in the base of
the table underneath the covers. For access see sections
6.24 to remove the covers and 6.25 to refit them.
Hand control
Fig. 6 Table tilted for access
iv
Place an anaesthetist’s stool, or a similar strong
support, along one side of the table. With two
people standing on the same side of the table
as the support (one at each end), tilt the table
over and gently lower it onto the support, making
sure that it rests on the side bars of the long and
short trunk sections as shown in Fig. 6.
6.12 With the table tilted, proceed as follows
(referring to Fig 7):
i
ii
iii
Examine the five base foot-pads for damage or
excessive wear. If necessary, replace the
appropriate base foot-pad as described in
sections 6.43 & 6.44.
Clean each castor assembly making sure that
they are free of dust and debris. Lubricate the
bearings of each castor with a light machine oil.
On completion, return the table upright.
1
2
3
4
5
Castor assembly
Table base plate
Height cylinder pivot clamp blocks
Height cylinder
Base feet
Fig. 7 Base detail table tilted
6.14 The factory sealed hand control requires no
maintenance. If a fault is suspected in the hand control
first test all table functions using a hand control known
to be fault free. If a fault is confirmed with the hand
control the complete assembly (including lead and
plug) should be replaced. (See Fig. 25 for hand control
function details).
After Maintenance
6.15 After maintenance on the operation table,
always check all functions (section 6.16) and lower
the table fully.
FUNCTIONAL CHECKS
General
6.16 The following functional checks should be
carried out after maintenance of the operation table,
or after rectification of any faults:
i
Check the state of batteries using the hand
control, codes 01 and 02 should not be displayed.
If they are the table batteries need recharging.
ii
Using the hand control, check that all table
movements agree with the Technical Data.
iii Using the foot control unit (optional extra),
check that the table movements are correct for
Trendelenburg, Reverse Trendelenburg and
Height.
iv Use hand control to check operation of the ‘auto
level’ function.
1
2
3
Programmed microcontroller
Beeper
Fuses
Fig. 8
T-SM13h
Main control Board
15/40
6. MAINTENANCE
Fig. 9
16/40
Hydraulic system - Schematic diagram
T-SM13h
RX500
OPERATION TABLE
6. MAINTENANCE
1
2
3
4
5
6
7
8
9
10
11
12
Manifold 1
Hydraulic connections
Power unit
Feed from reservoir
Power unit electrical lead
Base distribution board
Base control board
Manifold 2
Trendelenburg cylinder
Tilt cylinder
Manifold 4
Manifold 3
For break cylinders see Fig.18
and for height cylinder see Fig.22.
The lateral tilt cylinder is also
shown in greater detail in Fig.19.
Fig. 10
T-SM13h
Hydraulic system - main components
17/40
6. MAINTENANCE
HYDRAULIC SYSTEM
CAUTION
Scrupulous cleanliness is essential to prevent
contamination of the fluid in the hydraulic system.
Note: Hydraulic cylinder rams are retracted when the
table top is positioned as follows, but care must be
taken when moving the table into this position to avoid
damage, sections will be very close to the floor :
• Minimum height and onto castors.
• Maximum extension achievable at the
minimum height set above.
• Maximum tilt achievable with table at the
minimum height and extension set above (tilt
table such that the right hand side is lowered
when viewed from long trunk end of table).
Notes:
1
2
3
Use only Eschmann RX hydraulic oil, Part
No.699408, which is obtainable from Eschmann
Equipment or their accredited agents. Replace
cap on oil container after use.
When replacing hydraulic components all Banjo
fittings must be tightened to a torque setting
between 19 and 21 Nm.
The hydraulic system schematic diagram is
shown in Fig. 9 with the main components
illustrated in Fig. 10. Individual cylinders are also
shown in the ‘Removal and Installation’ section
later in the manual.
General
6.17 If the table cannot be placed into the castor
position using the hand control, it may be necessary
to manually raise the table base. To raise the table
base, proceed as follows:
i
ii
iii
Remove table base covers, see section 6.24.
Locate the Nyloc jacking nut at each corner of
the table base (see Fig.24, item 1) and wind
the nuts down evenly to raise the table base.
Return Nyloc jacking nuts to the position shown
in Fig.24 (i.e. flush with the top of the guide
pins) after corrective maintenance and replace
covers as section 6.25.
ADJUSTMENTS
Trendelenburg Microswitch
6.19 To check and adjust the Trendelenburg
microswitch (item 3, Fig. 11) proceed as follows:
i
ii
iii
iv
v
vi
Topping-up the Hydraulic Reservoir
6.18
i
ii
iii
iv
v
vi
vii
Top-up the hydraulic reservoir as follows:
Set table to an appropriate height and remove
base covers as described in section 6.24.
Release the central column cover and remove
the upstand as described in section 6.28 and
release bezel.
Retract all cylinder rams (see note below)
before filling reservoir so that true oil level can
be established. Overfilling could cause damage
to reservoir.
Remove the filler cap from the hydraulic
reservoir and fill the reservoir with Eschmann
RX hydraulic oil (see Note 1 above) until oil level
is 13 mm below the filler hole of the reservoir.
Refit the filler cap on reservoir.
Refit the central column cover and upstand as
described in section 6.29.
Refit the base covers as described in section 6.25.
18/40
Ensure the table is on a level surface.
Using the hand control, move the table top to
the maximum Trendelenburg position.
On the hand control, press the ‘auto level’ button
and wait until the table top stops when level.
Using an inclinometer (on section radiopaque
top not the mattress), check the angle of the
long trunk section in the horizontal plane.
If the angle is more than one degree out in either
direction adjust the Trendelenburg microswitch as
necessary, by releasing the adjusting screws (2,
Fig. 11) and moving the microswitch in the
appropriate direction, retighten the adjusting screws.
Repeat steps ‘ii-v’ until the long trunk section
stops level.
Lateral Tilt Opto
6.20 To check and adjust the lateral tilt opto (item
3, Fig. 12) proceed as follows:
i
ii
iii
iv
v
vi
Ensure the table is on a level surface.
Using the hand control, tilt the table top to the
maximum lateral tilt position (left or right).
On the hand control, press the ‘auto level’ button
and wait until the table top stops when level.
Using an inclinometer (on section radiopaque
top not the mattress), check the angle of the
table top in the lateral plane.
If the angle is more than one degree out in either
direction adjust the flag (item 4, Fig. 12) of the
lateral tilt opto by releasing the adjusting screws
(item 2, Fig. 12) and moving the flag in the
appropriate direction, retighten adjusting screws.
Repeat steps ‘ii-v’ until the table stops level.
T-SM13h
RX500
OPERATION TABLE
6. MAINTENANCE
Break Microswitch
6.21
To check and adjust the break microswitch
(item 1, Fig. 13) proceed as follows:
i
ii
iii
iv
v
1
2
3
4
5
6
7
8
Break cylinder
Microswitch adjusting screws
Trendelenburg microswitch
Yoke
Pivot pin
Pivot pin set screw
Tilt cylinder ram lock nut
Tilt cylinder ram
Fig. 11 Trendelenburg microswitch
1
2
3
4
5
Yoke
Adjusting screws
Lateral tilt opto board
Lateral tilt opto flag
Top of column distribution board
vi
vii
Ensure the table is on a level floor.
On the hand control, press the break
(extension) button and move the table top to
the maximum break (extension) position.
On the hand control, press the ‘auto level’ button
and wait until the table top stops when level.
Using an inclinometer (on section radiopaque
top not the mattress), check that the long trunk
section is level, if it is not adjust the
Trendelenburg microswitch as detailed in
section 6.19.
Using an inclinometer (on section radiopaque
top not the mattress), check the angle of the
short trunk section.
If the angle is more than one degree out in either
direction adjust the break microswitch by
releasing the adjusting screws (items 4, Fig.
13) and moving the microswitch in the
appropriate direction, retighten the adjusting
screws.
Repeat steps ‘ii-vi’ until the short trunk section
stops level.
1
2
3
4
5
6
Break microswitch
Long trunk assembly
Short trunk assembly
Adjusting screws
Tilt cylinder ram
Break cylinder ram
Fig. 13 Break microswitch
Fig. 12 Lateral tilt opto detail
T-SM13h
19/40
6. MAINTENANCE
Tilt Switch
REMOVAL AND INSTALLATION
6.22 To adjust the tilt switch (item 4, Fig. 14)
proceed as follows:
General
i
ii
iii
iv
v
vi
vii
Ensure the table is on a level floor.
On the hand control, press the ‘auto level’ button
and wait until the table top stops when level
(check the long and short truck sections are
level in both directions and adjust if required as
detailed in sections 6.19 and 6.21).
On the hand control, press patient left
orientation button (button 1, Fig. 27).
On the hand control, press the reverse
Trendelenburg button (button 4, Fig. 27) and
move the table top to the maximum reverse
Trendelenburg position.
Using an inclinometer (on the radiopaque top
not the mattress of the long trunk section),
check the angle of the table top. The angle
should be 35 degrees.
On the hand control, press the break (extension)
button and check for movement of the short trunk
section of the table top. If movement occurs,
adjust the tilt switch by releasing the adjusting
screws (item 3, Fig. 14) and moving the tilt switch
in the appropriate direction to stop any
movement of the short trunk section with the
table top in the reverse Trendelenburg position.
After adjusting the tilt switch repeat actions (iv)
(v) and (vi) until there is no movement of the
short trunk section in the maximum reverse
Trendelenburg position.
6.23 All equipment in the base of the operation
table is accessible after the base covers have been
removed (see section 6.24). To gain access to
equipment located around the central column it is
necessary to remove the top-of-column covers (see
section 6.26) and release the central column cover
and upstand if required (see section 6.28).
Remove Table Base Covers
6.24
i
ii
iv
v
To remove table base covers proceed as follows:
Open doors at the ends of the table base, see Fig.1.
At the long trunk end of the table base:
(a) Remove two screws (item 30, Fig. 1) and
shouldered washers and pull the long trunk end
base cover (item 44, Fig. 2) from the base.
At the short trunk end of the table base:
(a) Remove the two black button covers from
the standby hydraulic push buttons (item 19,
Fig. 1) by gently pulling them off.
(b) Remove two screws (item 30, Fig. 1) and
shouldered washers and pull the short trunk
end base cover (item 45, Fig. 2) from the base.
Remove the two base seals (item 42, Fig. 2).
The column seal (item 43, Fig. 2) can remain in
place on the upstand unless access is required
to the lower column (see section 6.28).
Note: When the hinged cover at the short trunk end of the
table is opened, or when the base cover is removed, a
microswitch operates to isolate the electrical supply to the
table. To operate the table with this cover removed, the
microswitch must be taped in the operated position.
Install Table End Base Covers
Note: Before replacing covers check that all cables
and hydraulic pipes are secured and that they cannot
be pinched, chaffed or cut by any moving parts.
6.25 To install table end base covers proceed as
follows referring as required to Fig.1 and 2 :
i
ii
1
2
3
4
Push button
Short trunk assembly
Adjusting screws
Tilt switch
Fig. 14 Tilt switch
20/40
Check that all tools and discarded equipment
have been removed from inside table base
before installing base covers.
To install the short trunk end base cover:
(a) Press the two springs at the short trunk
end of the base and locate the short trunk base
cover in the slide rails along the sides of the base.
(b) Push the end cover fully home and secure
with two screws and shouldered washers, finally
replace the two push button covers.
T-SM13h
RX500
OPERATION TABLE
6. MAINTENANCE
iii
To install the long trunk end base cover proceed
as follows referring as required to Fig.1 and 2 :
(a) Press two springs at the long trunk end
of the base and locate the end cover in the slide
rails along the sides of the base.
(b) Push the end cover onto the base until it
is approximately 3 to 4 mm from the short trunk
end base cover.
(c) Push two base seals into position
between the end base covers, and push the
long trunk end base cover fully into position.
Secure the long trunk base cover using two
screws and shouldered washers.
(d) If removed replace the column seal onto
the upstand, it may be necessary to leave the
column seal to contract after initial assembly
before butting the edges together, do not
stretch the seal or trim length.
(e) Test cover pressure microswitches.
Remove Top-of-Column Covers
6.26 To remove the two top-of-column covers (item
31, Fig. 1) proceed as follows:
i
Using the hand control or foot switch control
unit set the table to full height and full flexion
position.
ii
Switch the table ‘off’, unplug hand control and
remove the main 30 Amp fuse from the table
base (item 22, Fig. 1).
iii Remove the four screws and washers on the
top of the covers and the two push rivets (see
Fig. 15) at the bottom edge of the covers.
iv Release the two top-of-column covers taking care
when removing the covers to ensure that the
gaiter for the Trendelenburg cylinder is not
damaged.
Install Top-of-Column Covers
Note: Before replacing covers check that all cables
and hydraulic pipes are secured and that they cannot
be pinched, chaffed or cut by any moving parts.
6.27 Installation of the top-of-column covers is the
reverse of the removal procedure described in section
6.26. When installing the top-of-column covers make
sure that the gaiter for the Trendelenburg cylinder is
correctly installed.
Releasing the telescopic cover and upstand
6.28 To release the telescopic cover and upstand
(items 46 and 47, Fig. 2) proceed as follows:
i
Remove the top-of-column covers as described
in section 6.26.
ii
Remove all the push rivets (see Fig. 15) holding
the telescopic cover to the top bezel to enable
the cover to be lowered.
iii Flex upstand to release cover from its lower edge.
iv Remove the 4 slotted screws and the base seal
(item 42, Fig.2) from the lower edge of the
upstand and remove the upstand (if access to
the lower column is required).
Refixing the telescopic cover and upstand
Note: Before refitting covers and upstand check that
all cables and hydraulic pipes are secured and that
they cannot be pinched, chaffed or cut by any moving
parts and that the ribbon cable mechanisms are
working correctly.
.
6.29 Refit telescopic cover and upstand (if removed
for access to lower column) by the reverse of section
6.28 but note that it may be necessary to leave the
base seal to contract after initial assembly to the
upstand to allow the edges to butt together (do not
trim length to fit).
Removing the telescopic cover
6.30 To remove the telescopic cover (items 46, Fig.
2) proceed as follows:
i
a)
b)
a)
b)
c)
To remove rivets :
Pull up plunger head (see 2 above) taking care not
to damage rivet head.
Pull rivet out of cover section (see 1 above).
To replace rivets :
Align holes in cover sections (see 1 above).
Place rivet into hole so that the shoulder of the rivet
shaft is flush with the outer cover face (see 2 above).
Press rivet plunger head until flush with cover surface
(see 3 above).
Fig. 15 Cover retaining push rivets
T-SM13h
ii
Remove the top-of-column covers as described
in section 6.26.
Remove all the push rivets (see Fig. 15) holding
the telescopic cover to the top bezel. Then
remove the rivets in each pair of telescopic cover
section (top pair first then middle and lower) and
remove the telescopic cover. Remove the
upstand if required as detailed in section 6.28.
Replacing the telescopic cover
Note: Before refitting covers check that all cables and
hydraulic pipes are secured and that they cannot be
21/40
6. MAINTENANCE
1
2
4
5
6
7
8
9
10
11
12
13
14
15
16
17
18
19
Yoke pivot bolt
Spring washer
Yoke
Sel-Lok pin
Tilt opto flag
Yoke pivot
Tilt opto board
Top of column
casting
Washer
Yoke pivot bush
Tilt hanger
Microswitch plate
Microswitch
Microswitch
adjusting screws
Top of column
distribution board
Hinge plate
Height cylinder
locking screws
Column assy.
inner
NOTE: Revised new yoke assembly (preferred): New ‘Thrust washer’ (item 10, Part
number 110905) either side of item 19. Thrust washers orientation is important, position
black face of both towards head of pivot bolt. Use new ‘Washer’ (item 2, Part number
110904) and modified bush (no shoulder), with ‘Loctite 270’ (Part number 110906)
on screw thread of item 1.
Fig. 16 Top of column hinge assembly detail
22/40
T-SM13h
RX500
OPERATION TABLE
6. MAINTENANCE
pinched, chaffed or cut by any moving parts and that
the ribbon cable mechanisms are working correctly.
ix
.
6.31 Refit the telescopic covers (and upstand if
removed) in pairs in the correct sequence so they
work correctly by the reverse of section 6.30.
WARNING
Remove Long and Short Trunk Assemblies
6.32 To remove the long and shor t trunk
assemblies proceed as follows:
i
Remove the head, leg, and infill sections.
ii
Remove the top-of-column covers as described
in section 6.26.
iii Remove the black tops, side bars, aluminium
covers, plastic covers and hinge covers from
the long and short trunk assemblies.
iv Disconnect the hydraulic hoses (item 3 and 5,
Fig. 18) from the two break cylinders (item 7,
Fig. 18) and blank off the hydraulic connections
and cylinders.
v
Remove two screws (item 3, Fig. 14),
shakeproof washers and plain washers which
secure the tilt switch (item 4, Fig. 14) to the
short trunk assembly and remove the tilt switch.
vi Remove the lateral tilt opto flag (item 4, Fig.
12) to prevent damage by removing the two
adjusting screws (item 2, Fig. 12).
vii Remove the two screws (item 2, Fig. 11) ,
shakeproof washers and plain washers which
secure the Trendelenburg microswitch (item 3,
Fig. 11) to the tilt hanger (item 12, Fig. 16) and
remove the Trendelenburg microswitch and
microswitch plate (item 13 and 14, Fig. 16).
Fig. 17 Top of Trendelenburg cylinder
viii Remove the two screws (item 4, Fig. 13),
shakeproof washers and plain washers which
secure the ‘break’ microswitch (item 1, Fig. 13)
to the short trunk and remove the ‘break’
microswitch.
T-SM13h
Remove the ty-wrap straps which secure the
hydraulic hoses and the electrical wires to the
yoke and move the hydraulic hoses and
electrical wires clear of the yoke. Note routing
and attachment of hoses and wires.
The long and short trunk assemblies are heavy,
two people are needed to lift them. The next
stages will enable the table top assemblies to
move freely in Trendelenburg and then tilt
positions and will need to be firmly supported
until they have been removed and placed aside.
x
Remove the two dome headed nuts (item 1,
Fig. 17) and plain washers from the
Trendelenburg cylinder pivot pin on the
underside of the long trunk assembly. Remove
the pivot pin (item 4, Fig. 17) and disconnect
the Trendelenburg cylinder ram from the long
trunk assembly. Collect the two spacers (item
5, Fig.17) which are fitted on the pivot pin.
xi Remove the grub screw (item 5, Fig. 19) which
retains the pivot pin for the lateral tilt cylinder (item
1, Fig. 19). Remove the pivot pin (item 6, Fig. 19)
and disconnect the clevis (item 10, Fig. 19) on
the lateral tilt cylinder ram from the tilt hanger (item
12, Fig. 16 and item 7, Fig. 19), take care not to
misplace the bush inside the tilt hanger.
xii See note Fig. 16. Remove the hexagon headed
bolt (item 1, Fig 16), and shakeproof washer
(item 2, Fig. 16).
xiii See note Fig. 16. The pivot pin (item 7, Fig. 16)
together with washer (item 10, Fig.16) which
attaches the yoke (item 4, Fig.16) of the long trunk
assembly to the hinge, can now be removed if
the full weight of the Long and Short trunk
assemblies are supported. Remove the long and
short trunk assemblies and lay them aside upside
down taking care to protect the radiopaque
surfaces. Remove the Yoke pivot bush (item 11,
Fig. 16) and Sel-Lok pin (item 5, Fig.16) if required
from the yoke and inner column respectively.
Install Long and Short Trunk Assemblies
Note:Before proceeding read the Caution and notes
that precede section 6.17 and the WARNING
above in section 6.32.
6.33 To install the long and short trunk assemblies
proceed as follows:
Note: Apply Rocol white grease (Part No.110477) to
all pivot pins prior to assembly.
23/40
6. MAINTENANCE
1
2
3
4
5
6
7
8
9
Short trunk assembly
Short trunk pivot pin
Hydraulic connection
Hydraulic hoses
Hydraulic connection
Long trunk pivot pin
Break cylinder
Long trunk assembly
Break microswitch
Fig. 18
24/40
Break cylinders
T-SM13h
RX500
OPERATION TABLE
6. MAINTENANCE
1
2
3
4
5
6
7
8
9
10
11
12
13
Tilt cylinder
Hydraulic connection
Top of column solenoid board
Clevis nut
Pivot pin grub screw
Pivot pin
Tilt hanger
Microswitch adjusting screws
Break microswitch
Clevis
‘R’ clip
Washer
Pivot pin
Fig. 19
T-SM13h
Lateral tilt cylinder (upper bezel omitted for clarity)
25/40
6. MAINTENANCE
i
ii
iii
Apply Rocol white grease (Part No.110477) to
the Yoke pivot bush (item 11, Fig. 16) and install
into the inner column.
Using at least two people, carefully lift and correctly
position the long and short trunk assemblies onto
the inner column hinge (item 9, Fig. 16) and replace
the pivot pin washer and Sel-Lok pin (items 5,7 and
10, Fig. 16). Hold in place with hexagon headed bolt
and shakeproof washer (items 1 and 3, Fig. 16).
Attach the eye-end of the Trendelenburg
cylinder to the pivot plates on the cross member
of the long trunk assembly as follows (refer to
Fig.17 and Fig. 19 as required) :
(a) Position the eye-end of the Trendelenburg
cylinder between the pivot plates on the cross
member.
(b) Install pivot pin through one pivot plate on
cross member and install one spacer on pivot pin.
(c) Push pivot pin through the spacer and eyeend and install remaining spacer on the pivot pin.
(d) Push the pivot pin through the second
spacer and the second pivot plate.
(e) Secure the pivot pin equally between the pivot
plates using the two dome nuts and plain washers.
iv
Position the clevis on the tilt cylinder ram around
the tilt hanger and install the pivot pin taking
care not to dislodge the bush in the tilt hanger.
Secure the pivot pin in the lugs of the clevis
with pivot pin grub screw.
v
Route the hydraulic hoses and electrical wires
over the yoke in the same positions noted in
the removal procedure.
vi Remove the blanks from the break cylinder
hydraulic hoses and connect the hydraulic
hoses to each break cylinder.
vii Install the ‘break’ microswitch on the short trunk
assembly, ensuring that two spacers are installed
behind the bracket, and secure with two screws,
shakeproof washers and plain washers.
viii Install the Trendelenburg microswitch on the tilt
hanger with the microswitch plate and secure with
two screws, shakeproof washers and plain washers.
ix Install the lateral tilt opto flag onto the hinge
pivot pin and secure with two screws,
shakeproof washers and plain washers.
x
Install the tilt switch on the inside web of the
short trunk section, ensuring wires for the switch
faces toward the end of the short trunk. Secure
the tilt switch with two screws, shakeproof
washers and plain washers.
xi Use ty-wrap straps to secure the hydraulic
hoses and the electrical wires.
26/40
xii
Top up the hydraulic system reservoir as
described in section 6.18.
xiii Check and adjust the Trendelenburg and break
microswitches, lateral tilt opto and tilt switch as
described in sections 6.19-6.22.
xiv Carry out a full functional check of the operation
table as described in section 6.16.
xv Install plastic covers on the hinge pivot points
and install the plastic covers, aluminium outer
covers, black tops and side bars on the long
and short trunk assemblies. Make sure that the
plastic covers and the aluminium outer covers
do not protrude above the top face of the long
and short trunk castings and that they do not
restrict push button movement.
xvi Install top-of-column covers as described in
section 6.27.
Remove Break Cylinder
Note: Before proceeding read the Caution and notes
that precede section 6.17.
6.34 To remove a break cylinder proceed as
follows:
i
ii
iii
iv
v
At the applicable side of the long trunk
assembly, remove the side bar, aluminium outer
cover, inner plastic cover and the hinge cover.
Disconnect the three hydraulic hoses (item 4,
Fig.18) from the applicable break cylinder (item
7, Fig.18) and blank off the hydraulic connections
and cylinder (items 3 and 5, Fig. 18).
At the short trunk end of the break cylinder,
remove the grub screw which secures the pivot
pin (item 2, Fig. 18) and remove the pivot pin.
At the long trunk end of the break cylinder,
remove the grub screw which secures the pivot
pin (item 6, Fig. 18) and remove the pivot pin.
Remove break cylinder from long trunk assembly.
Install Break Cylinder
6.35 To install a break cylinder proceed as follows
(referring as required to Fig. 18) :
i
ii
iii
Position the break cylinder in the long trunk
assembly with the cylinder eye-end positioned
at the long trunk end.
Apply Rocol white grease (Part No.110477) to
the pivot pin for the long trunk end and install
the pivot pin in the long trunk and the break
cylinder eye-end. Secure the pivot pin to the
long trunk with a grub screw.
Apply Rocol white grease (Part No.110477) to
the pivot pin for the short trunk end and install
T-SM13h
RX500
OPERATION TABLE
6. MAINTENANCE
the pivot pin in the short trunk and the break cylinder
piston eye-end. Secure the pivot pin to the short
trunk with a grub screw.
iv Remove the blanks from the three hydraulic
hoses for the break cylinder and connect the
hydraulic hoses to the break cylinder.
v
Top up the hydraulic system reservoir as
described in section 6.18.
vi Carry Out a functional check of the operation
table as described in section 6.16.
vii Install the hinge cover, inner plastic cover,
aluminium outer cover, and side bar on the
applicable side of the long trunk assembly. Make
sure that the inner plastic cover and the outer
aluminium cover do not protrude above the top
face of the long trunk casting and that they do
not restrict push button movement.
out a functional test of the operation table as
described in section 6.16.
Remove Trendelenburg Cylinder
Note: Before proceeding read the Caution and notes
that precede section 6.17.
6.38 To remove the Trendelenburg cylinder (item
2, Fig. 20) proceed as follows:
i
ii
Remove the top-of-column covers as described
in section 6.26, and release the central column
telescopic cover as described in section 6.28.
Disconnect the two hydraulic hoses from the
Trendelenburg cylinder and blank off the
hydraulic connections and cylinder (only one
connection shown, item 3, Fig. 20, the second
one is beneath the bellows).
Remove Lateral Tilt Cylinder
Note: Before proceeding read the Caution and notes
that precede section 6.17.
6.36 To remove lateral tilt cylinder (item 1, Fig. 19)
proceed as follows:
i
ii
iii
iv
v
Remove the top-of-column covers as described
in section 6.26, and release the telescopic
column cover as described in section 6.28.
Disconnect the two hydraulic hoses (item 2, Fig.
19) from the lateral tilt cylinder (item 1, Fig. 19)
and blank off the hydraulic connections.
Remove the grub screw (item 5, Fig.19) which
retains the lateral tilt cylinder pivot pin (item 6,
Fig. 19) and remove the pivot pin. Disconnect
the lateral tilt cylinder from the tilt hanger
assembly (take care not to loose the bush in
the tilt hanger).
At the column chassis, remove the ‘R’-clip (item
11, Fig. 19) from each end of the pivot pin (item
13, Fig. 19). Remove the washers (item 12, Fig.
19) and remove the pivot pin.
Remove the lateral tilt cylinder and remove clevis
if refitting a new cylinder by releasing nut (item 4
Fig. 19) and unscrewing clevis (item 10, Fig. 19).
1
2
3
4
5
6
Install Lateral Tilt Cylinder
6.37 Installation of the lateral tilt cylinder is the reverse
of the removal procedure, however, note the following
points on installation and refer to Fig. 19 as required :
i
ii
Apply Rocol white grease (Part No.110477) to
the pivot pins prior to installation.
On completion, top-up the hydraulic system
reservoir as described in section 6.18, and carry
T-SM13h
Trendelenburg cylinder bellows
Trendelenburg cylinder
Hydraulic connection
Pivot pin nut
Spacers
Pivot pin
Fig. 20 Trendelenburg cylinder
iii
At the long trunk assembly, remove the two dome
headed nuts (item 1, Fig. 17) and plain washers
(item 6, Fig. 17) from the Trendelenburg cylinder
27/40
6. MAINTENANCE
pivot pin (item 4, Fig. 17) and remove the pivot pin
to disconnect the eye-end of the Trendelenburg
cylinder from the long trunk assembly (taking care
to retain the spacers (item 5, Fig. 17).
iv At the column chassis, remove nut (item 4, Fig.
20) from each end of Trendelenburg cylinder
pivot pin (item 6, Fig. 20) and remove pivot pin
(take care to retain spacers item 5, Fig. 20).
v
Remove the Trendelenburg cylinder and remove
the eye end from the piston rod.
Install Trendelenburg Cylinder
iv
Remove the eight screws (item 8, Fig.22) and
washers and remove the two clamp blocks (item
3, Fig. 22) which attach the pivot pin (item 9, Fig.
22) for the height cylinder to the base of the table.
Disconnect the bottom hydraulic hose (Fig. 22,
item 6) withdraw the height cylinder from the table
column and then reconnect the hose. Power cylinder
to minimum height to return most of the hydraulic
oil to the reservoir. Disconnect both hydraulic hoses
and blank off the hydraulic connections and cylinder.
v
6.39 Installation of the Trendelenburg cylinder is
the reverse of the removal procedure, however, note
the following points on installation:
i
ii
iii
Apply Rocol white grease (Part No.110477) to
the pivot pins prior to installation.
When connecting Trendelenburg cylinder to
long trunk assembly and column chassis ensure
two spacers are fitted on each pivot pin.
On completion, top up the hydraulic system
reservoir as described section 6.18, and carry
out a functional test of the operation table as
described in section 6.16.
Remove Height Cylinder
Fig. 22 Bottom of height cylinder detail
vi
Note: Before proceeding read the Caution and notes
that precede section 6.17.
6.40 To remove the height cylinder power table to
maximum height and proceed as follows:
i
ii
Remove top-of-column covers (see section 6.26).
(WARNING The following procedure will need
at least three people as the table is heavy.
Extreme care must also be taken to avoid
injury and damage to the table). Gain access
to the underside of the table base by carefully
laying the table onto its side on the floor.
Install Height Cylinder
6.41 To install the height cylinder proceed as
follows referring as required to Fig. 21 and 22 :
i
ii
iii
iv
Fig. 21 Top of column detail
iii
Locate and remove the four screws (item 2, Fig. 21)
in the hinge plate (item 3, Fig. 21) which secure
the rod end of the height cylinder (item 4, Fig. 22).
28/40
Remove the pivot pin from the cylinder end of
the height cylinder and remove the rod end from
the piston rod.
v
Apply Loctite 222 (Part No.670650) to the threads
of the height cylinder piston rod and install the
rod end on the piston rod of the height cylinder.
Remove the blanks from hydraulic hoses and
cylinder and connect the hoses to the height
cylinder. Power cylinder to maximum height and
then disconnect the bottom hose.
Install the height cylinder in the table column
with the rod end upper most and reconnect the
bottom hose. Make sure that the rod end seats
correctly in the hinge plate.
Secure the rod end of the height cylinder to the
hinge plate with four set screws (item 2, Fig. 21). It
is important that the socket set screws are
below flush of hinge plate when fully tightened.
Note: Apply Loctite 222 (Part No.670650) to
the threads of the screws prior to installation.
Apply Rocol white grease to the pivot pin and
install the pivot pin in the cylinder end of the
height cylinder.
T-SM13h
RX500
OPERATION TABLE
6. MAINTENANCE
vi
Position the pivot pin on the base of the table
and secure it with two clamp blocks. Secure the
two clamp blocks with eight screws and washers.
vii Place the operation table in the upright position.
viii Top up the hydraulic reservoir as described in
section 6.18.
ix Carry out a functional check of the operation
table as described in section 6.16.
x
Install the top-of-column covers as described
in section 6.27.
iv
Install Batteries
6.45 Installation of the batteries is the reverse of
the removal procedure, then replace covers as section
6.25.
Remove the Base Feet
6.46
i
Gas Spring Replacement
6.42 To remove and replace a head or leg section
gas spring proceed as follows :
ii
Note: In Fig. 23 a head section is shown, the
arrangement is basically the same for a leg section
also see WARNINGS and Caution in section 6.4.
i
ii
iii
iv
Release gas piston nut (1, Fig.23) from link (4, Fig. 23)
Release grub screw (2, Fig. 23) retaining pivot pin
(3, Fig. 23) and remove the pivot pin by inserting a
screw into the end of the pivot pin to aid removal.
Unscrew the gas spring piston from the link.
Replace a new gas spring by the reverse of
above (adjusting it as below) and lubricate the
pivot pin with grease.
Using the cord provided, lift the batteries from
base.
iii
To remove the base feet, proceed as follows:
With the table in the castor position remove the
base covers as described in section 6.24.
Remove each of the four corner feet as follows:
(a) Turn the Nyloc nut (1, Fig.24) down
sufficiently to add and lock another nut onto it.
(b) Loosen the nut (4, Fig.24) securing the
corner guide pin (2, Fig.24) to the base.
(c) Loosen and remove the guide pin from
the foot (5, Fig.24).
(d) Remove the foot from the base by pulling
it away from the base with the two Sel-Lok pins.
To remove the fifth foot, proceed as follows:
(a) Remove the 30A fuse (item 4, Fig.4).
(b) Remove the battery at the short trunk end
of the base (see section 6.43).
(c) Remove one socket head countersunk
screw with spring washer and remove the foot
from the base with the two Sel-Lok pins.
Fig. 23 Gas spring detail
v
Adjust the gas spring by screwing the piston into
the link until the actuator nipple has 0.5-1.0mm
clearance with the release bar and ensure that
both gas springs of the section are adjusted to
match. Finally tighten the piston nut (1, Fig. 23)
onto the link.
Remove Batteries
6.43 To remove the batteries proceed as follows:
i
Remove the base covers as described in
section 6.24.
ii
Remove the 30A fuse (item 4, Fig.4).
iii Disconnect the positive (+) and negative (-)
leads from each battery.
T-SM13h
Fig. 24 Base feet detail
29/40
6. MAINTENANCE
Install the Base Feet
Push button replacement and adjustment
6.47
6.48 To replace the push-button catches remove
any attached table section, refer to Fig.26 and
proceed as follows:
i
Remove screw (1) to release the push-button.
The right hand push-button operates in
conjunction with spring loaded plungers (2)
which hold the push-button ‘in’ when pressed
with a section in position. To access to these
plungers place a screwdriver in catch retainer
(3) and remove plungers (2) with spring.
To install the base feet, proceed as follows:
i
Install each of the four corner feet as follows:
(a) Fit two new Sel-Lok pins into the foot, ensuring they are pressed to the bottom of the blind holes.
(b) Position the foot on the base plate and secure
it using corner guide pin, nut and spring washer
(spring 3, Fig.24 should still be on guide pin).
(c) Remove the lock nut placed at stage (i)
section 6.46 and turn Nyloc nut (item 1, Fig.
24) up until it is flush with the top of the guide
pin (item 2, Fig. 24) as shown in Fig. 24.
ii
Install the fifth foot as follows:
(a) Fit two new Sel-Lok pins into the foot,
ensur-ing they are pressed to the bottom of the
blind holes.
(b) Position the fifth foot on the base plate
and secure it using the socket head
countersunk screw and spring washer.
(c) Install the battery at the short trunk end
of the table base and replace the 30A fuse.
iii Install the base covers as described in section 6.25.
Infill interlocking mechanism replacement
6.48 To remove and replace the interlocking
mechanism in the infill section, refer to Fig. 25 and
proceed as follows:
i
Release each interlock rod (4 and 6) from the
connecting block (2) by releasing the grub
screws in connecting block (2).
ii
Replace any worn parts and reassemble as shown
in Fig. 25, with 5mm of rod 6 and 4mm of rod 4,
protruding through the connecting block (2) and
springs (3) correctly positioned. Finally adjust the
mechanism by inserting tool No.1752 into the guide
pin hole and pushing fully home, rod (4) should
protrude 6.5mm out of the infill casting.
iii Lubricate all moving parts with a smear of light
machine oil and check operation, (i.e. a head
or leg section guide pin (1) should operate the
mechanism as shown in Fig.25).
Fig. 26 Catch mechanism
ii
iii
If the plunger has become damaged or distorted
it should be replaced. If the latch has scored the
guide pin of head, leg or infill section the complete
push-button and guide pin should be replaced.
Reassemble using new parts as required with
Loctite on screw (1) and ensure free movement of
all parts, lubricating with light machine oil. It is advised
that setting tool number T1612 Part No. 759579 is
used when finally adjusting push buttons as follows:
a) Push setting tool T1612 into guide pin hole
up to the edge of the groove and tighten screw
(1) until the washer (5) just touches the side of
the casting with the setting tool in place.
b) Check the setting of the push button by sliding the
tool in and out slowly, it should be possible to feel the
push button rubbing on the gauge by resting a finger
lightly on the button and a slight jump of the button
will be felt when the gauge contacts the button.
Removal and installation of hydraulic components
Note: Before proceeding read the Caution and notes
that precede section 6.17.
6.50 The hydraulic power unit is replaced as a
complete unit and is a self-evident procedure. The
manifold and solenoid valve assemblies should be
treated similarly. Hydraulic cylinder replacement is
covered individually in sections 6.34 to 6.41. Check
all table functions after removal and installation, as
detailed in section 6.16.
Removal and installation of electrical components
Fig.25 Infill interlocking mechanism
30/40
6.51 All PCBs are non-repairable items and should
be replaced as complete units. Replacement of all
electrical components is a self evident procedure.
T-SM13h
RX500
OPERATION TABLE
6. MAINTENANCE
FAULT DIAGNOSIS
6.52 The fault diagnosis table that follows lists possible causes of faults and/or conditions that can be rectified
during use, or maintenance procedures, depending on the remedy given. Electrical/electronic faults should be
traced and rectified in conjunction with the relevant circuit diagrams supplied (see Index on page 33). For any
faults, listed or not, which cannot be resolved, please contact the Eschmann After Sales Service Department;
for details see inside front cover.
TABLE 1 - FAULT DIAGNOSIS
Fault/Condition
1 Code 01
is displayed.
Possible Cause
Remedy
Battery voltage low,
i.e. below 18V d.c. on load.
Charge batteries using
internal battery charger.
Engineer to check condition
of batteries and replace if
necessary.
2 Code 02
is displayed.
Battery voltage critically low,
i.e. less than 18V d.c. off load.
Charge batteries using
external battery charger.
Engineer to check condition
of batteries and replace if
necessary.
Note: Low battery detection does not cause the table to stop moving. The warnings can only be
cleared by switching the table ‘off’ at the base and then ‘on’ again. Code 02 stops all table
movements except Trendelenburg.
3 Code 03 is displayed and
a fast repeated audible warning
is given from the base and the
table will not move when any
motion is selected.
One of the base cover pressure
switches has operated.
Remove object from base cover.
4 Code 03 is displayed and
a fast repeated audible warning
is given from the base when the
table is moving from the castor
position to the brake position.
One of the base cover pressure Remove object from base cover.
switches has been operated. If
the hand control button remains
pressed when the condition occurs,
the table will stop for two seconds,
reverse its movement for 1.5
seconds and then stop.
5 Code 04 is displayed and
Tilt switch has
Table will not move when Trend, operated.
reverse Trend, Break Up or
Break Down buttons are pressed.
Press opposite button, e.g.
Reverse Trend instead of Trend
or, Break Up instead of Break .
Down.
6 Code 04 is displayed and
Table movement stops when
moving to Trend or Break
Down positions.
Press opposite button, e.g.
Reverse Trend instead of Trend or
Break Up instead of Break Down.
Tilt switch has operated
to limit movement of table top.
(Continued)
T-SM13h
31/40
6. MAINTENANCE
TABLE 1 - FAULT DIAGNOSIS
Fault/Condition
Possible Cause
7 Code 05 is displayed and
The applicable table motion
an LED is illuminated (see below), has been used for more than
the Table stops moving and there 40 seconds (consider whether
is a continuous audible warning a button has been accidentally
given.
depressed and held down).
Button Pushed
LED illum’d.
Trend (3 or 4)
Patient (L) - (1)
Break (5 or 6)
Patient (R) - (2) Hand control membrane
Lat’l Tilt (7 or 8)
Brake - (13) faulty and making contact
Height (9 or 10)
Height - (10) without being touched.
Castor (12)
Castor - (12)
Auto level (11)
Auto level - (11)
8
Remedy
Switch the table ‘off’, using
the table on/off switch, (Fig.1
item 18), and then switch back ‘on’.
Engineer to check Hand control.
Code 06 is displayed and
Table stops moving.
Table duty cycle has been
Wait for sufficient time to allow
exceeded (2 minutes on
duty cycle protection circuit to
in 8 minutes).
re-enable.
Note: With this condition, movement of the table top to the full Trendelenburg position (orange hand
control button 3 Fig. 4) is still possible.
9 Code 07 is displayed and
Table stops moving, and there
is a continuous audible warning
given.
A hydraulic solenoid has
gone open or short-circuit.
Engineer to identify and replace
the faulty hydraulic solenoid.
10 Code 08 is displayed.
Height Up button is pressed
when table is not on its feet.
Warnings will stop when Height Up
button is released. Press Brake
button (13) then Height up (9).
11 Code 09 is displayed.
Castor button is pressed with
table above minimum height.
Warnings will stop when Castor
button is released. Press Height
Down button (10) until minimum
height then Castor button (12).
12 Code 10 is displayed and
Footswitch unit not connected.
footswitch cannot be selected
by pressing ‘footswitch’ button
(see Fig. 4 item 14) on the hand
control.
Connect footswitch unit.
(Continued)
32/40
T-SM13h
RX500
OPERATION TABLE
6. MAINTENANCE
TABLE 1 - FAULT DIAGNOSIS
Fault/Condition
13 Code 10 is displayed and
footswitch LED flashes
(see Fig. 4 item 14) and table
stops moving,
Possible Cause
The footswitch system has
failed.
Remedy
Re-select footswitch by pressing
footswitch select button and re-try.
If fault repeats, engineer to check
connections and, if necessary,
replace footswitch.
14 A single audible warning is given Height down button is pressed
from the hand control and the
when table is already at
table will not move
minimum height.
Warnings will stop when
appropriate hand control button
is released.
15 Red emergency stop LED
The ‘emergency stop’ button
continuously illuminated
has been pressed
accompanied by a continuous
audible warning sound from the
base and an intermittent warning
sound from the hand control.
To reset ‘emergency
stop’, switch table ‘off’
and then ‘on’ again.
16 Table will not move and main
control board audible warning
sounds.
The serial communication link
between the main control board
and the hand control has failed,
e.g. because of a broken wire or
the hand control becoming
disconnected.
Reconnect hand control or
engineer to locate and repair
broken wire.
Try different handset socket, if
problem solved engineer to inspect
faulty socket.
17 Table will not move.
End door (short trunk
section end) is open.
Close door or operate
door microswitch.
CIRCUIT DIAGRAM INDEX
Drawing No.
699501
699569
699497
699755
700303
699495
699980
699819
699364
T-SM13h
Title
Base distribution board
Opto board
Top-of-column solenoid board
Pin connections
Tilt opto board
Top-of-column distribution board
Battery charger distribution board
RX500 Main control board
RX500 System diagram
Fig. No.
27
28
29
30
31
32
33
34
35
Page No.
35
35
36
36
36
37
38
39
40
33/40
6. MAINTENANCE
1.
2.
3.
4.
5.
6.
7.
8.
9.
10.
11.
12.
13.
14.
15.
16.
Patient orientation button and green indicator.
Patient orientation button and green indicator.
Trendelenburg button (orange).
Reverse Trendelenburg button.
Break (Extension) button.
Break (Flexion) button.
Lateral tilt button.
Lateral tilt button.
Table raising button.
Table lowering button.
Return to pre-set (auto level) position button.
Castor button and yellow indicator.
Brake button and yellow indicator.
Footswitch control button and yellow indicator.
Display panel for two digit code .
Emergency stop button and red indicator.
Fig. 27
Hand control functions
TABLE 2 : CODES FOR 2-DIGIT DISPLAY
CODE
01
02
03
04
05
06
07
08
09
10
10+LED
CAUSE
Battery voltage low.
Battery voltage critically low.
Base cover switch operated.
Maximum Break or Trendelenburg achieved.
Button pressed for over 40 seconds.
Table duty cycle (2 min. in 8) exceeded.
Hydraulic solenoid failure.
Height Up button pressed with table on castors.
Castor button pressed with table raised.
Footswitch selected without Footswitch.
Footswitch system failure.
REMEDY
Recharge batteries as soon as possible.
Recharge batteries immediately.
Remove pressure or weight from cover.
Select reverse of function.
Switch table ‘off’ then ‘on’ with switch 18.
Allow time for auto reset.
Call engineer.
Brake table with button (13).
Lower table fully with button (10).
Connect footswitch.
Retry and/or call engineer.
See Table 1 for more details of the codes and remedies.
34/40
T-SM13h
RX500
OPERATION TABLE
6. MAINTENANCE
Fig. 28
Base Distribution Board
Fig. 29
T-SM13h
Opto Board
35/40
6. MAINTENANCE
Fig. 30
Top-Of-Column Solenoid Board
Fig. 31
Fig. 32
36/40
Pin Connections
Tilt opto board
T-SM13h
RX500
OPERATION TABLE
6. MAINTENANCE
Fig. 33
T-SM13h
Top-Of-Column Distribution Board
37/40
6. MAINTENANCE
Fig. 34
38/40
Battery Charger Distribution Board
T-SM13h
RX500
OPERATION TABLE
T-SM13h
39/40
Eschmann Equipment, Peter Road, Lancing, West Sussex, BN15 8TJ, England.
Tel: +44 (0) 1903 753322. Fax: +44 (0) 1903 766793. www.eschmann.co.uk