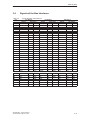
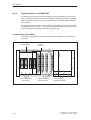
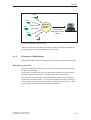
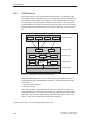
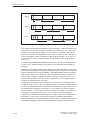
1
Table of Contents
SICOMP IMC
Industrial Microcomputer
System Manual
SICOMP IMC System
1
SMP16 System
2
AMS System
3
PCI System
4
Compact Computer
5
Assembling Center
6
Power Supplies
7
System Layout
8
Software
9
Communication
10
Commissioning, Testing and
Debugging
11
Environmental Requirements
12
Service/System Consulting/
Training
13
Glossary/Abbreviations
6AR1950-7AA00-2CA0
Release 09.98
Safety Guidelines
This manual contains notices which you should observe to ensure your own personal safety, as well as to protect
the product and connected equipment. These notices are highlighted in the manual by a warning triangle and are
marked as follows according to the level of danger:
Danger
!
indicates that death, severe personal injury or substantial property damage will result if
proper precautions are not taken.
Warning
!
indicates that death, severe personal injury or substantial property damage can result if
proper precautions are not taken.
Caution
!
indicates that minor personal injury or property damage can result if proper precautions
are not taken.
Note
draws your attention to particularly important information on the product, handling the
product, or to a particular part of the documentation.
Qualified Personnel
The device/system may only be set up and operated in conjunction with this manual. Only qualified personnel
should be allowed to install and work on this equipment. Qualified persons are defined as persons who are authorized to commission, to ground, and to tag circuits, equipment, and systems in accordance with established safety
practices and standards.
Trademarks
SICOMPR is a registered trademark of SIEMENS AG.
Some of the other designations used in this publication may also be registered trademarks; the owner’s rights may
be violated if they are used by third parties for their own purposes.
Copyright Siemens AG 1998 All rights reserved
Disclaimer of Liability
The reproduction, transmission or use of this document or its contents is not
permitted without express written authority. Offenders will be liable for
damages. All rights, including rights created by patent grant or registration of
a utility model or design, are reserved.
We have checked the contents of this manual for agreement with the hardware and software described. Since deviations cannot be precluded entirely,
we cannot guarantee full agreement. However, the data in this manual are
reviewed regularly and any necessary corrections included in subsequent
editions. Suggestions for improvement are welcomed.
Siemens AG
Automation and Drive Technology
Combination technology
P.O. Box 2355, D-90713 Fuerth
E Siemens AG 1998
Subject to change without prior notice
Siemens Aktiengesellschaft
Order no. 6AR1950-7AA00-2CA0
Table of Contents
1
SICOMP IMC System . . . . . . . . . . . . . . . . . . . . . . . . . . . . . . . . . . . . . . . . . . . . . . . . . . . .
1–1
2
SMP16 System . . . . . . . . . . . . . . . . . . . . . . . . . . . . . . . . . . . . . . . . . . . . . . . . . . . . . . . . .
2–1
2.1
System Overview . . . . . . . . . . . . . . . . . . . . . . . . . . . . . . . . . . . . . . . . . . . . . . .
2–2
2.2
2.2.1
2.2.2
Function Description . . . . . . . . . . . . . . . . . . . . . . . . . . . . . . . . . . . . . . . . . . . . .
Bus Elements . . . . . . . . . . . . . . . . . . . . . . . . . . . . . . . . . . . . . . . . . . . . . . . . . . .
System Architecture . . . . . . . . . . . . . . . . . . . . . . . . . . . . . . . . . . . . . . . . . . . . .
2–5
2–5
2–6
2.3
General Technical Description . . . . . . . . . . . . . . . . . . . . . . . . . . . . . . . . . . . . .
2–8
2.4
2.4.1
2.4.2
Signals of the Bus Interface . . . . . . . . . . . . . . . . . . . . . . . . . . . . . . . . . . . . . . .
Explanation of Table 2-4 . . . . . . . . . . . . . . . . . . . . . . . . . . . . . . . . . . . . . . . . . .
Description of the Bus Signals . . . . . . . . . . . . . . . . . . . . . . . . . . . . . . . . . . . .
2–9
2–10
2–11
2.5
2.5.1
2.5.2
2.5.3
2.5.4
2.5.5
2.5.6
2.5.7
Data Transmission on the Bus . . . . . . . . . . . . . . . . . . . . . . . . . . . . . . . . . . . .
General Description . . . . . . . . . . . . . . . . . . . . . . . . . . . . . . . . . . . . . . . . . . . . .
Data Bus Length . . . . . . . . . . . . . . . . . . . . . . . . . . . . . . . . . . . . . . . . . . . . . . . .
Control of the Data Bus length with IOCS16* and MEMCS16* . . . . . . . . .
Read Operations . . . . . . . . . . . . . . . . . . . . . . . . . . . . . . . . . . . . . . . . . . . . . . . .
Write Operations . . . . . . . . . . . . . . . . . . . . . . . . . . . . . . . . . . . . . . . . . . . . . . . .
Slave-Master Synchronization with RDYIN . . . . . . . . . . . . . . . . . . . . . . . . . .
Command Delays and Wait Cycles . . . . . . . . . . . . . . . . . . . . . . . . . . . . . . . .
2–19
2–19
2–19
2–20
2–21
2–21
2–21
2–22
2.6
Combination of SMP16 and SMP Components . . . . . . . . . . . . . . . . . . . . . .
2–23
2.7
List of References . . . . . . . . . . . . . . . . . . . . . . . . . . . . . . . . . . . . . . . . . . . . . . .
2–26
AMS System . . . . . . . . . . . . . . . . . . . . . . . . . . . . . . . . . . . . . . . . . . . . . . . . . . . . . . . . . . .
3–1
3.1
System Overview . . . . . . . . . . . . . . . . . . . . . . . . . . . . . . . . . . . . . . . . . . . . . . .
3–2
3.2
3.2.1
3.2.2
Function Description . . . . . . . . . . . . . . . . . . . . . . . . . . . . . . . . . . . . . . . . . . . . .
Bus Elements . . . . . . . . . . . . . . . . . . . . . . . . . . . . . . . . . . . . . . . . . . . . . . . . . . .
Integration of the SMP16 and iPCI System in the AMS System . . . . . . . .
3–4
3–4
3–6
3.3
General Technical Description . . . . . . . . . . . . . . . . . . . . . . . . . . . . . . . . . . . . .
3–7
3.4
3.4.1
3.4.2
Signals of the Bus Interfaces . . . . . . . . . . . . . . . . . . . . . . . . . . . . . . . . . . . . . .
Information on Table LEERER MERKER . . . . . . . . . . . . . . . . . . . . . . . . . . .
BDescription of the us Signals . . . . . . . . . . . . . . . . . . . . . . . . . . . . . . . . . . . .
3–9
3–10
3–11
3.5
3.5.1
3.5.2
3.5.3
3.5.4
How the AMS Bus Functions . . . . . . . . . . . . . . . . . . . . . . . . . . . . . . . . . . . . . .
Initialization . . . . . . . . . . . . . . . . . . . . . . . . . . . . . . . . . . . . . . . . . . . . . . . . . . . . .
Data Transmission . . . . . . . . . . . . . . . . . . . . . . . . . . . . . . . . . . . . . . . . . . . . . .
Interrupt Operation . . . . . . . . . . . . . . . . . . . . . . . . . . . . . . . . . . . . . . . . . . . . . .
Bus Allocation Control . . . . . . . . . . . . . . . . . . . . . . . . . . . . . . . . . . . . . . . . . . .
3–16
3–16
3–16
3–18
3–19
3.6
Combination of AMS, SMP16 and SMP Components . . . . . . . . . . . . . . . .
3–20
3
SICOMP IMC – System Manual
J31069-D2001-U001-A0-7618
I
Table of Contents
4
PCI System . . . . . . . . . . . . . . . . . . . . . . . . . . . . . . . . . . . . . . . . . . . . . . . . . . . . . . . . . . . .
4–1
4.1
4.1.1
4.1.2
4.1.3
System Overview . . . . . . . . . . . . . . . . . . . . . . . . . . . . . . . . . . . . . . . . . . . . . . .
Backplane Bus System . . . . . . . . . . . . . . . . . . . . . . . . . . . . . . . . . . . . . . . . . .
Located Expansion Bus . . . . . . . . . . . . . . . . . . . . . . . . . . . . . . . . . . . . . . . . . .
Nomenclature . . . . . . . . . . . . . . . . . . . . . . . . . . . . . . . . . . . . . . . . . . . . . . . . . . .
4–2
4–2
4–3
4–3
4.2
4.2.1
4.2.2
4.2.3
iPCI System . . . . . . . . . . . . . . . . . . . . . . . . . . . . . . . . . . . . . . . . . . . . . . . . . . . .
General Technical Description . . . . . . . . . . . . . . . . . . . . . . . . . . . . . . . . . . . . .
Implementation on SICOMP IMC . . . . . . . . . . . . . . . . . . . . . . . . . . . . . . . . . .
Signals of the Bus Interfaces . . . . . . . . . . . . . . . . . . . . . . . . . . . . . . . . . . . . . .
4–4
4–4
4–8
4–10
4.3
4.3.1
4.3.2
Local PCI Expansion Bus . . . . . . . . . . . . . . . . . . . . . . . . . . . . . . . . . . . . . . . . .
General . . . . . . . . . . . . . . . . . . . . . . . . . . . . . . . . . . . . . . . . . . . . . . . . . . . . . . . .
Signals of the PMC Module Interface . . . . . . . . . . . . . . . . . . . . . . . . . . . . . . .
4–14
4–14
4–15
4.4
List of References . . . . . . . . . . . . . . . . . . . . . . . . . . . . . . . . . . . . . . . . . . . . . . .
4–16
5
Compact Computer . . . . . . . . . . . . . . . . . . . . . . . . . . . . . . . . . . . . . . . . . . . . . . . . . . . . .
5–1
6
Assembling Center . . . . . . . . . . . . . . . . . . . . . . . . . . . . . . . . . . . . . . . . . . . . . . . . . . . . .
6–1
7
Power Supplies . . . . . . . . . . . . . . . . . . . . . . . . . . . . . . . . . . . . . . . . . . . . . . . . . . . . . . . .
7–1
7.1
Connecting Plug Connector . . . . . . . . . . . . . . . . . . . . . . . . . . . . . . . . . . . . . . .
7–2
7.2
7.2.1
7.2.2
7.2.3
Electrical Characteristics . . . . . . . . . . . . . . . . . . . . . . . . . . . . . . . . . . . . . . . . .
Electrical Operational Characteristics . . . . . . . . . . . . . . . . . . . . . . . . . . . . . .
Indications and Operation . . . . . . . . . . . . . . . . . . . . . . . . . . . . . . . . . . . . . . . .
Definition of Terms . . . . . . . . . . . . . . . . . . . . . . . . . . . . . . . . . . . . . . . . . . . . . .
7–3
7–3
7–4
7–5
7.3
Power Failure Signaling . . . . . . . . . . . . . . . . . . . . . . . . . . . . . . . . . . . . . . . . . .
7–8
7.4
7.4.1
7.4.2
Compatibility . . . . . . . . . . . . . . . . . . . . . . . . . . . . . . . . . . . . . . . . . . . . . . . . . . . .
Replacement Boards . . . . . . . . . . . . . . . . . . . . . . . . . . . . . . . . . . . . . . . . . . . .
Connection Compatibility . . . . . . . . . . . . . . . . . . . . . . . . . . . . . . . . . . . . . . . . .
7–10
7–10
7–12
System Layout . . . . . . . . . . . . . . . . . . . . . . . . . . . . . . . . . . . . . . . . . . . . . . . . . . . . . . . . .
8–1
8.1
The Inch Layout System . . . . . . . . . . . . . . . . . . . . . . . . . . . . . . . . . . . . . . . . .
8–2
8.2
Receptacles . . . . . . . . . . . . . . . . . . . . . . . . . . . . . . . . . . . . . . . . . . . . . . . . . . . .
8–3
8.3
8.3.1
8.3.2
8.3.3
8.3.4
8.3.5
Subracks . . . . . . . . . . . . . . . . . . . . . . . . . . . . . . . . . . . . . . . . . . . . . . . . . . . . . . .
System Modules . . . . . . . . . . . . . . . . . . . . . . . . . . . . . . . . . . . . . . . . . . . . . . . .
Bus Backplanes . . . . . . . . . . . . . . . . . . . . . . . . . . . . . . . . . . . . . . . . . . . . . . . . .
Bus Coupling Boards . . . . . . . . . . . . . . . . . . . . . . . . . . . . . . . . . . . . . . . . . . . .
Backup Battery . . . . . . . . . . . . . . . . . . . . . . . . . . . . . . . . . . . . . . . . . . . . . . . . .
Mechanical Accessories . . . . . . . . . . . . . . . . . . . . . . . . . . . . . . . . . . . . . . . . . .
8–4
8–4
8–6
8–8
8–9
8–10
8.4
Boards . . . . . . . . . . . . . . . . . . . . . . . . . . . . . . . . . . . . . . . . . . . . . . . . . . . . . . . . .
8–11
8.5
Plug-In Connectors . . . . . . . . . . . . . . . . . . . . . . . . . . . . . . . . . . . . . . . . . . . . . .
8–12
8.6
Placement of the Boards in the System . . . . . . . . . . . . . . . . . . . . . . . . . . . .
8–23
8.7
8.7.1
8.7.2
8.7.3
8.7.4
8.7.5
8.7.6
Information on Mounting . . . . . . . . . . . . . . . . . . . . . . . . . . . . . . . . . . . . . . . . . .
Connecting the Guides . . . . . . . . . . . . . . . . . . . . . . . . . . . . . . . . . . . . . . . . . . .
Mounting the Wiring Shield Plate . . . . . . . . . . . . . . . . . . . . . . . . . . . . . . . . . .
Bus Backplanes . . . . . . . . . . . . . . . . . . . . . . . . . . . . . . . . . . . . . . . . . . . . . . . . .
Installing the Boards . . . . . . . . . . . . . . . . . . . . . . . . . . . . . . . . . . . . . . . . . . . . .
Installing and Removing the Boards . . . . . . . . . . . . . . . . . . . . . . . . . . . . . . . .
Mounting the Cabinets and Housings . . . . . . . . . . . . . . . . . . . . . . . . . . . . . .
8–25
8–25
8–26
8–26
8–27
8–28
8–29
8
II
SICOMP IMC – System Manual
J31069-D2001-U001-A0-7618
Table of Contents
9
10
8.7.7
Multiple-Row Systems, Special Systems and Cable Fabrication . . . . . . .
8–29
8.8
8.8.1
8.8.2
8.8.3
8.8.4
8.8.5
8.8.6
8.8.7
8.8.8
8.8.9
8.8.10
Wiring . . . . . . . . . . . . . . . . . . . . . . . . . . . . . . . . . . . . . . . . . . . . . . . . . . . . . . . . .
Baring of Cables . . . . . . . . . . . . . . . . . . . . . . . . . . . . . . . . . . . . . . . . . . . . . . . .
Tagging the Cable Ends . . . . . . . . . . . . . . . . . . . . . . . . . . . . . . . . . . . . . . . . . .
Wrap Connections . . . . . . . . . . . . . . . . . . . . . . . . . . . . . . . . . . . . . . . . . . . . . . .
Wiring Cable Harnesses . . . . . . . . . . . . . . . . . . . . . . . . . . . . . . . . . . . . . . . . . .
Crimping . . . . . . . . . . . . . . . . . . . . . . . . . . . . . . . . . . . . . . . . . . . . . . . . . . . . . . .
Insulation-Displacement-Connector Technique . . . . . . . . . . . . . . . . . . . . . .
Screw Connections . . . . . . . . . . . . . . . . . . . . . . . . . . . . . . . . . . . . . . . . . . . . . .
Plug-In Connections . . . . . . . . . . . . . . . . . . . . . . . . . . . . . . . . . . . . . . . . . . . . .
Wiring the Power Supply on the Subrack . . . . . . . . . . . . . . . . . . . . . . . . . . .
Line Installation . . . . . . . . . . . . . . . . . . . . . . . . . . . . . . . . . . . . . . . . . . . . . . . . .
8–30
8–30
8–30
8–30
8–33
8–36
8–40
8–41
8–41
8–43
8–47
Software . . . . . . . . . . . . . . . . . . . . . . . . . . . . . . . . . . . . . . . . . . . . . . . . . . . . . . . . . . . . . . .
9.1
General . . . . . . . . . . . . . . . . . . . . . . . . . . . . . . . . . . . . . . . . . . . . . . . . . . . . . . . .
9.1.1
Demands on Operating Systems . . . . . . . . . . . . . . . . . . . . . . . . . . . . . . . . . .
9.1.2
Operating System Classes . . . . . . . . . . . . . . . . . . . . . . . . . . . . . . . . . . . . . . .
9.1.3
Automation Tasks . . . . . . . . . . . . . . . . . . . . . . . . . . . . . . . . . . . . . . . . . . . . . . .
9.1.4
Principles of Multitasking . . . . . . . . . . . . . . . . . . . . . . . . . . . . . . . . . . . . . . . . .
9.1.5
Task Communication and Coordination . . . . . . . . . . . . . . . . . . . . . . . . . . . . .
9–1
9–2
9–2
9–3
9–4
9–5
9–7
9.2
9.2.1
9.2.2
Operating Systems Which Can Be Used . . . . . . . . . . . . . . . . . . . . . . . . . . . .
RMOS3 . . . . . . . . . . . . . . . . . . . . . . . . . . . . . . . . . . . . . . . . . . . . . . . . . . . . . . . .
Other Operating Systems . . . . . . . . . . . . . . . . . . . . . . . . . . . . . . . . . . . . . . . .
9–9
9–9
9–9
9.3
9.3.1
9.3.2
9.3.3
9.3.4
9.3.5
RMOS Operating System . . . . . . . . . . . . . . . . . . . . . . . . . . . . . . . . . . . . . . . .
Features of RMOS3 . . . . . . . . . . . . . . . . . . . . . . . . . . . . . . . . . . . . . . . . . . . . .
Components of RMOS . . . . . . . . . . . . . . . . . . . . . . . . . . . . . . . . . . . . . . . . . . .
Management of Tasks . . . . . . . . . . . . . . . . . . . . . . . . . . . . . . . . . . . . . . . . . . .
Configuration . . . . . . . . . . . . . . . . . . . . . . . . . . . . . . . . . . . . . . . . . . . . . . . . . . .
Development Tools . . . . . . . . . . . . . . . . . . . . . . . . . . . . . . . . . . . . . . . . . . . . . .
9–10
9–10
9–11
9–14
9–16
9–18
9.4
9.4.1
9.4.2
9.4.3
9.4.4
Standard Software . . . . . . . . . . . . . . . . . . . . . . . . . . . . . . . . . . . . . . . . . . . . . .
SMP16-AKO . . . . . . . . . . . . . . . . . . . . . . . . . . . . . . . . . . . . . . . . . . . . . . . . . . . .
Board Support Packages (BSPs) . . . . . . . . . . . . . . . . . . . . . . . . . . . . . . . . . .
RMOS3-PLC . . . . . . . . . . . . . . . . . . . . . . . . . . . . . . . . . . . . . . . . . . . . . . . . . . .
Other . . . . . . . . . . . . . . . . . . . . . . . . . . . . . . . . . . . . . . . . . . . . . . . . . . . . . . . . . .
9–19
9–19
9–20
9–20
9–20
Communication . . . . . . . . . . . . . . . . . . . . . . . . . . . . . . . . . . . . . . . . . . . . . . . . . . . . . . . .
10.1
Introduction and System Design . . . . . . . . . . . . . . . . . . . . . . . . . . . . . . . . . . .
10.1.1 ISO Layer Model . . . . . . . . . . . . . . . . . . . . . . . . . . . . . . . . . . . . . . . . . . . . . . . .
10.1.2 TCP/IP Protocol . . . . . . . . . . . . . . . . . . . . . . . . . . . . . . . . . . . . . . . . . . . . . . . . .
10.1.3 HTTP Protocol . . . . . . . . . . . . . . . . . . . . . . . . . . . . . . . . . . . . . . . . . . . . . . . . . .
10.2
Industrial Ethernet . . . . . . . . . . . . . . . . . . . . . . . . . . . . . . . . . . . . . . . . . . . . . . .
10.2.1 Layout . . . . . . . . . . . . . . . . . . . . . . . . . . . . . . . . . . . . . . . . . . . . . . . . . . . . . . . . .
10.2.2 Industrial Ethernet Network Configurations . . . . . . . . . . . . . . . . . . . . . . . . . .
10–1
10–2
10–6
10–8
10–13
10–14
10–15
10–16
10.3
10.3.1
10.3.2
PROFIBUS . . . . . . . . . . . . . . . . . . . . . . . . . . . . . . . . . . . . . . . . . . . . . . . . . . . . . 10–17
Layout . . . . . . . . . . . . . . . . . . . . . . . . . . . . . . . . . . . . . . . . . . . . . . . . . . . . . . . . . 10–20
PROFIBUS Network Configurations . . . . . . . . . . . . . . . . . . . . . . . . . . . . . . . . 10–22
10.4
10.4.1
10.4.2
10.4.3
Controller Area Network (CAN) . . . . . . . . . . . . . . . . . . . . . . . . . . . . . . . . . . . .
Physical Structure . . . . . . . . . . . . . . . . . . . . . . . . . . . . . . . . . . . . . . . . . . . . . . .
Features of the Protocol . . . . . . . . . . . . . . . . . . . . . . . . . . . . . . . . . . . . . . . . . .
Summary . . . . . . . . . . . . . . . . . . . . . . . . . . . . . . . . . . . . . . . . . . . . . . . . . . . . . .
10.5
Remote Maintenance and Remote Diagnosis Via Internet . . . . . . . . . . . . . 10–27
SICOMP IMC – System Manual
J31069-D2001-U001-A0-7618
10–24
10–24
10–25
10–26
III
Table of Contents
11
12
13
Commissioning, Testing and Debugging . . . . . . . . . . . . . . . . . . . . . . . . . . . . . . . . .
11–1
11.1
Commissioning . . . . . . . . . . . . . . . . . . . . . . . . . . . . . . . . . . . . . . . . . . . . . . . . .
11–2
11.2
Commissioning the Hardware . . . . . . . . . . . . . . . . . . . . . . . . . . . . . . . . . . . . .
11–2
11.3
11.3.1
11.3.2
11.3.3
Installing the Operating System . . . . . . . . . . . . . . . . . . . . . . . . . . . . . . . . . . .
RMOS . . . . . . . . . . . . . . . . . . . . . . . . . . . . . . . . . . . . . . . . . . . . . . . . . . . . . . . . .
MS-DOS . . . . . . . . . . . . . . . . . . . . . . . . . . . . . . . . . . . . . . . . . . . . . . . . . . . . . . .
Windows . . . . . . . . . . . . . . . . . . . . . . . . . . . . . . . . . . . . . . . . . . . . . . . . . . . . . . .
11–4
11–4
11–6
11–6
11.4
11.4.1
11.4.2
11.4.3
Parameterizing the Boards . . . . . . . . . . . . . . . . . . . . . . . . . . . . . . . . . . . . . . .
Software Settings . . . . . . . . . . . . . . . . . . . . . . . . . . . . . . . . . . . . . . . . . . . . . . .
Hardware Settings . . . . . . . . . . . . . . . . . . . . . . . . . . . . . . . . . . . . . . . . . . . . . . .
Testing the Set Boards . . . . . . . . . . . . . . . . . . . . . . . . . . . . . . . . . . . . . . . . . . .
11–6
11–7
11–8
11–8
11.5
11.5.1
11.5.2
Commissioning an Application . . . . . . . . . . . . . . . . . . . . . . . . . . . . . . . . . . . .
Generating New Applications . . . . . . . . . . . . . . . . . . . . . . . . . . . . . . . . . . . . .
System Expansions . . . . . . . . . . . . . . . . . . . . . . . . . . . . . . . . . . . . . . . . . . . . .
11–9
11–9
11–9
11.6
Test and Debugging under RMOS . . . . . . . . . . . . . . . . . . . . . . . . . . . . . . . . . 11–10
Environmental Requirements . . . . . . . . . . . . . . . . . . . . . . . . . . . . . . . . . . . . . . . . . . . .
12–1
12.1
General Information . . . . . . . . . . . . . . . . . . . . . . . . . . . . . . . . . . . . . . . . . . . . .
12–2
12.2
Electrical Requirements . . . . . . . . . . . . . . . . . . . . . . . . . . . . . . . . . . . . . . . . . .
12–3
12.3
12.3.1
12.3.2
12.3.3
Electro-Magnetic Compatibility . . . . . . . . . . . . . . . . . . . . . . . . . . . . . . . . . . . .
Requirements . . . . . . . . . . . . . . . . . . . . . . . . . . . . . . . . . . . . . . . . . . . . . . . . . . .
Possible Sources of Interference . . . . . . . . . . . . . . . . . . . . . . . . . . . . . . . . . .
Measures for Suppression of Interference . . . . . . . . . . . . . . . . . . . . . . . . . .
12–4
12–4
12–5
12–5
12.4
Climatic Requirements . . . . . . . . . . . . . . . . . . . . . . . . . . . . . . . . . . . . . . . . . . . 12–15
12.5
Physical Requirements . . . . . . . . . . . . . . . . . . . . . . . . . . . . . . . . . . . . . . . . . . . 12–16
12.6
12.6.1
12.6.2
Electrical Safety . . . . . . . . . . . . . . . . . . . . . . . . . . . . . . . . . . . . . . . . . . . . . . . . . 12–17
Requirements at the System Level . . . . . . . . . . . . . . . . . . . . . . . . . . . . . . . . . 12–17
Notes on System Integration . . . . . . . . . . . . . . . . . . . . . . . . . . . . . . . . . . . . . . 12–19
12.7
EG Statement of Conformity . . . . . . . . . . . . . . . . . . . . . . . . . . . . . . . . . . . . . . 12–20
Service/System Consulting/Training . . . . . . . . . . . . . . . . . . . . . . . . . . . . . . . . . . . . .
13–1
13.1
Service . . . . . . . . . . . . . . . . . . . . . . . . . . . . . . . . . . . . . . . . . . . . . . . . . . . . . . . .
13–2
13.2
13.2.1
13.2.2
13.2.3
13.2.4
13.2.5
13.2.6
13.2.7
Replacement Parts and Repairs . . . . . . . . . . . . . . . . . . . . . . . . . . . . . . . . . . .
Replacement Parts and Repair Service . . . . . . . . . . . . . . . . . . . . . . . . . . . . .
Delivery Dates for Replacement Parts Service . . . . . . . . . . . . . . . . . . . . . .
Delivery Dates for Repair Service (“Naemlichkeit” Repairs) . . . . . . . . . . . .
Delivery Releases . . . . . . . . . . . . . . . . . . . . . . . . . . . . . . . . . . . . . . . . . . . . . . .
Handling . . . . . . . . . . . . . . . . . . . . . . . . . . . . . . . . . . . . . . . . . . . . . . . . . . . . . . .
Warranty Times . . . . . . . . . . . . . . . . . . . . . . . . . . . . . . . . . . . . . . . . . . . . . . . . .
Packing . . . . . . . . . . . . . . . . . . . . . . . . . . . . . . . . . . . . . . . . . . . . . . . . . . . . . . . .
13–4
13–4
13–5
13–6
13–6
13–7
13–9
13–9
13.3
Export Regulations . . . . . . . . . . . . . . . . . . . . . . . . . . . . . . . . . . . . . . . . . . . . . . 13–10
13.4
Training Service . . . . . . . . . . . . . . . . . . . . . . . . . . . . . . . . . . . . . . . . . . . . . . . . . 13–11
14
Glossary/Abbreviations . . . . . . . . . . . . . . . . . . . . . . . . . . . . . . . . . . . . . . . . . . . . . . . . .
G–1
15
Notes . . . . . . . . . . . . . . . . . . . . . . . . . . . . . . . . . . . . . . . . . . . . . . . . . . . . . . . . . . . . . . . . . .
I
IV
SICOMP IMC – System Manual
J31069-D2001-U001-A0-7618
SICOMP IMC System
1
Foreword
The open, PC-compatible SICOMP IMC system has been developed for industrial applications (e.g., measuring, and open and closed-loop control). Due to its sturdiness
and universality, it is also being used increasingly for many other tasks. Tasks for
which microcomputers are used are continuously increasing in scope and complexity.
The demands placed on such a system are listed below.
Deterministic behavior and short reaction times
Precise and fast acquisition and evaluation of measuring data
High working speed
Extensive controller functions
Interfaces to positioning systems and drives
Unlimited communication capability (e.g., point-to-point, fieldbus or LAN/WAN)
High degree of reliability and sturdiness
Easy to use
Open to PC operating systems (e.g., Windows NT, Windows CE, and so on)
SICOMP IMC offers a wide variety of products and is the optimal basis for the applications and requirements listed below.
Real-time applications using standard boards
Visualization of processes
Very high computation capability
Highest demands on transparency of the logical structures
Easy to expand
The hardware components of the SICOMP IMC include powerful, future-oriented
and inexpensive compact devices – board systems SMP16 in single Europa format
and AMS in double Europa format for 19-inch layout technology.
SICOMP IMC – System Manual
J31069-D2001-U001-A0-7618
1–1
SICOMP IMC System
The bus systems have been optimally adapted to the requirements.
SMP16 (8/16-bit) is an open, interference-immune and sturdy bus for I/O with a
defined bus performance of up to 10 Mbyte/sec.
AMS (16-bit) is a multi-master bus in accordance with Multibus I specifications.
iPCI (32/64-bit) is an embedded standard PCI bus for highest data speeds up to
132 Mbyte/sec.
PMC is a local bus for standardized PCI Mezzanine Cards.
The board systems have been coordinated to permit the advantages of the compact SMP16 boards and multiprocessor-capable AMS boards to be combined in
one frame. With the AMS, the transparent local bus concept based on SMP16 or
iPCI permits integration of two or more bus systems in one frame. PMC modules
can be integrated in both the SMP16 and AMS systems.
SICOMP IMC is also flexible when it comes to operating systems. It can handle
Windows NT, Windows CE, the RMOS real-time operating system, and any other
operating systems based on the PC platform. SICOMP IMC ensures an unusual
amount of freedom – from full PC compatibility to optimized embedded solutions.
1–2
SICOMP IMC – System Manual
J31069-D2001-U001-A0-7618
SMP16 System
2
Table of Contents
2.1
System Overview . . . . . . . . . . . . . . . . . . . . . . . . . . . . . . . . . . . . . . . . . . . . . . .
2-2
2.2
2.2.1
2.2.2
Function Description . . . . . . . . . . . . . . . . . . . . . . . . . . . . . . . . . . . . . . . . . . . . .
Bus Elements . . . . . . . . . . . . . . . . . . . . . . . . . . . . . . . . . . . . . . . . . . . . . . . . . . .
System Architecture . . . . . . . . . . . . . . . . . . . . . . . . . . . . . . . . . . . . . . . . . . . . .
2-5
2-5
2-6
2.3
General Technical Description . . . . . . . . . . . . . . . . . . . . . . . . . . . . . . . . . . . . .
2-8
2.4
2.4.1
2.4.2
Signals of the Bus Interface . . . . . . . . . . . . . . . . . . . . . . . . . . . . . . . . . . . . . . .
Explanation of Table 2-4 . . . . . . . . . . . . . . . . . . . . . . . . . . . . . . . . . . . . . . . . . .
Description of the Bus Signals . . . . . . . . . . . . . . . . . . . . . . . . . . . . . . . . . . . .
2-9
2-10
2-11
2.5
2.5.1
2.5.2
2.5.3
2.5.4
2.5.5
2.5.6
2.5.7
Data Transmission on the Bus . . . . . . . . . . . . . . . . . . . . . . . . . . . . . . . . . . . .
General Description . . . . . . . . . . . . . . . . . . . . . . . . . . . . . . . . . . . . . . . . . . . . .
Data Bus Length . . . . . . . . . . . . . . . . . . . . . . . . . . . . . . . . . . . . . . . . . . . . . . . .
Control of the Data Bus Length with IOCS16* and MEMCS16* . . . . . . . .
Read Operations . . . . . . . . . . . . . . . . . . . . . . . . . . . . . . . . . . . . . . . . . . . . . . . .
Write Operations . . . . . . . . . . . . . . . . . . . . . . . . . . . . . . . . . . . . . . . . . . . . . . . .
Slave-Master Synchronization with RDYIN . . . . . . . . . . . . . . . . . . . . . . . . . .
Command Delays and Wait Cycles . . . . . . . . . . . . . . . . . . . . . . . . . . . . . . . .
2-19
2-19
2-19
2-20
2-21
2-21
2-21
2-22
2.6
Combination of SMP16 and SMP Components . . . . . . . . . . . . . . . . . . . . . .
2-23
2.7
List of References . . . . . . . . . . . . . . . . . . . . . . . . . . . . . . . . . . . . . . . . . . . . . . .
2-26
SICOMP IMC – System Manual
J31069-D2001-U001-A0-7618
2–1
SMP16 System
2.1
System Overview
The SICOMP SMP16 system
The SICOMP SMP16 system is a further development of the modular SMP board
system which has proven itself in long years of industrial use. Like the original system, this system offers reliability, continuity and constant innovative further development.
The SICOMP SMP16 bus is compatible with the over 150 SICOMP SMP boards
on the market today.
Use of the SICOMP SMP16 boards permits flexible automation systems to be set
up quickly. This provides extra time to write the application software.
The SMP16 bus is a synchronous mono master bus with 16-bit data bus, 20-bit
address bus and various signal lines. These control the memory and input/output
accesses. The memory area which can be addressed by the SMP16 bus can contain up to 1 Mbytes. In addition, for applications which make extensive use of inputs/outputs, there are 64 Kbytes for direct inputs/outputs and 4 Kbytes for
memory input/output (MMIO).
Depending on the board used, a choice of 8-bit or 16-bit data transfers is available.
The SMP16 bus supports one and two-cycle DMA transfers for high-speed data
transmission. This permits specific data transfers with minimum system load at
the time of the transfer.
Another feature of the SMP16 bus is its flexible support of interrupts. Its open
structure permits interrupts to be handled as simple point-to-point connections or
cascaded in master/slave operation.
Products
The following types of products are available with SICOMP SMP16.
Boards
Operating system software
Board support packages
Additional parts and accessories
Boards are delivered with or without firmware depending on the application area.
Board support packages contain board-specific software (firmware) in the form of
EPROM blocks and/or installation and driver software on floppy disk. In addition,
documentation on commissioning is included.
2–2
SICOMP IMC – System Manual
J31069-D2001-U001-A0-7618
SMP16 System
Advantages of the SMP16 bus system
Further development of the familiar and reliable SMP bus (industrial standard)
Its simple functions provide powerful bus interfaces with low bus interface
costs.
The timing of the SMP16 bus increases bus performance without compromising
compatibility with existing components.
Physically, the SMP16 offers the advantages of the well-known concept of the
single Europa card format and indirect connection. The layout of very powerful
systems is compact, and an optimized price/performance ratio is maintained at
the same time.
Since bus pins which can be wired as desired permit flexible use of special
functions (e.g., large interrupt systems), the SMP16 bus is very suited to industrial real-time applications with very short reaction times.
Using coupling modules, two separate SMP16 systems can be connected. In
addition, a bus coupler can be used to increase the number of slots for slave
boards.
The SMP16 bus offers efficient methods of process visualization and utilization
of a wide variety of software based on MS-DOS or RMOS. It can be used as a
stand-alone unit (I/O expansion) and together with a second SMP16 CPU (via a
coupler module). In addition, it can be used as a universal hardware platform
on which various operating systems can be run. The components of the
SMP16 bus are available individually and as a ready-to-use industrial system
from the Assembling Center.
SICOMP IMC – System Manual
J31069-D2001-U001-A0-7618
2–3
SMP16 System
Innovations of the SMP16 system in comparison to the SMP system
Data bus was expanded to 16 bits. In comparison to the SICOMP SMP, bus
performance has been increased by a factor of 3 to 5 with the SICOMP SMP16.
Prepared for the new generation of integrated circuits which require a 3.3 V
voltage supply
Bus timing was revised and made uniform.
Any PC-compatible SMP16 CPU can handle any SMP16 board. PC-compatible
I/O functions on the SMP16 bus must adhere to the SMP16 timing specifications. These boards (graphics and LAN) can also be operated on non-PC
systems. Some of the slower I/O boards can be handled by the CPU via wait
cycles and command delays which can be set.
Gross bus transfer speed was increased to up to 10 Mbyte/sec.
Special signal allocation was made uniform.
PC timing was integrated so that powerful real-time PCs can be generated on
an SMP16 basis.
The SMP16 bus is compatible with the SMP bus (i.e., with few exceptions,
existing SMP components can continue to be used with the SMP16 bus. See
chapter 2.6.
EMC compatibility was increased. All SMP16 boards have CE certification.
Metal front facings are equipped with single locking.
Guaranteed adherence to bus timing for modern SMP16 I/O boards with the
ASIC (ASBIC) bus interface
Using the ASBIC, wrap wiring on the I/O boards was largely replaced by software settings. For automatic configuration, see chapter 11.
High computer performance due to latest CPU boards
2–4
SICOMP IMC – System Manual
J31069-D2001-U001-A0-7618
SMP16 System
2.2
2.2.1
Function Description
Bus Elements
Primary bus master (CPUs)
Master boards (CPUs also) are boards which are able to actively initiate or execute
a data transfer to or from the slave boards. The user activates the control signals
of the system and provides a valid address.
Primary bus masters usually always have control over the bus. However, bus control can be temporarily turned over to a secondary bus master for DMA cycles.
While the secondary bus master has control of the bus, the primary bus master
remains passive on the bus.
The SMP16 bus only permits one primary bus master (i.e., mono-master bus).
Secondary bus master
Secondary bus masters are controllers which are not located with the primary master on one board but whose functions sometimes require control of the SMP16 bus
(e.g., DMA controller boards).
The user requests bus control from the primary bus master. The secondary bus
master cannot begin data transfer operations until the primary bus master releases
the bus.
If several secondary bus masters exist, they themselves must provide for arbitration of conflicting accesses. The SMP16 bus does not provide arbitration. If this
mode is desired, make sure that the primary bus master also supports this mode.
SMP16 slave boards
SMP16 slave boards evaluate the address signals supplied by the master and
react to its control signals.
SMP16 slave boards cannot be bus masters.
SICOMP IMC – System Manual
J31069-D2001-U001-A0-7618
2–5
SMP16 System
PC-compatible SMP16 slave boards
PC-compatible SMP16 slave boards support special PC-compatible input/output
bus cycles marked by an inactive BUSEN signal and the status of the AEN signal.
These boards permit conventional PC I/O functions such as PC-compatible networks, graphics (e.g., VGA) and so on. These boards can also be configured so
that they can be used with non PC-compatible bus masters.
When PC-compatible SMP16 slave boards are also to be used with standard
SMP16 bus masters, they must meet valid SMP16 specifications [1].
2.2.2
System Architecture
V.24
DMA
CPU/
Coprozessor
Memory
Interfaces
– RAM
static/dynamic
– EEPROM
– EPROM
– CMOS
– Memory-card
– Ethernet
– PROFIBUS
– SimoLink
– SINEC L1/H1
– Bit bus
– DA / AD
– Digital I/O
SMP16 bus
Software
– Driver
– Monitors
– Real-time
operating system
– Standardoperating system
Additional
system functions
– Counters/timers
– Interrupt control
– Calendar clock
– Power failure
I/O
controllers
– Floppy disk/hard disk
– CRT
– SCSI
– IEC
– Graphics
– Position control
– Stepper motor
control
Special
system functions
– Coupling boards
– Dual-port RAM
– PC-compatible
subsystem
Figure 2-1 System architecture of the SICOMP SMP/SMP16 bus
2–6
SICOMP IMC – System Manual
J31069-D2001-U001-A0-7618
SMP16 System
Table 2-1
SMP16 system data
SMP16 System Data
System configuration
System bus
Mono-master system with DMA capability
Synchronous bus, separate address/data lines
Transfer speed
Slots
Data size
Max. of 21 per 19-inch system subrack
8 or 16 bits
Address areas
Interrupt system
Multiple computer configuration
Methods of bus coupling
Board configuration
Plug connection system
EMC and environment compatibility
Fan
Backup battery
Supply voltages
≤ 10 Mbyte/sec
1-Mbyte memory address area
64-Kbyte input/output address area
4-Kbyte memory input/output address area (MMIO)
Depends on CPU used
Dual-port RAM coupling in a system frame with separate backplanes
SMP16 – SMP16. See chapter 8.
Via ASBIC per software, via local registers or wrap
settings
Indirect, 96-pin, in acc. w. DIN 41612
CE conformance. See chapter 12.
No fan. Exception: High-performance CPUs). See
chapter 12.4.
See chapter 8.
+5 V, ±5 %
+3.3 V, ±5 % (optional) 1)
±12 V, ±5 % (optional)
±15 V, ±3 % (optional)
1) Specific boards may have different requirements.
Table 2-2
Nomenclature
Communication boards
Nomenclature
SMP16-COM...
CPU boards
I/O controller
SMP16-CPU...
SMP16-CTR...
Input/output boards
Input/output modules
Memory boards
SMP16-EA...
SMP16-EAM...
SMP16-MEM...
Special function boards
Power supplies
SMP16-SFT...
SMP16-SV...
Mechanics components
Rack boards for modules
Accessories
SMP16-SYS...
SMP16-TBG...
SMP16-ZUB...
SICOMP IMC – System Manual
J31069-D2001-U001-A0-7618
2–7
SMP16 System
2.3
General Technical Description
Configuration side
Pull handle
Plug-in direction
100 mm
I/O connections (optional)
160 mm
SMP16
bus connector
Figure 2-2 Physical layout of SMP16 boards
Table 2-3
Dimensions of SMP16 boards
Length
Height
Thickness of the PCB
Front plate
100 mm
1.6 mm (±0.2 mm)
Aluminium, 2.5 mm thick
Max. height of the components
Length of the connections or
thickness of the components on
the back of the PCB
14 mm
Max. of 2.0 mm
Locking
Pull handle
Single locking with screws
Fixed pull handle with space for labeling (e.g., logo or
board designation)
Connectors suitable for the functions, usually
sub D technology
Ergo gray
In acc. w. internal specifications
I/O plug connector
Color of the outside
Mounting dimensions
Labeling
Accessories
Front system
2–8
Dimensions of SMP16 Boards
160 mm
At least 2.5 mm free on the upper and lower edge of
the PCBs so that the boards can be pushed freely
along the guide rails
In acc. w. internal specifications
Short front plate for installation in systems with total
locking
Flat front plate with fixed pull handle
SICOMP IMC – System Manual
J31069-D2001-U001-A0-7618
SMP16 System
2.4
Table 2-4
Pin
Signals of the Bus Interface
Signal assignment for the SMP16 bus
1
Pin Row A
Signal
Circuiting
–15 V
V2
–
Pin Row B
Signal
Circuiting
A16
V1
R1
Pin Row C
Signal
Circuiting
–12 V
V2
–
2
3
+3.3 V
–
V3
–
–
–
A17
AEN
V1
–
R1
–
GND
+5 V
V3
V3
–
–
4
5
6
CLK
MEMCS16*
RESET*
V1
V1
V1
R1
R1
R1
–
DREQ0*
DREQ1*
–
–
–
–
–
–
MMIO*
A12
A0
V1
V1
V1
R1
R1
R1
7
8
ALE
MEMR*
V1
V1
R1
R1/Z1
DACK0*
DACK1* 1)
–
–
–
–
A13
A1
V1
V1
R1
R1
9
10
11
RESIN*
MEMW*
–
V1
V1
–
–
R1/Z1
–
–
–
Reserved2)
–
–
–
–
–
–
A14
A2
A15
V1
V1
V1
R1
R1
R1
12
13
RDYIN
BUSEN
V1
V1
R1
R1
PWFAIL*
Reserved2)
–
–
–
R1
A3
NMI*
V1
–
R1
–
14
15
16
DB0
HOLDA 3)
DB1
V1
V1
V1
R1
R1
R1
+3.3 V
+5 V
GND
V3
V3
V3
–
–
–
A4
IRQ0*
A5
V1
–
V1
R1
–
R1
17
18
HOLD* 3)
DB2
V1
V1
R1
R1
GND
– 3)
V3
–
–
–
IRQ1*
A6
–
V1
R1
3) 4)
19
20
21
INT*
DB3
IOCS16*
V1
V1
V1
R1
R1
R1
ICAS0
ICAS1 3) 4)
ICAS2 3) 4)
–
–
–
–
–
–
IRQ2*
A7
IRQ3*
–
V1
–
–
R1
–
22
23
DB4
INTA*
V1
V1
R1
R1
DB8
DB9
V1
V1
R1
R1
A8
IRQ4*
V1
–
R1
–
24
25
26
DB5
UBAT
DB6
V1
V1
V1
R1
–
R1
DB10
DB11
DB12
V1
V1
V1
R1
R1
R1
A9
IRQ5*
A10
V1
–
V1
R1
–
R1
27
28
0WS
DB7
V1
V1
–
R1
DB13
DB14
V1
V1
R1
R1
IRQ6*
A11
–
V1
–
R1
29
30
31
TC/EOP*
IOW*
+15 V
V1
V1
V2
–
R1/Z1
–
DB15
BHEN
A18
V1
V1
V1
R1
R1
R1
IRQ7*
IOR*
GND
–
V1
V3
–
R1/Z1
–
+5 V
V3
–
A19
V1
R1
+12 V
V2
–
32
1)
2)
3)
4)
Is supplied by some CPUs as special signal OSC
Reserved for special signals ACEN (b11) and ACDONE (b13). See chapter 2.6.
Bus lines can also be used for DACK* and DREQ* signals or for DMA cascading.
Can be used to cascade interrupts (alternate to footnote 3)
SICOMP IMC – System Manual
J31069-D2001-U001-A0-7618
2–9
SMP16 System
2.4.1
Explanation of Table 2-4
“Signal” columns
If names are specified here, the connections are allocated with these bus signals.
An asterisk (*) after the name indicates a low-active signal.
A dash (–) means that boards can allocate special signals to the connection.
Reserved connections are provided for future or special applications and may not
be allocated with special signals.
“Circuiting” columns
The left-hand columns show the links established by the bus backplane. The righthand columns show the connection circuiting on the bus backplane.
Connection
V1
V2
V3
–
Non-through connection
Termination
R1
Z1
–
2–10
Meaning
Narrow cable on the bus backplane which connects connections with
the same connection row and number for all bus slots
Wide cable on the bus backplane which connects connections with
the same connection row and number for all bus slots
Connection with a through conductor level on the bus backplane
Meaning
Termination of the cable on the bus backplane located at this connection with a pull-up resistor of 3.3 k Ω against +5 V
Termination of the cable on the bus backplane located at this connection with an RC element
No circuiting
SICOMP IMC – System Manual
J31069-D2001-U001-A0-7618
SMP16 System
2.4.2
Description of the Bus Signals
The following tables use the abbreviations and symbols shown below.
Table 2-5
Explanation of the abbreviations and symbols
Signal Direction
Z>P
P>Z
Meaning
From
to I/O
From I/O to CPU
Z <> P
P <> P
Bi-directional signal flow between CPU and I/O
Bi-directional signal flow between I/O boards
Characteristic
OC
Requirements on Outputs for This Signal
Open collector
CPU 1)
OC outputs can assume two signal states:
LOW or high ohmic
TP
Totem pole
TP outputs can assume two signal states:
LOW or HIGH
TS
Tri state
TS outputs can assume three signal states:
LOW, HIGH or high ohmic
1) Primary or secondary bus master
Control signals of the SMP16 bus
Control signals are all signals required for correct handling of data communication.
Control signals permit activation of memory blocks, data transmission to and from
input/output blocks (direct addressing or MMIO), and the control of I/O devices
(e.g., acknowledgment signals for interrupts and DMA).
Table 2-6
Signal
ALE
Control signals of the SMP16 bus
Signal
Direction
Z>P
Characteristic
TP
“Address latch enable”
Function
The ALE signal was used on slave boards for latching of
address lines A0 to A19. It is usually activated at the
beginning of an SMP16 bus cycle.
Since some bus masters do not or do not always support it, it
may no longer be used by new slave boards.
Due to compatibility, the signal line of the ALE must remain
reserved.
SICOMP IMC – System Manual
J31069-D2001-U001-A0-7618
2–11
SMP16 System
Table 2-6
Signal
BHEN
Control signals of the SMP16 bus, continued
Signal
CharacteriDirection
stic
Z>P
TS/TP
“Byte high enable”
Function
Control signals to enable information communication on the
more significant part of the data bus (DB8 to DB15)
The BHEN signal indicates a real 16-bit access to an even
address (A0 =0) of the memory or the input/output area. This
signal is always inactive for 8-bit accesses.
BUSEN
Z>P
TP
“Bus enable”
Control signal to distinguish between CPU and special accesses
The inactive BUSEN signal prevents slave boards from decoding the address lines directly in the input/output area. In
this case, these boards can be selected via special signals
(e.g., DACK* for DMA transfer).
CLK
Z>P
TP
The BUSEN signal can be disregarded for memory or MMIO*
accesses.
“Clock”
System clock pulse on the CPU
HOLDA
Z>P
TP
This signal is generated by the primary bus master and may
not exceed 12 MHz.
“Hold acknowledge”
HOLD*
P>Z
TP
“Hold”
These signals are used to transfer the SMP16 bus from the
primary bus master to a secondary bus master (i.e., to a DMA
controller on a slave board).
The secondary bus master requests bus rights by activating
the HOLD* signal. If the primary bus master supports this
function, it transfers rights to the secondary bus master by
activating the HOLDA signal.
IOCS16*
IOR*
P>Z
Z>P
OC
For DMA function, see also DREQ*/DACK* in table
LEERER MERKER.
“Input/output chip select 16”
TS/TP
This signal tells the bus master whether the slave board addressed via address lines A0 to A15 in the input/output address area is able to perform a 16-bit access.
“I/O read”
Control signal of the CPU to read information using the direct
input/output procedure. The input/output address area contains 64 Kbytes.
IOW*
Z>P
TS/TP
“I/O write”
Control signal of the CPU to write information using the direct
input/output procedure. The input/output address area contains 64 Kbytes.
2–12
SICOMP IMC – System Manual
J31069-D2001-U001-A0-7618
SMP16 System
Table 2-6
Signal
Control signals of the SMP16 bus, continued
Signal
CharacteriFunction
Direction
stic
MEMCS16* P > Z
OC
“Memory chip select 16”
This signal tells the bus master whether the slave board addressed via address lines A0 to A19 (or via A0 to A11 together
with MMIO*) in the memory address area is able to perform a
16-bit access.
Bus masters which support the IOCS16* and MEMCS16*
signals automatically divide the 16-bit access (triggered by the
SW) into two byte accesses when the addressed slave board
does not activate any of the signals (appropriate to the type of
access) as soon as it recognizes its address. IOCS16* and
MEMCS16* may only be activated by slave boards at even
addresses (A0 = 0).
The IOCS16* and MEMCS16* signals are required for a 16-bit
transfer between SMP16 slave boards and PC-compatible
SMP16 bus masters.
MEMR*
Z>P
TS/TP
“Memory read”
Control signal of the CPU to read information from a 1-Mbyte
memory address area of the SMP16 bus
If the MMIO* signal is active at the same time, input/output
boards which use the so-called memory input/output procedure are addressed.
MEMW*
Z>P
TS/TP
“Memory write”
Control signal of the CPU to write information to a 1-Mbyte
memory address area of the SMP16 bus
If the MMIO* signal is active at the same time, input/output
boards which use the so-called memory input/output procedure are addressed.
MMIO*
Z>P
TP
“Memory Mapped I/O”
This signal can be used to address slave boards via an address window in the 1-Mbyte memory address area of the
SMP16 bus.
When direct input/output accesses are used, its status can be
active (LOW) or inactive (HIGH).
During memory accesses of the primary bus master (DMA or
“normal” accesses), its status is always active in the selected
address area and inactive outside the selected address area.
If the secondary bus master has control over the bus, the primary bus master must generate this signal from the waiting
address signals, or, if this is not possible, deactivate it.
SICOMP IMC – System Manual
J31069-D2001-U001-A0-7618
2–13
SMP16 System
Table 2-6
Signal
RDYIN
Control signals of the SMP16 bus, continued
Signal
CharacteriDirection
stic
P>Z
OC
“Ready input”
Function
Control signal for adaptation of the CPU and DMA controller to
slow I/O boards
Although the SMP16 bus is a synchronous bus, the master
board can be forced by the RDYIN signal from the addressed
slave board to leave the current command valid until the slave
board is ready for conclusion of this command.
RESET*
Z>P
TP
“Reset”
Control signal to reset I/O boards by the CPU
RESIN*
P>Z
OC
“Reset input”
This signal can be used to reset a CPU. The reset CPU then
activates the RESET* signal.
It can be activated (e.g., during system startup) by the power
pack or by the operator with a button (make-contact
against 0 V). The signal does not have to be debounced.
TC/EOP*
Z <> P
TP/OC
“End of process”
Control signal for DMA operation. It applies to the DMA functionality of the primary bus master or the DMA board (secondary bus master).
In individual cases, compatibility of DMA functionality of the
boards used in a system must be checked with respect to the
TC/EOP* bus line.
2–14
SICOMP IMC – System Manual
J31069-D2001-U001-A0-7618
SMP16 System
Address signals
Since the SMP16 bus transfers addresses with a length of up to 20 bits (A0 to
A19), 1 Mbyte of memory space can be addressed.
Table 2-7
Signal
A0 to A19
Address signals of the SMP16 bus
Signal
Direction
Z>P
Characteristic
TS/TP
Function
“Address n”
These lines are used to select up to 1 Mbyte of SMP16
memory (A0 to A19), 64 Kbytes of the input/output area (A0 to
A15), or 4 Kbytes of the MMIO area (A0 to A11). A19 is the
most significant bit of the address bus and A0 the least significant.
Each slave board is assigned an unambiguous address area
before a SMP16 system is commissioned or via automatic
configuration. During operation, each slave board compares
its address area with the address lines of the SMP16 bus to
determine whether it is being addressed. However, an access
does not become valid until one of the command lines
MEMR*, MEMW*, IOR* or IOW* becomes active.
Data signals
The SMP16 bus transfers 8-bit data words (DB0 to DB7) and 16-bit data words
(DB0 to DB15). You can choose between word and byte-accesses.
Table 2-8
Signal
DB0 to
DB15
Data signals of the SMP16 bus
Signal
CharacterFunction
Direction
istic
Z <> P
TS
“Data Bit n”
(P <> P)
Signals for exchange of information between bus master
boards (e.g., the CPU) and slave boards.
DB15 is the most significant bit and DB0 the least significant.
SICOMP IMC – System Manual
J31069-D2001-U001-A0-7618
2–15
SMP16 System
Interrupt signals
The SMP16 bus provides an interrupt interface (INT/INTA) for interrupt cascading
via the SMP16 bus. Additional interrupt inputs are available as special signals
(IRQn).
Table 2-9
Signal
INT*
Interrupt signals of the SMP16 bus
Signal
Direction
P>Z
Characteristic
OC
Function
“Interrupt”
Master input of the interrupt system for interruption of the running program on the primary bus master if requested.
If INT* was activated by an external interrupt controller, the
primary bus master can determine the interrupt source via the
INTA* control signal.
INTA*
Z>P
IRQ0* bis
IRQ7*
P>Z
ICAS0 bis
ICAS2
Z <> P
(P <> P)
2–16
TP
“Interrupt acknowledge”
OC
Control signal of the primary bus master to external interrupt
controllers to read the interrupt number (i.e., determine the
source)
“Interrupt request n”
Special-signal inputs on primary bus masters or interrupt controller boards, outputs of the interrupt-requesting I/O
TP
Used to interrupt the running program
“Interrupt cascaded address”
During INTA* cycles, the interrupt master uses lines ICAS0 to
ICAS2 to select the cascaded interrupt slave which is to supply the interrupt vector during an INTA cycle. Lines ICAS0 to
ICAS2 are used like addresses.
SICOMP IMC – System Manual
J31069-D2001-U001-A0-7618
SMP16 System
Special signals
This group contains signals which do not fit into the other signal groups and are not
part of the standard SMP16 bus. They can be used by the user as necessary.
The special signals which are actually used by the boards are specified in the respective product documentation.
Table 2-10
Signal
NMI
Special signals of the SMP16 bus
Signal
CharacteriFunction
Direction
stic
P>Z
OC
“Non maskable interrupt”
Usually the highest-priority interrupt used for safety requirements
DACKn*
Z>P
TP
“DMA acknowledge n”
DREQn*
P>Z
TP
“DMA request n”
These signals are special-signal inputs/outputs on primary
bus masters or DMA master boards.
PWFAIL*
UBAT
P>Z
OC
An SMP16 slave board with DMA capability activates the
DREQn* signal to request a data transfer using DMA mode.
The DMA master selects a requesting DMA slave board by
activating the appropriate DACKn* signal.
“Power failure”
Indication of the power pack that the primary power supply
has failed. After PWFAIL* becomes active, a certain amount
of time remains during which the system state is saved while
system power remains stable. See chapter 7.
“Battery voltage”
P > Z/P
External voltage input for battery powering of buffered SRAM,
CMOS clock blocks and so on. See chapter 8.
ACEN
P>P
ACDONE
P>P
OC
“Auto-configuration enable”
“Auto-configuration done”
Daisy chain signals for initialization of the ASBIC blocks on
SMP16 boards
The ACEN input tells a board that it has been selected for
configuration of the ASBIC block. The board uses the ACDONE output to announce that its configuration has been
completed and the next board can be configured. See chapter 11.
SICOMP IMC – System Manual
J31069-D2001-U001-A0-7618
2–17
SMP16 System
Table 2-10
Signal
AEN
Special signals of the SMP16 bus, continued
Signal
CharacteriDirection
stic
Z>P
TP
“Address enable”
Function
Control signal for PC-compatible bus accesses
This PC-compatible bus signal is activated when a one-cycle
DMA transfer or an input/output access occurs on PC-compatible SMP16 slave boards. AEN may only be deactivated if
the BUSEN signal of the SMP16 bus is also deactivated. This
signal can be disregarded for memory accesses.
0WS
OSC
P>Z
Z>P
OC
“0 wait states”
TP
This signal is activated by PC-compatible SMP16 slave
boards. It tells the bus master that the current bus cycle can
be performed without the permanently set wait cycles.
“Oscillator”
The 14.31818 oscillator clock pulse for PC-compatible SMP16
slave boards is supplied by the primary bus master.
2–18
SICOMP IMC – System Manual
J31069-D2001-U001-A0-7618
SMP16 System
2.5
2.5.1
Data Transmission on the Bus
General Description
A data transmission on the SMP16 bus begins with the SMP16 bus master putting
the address on the SMP16 bus. It then activates the desired command. During
MMIO accesses by the primary bus master, the MMIO* signal must be activated
before the command to prevent a misinterpretation by the slave board.
During write accesses, the bus master places the data on the bus with the command. During read accesses, the slave board must supply the data as quickly as
possible after detecting the active command.
The access is concluded when the command is deactivated by the bus master and
the addresses are removed a short time later.
A slave board can use the RDYIN signal to stop the bus master during the access
(i.e., extend the access).
2.5.2
Data Bus Length
The master on the SMP16 bus generates either 8 or 16-bit accesses. The desired
data bus length is indicated to the slave with the BHEN signal. The slave can
react with the IOCS16* or MEMCS16* signals to tell the master the possible data
bus length for the bus access just triggered.
To ensure compatibility between 8-bit boards and 16-bit boards, 8-bit accesses are
always used for even and odd addresses on the lower half of the data bus (DB0 to
DB7). For this reason, 8-bit boards do not have to consider the BHEN signal. Sixteen-bit accesses can only be performed on even addresses (A0 = 0) whereby the
BHEN signal is then activated.
If 16-bit slave boards are to be able to be written with 8-bit values (by byte), they
require a so-called “byte swap” logic which transfers the data internally from
DB0 – DB7 to LDB8 – LDB15 (write operation, L stands for local) during odd 8-bit
accesses to the board, or from LDB8 – LDB15 to DB0 – DB7 (read operation).
SICOMP IMC – System Manual
J31069-D2001-U001-A0-7618
2–19
SMP16 System
2.5.3
Control of the Data Bus length with IOCS16* and MEMCS16*
Slave boards use the IOCS16* and MEMCS16* signal lines to tell the bus master
that they are able to perform 16-bit cycles. However, 16-bit cycles are only performed when they have been initiated by the bus master as 16-bit cycles.
IOCS16* and MEMCS16* are generated when the slave board recognizes its address on the bus and an even bus access (A0 = 0) is involved. Slave boards
which use the memory-oriented input/output procedure also consider the MMIO*
signal in addition to the addresses.
Bus masters with a 16-bit bus interface which support the IOCS16* and
MEMCS16* signals only perform 16-bit bus cycles when the appropriate signal has
been activated by the slave board. If the appropriate signal is not activated for
16-bit accesses triggered by the software, such bus masters automatically perform
this access as two consecutive 8-bit bus cycles. This also means that a 16-bit
slave board which does not generate an IOCS16* or MEMCS16* signal is only processed with 8-bit accesses by a 16-bit bus master which supports the IOCS16* or
MEMCS16* signal.
Master boards ignore IOCS16* when performing a memory access and ignore
MEMCS16* when performing an input/output access.
Bus masters which do not support IOCS16* or MEMCS16* ignore this signal and
perform their bus cycles as initiated by the software.
The following table shows the relationship between the A0 address bit, the BHEN,
IOCS16* and MEMCS16* signals and the data transmission.
Table 2-11
Z>P
Data transmission
P>Z
A0
BHEN
0
X
IOCS16*,
Resulting
MEMCS16* Data Length
1
8 bits
Data Bits
Used
DB0 to DB7
Even byte-access to 8-bit slave
1
0
0
0
0
1
1
0
0
8 bits
8 bits
16 bits
DB0 to DB7
DB0 to DB7
DB0 to DB15
Odd byte-access to 8-bit slave
Even byte-access to 16-bit slave
Word access to 16-bit slave
1
1
0
1
0
X
–
–
Invalid
Invalid
Slave may never use CS16* for A0=1.
Never occurs on the bus
Executed Data Transfer
Remarks
Eight-bit and 8/16- bit slave boards can be mixed in an SMP16 system. In addition, 8-bit slave boards can be used with 8/16-bit master boards and vice versa.
For details, see chapter 2.6.
2–20
SICOMP IMC – System Manual
J31069-D2001-U001-A0-7618
SMP16 System
2.5.4
Read Operations
During read operations, 8 or 16-bit data words are transferred from a slave board
to the bus master.
The slave board must place the data on the bus within a defined amount of time
before the rising edge of the MEMR* or IOR* signal. The access is concluded with
the rising edge of the command.
2.5.5
Write Operations
During write operations, 8 or 16-bit data words are transferred from the bus master
to one of the slave boards.
The bus master must place the data on the bus within a defined amount of time
after the falling edge of the MEMW* or IOW* command. The data can then be accepted with the rising edge of the command.
2.5.6
Slave-Master Synchronization with RDYIN
SMP16 bus cycles are “normally ready” cycles (i.e., the bus master assumes that
a slave board usually does not require individual wait cycles and the normal command length of the bus master is sufficient).
However, there are certain situations in which the command length must be adjusted with RDYIN. This may be true, for example, for certain accesses during
which other processes must be waited for or the addressed slave board always
requires a command length of more than 500 nsec.
A slave board which always uses RDYIN to extend commands must activate
RDYIN for at least the amount of time required by the command.
RDYIN may then only be deactivated by slave boards for a maximum of 8 µsec
when an address which is valid for the board and an active command are present.
SICOMP IMC – System Manual
J31069-D2001-U001-A0-7618
2–21
SMP16 System
2.5.7
Command Delays and Wait Cycles
To adjust the bus timing of a bus master to the requirements of a slave board and
to make the SMP16 bus available to a wide variety of I/O blocks and controllers in
simple and inexpensive applications, it may be necessary to extend bus accesses
on the bus master with command delays and additional permanently set wait
cycles.
The length of the command delays and wait cycles is usually derived from an internal clock pulse of the bus master and specified by the number of clock pulse
cycles set.
Altogether, a bus access by the bus master is increased by the bus master by the
command delay times plus the permanently set wait cycles.
Command delays
During command delays, activation of the command signals is delayed by a certain
amount of time after the address becomes valid. The command delay must be set
so that the actual command length is not decreased to less than the minimum
command length.
Wait cycles
The wait cycles permanently set on the bus master can be used to increase the
length of a command for each access of the primary bus master by a certain
amount of time. Altogether, a bus master must be able to generate a command
length of at least 500 nsec using wait cycles. This also applies when command
delays are set. Slave boards which require an even longer command length in
addition must generate this themselves by deactivating the RDYIN signal. Bus
masters may perform wait cycles separately by type of bus access (e.g., for
memory accesses, input/output accesses or INTA accesses). Distinction according to certain address areas for flexible adjustment to existing slave boards is also
permitted.
2–22
SICOMP IMC – System Manual
J31069-D2001-U001-A0-7618
SMP16 System
2.6
Combination of SMP16 and SMP Components
Bus backplanes
Different types of bus backplanes can be used for the SMP and SMP16 bus systems.
Table 2-12
Bus backplanes for the SMP/SMP16 system
Type
SMP–S401
Bus System
SMP bus
Features
Only for ES902A system frames. Cannot be
used for ES902C system frames.
SMP–E402
SMP bus
Only for old systems
SMP16–SYS402
SMP16–SYS403
SMP16 bus
SMP16 bus
Discontinued
– Termination of the command signals
Discontinued
–
Auto-configuration daisy chain
Due to different signal driver design and different allocation of special signals,
some older boards cannot be used with the SMP16-SYS403 or can only be used
with restrictions. See below.
Boards with restricted use
The following boards can only be used with the SMP16-SYS403 under certain
conditions.
Table 2-13
Boards with limited use with the SMP16–SYS403
Board
AMS-M18-A160
Condition/Restriction
Connector X6 for the KSP-S18 plug-in module may not be used since
this might cause data collisions of the signals leading to the plug-in
module.
Termination on the SMP16-SYS403 must be deactivated.1
AMS-M44-Axx
Wrap connections for the DACK(1) and DREQ(1) lines are required
on the backplane if these signals are used.
Termination on the SMP16-SYS403 must be deactivated.1
SMP-E14-Axx
SMP-E591
SMP-E592
SMP16-CPU024
SMP16-CPU035
SMP16-CPU045
Termination on the SMP16-SYS403 must be deactivated.1
Wrap connections for the DACK(3) and DREQ(3) lines are required
on the backplane if these signals are used.
Termination on the SMP16-SYS403 must be deactivated.1
Only boards with MLFB no. Xxxxxx-xxxxx-0AA0
(exception: SMP16 CPU 045/100)
Termination on the SMP16-SYS403 must be deactivated.1
1) See “Deactivation of the termination of the command signals.”
SICOMP IMC – System Manual
J31069-D2001-U001-A0-7618
2–23
SMP16 System
Unsuitable boards
The following boards may not be used with the SMP16-SYS403.
Table 2-14
Boards not suited for the SMP16–SYS403
Board
AMS-M17-A8
Explanation
Can only be used with the SMP-E402
AMS-M36-A251
AMS-M360-A3
AMS-M390-A1
Can only be used with the SMP-E402
Can only be used with the SMP-E402
Can only be used with the SMP-E402
SMP-E18-A8
SMP-E20
Can only be used with the SMP-E402
Can only be used with the SMP-E402
Required:
DB8 to DB15: 3.3 kΩ pull-up resistors in CPU slot
Wrap connections for the BHEN and MMIO* signals if these signals are used
16-bit access: Additional wrap connections for DB8 to DB15
SMP-E224
SMP-E302-A11
Can only be used with the SMP-E402
Can only be used with the SMP-E402
For use with the SMP-E18/E20: See above.
SMP-E303-A1
Can only be used with the SMP-E402
For use with the SMP-E18/E20: See above.
Deactivation of the termination of the command signals
Use of the CPU boards listed in table 2-13 with the SMP16-SYS403 bus backplanes requires that their termination RC elements be deactivated. To do this,
carefully pull out the resistor networks shown in figure 2-3 from their sockets with a
pair of flat pliers.
The SMP16-SYS403 backplanes with three or five slots have only one resistor network.
!
2–24
Caution
Be careful not to damage the components next to these resistor networks.
SICOMP IMC – System Manual
J31069-D2001-U001-A0-7618
SMP16 System
Resistor
networks to be removed
Figure 2-3 Location of the networks to be removed (view of the configuration side)
Combination of boards
Pure 16-bit I/O boards cannot be used with 8-bit bus masters.
SICOMP IMC – System Manual
J31069-D2001-U001-A0-7618
2–25
SMP16 System
2.7
List of References
[1]
2–26
SMP16 Bus-Spezifikation, version 1.0 dated 12.02.93
SICOMP IMC – System Manual
J31069-D2001-U001-A0-7618
AMS System
3
Table of Contents
3.1
System Overview . . . . . . . . . . . . . . . . . . . . . . . . . . . . . . . . . . . . . . . . . . . . . . .
3-2
3.2
3.2.1
3.2.2
Function Description . . . . . . . . . . . . . . . . . . . . . . . . . . . . . . . . . . . . . . . . . . . . .
Bus Elements . . . . . . . . . . . . . . . . . . . . . . . . . . . . . . . . . . . . . . . . . . . . . . . . . . .
Integration of the SMP16 and iPCI System in the AMS System . . . . . . . .
3-4
3-4
3-6
3.3
General Technical Description . . . . . . . . . . . . . . . . . . . . . . . . . . . . . . . . . . . . .
3-7
3.4
3.4.1
3.4.2
Signals of the Bus Interfaces . . . . . . . . . . . . . . . . . . . . . . . . . . . . . . . . . . . . . .
Information on Table 3-3 . . . . . . . . . . . . . . . . . . . . . . . . . . . . . . . . . . . . . . . . . .
Description of the Bus Signals . . . . . . . . . . . . . . . . . . . . . . . . . . . . . . . . . . . .
3-9
3-10
3-11
3.5
3.5.1
3.5.2
3.5.3
3.5.4
How the AMS Bus Functions . . . . . . . . . . . . . . . . . . . . . . . . . . . . . . . . . . . . . .
Initialization . . . . . . . . . . . . . . . . . . . . . . . . . . . . . . . . . . . . . . . . . . . . . . . . . . . . .
Data Transmission . . . . . . . . . . . . . . . . . . . . . . . . . . . . . . . . . . . . . . . . . . . . . .
Interrupt Operation . . . . . . . . . . . . . . . . . . . . . . . . . . . . . . . . . . . . . . . . . . . . . .
Bus Allocation Control . . . . . . . . . . . . . . . . . . . . . . . . . . . . . . . . . . . . . . . . . . .
3-16
3-16
3-16
3-18
3-19
3.6
Combination of AMS, SMP16 and SMP Components . . . . . . . . . . . . . . . .
3-20
SICOMP IMC – System Manual
J31069-D2001-U001-A0-7618
3–1
AMS System
3.1
System Overview
The SICOMP AMS system
SICOMP AMS (Advanced Microcomputer System) is an open, 16-bit board system
with multiprocessor capability. It conforms to the Multibus I Specification and has
worldwide standardization by the International Electrotechnical Commission (IEC)
under the title IEC 796.
Physically, AMS offers the advantages of the established concept of the double
Europa card format and indirect connection.
The AMS bus architecture is based on a hierarchy with the following levels.
System bus (parallel): AMS bus
Local expansion bus (parallel): SMP16 bus
Local expansion bus (parallel): iPCI
Serial bus: Pins are reserved for this for future requirements
The specifications of the AMS bus permit the operation of up to 16 CPU boards on
the system bus. Prioritization logic controls access rights. The local bus concept
ensures compatibility with the 16-bit SMP16 system.
Of particular importance is the capability of using an AT subsystem to integrate the
PC functions in the SICOMP AMS industrial microcomputer system. This subsystem provides an all-purpose hardware platform.
Products
The following types of products are available for SICOMP AMS.
Boards
Operating system software
Board software (board support packages)
Setup components and accessories
Depending on the particular application area, boards are delivered with or without
firmware.
Board support packages contain board-related software (firmware) in the form of
EPROM blocks and/or installation and driver software on floppy disk. In addition,
these packages include commissioning documentation.
3–2
SICOMP IMC – System Manual
J31069-D2001-U001-A0-7618
AMS System
Table 3-1
AMS system data
AMS System Data
System configuration
System bus
Multimaster system,
max. of 16 bus master boards possible
Asynchronous, separate data and address bus
Transfer speed
Slots
Data width
10 Mbyte/sec
Max. of 21 per 19-inch system row
16 bits
Address areas
Interrupt system
Communication between bus
masters
Board configuration
Ability to be coupled to other
buses
Plug-in system
EMC and environmental compatibility
Ventilation
Backup battery
Supply voltages
≤
16 Mbytes of memory addresses,
64 Kbytes of input/output addresses
Depends on the bus master board used
Via onboard dual-port RAM
With wrap jumpers, with local registers
SMP16, iPCI
Indirect, 96-pin in acc. w. DIN 41612
CE conformance. See chapter 12.
No fan. Exception: High-performance CPUs. See
chapter 12.4.
See chapter 8.
+5 V, ±5 %
+3.3 V, ±5 % (optional) 1)
±12 V, ±5 % (optional)
±15 V, ±3 % (optional)
1) Requirements may differ for specific boards.
SICOMP IMC – System Manual
J31069-D2001-U001-A0-7618
3–3
AMS System
3.2
3.2.1
Function Description
Bus Elements
Bus master
A bus master is the board which controls the bus. The bus master performs this
control function by using the bus allocation controller to assume control over the
bus and then generating appropriate control and address signals or memory and
input/output addresses. To perform these tasks, the master is equipped with a
CPU or a special controller with which the data can be transferred via the bus to
and from other bus stations.
AMS bus architecture supports the use of several bus masters in one system. A
bus allocation controller ensures that each bus master can obtain control over the
bus.
A bus master can work with the following operating modes.
Operating mode 1
The bus master may only execute one bus transfer per bus allocation. When
all bus masters are using this operating mode, time behavior of the system is
determined by the maximum duration of the BUSY* interval.
Operating mode 2
The bus master has unrestricted control over the bus. The bus can be disabled
(override) for other bus masters, and the regular duration of bus cycles can be
exceeded (bus timeout). The length of the BUSY* interval must not be considered here.
Operating mode 1 permits the user to estimate the total performance of his/her
system without having to think of unplanned time parameters (e.g., bus timeout).
Operating mode 2 supports a wide range of applications and gives the user a large
amount of room in which to implement his/her applications.
Bus masters which are only able to use operating mode 2 must be marked as “only
operating mode 2 for bus master.”
3–4
SICOMP IMC – System Manual
J31069-D2001-U001-A0-7618
AMS System
Slaves
A slave decodes the address signals on the bus and reacts to the control signals of
the respective bus master. A slave cannot assume bus control.
AMS bus signals
The bus signals can be subdivided into the following groups based on their functions.
Control signals
Address and data signals
Interrupt signals
Bus allocation signals
Special signals
Signals of the serial bus
The individual signals of these groups are described in more detail in chapter 3.4.
SICOMP IMC – System Manual
J31069-D2001-U001-A0-7618
3–5
AMS System
3.2.2
Integration of the SMP16 and iPCI System in the AMS System
The entire periphery of the SICOMP SMP16 and iPCI family can be utilized in the
16-bit AMS system to add powerful CPUs to SMP16 or iPCI applications to meet
rising demands on computer performance and greater data throughput.
Physical integration
The 6HE slots in an AMS system frame can be divided into 3HE slots (for SMP16
and iPCI) with accessory kits.
SMP16 bus or iPCI bus as local bus on SICOMP AMS system
The multimaster AMS structure permits the setup of logically structured, processoriented subsystems in which the SMP16 bus or the iPCI bus assumes the role of
the input/output bus. See figure below. Communication between the individual
subsystems takes place via dual-port RAM memory on the assigned CPUs via the
AMS bus (system bus).
AMS bus (multibus I; 16-bit)
AMS
CPU board
AMS
I/O board
iPCI bus (32-bit)
iPCI I/O
AMS
CPU board
AMS
mass memory
SMP16 bus (16-bit)
SMP16
input/output
SMP16
mass memory
Figure 3-1 SMP16 bus/iPCI bus as local bus on AMS system
3–6
SICOMP IMC – System Manual
J31069-D2001-U001-A0-7618
AMS System
3.3
General Technical Description
160
AMS
bus connector
I/O connection
Configuration side
I/O connection
233.35
SMP16/iPCI
bus connector
Direction of connection
Figure 3-2 Physical layout of AMS boards
Table 3-2
Dimensions of AMS boards
Length
Height
Dimensions of AMS Boards
160 mm
233.35 mm
Thickness of the PCB
Height of the components
1.6 mm (±0.2 mm)
Max. of 14 mm
Length of the connections or
thickness of the components
on the back of the PCB
Max. of 2.0 mm
Leave at least 2.5 mm of free space to the configuration and printed circuits on the upper and lower edge of
the PCBs so that the boards can be pushed into the
guide rails.
Front system
To prevent boards or connectors from accidentally falling out of subracks, a total or
single locking mechanism is provided for the board front plates on the subrack.
SICOMP IMC – System Manual
J31069-D2001-U001-A0-7618
3–7
AMS System
End piece for
total locking
End piece with level
for single locking
(conductive coating)
Contact spring for
ground connection
Pulling
eye
Pulling eye
Pull lever
AMS metal fornt plate
AMS metal front plate
AMS metal front plate
Figure 3-3 Previous design of front plate end pieces for total and single locking mechanism
AMS boards can be adjusted for total or individual locking by changing the end
pieces. The required accessories are available with detailed instructions. See figure LEERER MERKER. With end pieces for total locking, the grounding connection of the front plate to the subrack is achieved by placing the contact springs in
the end pieces. With end pieces for individual locking, the conductive coating of
the end pieces is used.
Front plates for total locking are equipped with pull eyes into which pull levers are
snapped. These can be used to detach boards installed in the frame from the basic plug connectors.
The front edge of AMS front plates is located at the front level. The front plates
are designed for use in ES902C subracks. They are screwed to the subrack.
Figure 3-4 New design of the front plate (U profile front plate with ejector lever)
3–8
SICOMP IMC – System Manual
J31069-D2001-U001-A0-7618
AMS System
3.4
Signals of the Bus Interfaces
Table 3-3
Pin
Signal allocation of the AMS bus
Pin Row A
Signal
Circuiting
Pin Row B
Signal
Circuiting
Pin Row C
Signal
Circuiting
1
2
MRDC*
MWTC*
V1
V1
R10
R10
BCLK*
GND
V1
V3
RT
–
IORC*
IOWC*
V1
V1
R10
R10
3
BPRN*
–
–
BUSY*
V1
R10
INTA*
V1
R10
4
BPRO*
–
–
CBRQ*
V1
R10
BREQ*
–
–
5
AUX0*
–
–
AUX1*
–
–
AUX2*
–
–
6
7
8
Reserved
INT0*
INT3*
V1
V1
V1
–
R10
R10
GND
INT1*
INT4*
V3
V1
V1
–
R10
R10
Reserved
INT2*
INT5*
V1
V1
V1
–
R10
R10
9
10
INT6*
AUX3*
V1
–
R10
–
GND
XACK*
V3
V1
–
R5
INT7*
INIT*
V1
V1
R10
R22
11
+5V
V3
–
AUX4*
–
–
AUX5*
–
–
12
+5V
V3
–
+12V
V2
–
+12V
V2
–
13
SDAT*
V1
–
GND
V3
–
SCLK*
V1
–
14
+5V
V3
–
–12V
V2
–
–12V
V2
–
15
+5V
V3
–
INH1*
V1
R10
INH2*
V1
R10
16
17
18
A0*
A3*
A5*
V1
V1
V1
R22
R22
R22
A1*
GND
A6*
V1
V3
V1
R22
A2*
A4*
A7*
V1
V1
V1
R22
R22
R22
19
20
A8*
A11*
V1
V1
R22
R22
A9*
GND
V1
V3
R22
A10*
A12*
V1
V1
R22
R22
21
22
23
A13*
A16*
A19*
V1
V1
V1
R22
R22
R22
A14*
A17*
GND
V1
V1
V3
R22
R22
A15*
A18*
A20*
V1
V1
V1
R22
R22
R22
24
25
A21*
A23*
V1
V1
R22
R22
A22*
BHEN*
V1
V1
R22
R22
+5V
+5V
V3
V3
–
–
26
LOCK*
V1
R10
GND
V3
CCLK*
V1
RT
27
28
D0*
D3*
V1
V1
R22
R22
D1*
D4*
V1
V1
R22
R22
D2*
D5*
V1
V1
R22
R22
29
30
D6*
D8*
V1
V1
R22
R22
GND
D9*
V3
V1
R22
D7*
D10*
V1
V1
R22
R22
31
32
D11*
D14*
V1
V1
R22
R22
D12*
GND
V1
V3
D13*
D15*
V1
V1
R22
R22
SICOMP IMC – System Manual
J31069-D2001-U001-A0-7618
R22
R22
3–9
AMS System
3.4.1
Information on Table LEERER MERKER
The signals of the AMS bus are combined into groups to protect against mutual
crosstalk. The groups are indicated in the table with double lines.
“Signal” column
An asterisk (*) after a signal name identifies it as a low-active signal.
Reserved connections are provided for future or special applications and may not
be used for special signals.
“Circuiting” column
The left-hand columns show the connections established by the bus backplane
between the connections of the individual slots. The right-hand columns show the
terminating circuits on the bus backplane.
Connection
V1
V2
V3
–
Non-through connection
Termination
R5
R10
R22
RT
–
3–10
Meaning
Narrow cable on the bus backplane which connects connections with
the same connection row and number for all bus slots
Wide cable on the bus backplane which connects connections with
the same connection row and number for all bus slots
Connection with a through conductor level on the bus backplane
Meaning
Termination of the bus cable with a pull-up resistor of 510 Ω
against +5 V
Termination of the bus cable with a pull-up resistor of 1.0 kΩ
against +5 V
Termination of the bus cable with a pull-up resistor of 2.2 kΩ
against +5 V
Termination of the bus cable with a voltage scaler with 220 Ω
against +5 V and 330 Ω against GND
No circuiting
SICOMP IMC – System Manual
J31069-D2001-U001-A0-7618
AMS System
3.4.2
BDescription of the us Signals
The following tables use the abbreviations and symbols shown below
Table 3-4
Explanation of the abbreviations and symbols
Signal Direction
M>S
S>M
Meaning
From active bus master to the slave boards
From the slave boards to the active bus master
M <> S
Bi-directional signal flow between active bus master and slave
boards
Bi-directional signal flow between slave boards
S <> S
M <> M
Characteristic
OC
Bi-directional signal flow between two bus master boards or between
slave boards
Requirements on Outputs for This Signal
Open collector
OC outputs can assume two signal states:
LOW or high ohmic
TP
Totem pole
TP outputs can assume two signal states:
LOW or HIGH
TS
Tri state
TS outputs can assume three signal states:
LOW, HIGH or high ohmic
Note
Here, “active bus master” means the bus master board which has control of the
AMS bus now.
SICOMP IMC – System Manual
J31069-D2001-U001-A0-7618
3–11
AMS System
Control signals of the AMS bus
All control signals required for control and coordination of a multimaster system are
defined for the AMS bus. Read and write-accesses to the bus are performed without multiplexing (i.e., neither address nor data signals must be latched).
Table 3-5
Signal
CCLK*
Control signals of the AMS bus
Signal
Direction
M>S
Characteristic
TP
Function
Constant clock
Cyclic clock pulse signal with constant frequency; can be
used by bus master and slave boards as the system clock
pulse.
Every bus master must be able to generate this signal. In a
multimaster system, the system clock pulse is always provided to the bus by a bus master only.
INH1, INH2
S <> S
OC
Inhibit
Blocking signal of a slave module to disable memory accesses of the system for another slave
INIT*
IORC*
M>S
M>S
OC
Initialize
TS
Initialization signal to put the entire system into a defined
state; can be triggered by every bus master or by an external
source (.e.g., “debounced” button).
I/O read command
Control signal of the CPU to read information from the input/
output address area
IOWC*
M>S
TS
I/O write command
Control signal of the CPU to write information in the input/output address area
LOCK*
M>S
TS
Lock
Lock signal for accesses of other bus masters to the system
bus; is generated by the active bus master.
MRDC*
M>S
TS
LOCK* also disables the second interface of the dual-port
RAM to prevent accesses foreign to the bus.
Memory read command
Control signal of the CPU to read information from the
memory address area
MWTC*
M>S
TS
Memory write command
Control signal of the CPU to write information to the memory
address area
XACK*
S>M
TS
Transfer acknowledge
Transmission acknowledgment of slave modules; signals the
bus master that the operation to be executed by the slave has
been executed and that the appropriate data have been read
or output on the data lines.
3–12
SICOMP IMC – System Manual
J31069-D2001-U001-A0-7618
AMS System
Address and data signals
The AMS bus has 24 address lines. This permits up to 16 Mbytes to be addressed
directly. Eight-bit and 16-bit accesses can be performed over 16 data lines.
Table 3-6
Signal
A0* to A23*
Address and data signals
Signal
Direction
M>S
Characteristic
TS
Function
Address
Inverted signals for selection of individual memory locations or
input/output channels
Memory accesses can be made to an up to 16-Mbyte memory
area (A0 to A23). Input/output accesses can be made to up
to 64k input/output channels (A0 to A15). Input/output modules must be able to react only to address lines A0 to A7 and
to ignore A8 to A15.
BHEN*
M>S
TS
Byte high enable
Control signal for enabling information exchange on the more
significant part of the data bus (D8 to D15)
D0* to D15*
M <> S
(S <> S)
TS
This signal indicates a real 16-bit access to an even address
(A0 = 0). This signal is always inactive for 8-bit accesses.
Data
Inverted bi-directional signals to transmit information (write) to
a slave board or to receive (read) information from there
D15 is the most significant bit, and D0 is the least significant.
Interrupt signals
The AMS bus has eight interrupt request lines.
Table 3-7
Signal
INT0* to
INT7*
INTA*
Interrupt signals
Signal
Direction
S>M
Characteristics
OC
Function
Interrupt request
Control signals to trigger interruptions of the running program.
When several interrupts are involved, INT0 has the highest
priority, and INT7 has the lowest priority.
M>S
TS
Interrupt acknowledge
Response signal to an interrupt request
This signal is generated by the bus master (if bus vectored
interrupts are used) to request output of an interrupt vector on
the data lines.
SICOMP IMC – System Manual
J31069-D2001-U001-A0-7618
3–13
AMS System
Bus allocation signals
To be able to use the AMS bus in a multimaster system, arbitrating signals are defined which can be used to allocate control over the bus.
Table 3-8
Signal
BCLK*
Bus allocation signals
Signal
Direction
M>S
Characteristic
TP
Function
Bus clock
Cyclic clock pulse signal for synchronization of bus allocation;
can be slowed down, stopped or operated in single steps.
Each bus master in a multimaster system must be able to
generate this signal. The bus clock pulse is always provided
to the bus by a bus master only.
BPRN*,
BPRO*
M>M
TP
BREQ*
M <> M
TP
BUSY*
M>S
OC
Bus priority in, bus priority out
Priority signals to prevent mutual blocking (i.e., deadlock) if
several bus masters request the bus at the same time
Bus request
Bus request signal of a bus master board
Bus busy
Generated by the active bus master. As long as the signal is
active, no other bus master can assume control.
CBRQ*
M>M
OC
Common bus request
Request signal of a bus master to the active bus master to
enable control over the bus
3–14
SICOMP IMC – System Manual
J31069-D2001-U001-A0-7618
AMS System
Special signals of the AMS bus
Signals are grouped here which do not belong to the standard signals of the AMS
bus and which can be used by the user if desired. Bus connections AUX0 to
AUX5 are available for these signals. The special signals which are actually used
by the boards are listed in the respective product documentation.
Table 3-9
Signal
BERR*
Special signals of the AMS bus
Signal
Direction
M>S
Characteristic
OC
Function
Board error
Failure signal (e.g., of the failsafe timer or the watchdog)
DREQ0*,
DREQ1*
S>M
OC
EXT0*,
EXT1*
M>S
OC
MPRO*
S>M
OC
DMA request
Request for DMA transfer
DMA exterminate
Control signal to abort a DMA cycle
Memory protect
Disable signal for memory accesses
PAUX
Power auxiliary
Auxiliary input for additional supply voltage
PFIN*
S>M
OC
Power failure interrupt
Indication of the power pack of a failure of the primary voltage
supply. After the signal becomes active, 10 msec remain to
save the system state.
PFSN*
S>M
OC
Power failure status
Indicates whether a warm or cold start has been performed
after return of power
RESET*
S>M
OC
WDOG0*,
WDOG1*
M>S
OC
Reset
Control signal for resetting one or more boards
Watchdog
Individual watchdog signals on the bus
Signals of the serial bus
The serial bus of the AMS system consists of two lines which are connected
through and shielded. This bus is provided for the serial transmission of additional
information which is not subject to the bus timing of the parallel bus.
Table 3-10
Signal
SDAT*,
SCLK*
Signals of the serial bus
Signal
CharacterDirection
istic
M <> M
S <> S
SICOMP IMC – System Manual
J31069-D2001-U001-A0-7618
Function
Serial data, serial clock
3–15
AMS System
3.5
3.5.1
How the AMS Bus Functions
Initialization
Before transmission on the bus can be started, all bus master and slave modules
must be reset to a defined state. This is achieved with the INIT* initialization signal
which can be generated by various sources.
By an RC element which activates the signal when the power is turned on
By a “debounced” switch or button available to the user on an operator panel
By a software command
3.5.2
Data Transmission
During data transmission, the bus master board first places the memory or input/
output address on the address lines and (only for write operations) the data on the
data lines. It then uses one of the signals MRDC, MWTC, IORC or IOWC to generate a command with which the appropriate slave is activated.
During a write operation, the slave accepts the information from the data lines.
During a read operation, it places the requested data on the bus. It then activates
the transmission acknowledgment XACK. The bus master concludes the cycle by
deactivating the command signal and then the address and data lines.
Data bus size
Control signal BHEN and the status of address bit A0 can be used to perform an
8-bit or a 16-bit access. Slave boards have no effect on the data bus size.
Table 3-11
Resulting bus size for data transmission operations
A0
BHEN*
Bus Size
0
HIGH
8 bits (low byte on D0 to D7)
3–16
1
0
HIGH
LOW
8 bits (high byte on D0 to D7, byte swap)
16 bits (low byte on D0 to D7, high byte on D8 to D15)
1
LOW
Not permitted
SICOMP IMC – System Manual
J31069-D2001-U001-A0-7618
AMS System
Inhibiting of memory accesses
Inhibiting signals INH1* and INH2* can be used to block memory accesses of the
bus master for the slave module actually addressed by the memory addresses.
The inhibiting signals can be activated by another slave module for accesses to
any areas of the AMS memory (even for individual bytes).
The slave modules are divided into three priority classes regarding inhibiting.
Lowest priority
These slaves can be blocked by inhibiting signals INH1* and INH2*, but cannot
activate blocking themselves.
Example: Read/write memory
Medium priority
These slaves can activate inhibiting signal INH1* (i.e., block slaves of the lowest priority), but can be blocked themselves with INH2*.
Example: Memory input/output module
Highest priority
These slaves can activate inhibiting signals INH1* and INH2* to block slaves of
the lowest and medium priorities.
Example: Initial program loading or boot ROM
A slave module which is inhibited in this way blocks its drivers for all address, data
and acknowledgment signals of the AMS bus. The XACK acknowledgment signal
for concluding the access is activated by the blocking slave. Blocking signals activated during input/output accesses or INTA cycles have no effect.
Blocking during memory read-accesses may not create disadvantages for the
blocked slave. In particular, this must have no effect on its data or its status registers.
Blocking during memory write-accesses may only have an effect on the addressed
byte or word for the blocked slave. It may not affect other data.
SICOMP IMC – System Manual
J31069-D2001-U001-A0-7618
3–17
AMS System
3.5.3
Interrupt Operation
The AMS bus is equipped with eight interrupt request lines of various priorities.
When arriving interrupts are processed by the CPU, a distinction is made between
the following types.
Bus-vectored interrupts (BV)
The vector required as the start address of the interrupt routine is supplied by
the interrupt-requesting module via the AMS bus.
Interrupts without vector (non bus-vectored, NBV)
The jump address for the interrupt routine is stored on the bus master board
and is not supplied via the AMS bus.
Interrupts are usually triggered by edge. Several interrupt sources can be circuited
in parallel via open collector outputs on a request line. Level-triggering can also be
programmed.
An AMS system can be configured for mixed use of BV and NBV interrupts.
Bus-vectored interrupts
When an interrupt request arrives at the bus master board via control signals
INT0* to INT7*, the interrupt controller interrupts the program sequence, and activates the INTA* response signal. At the same time, it places the number of the
highest priority interrupt on the address lines (i.e., INT0* has the highest priority
and INT7* the lowest). If interrupts are cascaded, this procedure is repeated if
necessary.
The module which requested the interrupt now places an 8-bit word on the data
lines. These data represent the offset in a fixed interrupt vector table stored on the
bus master. The start address of the interrupt routine is taken from this table.
For more information on this procedure, see the respective product documentation
of the bus master boards.
To ensure an uninterrupted sequence of bus cycles, control of the AMS bus is not
given to another bus master while the interrupt is being processed.
Non bus-vectored interrupts
These interrupts do not require data transmission via the AMS bus to determine
the jump address for the interrupt routine. The bus master performs all required
operations itself.
The interrupt-triggering modules are also able to locate themselves on the bus
master board.
3–18
SICOMP IMC – System Manual
J31069-D2001-U001-A0-7618
AMS System
3.5.4
Bus Allocation Control
If necessary, the bus master boards circuited together in an AMS system can obtain control over the AMS bus in order to perform the required transmission operations. Two priority procedures can be implemented using a series of bus allocation
signals.
Serial priority resolution
There is a highest-priority and a lowest-priority bus master board. In between,
no two bus masters have the same priority. The priorities are assigned by wiring on the bus backplane.
Parallel priority resolution
Bus allocation is performed by an external circuit which knows the priorities of
the individual bus master boards.
Generation and evaluation of the bus allocation signals is synchronized by the bus
clock pulse signal BCLK*.
Serial priority resolution
The bus master boards are daisy chained together. A signal which is not connected through to the bus is led from one bus master to the next. Output BPRO*
of the highest-priority bus master is connected to input BPRN* of the bus master
with the next lower priority, and so on. The active level of this signal tells a bus
master that no bus master with a higher priority requires the bus.
BPRN* of the highest-priority bus master must be connected to GND.
Parallel priority resolution
This procedure is used for large systems (with more than two bus masters) and for
rotating priority.
The external bus allocation circuit evaluates the BREQ* bus requests of the bus
master boards and gives the next bus access to the currently highest-priority bus
master via the BPRN* priority input.
Using the common CBRQ* request signal, the bus master which is currently in
control of the bus can determine whether other bus masters require the bus and
give them control temporarily.
SICOMP IMC – System Manual
J31069-D2001-U001-A0-7618
3–19
AMS System
3.6
Combination of AMS, SMP16 and SMP Components
When AMS components are combined with SMP16 and SMP components, remember to adhere the notes in chapter 2.6.
Table 3-12
Compatibility of AMS backplanes
Backplane
AMS-M401
Features
Soldered
Conditions/Remarks
With AMS-Z402 accessory:
Adjustment of the XACK* bus signal
For ES902A system frames:
Not compatible with ES902C system frames
AMS-M402-A5/-A18/-A21,
version 1
Insertion
With AMS-Z402 accessory:
Adjustment of the XACK* bus signal
For ES902C system frames
AMS-M402-A5/-A18/-A21,
version 2 and remaining
types
3–20
Insertion
Active driver for adjustment of the XACK* bus signal is integrated on the backplane.
For ES902C system frames
SICOMP IMC – System Manual
J31069-D2001-U001-A0-7618
PCI System
4
Table of Contents
4.1
4.1.1
4.1.2
4.1.3
System Overview . . . . . . . . . . . . . . . . . . . . . . . . . . . . . . . . . . . . . . . . . . . . . . .
Bachplane Bus System . . . . . . . . . . . . . . . . . . . . . . . . . . . . . . . . . . . . . . . . . .
Located Expansion Bus . . . . . . . . . . . . . . . . . . . . . . . . . . . . . . . . . . . . . . . . . .
Nomenclature . . . . . . . . . . . . . . . . . . . . . . . . . . . . . . . . . . . . . . . . . . . . . . . . . . .
4-2
4-2
4-3
4-3
4.2
4.2.1
4.2.2
4.2.3
iPCI System . . . . . . . . . . . . . . . . . . . . . . . . . . . . . . . . . . . . . . . . . . . . . . . . . . . .
General Technical Description . . . . . . . . . . . . . . . . . . . . . . . . . . . . . . . . . . . . .
Implementation on SICOMP IMC . . . . . . . . . . . . . . . . . . . . . . . . . . . . . . . . . .
Signals of the Bus Interfaces . . . . . . . . . . . . . . . . . . . . . . . . . . . . . . . . . . . . . .
4-4
4-4
4-8
4-10
4.3
4.3.1
4.3.2
Local PCI Expansion Bus . . . . . . . . . . . . . . . . . . . . . . . . . . . . . . . . . . . . . . . . .
General . . . . . . . . . . . . . . . . . . . . . . . . . . . . . . . . . . . . . . . . . . . . . . . . . . . . . . . .
Signals of the PMC Module Interface . . . . . . . . . . . . . . . . . . . . . . . . . . . . . . .
4-14
4-14
4-15
4.4
List of References . . . . . . . . . . . . . . . . . . . . . . . . . . . . . . . . . . . . . . . . . . . . . . .
4-16
SICOMP IMC – System Manual
J31069-D2001-U001-A0-7618
4–1
PCI System
4.1
4.1.1
System Overview
Backplane Bus System
Introduction of PCI technology in industrial systems brought with it a demand for a
PCI expansion which could be used in industrial environments. Almost simultaneously, the two specifications CPCI (i.e., Compact PCI) and iPCI (i.e., Industrial
PCI) were developed in America and Europe respectively.
With membership in the SIPS e.V. came the introduction of the iPCI as PCI expansion bus for SICOMP IMC. The PCI bus is designed in accordance with the iPCI
specifications [1]. All technical details are included in these specifications.
Motivation, goals
Although plug-in systems with passive bus backplanes are ideal for industrial systems, PCI specification 2.0 had to be expanded to include several important signals for industrial applications.
Below are the primary foundations on which the iPCI specification is based.
The existing board format is designed for 19” subracks.
Comparable electrical data are required to be able to easily link in existing PCI
blocks in accordance with PCI specification 2.0.
The geometry of all important signals was designed precisely as described in
PCI specifications but with plug-in connectors with industrial capability.
Passive bus with up to 5 PCI slots (each has master capability). More slots
cannot be implemented at this time since the driver blocks are able to drive a
maximum of 10 loads. Each plug-connector and each PCI block count as one
load. Use of fewer slots is also permitted.
This configuration corresponds to a standard motherboard with four PCI slots.
To obtain maximum flexibility when designing an iPCI system, the plug-in connector is divided into three separate parts.
A 120-pin base connector with all 32-bit PCI signals. This connector is always
required.
A 60-pin expansion connector with the signals for the 64-bit expansion of the
PCI bus (optional)
A 60-pin expansion connector for I/O expansions (optional)
Imaging the functionality of a standard motherboard with its PCI expansion slots on
the iPCI bus backplane requires a special system slot. This slot contains the CPU,
supplies the I/O slots with the PCI clock pulse, and is the sink for the interrupt and
arbitrating signals.
4–2
SICOMP IMC – System Manual
J31069-D2001-U001-A0-7618
PCI System
4.1.2
Located Expansion Bus
In addition to the iPCI backplane bus, a local PCI bus expansion is sometimes also
provided for CPUs without iPCI bus interface.
Here, expansion is limited to only one card. Physical and electrical design is based
on PMC specifications [2], [3], for example.
4.1.3
Nomenclature
The nomenclature is based on that of the SMP16 system.
See table 2-2.
SICOMP IMC – System Manual
J31069-D2001-U001-A0-7618
4–3
PCI System
4.2
4.2.1
iPCI System
General Technical Description
Board layout
Due to the dimensions of the bus connector, a somewhat longer PCB is required
(i.e., 163 mm). The defined free space of 2.5 mm for the plug-in rails must be reduced to 2 mm in the area around the bus connector.
A single Europa card is shown here as an example.
163 mm
1E
1A
Expansion connector
64-bit PCI bus
1A
1E
1A
100 mm
1E
Base connector
32-bit PCI bus
Expansion connector
UNI I/O bus
Figure 4-1 Physical layout of the iPCI boards
4–4
SICOMP IMC – System Manual
J31069-D2001-U001-A0-7618
PCI System
Table 4-1
Specification for iPCI boards
Length
Height
163 mm
100 mm
PCB thickness
Front plate
1.6 mm (±0.2 mm)
Aluminum, 2.5 mm thick, U profile EMC springs possible
Max. of 14 mm
Height of the components
Length of the connections or
thickness of the components
on the back of the PCB
Locking
Max. of 2.0 mm
Pull lever
Color of the outside
Tip lever with space for labeling (e.g., logo or board
designation)
Connectors appropriate for the functions, primarily sub
D technology
No color, anodized
Mounting dimensions
Labeling
In acc. w. internal specifications
In acc. w. internal specifications
Backup battery
Supply voltages
See chapter 8.
+5 V, ±5 %
+3.3 V, ±5 % (optional) 1)
±12 V, ±5 % (optional)
±15 V, ±3 % (optional)
I/O connector
Individual locking with screws
1) Other requirements may pertain to specific boards.
Bus backplane
The following prerequisites apply to the iPCI bus backplane of the SICOMP IMC
system.
The bus backplane consists of one system slot and a maximum of four expansion slots. If fewer expansion slots are needed, the bus backplane may be
shorter.
The system slot is always located on the right, as seen from the front.
If more than four expansion slots are needed, an appropriate bus coupler
(PCI2PCI bridge) must be used. The bridge occupies the system slot of the
second bus backplane.
The geometrical dimensions of the bus backplane and the position of the connectors must comply with Europa format definitions.
SICOMP IMC – System Manual
J31069-D2001-U001-A0-7618
4–5
Additional
backplane
64 bits
64 bits
64 bits
Slot 2
Slot 3
Slot 4
64 bits
Slot 1
System slot 64 bits
PCI System
Additional
backplane
iPCI backplane
Figure 4-2 Principal layout of an iPCI bus backplane (view of back)
An iPCI bus backplane with five slots is located in the middle. The left-hand slot is
the system slot. Additional backplanes are shown to the left and right of this bus
backplane. These permit integration of existing bus systems. The iPCI bus can
also be expanded with a PCI2PCI bridge.
The UNI I/O expansion can be used to decouple the expansion bus from the back
and wire it to the SMP16 bus backplane (e.g., via a backplane connection).
Coding of the slots
The slots of the bus backplane are coded as system slot or I/O slots.
However, the SICOMP IMC CPUs do not have coding since their layout makes
incorrect installation on the iPCI bus impossible.
4–6
SICOMP IMC – System Manual
J31069-D2001-U001-A0-7618
PCI System
Power Supply
The supply voltages +5 V, +3.3 V and +12 V must be applied to the iPCI bus backplane based on the boards used.
The VIO potential depends on the requirement of the iPCI boards used and must
be connected to +5 V or +3.3 V. There is only one GND potential on the bus backplane.
Table 4-2
Power supply and current consumption in accordance with specifications
Supply Voltage
+5 Volts (±5%)
+3.3 Volts (±5%)
Connections per
Slot
8
7
Consumption per
Slot
Max. of 7 A
Max. of 7 A
Total Consumption (5 Slots)
Max. of 20 A
Max. of 20 A
+12 Volts (±5%)
–12 Volts (±5%)
1
1
Max. of 1 A
Max. of 0.5 A
Max. of 2 A
Max. of 1 A
VIO
VBAT (3.0 to 3.6 V)
GND
4
1
22
Max. of 1 A
Max. of 0.01 A
Max. of 2 A
Max. of 0.05 A
Max. of 40 W
Max. of 100 W
Total power
Front system
Figure 4-3 U profile front plate (2 slots wide) with ejection lever
SICOMP IMC – System Manual
J31069-D2001-U001-A0-7618
4–7
PCI System
4.2.2
Implementation on SICOMP IMC
In contrast to the conventional implementation on iPCI (decoupling of the bus signals via UNI I/O and wiring on the bus backplane), the iPCI CPUs of the SICOMP
IMC product family supply up to two (with SMP16) or three (with AMS) backplane
bus systems.
These CPUs always contact the iPCI bus from the left (as seen from the front) and
the SMP16 bus from the right. This means that SICOMP IMC CPUs may only be
used on iPCI backplanes with the system slot to the right.
Implementation with SMP16
The following figure shows a sample configuration for the layout of a SMP16 system frame.
iPCI backplane
Slot for
iPCI-CPU
Slots for additional
iPCI boards
Slots for additional
SMP16 boards
Slots for power
supplies (if needed)
Figure 4-4 Sample configuration for SMP16 with iPCI bus backplane
4–8
SICOMP IMC – System Manual
J31069-D2001-U001-A0-7618
PCI System
Implementation with AMS
The following figure shows a sample configuration for the layout of an AMS system
frame.
Slot for
iPCI-CPU
iPCI backplane
Slots for power supplies
(if needed)
Slots for additional
iPCI boards
Slots for additional
AMS boards
Slots for additional
AMS boards or
SMP16 bus segments
Figure 4-5 Sample configuration for AMS with iPCI and SMP16 bus backplane
SICOMP IMC – System Manual
J31069-D2001-U001-A0-7618
4–9
PCI System
4.2.3
Signals of the Bus Interfaces
The following bus connectors are defined in accordance with PCI specification
V2.0.
Basic connector for 32-bit PCI (different for system slot and I/O slots)
Connector for 64-bit expansion
Connector for I/O expansion
Baseconnector for 32-bit PCI
Table 4-3
iPCI base connector for system slot (CPU slot)
Connection
a
b
c
d
e
1
2
VCC3
AD2
REQ64#
AD3
ACK64#
GND
AD0
AD4
AD1
AD5
3
4
5
AD6
GND
AD10
VCC
AD8
VCC3
AD7
AD9
AD11
C/BE0#
VCC3
AD12
GND
M66EN
GND
6
7
AD13
GND
AD14
PAR
GND
SERR#
AD15
VIO
C/BE1
SBO#
8
9
10
SDONE
GND
FRAME#
VCC3
STOP#
C/BE2#
PERR#
DEVSEL#
GND
LOCK#
TRDY#
AD16
VCC
IRDY#
AD17
11
12
AD18
GND
VIO
AD21
AD19
AD22
AD20
VCC
GND
AD23
13
14
15
VCC
AD24
AD27
VCC3
VIO
AD28
GND
AD25
GND
VCC
AD26
AD29
C/BE3#
GND
AD30
16
17
GND
REQ2
AD31
VCC3
X1
GNT2
REQ1
REQ3
GNT1
VCC
18
19
20
GND
CLK1
CLK2
GNT3
RST#
NMI#
REQ4
SLEEP#
X4
VIO
X2
X5
GNT4
X3
GND
21
22
GND
CLK3
X6
VCC
INTD#
INTB#
VCC3
INTA#
INTC#
N12
23
24
CLK4
VCC3
RSTIN#
USB+
VCC
USB–
ICPEN#
OSC
P12
VBATT
4–10
SICOMP IMC – System Manual
J31069-D2001-U001-A0-7618
PCI System
Table 4-4
iPCI basic connector for I/O slot
Connection
a
b
c
d
e
1
2
VCC3
AD2
REQ64#
AD3
ACK64#
GND
AD0
AD4
AD1
AD5
3
4
5
AD6
GND
AD10
VCC
AD8
VCC3
AD7
AD9
AD11
C/BE0#
VCC3
AD12
GND
M66EN
GND
6
7
AD13
GND
AD14
PAR
GND
SERR#
AD15
VIO
C/BE1
SBO#
8
9
10
SDONE
GND
FRAME#
VCC3
STOP#
C/BE2#
PERR#
DEVSEL#
GND
LOCK#
TRDY#
AD16
VCC
IRDY#
AD17
11
12
AD18
GND
VIO
AD21
AD19
AD22
AD20
VCC
GND
AD23
13
14
15
VCC
AD24
AD27
VCC3
VIO
AD28
GND
AD25
GND
VCC
AD26
AD29
C/BE3#
GND
AD30
16
17
GND
IDSEL0
AD31
VCC3
X1
IDSEL1
REQ
IDSEL2
GNT
VCC
18
19
20
GND
CLK
GND
GND
RST#
NMI#
GND
SLEEP#
X4
VIO
X2
X5
GND
X3
GND
21
22
GND
GND
X6
VCC
INTD#
INTB#
VCC3
INTA#
INTC#
N12
23
24
GND
VCC3
RSTIN#
USB+
VCC
USB–
ICPEN#
OSC
P12
VBATT
The entries in bold type differentiate the I/O slots from the system slot.
Both tables show a view of the backplane. Routing of the interrupts, requests and
clock pulse supply is described in the iPCI specification [1].
SICOMP IMC – System Manual
J31069-D2001-U001-A0-7618
4–11
PCI System
Special signals of the iPCI bus
Table 4-5
Signal
ACK64#
REQ64#
Special signals of the iPCI bus
Signal
CharacterFunction
Direction
istic
Z>P
OC
Request and acknowledgment for 64-bit transfers
P>Z
The pull–up resistor required for REQ64# is integrated on the
CPU board in the system slot.
X1 to X6
–
–
M66EN
P>Z
OC
OSC
Z>P
TP
RSTIN#
P>Z
OC
VBAT
Z>P
–
P>Z
SCLK#
SDAT#
Z>P
TS/TP
P>Z
OC
NMI#
Z>P
OC
USB+
USB–
VIO
Z>P
TS/TP
–
–
X7 to X12
–
–
4–12
These signals are connected through on the bus backplane
and may not be used.
This signal indicates whether the bus can be clock pulsed
with 66 MHz (in anticipation of PCI specification V2.1).
Expansion cards which do not support this clock pulse frequency must apply the signal to GND or connect with VIO via
pull-up resistor (4.7 kΩ).
TTL-compatible signal with 14.3180 MHz, driven from the system slot
Open collector signal, low-active, of a watchdog or RESET
button. The input of the RESET circuit of the CPU board in
the system slot requires a pull-up resistor (330 Ω) and appropriate decoupling. Only for the RESET generator (system
slot) is the RSTIN# signal an input. For all expansion cards,
the RSTIN# signal is an output.
An additional battery can be connected here.
See chapter 8.3.4.
Signals of the serial bus (I2C) are not used by SICOMP IMC
and require one pull-up resistor (4.7 kΩ) each on the CPU
board.
Non-maskable interrupt (low-active). All I/O cards can activate NMI# separately.
Universal serial bus. If not used, one pull-up resistor (4.7 kΩ)
each is required on the CPU board.
The voltage level on the VIO depends on the level of the PCI
signals (+5 V or +3.3 V). The 32-bit bus and the 64-bit expansion must have the same level.
These signals may not be used. They are reserved for future
expansions of the PCI bus.
SICOMP IMC – System Manual
J31069-D2001-U001-A0-7618
PCI System
64-bit expansion
All signals for the 64-bit expansion must be terminated on the CPU with resistors in
accordance with PCI specification 2.0 (2.7 kΩ for 5 V signals and 8.2 kΩ for 3.3 V
signals).
The 64-bit expansion is planned for the bus backplane but is not configured currently.
Table 4-6
Signal allocation of the iPCI bus, I/O slot
Connectin
a
b
c
d
e
1
2
GND
X10
X7
GND
X8
AD32
X9
AD33
GND
AD34
3
4
AD35
AD38
AD36
AD39
GND
AD40
AD37
GND
VIO
AD41
5
6
7
AD42
VIO
VIO
AD43
AD46
AD49
AD44
GND
GND
AD45
AD47
AD50
GND
AD48
AD51
8
9
AD52
AD56
AD53
AD57
AD54
AD58
AD55
GND
GND
AD59
10
11
12
AD60
AD63
GND
AD61
GND
C/BE6#
GND
PAR64
C/BE7#
AD62
C/BE4#
X11
VIO
C/BE5#
X12
I/O bus expansion
This optional plug connector provides an interface to another bus system or to an
I/O connector which can be defined as desired (different for each slot). A distinction can be made with coding.
Currently defined bus expansions on the UNI I/O are listed below.
SMP16
ISA (ISA96 / AT96 / PC104)
ECB
FD/IDE
SCSI
VME
SICOMP IMC – System Manual
J31069-D2001-U001-A0-7618
4–13
PCI System
4.3
4.3.1
Local PCI Expansion Bus
General
Mezzanine expansion modules have been defined (in acc. w. [2]) for VME systems. This standard combines the electrical elements of the PCI bus with the
physical form factors for CMC (Common Mezzanine Card [3]).
Some SICOMP IMC CPUs are equipped with an interface for single PMC cards.
The component side of the cards points to the basic board. The standard then defines the component heights shown next. The total height shown (< 10 mm)
(10 mm conventional distance, greater distances due to connector on the board
possible) is binding. See [2] and [3].
Front plate
PMC module on the component side
Socket
ÑÑÑÑÑÑÑÑÑÑÑÑÑÑÑÑÑÑÑÑÑ
ÑÑÑÑÑÑÑÑÑÑÑÑÑÑÑÑÑÑÑÑÑÑ
3.5 mm
4.3 mm
Component height:
9.8 mm
Component height 4.7 mm
Connector area: 31 mm
Support point
Connector
PCB, basic board
Figure 4-6 PMC cards, available component heights
Bus mode signals
Since the PMC interface may also have been allocated for other bus systems than
PCI, four signals have been defined which indicate the type of bus signals.
The BUSMODE signals [4, 3 and 2] are permanently set to 001bin for PCI modules.
The BUSMODE1 signal tells the CPU that “module exists and is active”.
The module only activates its interface blocks when the correct identifier is specified by the CPU.
4–14
SICOMP IMC – System Manual
J31069-D2001-U001-A0-7618
PCI System
4.3.2
Signals of the PMC Module Interface
Table 4-7
Signals of the PMC module interface
Connection X8
Signal
Pin
Pin
Signal
Pin
Connection X9
Signal
Pin
Signal
1
3
5
–
GND
INTB#
2
4
6
–12 V
INTA#
INTC#
1
3
5
+12 V
–
–
2
4
6
–
–
GND
7
9
BUSMODE1#
INTD#
8
10
+5 V
Reserved
7
9
GND
Reserved
8
10
Reserved
Reserved
11
13
15
GND
CLK
GND
12
14
16
Reserved
GND
GNT#
11
13
15
BUSMODE2#
RST#
+3.3 V
12
14
16
+3.3 V
BUSMODE3#
BUSMODE4#
17
19
REQ#
V (I/O)
18
20
+5 V
AD31
17
19
Reserved
AD30
18
20
GND
AD29
21
23
25
AD28
AD25
GND
22
24
26
AD27
GND
C/BE3#
21
23
25
GND
AD24
IDSEL
22
24
26
AD26
+3.3 V
AD23
27
29
AD22
AD19
28
30
AD21
+5 V
27
29
+3.3 V
AD18
28
30
AD20
GND
31
33
35
V (I/O)
FRAME#
GND
32
34
36
AD17
GND
IRDY#
31
33
35
AD16
GND
TRDY#
32
34
36
C/BE2#
Reserved
+3.3 V
37
39
DEVSEL#
GND
38
40
+5 V
LOCK#
37
39
GND
PERR#
38
40
STOP#
GND
41
43
45
SDONE#
PAR
V (I/O)
42
44
46
SBO#
GND
AD15
41
43
45
+3.3 V
C/BE1#
AD14
42
44
46
SERR#
GND
AD13
47
49
AD12
AD09
48
50
AD11
+5 V
47
49
GND
AD08
48
50
AD10
+3.3 V
51
53
55
GND
AD06
AD04
52
54
56
C/BE0#
AD05
GND
51
53
55
AD07
+3.3 V
Reserved
52
54
56
Reserved
Reserved
GND
57
59
V (I/O)
AD02
58
60
AD03
AD01
57
59
Reserved
GND
58
60
Reserved
Reserved
61
63
AD00
GND
62
64
+5 V
REQ64#
61
63
ACK64#
GND
62
64
+3.3 V
Reserved
Allocation corresponds to IEEE P1368.1.
SICOMP IMC – System Manual
J31069-D2001-U001-A0-7618
4–15
PCI System
4.4
4–16
List of References
[1]
Industrial PCI (iPCI) Version 1.4, Technical Specification
[2]
IEEE P1386.1 draft 1.6 “PCI Mezzanine Cards” dated 04.04.95
[3]
IEEE P1386 draft 2.0 “Common Mezzanine Card Family” dated 04.04.95
SICOMP IMC – System Manual
J31069-D2001-U001-A0-7618
Compact Computer
5
In performance, the product line of the SICOMP IMC compact computers represents the entrance to the SICOMP IMC world. The products included in this product line have the primary features described below.
Compact hardware layout
The primary functions needed in the automation world today are located in a compact device whose simple installation directly implements the man-machine interface.
Closed and open-loop control
Operator control and monitoring
Implementation of the above functions is provided by the following types of core
hardware components in the various performance levels of compact computers.
x86 processor core with memory architecture
Digital and analog input/output
Serial interface(s)
Encoder inputs
Keyboard (connection)
Display
Bus interface
Uniform software structure
A uniform software structure is provided by using the RMOS3 real-time operating
system as a platform. All other applications (e.g., applications written by the customer) can then be linked in as tasks under RMOS.
This is supported by an included Basic IO System (i.e., BIOS) which is linked in as
a library under RMOS. All other programs must also be linked in at the task level.
Software packages are available for the various compact computers. For more
information, contact your Siemens office.
SICOMP IMC – System Manual
J31069-D2001-U001-A0-7618
5–1
Compact Computer
Transparency on software basis
The method described above ensures transparency of the compact computer level
both to the SMP16 system and the AMS system at operating system and program
levels.
Examples
Compact computers may be provided with the following performance features, for
example.
Table 5-1
Sample configurations
Example 1
Text LC display with 4 x 40 characters
Sealed keyboard (IP54) with 22 keys
Example 2
Graphic LC display with 320 x 240 pixels
9 status LEDs on the function keys
Sealed keyboard (IP54) with 38 keys
80386EX
7 status LEDs on the function keys
512-Kbyte flash memory
80386EX with co-processor
128-Kbyte SRAM
2-Mbyte flash memory
2 serial interfaces for programming and
for use as desired
1-Mbyte SRAM
Digital I/O
12 inputs/8 outputs
2 serial interfaces for programming and
for use as desired
Analog I/O
2 inputs/1 output
Digital I/O
64 inputs/48 outputs
Link to process control technology
via PROFIBUS-DP
Analog I/O
2 inputs/4 outputs
Real-time clock (battery buffered)
3 encoder inputs and 2 handwheel inputs for positioning applications
Link to process control technology via
CAN bus interface
Customer-specific system solutions
In sufficient numbers, customer-specific standard systems can be converted to
compact computers.
5–2
SICOMP IMC – System Manual
J31069-D2001-U001-A0-7618
Assembling Center
6
The combination of existing SICOMP IMC components based on specific customer requirements is offered within the scope of manufacturing.
A ready-to-run device can be created based on customer needs. Just select the
appropriate components from the SICOMP IMC product family, and provide us with
the necessary wiring and setting documentation.
For example, this service includes the following.
Setting up a customer-related system frame
Installation of the boards
Wiring of the bus backplane
Setting the board addresses
Installing the software
Cabling
Components of other product families can also be used if necessary.
A wiring and startup test is performed on the finished system. Other tests are also
available on request.
Forms
The following forms should be used for duplication. They are also available from
your Siemens office.
SICOMP IMC – System Manual
J31069-D2001-U001-A0-7618
6–1
Assembling Center
Selection: 3HE subrack as system basis
(See also KT51 or KT1 catalog)
System1)
Fan
(SMP16SYS562)
X
SMP16-SYS500
Backplane
(SMP16SYS403)
None
Prepared for
SMP16SV531
X
Prepared for
SMP16SV430
X
SMP16-SYS501
SMP16-SYS502
X
16 EP
21 EP
X
SMP16-SYS503
SMP16-SYS504
X
18 EP
None
X
X
Switch board
X
Other
1) Check accordingly.
Bus backplanes (Enter type and slot area.)
1
2
3
4
5
6
7
8
9
10
11
12
13
14
15
16
17
18
19
20
21
14
15
16
17
18
19
20
21
14
15
16
17
18
19
20
21
18
19
20
21
Configuration (Enter board or position on piece list.)
1
2
3
4
5
6
7
8
9
10
11
12
13
Dummy covers (Check empty slots to be covered.)
1
2
3
4
5
6
7
8
9
10
11
12
13
Locking (Enter S for total locking and E for individual locking.)
1
6–2
2
3
4
5
6
7
8
9
10
11
12
13
14
15
16
17
SICOMP IMC – System Manual
J31069-D2001-U001-A0-7618
Assembling Center
Selection: 6HE subrack as system basis
(See also KT51 or KT1 catalog.)
System1)
Fan
(SMP16SYS562)
X
AMS-M551
Prepared for
AMS-M431
X
Other
The following forms show the upper and lower system row of the 6HE subrack.
Bus backplanes (Enter type and slot area.)
1
2
3
4
5
6
7
8
9
10
11
12
13
14
15
16
17
18
19
20
21
Configuration. (Enter board or position on piece list.)
Enter retrofit kit AMS-SMP16, AMS-Z451 or SMP16-ZUB451.
1
2
3
4
5
6
7
8
9
10
11
12
13
14
15
16
17
18
19
20
21
15
16
17
18
19
20
21
18
19
20
21
Dummy covers. (Check empty slots to be covered.)
1
2
3
4
5
6
7
8
9
10
11
12
13
14
Locking. (Enter S for total locking and E for individual locking.)
1
2
3
4
5
6
SICOMP IMC – System Manual
J31069-D2001-U001-A0-7618
7
8
9
10
11
12
13
14
15
16
17
6–3
Assembling Center
Operating system/software
Version
Installed1)
Included1)
MS-DOS
MS-Windows
RMOS
Other
1) Check accordingly.
Notes on installation/
remarks on customer-specific or other software
6–4
SICOMP IMC – System Manual
J31069-D2001-U001-A0-7618
Assembling Center
Board settings
Type:
Slot:
Top / middle/ bottom1)
Address range(s): From_________hex to_________hex
Address area: PC-IO / SMP-IO / MEM / MMIO1)
Other settings (different from plant presettings)
Type:
Slot:
Top/ middle/ bottom1)
Address range(s): From_________hex to_________hex
Address area: PC-IO / SMP-IO / MEM / MMIO1)
Other settings (different from plant presettings)
1) Cross out what does not apply.
SICOMP IMC – System Manual
J31069-D2001-U001-A0-7618
6–5
Assembling Center
Special wiring
Slot1)
Slot1)
Pin No.
Pin No.
↔
↔
↔
↔
↔
↔
↔
↔
↔
↔
↔
↔
↔
↔
↔
↔
↔
↔
↔
↔
↔
↔
↔
↔
↔
↔
↔
↔
↔
↔
↔
↔
↔
↔
↔
↔
↔
↔
↔
↔
↔
↔
↔
↔
1) Specify if necessary: o = top, m = middle, u = bottom
6–6
SICOMP IMC – System Manual
J31069-D2001-U001-A0-7618
Power Supplies
7
Table of Contents
7.1
Connecting Plug Connector . . . . . . . . . . . . . . . . . . . . . . . . . . . . . . . . . . . . . . .
7-2
7.2
7.2.1
7.2.2
7.2.3
Electrical Characteristics . . . . . . . . . . . . . . . . . . . . . . . . . . . . . . . . . . . . . . . . .
Electrical Operational Characteristics . . . . . . . . . . . . . . . . . . . . . . . . . . . . . .
Indications and Operation . . . . . . . . . . . . . . . . . . . . . . . . . . . . . . . . . . . . . . . .
Definition of Terms . . . . . . . . . . . . . . . . . . . . . . . . . . . . . . . . . . . . . . . . . . . . . .
7-3
7-3
7-4
7-5
7.3
Power Failure Signaling . . . . . . . . . . . . . . . . . . . . . . . . . . . . . . . . . . . . . . . . . .
7-8
7.4
7.4.1
7.4.2
Compatibility . . . . . . . . . . . . . . . . . . . . . . . . . . . . . . . . . . . . . . . . . . . . . . . . . . . .
Replacement Boards . . . . . . . . . . . . . . . . . . . . . . . . . . . . . . . . . . . . . . . . . . . .
Connection Compatibility . . . . . . . . . . . . . . . . . . . . . . . . . . . . . . . . . . . . . . . . .
7-10
7-10
7-12
SICOMP IMC – System Manual
J31069-D2001-U001-A0-7618
7–1
Power Supplies
General
Power supplies (PS) for microcomputer systems must meet the following primary
requirements.
The power supplies must be able to be installed in 19-inch subracks.
Microcomputer systems generally permit an operational voltage tolerance
of + 5%. This represents the upper limit of permissible deviation of the PS output voltage from its nominal value under permissible operational conditions.
Interference voltages on the outputs of the power supplies must be so small
that they do not affect the interference immunity of the system.
7.1
Connecting Plug Connector
Fifteen-pin multi-point terminal strips (DIN 41612, model H15, tin-plated) are used
as the base plug connectors for SICOMP IMC power supplies. Remember that the
socket terminal strips must also be tin-plated.
For boards with low voltages and currents, multi-point terminal strips (DIN 41612,
model C) may also be used.
For power supplies with power network operation, the power network voltage is
present on connections 28 and 30 of the H15 multi-point terminal strip. The protective conductor is present on connection 32. The related contact point leads.
7–2
SICOMP IMC – System Manual
J31069-D2001-U001-A0-7618
Power Supplies
7.2
Electrical Characteristics
7.2.1
Electrical Operational Characteristics
Parallel and series circuitry
Parallel and series circuiting of the PS outputs is only possible with a few older
types. Since these operating modes are no longer supported by all other types
(see respective product documentation), we will not discuss them here.
Sensor line
For high-current outputs, the voltage drop caused by load current on the resistor of
the load lines and the connection terminals can be offset by connecting sensor
lines up to a value of 0.25 V (typical) (i.e., a total of up to 0.5 V (typical)).
For wiring, see chapter 8 (“System Layout”).
Shutdown
For any shutdown or switchoff functions, see the product documentation of the individual power supplies.
Overvoltage protection
Input and outputs of the power supplies are provided with overvoltage protection.
On the input side, a varistor between phase and directly grounded conductor offers
protection against brief overvoltages.
The outputs are protected against internally caused device overvoltages at approx.
125% of the nominal output voltage Uan by self-recovering switchoff of the switching controller. Outputs with small voltages are equipped with protective diodes.
SICOMP IMC – System Manual
J31069-D2001-U001-A0-7618
7–3
Power Supplies
Protection against excessive temperatures
With few exceptions, the power supplies are protected against excessive temperatures by a thermo sensor. After this protective circuit is triggered, the device must
cool down first before it starts up again automatically (i.e., hysteresis). A latched
switchoff is also possible. After cooling off, the device is put back into operation
with a power off/on.
With the switchoff and switchon procedure, normal power failure signaling is performed. See chapter 7.3. For type of procedure, see the product documentation
of the individual power supplies.
Dimensioning
When selecting the power supply, make sure that the total nominal performance is
not completely utilized continuously (i.e., system reserve).
7.2.2
Indications and Operation
Indications
LEDs on the front plate indicate the operational state of the device.
Each output is equipped with a yellow LED with a series resistor between 0 V and
Ua. This LED goes on when the related output voltage reaches a certain value.
With some power supplies, a green LED (labeled “EIN/ON”) goes on if the input
voltage is greater than the startup voltage.
For exceptions, see the product documentation of the individual power supplies.
Selection of the input voltages for power packs
The supply voltages of the power packs are the power pack voltages 120/110 V
AC or 230/220 V AC. Switching between these two voltages can be performed in
two ways.
For older power supplies: Manual adjustment of the voltage switch or replacement of an appropriate fuse
For newer power supplies: Automatic adjustment when the supply voltage is
applied. Operation outside the specified voltage ranges is not permitted.
For details, see the product documentation of the individual power supplies.
7–4
SICOMP IMC – System Manual
J31069-D2001-U001-A0-7618
Power Supplies
Adjustment of the output voltage for power packs
With many power supplies, the output voltages can be adjusted with trimmers.
The setting range is between Uan –5% and Uan +5%. The trimmers can be used
without having to demount them. The access openings are labeled. Normally, the
output voltage does not have to be set.
For details, see the product documentation of the individual power supplies.
7.2.3
Definition of Terms
Table 7-1
Definition of terms
Term
Input voltage Ue
Frequency fe of the input
voltage
Current consumption le
Fuses
Output nominal voltage
Uan
Output nominal current
Ian
Definition
The voltage with which the power supply is to operate on the primary side. It
is supplied by the nominal voltage Uen with its tolerance range (e.g., for
power network supply: 230 V AC, + 15%).
The input voltage can be a sinusoidal alternating voltage, a direct voltage
(for DC/DC converters and primary-pulsed power packs), or a square wave
voltage (for primary-pulsed power packs).
Nominal frequencies (50/60 Hz) and a permissible frequency range
(47 to 63 Hz) are specified for power packs which operate with sinusoidal or
square wave alternating voltage.
The effective value of the input current at nominal input voltage and nominal
load on all outputs of the device. The value of the input current shown on
the nameplate is the maximum occurring le at Ue,min and overload on the
outputs. The specified value is approximately 20 to 30% over the typical
measured value.
For the type of fuse, see the product documentation of the individual power
supplies.
The direct voltage for which an output is designed
(e.g., +5 V DC or –12 V DC)
The current for which an output is designed (i.e., the maximum continuous
current with which an output may be loaded under the following conditions)
Ue within permissible range
Ua = Uan
Ambient temperature within specified operational temperature range
All other parameters for nominal conditions
Output limit current Iag
All outputs are provided with continuous short-circuit immunity by current
limitation. The output limit current Iag is the value of the output current at
which the internal device current limitation is triggered
(Ua drops below 0.95 x Uan). It is usually 1.10 to 1.20 x Ian.
Output short circuit
current Iak
The value of Ia for short circuited output (0 Ω)
SICOMP IMC – System Manual
J31069-D2001-U001-A0-7618
7–5
Power Supplies
Table 7-1
Definition of terms, continued
Term
Definition
Tolerance of the output
The deviation of the output voltage on delivery from the nominal voltage Uan.
voltage on delivery
The output voltage is measured directly on the H15 counter plug. Any sensor lines are also connected there.
Measuring requirements:
Ue = Uen
fe = fen
Ia = 0,1 x Ian (for all outputs)
Static regulation deviation
of the output voltage
Load regulation (deviation for change in load on the output to be measured):
The deviation of the output voltage from the value of Ua at Ia = 0.1 x Ian
when the output current is varied from Iamin to Ian. The other outputs of the
device are loaded with nominal current. Measurement is performed directly
on the H15 counter plug at Uen and fen.
Network regulation (deviation for change in the input voltage):
The deviation of the output voltage from the value at Uen when the input
voltage is varied between Uemin and Uemax. Measurement is performed
directly on the H15 counter plug for sinusoidal alternating voltage Ue with
fen. Any sensor lines are also connected there. All outputs of the device are
loaded with nominal current.
Dynamic overswings of
the output voltage dUa
Settling time tA for a load
jump
Total interference voltage
Ripple Uw
Hum voltage Ubr
Effectivity
Startup time
Puffer time
7–6
Dynamic overswings take place when load jumps occur on the output. This
is characterized by the amplitude of the voltage drop (–dUa) or excess voltage (+dUa) during a jump from the lower to the higher value of the load current or vice versa.
Measurement is performed directly on the H15 counter plug under nominal
conditions and a load jump from 0.5 x Ian to 0.7 x Ian or vice versa.
The time from the beginning of the deviation until the final return of the output voltage to the tolerance range of + 2.5%, as related to the final value of
Ua after the jump
The maximum value (peak-peak) of the interference voltage on the output
direct voltage containing the three components ripple, spikes and hum voltage
Interference voltages are measured directly on the H15 counter plug at nominal conditions and pure ohmic load with an oscilloscope whose band width
is limited to 20 MHz.
The approximately toothed-shaped main portion of the interference voltage
whose frequency corresponds to the switching frequency of the device
Low-frequency portion (approx. 100 Hz) of the interference voltage coming
from the rectification of the network voltage.
The ratio of emitted and absorbed active power at nominal conditions
(Uen, fen and Ian)
The time between device switchon or return of input voltage after a power
failure and the time at which all output voltages reach their tolerance range
of 5% of their static end values
The prewarning time between the activation of the PF* signal during failure
of the input voltage and dropping of the output voltage to Uan – 5%
SICOMP IMC – System Manual
J31069-D2001-U001-A0-7618
Power Supplies
Table 7-1
Definition of terms, continued
Term
Definition
PF delay time
The waiting time until deactivation of the prewarning signal PF* during
switchon or restart. It begins at the time at which the output voltage +5 V
reaches its lower tolerance limit and ensures that, for multiple voltage devices, the other voltages will have reached their tolerance limits before deactivation of PF*.
Reserve time
Time before failure of the input voltage (calculated from the last voltage zero
crossing) to the dropping of the output voltage to Uan – 5%. The reserve
time depends on the input voltage Ue and the load Ia.
Standard values for the reserve time at Ia = Ian
For Ue = Uemin: Reserve time > minimum buffer time
For Ue > Uen: Reserve time > 20 msec
Power failure
backup time
The maximum permissible duration for a failure of the input voltage without
activation of the PF* signal
Minimum backup time > minimum buffer time
SICOMP IMC – System Manual
J31069-D2001-U001-A0-7618
7–7
Power Supplies
7.3
Power Failure Signaling
To ensure data saving and later restart of the microcomputer system when a failure
occurs or the supply voltage drops below the tolerance limit, the power pack supplying the +5 V supply voltage must generate a power failure prewarning signal.
This must be connected to an interrupt input of the CPU for evaluation.
The prewarning signal must fulfill important time conditions for the startup and
dropping of the output voltages based on the input voltage. The following values
are binding for all power supplies.
Table 7-2
Time conditions for power failure prewarning signal
Time Condition
Typical Value
Buffer time for data saving
Startup time
Min. of 10 msec
Max. of 0.1 sec
PF* delay time
0.3 to 0.6 sec
For the exact values of these time conditions, see the product documentation of
the individual products.
Power failure prewarning signal PF*
The power pack uses the TTL signal PF* (power failure) to indicate the function
status of the power supply.
Table 7-3
Meaning and characteristics of the power failure prewarning signal PF*
Signal State
Characteristic
Meaning
Inactive (high)
Active (low)
7–8
IPF ≤ 5 mA (source)
UPF ≥ 2.4 V
IPF ≤ 50 mA (drop)
UPF ≤ 0.4 V
Input voltages within tolerance range
Input voltages outside the tolerance range.
Remember time conditions.
SICOMP IMC – System Manual
J31069-D2001-U001-A0-7618
Power Supplies
+5V
4k7
BC327
PF*
2k7
0V
Figure 7-1 Internal circuiting of the PF* signal output
Power failure
without PF*
Power failure with PF*
Ue
1
4
2
5
Ua
3
6
PF*
1 Power failure buffering time
3 Buffering time
5 Booting time
2 Reserve time
4 Startup time
6 PF delay time
Figure 7-2 Time behavior of the PF* signal output
SICOMP IMC – System Manual
J31069-D2001-U001-A0-7618
7–9
Power Supplies
7.4
Compatibility
7.4.1
Replacement Boards
The following table shows which old power supply boards can be replaced by new
boards and the conditions which must be fulfilled.
Table 7-4
Replacement boards
Board
SMP-E423-A1
SMP-E423-A2
SMP-E423-A3
Replacement
Board
SMP-E431-A6
Restrictions/Conditions
At +5 V: 20 A only with fan
Open pins
(SD), 14 (+12 V), 22 (–12 V)
Additional 2-slot front plate required
SMP-E423-A30
SMP-E424-Ax
SMP-E425-A1
SMP-E425-A2
SMP-E425-A3
SMP-E426-A1
SMP-E426-A2
SMP-E426-A3
Cannot be replaced
Cannot be replaced
SMP-E430-A6
Change installation geometry1.
Master-slave boards are no longer part of our product program.
± 12 V outputs with 4 A are no longer part of our product program.
At + 15 V only 1.5 A (instead of 3.2 A)
No SD, no PF, no sensors available anymore
Can be replaced
under certain conditions
SMP-E431-A6
Change installation geometry. Additional 4-slot front plate
required.
–5 V outputs are no longer part of our product program.
Only if no –5 V required. At –12 V, only 0.5 A (instead of 2 A)
Open pin 4 (SD).
Additional 2-slot front plate required
Change installation geometry1.
SMP-E427-A1
SMP-E427-A2
SMP-E427-A3
SMP-E428-A1
SMP-E428-A2
SMP-E428-A3
Cannot be replaced
Combination of + 15 V outputs with other voltages is no longer
part of our product program.
SMP-E432-A8
For –12 V, only 0.5 A (instead of 1.2 A)
SMP-E429-A3
Cannot be replaced
SMP-E430-A6
24 V outputs are no longer part of our product program.
SMP-E431-A6
No SD (open pin 4), no more +12 V sensor
SMP-E430-A1
SMP-E430-A2
SMP-E431-A1
SMP-E431-A2
SMP-E431-A3
SMP-E431-A5
Change installation geometry. Requires 3 slots instead of 2
(not with SMP-E428-A3).
Change installation geometry.
Additional 2-slot front plate required
SMP-E431-A6
Change installation geometry1.
No more +12 V sensor
Different pin allocation. See table 7-5.
Change installation geometry1.
7–10
SICOMP IMC – System Manual
J31069-D2001-U001-A0-7618
Power Supplies
Table 7-4
Replacement boards, continued
Board
Replacement
Restrictions/Conditions
Board
SMP-E431-A6
SMP-E431-A6
Change installation geometry1.
to KS 5
from KS 6
SMP-E431-A61
SMP-E431-A6
Change installation geometry1.
from KS 6
SMP-E432-A5
SMP-E432-A8
Additional power failure monitoring and sensors (0 V, +5 V)
Change installation geometry: Move guide rails, H15 connector stays the same.
SMP-E432-A6
SMP-E432-A7
SMP-E432-A8
SMP-E433-A6
Cannot be
replaced
Cannot be
replaced
Cannot be
replaced
Cannot be
replaced
Cannot be
replaced
SMP16-SV431
from KS 2
SMP-E434-A6
SMP-E435-A6
SMP-E440-A2
SMP-E441-A2
SMP16-SV431
KS 1
Additional power failure monitoring
Change installation geometry: Move guide rails, H15 connector stays the same.
+12 V outputs with 6 A are no longer part of our product program.
+5 V outputs with 35 A are no longer part of our product program.
+24 V inputs are no longer part of our product program.
+24 V inputs are no longer part of our product program.
Change installation geometry1.
1) Move left-hand guide rails to the right. The right-hand guide rails are no longer needed.
SICOMP IMC – System Manual
J31069-D2001-U001-A0-7618
7–11
Power Supplies
7.4.2
Connection Compatibility
The following tables list the connection allocations of all power supplies. Unallocated connections (–) may not be circuited. Remove any circuiting if necessary.
Table 7-5
Connection allocation of the H15 multi-point terminal strips
Pin
AMS-M431-A5
Top
SMP-E423-A30
SMP-E424-A3
Bottom
4
+5 V
–
SD*
SD*
6
8
+5 V
+5 V
PF
–
PF*
0 VF
PF*
0 VF
10
12
14
+5 V
+5 V
+5 VF
–
–
–
+5 VF
+5 V
+5 V
–
–
+12 V
16
18
–12 V
0V
–
–
0V
0V
0V
0V
20
22
24
0V
0V
0V
–
–
–
Syn.A
Syn.E
Mas.A
–
–12 V
–12 VF
26
28
0V
+12 V
–
Power
Sla.E
Power
+12 VF
Power
30
32
+12 V
0 VF
Power
PE
Power
PE
Power
PE
Pin
4
SMP-E425-A3
SD*
SMP-E426-A3
SD*
SMP-E427-A3
SD*
–
–
6
8
PF*
0 VF
PF*
0 VF
PF*
0 VF
–
–
–
–U3
10
12
14
–
–
+15 V
+5 VF
+5 V
+12 V
+5 VF
+5 V
+15 V
–
–
+12 V
+U3 (24 V, 0.4 A)
–
+U1 (24 V, 0.8 A)
16
18
0V
0V
0V
0V
0V
0V
0V
0V
–U1
+U2 (24 V, 0.4 A)
20
22
24
–
–15 V
–15 VF
–5 VF
–12 V
–
–5 VF
–15 V
–
–
–12 V
–
–U2
–U4
+U4 (24 V, 0.2 A)
26
28
+15 VF
Power
–
Power
–
Power
–
Power
–
Power
30
32
Power
PE
Power
PE
Power
PE
Power
PE
Power
PE
7–12
SMP-E428-Ax
SMP-E429
SICOMP IMC – System Manual
J31069-D2001-U001-A0-7618
Power Supplies
Pin
SMP-E430-Ax
SMP-E431-A5
SMP-E431-A6
SMP-E432-A5
SMP-E432-A8
4
6
–
–
–
PF*
+5 V
PF*
–
–
–
PF*
8
10
12
–
–
–
0 VF
+5 VF
+5 V
0 VF
+5 VF
+5 V
(0 VF)
(+5 VF)
+5 V
(0 VF)
(+5 VF)
+5 V
14
16
+15 V
0V
+12 V
0V
+12 V
0V
+12 V
0V
+12 V
0V
18
20
22
0V
–
–15 V
0V
–
–12 V
0V
–
–12 V
0V
–
–12 V
0V
–
–12 V
24
26
–
–
–
+12 VF
–
–
–
–
–
–
28
30
32
Power
Power
PE
Power
Power
PE
Power
Power
PE
Power
Power
PE
Power
Power
PE
Pin
SMP-E433-A6
SMP-E434-A6
SMP-E435-A6
SMP-E436-A6
SMP-E440-Ax
4
6
8
+5 V
PF*
0 VF
–
–
–
PF*
+5 VF
0 VF
+5 V
+5 V
–5 V
–
–
–
10
12
+5 VF
+5 V
–
–
+5 V
+5 V
–5 V
+12 V
–
–
14
16
18
–
0V
0V
+12 V
0V
0V
+5 V
+5 V
0V
–12 V
+12 V
–12 V
+15 V
0V
0V
20
22
–
–
–
–
0V
0V
–
PF*
–
–15 V
24
26
28
–
–
Power
–
–
Power
0V
–
Power
–
–
Power
–
–
+Ue (24 VDC)
30
32
Power
PE
Power
PE
Power
PE
Power
PE
–Ue (0 VDC)
PE
SICOMP IMC – System Manual
J31069-D2001-U001-A0-7618
7–13
Power Supplies
Pin
SMP-E441-A2
SMP16-SV330
SMP16-SV430
SMP16-SV431
SMP16-SV531
4
6
SD*
PF*
ER*
PF*
–
–
+5 V
PF*
+5 V
PF*
8
10
12
0 VF
+5 VF
+5 V
0V
+5 V
0V
–
–
–
0 VF
+5 VF
+5 V
0 VF
+5 VF
+5 V
14
16
+12 V
0V
+5 V
0 VF
+15 V
0V
+12 V
0V
+12 V
0V
18
20
22
0V
–
–12 V
+5 V
0V
+3.3 V
0V
–
–15 V
0V
–
–12 V
0V
ER*
–12 V
24
26
–
–12 VF
+3.3 VF
+3.3 V
–
–
–
–
–
–
28
30
32
+Ue (24 VDC)
–Ue (0 VDC)
PE
–
+3.3 V
–
Power
Power
PE
Power
Power
PE
Power
Power
PE
7–14
SICOMP IMC – System Manual
J31069-D2001-U001-A0-7618
System Layout
8
Table of Contents
8.1
The Inch Layout System . . . . . . . . . . . . . . . . . . . . . . . . . . . . . . . . . . . . . . . . .
8-2
8.2
Receptacles . . . . . . . . . . . . . . . . . . . . . . . . . . . . . . . . . . . . . . . . . . . . . . . . . . . .
8-3
8.3
8.3.1
8.3.2
8.3.3
8.3.4
8.3.5
Subracks . . . . . . . . . . . . . . . . . . . . . . . . . . . . . . . . . . . . . . . . . . . . . . . . . . . . . . .
System Modules . . . . . . . . . . . . . . . . . . . . . . . . . . . . . . . . . . . . . . . . . . . . . . . .
Bus Backplanes . . . . . . . . . . . . . . . . . . . . . . . . . . . . . . . . . . . . . . . . . . . . . . . . .
Bus Coupling Boards . . . . . . . . . . . . . . . . . . . . . . . . . . . . . . . . . . . . . . . . . . . .
Backup Battery . . . . . . . . . . . . . . . . . . . . . . . . . . . . . . . . . . . . . . . . . . . . . . . . .
Mechanical Accessories . . . . . . . . . . . . . . . . . . . . . . . . . . . . . . . . . . . . . . . . . .
8-4
8-4
8-6
8-8
8-9
8-10
8.4
Boards . . . . . . . . . . . . . . . . . . . . . . . . . . . . . . . . . . . . . . . . . . . . . . . . . . . . . . . . .
8-11
8.5
Plug-In Connectors . . . . . . . . . . . . . . . . . . . . . . . . . . . . . . . . . . . . . . . . . . . . . .
8-12
8.6
Placement of the Boards in the System . . . . . . . . . . . . . . . . . . . . . . . . . . . .
8-23
8.7
8.7.1
8.7.2
8.7.3
8.7.4
8.7.5
8.7.6
8.7.7
Information on Mounting . . . . . . . . . . . . . . . . . . . . . . . . . . . . . . . . . . . . . . . . . .
Connecting the Guides . . . . . . . . . . . . . . . . . . . . . . . . . . . . . . . . . . . . . . . . . . .
Mounting the Wiring Shield Plate . . . . . . . . . . . . . . . . . . . . . . . . . . . . . . . . . .
Bus Backplanes . . . . . . . . . . . . . . . . . . . . . . . . . . . . . . . . . . . . . . . . . . . . . . . . .
Installing the Boards . . . . . . . . . . . . . . . . . . . . . . . . . . . . . . . . . . . . . . . . . . . . .
Installing and Removing the Boards . . . . . . . . . . . . . . . . . . . . . . . . . . . . . . . .
Mounting the Cabinets and Housings . . . . . . . . . . . . . . . . . . . . . . . . . . . . . .
Multiple-Row Systems, Special Systems and Cable Fabrication . . . . . . .
8-25
8-25
8-26
8-26
8-27
8-28
8-29
8-29
8.8
8.8.1
8.8.2
8.8.3
8.8.4
8.8.5
8.8.6
8.8.7
8.8.8
8.8.9
8.8.10
Wiring . . . . . . . . . . . . . . . . . . . . . . . . . . . . . . . . . . . . . . . . . . . . . . . . . . . . . . . . .
Baring of Cables . . . . . . . . . . . . . . . . . . . . . . . . . . . . . . . . . . . . . . . . . . . . . . . .
Tagging the Cable Ends . . . . . . . . . . . . . . . . . . . . . . . . . . . . . . . . . . . . . . . . . .
Wrap Connections . . . . . . . . . . . . . . . . . . . . . . . . . . . . . . . . . . . . . . . . . . . . . . .
Wiring Cable Harnesses . . . . . . . . . . . . . . . . . . . . . . . . . . . . . . . . . . . . . . . . . .
Crimping . . . . . . . . . . . . . . . . . . . . . . . . . . . . . . . . . . . . . . . . . . . . . . . . . . . . . . .
Insulation-Displacement-Connector Technique . . . . . . . . . . . . . . . . . . . . . .
Screw Connections . . . . . . . . . . . . . . . . . . . . . . . . . . . . . . . . . . . . . . . . . . . . . .
Plug-In Connections . . . . . . . . . . . . . . . . . . . . . . . . . . . . . . . . . . . . . . . . . . . . .
Wiring the Power Supply on the Subrack . . . . . . . . . . . . . . . . . . . . . . . . . . .
Line Installation . . . . . . . . . . . . . . . . . . . . . . . . . . . . . . . . . . . . . . . . . . . . . . . . .
8-30
8-30
8-30
8-30
8-33
8-36
8-40
8-41
8-41
8-43
8-47
SICOMP IMC – System Manual
J31069-D2001-U001-A0-7618
8–1
System Layout
8.1
The Inch Layout System
The physical layout of SICOMP IMC microcomputer board systems is based on
the DIN 41 494 standard covering the layout of electronic systems. This standard
provides for four levels.
Level 4: Receptacles
Housing, frames and cabinets for holding subracks and boards of level 3 and 2
Level 3: Subracks
For holding boards of level 2
Level 2: Boards
Connection plates, connection blocks and cassettes consisting of level-1 components
Level 1: Components and elements
PCBs, front plates, plug-in connectors and components on front plates
Level 4
Holders
Level 3
Subtracks
19” front plate
19” front plate
482.6 mm
.
482.6 mm
Level 2
Boards
Level 1
Components
and elements
Figure 8-1 Physical design
8–2
SICOMP IMC – System Manual
J31069-D2001-U001-A0-7618
System Layout
Scaling dimensions
All system dimensions are derived from the basic dimension 1/10 inch
(i.e., 2.54 mm).
Scaling unit: 1 TE = 2/10 inch (i.e., 5.08 mm)
Much-used conventional definition of the mounting width (i.e., corresponds to
the positioning of the holes on the connection rails and the wiring grid for plug-in
connections)
Slot: 1 EP = 8/10 inch (i.e., 20.32 mm)
Unit for the slot width in the subracks
Example:
A 19-inch subrack offers 21 slots (i.e., space for 21 single-width boards).
Height unit: 1 HE = 1 3/4 inches (i.e., 44.45 mm)
Unit of height for subracks in acc. w. IEC and DIN
Example:
3 HE (i.e., 5 1/4 inches) corresponds to the height of a subrack row for singleheight boards with 100-mm-height PCBs (e.g., SMP16).
6 HE for boards with double Europa format (e.g., AMS)
The following figure illustrates the use of these scaling units.
482.6 (19”)
20.32
11
7
57.15
132
37.4
5.08
426.72 (84 TE)
465.1
Figure 8-2 Dimensions of an 84-TE-width subrack of type ES902C
8.2
Receptacles
Receptacles such as housings, frames and cabinets are not included in the product family of SICOMP IMC microcomputer board systems. For information on the
physical dimensions of receptacles, see the catalogs of the Automation and Drives
division for SIPAC layout systems and power supplies of Siemens AG, and contact
your local Siemens office.
SICOMP IMC – System Manual
J31069-D2001-U001-A0-7618
8–3
System Layout
8.3
Subracks
Subracks are used to physically hold the boards and their electrical connections.
Guide rails are used to hold the boards, while plug-in connectors are used to hold
the electrical connections.
Note
For details not covered here, see the ET1 catalog concerning the inch layout system ES902C of the Automation and Drives division of SIPAC layout systems and
power supplies of Siemens AG, and contact your local Siemens office.
The subracks included in the product family of the SICOMP IMC microcomputer
board systems are based on the ES902C system. They are available in various
versions (i.e., fully mounted with wiring and tier shield plates, and partially configured with bus backplanes and/or switch boards which are also available separately).
In addition to bus coupling boards (see chapter 8.3.3), mechanical accessory kits
(see chapter 8.3.5) enhance possible use and combination of the system modules.
See also chapter 6 on the Assembling Center.
8.3.1
System Modules
Listed below is a summary of the characteristic values of currently available products. For details, see the respective product documentation.
Characteristic values of SICOMP IMC system modules
Available system modules offer all the advantages of the ES902C layout system.
Metallic front system for shielded setups
Boards with front plates for single and total locking in acc. w. DIN 41 494
– Single locking: For AMS, SMP16 and iPCI boards
– Total locking: For AMS boards
Symmetrical layout (i.e., same-type connection rails, side pieces and guide
rails)
Plug connector single mounting and backplane technology combinable in one
subrack
Side pieces of high-quality extruded aluminum alloy
8–4
SICOMP IMC – System Manual
J31069-D2001-U001-A0-7618
System Layout
Low impedance transition points between aluminum parts ensures extremely
interference-immune layout (meets EMC requirements) with system parts such
as tier and wiring shield plates. These parts are connected conductively to the
frame with EMC contact springs and screws.
The surfaces of the aluminum subrack parts have been treated chemically or
mechanically so that they are not sensitive to touch but still have good electrical
conductivity.
Guide rails of plastic, 160 mm in length
The frame which extends back over the bus backplane protects the connections
of the bus socket terminal strips and backplane wiring from physical damage.
Electromagnetic compatibility (EMC)
EMC requirements are becoming increasingly important for devices and systems.
See also chapter 12 on environment requirements. The primary reasons for this
are listed below.
Processing speeds of the systems are increasing.
Systems are becoming larger.
Different systems converge in one plant.
One plant contains different performance levels.
External interference level is increasing.
Examples of SICOMP IMC system frames
Ñ
Figure 8-3 3 HE system frame, view of the front
SICOMP IMC – System Manual
J31069-D2001-U001-A0-7618
8–5
System Layout
Ñ
Figure 8-4 6 HE system frame, view of the front
Whether a system requires convection or forced ventilation depends on the boards
being used. See also chapter 12 on environmental requirement. Buttons and
power switches are provided by a fan module or a switch board.
8.3.2
Bus Backplanes
Connection of the bus signals of the individual boards is handled by the bus systems SMP16, AMS and iPCI. Special bus backplanes are available for each bus
system. For detailed information on the characteristics and requirements of the
individual bus systems, see chapters 2 to 4.
The bus backplanes consist of an approximately 3.2-mm thick PCB with slots for
up to 21 boards (SMP16 and AMS systems) and up to 5 boards (iPCI systems).
The slots of the SMP16 and AMS systems use 96-pin socket terminal strips while
the slots of the iPCI system use 120-pin socket terminal strips. Design uses insertion technology.
The backs of the contacts of the bus socket terminal strips for SMP16 and AMS
bus backplanes are equipped with approximately 10-mm long wrap pins which can
be used for special wiring.
For detailed information on power, electrical shielding and so on, see the respective product documentation. For notes on mounting, see chapter 8.6.
8–6
SICOMP IMC – System Manual
J31069-D2001-U001-A0-7618
System Layout
The following figure shows the calculation of the total length of a bus backplane,
using the SMP16 bus backplane with five slots as an example.
128.7
122.5
20.32
Approx. 10
a
3.2
11.6
Length:
a = (n–1) x 20.32 + 10.36
whereby n = number of slots
and 1 slot = 20.32 [mm]
Figure 8-5 Length of a bus backplane
SICOMP IMC – System Manual
J31069-D2001-U001-A0-7618
8–7
System Layout
8.3.3
Bus Coupling Boards
Bus coupling boards are used to connect individual SMP16 bus systems with each
other. There are two types of coupling.
Coupling of two SMP16 bus system located underneath each other
Master row
with CPU board
Bus coupler
Slave row
with I/O
Figure 8-6 Example of coupling two SMP16 bus systems located underneath each other
Coupling of two SMP16 bus system located next to each other
SMP16 system 1
with CPU board
SMP16 system 2
with CPU board
Bus coupler
Figure 8-7 Example of coupling two SMP16 bus systems located next to each other
(e.g., dual-port RAM coupling)
8–8
SICOMP IMC – System Manual
J31069-D2001-U001-A0-7618
System Layout
!
8.3.4
Caution
Single wires may not be used to connect bus systems. Coupling must be performed via appropriate bus coupling boards. The interrupt lines are an exception
to this rule. Twisted-pair wiring (i.e., interrupt signal and GND) must be used for
the interrupt lines. The GND line of the power supply must be connected to both
backplanes. See figure 8-22.
Backup Battery
There are two ways to supply SICOMP IMC systems with battery power to buffer
the backup functions, real-time clock and CMOS RAM.
Accessory:
Battery module with protective circuit (diode against charge reversal currents
and resistor for current limitation if diode fails)
This accessory can be secured to the system frame and is connected to the
system bus backplane with two connection cables.
Board:
On an SMP16 board, the voltages required by the system are provided directly
via the system bus.
The maximum lifespan of a lithium battery is 10 years. The load shortens its life
accordingly. Remember this when designing cyclic communication.
SICOMP IMC – System Manual
J31069-D2001-U001-A0-7618
8–9
System Layout
8.3.5
Mechanical Accessories
Utilization and combination of the system modules is enhanced by available accessory kits.
These accessory kits permit the setup of mixed systems (i.e., AMS, SMP16 and
iPCI systems) in multiple-row system modules. Total and individual locking is provided for the boards.
The accessory kits divide an AMS slot (double Europa format) into two SMP16 or
iPCI slots (single Europa format). They can be installed on any slots in multiplerow SICOMP IMC system frames.
Upper connection rail with guides
Middle connection rail
Lower connection rail with guides
Figure 8-8 Example of the accessory kit mounted on any slots (view of back)
8–10
SICOMP IMC – System Manual
J31069-D2001-U001-A0-7618
System Layout
8.4
Boards
In accordance with part 5 of DIN 41 494, the board is considered the overall term
for printed card (PCB), sub-unit (plug-in module and expansion module) and cassette (insert and module).
Detailed product documentation is available on some of the boards of SICOMP
IMC microcomputer board systems. The boards are delivered with default settings
to support commissioning.
When I/O boards are involved, remember that their use may require firmware
(EPROMs) and software (floppy disks) which you can order as BSP (Board Support Package) from your local Siemens office.
SICOMP IMC – System Manual
J31069-D2001-U001-A0-7618
8–11
System Layout
8.5
Plug-In Connectors
If they can be connected to bus systems, SMP16, AMS and iPCI boards are
equipped with bus plug-in connectors. Connections to the I/O are implemented
with I/O plug-in connectors. Power and operational voltages are transmitted via
H15 power connectors.
Plug-in connectors and board-specific accessories are specified in the chapters on
interfaces and recommended accessories in the respective product documentation.
The types of connectors most frequently used for SMP16 and AMS boards will
now be described.
Multi-point terminal strips and socket terminal strips in acc. w. DIN 41 612
Subminiature plug-in connectors in acc. w. DIN 41 652
IDC plug-in connectors BK-MOD 421/422 in acc. w. DIN 41 651
Other plug-in connectors (e.g., miniature coaxial sockets, front connector K and
front connector K-2)
8–12
SICOMP IMC – System Manual
J31069-D2001-U001-A0-7618
System Layout
Multi-point and socket terminal strips in acc. w. DIN 41 612
Multi-point terminal strips and socket terminal strips in accordance with DIN 41 612
are used as bus plug-in connectors. For electrical and physical features, see the
table below. Dimensional drawings follow.
Table 8-1
Electrical and physical characteristic values of the multi-point and socket terminal strips in
acc. w. DIN 41 612
Models in Acc. w.
B
C
M
Q
R
D
F, G
DIN 41 612
B/2
C/2
M/2
Q/2
R/2
B/3
C/3
M/3
Q/3
R/3
Requirement stages
2, 3
2, 3
1, 2
2, 3
2, 3
2, 3
1, 2, 3
in acc. w. DIN 41 612
Temperature range
–55° C to +125° C
Current load at 70 °C
1A
4A
Voltage strength
1000 V
1550 V
Creepage distance,
contact/contact
Clearance in air,
contact/contact
Throughput resistance
Isolation resistance
Connection models for
1.2 mm
3 mm
1.2 mm
1.6 mm
≤ 20 mΩ
≥ 106 MΩ
≤ 15 mΩ
Soldering on PCBs
x
x
Wrap connections
x
x
Insert technique
x
Insulation material
Contact surface
x
x
x
Thermoplastic synthetic material, glass-fiber reinforcement
Au over Pd over Ni Au over Au over Pd over Ni Au over
Ni or Au
Ni
over Pd
over Ni
Au over
Pd over
Ni
Plugging frequency 1)
≥ 500 plugging cycles and industrial conditions in acc. w. part 5 of
DIN 41 612
Requirement state 1
Requirement state 2
≥ 400 plugging cycles and industrial conditions in acc. w. part 5 of
DIN 41 612
Requirement state 3
≥ 400 plugging cycles (≥ 50 plugging cycles)
Yes
–
High current and coaxial contacts
Approval for
–
Siemens plug-in connector
CECC 75 101-801
UL-listed: File E 92329, project 84 ME 9787
1) Industrial climate test
SICOMP IMC – System Manual
J31069-D2001-U001-A0-7618
8–13
System Layout
Bus plug-in connectors
96-pin multi-point terminal strip in acc. w. DIN 41 612, model C
3-row strip body, rows a, b and c configured
10.6
24.5
2.8 D11
13
cba
2 x 2.54
78.74 ±0.1 (31 x 2.54)
85 –0,15
95 –0.1
90 ±0.1
2.54
1
32
Figure 8-9 Dimensional drawing of a 96-pin bus socket terminal strip (dimensions in mm)
8–14
SICOMP IMC – System Manual
J31069-D2001-U001-A0-7618
System Layout
iPCI bus plug-in connectors
4.3
3.70
17.80
0.50
2.00
Contact surface
Contact lengths
5.00
5.75
6.50
7.25
8.00
mm
mm
mm
mm
mm
0.50
17.00
4.3
Figure 8-10 Dimensional drawing of an iPCI bus pin strip
24.00
12.44
11.30
1.50
13.30
2.73
3.08
0.40
2.00
2.00
8.00
9.50
4.00
Figure 8-11 Dimensional drawing of an iPCI bus socket strip
SICOMP IMC – System Manual
J31069-D2001-U001-A0-7618
8–15
System Layout
Subminiature plug-in connectors in acc. w. DIN 41 651
Subminiature plug-in connectors in accordance with DIN 41 651 as socket and pin
strips (e.g., SBM 383) are used as I/O plug-in connectors.
With 2-row strip body: 9, 15, 25 and 37-pin
With 3-row strip body: 15, 26 and 50-pin
Table 8-2
Electrical and physical characteristic values of subminiature plug-in connectors
General Specifications
Explanation
Certification for Siemens plug-in connectors
Materials
UL file E 92320, project 85 ME 3872
Technical specifications
Stress, measuring and test procedures in acc. w.
IEC publ. 68 and IEC publ. 512, DIN 40 046 and 41 640
Electrical Characteristic
Current loadability per contact for ambient temperature
Insulation body: thermoplastic synthetic material, glass-fiber
reinforcement; metal protective collar: steel, nickel-plated;
contacts: Cu alloy, punched/rolled, nickel-plating in plug in
area and hard gold-plated; connections: tin-plated
Characteristic values and dimensions in acc. w. IEC 48 B
(Germany) 99, DIN 41 652 and MIL-C-24308
Value
+20° C
5A
+70° C
3A
+100° C
Operational voltage
Air and creepage distance
1.5 A
Depends on safety regulations for the device
Contact/contact
1 mm
Contact/ground
2.2 mm
Voltage strength (test stand) for air pressure
860 to1060 hPa
1000 V; 50 Hz
300 hPa (8500 m over sea level)
Partial-discharge voltage
Throughput resistance
350 V, 50 Hz
≥ 1000 V
≤ 10 mΩ
Isolation resistance
Physical/Climatic Characteristic
Values
Lifespan
≥ 5 x 10³ MΩ
9-Pin
15-Pin
For requirement stage 2
≥ 400 plugging cycles
For requirement stage 3
≥ 50 plugging cycles
25-Pin
37-Pin
50-Pin
Flammability
Limit temperature range
Selfextinguishing after ≤ 10 sec, UL 94-VO
-55° C to+125° C
Plugging strength
Pulling strength
≤ 30 N
≤ 20 N
≤ 50 N
≤ 33 N
≤ 83 N
≤ 56 N
≤ 123 N
≤ 82 N
≤ 167 N
≤ 111 N
Approx. pin strip weights
Approx. socket strip weights
5g
6g
8g
9g
11 g
12 g
16 g
18 g
18 g
20 g
8–16
SICOMP IMC – System Manual
J31069-D2001-U001-A0-7618
System Layout
With crimp connection
Pin strip, 9 to 37-pin
With insulation-displacement
connection
11 (max.)
3.5 (max.)
3 + 0.15
1.78 (max.)
1.5 (max.)
13.5 (max.) 2)
15.9 (max.) 3)
10.8
Socket strip, 9 to 37-pin
3 + 0.15
Pin strip, 50-pin
For missing dimensions, see above.
Socket strip, 50-pin
For missing dimensions, see above.
Number
of Pins
Strip
Dimensions in mm
A
B
Pin
Socket
–0.76
–0.76
+0.25
–0.25
C
D
E
+0.25
–0.25
–0.76
–0.76
–0.3
–0.25
9
9
Pin
Socket
31.19
31.19
16.79
16.46
25
25
15
15
Pin
Socket
39.52
39.52
25.12
24.79
25
25
Pin
Socket
53.42
53.42
37
37
Pin
Socket
50
50
Pin
Socket
G
+0.12/–0.13
+0.12/–0.13
8.23
8.02
12.93
12.93
6.12
6.3
33.3
33.3
+0.15/–0.1
+0.15/–0.1
8.23
8.02
12.93
12.93
6.12
6.3
38.84
38.5
47.04
47.04
+/–0.13
+/–0.13
8.23
8.02
12.93
12.93
5.99
6.3
69.7
69.7
55.3
54.96
63.5
63.5
+/–0.13
+/–0.13
8.23
8.02
12.93
12.93
5.99
6.3
67.31
67.31
52.68
52.55
61.1
61.1
+0.14/–0.11
+0.14/–0.11
10.95
10.87
15.75
15.75
5.99
6.3
Figure 8-12 Dimensional drawing of subminiature plug connectors
SICOMP IMC – System Manual
J31069-D2001-U001-A0-7618
8–17
System Layout
Working side
Housing side
Pin number
8.89
Dimensions (mm)
1
15
A
31.04
1
2
VESA/VGA
26
31.04
39.4
B
24.99
C
21.23
D
12.55
24.99
33.3
21.23
21.2
12.55
12.5
Figure 8-13 Dimensional drawing of 3-row subminiature plug connectors
(socket terminal strip)
8–18
SICOMP IMC – System Manual
J31069-D2001-U001-A0-7618
System Layout
IDC plug-in connectors BK-MOD 421/422 in acc. w. DIN 41 651
These plug-in connectors are 2-row insulation-displacement connectors in accordance with DIN 41 651 for flat lines (IDC = Insulation Displacement Connector).
Table 8-3
Electrical and physical characteristic values for the BK-MOD 421/422 IDC plug connectors
Material
Insulating materials
Contact carrier
Contact surface
Technical specifications
Pin Strip
Socket Strip
Thermoplastic synthetic material, glass-fiber reinforcement;
flammability-protected in acc. w. UL-VO, pebble-gray (RAL
7032 or black locking compact header (RAL 9005)
Copper alloy
Copper alloy
Contact pin: Au-Pd
Plugging area: Double connect, Au-Pd
Soldered pin: Tin over nickel
Insulation-displacement: Tin
over nickel
Model in acc. w. DIN 41 651, compatible with:
Great Britain (GB) PPO SPEC D 2632, connector
France (F) UTEC C93-428 Modèle HE 10-01
IDC technology
Electrical Characteristic Values
Current loadability per contact
at ambient temperature:
Europe (EUR) CECC 75 101
In acc. w. DIN 41 611, part 6
Stress, measuring and testing procedures in acc. w. IEC publ.
68 and IEC publ. 512, DIN 40 046 and 41 640
Pin Strip
Socket Strip
+20° C
1.5 A
+70° C
1.0 A
+100° C
Operational voltage
0.5 A
Depends on safety regulations of the device
Voltage strength
Test voltage, contact-contact
Depends on type of cable used
940 V AC
Isolation resistance
Physical and Climatic
Characteristic Values
Plugging frequency
≥ 105 MΩ
Pin Strip
Requirement stage 2
≥ 200 plugging cycles
Requirement stage 3
≥ 50 plugging cycles
Socket Strip
Flammability of insulation materials
(without cable)
Temperature range
Self-extinguishing after v 10 sec, UL 94-VO
Creepage and air distances, contactcontact
0.7 mm
SICOMP IMC – System Manual
J31069-D2001-U001-A0-7618
-55° C to +125° C (remember cable insulation)
8–19
System Layout
Socket strip
with pregridded press plate
max. 3.7
1.27
2.54
max. 6.1
max. 7.3
3.81
2.54
Adhesive tape
Direction of winding
0.2
14.3 +/–
Press plate
can be hinged
on both sides
Number
of pins
a
6
10
5.08
10.16
12.2
17.3
7.87
12.95
14
16
20
15.24
17.78
22.86
22.4
24.9
30.0
18.03
20.57
25.65
26
34
40
30.48
40.64
48.26
37.6
47.8
55.4
33.27
43.43
51.05
50
60
60.96
73.66
68.1
80.8
63.75
76.45
64
78.74
85.9
81.53
b max. c min.
Marking of first contact
Figure 8-14 Dimensional drawing of IDC plug connectors
8–20
SICOMP IMC – System Manual
J31069-D2001-U001-A0-7618
System Layout
Other plug-in connectors
Siemens front FK-2 plug-in connectors with LED indication
Section A–B
Section A–B
6
10
14
16
20
26
34
40
50
60
64
FK-2 socket strip
FK-2 multi-point strip
Figure 8-15 Dimensional drawing of the FK-2 front plug-in connector
SICOMP IMC – System Manual
J31069-D2001-U001-A0-7618
8–21
System Layout
Accessories for plug-in connectors
Counterparts for the multi-point, female, pin and socket strips (etc.) and housing,
covering caps (etc.) used on the SICOMP IMC boards are available with order
numbers in various Siemens publications. Some examples are listed below.
SBS (Siemens component service)
Passive components and tubes and electro-mechanical components
The catalog offers you an extensive customer-friendly immediate delivery
source including direct contact with fast-service warehouses, immediate information and direct booking.
Plug connector data book: Delivery directory
Electro-mechanical components: Siemens data books
Plug connectors for PC 612 printed circuits in accordance with DIN 41 612:
Delivery program
SBM 383 subminiature plug connector: Delivery program
IDC plug connector with BK-MOD 421/422 module scale: Delivery program
This information is intended to make it easier to obtain accessories. Other
manufacturers or suppliers which are not listed here exist for the individual parts.
No guarantee is assumed for the correctness of this information. We recommend
always first obtaining information on delivery conditions, current status of the delivery program and the minimum ordering quantities.
Electronic components
Electronic components (e.g., arithmetic coprocessors) may be used on some
boards to expand functions. Capacity can be modified by replacing chips (e.g., by
using EPROMs of different capacities).
!
!
8–22
Caution
When installing components, make sure that component and receptacle match.
For more information, see “Package Information” in the component description.
Caution
Adhere to the ESD guidelines when handling the boards. See chapter 8.7.4.
SICOMP IMC – System Manual
J31069-D2001-U001-A0-7618
System Layout
8.6
!
Placement of the Boards in the System
Caution
Remember the following points when planning your system.
Placement of drives
Magnetic memory mediums must always be placed as far away as possible from
power supplies.
High currents may affect drives electro-magnetically.
Continuous heat emission from the power supply decreases the MTBF of the
drives.
SICOMP IMC drive inserts may only be connected to the CPU with the included
connection cables.
Two-CPU solution
Place the shorter of the two bus segments further away from the power supply.
For both bus segments, adhere to the notes on drive placement. See above.
Analog input/output boards
To completely preclude possible measuring errors with high-resolution converters,
these boards should not be operated in the immediate vicinity of potential interference sources (e.g., switching power packs and graphics cards).
Single-Europa-format boards in multi-row system frames
To prevent unnecessary warming of other system components, boards with high
heat emission (e.g., CPU boards and power supplies) must always be placed in
the top system row in multi-row system frames.
SICOMP IMC – System Manual
J31069-D2001-U001-A0-7618
8–23
System Layout
Heat pockets
To prevent heat pockets from forming, boards with high heat emission should not
be placed directly next to each other.
Mixed AMS-SMP16 system
When several AMS bus masters are used, make sure that the SMP16 buses are
separated from each other (i.e., no continuous SMP16 bus backplane).
8–24
SICOMP IMC – System Manual
J31069-D2001-U001-A0-7618
System Layout
8.7
Information on Mounting
This chapter contains information on mounting and installation of individual components of the product family of SICOMP IMC board systems.
!
8.7.1
Warning
When mounting, be careful not to damage the protective conductor. Do not disconnect the screw connection marked with the grounding symbol (protective conductor).
Connecting the Guides
When plugging in the guide rails, adhere to the scaling dimensions of the front
plates. For SMP16 or AMS boards, this is 20.32 mm or a multiple thereof. The
currently available system frames always include guide rails 6XB9623-1BE00.
Shoulders
Figure 8-16 Connecting guide rails 6XB9623-1BE00
Pay careful attention to connecting the guide rails when installing boards, power
packs and so on.
As shown in figure 8-16, the shoulders of the rail point to the right (both top and
bottom).
The pin of the first rail must be inserted into the second hole of the left-hand
side of the system frame.
The pin of the next rail must be inserted into the fourth consecutive rail, and so
on.
SICOMP IMC – System Manual
J31069-D2001-U001-A0-7618
8–25
System Layout
8.7.2
Mounting the Wiring Shield Plate
The wiring shield plate is permanently mounted when the system module is delivered. After the screws have been disconnected, the wiring shield plate can be removed from the back. Care save the screws.
After the bus backplane has been wired, replace the wiring shield plate.
8.7.3
Bus Backplanes
The bus backplanes are screwed from the back to the profile rails of the SICOMP
IMC subrack.
Adjusting the bus backplanes
Bus backplanes must always be adjusted so that the guide rails are exactly aligned
with the socket terminal strips of the bus backplane. This is particularly important
for multiple-row subracks.
1. Secure the bus backplanes with a few screws so that they can still be moved
easily.
2. Insert two boards in the guide rails of two slots which are as far apart as possible.
3. Press the boards into the socket terminal strips of the bus backplanes. To
make this easier, you should move the bus backplanes slightly.
4. Insert the remaining screws, and tighten all. Generally it is sufficient to use a
screw for every second slot.
Note
Adjustment is particularly important when two bus backplanes are to be connected
with a bus coupler. See chapter 8.3.3. The bus coupler should also be included in
the adjustment.
!
8–26
Caution
Adhere to the ESD guidelines when handling the boards. See chapter 8.7.4.
SICOMP IMC – System Manual
J31069-D2001-U001-A0-7618
System Layout
8.7.4
Installing the Boards
Safety notes for SICOMP IMC boards
ESD protective measures
Adhere to the ESD guidelines (Electrostatic Sensitive Device) when handling the
boards.
Never touch the boards unless required work makes this absolutely necessary.
When working with the boards, use a conductive and grounded work surface.
Wear a grounding bracelet.
Never touch the pins, connections or printed circuits of the boards.
Never permit the boards or components to be touched by chargeable objects
(e.g., synthetic materials).
Keep the boards or components at least 10 cm away from CRT units and television sets.
Leave the boards in their special packaging until they are needed. When registering boards, etc. do not remove the boards from their packaging or touch
them.
Boards may only be installed or removed when the voltage is off.
Adhere to the ESD protection guidelines when this warning label is affixed to
Siemens products.
ACHTUNG
ATTENTION
Nur geschultes Personal
darf die Verpackung öffnen
Observe Precautions
for Handling
Elektrostatisch gefährdete
Bauelemente (EGB)
Electrostatic Sensitive
Devices (ESD)
Figure 8-17 ESD warning label
SICOMP IMC – System Manual
J31069-D2001-U001-A0-7618
8–27
System Layout
Notes on installation
With a SICOMP IMC microcomputer system, additional settings can be used to
adjust the individual components (e.g., with regard to address assignment, interrupts or timing) to each other and the application.
For possible settings, see the chapter on commissioning of the product documentation of a board. Software settings are covered in the chapter on programming
notes.
Empty slots
Slots which are not configured with a board must be closed for the following reasons.
Protection against touch and foreign bodies
EMC compatibility
Assurance of defined air circulation (.e.g, for forced ventilation). See also chapter 12.
Suitable front plates (i.e., dummy covers) are available as accessories.
8.7.5
!
!
Installing and Removing the Boards
Caution
Make sure that the bus backplanes are positioned as described in chapter 8.7.3.
Otherwise, boards or bus backplanes may be damaged.
Caution
Adhere to the ESD guidelines when handling the boards. See chapter 8.7.4.
To remove a board, gently move it up and down while pulling it to the front and out
of the subrack. The board should only be touched on the front plate.
iPCI and newer AMS boards are equipped with a pull-tilt lever which makes it easier to remove the board.
8–28
SICOMP IMC – System Manual
J31069-D2001-U001-A0-7618
System Layout
8.7.6
Mounting the Cabinets and Housings
Depending on the application, both fully mounted cabinets and housings are available in various models as well as easy-to-use mounting kits.
Note
When selecting cabinets and housings, remember that boards with front plug connectors require a distance of at least 60 mm between the front plate and the front
door.
The Assembling Center offers implementation of customized solutions.
8.7.7
Multiple-Row Systems, Special Systems and Cable Fabrication
Most of the multiple-row SICOMP IMC systems consist of a 6HE system frame
configured with AMS, SMP16 and/or iPCI bus backplanes.
Since AMS CPU boards use the AMS bus to communicate with each other and
locally are able to handle one SMP16/iPCI bus each, possible configurations are
almost unlimited.
The SICOMP IMC Assembling Center can handle the task of setting up and commissioning such a system. See chapter 6.
This also applies when your application does not permit exclusive use of the
SICOMP IMC family of products, and you require other subracks (i.e., height more
than 6 HE, width other than 84 TE) or a special operating system and software
solution, for example.
Cable fabrication
Due to the wide variety of possible cables, they cannot be stocked.
For ready-to-use cables or cable hamesses, contact the SICOMP IMC Assembling
Center.
SICOMP IMC – System Manual
J31069-D2001-U001-A0-7618
8–29
System Layout
8.8
8.8.1
Wiring
Baring of Cables
Cables can be bared mechanically or thermally, by hand or automatically. The type
of tool to be used depends on the type and quantity of cables to be bared.
The length of be bared depends on the particular connection technique being used.
!
8.8.2
Warning
When baring the cables, do not nick or otherwise damage the individual conductors. Use the correct baring tool for the particular type and cross section of cable.
Tagging the Cable Ends
Permanent identification of the individual cables is desirable. It simplifies mounting
and trouble-shooting. Plastic markers, ID sleeves or different-colored cables are
suitable, for example.
8.8.3
Wrap Connections
The term “wrap connection” is derived from “Wire Wrap”, a registered trademark of
the Gardner & Denver company.
Wrap connections in accordance with DIN 41 b11 are solder-free wire connections
with a very high degree of reliability. Using a wrap tool, several windings of bared
wrap wire are applied to a four-corner wrap pin.
The high pressure creates friction-locked, gas-tight connections on the edges of
the wrap pin which ensure an age-proof and very low ohmic connection.
There are two types of wrap connections (i.e., standard and modified). With the
modified wrap connection, there is less danger of a wire break in comparison to the
standard wrap connection. For this reason, the modified wrap connection is particularly recommended when wires are subjected to greater stress (e.g., vibration).
8–30
SICOMP IMC – System Manual
J31069-D2001-U001-A0-7618
System Layout
Standard Wrap Connection
Modified Wrap Connection
Insulated wire
Insulated or
uninsulated
(bare) wire
Reference edge
Reference edge
Counting the wire windings
Starting with the reference edge at the first contact point of the wrap pin with the
bare wire, only complete windings which encircle the wrap pin by 360° are counted.
At least four windings are required for wrap connections on SMP16 or AMS bus
backplanes and boards.
Wrap tools
Electrical, air-pressure and manually operated tools are available. For detailed
information, see the product documentation of the respective manufacturer. Electrical wrap tools are sold by the following company, for example.
CooperTools
Karl-Benz-Str. 2
74354 Besigheim
Note
Adhere to the user’s instructions for the wrap tool.
Wrap wire
Choosing the correct wire quality (i.e., conductor and insulation) is decisive to the
reliability of wrap connections. Only wire which is suitable for the wrap technique
may be used.
Only wire with easily adhering insulation may be used for wrap connections with
self-baring wrap tools.
SICOMP IMC – System Manual
J31069-D2001-U001-A0-7618
8–31
System Layout
Making the wrap connection
1. Make a wire table. See example shown below.
WF 1.1
–
WF 2.1
WF 1.3
–
WF 2.3
WC 1.1
–
WC 1.2
Pin
Row
Wrap field
2. Prepare wrap wires. Cut and bare the required pieces of wire (not necessary
with self-baring wrap tool with wire roll).
The amount of switching wire to be bared depends on the shape and size of the
pin, the diameter of the wire and the number of bare wire windings
(e.g., in acc. w. AWG no. 30).
Pin dimensions:
0.6 x 0.6 mm (pin diagonal of 0.85 mm)
Diameter:
0.25 mm
Number of windings: 5 (recommended for alloyed wire, ex: alloy 135)
Length to be bared: 18.0 ±1.0 mm
3. Make the wrap connections.
In the first layer, do the short wires first and then the long wires. In the second
layer, do the long wires first and then the short wires. The end of the wire does
not have to hug the wrap pin closely and can protrude tangentially up to a single
diameter of the wire.
The wrap pins on SMP16 and AMS boards are 6 mm in length and permit a maximum of two wiring levels. On bus backplanes, the wrap pins are approximately
10 mm in length and permit a maximum of three wiring levels.
!
Caution
The two windings of a short wrap connection must be located in the same wiring
level, otherwise there is a danger of short-circuiting.
If wrap pins are used as turning points, the wrap wire may not hug the corners
tightly.
Bared ends of wires may not protrude from the wrap pin.
To prevent already installed wires from being damaged by a wrap or the wrap tool,
a minimum distance of 0.1 mm must be maintained in the first layer between the
insulation body and the beginning of the wrap.
8–32
SICOMP IMC – System Manual
J31069-D2001-U001-A0-7618
System Layout
Evaluating a wrap connection
Good
Faulty
Figure 8-18 Evaluating a wrap connection
1. Correctly modified wire winding
The end of the wire does not have to hug the wrap pin and may protrude somewhat in a tangential direction. Dimension “a” may not exceed the diameter of
the conductor.
2. Insulation does not extend over at least three edges of the wrap pin.
3. Spiral-shaped winding when counter pressure is too low
4. Open winding when counter pressure is not uniform
5. Over winding when counter pressure is too great or winding is unsuitable
Wiring modification
Wire ends which have already been used and bent may not be used again. A
wrap winding may not be applied more than 20 times to the same location on a
wrap pin.
8.8.4
Wiring Cable Harnesses
Cable harnesses permit fast and reliable connection of components (i.e., identical
arrangement and easy to recognize) for mass-production manufacturing.
Cable harnesses consist of single insulated wires which are bundled into master
cables and branches. Depending on construction specifications, the bared ends
can be provided with various contact elements, and connected with screws, insertion or soldering.
SICOMP IMC – System Manual
J31069-D2001-U001-A0-7618
8–33
System Layout
Making cable harnesses
First, the hook-up wires or cables are measured in accordance with the diagrams
and a sample cabinet, and installed and positioned on a harness board made for
this purpose.
The bundles of wires are tied off, cut and bared.
There are several ways to tie off bundles.
Classical method: Yarn is knotted around the individual lines to create a well-organized and closed wiring picture inside the cabinet. This method is no longer used
today.
Alternatives to yarn: A variety of methods is available (e.g., cable binders and
plastic spiral tubing or binder and mounting systems for which special tools can be
used to perform bundling and mounting in one step).
8–34
SICOMP IMC – System Manual
J31069-D2001-U001-A0-7618
System Layout
Cable binders (cable holding tape)
Cable binders are tapes made of flexible plastic which are placed around cable
bundles and pulled tight with a pair of flat pliers or special tools. They are available
in various lengths, widths and with various locking systems.
Cable binders are self-locking and, together with special mounting anchors, make
securing of cable bundles simple and quick.
Secure master cable or bundle to
mounting plate only with mounting
anchor.
Mounting anchor, glued or
screwed down
Figure 8-19 Use of cable binders
SICOMP IMC – System Manual
J31069-D2001-U001-A0-7618
8–35
System Layout
8.8.5
Crimping
With crimping, multiple-core conductors (i.e., flexible leads) are usually inserted
with a bared end into a connection sleeve and crimped with a crimping or pneumatic tool. The pressure created by this procedure is so great that a gas-tight connection between reshaped sleeve and conductor is created.
!
Warning
Make sure that conductor, insulation and contact piece are suitable for each other
(in accordance with paragraph 10, part 3 of DIN 41 611). For non-standardized
connection elements, follow the directions of the manufacturer.
Only multiple-core conductors (e.g., flexible leads in accordance with DIN 41281 or
DIN 51 881) are always suitable for crimping. In exceptional cases, copper or aluminum conductors may be used.
The tools (i.e., crimping tool and hydraulic tools with inserts) must be selected
based on the conductor cross section, the insulation diameter and the contact elements, and may only be used for the contact elements specified by the manufacturer of the tool.
!
Warning
Never add extra tin-plating to multiple-core conductors (i.e., flexible leads) before
crimping.
Crimp connection shapes
Table 8-4
Crimp connection shapes
Shape A
8–36
Shape B
SICOMP IMC – System Manual
J31069-D2001-U001-A0-7618
System Layout
Evaluating the crimp connection
Crimp connections must meet the requirements of DIN 41 611 (part 3 for line cross
sections less than 10 mm2).
Note
The crimping procedure must be performed so that the correct position of the conductor can be examined on the finished crimp connection.
Table 8-5
Evaluating a crimp connection
Drawing
Evaluation
Good crimp connection (conductor and insulation visible)
Bad crimp connection (insulation crimped too)
Bad crimp connection (flexible lead spread apart)
SICOMP IMC – System Manual
J31069-D2001-U001-A0-7618
8–37
System Layout
Crimping of cable shoes and connection sleeves
Cable shoes (DIN 46 225, 46 234 and 46 235) and connection sleeves
(DIN 46 341) must be adapted to the conductor cross section.
Several conductors may be crimped simultaneously in cable shoes or connection
sleeves if the total of the individual cross sections is approximately the same as
the nominal cross section of the cable shoe or connection sleeve.
!
Warning
A space of 1.5 to 2 mm must be provided between insulation and the crimp area.
Insulation remains may not protrude into the crimp area.
Table 8-6
Crimping of cable shoes
Cable Shoe
Drawing
Based on DIN 46 235
Based on DIN 46 234
Pin cable shoe in acc. w. DIN 46 230 is
treated accordingly.
Based on DIN 46 225
8–38
SICOMP IMC – System Manual
J31069-D2001-U001-A0-7618
System Layout
Crimping other contact elements
Flat plug connectors, plug-in sleeves, contact sockets, pins and core sleeves are
usually handled in accordance with DIN 41 611. In individual cases, they are also
handled as line cross sections of under 10 mm2 (e.g., core end sleeves in accordance with DIN 46 228) and also in accordance with VDE 0220 T1.2.
Table 8-7
Possible crimp contact elements
Designation
Plug-in sleeve
DIN Standard or
Manufacturer
DIN 46 245
Drawing
Crimp Type
Closed with insulation sleeve
without encompassing the insulation
Max. of 1 mm
Plug-in sleeve
DIN 46 247
Open, shape B,
encompassing insulation
Max. of 1 mm
Flat plug connector DIN 46 248
Open, shape B,
encompassing insulation
Max. of 1 mm
Socket
AMP company,
module 4
Open, shape B,
encompassing insulation
Pin
AMP company,
Mate-N-Lock
Open, shape B,
encompassing insulation
SICOMP IMC – System Manual
J31069-D2001-U001-A0-7618
8–39
System Layout
8.8.6
Insulation-Displacement-Connector Technique
With this technique, an insulated conductor (i.e., flexible lead or solid conductor) is
pressed into a fork-shaped contact with a special tool. The sharp corners of the
contact edges cut through the insulation and, together with the force of insertion,
create a gas-tight contact between conductor and fork contact. The insulation-displacement-contact technique is primary used for ribbon cables.
Ribbon cables
Ribbon cables are multiple-core, mutually insulated conductors whose individual
cores are located in one level. This type of cable is primarily used for the parallel
transmission of digital signals.
Note
Division of the conductors must correspond to the division of the plug connector.
Use only those cables which meet the specifications of the manufacturer of the
plug connector.
Location of the conductor: Does not differ from the plug connector.
The plug connector must be completely closed.
Use only the tools of the manufacturer of the plug connector or those recommended by that company.
Examples of insulation-displacement connectors
IDC plug connector in module scale BK-MOD 421/422
Pin and socket terminal strips in accordance with DIN 41 651 (6, 10, 14, 16, 20,
26, 34, 40, 50, 60 and 64-pin)
Figure 8-20 IDC plug connectors
8–40
SICOMP IMC – System Manual
J31069-D2001-U001-A0-7618
System Layout
8.8.7
Screw Connections
With screw-type connections, connection is established by the pressure of the
screw.
!
Caution
Be sure to leave air and creepage distances as long as possible during installation.
Screw connection with cable shoe
The cable shoe is squeezed onto wires or flexible leads. See chapter 8.8.5.
Direct screw connection
Single-wire cables are connected directly without core end sleeves. With flexible
leads, the bare ends must be protected against splicing with core end sleeves.
Double connections of fine-wire cables (with same or different cross sections) must
be provided with a core end sleeve which is squeezed on with a suitable tool. See
chapter 8.8.5.
With double connections of single-wire conductors, make sure that both conductors are positioned parallel to each other on the terminal. With conductors with
different cross sections, use only suitable connection elements (e.g., in accordance
with DIN 46 288).
8.8.8
Plug-In Connections
With plug-in connections, contact is established by joining two connection elements
(e.g., single plug connector elements, sleeves and flat connectors, multiple-pin
plug-in connections or by direct insertion (e.g., socket terminal connections).
SICOMP IMC – System Manual
J31069-D2001-U001-A0-7618
8–41
System Layout
Insertion of plug-in sleeves and flat plug connectors
Multiple connections (i.e., with several plug-in sleeves on one plug connector) are
not recommended since they require greater socket strength. See table 8-8.
Caution
!
To avoid damaging the plug-in connection, use the tools of the manufacturer or
special insertion/removal aids when establishing or disconnecting the connection.
Table 8-8
Standardized plug-in sleeves and suitable flat connectors
Plug-In Element
Plug-in sleeves with insulating sleeve in acc. w.
DIN 46 2451
Plug-in sleeves with insulating sleeve in acc. w.
DIN 46 247
Plug Connector
Width
(in mm)
Flexible Lead
Cross Section
(in mm2)
Can Be Used with
2.8
0.5 to 1.0
Flat plug connector in acc. w. DIN 46 342
(straight and bent)
4.8
0.5 to 2.5
6.3
0.5 to 6.0
Multi-point terminal strip in acc. w.
DIN 41 612
2.8
0.5 to 1.0
4.8
1.0 to 2.5
6.3
1.0 to 6.0
9.5
6.0
6.3
1.0 to 6.0
Flat plug connector in acc. w. DIN 46 244
Flat plug connector in acc. w. DIN 46 342
(straight and bent)
Multi-point terminal strip in acc. w.
DIN 41 612
Flat plug connector in acc. w. DIN 46 244
–
Flat plug connector without insulating sleeve in
acc. w. DIN 46 2481
–
1) Several conductors can also be crimped in the plug-in sleeve. The ends of flexible leads may not be soldered. Color IDs in accordance with DIN 47 002.
Plug connectors with protection against disconnection (i.e., locking clip) are available from the AMP company for plug-in connection of signal lines to the wrap pins
of the bus backplanes.
Insertion of ribbon cables and lines with multiple plug connectors
Generally, no special tools are required for this connection. If necessary, make
sure that the coding of both parts of the plug-in connection match. Snap-in locks,
locks and screws must be snapped in or tightened.
Note
Adhere to the specifications of the manufacturer for current loadability and plugging frequency.
8–42
SICOMP IMC – System Manual
J31069-D2001-U001-A0-7618
System Layout
8.8.9
Wiring the Power Supply on the Subrack
The H15 socket terminal strips (for power packs) mounted on the subrack must be
connected to connections 28, 30 and 32 with the high voltage power network and
to the other connections with the consumer (e.g., the bus backplane). Insulated
flexible copper leads should be used for this purpose. The conductor cross section
must be sufficient for the particular current. 1.5-mm2 flexible copper leads which
correspond to the H15 plug-in connection with respect to maximum current loadability can be recommended for both input and output voltages. The rule of thumb
is 10 A at temperatures up to +55° C. If the current load is greater, the load must
be distributed over several lines. Signal and sensor lines may have a smaller
cross section. 0.5 mm2 is recommended.
Table 8-9
Insulation colors for alternating current lines
Function of the Line
Color
Protective conductor
Green-yellow
Directly grounded conduc- Blue
tor
Exterior conductor (phase) Black
Table 8-10
Insulation colors for direct current lines
Function of the Line
0 V (GND)
+5 V
Black
Red
+3.3 V
+12 V
-12 V
Orange
Brown
Violet
+15 V
-15 V
Pink
White
Color
Two-colored flexible leads should be used for other types of wiring.
Power connection
Power network voltage is supplied via a solid-state plug connector. This connector
is mounted on the back of the subrack in the vicinity of the power packs and connected to the power connections of the H15 multi-point strips. Keep this connection as short as possible.
SICOMP IMC – System Manual
J31069-D2001-U001-A0-7618
8–43
System Layout
!
Warning
Make sure insulation is good, and use contraction sleeves in addition on the connections. The protective conductor connection of the solid-state plug connector
must be connected to the metal frame of the subrack with a separate line (e.g., via
screw, spring washer, toothed washer and two nuts).
The power connection lines may not cross the low-voltage lines and may not be
installed parallel to these. The low-voltage guidelines must be adhered to (e.g.,
double insulation of the power side).
With greater power connection current (e.g., for 120 V operation or higher connection power), a permanent connection with pull relief is recommended. Power connector, solid-state connector and power switch must have sufficient loadability.
Output voltages
With power supplies with multiple connections (i.e., several connections for one
output voltage or for 0 V), all connections must be connected (if required for the
load) with the load via lines of the same length and same cross section.
AC/DC
+5 V
+5 V
+5 V
0V
0V
0V
Bus backplane
+5 V
+5 V
0V
0V
Correct wiring
AC/DC
Bus backplane
+5 V
+5 V
+5 V
+5 V
+5 V
0V
0V
0V
0V
0V
Wrong wiring
Figure 8-21 Wiring of multiple connections
With systems with more than one bus backplane, the power supply lines must be
connected in a star to the power supply board. See figure 8-22.
8–44
SICOMP IMC – System Manual
J31069-D2001-U001-A0-7618
System Layout
Signal and sensor lines
The voltage drop on the load lines of high-voltage outputs can be compensated for
up to a maximum value by using sensor lines. See chapter 7.
The applicable voltage is taken as close as possible on the consumer (flat plug
connector of the bus backplanes) and connected via the sensor lines with the appropriate connections of the H15 socket terminal strip. The respective sensor line
pair (e.g., 0 V/+5 V) should be installed as twisted-pair or close-parallel, and as
separate as possible from other wiring.
Note
With systems with two or more bus backplanes, the sensor lines must be connected to the bus backplane with the greatest power requirements.
The bus backplanes may not be circuited in series.
In an environment with much interference, a 0 V line should also be installed in
addition to the lines of the error signals of the power packs.
For details on the signal and sensor lines, see the product documentation of the
power supplies used.
SICOMP IMC – System Manual
J31069-D2001-U001-A0-7618
8–45
System Layout
Example of wiring for the power supply
AC/DC
Bus backplane 1
+5 V
+5 V
+12 V
+12 V
–12 V
–12 V
0V
with higher
current consumption at +5 V
0V
0 VF
0 VF
+5 VF
+5 VF
PF*
PF*
PF*
+5 V Bus backplane 2
with lower
+12 V current consumption at +5 V
–12 V
+5 V
0V
0V
+5 VF
P
+3.3 V
+3.3 V
N
+3.3 VF
+3.3 VF
PE
0 VF
DC/DC
ER*
ER*
0 VF
Alterning current power network
Figure 8-22 Power supply wiring for a system with two backplanes (broken lines = optional)
8–46
SICOMP IMC – System Manual
J31069-D2001-U001-A0-7618
System Layout
8.8.10
Line Installation
The following points concerning cable installation require special attention.
Lines should be installed so that connection points have pull-relief and are easy
to access.
Lines may not be subjected to the following.
– Be led through metal plate leadthroughs without rubber sleeves
– Touch components such as transformers, heat dissipaters and so on
– Be installed so that they can be pinched
– Be damaged by moving parts (e.g., fans)
Cable binders must be made of non-conductive materials. The insulation
sleeve of cables may not be cut into when the cable binders are tightened.
Clamps or cable binders must be used to provide the ends of bundles of lines
with pull-relief on the ends so that forces cannot affect the connection points.
!
Warning
Cables must be installed safely in accordance with VDE regulations. This means
that cables which carry different voltages may only be installed together under certain conditions. See VDE 0804 and chapter 8.8.9.
Cable installation with swivel frames
The physical stress caused when the swivel frame is turned must be kept as low
as possible for wire connections between subracks and cabinet.
This is achieved by bundling as many wire connections as possible and installing
them in reliable radiuses. See DIN 57 298 or VDE 0891. We recommend using a
PVC protective sleeve which is secured with end sleeves and clamps.
Table 8-11
Cable installation with swivel frames
Right Installation
Wrong Installation
Cabinet
Swivel frame
SICOMP IMC – System Manual
J31069-D2001-U001-A0-7618
Cabinet
Swivel frame
8–47
System Layout
Cable harness installation
Adhere to the following points when installing cable harnesses.
Before actual connection, the wire ends should already be pointed toward and
shaped to the physical location of the connection point.
To decrease the danger of wire breaks, the wire ends must be bent so that the
bent does not start until the insulated part of the wire.
Ribbon cable installation
Pay particular attention to correct insertion, pull-relief and the correct position of
the individual conductors (i.e., cores). If necessary, ribbon cables must be bent or
folded to achieve the correct position.
Folding the ribbon cable gives it its own rigidity. Use of double-sided adhesive tape
between the halves of the fold prevents unfolding.
Conductor 1
Folding line
Folding line
Conductor 1
Coordinate
dim.
Beg. of cable
Direction of work
Coordinate
Conduc- dim.
tor 1
Beg. of cable
Conductor 1
Direction of work
Figure 8-23 Folding of ribbon cables
Note
Make sure that ribbon cables on or between boards do not rub on pins or other
sharp edges.
8–48
SICOMP IMC – System Manual
J31069-D2001-U001-A0-7618
System Layout
Folding down to left
Conductor 1
Folding down
to right
Conductor 1
Orientation fold
with folding up
and down
Bending radius
1 mm
Conductor 1
Orientation fold
with folding up
Bending line
Conductor 1
Bending line
Conductor 1
Coordinate dim.
Beg. of cable
Direction of work
Figure 8-24 Example of folding for installation of ribbon cables
Adhesive mounting
Self-adhesive mounting is mainly used to affix cable harnesses to metallic surfaces.
!
Warning
Adhesives may not be used on vibration-proof housings, on cabinets outside
closed rooms, on unbaked paint, on silicon-treated or curved surfaces and under
extreme operating temperatures. For details, see the specifications of the
manufacturer.
Application of adhesives requires very careful attention.
Dirt and moisture cause poor adhesive connections Use alcohol or other
agents to remove grease from the points of the device to which adhesive is to
be applied.
Make the adhesive connection at room temperature.
Immediately after removing the protective foil, press the adhesive strips on the
appropriate points.
The better the adhesive connection, the greater the pressure used.
SICOMP IMC – System Manual
J31069-D2001-U001-A0-7618
8–49
System Layout
8–50
SICOMP IMC – System Manual
J31069-D2001-U001-A0-7618
Software
9
Table of Contents
9.1
9.1.1
9.1.2
9.1.3
9.1.4
9.1.5
General . . . . . . . . . . . . . . . . . . . . . . . . . . . . . . . . . . . . . . . . . . . . . . . . . . . . . . . .
Demands on Operating Systems . . . . . . . . . . . . . . . . . . . . . . . . . . . . . . . . . .
Operating System Classes . . . . . . . . . . . . . . . . . . . . . . . . . . . . . . . . . . . . . . .
Automation Tasks . . . . . . . . . . . . . . . . . . . . . . . . . . . . . . . . . . . . . . . . . . . . . . .
Principles of Multitasking . . . . . . . . . . . . . . . . . . . . . . . . . . . . . . . . . . . . . . . . .
Task Communication and Coordination . . . . . . . . . . . . . . . . . . . . . . . . . . . . .
9-2
9-2
9-3
9-4
9-5
9-7
9.2
9.2.1
9.2.2
Operating Systems Which Can Be Used . . . . . . . . . . . . . . . . . . . . . . . . . . . .
RMOS3 . . . . . . . . . . . . . . . . . . . . . . . . . . . . . . . . . . . . . . . . . . . . . . . . . . . . . . . .
Other Operating Systems . . . . . . . . . . . . . . . . . . . . . . . . . . . . . . . . . . . . . . . .
9-9
9-9
9-9
9.3
9.3.1
9.3.2
9.3.3
9.3.4
9.3.5
RMOS Operating System . . . . . . . . . . . . . . . . . . . . . . . . . . . . . . . . . . . . . . . .
Features of RMOS3 . . . . . . . . . . . . . . . . . . . . . . . . . . . . . . . . . . . . . . . . . . . . .
Components of RMOS . . . . . . . . . . . . . . . . . . . . . . . . . . . . . . . . . . . . . . . . . . .
Management of Tasks . . . . . . . . . . . . . . . . . . . . . . . . . . . . . . . . . . . . . . . . . . .
Configuration . . . . . . . . . . . . . . . . . . . . . . . . . . . . . . . . . . . . . . . . . . . . . . . . . . .
Development Tools . . . . . . . . . . . . . . . . . . . . . . . . . . . . . . . . . . . . . . . . . . . . . .
9-10
9-10
9-11
9-14
9-16
9-18
9.4
9.4.1
9.4.2
9.4.3
9.4.4
Standard Software . . . . . . . . . . . . . . . . . . . . . . . . . . . . . . . . . . . . . . . . . . . . . .
SMP16-AKO . . . . . . . . . . . . . . . . . . . . . . . . . . . . . . . . . . . . . . . . . . . . . . . . . . . .
Board Support Packages (BSPs) . . . . . . . . . . . . . . . . . . . . . . . . . . . . . . . . . .
RMOS3-PLC . . . . . . . . . . . . . . . . . . . . . . . . . . . . . . . . . . . . . . . . . . . . . . . . . . .
Other . . . . . . . . . . . . . . . . . . . . . . . . . . . . . . . . . . . . . . . . . . . . . . . . . . . . . . . . . .
9-19
9-19
9-20
9-20
9-20
SICOMP IMC – System Manual
J31069-D2001-U001-A0-7618
9–1
Software
9.1
9.1.1
General
Demands on Operating Systems
With microelectronics, the hardware components of a system are becoming increasingly faster and more compact, and these components are being used in increasingly powerful computers. Operating systems handle the task of making economical use of the resources of such computers and simplifying communication
between man and machine.
The characteristics which an operating system must have are determined by the
environment in which it is used.
Typical demands on an operating system
Management of computer resources (e.g., time, memory, and so on)
Management of computer devices (e.g., monitor screen, printer, keyboard and
so on) and, when necessary, allocation of these devices to the user programs
Support of the so-called parallel running of the user programs
Communication between computer and user (i.e., man-machine interface)
Reaction to user program demands on the computer
Protection of data and program areas
Other important criteria
A certain independence from hardware
Ability to be scaled (i.e., to minimize memory requirements, only those modules
required by an application are linked to the system)
Portability (i.e., retention of hardware-dependent coding in separate modules
and adjustment of only these modules when moved)
Support of PC-compatible hardware architectures
9–2
SICOMP IMC – System Manual
J31069-D2001-U001-A0-7618
Software
9.1.2
Operating System Classes
Operating systems can be divided into the following classes based on the application area.
Time-sharing operating systems
The applications (i.e., programs) share computer time via these operating systems.
A quantity of time is allocated to each program. During this time, the program is
processed by the microprocessor. Allocation and management of these time
frames can be static or dynamic. Each program which is processed during the
time allocated to it “thinks” that it has exclusive use of all computer and system
resources.
Batch operating systems
These operating systems use the stacking principle. Each program is entered individually or only called by a user in the dialog with the computer.
Real-time operating systems
With real-time operating systems, the individual programs (i.e., tasks) are assigned
priorities.
The individual tasks are processed by priority (i.e., the task with the highest priority
is always granted computing time by the processor). This task is granted computing time until it has concluded its job or is interrupted by a higher-priority task or
puts itself into waiting status (e.g., waiting for flags, mails, semaphores, expiration
of a selected wait time, and so on). Computing time then becomes available for
lower-priority tasks.
The following demands which are particularly important in automation technology
are primarily met by real-time operating systems.
Deterministic sequence of functions as reaction to external events
With prioritization of tasks, the sequence of reactions to external events can be
predicted and reproduced.
Deterministic reaction times
A process must be able to react to an external event within a specified maximum reaction time.
SICOMP IMC – System Manual
J31069-D2001-U001-A0-7618
9–3
Software
9.1.3
Automation Tasks
The following primary automation tasks are created by the division of technical processes into several, mutually linked, parallel subprocesses.
Measuring
Open-loop control
Closed-loop control
Visualization
Operator control
Demands of these subprocesses on reaction times, execution times, memory requirements, resources used and so on differ greatly.
These jobs are implemented by executing the appropriate programs (i.e., tasks).
The job of a multitasking operating system is to manage these individual tasks and
execute them in accordance with the demands above.
AWL
U
U
U
=
Task
Operator control and monitoring
R
M
O
S
Task 2
Man-machine
Interface
H
W
E1.1
&
E1.3
E1.7
A3.5
Open-loop control
Closed-loop control
Task 1
E1.1
E1.3
E1.7
A3.5
FUP
Task ...
Task n
Closed-loop
Communication
control
RMOS3-PLC
Programmable controller
Figure 9-1 Tasks of automation
Many operating systems are designed for a mono-processor environment. Execution of programs (i.e., tasks) is handled by only one processor. In this environment, task management means the assignment of the CPU to one task so that the
CPU can execute it.
9–4
SICOMP IMC – System Manual
J31069-D2001-U001-A0-7618
Software
Task 4
Task 2
Task 5
Want to be
executed
Real-time
operating
system
CPU
Coordinates
execution of the
tasks
Task 1
Task 3
Figure 9-2 Multitasking operating system
The next few sections describe the principles by which a real-time operating system manages the tasks and allocates them to the CPU.
9.1.4
Principles of Multitasking
The principles below permit a real-time operating system to execute several tasks.
Allocation of priorities
Each task is assigned a certain priority. The priority indicates the importance of
the task to be executed.
This priority is required to decide which task will be granted CPU time when several tasks want to be executed (i.e., all tasks which are in ready status).
With a system containing tasks of different priorities, frequency of execution increases with increasing priority (i.e., the execution speed increases in relation to
the total system) since higher-priority tasks are granted more CPU time. In addition, time spent waiting for processor allocation decreases.
SICOMP IMC – System Manual
J31069-D2001-U001-A0-7618
9–5
Software
The priority of a task is not static. Some real-time operating systems are able to
change the priority while programs are running. The priority of a set starting priority is incremented cyclically up to a specified end priority. This increases the
chances of a task to receive CPU time the longer it waits. This mechanism prevents higher-priority tasks from continuously “snatching away” the CPU from a task
with a relatively low (start) priority.
Allocation of the CPU by the scheduler
The scheduler is part of the nucleus of the operating system kernel.
Its job is to allocate CPU computing time to the individual tasks so that they can be
executed. The priority of the tasks is used as the decision criterion.
Only tasks which are in ready status can be assigned CPU time (i.e., these are the
only tasks which can be executed anyway).
Allocation based on priority
The scheduler allocates the task with the currently highest priority to the CPU. The
task retains the CPU until a task with a higher priority becomes ready for execution
and is granted the CPU.
Round robin
If the scheduler finds several tasks with the same priority, a clear decision is impossible. These tasks are then executed using the round robin procedure.
With the round robin procedure, tasks of the same priority are granted CPU time
for a certain interval. Processor allocation changes cyclically.
This procedure requires that the interval of CPU allocation (i.e., the round robin
time interval) be specified.
Selection of the round robin time interval:
If selected high, the wait time for other tasks or processes may exceed legal
limits. On the other hand, system throughput is increased.
If selected low, the real-time behavior of the system is improved. On the other
hand, management time is increased.
9–6
SICOMP IMC – System Manual
J31069-D2001-U001-A0-7618
Software
9.1.5
Task Communication and Coordination
Selection of a suitable medium of communication depends on the application. This
decision must be made by the programmer. The following are available methods
for communication of information between individual tasks.
Event flags
Event flags involve the setting or resetting of an individual bit which tells other
tasks that a certain condition has been fulfilled or an interrupt has occurred, for
example. The flags are combined into event flag groups. A task can set, reset or
query a flag or wait for a bit or bit pattern.
Use of flag groups provides a fast way to exchange information but, as explained
above, is limited to binary information.
Message queues
With this type of communication, a FIFO memory to which other tasks can copy
messages is set up for each task. This permits even large data packets to be exchanged. Message queues are permanently assigned to the receiver task.
Mailbox
A mailbox can be used by various tasks to store and receive messages. The individual messages are assigned a priority and arranged in a waiting queue based on
this priority. Another task can now access the mailbox and read the first message
in the waiting queue.
Shared memory
Data communication via a common memory area (i.e., shared memory) is recommended for situations in which fast access to current data is important. The required information is written by a task to a particular memory location and is then
read by another task. Information previously contained in this memory location is
overwritten. This means that the current data record is always accessed. However, the user must design his/her program so that two or more tasks cannot access this memory at the same time. Otherwise, incorrect or disconnected data
might be introduced to the system.
SICOMP IMC – System Manual
J31069-D2001-U001-A0-7618
9–7
Software
Semaphores
Tasks must be coordinated to prevent them from colliding. This particularly applies
to accesses to a common memory area (i.e., shared memory) or accesses to common resources. Semaphores are available for coordination of the individual tasks.
When a semaphore is set, access to a certain device or shared memory is reserved for one task. Not until the semaphore is released can another task access
this device or memory area. If a task requests a reserved semaphore, this task is
put into the wait state until the semaphore is released.
9–8
SICOMP IMC – System Manual
J31069-D2001-U001-A0-7618
Software
9.2
9.2.1
Operating Systems Which Can Be Used
RMOS3
SICOMP RMOS3 is an operating system designed for the special requirements of
machine controllers. Since real-time capabilities, multitasking and operational reliability are the primary requirements of this application area and RMOS meets
these requirements, RMOS3 is an excellent operating system for many automation
solutions based on SICOMP IMC. RMOS can be configured to the technological
requirements.
For details, see chapter 9.3.
9.2.2
Other Operating Systems
Depending on the particular application, operating systems of other manufacturers
which can be run on PC-compatible hardware platforms can also be used with PCcompatible SICOMP IMC systems. Examples are listed below.
Windows NT
Windows CE
Windows 95 or 3.11
DOS
QNX
IRMX
Other
For further details on possible use, performance, functionality, driver support and
other information on these operating systems, contact the manufacturer or distributor.
Applications for these operating systems can be written with their conventional programming languages. In the future, JAVA will also be able to be used.
SICOMP IMC – System Manual
J31069-D2001-U001-A0-7618
9–9
Software
9.3
9.3.1
RMOS Operating System
Features of RMOS3
Freely configurable hardware, 80386 and above
Higher-speed compact nucleus
Defined reaction times way below 100 µsec (depends on processor)
4-Gbyte address area
Deterministic behavior
Priority-controlled multitasking
Scaleable scope of performance
Dynamic management of task priorities by scheduler
Task communication via priority-controlled mailboxes and messages
Resource management via binary semaphores
Symbolic resource management
Hooks for nucleus expansion
MS-DOS-format-compatible, hierarchical file management system, network capability
RAM disk
User interface similar to MS-DOS (command line interpreter)
Code with ROM capability
ANSI C runtime library
Memory protection mechanisms between tasks and operating system and between tasks via segmented memory model and 32-bit protected mode of microprocessor
Cross software development under DOS/Windows with CAD-UL development
tools
High-level language debugging with CAD-UL XDB RMOS debugger
Integrated development environment (Workbench) for CAD-UL tools available
under Windows 95
Optional support of non-segmented memory models (flat model) for
Borland C++
9–10
SICOMP IMC – System Manual
J31069-D2001-U001-A0-7618
Software
9.3.2
Components of RMOS
The RMOS operating system is divided into the nucleus, driver, interrupt handler
and system processes.
User tasks
Service tasks
Task 3
Task 2
Task 1
Task 6
Task 5
Task 4
User and
system software
Software interface
RMOS
Nucleus
Driver
Operating software
Interrupt handler
Hardware interface
CPU boards, I/O boards,
mass memory and server boards
Hardware
Figure 9-3 Components of RMOS
Nukleus
The nucleus represents the so-called operating system kernel. Its job is to manage the individual tasks.
The nucleus contains all procedures required to handle the multitasking functions.
The scheduler has a central function. It allocates computing time to the tasks
based on their priority.
In addition to memory and time management, the mechanisms for communication
and synchronization of user tasks are handled by the nucleus. The nucleus also
handles the operating system calls (SVCs) of the software interface.
SICOMP IMC – System Manual
J31069-D2001-U001-A0-7618
9–11
Software
Drivers
A device driver usually consists of several programs written in C or Assembler (i.e.,
processing sequences and system processes) which control and manage one or
more I/O devices of the same type or their controllers. For example, I/O devices of
the same type could be several terminals which are addressed via V.24 interfaces.
Drivers have a standardized interface to the RMOS nucleus containing data structures and procedure jumps.
All tasks can issue jobs to a driver using an operating system call
(SuperVisor Call = SVC). The nucleus checks the SVC, copies the parameters to
an internal data structure, and calls the appropriate program of the driver.
At the same time, other programs of the driver provide the interface between the
device hardware and the RMOS nucleus. This interface is implemented by interrupt handlers. All programs of one driver use the same data structures. The programs of the drivers usually access these data structures independently of one
another.
All programs of a drive are components of RMOS and implicitly have a higher
priority than the user tasks. The following parts of a driver can be implemented as
separate programs.
Initialize (hardware and some data structures)
Handle requests by a task (RmIO-SVC)
Handle interrupts
Handle timeouts
Conclude a request
A driver must control and manage several devices of the same type or their controllers. Adjustment of the driver to the controller is performed via initialized data
structures (DCD and UCD tables) in the configuration.
9–12
SICOMP IMC – System Manual
J31069-D2001-U001-A0-7618
Software
The interrupt handler
An interrupt handler is a procedure which is jumped to and executed immediately
after a hardware or software interrupt occurs on the processor.
Under RMOS, an interrupt handler can always be tailored to special hardware conditions.
Interrupt handlers can be configured, enabled and disabled from tasks that are running.
If necessary, an interrupt handler can branch to a system process for which task
communication resources are available for event flags, local mailboxes and task
starts, by calling subprograms.
Tasks
Task 3
Task 2
Task 1
Job for driver via SVC
Nucleus
Call driver program
Interrupt
Driver
SVC check
Copy parameters
Management
control
Interrupt handler
Interrupt
I/O devices
Figure 9-4 Interrupt handler
SICOMP IMC – System Manual
J31069-D2001-U001-A0-7618
9–13
Software
9.3.3
Management of Tasks
Task management is one of the primary jobs of the operating system kernel (i.e.,
nucleus). For example, RMOS defines five different states which a task can assume. To ensure transparency, a task must always be in one of the following
states under RMOS.
Table 9-1
State
Computing
Ready
Waiting
Dormant
Non-existent
Possible states of tasks
Meaning
Computing is the task which has been granted CPU time and is executing its code.
The task which has all resources (except for the CPU) required to
execute the task is in the ready state.
If the resources required to execute a task are not free or the task is
waiting for an event, this task must assume the wait state before it
can become ready again.
The task is in standby. It is no longer involved in processing but is
still known to the operating system via its structures.
The operating system is not aware of the existence of the task. The
coding of this task may already exist in memory or be reloaded from
mass memory.
When allocating CPU rights, the scheduler only considers the tasks which are in
ready status.
Change in state
Each task is in one of the possible task states. However, a task is not assigned a
certain state at the outset. A task assumes certain states and changes states.
These changes in state are determined by the required availability of tasks, provision of necessary resources for execution, and so on.
The following changes in state exist for individual task states.
9–14
SICOMP IMC – System Manual
J31069-D2001-U001-A0-7618
Software
Delete
Non-existent
Computing
Conclude
Create
Block
Delete
Dormant
Displace
Allocate
Make available
Waiting
Deblock
Ready
Figure 9-5 Change in task states
Table 9-2
Change in task states
State
Create/delete
Make available
Allocate/displace
Block
Deblock
Conclude
Meaning
While the system is running, tasks are redefined or deleted by already running tasks.
For example, the “make available” change in state is executed for an
automatic start of the specified initialization task, the “start task” system call, or the start request due to an interrupt.
The CPU is allocated to one of the “ready” tasks so that this task can
be executed. This task then assumes the “computing” state.
During its execution, the task which is currently computing can be
removed from the CPU (i.e., displaced). Execution of an interrupted
task can be continued later.
The circumstances surrounding the wait state provide the reason for
this change in state (e.g., resources required for execution are not
available).
Typical reasons for this change in state include, system calls of the
computing task with a wait condition (e.g., wait for an input/output
function to be concluded or wait for a pause to expire).
Similar to the “block” change in state, the operating system executes
this change in state when the waiting condition stated before is concluded.
A task is concluded after it has fulfilled its purpose (i.e., has been
executed completely).
The computing task can initiate this change in state with the system
call “conclude task” or “conclude task and start again after expiration
of a time interval.”
SICOMP IMC – System Manual
J31069-D2001-U001-A0-7618
9–15
Software
9.3.4
Configuration
Configuration is the adjustment of the RMOS operating system to different computer systems and application requirements. To adapt to a hardware interface, the
hardware-dependent software parts of the operating system (e.g., the drivers) can
be modified or have already been specified as configuration files. Drivers can be
removed or added. To adapt to the application requirements, memory and code
requirements can be optimized by adjusting the software interface (i.e., leave out
unnecessary SVCs). RMOS is adapted to different hardware interfaces by editing
configuration files.
Comprehensive adjustment of the operating system to an application is shown in
the figure below.
User tasks
RMOS
configuration
files
Drivers
Assembling or
compiling
Editing, assembling or compiling
Assembling or
compiling
RMOS
nucleus
Compling or linking
Compiled
application
Loading
Building or locating
Finished
application
Figure 9-6 Configuration of the operating system
Hardware configuration
Configuration is the adjustment of the operating system to the specific hardware
interface (i.e., existing boards and the software interface) required by the applications. The routines for using the hardware are located in the configuration library
and are provided to the operating system by appropriate calls during system
startup (RmInitOS). These routines ensure correct handling of the interrupt controller, initialization of the timer block, and the output of messages during system
startup.
9–16
SICOMP IMC – System Manual
J31069-D2001-U001-A0-7618
Software
System startup is specified in the RMCONF.C file where all necessary configuration calls are made.
Software configuration
Software configuration is also performed during system startup using calls of the
configuration library. This permits certain operating system tasks (e.g., error logger, debugger and resource reporter) to be initialized. In addition, the drivers and
units are installed (BYT and hard disk).
Task configuration
A task is always managed by two data structures – the TCD block (Task Control
Data) and the TCB block (dynamic Task Control Block).
Both structures are contained in a special header file (RMTYPES.H) where they
can be read. These data structures are set up during system startup.
Code area
TCD block
Information
on a task in the
“dormant”
state
Data area
Stack area
Register at runtime
TCB block
Dynamic
information
on the status of a
task during
runtime
Priority at start
Start parameters
Round robin counter
Current priority
Figure 9-7 Task configuration
Other specifications for configuration include the number of mailboxes, event flag
groups, semaphores and similar. These are set up by the SVC RmCreateOS.
SICOMP IMC – System Manual
J31069-D2001-U001-A0-7618
9–17
Software
Driver configuration
To adapt themselves to the hardware, each driver and unit data structure has a
parameter section whose size is specified by RMOS but whose contents pertain to
the specific driver. For example, port addresses or block types are initialized here.
See the product documentation for this information. The location of interrupt routines is also specified in the configuration.
9.3.5
Development Tools
Development of RMOS user software is performed on a PC with third-party compilers and tools. The tools from the CAD-UL company have been optimized for
RMOS3. These are cross tools which can be run under DOS and Windows 95.
The cross development system consists of the ANSI C Cross Optimizing Compiler,
the Structured Macro Cross Assembler, the Cross Linker and System Builder, and
the optional High-Level Language Remote Debugger. Within the system, all tools
use the Intel object model format OMF386 both for code and for symbol and debugging information.
All popular memory models have been implemented. This makes it easy for the
user to switch to CAD-UL tools.
CAD-UL CC386
The CC386 is a powerful C and C++ compiler. It generates ROM-capability protected mode code for the conventional memory models (i.e., FLAT, SMALL, COMPACT and LARGE). The compiler contains many settable optimization methods
regarding runtime and resource requirements as well as intrinsic functions (e.g., for
direct hardware access from C). This makes the CC386 particularly suitable for
real-time and embedded applications. It generates output in OMF format. Generation of Assembler output can also be set.
CAD-UL AS386 Structure Macro Cross Assembler
The CAD-UL AS386 is a cross assembler with extensive macro functionality and
control structures. It was developed as an assembler tool for programmers who
work close to the hardware. Provision of clearly organized listing files in addition to
cross reference capabilities and the symbol map make the CAD-UL AS386 a powerful cross development tool for program requirements close to the hardware.
9–18
SICOMP IMC – System Manual
J31069-D2001-U001-A0-7618
Software
CAD-UL LINK386
CAD-UL LINK386 links the input modules (linkable OMF386 format) to an output
module. One of the following formats can also be generated instead as the output
format – Intel linkable OMF386, loadable OMF386 or boot-loadable OMF386.
LINK386 provides the compiler and builder functionality of a tool. If desired, only
the compiler can be called to support incremental linking. This makes it possible to
generate applications for the RMOS3 operating system (LINK386) and embedded
systems.
The CAD-UL cross linker generates the Intel OMF386 object format for code, symbol and debugging information which means that existing in-circuit emulators can
continue to be used. Intel build files can be read in and processed without modification. This makes it easy to switch to CAD-UL tools.
CAD-UL XDB386 RMOS
XDB386 provides user support during debugging RMOS3 systems which were
created with CAD-UL CC386. Since it uses the breakpoint registers of the processor and breakpoints or watch-points can also be set on the ROM, real-time debugging can also be performed on code located on the ROM.
The XDB RMOS offers easy and effective testing of an RMOS system. XDB can
evaluate complex expressions (CAST operations are permitted). The dynamic call
hierarchy can be indicated. The local stack variables of any function in the call
hierarchy can even be indicated. Of course, functions such as indication and modification of variables, registers or memory contents, Single Step of programs and
so on are available.
9.4
9.4.1
Standard Software
SMP16-AKO
For auto-configuration of SMP16 boards, see chapter 11.
SICOMP IMC – System Manual
J31069-D2001-U001-A0-7618
9–19
Software
9.4.2
Board Support Packages (BSPs)
BSPs are add-on software packages for RMOS which contain a user interface to
the SICOMP IMC I/O boards or for SICOMP IMC compact computers. The BSPs
contain the specific hardware characteristics of a device. They provide an interface to RMOS user tasks. BSPs perform communication-related tasks (e.g., direct
hardware access, data consistency, data blocking, synchronization, and so on).
BSPs are hardware-related (i.e., a special RMOS board support package is available for every (intelligent) SICOMP IMC I/O board). The contents of the package
are listed below.
Menu-prompted installation program for the BSP
Interface driver
Hardware-specific utilities (e.g., positioning and location control software)
9.4.3
RMOS3-PLC
RMOS3-PLC is a software module with the function scope of a programmable controller. It can execute user programs in STEP5. In addition, STEP5 function
blocks can be programmed as high-level language blocks in C, and can be called
from STEP5.
Together with RMOS, RMOS3-PLC provides the following functions in a real-time
environment on a single CPU.
Control with STEP5 PLC programs
(command set almost like S5 CPU 944)
Visualization with standard software packages
Free programming in high-level language
9.4.4
Other
Additional software packages are available which handle tasks related to visualization, axis control, data processing and communication.
For additional information, see the applicable catalogs which can be obtained from
your Siemens office.
9–20
SICOMP IMC – System Manual
J31069-D2001-U001-A0-7618
Communication
10
Table of Contents
10.1
10.1.1
10.1.2
10.1.3
Introduction and System Design . . . . . . . . . . . . . . . . . . . . . . . . . . . . . . . . . . . 10-2
ISO Layer Model . . . . . . . . . . . . . . . . . . . . . . . . . . . . . . . . . . . . . . . . . . . . . . . . 10-6
TCP/IP Protocol . . . . . . . . . . . . . . . . . . . . . . . . . . . . . . . . . . . . . . . . . . . . . . . . . 10-8
HTTP Protocol . . . . . . . . . . . . . . . . . . . . . . . . . . . . . . . . . . . . . . . . . . . . . . . . . . 10-13
10.2
10.2.1
10.2.2
Industrial Ethernet . . . . . . . . . . . . . . . . . . . . . . . . . . . . . . . . . . . . . . . . . . . . . . . 10-14
Layout . . . . . . . . . . . . . . . . . . . . . . . . . . . . . . . . . . . . . . . . . . . . . . . . . . . . . . . . . 10-15
Industrial Ethernet Network Configurations . . . . . . . . . . . . . . . . . . . . . . . . . . 10-16
10.3
10.3.1
10.3.2
PROFIBUS . . . . . . . . . . . . . . . . . . . . . . . . . . . . . . . . . . . . . . . . . . . . . . . . . . . . . 10-17
Layout . . . . . . . . . . . . . . . . . . . . . . . . . . . . . . . . . . . . . . . . . . . . . . . . . . . . . . . . . 10-20
PROFIBUS Network Configurations . . . . . . . . . . . . . . . . . . . . . . . . . . . . . . . . 10-22
10.4
10.4.1
10.4.2
10.4.3
Controller Area Network (CAN) . . . . . . . . . . . . . . . . . . . . . . . . . . . . . . . . . . . .
Physical Structure . . . . . . . . . . . . . . . . . . . . . . . . . . . . . . . . . . . . . . . . . . . . . . .
Features of the Protocol . . . . . . . . . . . . . . . . . . . . . . . . . . . . . . . . . . . . . . . . . .
Summary . . . . . . . . . . . . . . . . . . . . . . . . . . . . . . . . . . . . . . . . . . . . . . . . . . . . . .
10.5
Remote Maintenance and Remote Diagnosis Via Internet . . . . . . . . . . . . . 10-27
SICOMP IMC – System Manual
J31069-D2001-U001-A0-7618
10-24
10-24
10-25
10-26
10–1
Communication
10.1
Introduction and System Design
Fully integrated automation
Fully integrated automation with SICOMP IMC means that all automation tasks can
be solved with a single, completely integrated and transparent system.
SICOMP IMC networks provide uniform communication from the control level
down to the field level. Openness to office networks via TCP/IP, integration of the
actuator and sensor level via CAN and the AS interface in the transparent communication environment are all ensured.
The entire automation task can be implemented on a fully integrated, uniform hardware and software platform. The user is totally flexible since products of other
manufacturers can also be linked to the open, standardized networks via standardized software interfaces (i.e., an open system).
The networks form the backbone of the entire automation solution. Familiar industrial standards open the system to all sides.
Industrial networks
Industrial Ethernet (IEEE 802.3)
The international standard for area and cell networks
PROFIBUS (EN 50 170)
The international standard for field and cell networks for a small number of stations
CAN (ISO 11 898)
The international standard for the actuator/sensor area for short distances
Special industrial conditions (e.g., electromagnetic fields of interference, corrosive
fluids and air, increased dirt or mechanical stress) place a high strain on network
components.
10–2
SICOMP IMC – System Manual
J31069-D2001-U001-A0-7618
Communication
SICOMP IMC products were especially developed for industrial use and are found
today in a wide variety of sectors. Some examples:
Automotive industry
Chemicals industry
Electrical industry
Power plant technology
Mechanical engineering
Food industry
Paper and printing industry
Traffic engineering
Water and waste water technology
SICOMP IMC offers the right network for complex communication tasks at all levels of automation.
The latest information from the factory floor reaches the office immediately, and the
office is able to modify manufacturing sequences without delays.
Industrial Ethernet
Industrial Ethernet is a powerful cell network based on the IEEE 802.3 standard
(ETHERNET).
This open communication network was especially designed for the economical
solution of demanding communication tasks in rugged industrial environments.
Key to its success are its impressive features such as speed (10 Mbit/sec), easy
expansion, openness, high availability, and worldwide use.
PROFIBUS
Valves, actuators and drives – the field area contains a wide variety of components. Many of these components are located far away from computers or controllers. An automation system must provide for all these factors. Decentral I/O devices are used for this purpose in the field area today.
This area requires powerful, open and rugged bus systems to ensure smooth communication while keeping cabling costs low. PROFIBUS is such a system.
In addition, PROFIBUS can be used to establish cell networks with a small number
of stations.
SICOMP IMC – System Manual
J31069-D2001-U001-A0-7618
10–3
Communication
CAN
Originally developed for the automotive industry, CAN is increasingly being used
today in automation applications. Extensive error handling and high effective
transmission speed make this network particularly suitable for use in geographically small, real-time systems.
Transmission mediums
Because requirements are so different, the cell and area network is also available
in two basically different models (i.e., in copper or glass fiber technology). Copper
is recommended when low cabling costs and easy expansion are desired.
A coaxial cable with additional shielding (triaxial cable) is used as the electrical
transmission medium which guarantees high interference immunity.
The industrial twisted-pair cabling system is ideal for structured cabling on the factory floor. Twisted-pair copper wires with double foil and braid shielding ensure
reliable data transmission. Easy installation, flexible expansion and stationary wiring using connection components are the outstanding characteristics of industrial
twisted-pair wiring.
However, if galvanic isolation and EMC protection are the important factors, glass
fiber wiring is the optimal technology. Never-outdated, fiber optic conductor cables
represent a transmission medium which is totally insensitive to electro-magnetic
interference. In addition, this type of cable is completely isolated from the potential. Absolutely no investment for expensive equipotential bonding is required.
10–4
SICOMP IMC – System Manual
J31069-D2001-U001-A0-7618
Communication
Criteria for selecting a network
Table 10-1
Criteria for selecting a network
Feature
Industrial Ethernet
Standard
Ethernet in acc. w.
IEEE 802.3
Access procedure
CSMA/CD
Transmission
speed
10 Mbit/sec
Transmission medium
Electrical network
Triaxial cable
Double shielded,
twisted-pair cable
Optical network
Max. number of
stations
Approx. network
size
Topology
Protocols
Applications/
area of use
PROFIBUS
PROFIBUS in acc. w. EN
50 170, volume 2, PROFIBUS
Token passing with lowerlevel master-slave
9.6 to 1500 kbit/sec (adjustable);
max. of 12 Mbit/sec
Electrical network
Shielded two-wire
cable
CAN
Specifications in acc. w.
DIN ISO 11 898
CSMA/CR
9.6 to 1000 kbit/sec
Shielded, twisted pair
cable
Optical network
Fiber optic conductor
(glass or plastic)
Fiber optic conductor
(glass)
1024
127
64 masters
Electrical network: 1.5 km
Electrical network: 9.6 km
Optical network: Up to
200 km
Optical network:
Up to 90 km
Cable length: 40 m to
max. of 1000 m
Line, tree, ring, star
MAP
Line, tree, ring, star
PROFIBUS-FMS
Line, tree, star
CAL
TF
PROFIBUS-DP
SDS
SEND/RECEIVE
SEND/RECEIVE
DeviceNet
S7 functions
Cell network
S7 functions
Networking of field devices (e.g., decentral I/O)
Networking of field devices
Link to PLC, PC, WS
Link to technical office
Networking via WAN
Cell networks with small
number of stations (typically up to 10 PLCs or
PCs)
Sensor/actuator bus systems
Mobile systems
Use also in intrinsically
safe areas
SICOMP IMC – System Manual
J31069-D2001-U001-A0-7618
10–5
Communication
10.1.1
ISO Layer Model
When data communication between programmable controllers takes place over a
bus system, it is important to define the transmission system and the access procedure. Other information must also be specified (e.g., on the establishment of the
connection). For this reason, the International Standardization Organization (i.e.,
ISO) defined a 7-layer model.
Table 10-2
Layer
7
ISO 7-layer model
Designation
Application layer
Function
Application functions
Features
Read/write
Start/stop
6
Presentation layer
Data presentation
5
Session layer
Synchronization
Communication control
4
Transport layer
Connection establishment
and disconnection
File transfer
Common language
Coordination of the connection (e.g, opening,
end)
Protected transmission of
raw information
Acknowledgments
3
Network layer
2
Data link layer
1
Physical layer
Segmentation
Addressing of other networks/network connections
Access procedures
Communication between
two networks
CRC check
Protected transmission
CSMA/CD token
Physical transmission
rights
Coaxial/triaxial cable
Fiber optic conductor cable
Industrial twisted pair
The declarations of the layers are called protocols. This model is divided into two
areas.
10–6
SICOMP IMC – System Manual
J31069-D2001-U001-A0-7618
Communication
Transport-oriented layers (1 to 4)
Layers 1, 2 and 4 are an absolute requirement for realistic, sufficient and reliable
communication.
Layer 1 specifies the physical conditions (e.g., current and voltage level among
others).
Layer 2 defines the access mechanism and addressing of the station (i.e., only one
station can send data via the bus at a time).
Layer 4 (i.e., the transport layer) ensures data security and consistency.
In addition to transport control, the transport layer handles tasks involving flow control, and blocking and acknowledgment. Connections (e.g., channels and communication relationships) are established to implement these functions.
User-oriented layers (5 to 7)
Session layer 5 (i.e., the communication control layer) handles the synchronization
of communication.
Layer 6 handles the coding of data in a common language.
Application layer 7 contains the user services (e.g., FMS).
SICOMP IMC – System Manual
J31069-D2001-U001-A0-7618
10–7
Communication
10.1.2
TCP/IP Protocol
The TCP/IP protocol is part of the Internet protocol family. It is the basis of the
increasingly popular worldwide Internet (i.e., a combination of many individual computer networks which began in the 1970s). Currently, several million computers
are connected in many thousands of networks under Internet. This was all first
made possible by the uniform TCP/IP protocol whose goal is connection of heterogeneous networks and independence from specific computers. The TCP/IP protocol is intended for levels three and four and does not affect OSI layers one and
two.
Web
FTP
Telnet
TCP
TFTP
UDP
7 Application layer
4 Transport layer
ICMP
IP
IGMP
3 Network layer
RARP
Hardware
control
BOOTP
2 Network layer
ARP
Transmission cable
1 Physical layer
Figure 10-1 Arrangement of TCP/IP in the layer model
The decisive advantage of this protocol is its simple implementation and the uncomplicated and quick standardization procedure. Its development follows two
simple rules.
Anyone can say anything
Nothing is official
The current guidelines are published in the RFC (i.e., Request For Comment).
These guidelines are divided into three phases (i.e., proposal, draft and finally international standard). The Internet Activities Board (IAB) decides which phase is
applicable. At the moment, approximately 2300 RFCs are open for view on the
Internet. They can be obtained from there via the Internet1).
1) Address: http://dxcoms.cern.ch/wwwcs/public/ip/internetdoc.html
10–8
SICOMP IMC – System Manual
J31069-D2001-U001-A0-7618
Communication
The Internet protocol family not only standardizes data transmission but also defines standard applications such as telnet, ftp and mail. This makes it easier
to work with different computers since the basic applications already exist.
The TCP/IP protocol is divided into two separate protocols – the Internet Protocol
(IP) and the Transmission Control Protocol (TCP).
The Internet Protokoll (IP)
Standardized in RFC 791, IP is the protocol of level three. It is responsible for the
connectionless data transmission in the network. The data are segmented into
so-called datagrams and sent to the network with destination and source address.
There the datagrams find their destination via various routers. There is no procedure to determine whether the data arrived safely, not to mention whether the destination computer is even part of the network. The security of the data transmission must be ensured at a higher level by other protocols.
Since the transmission is connectionless, any errors must be reported explicitly to
the sender. The ICMP (Internet Control Message Protocol) auxiliary protocol is
used for this purpose. The best known command from this protocol is the ping
command which can be used to determine whether a computer is present in the
network. A test packet is sent to the destination computer which must then react
with a response. If this occurs within a certain period of time (usually 20 msec),
the computer is reported as accessible. The ping command only includes level
three but not the higher levels.
Addressing
IP uses a 32-bit address which is divided into four octets of 8 bits each. The first
portion is a network address, and the second portion is a computer address. Addressing is globally valid (i.e., to prevent problems, each address in the world may
only exist once on the public Internet). Assignment of IP addresses is handled by
the Network Information Center in the USA2). If you are not connected to the public
Internet, you can select your addresses as desired.
There are three different classes of addressing. These classes specify how many
address bits the network number contains and how many address bits the computer number contains.
2) Address:
http://rs.internic.net
http://nic.ddn.mil
SICOMP IMC – System Manual
J31069-D2001-U001-A0-7618
10–9
Communication
Class A
0
Computer
Network
Class B
1
0
Network
Class C
1
1
Computer
0
Network
Computer
Figure 10-2 Classes of addressing
The classes are distinguished between by their initial bits. A class-A network only
uses the first seven bits to distinguish between the networks (i.e., only 126 class-A
networks exist worldwide but these can contain all 224 computers). Class-B networks can still address 65,536 different computers. A total of 16,384 class-B networks are possible. Class-C networks are the smallest networks. They can contain a maximum of 256 computers but can be addressed in very great numbers
(i.e., 221).
In addition, special Multicast addresses are reserved. These are identified by the
first bits 1110. Addresses with the bit sequence 1111 are reserved for future applications.
Originally, it was assumed that a 32-bit address area would be sufficient. However,
the enormous popularity of the Internet caught everyone by surprise. Already now,
class-A addresses are no longer available. Class-B addresses are only assigned
after rigorous examination. However, class-C addresses are easy to obtain. Currently, strong initiatives to expand this address area are making the rounds. The
draft with the greatest chance of success is called IPng (i.e., IP next generation).
It defines an address area of 16 octets.
IP addresses are noted in decimal format in groups of four. For example, a valid
IP address is 201.1.212.1. This is a class-C address. The initial number indicates
this since C-class networks are located in the area from 192 to 223. The last number specifies the computer in the network. In our example, this is the computer
with the address 1. The numbers 0 and 255 should not be used in the address
since they have special functions (e.g., zero is used for network addresses).
The ARP (i.e., Address Resolution Protocol) is used to announce IP addresses on
the Internet. This protocol can be used to assign a hardware address (MAC,
Ethernet address) to a known IP address and vice versa. A diskless client can use
a Broadcast message announcing its MAC address to fetch its IP address from
10–10
SICOMP IMC – System Manual
J31069-D2001-U001-A0-7618
Communication
another computer. Every computer in the network sets up a dynamic ARP table
containing the computer name, the MAC address and the path to the computer.
This table can be used to find the quickest route to the destination computer.
Subnet masks
Subnet masks are required for the further structuring of a network which has already received an address. Since routers must be able to recognize the different
subnetworks, part of the computer number is defined by the subnet mask as the
network number. The subnet mask helps to save on IP addresses since no new
addresses must be requested.
The subnet mask specifies which of the address bits represent a network number.
The subnet mask is created by converting the binary-format of the network bits to
the decimal value. Eight set network bits are the same as a subnet value of 255.
The example below illustrates this.
Class B
185.2.0.0
1
0
11101
00000010
Network
Class B
Subnet mask
255.255.255.0
1
0
11101
Computer
00000010
Network
Subnet
Computer
Figure 10-3 Subnet mask
Subnet mask 255.255.255.0 uses the first 24 bits as network bits (i.e., they represent the network address). 256 different subnetworks with 256 computers each
can be addressed in this way.
SICOMP IMC – System Manual
J31069-D2001-U001-A0-7618
10–11
Communication
31
0
Version
IHL
Type of service
Identification
Time to live
Total length
Flags
Protocol
Fragment offset
Header checksum
Source address
Destination address
Payload
Figure 10-4 IP data format
The header field of the IP data format contains the version of the header field, the
Internet header length (IHL), the QOS parameters and an identification code (segmentation aid), among others. With the exception of the absolute length, the position of the individual fragments is also specified. In addition to the source and destination address, the “time to live” value (TTL) is an important field in the header. It
specifies how long the datagram has to live. This is the maximum number of routers which the datagram can pass. Data which are only intended for the local network can have a low TTL value, while other data which are intended for a wider
circle require a higher value. This prevents the data from wandering around the
network endlessly when an error occurs. The protocol field identifies the protocol
of the higher level (e.g., TCP in our example). The header is protected by a 16-bit
checksum. The user data are transmitted in the payload field (i.e., the data of the
higher layers are inserted).
TCP protocol
In addition to the UDP protocol, the TCP protocol is the most used protocol of layer
4. Its primary task is to protect the data transmission of the IP layer. For the specifications of the TCP protocol, see RFC 793.
In contrast to the IP protocol, the TCP protocol is connection-oriented and handles
error monitoring and correction. When errors in the data are detected at the receiver, it requests the erroneous datagram again. This procedure is repeated until
the transmission is correct. Double datagrams are also detected and eliminated in
this way. A slow computer is able to slow down the data flow when it cannot keep
up with receipt. TCP numbers the individual datagrams in sequence and assembles them correctly again for the receiver. TCP permits several services to
use one connection simultaneously. This is achieved with a two-octet port number
which addresses the individual services. Fixed ports have been defined for standard applications.
10–12
SICOMP IMC – System Manual
J31069-D2001-U001-A0-7618
Communication
10.1.3
HTTP Protocol
In addition to TCP/IP, HTTP (i.e., Hyper Text Transfer Protocol) is one of the widest-used protocols of the Internet. HTTP was especially developed for the transmission of text, graphics, sound and video. On the Internet, it is used for communication between client and server. The client requires a browser for
communication. Microsoft and Netscape, for example, provide one free of charge.
Although HTTP has already been specified by the W3C (a standardization committee) in version 1.1, most browsers support version 1.0. More information on HTTP
is available from the Internet under http://w3c.org/Protocols/rfc1945/rfc1945.
Function principle
HTTP is a protocol without states (i.e., server and client do not store data on the
status of the connection).
Request
Response
Client
Server
Figure 10-5 Data communication with HTTP
The client sends a request to the server. The server evaluates this request, executes a certain function, and returns a response to the client.
SICOMP IMC – System Manual
J31069-D2001-U001-A0-7618
10–13
Communication
10.2
Industrial Ethernet
Cell network based on international standard IEEE 802.3 (Ethernet), designed
for industrial applications
Connection of automation systems with each other and with PCs and workstations for homogeneous and heterogeneous communication
Possible implementation of extensive open network solutions
High transmission performance
Various transmission mediums (e.g., triaxial cable, industrial twisted pair and
fiber optic conductors)
Industrial Ethernet is the industrial standard – tested and accepted around the
world.
Functions
Industrial Ethernet functions in accordance with the IEEE 802.3 standardized access procedure CSMA/CD (i.e., Carrier Sense Multiple Access with Collision
Detection).
Industrial Ethernet offers an extensive range of network components for electrical
and optical transmission technology.
Protocol profile
SEND/RECEIVE
The SEND/RECEIVE interface has been optimized for communication between
SICOMP IMC and S5 or S7 controllers.
TCP/IP (See chapter 10.1.2.)
Systems which can be connected
Communication interfaces are available for many terminals.
Table 10-3
Application areas of industrial Ethernet protocols
Protocol
Application Area
SEND/RECEIVE
S7 functions
TCP, IP
10–14
SICOMP IMC,
SIMATIC S5/S7, PC/PG, HMI
SICOMP IMC,
SIMATIC S7, PC/PG, HMI
SICOMP IMC,
SIMATIC S7, PC/PG, HMI
User Interface
Simple functionality
High functionality, optimized for
communication with SIMATIC S7
General communication
SICOMP IMC – System Manual
J31069-D2001-U001-A0-7618
Communication
PC/PG
PC/PG
SEND / RECEIVE
TCP/IP
SICOMP IMC
S7 functions
SICOMP IMC
SIMATIC S7
Figure 10-6 SIMATIC S7 migration with industrial Ethernet
Networking capabilities available worldwide
The ISO and TCP/IP protocols are available as transport protocols. The user interface for SEND/RECEIVE is not dependent on the transport protocol used. Use
of TCP/IP permits worldwide networking of industrial Ethernet via WAN (Wide Area
Network, examples: ISDN, X.25, ATM, and so on).
10.2.1
Layout
Electrical network
The electrical network can be set up with the classical bus structure with triaxial
cable as the transmission medium.
ELM (Electrical Link Modules) or ITP (Industrial Twisted Pair) offer supplements
and alternatives to conventional bus cabling for the connection of terminals. Inexpensive star-shaped networks can be set up in accordance with IEEE 802.3.
SICOMP IMC – System Manual
J31069-D2001-U001-A0-7618
10–15
Communication
Optical network
Optical industrial Ethernet can be set up in a linear, ring or start-shaped structure.
The structure is set up with OLMs (Optical Link Modules) and/or ASGE star couplers.
Fiber optic conductors are used as the transmission medium. Network configurations of up to 4.5 km are possible.
Mixed network
The electrical and optical networks can be mixed. The advantages and configuration capabilities of both types of networks can be utilized. By linking several networks with switches (e.g., MultiLAN switch MR 8-03), even greater distances can
be achieved (i.e., up to 42 km). A WAN link via the ISDN network is also possible.
10.2.2
Industrial Ethernet Network Configurations
Electrical Network
The electrical network consists of individual bus segments with a maximum segment length of 500 m each. Up to 100 bus couplers (transceivers) are connected
to one bus segment. If the length of the segment is not sufficient, additional segments can be added via repeaters.
ELMs (Electrical Link Modules) can be used to link bus stations (terminals) to the
bus system via industrial twisted pair cables.
Optical network
The optical network can be set up with a star, linear or ring structure. OLMs (Optical Link Modules) can be combined with the appropriate interface cards of a star
coupler.
The data packets received from a bus station (terminal) are distributed simultaneously to all other systems via the star coupler. The redundant optical ring structure increases the availability of a network since communication can be maintained
even after a fiber optic conductor breaks. Terminals can be directly connected to
the interface cards of the star coupler via the 727-1 stub line or industrial twisted
pair, or to the OLM via ITP.
The MINI OTDE optical bus coupler can be used if the optical network is to be implemented as far as possible up to the terminal.
Mixed network
The electrical and the optical networks can be mixed.
10–16
SICOMP IMC – System Manual
J31069-D2001-U001-A0-7618
Communication
10.3
PROFIBUS
PROFIBUS is the bus system for cell networks with a small number of stations
(typically ten). It is based on the European standard EN 50 170, volume 2, PROFIBUS.
By meeting these requirements, PROFIBUS ensures openness for connection of
the standardized components of other manufacturers.
PROFIBUS – the fieldbus standard for production and process automation – consists of the following.
Specification of the standards for the physical bus structure and access procedures (layers 1 and 2 of the ISO layer model)
Specification of the user protocol and the PROFIBUS-FMS user interface (layer
7) for communication between programmable controllers and field devices
PROFIBUS-DP for high-speed, cyclic data communication with field devices
PROFIBUS-PA for applications in process automation which are intrinsically
safe
PROFIBUS: Fully standardized and a good investment for the future
Worldwide, far more than 500 manufacturers offer a wide variety of products for
field use with suitable interface. Siemens itself offers a complete family of products including the required network components.
Table 10-4
Application areas for PROFIBUS protocols
Protocol
FMS
DP
SEND/RECEIVE
SICOMP IMC – System Manual
J31069-D2001-U001-A0-7618
Application
SICOMP IMC,
SIMATIC S5/S7, PG/PC, HMI
Intelligent binary and analog field
devices
SICOMP IMC,
SIMATIC S5/S7, PC/PG, HMI
User Interface
High functionality
Optimized for communication
with field devices
Simple functionality
10–17
Communication
PC/PG, HMI
PC/PG, HMI
FMS, DP
SIMATIC S5
SEND / RECEIVE
SICOMP IMC
SIMATIC S7
Figure 10-7 SICOMP IMC – SIMATIC link via PROFIBUS
PROFIBUS: The right network for every task
PROFIBUS permits both flexible network configurations and use under extremely
rugged industrial conditions. Profiles with various grades of performance have
proven to be very advantageous since they permit optimum adjustment at field and
cell levels.
A few examples:
PROFIBUS-FMS (Fieldbus Message Specification)
Ideal for communication between programmable controllers in cell networks
with a small number of stations
PROFIBUS-DP (Decentral Periphery)
This protocol profile for connection of decentralized I/O (e.g., SIMATIC ET 200)
offers very fast reaction times.
PROFIBUS-PA (Process Automation)
This powerful protocol profile is based on PROFIBUS-DP with intrinsically safe
transmission technology in accordance with international standard IEC 1158-2.
The SEND/RECEIVE interface has been optimized for communication between
SICOMP IMC and S5/S7 controllers.
A wide variety of devices are available to make implementation of PROFIBUS
quick and inexpensive for the user. For manufacturers of field devices, Siemens
offers ASICs for connection of the systems.
Thanks to the openness of PROFIBUS, standardized components of different
manufacturers can also be connected, of course. Configuration, commissioning
and trouble-shooting can be conveniently carried out from any point. This makes
the freely selectable communication relationships very flexible, simple to use in
actual practice and easy to change.
10–18
SICOMP IMC – System Manual
J31069-D2001-U001-A0-7618
Communication
Bus cables for PROFIBUS
See table 10-1.
Protocol profiles for all applications in the field area
Protocol profiles in accordance with EN 50 170, volume 2, PROFIBUS
PROFIBUS-FMS (Fieldbus Message Specification)
PROFIBUS-FMS is suitable for communication of programmable controllers
within small cell networks and for communication with field devices with FMS
interfaces.
PROFIBUS-DP (Decentral Periphery)
PROFIBUS-DP is the protocol profile for connection of decentralized I/O
(e.g., ET 200) with very fast reaction times.
PROFIBUS-PA (Process Automation)
PROFIBUS-PA is the communication-compatible expansion of PROFIBUS-DP
with a transmission technique which can be used in explosion-proof areas. The
transmission technique used by PROFIBUS-PA conforms to international
standard IEC 1158-2.
SEND/RECEIVE (FDL interface)
All protocol profiles can be used together on one cable (RS 485 or fiber optic conductor).
Possible connections
Simple cabling using electrical and optical transmission technology
Long distances can be implemented.
Possible connection of a wide variety of Siemens field devices, automation systems and systems of other manufacturers for implementation of small cell networks
Mixed use of programmable controllers and field devices possible
Table 10-5
Systems which can be connected to PROFIBUS
Automation systems
Systems Which Can Be Connected
SICOMP IMC
SIMATIC S5/S7/M7/C7
SIMATIC HMI operator control and monitoring devices or systems
SIMATIC PG/PC
SINUMERIK CNC controllers
MOBY identification systems
SICLIMAT COMPAS compact automation station
Field devices
SICOMP IMC – System Manual
J31069-D2001-U001-A0-7618
ET 200 decentral I/O system
10–19
Communication
Table 10-5
Systems which can be connected to PROFIBUS, continued
Systems Which Can Be Connected
Process control systems
SIPART industrial/process controller
TELEPERM M
SIMATIC PCS 7
Drive systems
SIWAREX
SIMODRIVE sensor
SIMOVERT master drives
SIMADYN digital control system
SIMOREG
Micro/midi master
Power reversal actuator/SIPOS actuating drives
Functions
The PROFIBUS access procedure is based on the token passing procedure with
subordinate master–slave in accordance with EN 50 170, volume 2, PROFIBUS.
A distinction is made between active and passive network stations.
Only active stations receive the token (i.e., sending rights which are passed from
one active station to the next within a specified period of time).
Failure of a station or addition of a new station is detected automatically. All stations in the network must be set to the same transmission speed.
10.3.1
Layout
PROFIBUS offers an extensive selection of network components for electrical and
optical transmission technologies.
Electrical network
As its transmission medium, the electrical network uses a shielded, twisted pair
cable. Since the RS 485 interface works with voltage differences, it is less sensitive to interference than a voltage or current interface. With PROFIBUS, the stations are connected to the bus via a bus terminal or a bus plug connector (maximum of 32 stations per segment). The individual segments are linked via
repeaters.
The transmission speed can be set in stages from 9.6 kbit/sec to 12 Mbit/sec in
accordance with PROFIBUS.
The maximum segment length depends on the transmission speed.
10–20
SICOMP IMC – System Manual
J31069-D2001-U001-A0-7618
Communication
PROFIBUS-PA electrical network
The PROFIBUS-PA transmission technology is based on IEC 1158-2. The transmission speed is 31.25 kbit/sec.
Optical network
The optical PROFIBUS network uses fiber optic conductors as its transmission
medium. The fiber optic conductor version is not sensitive to electro-magnetic interference and potential differences. It is suitable for long distances and uses fiber
optic conductors of either plastic or glass.
Transmission speeds between 9.6 kbit/sec and 12 Mbit/sec can be used. With the
optical PROFIBUS, the maximum segment length is not dependent on the transmission speed (exception: redundant optical rings).
Fiber optic conductor networks are set up with OLMs (Optical Link Modules) with
fiber optic conductors of glass or plastic. OLMs permit an optical network to be set
up with linear, ring and star structures. Simple plastic single-fiber rings can be implemented with OLPs (Optical Link Plugs).
Terminals are directly connected to OLMs or OLPs. Terminals are only connected
to OLPs with passive PROFIBUS stations (i.e., DP/FMS slaves). Single-fiber rings
(cost-optimized) or two-fiber rings (increased network availability) can be used for
the optical rings.
Mixed network
Structures of electrical and optical PROFIBUS networks can be mixed.
The transition between the two mediums is provided by the OLM. During communication between stations on the bus, there is no difference in electrical and optical
transmission technology. Up to 127 stations can be connected to one PROFIBUS
network.
SICOMP IMC – System Manual
J31069-D2001-U001-A0-7618
10–21
Communication
10.3.2
PROFIBUS Network Configurations
Electrical network
The electrical network can be configured with a linear or tree structure.
Features:
Physically and electrically high-quality bus cable
RS 485 transmission procedure (in acc. w. EIA)
Bus structure with bus terminals and bus connection plugs for connection of the
PROFIBUS stations
IEC 1158-2 transmission procedure for intrinsically safe areas
Bus structure with screw terminals, powering via the bus possible
Simple, uniform mounting and grounding
Simple installation
R
Ex
PROFIBUS–PA
SK
R
Ex
Intrinsically safe area
Bus connection
R
Terminating resistor
SK Segment coupler
RS 485 repeater
Figure 10-8 Electrical PROFIBUS network (linear and tree structure mixed)
10–22
SICOMP IMC – System Manual
J31069-D2001-U001-A0-7618
Communication
Optical network
The optical network is configured with OLMs (Optical Link Modules) in a linear, ring
or star structure. OLPs (Optical Link Plugs) are used to connect PROFIBUS slave
stations to OLMs for fiber optic conductors of plastic via an optical single-fiber ring.
Features:
Long distances
Cascading of OLMs or OLPs
Not sensitive to electro-magnetic interference
Galvanic isolation
Choice of fiber optic conductors of glass or plastic
Great adaptability to local conditions
High availability with redundant optical ring with OLMs
Inexpensive optical connection of PROFIBUS slaves via OLPs
Mixed network
The electrical PROFIBUS network can be mixed with the optical network so that
the advantages of both types of networks can be utilized.
OLP
OLP
O O
L L
M M
OLP
O
L
M
O
L
M
O
L
M
OLP
TwoTwo-wire cable
Bus connection plug
Fiber optic conductor with one fiber
Bus termination
Fiber optic conductor with two fibers
Figure 10-9 Network configuration combined from electrical and optical PROFIBUS network
SICOMP IMC – System Manual
J31069-D2001-U001-A0-7618
10–23
Communication
10.4
Controller Area Network (CAN)
Since CAN (Controller Area Network) was originally developed for the automotive
industry, the primary goals were reliability and low cost.
In the meantime, many of the big automotive manufacturers are using CAN networks or are preparing them. The association of US truck manufacturers has selected CAN as its fieldbus standard.
Several user associations have been founded in the field of automation. As the
umbrella organization for CAN, the CiA association (i.e., CAN in Automation) does
not just support CAN applications of classical automation technology. Presently,
the CiA association has approximately 150 members, including not only companies
but also other organizations which support CAN in special fields of use
(e.g., CANTUG as the CAN Textiles Users’ Group for textile machine manufacturers). Within these groups, various protocols of layer 7 have currently been standardized or included in standardization procedures.
10.4.1
Physical Structure
CAN uses linear architecture. Twisted pair cables with electric levels in accordance with ISO 11 898 or modified RS 485 standard cables are primarily used as
the transmission medium. This permits a maximum distance of 40 m at a maximum transfer speed of 1 Mbit/sec although, when the transmission speed is reduced to 50 kbit/sec, the network may have a length of up to 1000 m. Networks
based on fiber optic conductors play a subordinate role since the maximum network length is hardly increased by use of such networks.
10–24
SICOMP IMC – System Manual
J31069-D2001-U001-A0-7618
Communication
10.4.2
Features of the Protocol
CAN is a multi-master network in which messages of different priorities are transferred via Broadcasting. The arbitrating system is the key concept.
When the bus is free, any station can begin to send a message by sending the
telegram header. The header contains the identifier which is specifically assigned
to this message. The arbitration procedure concerns this identifier. During arbitration, recessive identifier bits (1) are overwritten by dominant identifier bits (0) of
another node which is attempting a bus access at the same time. Each sender
monitors the bus simultaneously and immediately switches from sending to receiving when it reads a dominant bit while sending a recessive bit. The sending node
with the highest identifier priority wins the arbitration (i.e., bus access rights). Its
message is sent without delay (i.e., arbitration is not destructive). After the arbitration is lost, another attempt to access the bus is automatically made.
ISO 11 898 only specifies CAN up to ISO/OSI layer 2. Messages including identifiers are exchanged between controller and application with this interface. The CAL
(CAN Application Layer) specification was prepared by CiA (CAN in Automation)
association as the first open specification of the application layer. In addition to a
wide variety of services for data communication, this specification contains service
groups for network management and identifier assignment. A profile family for industrial real-time applications consisting of communication and device profiles,
CANopen is based on CAL. For performance reasons, CANopen only uses one
subset of CAL, but provides the user with standardized interfaces for device communications.
In addition to CAL/CANopen, the layer-7 specifications of Allen-Bradley (DeviceNet) and Honeywell (SDS) play an important role in their respective market segments. DeviceNet enjoys strong popularity on the American market, while SDS
(Smart Distributed System) is primarily designed for sensor networking (I/O level).
Founded in April 1995 in the USA, ODVA (Open DeviceNet Vendor Association) is
also planning to develop device profiles.
SICOMP IMC – System Manual
J31069-D2001-U001-A0-7618
10–25
Communication
10.4.3
Summary
The CAN protocol permits efficient transmission of both digital input/output data
and data of higher communication (e.g., parameters). It offers extensive error handling and has a highly effective transmission speed (i.e., telegrams do not absolutely have to be poled by a logical master).
However, large real-time systems do place relatively high demands on configuration (e.g., identifier assignment) to ensure real-time capability. This can be avoided
by using the CANopen, DeviceNet and SDS protocol specifications which have just
become available.
Due to the decentral bus access regulation, CAN offers short reaction times although the data speed which can be achieved is very restricted when large networks are involved.
When carefully configured, CAN is partiqulary suitable for geographically small
real-time systems with distributed intelligence and high demands on reliability. In
addition, a wide variety of possible applications exists for systems in which the
special protocol features play an important role.
10–26
SICOMP IMC – System Manual
J31069-D2001-U001-A0-7618
Communication
10.5
Remote Maintenance and Remote Diagnosis Via Internet
Description
While we usually think of remote maintenance as the updating of software components, remote diagnosis offers the capability of scanning the internal states of a
system or a machine from a remote location. Using the capabilities provided by
the Internet and the Intranet, there are no restrictions whatsoever on the location of
the system with respect to function scope.
In the future SICOMP IMC will be offering an http server written in Java for the
RMOS operating system. This server will make it possible to provide customerspecific HTML pages over the Internet. It will also permit auto-configuration data
to be scanned and the information of the I/O boards to be accessed. Applets for
customer applications can also be downloaded from this server to an Internet
browser.
How it functions
Remote maintenance and diagnosis takes advantage of Internet technology. Both
are based on the client-server principle. This means that a provider (i.e., server)
can make data and services available which a customer (i.e., client) can call up. In
additional to normal functionality (e.g., login and data transfer), other demands are
placed on a server which supports remote maintenance and diagnosis. These requirements include access to process variables, processing of external interrupts
and the conclusion of a task which has crashed, for example.
Special programs (i.e., Java servlets) which handle these tasks are stored on the
server. A request from the customer (i.e., client) causes the server to call the related program. This creates a standardized document (HTML page, and so on)
which is sent to the customer via the Internet. The customer uses an Internet
browser as an application to evaluate the received document.
SICOMP IMC – System Manual
J31069-D2001-U001-A0-7618
10–27
Communication
Advantages
Remote maintenance and diagnosis of SICOMP IMC is available worldwide
through the Internet. This ensures quick and direct access to current process and
machine data even from inaccessible systems.
Platform-independent process visualizations via HTML pages or Java applets can
be easily created with standard tools (e.g., Frontpage and JDK). Access and presentation of this information is provided by standard Internet browsers
(e.g., Netscape and Internet Explorer) regardless of the location. No special programs are required for presentation of the information. This method permits quick
diagnosis (i.e., low standstill times for the systems). Similarly, you receive correct
and current system data for trouble-shooting. This cuts down travel time for service personnel.
Remote maintenance and remote diagnosis are under preparation.
10–28
SICOMP IMC – System Manual
J31069-D2001-U001-A0-7618
Commissioning, Testing and Debugging
11
Table of Contents
11.1
Commissioning . . . . . . . . . . . . . . . . . . . . . . . . . . . . . . . . . . . . . . . . . . . . . . . . .
11-2
11.2
Commissioning the Hardware . . . . . . . . . . . . . . . . . . . . . . . . . . . . . . . . . . . . .
11-2
11.3
11.3.1
11.3.2
11.3.3
Installing the Operating System . . . . . . . . . . . . . . . . . . . . . . . . . . . . . . . . . . .
RMOS . . . . . . . . . . . . . . . . . . . . . . . . . . . . . . . . . . . . . . . . . . . . . . . . . . . . . . . . .
MS-DOS . . . . . . . . . . . . . . . . . . . . . . . . . . . . . . . . . . . . . . . . . . . . . . . . . . . . . . .
Windows . . . . . . . . . . . . . . . . . . . . . . . . . . . . . . . . . . . . . . . . . . . . . . . . . . . . . . .
11-4
11-4
11-6
11-6
11.4
11.4.1
11.4.2
11.4.3
Parameterizing the Boards . . . . . . . . . . . . . . . . . . . . . . . . . . . . . . . . . . . . . . .
Software Settings . . . . . . . . . . . . . . . . . . . . . . . . . . . . . . . . . . . . . . . . . . . . . . .
Hardware Settings . . . . . . . . . . . . . . . . . . . . . . . . . . . . . . . . . . . . . . . . . . . . . . .
Testing the Set Boards . . . . . . . . . . . . . . . . . . . . . . . . . . . . . . . . . . . . . . . . . . .
11-6
11-7
11-8
11-8
11.5
11.5.1
11.5.2
Commissioning an Application . . . . . . . . . . . . . . . . . . . . . . . . . . . . . . . . . . . .
Generating New Applications . . . . . . . . . . . . . . . . . . . . . . . . . . . . . . . . . . . . .
System Expansions . . . . . . . . . . . . . . . . . . . . . . . . . . . . . . . . . . . . . . . . . . . . .
11-9
11-9
11-9
11.6
Test and Debugging under RMOS . . . . . . . . . . . . . . . . . . . . . . . . . . . . . . . . . 11-10
SICOMP IMC – System Manual
J31069-D2001-U001-A0-7618
11–1
Commissioning, Testing and Debugging
11.1
Commissioning
Commissioning a SICOMP IMC system involves the following general steps.
1. Commission the hardware
– Check voltage supply
– Check special wiring
– Install the boards
2. Install the operating system
Set up a software base for the actual application software
3. Parameterize the boards
The boards required for the application must be adjusted (i.e., address and type
of function) to the specific requirements.
4. Commission an application
The software required for the application must be tested in stages.
11.2
Commissioning the Hardware
Checking the voltage supply
After the physical components (e.g., system frame, bus backplanes, guide rails,
power supply and so on) have been assembled and wired, we recommend checking the voltages which are fed in.
Connect the complete power supply of the system (but no other boards) with the
bus backplane(s).
After the SICOMP IMC power supply/supplies is/are turned on and all LEDs on
their front plates go on, the system voltages can be checked with a voltage measuring instrument on the bus backplanes on the pins of the bus socket terminal
strips or the connections of the voltage supplies.
!
Caution
If one or more LEDs do not light up, the wiring of the system probably has a short
circuit.
If so, turn off the power supplies immediately to avoid damaging the system.
11–2
SICOMP IMC – System Manual
J31069-D2001-U001-A0-7618
Commissioning, Testing and Debugging
Checking the special wiring
In addition to visually checking all wrap connections and other extra wiring, we recommend performing a check with a continuity tester. For this, the power supply of
the entire system must be turned off to avoid a short circuit or false interpretation
during measurement.
Installing the boards
Before installing the boards in the SICOMP IMC system, we recommend performing the following steps.
Check the address areas occupied by the boards. Graphic representation of
the individual address areas and the location of the individual boards helps to
locate overlapping quickly.
Check the settings which have been made on the board with short-circuit jumpers, DIP switches or wrap connections.
!
Warning
Boards may only be installed or removed when the system frame is electrically
free of voltage.
The notes in the product documentation of the boards must be adhered to
(e.g., notes on ESD).
When installing the boards, proceed with extreme care.
The guide rails must be parallel to each other to prevent tension on the boards
in the system.
The boards must not be stuck in the front plates since this would prevent correct contact with the bus backplane.
The bottom of a board to be installed must not touch the electronic and mechanical components of the adjacent physical components (e.g., insertion in the
guide rails at an angle).
SICOMP IMC – System Manual
J31069-D2001-U001-A0-7618
11–3
Commissioning, Testing and Debugging
11.3
Installing the Operating System
Applications are usually based on a software platform which provides certain basic
functions (e.g., interface to input/output components and so on).
These basic functions may include the following, among others.
Interface to hard disk and floppy disk drive
Interface to input/output components
Graphical outputs and keyboard input
In general, this basic software is called the operating system.
SICOMP IMC offers three types of operating systems.
RMOS
Real-time operating system which ensures defined reaction times to external
events
MS-DOS
Windows
Graphics-oriented user environment in various versions
For information on using other operating systems, contact the particular manufacturer or distributor.
11.3.1
RMOS
To develop an application and create a customer-specific RMOS runtime system,
the required software must be installed on the generating system.
After the RMOS runtime system has been transferred to the target system, it can
be booted from there.
Generating system
The generation system may be any PC/AT platform with 7 Mbytes of free mass
memory space for the RMOS development environment and additional memory for
the compilers and their development environment.
The generation system must have MS-DOS (version 3.3 or later) and a floppy disk
drive to transfer the RMOS system to the target computer.
11–4
SICOMP IMC – System Manual
J31069-D2001-U001-A0-7618
Commissioning, Testing and Debugging
Table 11-1
Installation of the generation system
Development environment For installation of the development environment of RMOS on
of RMOS
the generation system, see the instructions of the RMOS
user’s manual.
Based on examples for the RMOS-PC1 and RMOS-DOS operating system versions, your own hardware adjustments and
system expansions can be performed.
A development tool from Intel or CAD-UL is required to generate a customer-specific operating system.
Compiler
Applications can also be created with a Borland C compiler.
For exact designations and versions, see the RMOS user’s
manual.
To install, proceed as described in the compiler manuals.
Board support packages
(BSPs)
BSPs can be used to adapt the RMOS operating system to
customer-specific requirements.
Each BSP contains sample generations for a standard operating system version with expansions for the hardware. This
makes it easy to reconstruct the expansion functions.
To install, proceed as described in the applicable product documentation.
SICOMP IMC target system
Initial installation of an RMOS runtime system on the target computer depends on
the version of the operating system desired.
Table 11-2
Initial installation of an RMOS runtime system
Operating System
Version
RMOS-DOS system
RMOS-PC1 system
Initial Installation of the Runtime System
The RMOS installation floppy disks contain a preconfigured
RMOS-DOS system.
This system is installed on the hard disk of the target system
with the selection menu of the installation floppy disks. After
the CPU is started again, the RMOS-DOS system is loaded
and started.
The RMOS installation floppy disks include a bootable floppy
disk with which a preconfigured RMOS-PC1 system can be
started. After a warm or cold start, the RMOS-PC1 system is
booted from the floppy disk.
Both operating system versions are standard systems and can be executed on a
SICOMP IMC system with a minimum layout (i.e., PC/AT-compatible CPU, graphics card, and HD and FD mass memory).
SICOMP IMC – System Manual
J31069-D2001-U001-A0-7618
11–5
Commissioning, Testing and Debugging
11.3.2
MS-DOS
Prerequisite for installation: A PC/AT-compatible CPU board with hard disk and
floppy disk drive. Both must be entered in BIOS Setup, and the hard disk must
also be partitioned.
The system is started with the first floppy disk. Follow the instructions of the installation menu.
11.3.3
Windows
Prerequisite for installation and use of one of the Windows versions: CPU board
which meets system requirements
11.4
Parameterizing the Boards
SICOMP IMC boards are delivered with default settings which ensure principal
functionality. Since these default settings only represent the basis of an application, they must be adjusted to the particular application.
Addressing the boards
The first adjustment concerns the type of addressing and the address area under
which a board is to be addressed.
To prevent incorrect or double addressing within the system, assignment of the
addresses and address areas should be performed with utmost care. Errors in
address assignment may cause errors in operation later on which can be very
time-consuming to correct.
We recommend setting up a graphic overview in which the address areas of the
individual boards are entered for the various types of addressing.
In addition, make sure that address mirroring (particularly by older SICOMP IMC
boards which are linked to the system) does not cause address overlapping.
The reason for this is that since older boards sometimes only decode 8 to 12 address lines, they can be addressed several times in the applicable address area.
11–6
SICOMP IMC – System Manual
J31069-D2001-U001-A0-7618
Commissioning, Testing and Debugging
Other settings
Other settings are board-related. See product documentation. Examples of additional settings are listed below.
Output/input voltage range of an A/D converter board
Interrupt source(s) used
Clock pulse frequency and scaling factors
Baud rate and data format
Types of settings
The following types of settings are used for SICOMP IMC boards.
Software settings
Auto-configuration of I/O boards and BIOS Setup of CPU boards
Hardware settings
Wrap connections and plug-in jumpers
11.4.1
Software Settings
Auto-configuration
With SMP16 boards equipped with the ASBIC chip, application-related settings are
performed with the SMP16-AKO auto-configuration software.
For the settings required to operate a board, see the product documentation.
BIOS Setup
Most of the settings required to operate a CPU board with a SICOMP IMC system
are performed in its BIOS Setup and stored on a CMOS RAM, safe from power
failures. For more information, see the product documentation of the CPU board.
SICOMP IMC – System Manual
J31069-D2001-U001-A0-7618
11–7
Commissioning, Testing and Debugging
11.4.2
Hardware Settings
Wrap connections and plug-in jumpers are used for the following purposes.
Settings on boards without auto-configuration capability (e.g., older
SICOMP IMC boards)
Settings which exceed auto-configuration capability (e.g., signal level adjustments for interface boards)
11.4.3
Testing the Set Boards
A special debugger for the operating system being used (e.g., DEBUG.EXE for
MS-DOS) can be used for test access to the SICOMP IMC boards.
The product documentation of a board describes the scope of read or write-accesses to the board (e.g., read status register, address dual-port RAM, address
indication LEDs, and so on).
The read or write accesses can be used to determine whether the addressed
board reacts.
To localize possible errors right at the beginning of a system test, each board
should first be tested separately. All boards should then be installed and tested
again in the same manner.
If a system without operator interface is being generated, a CPU which can perform a test interactively should be used for commissioning. This may already require special preparation at the system planning stage (e.g., empty slots for test
adapters or testing with hard disk, and so on).
11–8
SICOMP IMC – System Manual
J31069-D2001-U001-A0-7618
Commissioning, Testing and Debugging
11.5
11.5.1
Commissioning an Application
Generating New Applications
The development environment of RMOS provides a variety of sample applications
which can be used to test RMOS functions and even interfaces.
These sample applications can be used as the basis for customer applications.
Various testing strategies are described in the RMOS user’s manual.
11.5.2
System Expansions
Board support packages which provide customer-specific system expansions
(hardware and software) are available for a variety of SICOMP IMC boards.
These packages contain preconfigured examples of the generation of a standard
system with the appropriate system expansion (e.g., LAN card or PROFIBUS-DP
interface board).
We recommend using these sample systems to link the system expansion to the
customer system. This prevents programming errors and any wiring or hardware
errors can be located more easily. The sample applications included with the
board support packages are also helpful.
If you do not have a board support package, memory or input/output accesses
must be performed based on the type of board. During an initial function test, a
debugger (e.g., MS-DOS or RMOS Low Level Debugger) can be used to access
the board.
During commissioning, a terminal should also be used (connection to serial interface) so that you can view the error messages output by the operating system.
This is helpful when localizing the cause of an error.
In addition, all return values of the RMOS calls should be evaluated so that you
can detect faulty functions from the start.
SICOMP IMC – System Manual
J31069-D2001-U001-A0-7618
11–9
Commissioning, Testing and Debugging
11.6
Test and Debugging under RMOS
The following testing resources are available for testing RMOS user tasks and drivers.
High-level-language debugging
– High-level-language debugger XDB386 from the CAD-UL company
– Hardware emulator (ICE), operating-system-independent testing resource
Testing resources of the operating system
As a supplement to high-level-language debugging, the operating system offers
the following resources.
– RMOS debugger for low-level debugging at the Assembler level
– Resource reporter
– RMOS testing and error message facilities
RMOS low-level debugger
Sequence control (e.g., start) and status check of all tasks being run under
RMOS
Check and modification of memory contents
Setting breakpoints in user tasks
Check and modification of register contents of an interrupted task
Reloading tasks from mass memory or via serial interface
Resource reporter
The resource reporter is a task which supplements the debugger. The resource
reporter can be used to indicate inventories of RMOS data structures and resources on the monitor screen or to write this information to a data medium. It includes evaluations for tasks, device drivers, memory pools, semaphores, global
event flags, programs with monitored access, and mailboxes.
RMOS testing and error message facilities
RMOS has several testing and error message facilities which are active during the
entire runtime of an application. When the system boots, messages are output
after each important initialization procedure within the system. This provides the
first indication that a configuration is correct. RMOS can register all SVCs which
were issued without correct parameters with a message on a configurable terminal.
This message is separate from any error evaluation of the SVC in the coding of the
calling task.
11–10
SICOMP IMC – System Manual
J31069-D2001-U001-A0-7618
Environmental Requirements
12
Table of Contents
12.1
General Information . . . . . . . . . . . . . . . . . . . . . . . . . . . . . . . . . . . . . . . . . . . . .
12-2
12.2
Electrical Requirements . . . . . . . . . . . . . . . . . . . . . . . . . . . . . . . . . . . . . . . . . .
12-3
12.3
12.3.1
12.3.2
12.3.3
Electro-Magnetic Compatibility . . . . . . . . . . . . . . . . . . . . . . . . . . . . . . . . . . . .
Requirements . . . . . . . . . . . . . . . . . . . . . . . . . . . . . . . . . . . . . . . . . . . . . . . . . . .
Possible Sources of Interference . . . . . . . . . . . . . . . . . . . . . . . . . . . . . . . . . .
Measures for Suppression of Interference . . . . . . . . . . . . . . . . . . . . . . . . . .
12-4
12-4
12-5
12-5
12.4
Climatic Requirements . . . . . . . . . . . . . . . . . . . . . . . . . . . . . . . . . . . . . . . . . . . 12-15
12.5
Physical Requirements . . . . . . . . . . . . . . . . . . . . . . . . . . . . . . . . . . . . . . . . . . . 12-16
12.6
12.6.1
12.6.2
Electrical Safety . . . . . . . . . . . . . . . . . . . . . . . . . . . . . . . . . . . . . . . . . . . . . . . . . 12-17
Requirements at the System Level . . . . . . . . . . . . . . . . . . . . . . . . . . . . . . . . . 12-17
Notes on System Integration . . . . . . . . . . . . . . . . . . . . . . . . . . . . . . . . . . . . . . 12-19
12.7
EG Statement of Conformity . . . . . . . . . . . . . . . . . . . . . . . . . . . . . . . . . . . . . . 12-20
SICOMP IMC – System Manual
J31069-D2001-U001-A0-7618
12–1
Environmental Requirements
12.1
General Information
Adherence to the specifications in this chapter will be documented with a type test
during development of the product.
A product from a pilot lot or preliminary run will be checked for adherence to the
technical requirements contained in the specification requirements or the technical
specifications.
To ensure that products fulfill the particular tasks required, individual SICOMP IMC
boards are tested in a complete SICOMP IMC system typical for the application.
Ideally, this system consists of high-end CPUs, and additional digital and/or analog
components which handle indication, measuring or control tasks.
In addition, quality assurance measures included in serial production ensure
constant quality of the products.
However, this high standard of quality can only be utilized when the system or the
plant is set up in accordance with specifications. The system concept is particularly important. Information on this is primarily found in the following sections.
Make absolutely sure that these specifications are adhered to.
12.3.2 to 12.3.3 (electro-magnetic compatibility)
12.4 (climatic requirements)
12.6.2 (system integration and electrical safety)
12–2
SICOMP IMC – System Manual
J31069-D2001-U001-A0-7618
Environmental Requirements
12.2
Electrical Requirements
Alternating current supply
Table 12-1
Demands placed on the alternating current supply
Nominal voltage UN
(V)
Lower limit
(V)
Upper limit
(V)
Nominal frequency
(Hz)
Lower limit
(Hz)
Upper limit
(Hz)
120
230
85
170
132
264
50/60
50/60
47
47
63
63
Direct current supply
Table 12-2
Demands placed on the direct current supply
Nominal voltage
(V)
Lower limit, static
(average value, V)
Lower limit, dynamic 1)
(V)
Upper limit, static
(average value, V)
Upper limit, dynamic 1)
(V)
+24
+20.4
+18.5
+28.8
+30.2
1) In accordance with DIN 19 240
SICOMP IMC – System Manual
J31069-D2001-U001-A0-7618
12–3
Environmental Requirements
12.3
12.3.1
Electro-Magnetic Compatibility
Requirements
CE seal
Basis is the generic standards EN 50081-2 (1993) and EN 50082-2 (1995).
CE conformity in accordance with EMC guidelines 89/336/EWG exists when the
CE-related measures described in EG statements of conformity have been integrated.
Table 12-3
Test values for electro-magnetic compatibility
Specification
Interference immunity against discharge of static electricity (ESD)
Testing in Accordance with
EN 61000-4-2:1995
Discharge through the air
8 kV 1)
Discharge on contact
4 kV 1)
Interference immunity against fast transient interference (bursts)
EN 61000-4-4:1995
Power supply cables for 120/230 V AC
2 kV
Signal cables (input/output and bus cables)
2 kV 2)
Interference immunity against surge voltages 3)
Power supply cables for 120/230 V AC
Interference immunity against electro-magnetic fields 1)
Amplitude-modulated HF, 80 to 1000 MHz
Interference immunity against electro-magnetic fields 1)
Pulse-modulated HF, 900 MHz
Interference immunity against cable-conducted interference, induced
by high-frequency fields
0.15 to 80 MHz
Interference emission1)
EN 61000-4-5:1995
1 kV symmetric 4)
2 kV asymmetric 4)
ENV 50140:1993
10 V/m 5)
80% AM (1 kHz)
ENV 50204:1995
10 V/m 5)
50% ED, 200 Hz repetition
frequency
ENV 50141:1993
10 V 5)
80% AM (1 kHz)
Source impedance 150 Ω
EN 55022:1994
Emission via the field
Limit value class A
Interference emission via power cable
Limit value class A
1) Installed on SICOMP IMC system frame
2) Signal cables which are not used for process control (e.g., cables to external printers): 1 kV
3) The interference immunity on DC power cables and data/signal cables must be ensured by appropriate
external measures.
4) Only applies to components with 120/230 V power (e.g., power supply boards)
5) For permissible deviation of analog input and output variables during interference input, see EG statement
of conformity.
12–4
SICOMP IMC – System Manual
J31069-D2001-U001-A0-7618
Environmental Requirements
12.3.2
Possible Sources of Interference
When setting up interference-immune microcomputer systems, the interference
from the system itself and the interference outside the system and related interference suppression measures must be considered separately.
Interference from the system itself
This interference is caused when signal changes on internal cables affect adjacent
cables capacitively or inductively. Another source of interference is that signal
changes on the outputs of switching circuits are accompanied by very high peak
currents (among others) on the power supply cables to the switching circuits.
Interference outside the system
This interference can be caused by the following interference signals.
Interference signals which are brought in via the power supply cables and the
input and output cables. This interference is caused by switching procedures in
the power network, for example.
Interference signals which are generated when magnetic, electrical and electromagnetic fields are brought in through the air. This interference is caused by
radio systems and mobile telephones, for example.
12.3.3
Measures for Suppression of Interference
The following measures can be used to suppress the interference stated in
chapter 12.3.2.
a) Use of switching cabinets
b) Shielding of data and signal cables
c) Filtering of voltage supply cables
d) Separate power supplies for encoder and output components
e) Equipotential bonding and/or grounding
f) Use of galvanically isolated boards
g) Restriction of cable lengths
h) Shielding of the wiring
i) Cable installation
j) System frame layout
k) Protection against lightning strikes
l) Differential interfaces
SICOMP IMC – System Manual
J31069-D2001-U001-A0-7618
12–5
Environmental Requirements
a) Use of switching cabinets
AMS and SMP systems may only be operated in suitable industrial cabinets
(e.g., 8MC or 8MF) using shield retention rails. The switching cabinets must be
connected together with good conductivity. SMP16 systems are also suitable for
open layout (i.e., without switching cabinets). However, the system must have
good HF grounding. In addition, empty slots must be covered with dummy covers
and secured tightly with screws. For more details, see i) – “cable guides.”
b) Shielding of data and signal cables
Data and signal cables must be shielded. Regarding HF, the shields must be firmly
applied on both sides to the plug connector housing or to special shielding rails.
Meaning of shielding with regard to HF:
Large-surface, bare contact points
Keep HF braided tapes as short as possible. Do not use interconnecting wires.
Use metal cable clamps which encircle the cable shield.
Use only metallized or metal plug connector housings.
With equipotential bonding, make sure that no equalizing currents are flowing over
shields. Supplementary notes and information applicable especially to the respective boards are found in the EG statements of conformity. Adherence is imperative.
Note
Coaxial cables are not considered shielded cables. Triaxial cables must be used
for cables longer than 10 m.
Braided shields should be used instead of foil shields. When cables with foil shield
are used, the shield wire contact to the shield rail must be kept as short as possible (approximately 3 cm). The shield rail must be well connected (good conductivity) to the support brace, the cabinet’s housing and the central grounding point in
the cabinet.
Cable shields must be applied in the cabinet to a shield rail near the cable lead-in.
Braided shields must be secured to the shield rail over as large a surface as possible (e.g., with metal tube binders which encircle the shield or “PUK” cable
clamps).
Cable shields must be firmly applied (HF) in the sub D plug connector housings of
the board connection cable. Shield rails for analog signal cables can be insulated
and connected at a central point with reference potential or ground.
Power supply cables (power voltage or 24 V) do not require shielding.
12–6
SICOMP IMC – System Manual
J31069-D2001-U001-A0-7618
Environmental Requirements
Only the measures listed below may be used to shield analog signal cables.
For isolated operation (preferred use)
– Shield applied on both ends. Equipotential bonding conductor required parallel to the signal cable.
For non-isolated operation
– Shield galvanically applied on one side and open on the other end. However, shield must be continued as far as possible to the end of the cable.
– Shield galvanically applied on one side and capacitively on the other end
of the cable. Ensure voltage strength in accordance with IEC 1131-2
(500 V DC for UN < 50 V). See “isolation test” under chapter 12.6.1.
Adhere to the following for non-isolated operation.
– Galvanic application on one side
Galvanically on the side on which the reference potential (e.g., GND) is connected with the housing. If necessary, the best side of the system must be
determined.
– The length of the unshielded cable may not exceed 3 cm.
c) Filtering of voltage supply cables
Switching processes in the power network cause the power supply to be superimposed with interference voltages. The higher-frequency portions of this interference cannot even be suppressed by regulated power packs. Special power network filters are required which are positioned directly on the subrack (for smaller
systems) or at the point where power is fed into the cabinet.
No overvoltages may occur in the cabinet on the 24 V power cables and the signal
cables. The following measures are recommended to avoid overvoltage peaks.
Take measures against inductivity built into the same cabinet (e.g., with RC elements).
Fluorescent tubes should not be used to illuminate the cabinet since these may
interfere with the devices. LINESTRA or incandescent filament bulbs are better. If fluorescent tubes must be used, the following measures must be taken.
– Power network filter or shielded power network feeder cable
– Metal encapsulated switch
– Completely shielded cable
– Shielding mesh over the light in exceptional cases (e.g., close to the controller)
SICOMP IMC – System Manual
J31069-D2001-U001-A0-7618
12–7
Environmental Requirements
d) Separate power supplies for encoders and output components
The power supplies of encoders and output components must be provided with
fuses and their interference must be suppressed. The following figures provide
information on the procedures to follow depending on the location of the circuit
breakers or fuses.
Input ports
Output ports
PL
Front plug
connector cable
+24 V
+24 V
Reference rail
Cabinet
Figure 12-1 Power supply for encoders and control devices with the fuses and terminations
located outside the electronics cabinet
If a separate power supply is not provided for the encoders and control devices,
the supply voltage must be led out of the electronics cabinet via a feedthrough capacitor. Fuses must be provided depending on the cable used.
12–8
SICOMP IMC – System Manual
J31069-D2001-U001-A0-7618
Environmental Requirements
Input ports
Output ports
PL
Front plug
connector cabel
+24 V
+24 V
c
b
Reference rail
b
a
a
e
d
e
f
Figure 12-2 Power supply for encoders and control devices with the fuses and terminations
located inside the electronics cabinet
a Locate input and output terminals or connections near the reference rail.
b Route 24 V DC to power the circuit breakers to the reference rail via leadthrough capacitor.
c Separate cabinet area in which the circuit breakers and “terminals” are located from the electronics system (e.g., with a punched plate).
d Connect separation plate with reference rail.
e Shield external cables depending on their length and ground on both sides.
f When unshielded external cables are used, at least one grounding cable must be provided.
SICOMP IMC – System Manual
J31069-D2001-U001-A0-7618
12–9
Environmental Requirements
e) Equipotential bonding and/or grounding
When SICOMP IMC is used on machines or in industrial systems, a grounded reference potential must be used. With extensive systems, ground fault monitoring
may make it necessary to leave the reference potential ungrounded (e.g., in the
chemicals industry or for power plants).
SICOMP IMC systems do not have an internal low-ohmic connection between the
housing (system frame) and reference potential (0 V). If required, this must be
established from the outside. Remember that certain I/O devices (e.g., monitors,
printers, PCs and SIMATIC controllers) may create such connections.
When several such I/O devices are used, unacceptably high equipotential bonding
currents may be created which must be led off via an equipotential bonding cable
(minimum cross section 10 mm2). This also applies when shielded devices have
been connected to different site grounding points with potential differences.
A low-ohmic equipotential bonding cable is required for two-sided grounding of the
cable shields of the digital signal cables which provides particularly good deflection
of high-frequency interference. Their resistance may not exceed approximately
10% of the shield braiding resistance. For analog signals, see section b – “Shielding of data and signal cables.”
To establish a conductive connection, the system frames must be secured to the
support braces over a large surface (good conductivity) using toothed contact
washers. The support braces must also be connected to the cabinet housing over
a large surface (good conductivity). If the devices are mounted on a wall, the device housing must be connected to the grounding potential (e.g., protective conductor rail) with a minimum cross section of 10 mm2.
f) Use of galvanically isolated boards
Use of galvanically isolated boards is preferred for SICOMP IMC systems.
12–10
SICOMP IMC – System Manual
J31069-D2001-U001-A0-7618
Environmental Requirements
g) Restriction of cable lengths
To limit the effects of interference, the cables should be kept as short as possible.
The lengths specified below may not be exceeded.
Table 12-4
Permissible cable lengths for digital signal cables when installed in a common cable
Type of Signal
Cable Length,
Cable Length,
Unshielded
Shielded
Outputs
400 m
1000 m
Inputs, 24 V DC
Inputs, 200 V AC
600 m
600 m
1000 m
1000 m
Table 12-5
Permissible cable lengths for analog signal cables when installed in a common cable
Type of Signal
Cable Length,
Permissible Difference
Shielded
in Potential
For UE = 50 mV
50 m
1.0 V
For UE = 500 mV
200 m
1.0 V
Note
For information on the required minimum cross section of signal cables and other
specifications, see the product documentation of the boards.
h) Shielding of the wiring
The relatively low supply voltage and the high speed of modern integrated circuits
make it necessary to protect the wiring between the boards from interference of
high-current cables. When smaller systems are involved, the wiring can be
shielded with a wiring shield plate (shielding hood) mounted directly on the subrack
via the bus backplane. When larger systems are involved, the cabinet in which the
subracks are installed can be used to shield the wiring.
SICOMP IMC system frames provide full shielding in conformance with EMC requirements.
SICOMP IMC – System Manual
J31069-D2001-U001-A0-7618
12–11
Environmental Requirements
i) Cable Installation
Signal and data cables must always be installed with shielded cables separately
from power supply cables and control cables of contactors, frequency converters
and control units. Separate cable ducts should be used whenever possible (minimum of 10 cm separation).
There should always be space between control current circuits and load current
circuits. In addition, analog signal cables should not be installed in the vicinity of
sources of interference (e.g., transformers, inverters, motors, contactors, high-voltage cables, and so on) and should be kept as short as possible.
Interference within the system itself is primarily caused by capacitive cross feed
(i.e., it depends on the strength of the capacitive coupling). Capacitive coupling
can be affected by the length of parallel cables, the distance of the cables from
each other and the use of large-surface grounding systems (e.g., in the wiring
field).
We recommend using divider plates to separate the portion of the cabinet in which
the inductivities (e.g., transformers and contactors in particular) are mounted.
Additional measures are required to ensure protection against dangerous body currents and protection against indirect touching.
The cabinet must be connected with a protective conductor (10 mm2) to the protective conductor of the power distribution to which the 230 V AC power supplies of
the devices are connected in the cabinet.
With the 24 V DC power supply, the device must be connected with the central
grounding point or with the protective conductor of the power distribution
(10 mm2). The protective conductor of the feeder cables must be connected individually to the protective conductor terminal. Several adjacent cabinets must be
connected with each other with screw-type connections which provide good conductivity, or a protective conductor (10 mm2) must be connected to each cabinet.
The measures described above will ensure that the cabinet and the resources
installed there are included in a protective measure against dangerous body currents (i.e., protection against indirect touching).
Cables installed outside the cabinet
!
12–12
Warning
Signal cables must be separated from high-voltage cables exceeding 500 V AC by
a distance of at least 10 cm and from high-voltage cables exceeding 1 kV AC by a
distance of 30 cm.
SICOMP IMC – System Manual
J31069-D2001-U001-A0-7618
Environmental Requirements
j) System frame layout
The subrack of smaller systems is set up so that it can also handle the shielding of
external interference signals. It is equipped with upper and lower tier shield plates
and a wiring shield plate over the wiring field so that an external shield is created.
The construction of the system frames of the SICOMP IMC product family are the
same as that of the ES902C layout system. With the exception of the visual alignments of the front plates, all parts are surface-treated and electrically conductive.
Use of wiring and tier shield plates and shielding plates on the back ensures a layout which is immune to interference. Use of metal front plates ensures reliable
shielding of the front.
k) Protection against lightning strikes
When cables and lines are installed for systems outside buildings, shielded cables
must always be used. The shield must be able to carry current and be connected
on both sides to ground. Double shielded cables must be used for analog signal
cables, and the inner shield may only be grounded on one side. See chapter
12.3.3, section b, “shielding of data and signal cables.”
In addition, the signal cables must be circuited with protective elements against
overvoltages (e.g., varistors and overvoltage conductors filled with nonflammable
gas) which must be installed at the point the cable enters the building (if at all possible) or the cabinet (at the latest).
Multiple-stage measures are listed below.
Basic protection
Medium protection
Fine protection
A complete lightning protection concept must be individually prepared after careful
analysis of the plant.
SICOMP IMC – System Manual
J31069-D2001-U001-A0-7618
12–13
Environmental Requirements
l) Differential interfaces for analog signal cables
A differential interface must be selected for the analog connections if the effects of
fault voltages created by asymmetric reverse currents are to be eliminated.
U1
U2
Figure 12-3 Differential interfaces of signal cables
Twisting the signal cables also reduces the effects of interference.
Note
If only a single-ended interface is possible, each analog signal cable must be assigned its own reference line.
For permissible potential difference, see chapter 12.3.3, section g, “restriction of
cable lengths.”
Differential interfaces for digital signal cables
With digital signal cables (e.g., RS 485), the differential interface with twisted signal
cables should be used instead of other interfaces.
For permissible potential difference, see chapter 12.3.3, section g, “restriction of
cable lengths.”
12–14
SICOMP IMC – System Manual
J31069-D2001-U001-A0-7618
Environmental Requirements
12.4
Climatic Requirements
Requirements
This chapter covers the climatic requirements for operation, transportation and
storage of the boards of the SICOMP IMC product family. Requirements are specified for standard products.
Table 12-6
Climatic requirements for standard SICOMP IMC products
Factor
Operation
Transportation and
Storage
–40° C to 70° C
10% to 90%
Ambient temperature
Relative humidity
0° C to 55° C
10% to 90%
Permissible air pressure
Permissible temperature fluctuation
795 hPa to 1080 hPa 1)
660 hPa to 1080 hPa
0.5 K/min, no condensation
(but not to exceed 10 K in 30 minutes)
1) At higher altitudes (i.e., > 2000 m), reduced ventilation may make it necessary to reduce the
maximum operating temperature and use a fan.
Ventilation
When in operation, electronic components convert part of the power fed to them
into heat which must then be dispersed. Depending on the type, number and
installation density of the components, power loss may be substantial.
To dissipate this heat surrounding the housing and cabinet, the following requirements must be met.
Free space of at least 5 cm below and above a system frame or fan module
If the permissible ambient temperature cannot be maintained with free convection, forced ventilation must be used.
Air throughput of at least 3 x 75 m3/h per system frame with 21 slots
Air current from bottom to top
SICOMP IMC – System Manual
J31069-D2001-U001-A0-7618
12–15
Environmental Requirements
12.5
Physical Requirements
This chapter lists the physical environmental requirements for operation, transportation and storage of SMP16, AMS and PMC boards. The requirements are
specified for standard products.
Table 12-7
Physical requirements for devices and boards without mass memory
Factor
Oscillation stress in acc. w. DIN
IEC 68-2-6
Shock stress in acc. w. DIN IEC
68-2-27
Operation
Fc test, 20 cycles on 3 axes:
Transportation and Storage
10 cycles on 3 axes:
10 to 61 Hz: 0.2 mm amplitude
5 to 9 Hz: 3.5 mm amplitude
61 to 500 Hz: 19.6 m/s2
Ea test, half-sine, 3 each per axis
in both directions:
9 to 500 Hz: 9.8 m/s2
300 m/s2, 11 msec
Shock stress in acc. w. DIN IEC
68-2-29
Half-sine, 1000 shocks per axis:
250 m/s2, 6 msec
Requirements on devices and boards with mass memory depend on the drives
being used. For details, see the product documentation.
12–16
SICOMP IMC – System Manual
J31069-D2001-U001-A0-7618
Environmental Requirements
12.6
12.6.1
Table 12-8
Electrical Safety
Requirements at the System Level
Requirements for the components of a system
Factor
Requirement
VDE 0106, part 1 (IEC 536)
Protection against foreign bodes
and water in acc. w. EN 60 529
Protection class I, with protective
conductor
Protection against foreign bodes:
IP 2X
Validity
For boards with power supplies
When installed
Protection against water: IP X0
Protection against foreign bodes:
IP 1X
Board level
Protection against water: IP X0
Air and creepage paths
in acc. w. IEC 1131
Overvoltage category II
Overvoltage category III
Isolation test
in acc. w. IEC 1131-2
Degree of soil 2
PCB material III a
500 V DC
1.2 x (2UN + 1000 V) x 1.414 DC
Fire resistance for open-type
controllers
in acc. w. IEC 1131-2
At least UL94 HB
For boards with nominal voltages
up to max. of 50 V
For boards with nominal voltages
starting at 50 V
For all boards
For boards with nominal voltages
up to max. of 50 V
For boards with nominal voltages
starting at 50 V
For housing parts
At least UL94 V-2
Manufacturing material
in acc. w. SN 36350
For holders for voltage carrying
parts
At least UL94 V-1
For PCB material
Environmentally compatible disposal of used devices
Avoidance of environmentally endangering substances and materials
Increased repairs due to easy disassembly
No materials emitting silicon or teflon
SICOMP IMC – System Manual
J31069-D2001-U001-A0-7618
12–17
Environmental Requirements
CE seal
The CE seal is based on the harmonized European standard EN 60950. CE conformance in accordance with guidelines (73/23/EWG) on low voltages exists if the
notes included in the appropriate EG statements of conformity have been adhered
to.
Note
The CE seal (guidelines 73/23/EWG on low voltages) is only required for boards
which are operated with a nominal supply voltage of more than 50 V DC or
75 V AC (e.g., system frames and power supplies). However, all boards must always meet the required safety standards applicable to today’s state of technology.
12–18
SICOMP IMC – System Manual
J31069-D2001-U001-A0-7618
Environmental Requirements
12.6.2
Notes on System Integration
Although at least the same requirements must be met as for the system level, adherence to additional guidelines may also be necessary (e.g., guidelines
89/392/EWG on machines). Additional standards may also have to be adhered to.
However, such standards can only be determined in individual cases and must be
considered when planning the system.
Safety measures when configuring systems
When configuring microcomputer board systems, the dame VDE regulations must
be adhered to as for safety controllers (e.g., VDE 0100 and VDE 0113). This includes the following measures which are particularly important to the prevention of
danger.
Dangerous states during which persons can be endangered or machines and
material can be damaged, must be prevented.
After return of power or release of the emergency-off facility, machines may not
be permitted to start up automatically again.
When the programmable controller malfunctions, commands of the emergencyoff facilities and fuse buttons must always remain active. These protective facilities must take direct effect on the control devices in the power pack.
When the emergency-off facility is activated, a state must be ensured during
which persons and systems are not endangered.
– Control devices and drives which can create dangerous states (e.g., main
spindle drives of machine tools) must be turned off.
– In contrast, control devices and drives which, when switched off, can endanger persons or systems (e.g., work holding fixtures) may not be permitted to
be switched off by the emergency-off facility.
Activation of the emergency-off facility must also be recorded by the programmable controller and evaluated by the user program.
Safety functions of SICOMP IMC products
Some SICOMP IMC products are equipped with special safety functions.
Voltage monitoring
Battery backup for powering real-time clocks and CMOS RAMs
Watchdog for monitoring program processing
Keyboard lock
Password protection
Temperature check
SICOMP IMC – System Manual
J31069-D2001-U001-A0-7618
12–19
Environmental Requirements
12.7
EG Statement of Conformity
The EG council has decided that industrial products covered by the technical
harmonization guidelines may not be sold until the manufacturer has affixed the
CE seal to them.
The CE seal must be accompanied by an EG statement of conformity signed by a
legally authorized person.
The EG statement of conformity for SICOMP IMC products usually consists of
three parts.
1. Cover sheet with specification of manufacturer, product designation, applicable
EG guidelines and legally binding signatures
2. Appendix to the EG statement of conformity with specification of the harmonized European standards used. In addition, it contains a list of the boards to
which the statement applies.
3. Notes on the CE seal of SICOMP IMC. This part includes special notes on application area and installation and setup guidelines. Information and test values
for electro-magnetic compatibility are also found here. CE conformity requires
that these notes be adhered to.
The summarized EG statements of conformity for SICOMP IMC product groups
can be obtained from your local Siemens office.
12–20
SICOMP IMC – System Manual
J31069-D2001-U001-A0-7618
Service/System Consulting/Training
13
Table of Contents
13.1
Service . . . . . . . . . . . . . . . . . . . . . . . . . . . . . . . . . . . . . . . . . . . . . . . . . . . . . . . .
13-2
13.2
13.2.1
13.2.2
13.2.3
13.2.4
13.2.5
13.2.6
13.2.7
Replacement Parts and Repairs . . . . . . . . . . . . . . . . . . . . . . . . . . . . . . . . . . .
Replacement Parts and Repair Service . . . . . . . . . . . . . . . . . . . . . . . . . . . . .
Delivery Dates for Replacement Parts Service . . . . . . . . . . . . . . . . . . . . . .
Delivery Dates for Repair Service (“Naemlichkeit” Repairs) . . . . . . . . . . . .
Delivery Releases . . . . . . . . . . . . . . . . . . . . . . . . . . . . . . . . . . . . . . . . . . . . . . .
Handling . . . . . . . . . . . . . . . . . . . . . . . . . . . . . . . . . . . . . . . . . . . . . . . . . . . . . . .
Warranty Times . . . . . . . . . . . . . . . . . . . . . . . . . . . . . . . . . . . . . . . . . . . . . . . . .
Packing . . . . . . . . . . . . . . . . . . . . . . . . . . . . . . . . . . . . . . . . . . . . . . . . . . . . . . . .
13-4
13-4
13-5
13-6
13-6
13-7
13-9
13-9
13.3
Export Regulations . . . . . . . . . . . . . . . . . . . . . . . . . . . . . . . . . . . . . . . . . . . . . . 13-10
13.4
Training Service . . . . . . . . . . . . . . . . . . . . . . . . . . . . . . . . . . . . . . . . . . . . . . . . . 13-11
SICOMP IMC – System Manual
J31069-D2001-U001-A0-7618
13–1
Service/System Consulting/Training
13.1
Service
The following services are available.
Consulting service
Support service
Replacement parts service
Applications service
Training service
Consulting and support are provided free of charge for SICOMP IMC products.
The other services are available on request and are invoiced at a flat rate or based
on time and cost. Services invoiced by time and cost are performed during your
region’s regular working hours with start of work at a conventional time.
Your contact partners for services are the sales representatives and specialized
consultants of VReg or LG.
Consulting service
Includes all questions on the subject of automation technology
Support service
Hotline: Central point for customer service by telephone
Applications support: Service during project implementation
Documentation: Requests for technical descriptions and manuals
Replacement parts service
Fast service: Storage and quick delivery of replacement parts
Fast service: “Naemlichkeit” repairs (fast service and emergency service)
Handling of returns: Reliable procedure for handling returns
Applications service
Consulting: Support during configuration
Application support during design-in
13–2
SICOMP IMC – System Manual
J31069-D2001-U001-A0-7618
Service/System Consulting/Training
Training service
Customer training: Training for service (also possible on site)
Presentations: Seminars with presentation of new products and solutions
Workshops: Training with special exercises (also customer-specific)
SICOMP IMC on the Internet
Current product support data of SICOMP IMC support are available on the Internet
under the following address.
http://www.ad.siemens.de/sicomp
Questions and answers
Tips and tricks
User information
Downloads
SICOMP IMC hotline
The hotline for the SICOMP IMC product family is available under the following
numbers Monday to Friday from 8:00 AM to 5:00 PM.
Telephone: (++49)911/750-2727
Telefax: (++49)911/750-4888
E-mail: [email protected]
Service manuals
Special service manuals are not available for SICOMP IMC. You will find the information required for service in the product documentations.
SICOMP IMC – System Manual
J31069-D2001-U001-A0-7618
13–3
Service/System Consulting/Training
13.2
Replacement Parts and Repairs
The repair procedure described below applies to SICOMP IMC products from the
catalogs of the “combination technology” division.
Returns covered by or not covered by the warranties are always handled in the
same way. If the customer was not at fault, returns covered by the warranty are
handled free of charge. Additional charges for immediate and AZS1) repairs are
always invoiced.
13.2.1
Replacement Parts and Repair Service
Two different services are always available.
Replacement parts service
A board is delivered with the current release status using replacement parts.
Repair service
Repairs are handled as “Naemlichkeit” repairs. If repairable, the same board is
returned to you.
The column labeled “Repair Identifier” in the price lists shows which service can be
used.
Repair Identifier
R1, R4
Meaning
Board can be repaired.
Replacement via replacement parts service possible
Repair flat rates based on table
R0
Board can be repaired.
Replacement via replacement parts service not possible
N
Repair only as “Naemlichkeit”
Board cannot be repaired (e.g., bus backplanes).
Replacement via replacement parts service not possible
1) Pickup and delivery service
13–4
SICOMP IMC – System Manual
J31069-D2001-U001-A0-7618
Service/System Consulting/Training
13.2.2
Delivery Dates for Replacement Parts Service
The flat rate for repairs is invoiced at the amount shown in the table plus any additional charges.
System standstill (highest priority)
When the order arrives at your Siemens office by 3:00 PM, the replacement parts
ordered are returned to the delivery point on the next working day following the
date of ordering.
Orders received after 3:00 PM are accepted under the following telefax number.
(++49)911/750-2299
Orders received after normal working hours (i.e., Monday to Friday after 6:00 PM,
and Saturday and Sunday) are accepted under the following telefax number with
the remark “system standstill.”
(++49)911/750-2585
The delivery point is for:
Germany and EU
Customer as per delivery address or Siemens office
Other countries
Responsible customs office
An additional fee of 5% of the list price is charged for use of fast service.
Note
Occasionally it may happen that a replacement part cannot be delivered despite all
efforts. In such cases, the customer is informed immediately and, if desired, can
have an immediate or AZS repair made.
It is very important that the “system standstill” urgency label remains reserved for
actual emergencies. Misuse puts a great strain on the replacement parts service.
Zero inventory filling (next highest priority)
Delivery is made within five working days of the order’s receipt.
Normal order for replacement parts (next highest priority)
Delivery of small quantities (one or two pieces) is made within five working days of
the order’s receipt.
SICOMP IMC – System Manual
J31069-D2001-U001-A0-7618
13–5
Service/System Consulting/Training
13.2.3
Delivery Dates for Repair Service (“Naemlichkeit” Repairs)
The repair flat rate is invoiced in accordance with the table plus applicable extra
fees.
Normal repairs
The boards are repaired within a period of ten working days after receipt at the
plant.
Fast repairs
The boards are repaired within a period of five working days after receipt at the
plant.
Immediate repairs
Immediate repairs are divided into three classes of urgency.
The boards are repaired after service confirmation within a period of 48, 24 or 8
working hours after receipt at the plant.
AZS repairs (pickup and delivery service)
The boards are repaired after service confirmation within a period of 8 working
hours after receipt at the plant.
Note
Immediate and AZS repairs must be handled by your Siemens office.
13.2.4
Delivery Releases
Replacement parts
It is ensured that a functionally compatible construction release is delivered. The
replacement parts warehouse carries the current construction release. The “Product Description” column of the price list indicates which other construction releases
are compatible with the latest release.
Construction releases which are not listed and construction releases listed with
additional letters (e.g., 2A, 2C and so on) cannot be replaced. They must be
handled as “Naemlichkeit” repairs.
13–6
SICOMP IMC – System Manual
J31069-D2001-U001-A0-7618
Service/System Consulting/Training
Since special customer boards are not carried by the replacement parts warehouse, they are not available for the replacement parts service.
Repairs
If technically possible, the board is upgraded to the current construction release.
Otherwise, an upgrade is made to a release which is functionally identical to the
current construction release. The construction release is given an extra letter
(e.g., 3A).
Note
The board is always returned with a default presetting (i.e., customer-specific settings are not restored).
13.2.5
Handling
Replacement parts
Table 13-1
Step
1
Handling of the replacement parts procedure
The customer submits a replacement parts order to his/her Siemens office
(via telefax or undocumented) and provides the following information.
–
Customer order identifier
–
Urgency
–
Product designation (exact specifications, construction release)
–
Amount
–
Delivery address
–
Type of shipping
–
Warranty claim
2
The Siemens office issues an order identifier (AKZ).
3
The replacement part is delivered within the applicable delivery time based
on the degree of urgency.
SICOMP IMC – System Manual
J31069-D2001-U001-A0-7618
13–7
Service/System Consulting/Training
4
The customer sends the defective part with the remark “replacement already
delivered with delivery slip number ... dated ...” and a description of the malfunction within four weeks to the address for returns and “naemlichkeit” repairs.
Siemens AG
A&D SE B9
Wuerzburger Str. 121
90766 Fuerth
5
If the customer does not return the part within four weeks or the part cannot
be repaired, the new part price plus any extra charges is invoiced.
After receipt at the plant and inspection, the repair flat rate based on the
table is invoiced plus any extra charges.
Repairs
Table 13-2
Step
1
Handling of the repair procedure
The customer submits a repair order to his/her Siemens office (by telefax or
undocumented) and provides the information stated in table 13-1. The following additional information is important.
–
A precise fault description of the board
–
2
3
4
A note as to whether special treatment (e.g., more thorough inspection) is required
The Siemens office issues an order identifier (AKZ).
The customer sends the defective part to the address for returns and “naemlichkeit” repairs.
Siemens AG
A&D SE B9
Wuerzburger Str. 121
90766 Fuerth
After receipt at the plant, the defective part is repaired and returned to the
customer within the following period of time.
Normal repair: 10 working days
Fast repair: 5 working days
Immediate repair: 48, 24 or 8 working hours
AZS repair: 8 working hours
5
The repair flat rate is invoiced based on the table plus any extra charges.
Prices
For valid prices for repair flat rates and extra charges, see the applicable price list.
Shipping charges are invoiced extra.
13–8
SICOMP IMC – System Manual
J31069-D2001-U001-A0-7618
Service/System Consulting/Training
13.2.6
Warranty Times
Table 13-3
Warranty times
Service
13.2.7
Duration
New parts
12 months
“Naemlichkeit” repairs and replacement parts
Inspection flat rate
6 months
Current warranty remains unchanged.
Packing
The following points must be adhered to when packaging return shipments.
Use the original packaging in which the new part was delivered.
If the original packaging is not available, electronic switching circuits and boards
may only be shipped, transported and stored in special ESD packaging.
Note
The sender is responsible for transportation risks. Improperly packaged return
shipments will be rejected.
SICOMP IMC – System Manual
J31069-D2001-U001-A0-7618
13–9
Service/System Consulting/Training
13.3
Export Regulations
Current regulations require that the following export regulations be adhered to for
all products.
Table 13-4
Meaning of the export identifier
Identifier
AL
Meaning
Number of the German export list
Products with identifiers other than N require export authorization.
ECCN
With software products, the export identifiers of the data medium
must also always be adhered to.
Number of the US export list (i.e., export control classification number)
Products with identifiers other than N require re-export authorization.
With software products, the export identifiers of the data medium
must also always be adhered to.
Note
Goods marked with “AL≠N” are subject to European or German export authorization when exported from the EU. Goods marked with “ECCN≠N” are subject to US
re-export authorization.
Authorization may still be required when no identifier exists or identifiers “AL:N”
and/or “ECCN:N” are used (e.g., due to final destination and purpose of the
goods).
Domestic conditional clause (external customer):
Export of contractual objects and documents may be subject to authorization
(e.g., due to their type or their purpose).
Precedence is given to the export identifiers specified in order confirmations, delivery slips and invoices.
13–10
SICOMP IMC – System Manual
J31069-D2001-U001-A0-7618
Service/System Consulting/Training
13.4
Training Service
Courses are available in German for the SICOMP IMC product family (i.e., hardware, software, operating systems and communication). Other versions are also
possible on request. These courses are only held when needed and after coordination. If desired, the courses can also be held on site.
Points of emphasis of these courses which are offered for developers and system
personnel include the following topics.
System architecture
Multi-computer operation
Networking
Software tools
Memory and input/output addressing
Interrupt management
PC kernel and expansions
Mass memory
Operating modes
Practical exercises
Compact computers
SICOMP IMC – System Manual
J31069-D2001-U001-A0-7618
13–11
Service/System Consulting/Training
13–12
SICOMP IMC – System Manual
J31069-D2001-U001-A0-7618
Glossary/Abbreviations
Area network
Combination of several cell networks into a higher-level system
Broadcasting
Simultaneous sending of a message to all bus stations
Cell network
Closed control unit (cf. area network)
CSMA/CD
Carrier Sense Multiple Access/Collision Detect
CSMA/CR
Carrier Sense Multiple Access/Collision Resolve.
Differential/single-ended
Type of information transmission
Differential
Transmission via two signal cables
The information is indicated by the voltage difference in the signal cables.
Single-ended
Transmission via one signal cable
The information is indicated by the voltage level of the signal cable in relation to
the generally valid reference potential.
Ground
Potential of grounding mass at the site of a system
Grounding
Conductive connection of a part of a system belonging to the operational current
circuit with the surrounding grounding mass
SICOMP IMC – System Manual
J31069-D2001-U001-A0-7618
Glossary–1
Glossary/Abbreviations
HF application
High-frequency currents can be obtained almost without power loss.
Intrinsically safe area
Area in which sparks created by bus stations may not cause an explosion.
iPCI
Industrial Peripheral Component Interconnection
Mass, ground
Designation for freely definable reference potentials in systems
MTBF
Mean Time Between Failures
Statistically determined interval between theoretical occurrence of two faults
Open system
System for which the system interfaces are available to everyone
PAL
Equipotential bonding conductor
PBB
Product release letter
Included with boards or software packages on delivery. Contains important information on use of the product.
PCI
Peripheral Component Interconnection
Product documentation
Technical description and/or product release letter
Glossary–2
SICOMP IMC – System Manual
J31069-D2001-U001-A0-7618
Glossary/Abbreviations
Protective ground
The conductive connection to ground of a conductive part of a resource which
does not belong to the operational current circuit
Reference potential
Basis of voltage interpretation
Shield
Protective measure for systems, cabinets or cables against interference from the
surroundings
Shield retainer rail
Group line for all shield cables in a switching cabinet or system
TB
Technical description
SICOMP IMC – System Manual
J31069-D2001-U001-A0-7618
Glossary–3
Glossary/Abbreviations
Glossary–4
SICOMP IMC – System Manual
J31069-D2001-U001-A0-7618
Notes
SICOMP IMC – System Manual
J31069-D2001-U001-A0-7618
I
Notes
II
SICOMP IMC – System Manual
J31069-D2001-U001-A0-7618
Notes
SICOMP IMC – System Manual
J31069-D2001-U001-A0-7618
III
Notes
IV
SICOMP IMC – System Manual
J31069-D2001-U001-A0-7618
Siemens AG
Your address
Automation and Drive Technology
A&D SE V32
Postfach 2355
D-90713 Fürth/Bay.
Name:
Company:
Department:
Street:
City/State:
Country:
Phone:
Date:
Dear Reader,
We hope that this documentation provided
you with extensive support while using our
products.
Our goal is to imporve technical documentation particularly with respect to your information needs and requirements.
Plaes help us to achieve this goal by sending
us your criticisms and ideas. The following
questions are provided as guidelines.
Page
Remarks on the description
What errors in content did you notice?
Which situations were described incorrectly or not
in sufficient detail?
Do you have suggestions for improvement?
Please send us a copy of this sheet with your remarks.
Thank you very much for your trouble.
With best regards,
Your documentation department
Siemens AG
Automation and Drive Technology
Systems Engineering
P.O. Box 2355, D-90713 Fuerth
Siemens Aktiengesellschaft
Subject to change without prior notice
Order no. 6AR1950-7AA00-2CA0
Printed in the Fed. Rep. of Germany