1
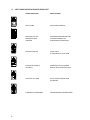
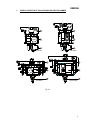
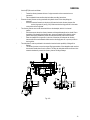
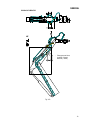
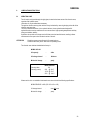
Pile Driver/Extractor
Parts, Safety, Operation
& Maintenance
November 1999
TABLE OF CONTENTS
1
2
3
Safety instructions
PAGE
5
1.1 General
1.2 Safety precautions
1.3 Limit conditions
1.3.1 Refusal
1.3.2 Rebound
1.3.3 Max. Bearing temperatures
1.4 Incorporated safety precautions
1.5 Safety signs for use on products with no text
5
5
8
8
8
8
9
10
General description
12
2.1
2.2
2.3
2.4
2.5
13
13
13
13
15
Vibration case
Extraction head
Hydraulic clamp
Turning mechanism of SH-version
Goose neck
Rigging of vibrator
16
3.1 Mechanical connection
3.2 Hydraulic connection
3.3 Clamp control Connection
17
17
22
4
Hydraulic scheme
4.1 B- and SH-version
4.2 RFB- and RFSH-version
23
23
25
5
Operating instructions
27
5.1
5.2
5.3
5.4
27
28
29
30
6
2
Clamp cylinder
Vibratory hammer
RF Vibratory hammer
Operating under water
Clamp rotated 90 degrees
31
TABLE OF CONTENTS
7
8
9
GENERAL
PAGE
Maintenance
32
7.1
7.2
7.3
7.4
7.5
32
32
33
33
33
General
Daily maintenance
Weekly maintenance
Bolt torque information
Vibrators
Lubrication instructions
34
8.1
8.2
8.3
8.4
34
35
35
35
Vibration case
Hydraulic clamp
Rotator
Hydraulic fluid
Ordering of parts
36
9.1 Procedure
9.1.1 Original equipment
9.1.2 Shipment
9.1.3 Shortages
9.1.4 Return of parts
9.2 Screws and bolts
9.3 Hoses
9.4 Fittings
35
36
36
36
36
36
38
39
10
Diagram
42
11
Parts manual
12
Clamps and chain assembly
3
1
SAFETY INSTRUCTIONS
1.1
GENERAL
Foundation equipment and especially pile driving hammers including vibratory hammers are designed to
transfer extremely high-energy ratings from the pile driver/extractor to a pile and the soil beneath.
The forces generated, either through impact or through vibration, are extremely high and therefore this
equipment requires proper maintenance and skilful operation. Pay special attention to the safety
instructions and the operation and maintenance section.
1.2
SAFETY PRECAUTIONS
TRAMAC accepts no liability for any damage or physical injury caused by non-compliance with the safety
instructions in this manual or by carelessness during the installation, use, adjustment or maintenance of
the equipment.
It is the sole responsibility of the user or operator to ensure that the local health and safety
regulations are adhered to prior to using the equipment.
General safety instructions throughout this manual are marked by:
CAUTION
Indicates a potentially hazardous situation which, if not avoided MAY result in minor or
moderate injury.
WARNING
Indicates a potentially hazardous situation which, if not avoided COULD result in death
or serious injury.
DANGER
Indicates an imminently hazardous situation which, if not avoided WILL result in death or
serious injury.
Pictographs used on the equipment are shown separately (see fig. 1.01).
Also, read the following regulations and operating instructions carefully!
Operators
Only trained technicians should be permitted to operate the equipment.
Temporary employees and trainees should only be permitted to work at the equipment under the
supervision and instruction of trained personnel.
Operation and service manual
Everyone who works at or with the equipment should be familiar with the contents of this manual and
should follow the instructions.
The management is under obligation to inform the personnel of the contents of this manual and is obliged
to observe all of the regulations and directions.
Clothing and footwear
4
GENERAL
When working with the equipment, do NOT wear rings, watches, jewellery or any loose clothing, which
could become caught in moving or rotating parts.
Always wear protective goggles, safety helmets and protective footwear specially suited for the work.
Keep hands away from moving or rotating parts. Wear working gloves.
Take appropriate measures for the protection of hearing if the sound pressure of 85 dB (A) is exceeded;
always use earplugs when working close to a machine in operation.
Water and moisture
Make sure all protective devices of the electric installation have been installed to guarantee adequate
protection from moisture and water. Failure to do so can result in the malfunction of safety circuits and
cause harm to personnel and equipment components.
NEVER direct a jet of water at electrical parts.
OPERATION
ALWAYS
-
NEVER
Watch a hammer in operation. Some parts might unexpectedly fail, fall down and injure
people. Stop operation IMMEDIATELY!
Stop the hammer for a check up if there is something wrong with it.
Pay attention to irregular or unusual noises and analyse where they come from.
Let the hammer cool down before you start maintenance or repairs on the hammers.
Remove all tools and electrical cords before starting the hammer.
Warn colleagues when you feel uncomfortable with the way the hammer is functioning.
-
Adjust or repair the unit whilst in operation.
Run the hammer in horizontal position.
Stand in close proximity to a working vibratory hammer.
Continue operation when service inspection is due, or when repairs are necessary.
Continue operation when it is known that one of the safety provisions is out of order or not
working properly.
Drag hoses as little as possible.
Tools
Never use defective (maintenance) tools. Only use a tool for the purpose for which it was designed.
5
Technical specifications
The specifications contained in the present manual should NOT be infringed.
Safeguards
All safeguards must be correctly installed and may only be removed for maintenance and service
purposes by qualified service technicians.
The equipment should never be switched ON when the protective covering is incomplete or when the
safeguards have been rendered inoperative.
All safeguards must be checked at regular intervals and repaired immediately in case of malfunction.
Safety directions and warnings
Any safety direction, warning or instruction fitted on the equipment should NOT be removed, rendered
illegible or covered. They should be present and legible throughout the entire operating life of the
equipment.
Illegible, damaged or covered safety directions, warnings or instructions should immediately be replaced
or repaired.
Service and maintenance
The service and maintenance activities should only be carried out by qualified service
personnel or one of Tramac’s appointed and certified dealers in full compliance with all safety measures
and the service intervals mentioned in the present manual.
Electrical system
Work on the electrical systems or equipment may only be carried out by skilled electricians or by specially
instructed personnel under the supervision of such electricians and in accordance with the applicable
electrical engineering rules.
Hydraulic system
Work on the hydraulic equipment may only be carried out by persons having special knowledge and
experience in hydraulic systems.
Use according to purpose
In order to guarantee correct operations, the equipment should only be used in accordance with the
purpose described in EN 292-1.
6
GENERAL
1.3
LIMIT CONDITIONS
As with all machinery there is a limit as to the operational conditions under which the machinery is
expected to last longer and operate safely and efficiently.
For vibratory driving, Tramac defines these limit conditions for REFUSAL and REBOUND as follows.
1.3.1 Refusal
-
Under normal, predictable and reproducible conditions, refusal is defined when the penetration rate (time
count) exceeds:
5 min per 0,25 m penetration (6 min/12”)
-
Under extreme, incidental occurring conditions, refusal is defined when the penetration rate (time count)
exceeds:
15 min per 0,25 m penetration (18 min/12”)
The penetration distance of 0,25 m (or 12”) is absolute; i.e. no conversion is allowed to, for instance, 60
min per meter penetration.
1.3.2 Rebound
Rebound occurs when a large portion of the hammer’s energy is “bounced” back into the pile as a result
of force reflection at the pile tip due to the pile hitting a nearly impenetrable layer or obstruction. The
rebound forces will be transferred back into the hammer and the head (suppressor head), as a result of
which the head will start “jumping” relative to the vibratory case. In this situation driving should be
stopped immediately or the hammer retracted.
1.3.3 Max. Bearing temperatures
The maximum bearing temperature, as measured on the bearing covers (some paint removed), must
never exceed 90 ºC (194 ºF).
Note: Tramac will not accept any warranty claims when equipment has been used beyond above
limit conditions.
7
1.4
INCORPORATED SAFETY PRECAUTIONS
*
The hammer has a number of built-in safety provisions, which ensure that the risk for failures, human
injuries and environmental pollution is reduced to a minimum:
The hammer cannot be put in operation when the clamp is open and has not been attached to “CLOSE”.
A running hammer is automatically switched OFF when the “CLAMP OPEN” switch is activated.
A pilot-operated check valve on the clamp ensures that the clamp pressure is maintained in case one of
the clamp hoses fails.
Individual pressure relief valves in pressure line, both clamp lines and leak oil line.
*
*
*
*
WARNING
Never change the electrical wiring or hydraulic safety setting which change the above
safety provisions.
In most countries the hammer and powerpack are not allowed to operate in explosion
risk areas without modifications.
Always contact Tramac Corp when special requirements are compulsory.
8
1.5
SAFETY SIGNS FOR USE ON PRODUCTS WITH NO TEXT
GENERAL
Fig. 1.01
9
1.5
10
SAFETY SIGNS FOR USE ON PRODUCTS WITH NO TEXT
HAZARD DESCRIPTION
HOW TO PREVENT
SAFETY SIGNS
READ OPERATION MANUAL
MAKE SURE THAT THE
MACHINE IS IN GOOD
CONDITION
READ MAINTENANCE INSTRUCTIONS
IN OPERATION MANUAL FOR
PROPER SERVICE PROCEDURES
SURFACE CAN BE HOT
DO NOT TOUCH
ALLOW SURFACE TO COOL DOWN
CRUSHING OF FINGER (S)
OR HAND (S)
NEVER REACH INTO THE DANGER
AREA AS LONG AS PARTS MAY MOVE
PARTS MAY FALL DOWN
STAY AT A SAFE DISTANCE FROM
THE MACHINE
COMPONENT IS PRESSURISED
DEPRESSURISE BEFORE MAINTENANCE
2
GENERAL DESCRIPTION OF EXCAVATOR MOUNTED VIBRATORY HAMMER
GENERAL
B-version
RFB-version
SH-version
RFSH-version
Fig. 2.01
11
2
GENERAL DESCRIPTION OF EXCAVATOR MOUNTED VIBRATORY HAMMER
The vibrator, both the (RF)B and the (RF)SH-version, consists of three major components:
1.
2.
3.
Vibration case
Extraction head
Hydraulic clamp
2.1
VIBRATION CASE
The vibration case contains two eccentric weights, which rotate in a vertical plane to create vibration.
The eccentric weights are driven by one hydraulic motor mounted on the vibration case. The motor and
the eccentrics are gear connected to maintain proper synchronisation. The eccentric shafts are mounted
in heavy-duty roller bearings.
Lubrication is provided by a splash system, activated by the rotating eccentrics and gears.
A flow control valve secures maximum speed of the eccentrics.
2.2
EXTRACTION HEAD
The extraction head contains rubber elements (elastomers) to isolate the vibrations from the vibration
case going into the excavator boom.
It also contains the rotator, which is connected with an adapter to the boom of the excavator.
2.3
HYDRAULIC CLAMP
The hydraulic clamp contains two gripping jaws, one fixed and one moveable. An in the clamp body
integrated cylinder operates the moveable jaw. The clamp cylinder is provided with a pilot operating
check valve, which keeps the clamp cylinder under pressure in case of hose damage.
The clamp cylinder is operated by a hydraulic remote control or an electrical remote control pendant,
which has two push buttons, one to open the clamp and one to close the clamp.
2.4
TURNING MECHANISM OF SH-VERSION
The TRAMAC (RF)SH-version vibratory hammer consists of an excavator mounted vibratory hammer where the
vibration case can be tilted 90 degree. relative to the extraction head.
The (RF)SH-version simplifies the handling of the sheetpile while picking them up and laying them
down, simplifies the positioning in to the lock of the already placed sheetpiles and makes the use of the
chain redundant.
When using a (RF)SH-version vibratory hammer a connector mounted between the excavator boom and
the vibratory hammer must be a pipe connection. By doing so, the twisting points between rotator and
boom or gooseneck (see fig. 2.03) will be eliminated. This advances the handling of the vibratory
hammer.
12
GENERAL
Use the (RF)SH-version as follows:
*
*
*
*
Fasten the vibratory hammer with use of a pipe connection to the excavator boom or
gooseneck.
*
Link the hydraulic hoses and the electrical cables according instructions.
Place the vibratory hammer on the ground with the hydraulic hoses of the clamp facing the
excavator.
*
Drive the excavator forward or let the boom tilt forward so that the vibratory hammer tilts
into the hinge pens A (see fig. 2.02). Make sure that the hinge pens fall in the undermost position of the long-holes.
The vibratory hammer can now be raised and slid over the sheetpile, which is in horizontal
position.
*
With the excavator boom the vibratory hammer and clamped sheetpile can be raised. Due to
the weight of the sheetpile the vibration case, clamp and sheetpile will be tilted in vertical
position. Both spring-loaded lock pins B will make sure that this position will be locked.
*
Place the sheetpile on the ground or in the lock of the other pile and press the vibratory
hammer with the boom downwards. Make sure that the hinge pens are in up-most position in
the long-holes.
The side-plates C must be positioned in the extraction head so that the possibility of tilting will be
blocked.
*
The vibratory hammer can now be started. During penetration of the sheetpiles make sure that
the extraction heads down force is sufficient. This way the side plates will be at all times in the
extraction head and it prevents the vibratory hammer of tilting sideways.
Fig. 2.02
13
Extract the sheetpiles with a (RF)SH-version as follows:
*
*
*
*
*
*
2.5
Place the clamp (thus also the vibratory hammer) over the sheet pile and activate the clamp.
With the use of the excavator extract the sheet piles
Place the end of the pile on the ground so that the hinge pens move to the under-most position
in the long-holes.
By moving the excavator boom side-wards, backward or forwards the vibratory hammer will
turn over the hinge pens. This way the sheet pile can be placed horizontally.
Open the clamp and remove it from the sheet pile.
If the spring-loaded pins are correctly adjusted, a force of aprox. 50 to 70 kg can be placed on
the clamp jaw. This way the vibratory hammer will be placed back into the vertical position.
GOOSE NECK
The gooseneck is an extension piece of the excavator boom, which can be mounted in different ways, depending
on the connection. By using a gooseneck the lifting height and the reach of the excavator will be larger.
Working with a gooseneck requires a learning period.
CAUTION
By using a gooseneck the lifting capacity decreases and the chance is bigger that the
excavator may fall over.
Fig. 2.03
14
3
GENERAL
RIGGING OF VIBRATOR
Fig. 3.01
15
3
RIGGING OF VIBRATOR
To operate the small vibratory hammers from an excavator, one needs to make 3 connections between
excavator and vibrator:
1.
2.
3.
Mechanical connection
Hydraulic connections
Clamp control connection (electrical or hydraulically)
3.1
MECHANICAL CONNECTION
The vibrator must mechanically be connected to the excavator using a special pivoting bracket
(See Fig. 3.01).
As most excavator manufacturers have different dimensions for the connecting pin and boom layout,
each excavator requires its own bracket. A special bracket covering a range of hammers is available
upon request.
When either the dimension A, B and C for external rigging or E, F and G for internal rigging are known, a
suitable adapter can be manufactured.
When rigging the bracket, make sure that the safety plates on both the upper pin and lower pin are
secured properly (see view K).
3.2
HYDRAULIC CONNECTIONS
There are 3 main hydraulic connections between the excavator and the vibrator (Fig. 3.02):
- Main pressure line
- Main return line
- Drain oil line
(P)
(T)
(D)
As the lay-out of the hydraulic system and hydraulic lines are different, each operator has to judge for
himself in co-operation with TRAMAC and/or the excavator manufacturer how to connect the vibratory
hammer for functioning correctly.
One of the most common adjustments is a 3-way valve connection, installed on the hydraulic lines on
the bucket cylinder (see as an example Fig. 3.03 with details on Fig. 3.04 and 3.05).
The drain line must always be connected with the hydraulic tank of the excavator; this means that the
drain line is always at a low pressure.
Never connect the hydraulic lines to “demolishing hammer connection ”
16
GENERAL
INSTALLATION WARNING:
1.
Always remember that both (P) and (T) can be used as pressure lines.
2.
For clamp operations port T must be pressurised to close and open the clamp.
The fittings on the 2.9-m hoses, delivered standard with the hammer are:
- Pressure (P) and return (T) line
- Drain line (D)
:
:
Excavator side
Vibratory hammer side
M36 * 2 (25S)
M22 * 1.5 (15L)
M36 * 2 (25S)
M22 * 1.5 (16S)
17
RIGGING OF VIBRATOR
Fig. 3.02
18
GENERAL
RIGGING OF VIBRATOR
-
Clamp open and close,
hydraulic (2 hoses)
electrical (1 cable)
Fig. 3.03
19
RIGGING OF VIBRATOR
Fig. 3.04
Fig. 3.05
20
3.3
CLAMP CONTROL CONNECTIONS
GENERAL
The clamp can be activated (CLAMP CLOSE) or de-activated (CLAMP OPEN) by an electric or
hydraulic operated valve mounted on top of the main manifold (see Fig. 3.02, connections), installed on
the extraction head of the vibratory hammer.
In case the hammer is equipped with an electrical valve, a 2,9-m electric cable and a remote control will
be delivered standard with the vibratory hammer. This cable is in connection with another 20-m electric
cable, which is connected to the vibratory hammer.
There is also a 10-m cable, which connects the remote control with the battery of the excavator or the
cigarette lighter (make sure this has 24V).
In case the hammer is equipped with a hydraulic valve, one needs to install two extra hydraulic hoses
from the excavator to the hammer (lines C in drawing Fig. 3.03) or use 2 other existing lines to the front
end of the boom. Delivered with the hammer are 2 hydraulic hoses, 2.9 m long and with a M16 * 1.5
female connection.
For further details we refer to hydraulic scheme (see 4.01) and the remote control connections in
the parts manual.
When using a hydraulic valve it is useful to contact TRAMAC for the correct use of this valve.
21
4
HYDRAULIC SCHEME
4.1
B- AND SH-VERSION
22
ITEM
DESCRIPTION
1
2
3
4
5
6
7
8
9
10
11
13
14
15
Manifold block
Cartridge (P)
Orifice
Relief valve
Relief valve
Check-valve
Check-valve
Check-valve
Control valve
Gauge coupling
Control cover
Orifice
Check-valve
Orifice
4.1
GENERAL
HYDRAULIC SCHEME
Fig. 4.01
23
4.2
24
RFB- AND RFSH-VERSION
ITEM
DESCRIPTION
1
3
4
5
6
7
8
9
10
11
12
13
14
15
16
17
18
19
20
Manifold block
Orifice
Relief valve
Relief valve
Check-valve
Check-valve
Check-valve
Control valve
Gauge coupling
Control cover
Orifice
Orifice
Check-valve
Orifice
Orifice
Check-valve
Control valve
Relief valve
Checkvalve
4.2
GENERAL
RFB- AND RFSH-VERSION
Fig. 4.01
25
5
OPERATING INSTRUCTIONS
5.1
CLAMP CYLINDER
The clamp cylinder operates as follows:
1.
First of all make sure the vibrator is not vibrating.
2.
A pressure between 200 and 280 bar is required in the return line. To get this pressure in the return line,
the excavator operator has to push the control lever to the return side.
An integrated check valve in the hydraulic manifold makes sure the vibrator is not starting.
3.
After this pressure is available, the excavator operator can close or open the clamp cylinder with the
remote control.
4.
After the clamp cylinder is closed, the operator can start vibrating.
During vibrating, the close line of the clamp cylinder is connected with the pressure line of the hydraulic
motor, so automatically extra oil will be supplied to the clamp cylinder, if required.
Note
-
All clamp bolts must be tight.
-
Never start vibrating if the clamp cylinder is not completely closed.
-
Do not change the adjustment of the relief valve on the hydraulic manifold. This results in clamp failure.
The right adjustment is 280 bar.
-
Make sure that the jaws are clean.
Worn jaws will result in slipping of the sheet pile and overheating of the clamp body which will damage
the seals.
-
Due to vibration, the connection between the chain and the clamp body will wear.
Replace the shackle and bolt in time.
26
5.2
VIBRATORY HAMMER
GENERAL
The vibratory hammer operates as follows:
1.
Make sure the clamp cylinder is closed.
2.
The vibrator starts vibrating after the excavator operator pushes the control lever to the pressure side.
3.
Overspeeding the vibrator is secured by a flow control valve. This valve must be adjusted properly by a
representative of the qualified Dealer.
The proper adjustment depends on the hydraulic power of the excavator.
Note
-
Make sure that the oil level in the vibration case is correct, check the level with the unit in a vertical
position.
-
All bolt connections, especially on the vibrating part of the unit, must be tight.
-
Avoid contact between the elastomers and hydraulic oil.
Especially the combination of oil and sunshine will shorten the lifetime of the elastomers.
-
Never exceed the maximum line pull on the extraction head.
Models 230 and 328 : 100kN and Models 428 and 625 : 120 kN,
Models 5RF and 7RF : 120 kN
-
Always pull as vertical as possible.
Pulling under a certain angle always results in elastomer failure.
-
Do not remove the orifice in the flow control. This can result in overspeeding the hammer and bearing
failure.
-
Never exceed a bearing temperature of 90 ºC.
The temperature can be measured on the outside of the bearing cover, using a normal contact
temperature gage.
-
Take special care of the hydraulic hoses. Make sure the connections are clean before connecting.
27
5.3
RF VIBRATORY HAMMER
On excavator mounted vibratory hammer provided with the RF system, the remote control has two
rotating knobs. One to operate the clamp, the other to operate the adjustment (see fig. 5.01).
Adjustment of the eccentric torque is only possible when the hydraulic motor of the vibratory hammer is
rotating.
The oil required to operate the actuator motor via the valve and the swivel coupler comes from the Pgate of the manifold (see fig. 4.02).
The safety valves for the maximum en minimum values (vibrations maximal or minimal) are set at 150
bar.
The connections between the manifold and the swivel coupler must be joined correctly.
A2 is the maximum adjustment (P1)
B2 is the minimum adjustment (P2)
ATTENTION!
At stopping the vibratory hammer first set the adjustment to minimum. If disregarded each
new start will instantly trigger a vibration. This vibration will be quite noticeable on the
excavator as well as on the ground.
Fig. 5.01
28
5.4
OPERATING UNDER WATER
GENERAL
The following should be adhered to when operating vibratory hammers under water:
*
*
*
*
*
*
*
Check the transmission case proceeding as follows:
Check the seals and gaskets (O-rings, gasket between vibration case and vibration case
adapter).
Check all bolt connections.
Check for possible leakage by bringing the pressure in the transmission case to approx. 0.2 bar
excess pressure and by checking with a mixture of water and soap.
Check all hydraulic hoses on leakage.
Check the oil level in the transmission case.
Remove the breather and replace it by a plug.
Should the water depth be less than 10 m, the following should suffice:
*
*
*
*
Join the transmission case to a compressor and bring the transmission case to 0.5 excess
pressure.
Increase the air pressure to 1.0 bar overpressure when the hammer is at 5 m below the water
line.
In this way there is a constant excess pressure of min. 0.2 bar and max. 0.5 bar present.
After completing under water working check lubrication oil and when required change it.
CAUTION
Watch carefully that hammer is not “hot” when lowered or driving through the water
surface. This may cause a thermo-shock and damage the bearings.
CAUTION
Excess pressure of more than 0.5 bar any damage the transmission case.
In case of water depths of over 10 m, always use the air regulation system for under water operation.
During these operations regularly check the oil level. If the oil becomes white/grey check immediately for
leakage and replace the oil.
CAUTION
Check lubrication oil regularly during and in any case after completion on water
content. Water can also enter the case as condensed from non-dried compressed air.
Contact TRAMAC for such operations.
29
6 CLAMP ROTATED 90 DEGREES
Hose set (1)
P/N: 9511003
P/N: 9112016
Hose set (2)
P/N: 9412055 (2x)
Fig. 6.01
1.
Disconnect clamp hose set (1) at A4 and B3
2.
Remove plugs at B2 and A3 and use them again to close ports at A4 and B3
3.
Disconnect clamp hose set (1) at clamp and replace with hose set (2)
4.
Change main clamp hose at A1 with plug at A2
5.
Unscrew the 4 bolts M30 (P/N 520.208) which connect the clamp to the hammer, turn clamp 90° and
fix clamp again using the same 4 bolts
6.
Connect hose set (2) to ports A3 and B2
30
7
MAINTENANCE
7.1
GENERAL
GENERAL
Preventive maintenance includes normal servicing that will keep the vibrator in good operating condition
and will prevent unnecessary trouble.
This servicing consists of periodic lubrication and inspection of the moving parts of the unit.
Lubrication is an essential part of protective maintenance, therefore it is important that the instructions
regarding type of lubricants and frequency be closed adhered too.
Clean all lubrication fittings, fillers and level plug and their surrounding surfaces thoroughly, before
servicing. Prevent dirt from entering with lubricants.
7.2
DAILY MAINTENANCE
1.
Check all seals and gaskets on the hydraulic motor, manifold and between the vibration case
and the vibration case adapter visually.
2.
Check all bolt connections visually.
3.
Check all the hoses for leakage and damages.
4.
Check the oil level in the vibration case.
5.
Grease the plunger in the clamp.
6.
Check the condition of the clamp jaws.
7.
Visually check all the elastomers.
8.
Check the electrical cable between the remote control and the vibrator.
9.
Check the connection between the excavator and the rotator.
Make sure all bolts are locked.
10.
Check the chain for handling the sheet piles on wear (especially the connection with the clamp
body). In case of wear, change the chain immediately.
31
7.3
7.4
WEEKLY MAINTENANCE
1
Tighten all bolts on the vibrator and hydraulic clamp (see torque information chart).
2
Grease the rotator bearing.
3
Check the air breather located in one of the bearing covers, if necessary clean the breather
with diesel fuel.
BOLT TORQUE INFORMATION
Torque (in kNm) is determined by the length of the wrench handle (in meters) multiplied by the force (in
kN) applied at the end of the handle. For example, if the wrench is 1 meter long and 50 N (5 kgm) of
force is applied at the end of the handle, the total torque applied would be 50 Nm (5 kgm).
Proper use of the torque wrench is important. To obtain the listed torque, a steady pull should be
exerted to the handle until the desired torque is reached.
7.5
VIBRATORS
The following torque specifications apply to the bolts from the component assemblies listed. Whenever
any of these bolts are replaced, the given torque specifications should be adhered to. Refer to the table
below.
TORQUE INFORMATION FOR BOLTS SHCS 12.9
THREAD DIAMETER
TORQUE
(inches)
(mm)
(Nm)
5/16” - 18
7.94
42
3/8” - 16
9.53
70
7/16” - 14
11.11
112
1/2” - 13
12.70
171
5/8” - 11
15.88
324
3/4” - 10
19.05
576
1” - 8
25.40
1479
1 1/4” - 7
31.75
2028
1 1/2” - 6
38.10
3482
M8
46
M10
89
M12
150
M16
373
M20
727
M24
1250
M30
1753
32
(lbs.ft)
31
32
83
126
239
425
1092
1497
2570
34
66
111
275
536
922
1294
8
LUBRICATION INSTRUCTIONS
8.1
VIBRATION CASE
GENERAL
The oil level is easily read through the sight glass, located at the lower centre of the vibration case,
opposite of the hydraulic motor.
Lubrication oil may be added when necessary.
Through the vibration case top plate and the oil may be drained by removing the plug at the side of the
vibration case base plate.
The most preferred lubrication oil is a synthetic lubricant, since synthetics were designed for
applications where service conditions are more severe due to high operating temperatures and they
have good oxidation stability.
Synthetics also provide much longer service life than natural mineral lubricants, resulting in fewer
maintenance hours spent on the mechanic service of the unit.
ATTENTION!
Check the grease pump after each 100 operating hours
Check the filter each year or after each 100 operating hours
The vibration case lubricant installed at the factory is:
MOBIL SHC 630
Oil capacity
:
4 litre
Oil change interval
:
100 hours
Minimal oil change
:
yearly
Viscosity index
Viscosity (mm2/s)
MOBIL SHC-630
150
218 @ 40°C
137.6 @ 50°C
25.9 @ 100°C
Whenever this oil is not available it is allowed to use mineral oil with the following specifications:
MOBIL GEAR 627 or 629 (ISO VG is 100 or 150)
Oil change interval
:
every 50 hours
Minimal oil change
:
yearly
33
8.2
CLAMP SYSTEM
In order to protect the plunger of the clamp, the hydraulic clamp has one lubrication point located on the
side of the clamp.
Note :
Grease this plunger daily
Use grease according to NLGI 1.
8.3
THE ROTATOR SYSTEM
The rotator is located in the extraction head. The bearing of the rotator needs to be greased weekly.
Use multi-service grease according to NLGI 1.
The grease fitting is located on the front side of the extraction head.
8.4
HYDRAULIC FLUID
Rating and performance data of the Volvo hydraulic motor are based on operating with good quality,
contamination free petroleum based fluids.
Hydraulic fluids type HLP (DIN 51524) automatic transmission fluids type A can be used.
At operating temperature, the viscosity should normally be kept above 8 mm2/S. At start up, the
viscosity
should not exceed 1000 mm2/S. The ideal operating range is 15 - 30 mm2/S.
34
9
ORDERING OF PARTS
9.1
PROCEDURE
GENERAL
When ordering parts, be sure to include the model and serial number of the unit or component. Confirm
all telephone orders immediately to avoid duplicating shipment.
9.1.1
Original equipment
Where serial numbers are given, these numbers only apply to equipment and components originally
furnished with the unit. Where equipment has been changed or added to, these numbers may not
necessarily apply.
9.1.2
Shipment
State to whom shipment is to be made and method of shipment desired, otherwise our own judgement
will be made.
9.1.3
Shortages
Claims for shortages or errors should be made immediately on receipt of parts.
No responsibility will be assumed for delay, damage or loss or material while in transit. Broken,
damaged or loss of material should be refused or a full description made of damage or loss to the
carrier agent on the freight or express bill.
9.1.4
Return of parts
If for any reason you desire to return parts to the factory or to any distributor from whom these parts
were obtained, first secure permission to return the parts.
Shipping instructions will be given along with this permission.
9.2
SCREWS AND BOLTS
Almost all connections on the units are made with socket-head cap (Allen) screws.
These high-strength screws are available at most industrial supply houses.
Screws and bolts are designated in the PARTS LIST in abbreviated form (see below). The information,
in parenthesis, immediately following the bolt or screw designation shows the size as follows:
1/2 - 13 x 1 1/2 à 1/2” Diameter, 13 Threads Per Inch, 1 1/2” Length
35
Note:
Some screws or bolts require a specific torque when replacing.
For identification of these bolts and a more thorough understanding of torque,
refer to section 7.5.
ABBREVIATIONS USED
BHCS
FHCS
FLCS
HC
HHCS
HHPP
HSSS
PHMS
RHMS
SHCS
SHPP
SHSS
36
Button Head Cap Screw
Flat Head Screw Cap
Flanged Head Screw Cap
High Collar
Hex. Head Cap Screw
Hex. Head Pipe Plug
Hex. Socket Set Screw
Phillips Head Machine Screw
Round Head Machine Screw
Socket Head Cap Screw
Socket Head Pipe Plug
Socket Head Shoulder Screw
9.3
HOSE
GENERAL
HOSES
a
125
b
R01
c
F
EXAMPLE OF HOSE DESIGNATION
d
e
f
g
9
24
P
O
a.
HOSE I.D. (3 digits) (125=1 1/4”) (050=1/2”), etc.
In inches; 2 place decimal
b.
SAE or MANUFACTURER RATING (3 digits)
(PT4 = Power Track)
(R01 = SAE Rating 100R1), etc.
c.
FIRST END - TYPE OF FITTING (1 digit)
(F = 3000 PSI Flange) (P = NPT-male)
(H = 6000 PSI Flange) (M = JIC-male)
(J = JIC-female swivel), etc.
d.
FIRST END - BEND ANGLE (1 digit)
(0) = None) (3 = 30º) (9 = 90º), etc.
e.
FIRST END - SIZE (in 1/16TH) (2 digits)
f.
SECOND END - TYPE OF FITTING (1 digit)
(See codes for first end)
g.
SECOND END - BEND ANGLE ( 1 digit)
(See codes for first end)
h.
SECOND END - SIZE (in 1/16th) (2 digits)
i.
LENGTH
In inches; 1 place decimal
(0395 = 39 1/2”) (1240 = 124”), etc.
j.
SPECIAL CODES
(0 = None)
(S = Spring Guard)
(L = S.S.Braid)
(D = Offset)
h
20
i
LO395
j
S
37
9.4
FITT
FITTINGS
a
2
b
c
L - 16
d
M
EXAMPLE OF FITTING DESIGNATION
e
f
g
h
i
12
J
00
0 - 00L
j
0
a.
SELECTOR INDEX
2: inch fittings
9: metric fittings
b.
CONFIGURATION OR SHADE OF FITTING
S: straight fitting
C: Cap
L: 90º elbow
P: Plug
V: 45º elbow
U: Union, pipe
T: Tee
X: Cross (fourth end fitting required)
c.
FIRST END SIZE
in sixteenth of an inch (index 2)**
in millimetres (index 9)
** Exceptions:
90 = 10”
92 = 12”
94 = 14”
96 = 6”
98 = 8”
99 = non code size
See general specification sheet for sequence of order.
d.
FIRST END FITTING STYLE
See fitting style selector chart.
e.
SECOND END SIZE
If applicable. See first end size.
f.
SECOND END FITTING STYLE
If applicable. See first end fitting style.
g.
THIRD END SIZE
If applicable. See first end size.
h.
THIRD END FITTING STYLE
If applicable. See first end fitting style.
i.
LENGTH CODE
(pipe nipples (long) only, in decimal inches for index 2)
050 = 5.0 inches
105 = 10.5 inches
in millimetres for index 9
120 = 12.0 inches
084 = 8.4 inches
38
k
0
l
0
m
1
GENERAL
FITTINGS CHART
Fig. 9.01
39
LENGTH CODE
(elbows/nipples)
OOL - long (elbow)
OOX - extra long (elbow)
OOC - close (nipple)
OOS - short (nipple)
FOURTH END SIZE and FOURTH END FITTING STYLE
(crosses only)
See first end fitting size or end style.
j.
INSTALLATION AID OR STYLE OF HEAD
O
: not applicable
H
: regular hex.
W
: wide or large hex.
Q
: square head (ext.)
R
: square head (int.)
S
: hex. head (int. socket)
T
: hex. head (ext.)
k.
PRESSURE RATING
0: not applicable
1: 125 lb
3: standard weight (40)
4: extra heavy (80)
l.
SPECIAL NOTATIONS
0
: none
A
: tapped hole in fitting
B
: orifice
F
: special fab., non-stock item
G
: galvanised
M
: magnetic
m.
MATERIAL
1
: carbon steel
2
: brass
3
: cast brass
4
: stainless steel
5
: A.A.R. mal. iron
6
: malleable iron
7
: cast iron
8
: forged steel
9
: aluminium
Also refer fittings chart (see fig. 9.01)
40
10
GENERAL
DIAGRAM
Fig. 10.01
41
42