1
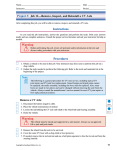
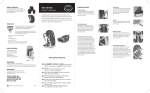
HOW - TO CV JOINTS Tool And Material Checklist Screwdriver Metal Shears Breaker Bar or Torque Wrench Assorted Wrenches Wire Evaporating Spray Solvent Pusher Tool Vise Snap Ring or Duckbill Pliers Drift CV Joint Grease Pliers Tape * This How-To Guide is designed as a general overview of a vehicle repair procedure. You should always refer to a service manual designed for your vehicle for detailed instructions. incorrect procedure. Parts Plus assumes no liability for an Constant velocity, or CV joints enable drive power to be transmitted through sharp angles. They must tolerate 20 ° vertical suspension movements and 50 ° side-to-side movements for steering. Front-wheel-drive cars have two drive shafts, or half shafts. There are CV joints at both ends of the half shafts. The CV joint that attaches one end of each half shaft to the differential portion of the transaxle is called an inboard. Inboard, or plunge, CV joints must accommodate the in-and-out movement of the half shafts as the suspension operates. The CV joint at the other end of the half shaft is called an outboard, or fixed joint. Outboard CV joints are almost always the Rzep-pa type; there are several types of inboard joints, including the tripod and the Rzeppa with a plunging outer race. Nevertheless, every kind of CV joint uses a boot and is serviced in a similar fashion. THE IMPORTANCE OF THE BOOT Neoprene or polyurethane boots are used to protect CV joints. The most frequent cause of CV joint failure is a bad boot. Thus, the boot should be replaced at the first sign of damage or deterioration to prevent damage to the CV joint. The cost of replacing a boot is inexpensive when compared to the price of a new CV joint. BOOT INSPECTION At the very least, boots should be checked during every oil change or at approximately 3,000-mile intervals. It is especially important that this be done just before winter, once during the winter, and again in the spring. An inspection is easier with the car on a lift, but it can be done in your driveway as follows: 1. Turn the steering wheel all the way to the left or right to spread out the folds of the boots. 2. Look under the front bumper and check for grease on the boots. 3. Check the boots for cracks, splits, tears, and holes. If any boot appears rotted, replace it. 4. Move the car several times approximately 1' to check all the way around the boots. 5. Squeeze-test the boots. If any air escapes, replacement is required. 6. Check the clamps for tightness. Hold a screwdriver to the band and push; the clamp should not wiggle. If it does, go to the next step. 7. Cut off the clamp with metal shears. (Be very careful not to slice the boot.) 8. Slide the boot back and scoop out a little of the grease. 9. If the grease appears milky, it has been contaminated with water. Rub it between your fingers. If it is gritty, dirt has entered the joint. 10. If the grease is contaminated with water and/or dirt, the CV joint should be examined and a new boot installed. REMOVING THE HALF SHAFT To replace a boot or examine a CV joint, the half shaft must be removed. Once this is done, examine both joints and install two new boots. Always read the specific instructions for your particular vehicle; check the service manual or the instructions provided with the replacement boots. Here is the basic procedure for removing a half shaft from a front-wheel-drive car: DISCONNECTING THE OUTBOARD END 7. Mark the relative position of the steering knuckle cam bolts with respect to the strut. This will help align the camber setting when the steering knuckle and strut are attached. 1. With all four wheels on the ground and the NOTE: If the bolts are not aligned properly, brakes applied, loosen the hub nut. Do not use an wheel alignment might be necessary. impact wrench. 8. Separate the steering knuckle from the strut. 2. Raise the car and support it under the side 9. Push out the knuckle while pulling the rails or chassis cross member. half shaft back through the wheel hub. 3. Remove the hub nut, washer, and wheel. 4. If the shaft of the inboard joint is pressed into the transaxle, disconnect the outboard joint from the steering knuckle and then disconnect the inboard joint. 5. If the shaft of the inboard joint is bolted to an output flange at the transaxle, unbolt the inboard joint and then disconnect the outboard joint from the steering knuckle. 6. Disconnect the brake hose clip and remove the brake caliper from its mount. Support the caliper with a piece of wire—do not let it hang free. 10. If this does not separate the two, try prying them apart, but do not pound on the end of the shaft with a hammer. This can damage the wheel bearings, the splines in the hub, the CV joint, and/or the differential gears. If the parts cannot be pried apart, use a hub puller to separate them. 11. Once the outboard end of the shaft is free, support it with a wire until the other end of the shaft can be disconnected. Do not allow the shaft to hang—it could damage the inboard joint. DISCONNECTING THE INBOARD JOINT Separate the inboard joint from the transaxle either by unbolting the inboard joint or pulling it out. When pulling it out, hold on to the outboard joint with one hand and the inboard joint with the other. Do not pull on the shaft because the joint might pull apart. It might be necessary to use a large screwdriver, pry bar, or slide hammer between the inboard joint and the transaxle to pull the shaft. 7. Clean the splines on the end of the shaft. Apply a light coat of grease before reassembly. INBOARD JOINT (TRIPOD TYPE) Be sure to consult the service manual for specific instructions. In some cars with automatic trans-axles, the speedometer cable drive must be removed before the inboard joint can be pulled Other cars require that the oil first be drained from the transaxle. CV JOINT REMOVAL You are now ready to remove the CV joint. Use the following procedure, choosing that which applies to your vehicle. OUTBOARD JOINT This procedure applies to Rzeppa joints only. 1. Place the shaft in a vise that has a soft-jaw adapter. If this type of vise is not available, \ slide rubber or wood strips between the vise jaws and shaft. Be careful not to over tighten the vise. 2. Make a mark on the shaft where the outer boot ends, then cut away the old boot and clamps. 3. Wipe the grease from the face of the joint. 4. Note whether or not the joint is secured by a snap ring. If it is, there will be a recessed pocket in the face of the inner race, and the snap ring tangs must be held open with snap ring or duckbill pliers during step 5. If the joint is secured by a small cir-clip on the end of the shaft, tap the circlip off the shaft to remove this type of joint. 6. Strike the outboard housing with a soft hammer to drive the joint off the shaft. If the joint does not come off, use a brass drift against the face of the inner race to drive it off. 1. Cut away the boot and clamps. In some cases, a boot-retaining ring is used instead of a clamp. Use a brass drift to drive it away from the outer housing. 2. If the joint is to be reused, be sure to mark the relative position of the rollers with respect to the tracks they go into. Reassembling the joint in the wrong track could result in looseness, binding, and/or premature joint failure. 3. Remove the outer housing from the tripod. In some instances, this might require slightly deforming the tripod retaining rings or tabs with pliers or a screwdriver. 4. Wipe the grease away from the end of the half shaft. 5. If a snap ring is visible at the end of the shaft, remove and discard it. Otherwise, move the spacer ring back on the shaft and slide the tripod assembly away from the end of the shaft so that the cir-clip is exposed. Remove the circlip and discard it. 6. On some cars, the roller bearings are not held on the tripod by snap rings. If the joint is to be reused, wrap tape around the tripod to prevent the rollers from falling off. 7. Remove the tripod from the shaft, using a hammer and drift to tap against the base of the tripod. Do not pound on the roller bearings. 8. Clean the splines of the shaft. Apply a light coat of grease before reassembly. INBOARD JOINT (RZEPPA CROSS-GROOVE) 1. Cut away the boot clamp. 2. Use a hammer and drift to drive the boot and Cap assembly back and away from the CV joint. 3. Wipe the grease away from the half shaft. 4. Use snap ring pliers to remove the snap ring from the end of the shaft. Discard the snap ring. 5. Use an arbor press to remove the inboard joint from the shaft, or use a hammer and drift to tap against the inner race. 6. Slide the dished washer (if used) and boot and cap assembly off the shaft. 7. Clean the splines on the end of the shaft. Apply a thin coat of grease prior to reassembly. CV JOINT INSPECTION 1. Clean the joint by soaking it in an evaporating spray solvent such as the type made for brakes. Do not use gasoline. 2. Inspect the condition of the internal components. For ball-type joints, follow step 3; for tripod joints, follow step 4. 3. Tilt the inner race to one side to expose each ball. Joint replacement is required if any of the following exist: severe pitting; galling; play between the ball and its cage window; cracking or other damage to the cage; or pitting, galling, or chips in the raceways. 4. Examine the fit between the rollers and housing. Joint replacement is required if any of the following exist: excessive free play; roughness on either the roller or track surfaces; or damage to the bearings or trunnions. CV JOINT INSTALLATION To install the CV joint, use the following procedures. Again, choose the one that applies to your vehicle. OUTBOARD JOINT 1. If a circlip on the end of the half shaft is used to retain the joint, always install a new one. 2. Tape the shaft splines to avoid damaging the new rubber boot. 3. Slide the small boot clamp and boot onto the shaft. 4. Remove the tape from the splines. 5. Fill the cavity behind the balls, the splined hole in the joint inner race, the ball tracks, and the outer face flush with grease. Put any leftover grease into the boot. NOTE: Use the grease provided in the CV joint kit or boot kit. Do not use a substitute or mix the approved grease with other lubricants. 6. Slide the joint onto the shaft splines. Push the joint onto the drive shaft until it clicks into place. Pull on the joint to make sure it is secure. 7. Bring the edge of the boot to the mark made earlier on the shaft. 8. Pull the boot over the joint, making sure it is not dimpled or collapsed. 9. Slide the clamps into place and tighten. INBOARD JOINT 1. Slide the small boot clamp and boot onto the half shaft. For tripod-type joints, follow step 2; for Rzeppa cross-groove joints, follow step 3. 2. Align the splines of the tripod with the shaft and gently tap it onto the shaft with a soft hammer. 3. Install the dished washer (if used) with the concave side facing the near end of the shaft. Align the splines on the joint with the shaft. Gently tap the joint onto the shaft with a soft hammer. 4. Install a new snap ring on the end of the shaft to lock the CV joint or tripod in place. 5. Completely pack the CV joint (or the tripod rollers and outer housing) with grease. Any grease remaining from the CV joint kit or boot kit should be put in the boot. Do not use substitute grease. 6. On the tripod-type joint, slide the outer housing onto the tripod. 7. Pull the boot over the joint. Make sure the boot is not dimpled or collapsed. 8. Slide the clamps into place and tighten. INSTALLATION OF THE HALF SHAFT Remember to support the half shaft with wire during installation so that it does not hang. Also, replace and torque all fasteners, including the hub nut, to the manufacturer’s specifications. If the knuckle was disconnected from the strut, a check of the front wheel camber might be necessary.