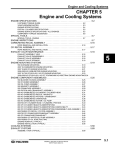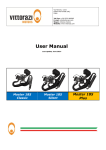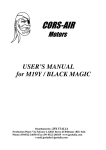
1
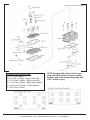
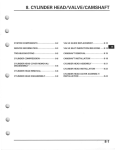
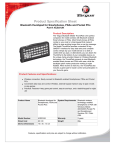
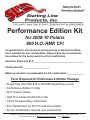
Performance Edition Kit
for 2008-10 Polaris
800 H.O. RMK CFI
Congratulations! You have just purchased one of the best modifications available for your snowmobile. Please follow the recommendations below for the best results from this modification.
Customer Name and ID # ______________________________________
Porting Serial # ____________________
Minimum elevation recommended for this combination _____________
Parts Required for Performance Edition Package
• Single Pipe (Part #09-878 or #09-888 depending on year)
• Performance Edition Porting
• SLP Cheater Heads
• High Flow Intake Kit (Part #14-140)
• Clutch Kit Depending on Elevation
• ECU Modification for SLP Performance Edition
• Air box modification required (see instructions)
Starting Line Products • 743 Iona Rd. Idaho Falls, ID 83401 • Sales (208)529-0244 • Tech (208)524-3397
Fax (208)529-9000 • web: www.startinglineproducts.com • e-mail: [email protected]
1
Courtesy of Polaris Service Manual
TORQUE SPECIFICATIONS:
A = 70 In.Lbs. (8Nm)
B = 9 Ft.Lbs. (12 Nm) - Apply Loctite 242
C = 25 Ft.Lbs. (34 Nm) - Apply Loctite 242
D = 18 Ft.Lbs. (24 Nm) - Apply Pipe Sealant
E = 168 In.Lbs. (19 Nm) - Clean and Dry
F = 42 Ft.Lbs. (57Nm)
NOTE: Engines with serial number beginning with S3489 Feature a bypass nozzle.
Engines with serial number beginning with
S3471 feature a plug.
Starting Line Products • 743 Iona Rd. Idaho Falls, ID 83401 • Sales (208)529-0244 • Tech (208)524-3397
Fax (208)529-9000 • web: www.startinglineproducts.com • e-mail: [email protected]
2
Disassembly / Assembly Pricess - 800 CFI Cylinder Head / Cylinder / Pistons
1. Remove the coolant from the engine using a syphon, wet/dry vac, or drain pan.
2. Remove the air box, exhaust pipe and resonator from the engine compartment.
3. Remove the high tension wires and spark plugs from the cylinder head.
4. Remove the thermostat housing outlet cooling hose from the housing.
5. Loosen all, then remove all hea cover fasteners. Clean the fastener threads to remove any thread
locking residue.
6. Discard the head cover and cylinder head o-rings. Always use new o-rings during assembly.
7. Inspect the cylinder head / combustion domes for any damage. Measure cylinder flatness. Replace
cylinder head if required.
8. If only hte cylinder is going to be removed, remove the fuel rail from the upper fuel injectors. See “CFI
Fuel Rail/Injector(s) Removal/Installation” on page 4.30 in the Polaris Service Manual.
9. Loosen all, then remove the cylinder bolts. Clean the bolt threads to remove any thread locking
residue.
10. Carefully pull the cylinder upwards taking care not to drop the pistons and rods abruptly against the
crankcase.
11. Remove the cylinder base gaske. Use a gasket scraper to clean the gasket residue form the
crankcase and cylinder base.
12. Inspect the cylinder walls. Nicasil cylinders can only be lightly honed. Damage that cannot be removed with a light hone requires cylinder replacement or re-choromed.
13. Inspect the crankcase and clylinder mating surface for warping.
14. The assembly process is the reverse dissasembly.
15. Always use new gaskets asnd o-rings during assembly. Liberally coat the inside of each cylinder bore
adn the outside of each piston with Polaris two-stroke enigne oil.
16. When installing a piston into a cylinder, verify each piston ring opening is located at each piston ring
locating pin. Squeeze the top ring, then carefully slide the cylinder over the compressed ring. Do the
same with the bottom ring.
17. Follow the torque specification and torque sequences located at beginning of chapter when tightening fasteners.
Starting Line Products • 743 Iona Rd. Idaho Falls, ID 83401 • Sales (208)529-0244 • Tech (208)524-3397 3
Fax (208)529-9000 • web: www.startinglineproducts.com • e-mail: [email protected]
1-20-10
Stock Air Box Modification
Remove the air box, using a 7/8” hole saw drill out 4 holes in the front of the shelf in
the air box. Remove any plastic shavings in the air box. Reinstall air box.
800 H.O. RMK Performance Edition Clutching Chart
using stock TEAM TSS-04 Driven Clutch
Altitude
(feet)
Drive Clutch
Clutch Spring
Shift Weight
TEAM TSS-04 Driven Clutch (Stock)
Cluch Spring
Driven Helix
0-3000 ft
SLP
Blue / Pink
#40-76
SLP MTX
71g
#40-84
2g rivet outer hole
2g inner hole
TEAM Ind.
Black/Purple
(Stock)
TEAM Ind.
58/40.36
#50-121
3000-6000 ft
SLP
Blue / Pink
#40-76
SLP MTX
68g
#40-83
3g rivet outer hole
2g inner hole
TEAM Ind.
Black/Purple
(Stock)
TEAM Ind.
58/40.36
#50-121
6000-8000 ft
SLP
Blue / Pink
#40-76
SLP MTX
68g
#40-83
2 g rivet outer hole
1g inner hole
TEAM Ind.
Black/Purple
(Stock)
TEAM Ind.
58/40.36
#50-121
8000-10000 ft
SLP
Blue / Pink
#40-76
SLP MTX
68g
#40-83
1g rivet outer hole
1g inner hole
TEAM Ind.
Black/Purple
(Stock)
TEAM Ind.
58/38.36
#50-121
Running RPM 8100-8250
ECU Modification Required. For proper performance ECU must be sent to SLP
for modification. See next page for additional information.
Starting Line Products • 743 Iona Rd. Idaho Falls, ID 83401 • Sales (208)529-0244 • Tech (208)524-3397
4
Fax (208)529-9000 • web: www.startinglineproducts.com • e-mail: [email protected]
1-20-10
800 H.O. RMK Performance Edition Clutching Chart
using TEAM Tied Driven Clutch
Altitude
(feet)
Drive Clutch
Clutch Spring
Shift Weight
TEAM Tied Driven Clutch
Cluch Spring
Driven Helix
0-3000 ft
SLP
Blue / Pink
#40-76
SLP MTX
74g
#40-84
2g rivet outer hole
2g inner hole
TEAM Ind.
Red/Blue
#50-4
TEAM Ind.
73/59.46
#50-214
3000-6000 ft
SLP
Blue / Pink
#40-76
SLP MTX
74g
#40-84
1g rivet outer hole
1g inner hole
TEAM Ind.
Red/Blue
#50-4
TEAM Ind.
73/59.46
#50-214
6000-8000 ft
SLP
Blue / Pink
#40-76
SLP MTX
68g
#40-83
2 g rivet outer hole
1g inner hole
TEAM Ind.
Red/Green
#50-2
TEAM Ind.
75/57.46
#50-218
8000-10000 ft
SLP
Blue / Pink
#40-76
SLP MTX
68g
#40-83
1g rivet outer hole
1g inner hole
TEAM Ind.
Red/Green
#50-2
TEAM Ind.
75/57.46
#50-218
Running RPM 8100-8250
ECU Modification Required. For proper performance ECU must be sent to SLP
for modification. See next page for additional information.
5
Oil Recoomendation: For best performance and dependability on the 800 be sure to run very high
quality oil like Red Line full synthetic Racing oil which is the first choice. The second choice would be
the new Polaris "VES Gold Plus" oil that we understand is good. No other oils are acceptable.
Octane: Minimum 91 octane pump fuel. Fuels containing ethanol or oxygen carrying additives will require more fuel than non oxygen carrying fuels and may require use of an EFI Control Box.
General Fuel Note: Due to inconsistencies in quality of fuel available today the following are a few
tips to prevent issues that may arise due to fuel.
- When riding in midrange throttle positions periodically vary throttle position, do not hold in constant
position for extended periods of time.
- Make sure that the premium/ethanol jumper wires are set proper for the fuel being used.
- A good practice and cheap insurance is to add a 1 oz of Lucas Octane Booster to every gallon of
fuel this can be found at most automotive stores.
MODIFIED ECU
This ECU will function with the Ethanol fuel wires.
Unlike the stock connection procedure, this ECU is opposite connection and will be set for
Ethanol use when the wires are connected together.
Disconnect for Non Ethanol fuel use.
Please install included sticker to the rear of the clutch cover. See picture below.
Starting Line Products • 743 Iona Rd. Idaho Falls, ID 83401 • Sales (208)529-0244 • Tech (208)524-3397
Fax (208)529-9000 • web: www.startinglineproducts.com • e-mail: [email protected]
6