1
®
2-chamber surface SKIMMER
®
INSTALLATION
We congratulate you on your choice of the Sequence® Surface Skimmer and/or Bottom Drain! Its leading edge design provides you with high output at a minimal operating cost. It is carefully constructed to give you long term, reliable service. To insure proper performance, we urge you to carefully follow the instructions in this manual. If you have any questions, please call your supplier for assistance.
2
3
4
PART No.
1
2
3
4
5
6
7
Description
TWO-CHAMBER SURFACE SKIMMER
DEBRIS NET
DEBRIS NET BRACE
WEIR FLAP
INLET HARDWARE KIT
INLET WEIR FACE
EXTENSION TUBE
Sequence® P/N
SKM-5600
SKM-A04
SKM-A05
SKM-A02
SKM-A01
SKM-A03
SKM-EXT
1
2-chamber surface SKIMMER
At the time of digging a pond or in a retrofit, selecting an optimal location for a skimmer is critical for proper functionality. Optimal location is usually achieved
by placing the skimmer on the opposite end of a waterfall directly in the flow path. Surface skimming works best when top/laminar currents of a pond are moving
towards the inlet-weir of a skimmer.
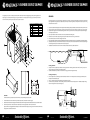
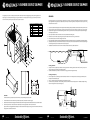
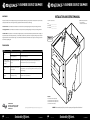
1. Once location is selected and excavated, place skimmer into position and backfill/compact partially to hold the tub in place. Double check to make sure skimmer is level.
2. Place a large bead of silicone around the opening on the face of the skimmer, then hold liner up (this is best done by a second person) in front of opening.
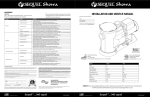
3. Situate the inlet-weir against the skimmer with the bolt-flange flush with skimmer face, and the inlet-weir out towards pond (reference exploded view diagram)
then line up the top holes with an awl.
4. Secure in place with bolts and washers. Install the four corner bolts first, and then install all remaining bolts.
5. After all bolts are in, reach inside face¬plate opening and cut away the liner. See below for instructions if using an extension tube.
6. Silicone should dry for at least one hour before being submersed in water.
7. Be sure to install the PVC frame into the skimmer before backfilling the dirt around the outside of the skimmer. This frame is a support that keeps the side walls from bowing in.
8. Completely backfill and compact soil around skimmer unit. Be cautious to not compact the soil into the sidewall of the skimmer. Soil should be compacted enough
to avoid settling and washout, but not create the skimmer walls to misshape or cave.
9. Install the debris net behind the inlet-weir of the skimmer. This will catch all leaves and debris as it is pulled into the skimmer.
5
6
1.
7
2.
1.
24.40
2.
3.
11.98
Connecting a bottom drain:
The Sequence® skimmer is supplied with a port intended for connecting a bottom drain. When looking at the front of the skimmer (inlet-weir), one 3” spin-weld
fitting is located on the right side in the side wall of the debris chamber.
The provided 3” threaded PVC cap should be used if a bottom drain is not going to be utilized or integrated into this port.
Connecting to an external pump:
Skimmer is supplied with a 2” spin-weld fitting located in the back/bottom of the unit. One 2” male adapter can be used to adapt 2” pipe to ultimately tie into
both Sequence® 750 and 4000 series pumps.
One 2” X 1.5” reducer bushing can be utilized for adapting to a Sequence®1000 series pump.
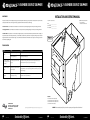
The skimmer unit is also provided with a 2” knockout on the top, rear-end of the skimmer wall for Suction lift applications. A 2” bulkhead/tank adapter fitting is
need for connecting in this format. (Please reference Figure 2)
10.98
suction lift
Extension Tube
An extension tube allows you to locate/remote the skimmer 24” away from the pond making it much easier to hide!
1.
2.
3.
pump
SWING CHECK VALVE
The extension tube bolts to the front of the skimmer just like the face plate would. (See installation instructions on page 3)
Use a thick bead of silicone around the opening on the skimmer then bolt tube to skimmer. The opposite end of the extension tube has inserts to secure the inlet-weir bolts.
Place a heavy bead of silicone on the face of the extension tube then place liner over opening and bolt on inlet-weir, then trim out liner.
Sequence® skimmers can be upgraded with either a filter pad rack or a filter brush rack. With either style, slide rack into groove in skimmer walls. When skimmer needs
cleaning, the racks can be lifted out and rinsed off.
Made in the USA
Sustainable, Efficient.
© 2010 MDM INC.
flooded suction
pump
(figure 2)
Made in the USA
Sustainable, Efficient.
© 2010 MDM INC.